Pink and spooky might sound like opposites, but together they create the most irresistible nail aesthetic of the season. Think soft blush tones paired with black spiders, hot pink backgrounds with tiny white ghosts, or bubblegum shades dressed up with coffin shapes and dripping blood art. This look gives you the best of both worlds playful and pretty with just enough edge. Whether you are heading to a Halloween party or just want something fun for October, pink spooky nails work for every skill level and budget. You do not need a salon to pull these off. Most of these ideas can be done at home with a few nail polishes and a thin brush from the dollar store. Read through all 32 pink spooky nail ideas and find the ones that match your vibe. If you’re also exploring Ghostface Nails Ideas, iconic white mask artwork, black-and-red horror accents, dripping blood details, and matte finishes can help create a chilling manicure that perfectly captures the suspenseful spirit of spooky season while remaining bold, stylish, and surprisingly wearable.
1. Bubblegum Pink Ghost Nails
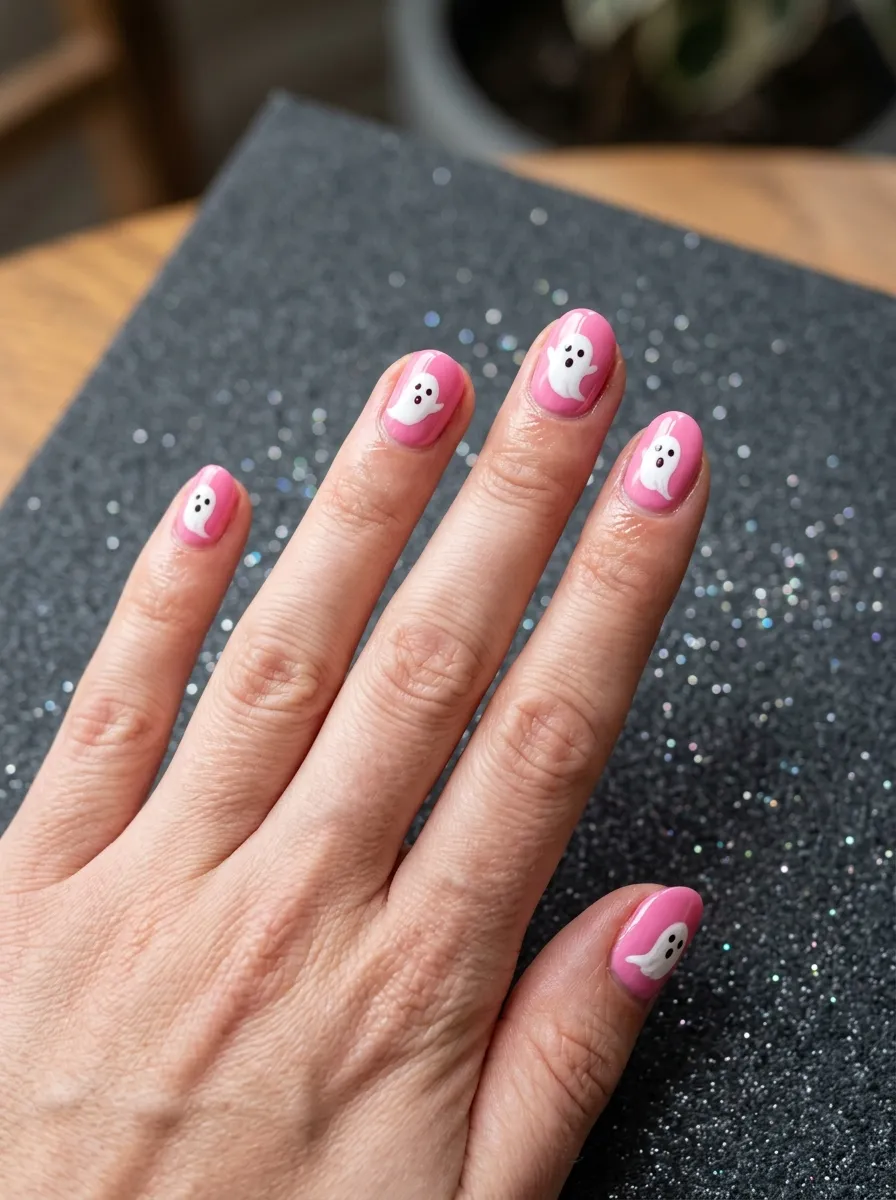
Ghosts are one of the easiest Halloween nail designs to draw, and they look adorable on a bubblegum pink base.
Start with two coats of a bright candy pink polish. Once dry, use a white nail art pen or a thin brush dipped in white acrylic paint to draw a simple ghost shape. It is basically a blob with a wavy bottom.
Add two tiny black dots for eyes. That is it.
You can do one ghost per nail or scatter three small ghosts across a single nail for a busier look. A black outline around each ghost makes it pop more if you want extra definition.
Budget tip: White nail art pens cost about $2 at most drugstores. You do not need professional gel polish for this. A regular pink polish from any brand works just as well.
This design dries fast and is forgiving if your ghost looks a little wobbly. Wonky ghosts are actually cuter. Finish with a clear top coat to seal everything and add shine.
This is a great starter design if you are new to nail art. It takes about 20 minutes once your base is dry.
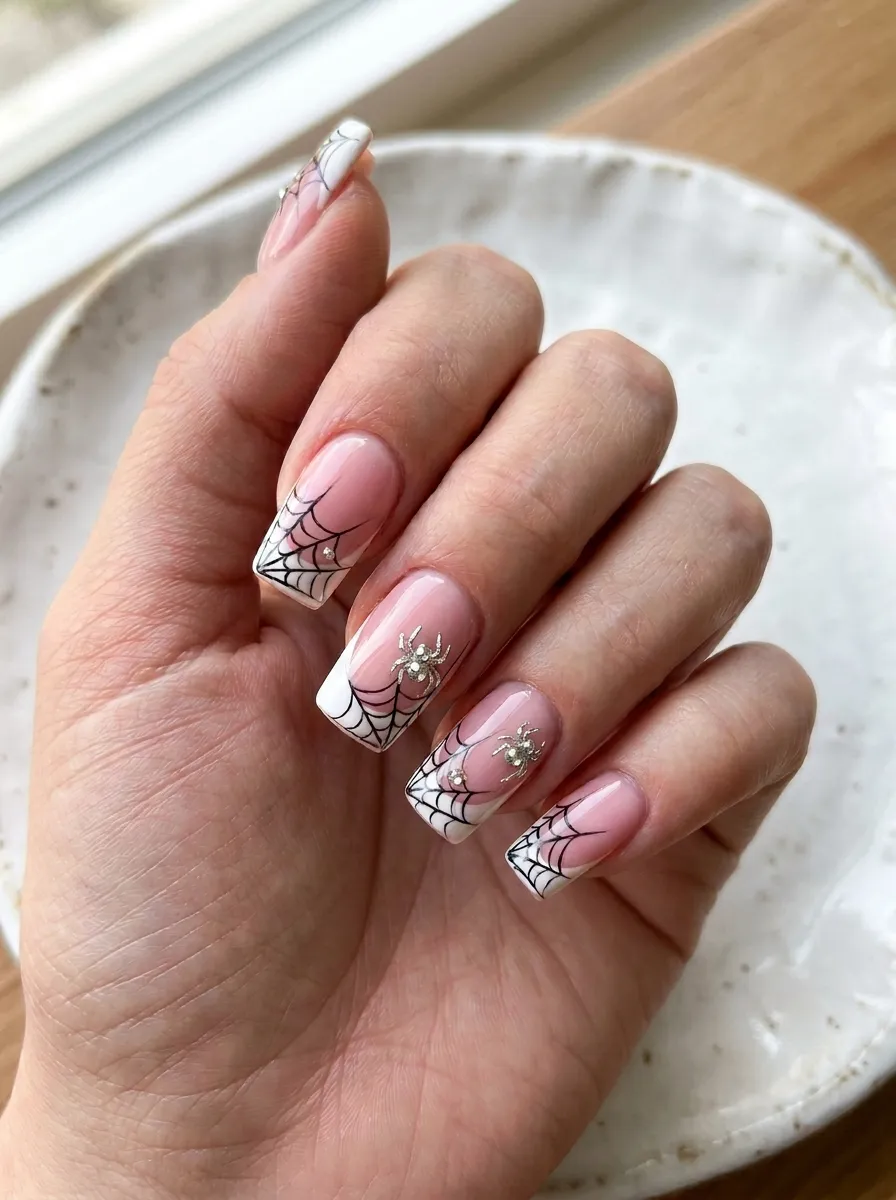
2. Hot Pink Spider Web Accent Nails
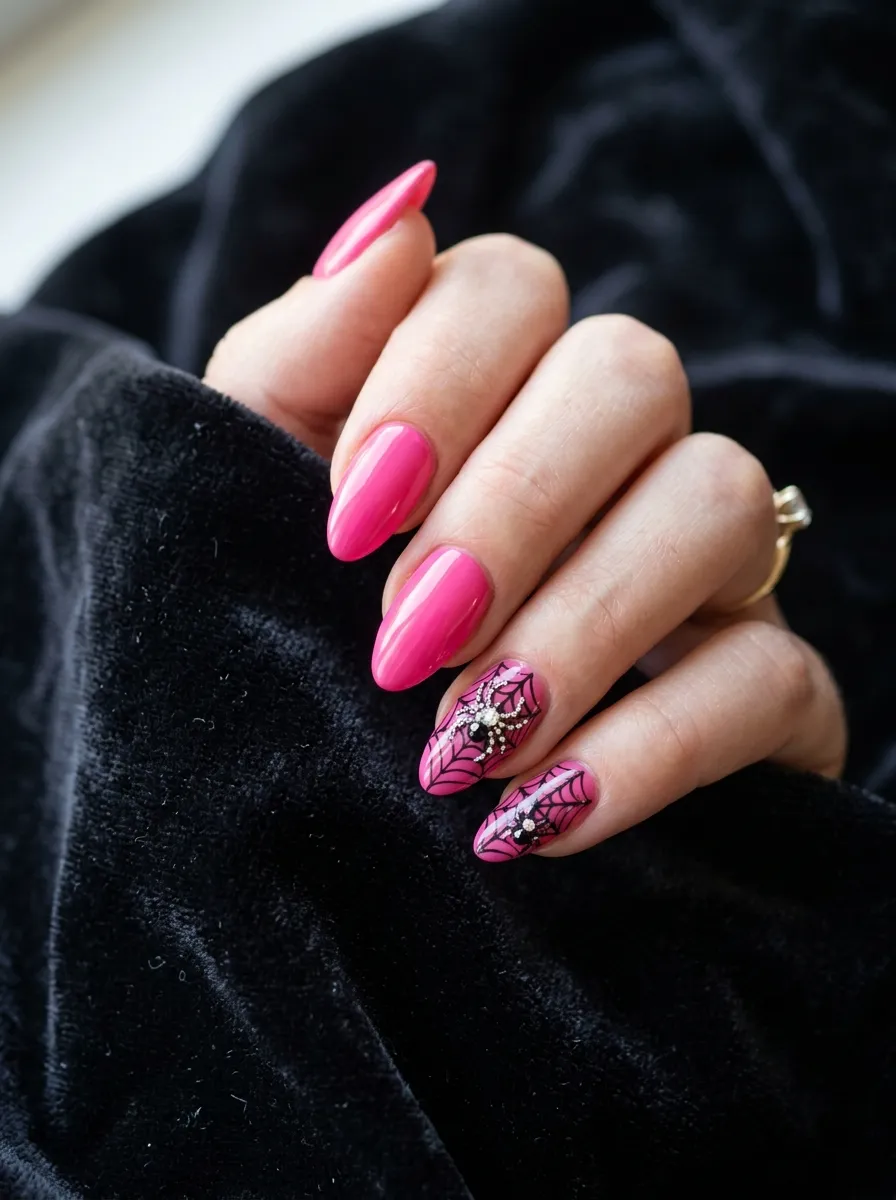
Spider webs look graphic and clean against a bold hot pink background.
Paint all nails in hot pink. Then pick one or two accent nails for the web design. The ring finger works great for this.
To draw the web, start with a small dot in the center of the nail. Draw thin lines radiating outward from that dot like spokes on a wheel. Then connect them with curved lines to form the web pattern.
It sounds tricky but gets easier with practice. Use a thin detail brush or a toothpick dipped in black polish.
DIY tip: If your web looks messy, add a tiny rhinestone spider at the center. It covers any imperfection and makes the nail look intentional and polished.
Keep the other nails as plain hot pink. The contrast between simple and detailed nails makes the design look more deliberate and stylish.
This works on any nail length. Short nails look chic with a small corner web. Long nails can handle a full web across the whole nail.
Seal with a matte top coat for an edgy finish or glossy top coat for a more feminine look.
3. Rose Pink Dripping Blood Nails
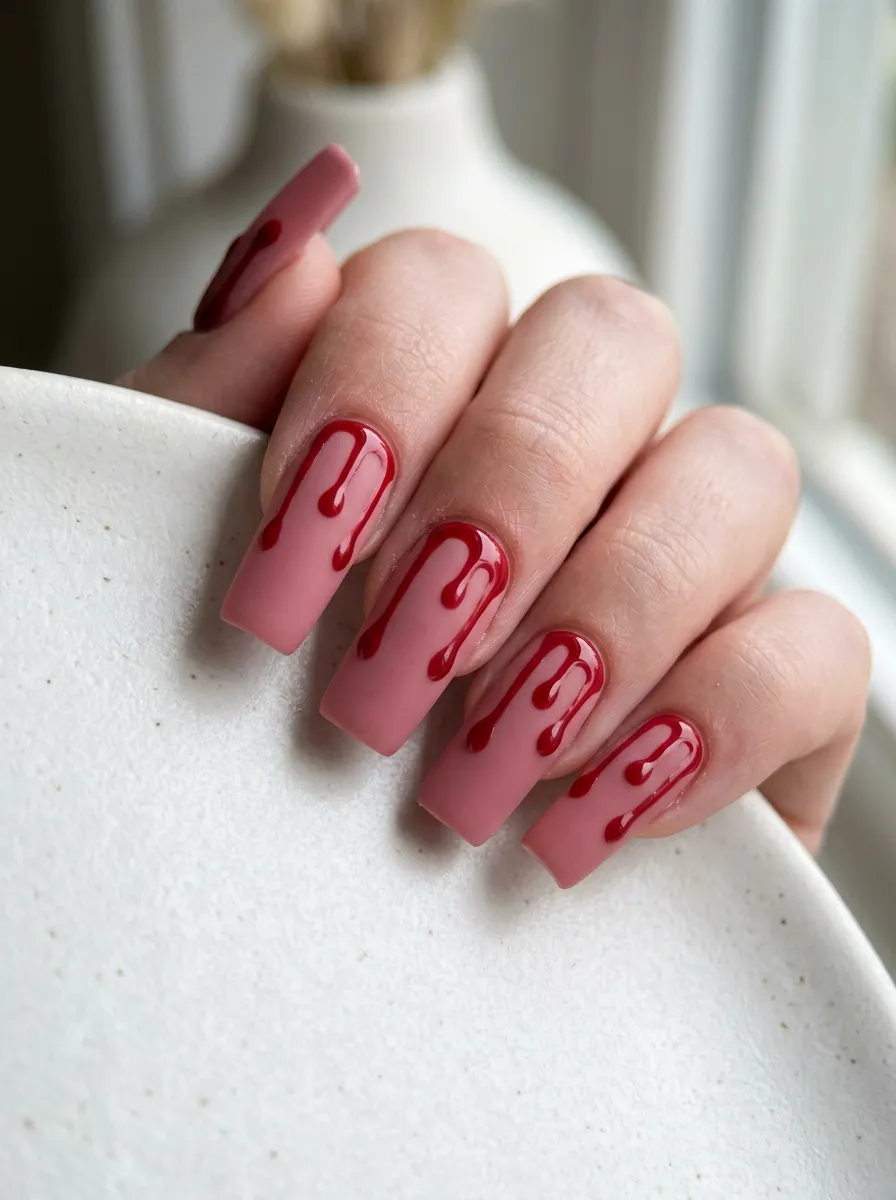
The dripping blood look is dramatic but surprisingly simple to recreate at home.
Use a soft rose pink as your base. Let it dry fully before adding the drip effect.
Mix a deep red polish with a tiny bit of clear top coat to make it slightly runny. Load a thin brush and paint thin irregular lines starting from the tip and dripping down toward the nail base. Make some drips shorter, some longer.
Let gravity do the work by tilting the brush slightly.
Budget tip: You do not need a special drip polish. Any deep red from the drugstore works when thinned slightly with top coat. Sally Hansen and Sinful Colors both have great reds for under $3.
The contrast between the pretty rose pink and the dark red drips is what makes this design work. It is sweet and sinister at the same time.
You can add a tiny drop-shaped blob at the bottom of each drip for a more realistic effect. Let everything dry completely and seal with a clear coat.
This look works especially well on longer nails where the drip has more room to travel.
4. Pastel Pink Skull Nails
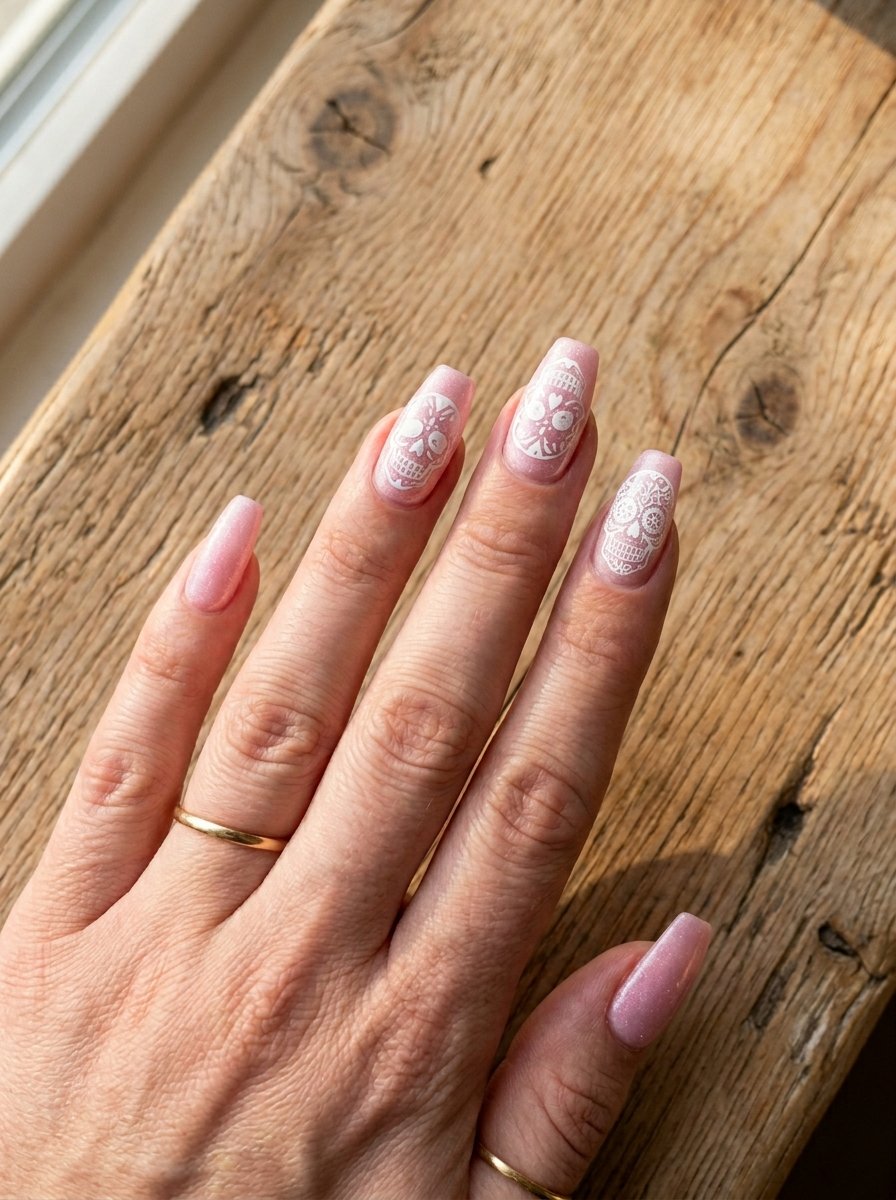
Skulls are a Halloween classic, but they look surprisingly sweet when paired with pastel pink.
Paint your nails in a light pastel pink with a hint of shimmer for extra charm. Once dry, use a white nail art pen to draw simple skull shapes.
A skull is just a circle with two oval eye sockets, a tiny upside-down heart for the nose, and a row of small rectangles for teeth. You do not have to make it realistic.
Simplified tip: Draw a tiny heart-shaped skull. Start with a heart shape and add eye holes inside. This works on even the shortest nails and looks intentional.
Do skulls on just two or three nails and leave the rest plain pink. This is called negative space and it actually makes the design look more professional.
Use black or gray for the skull details. Navy blue eyes on white skulls look especially striking.
Seal with glossy top coat to make the colors pop. These nails photograph beautifully and hold up well for about a week with regular top coat touch-ups.
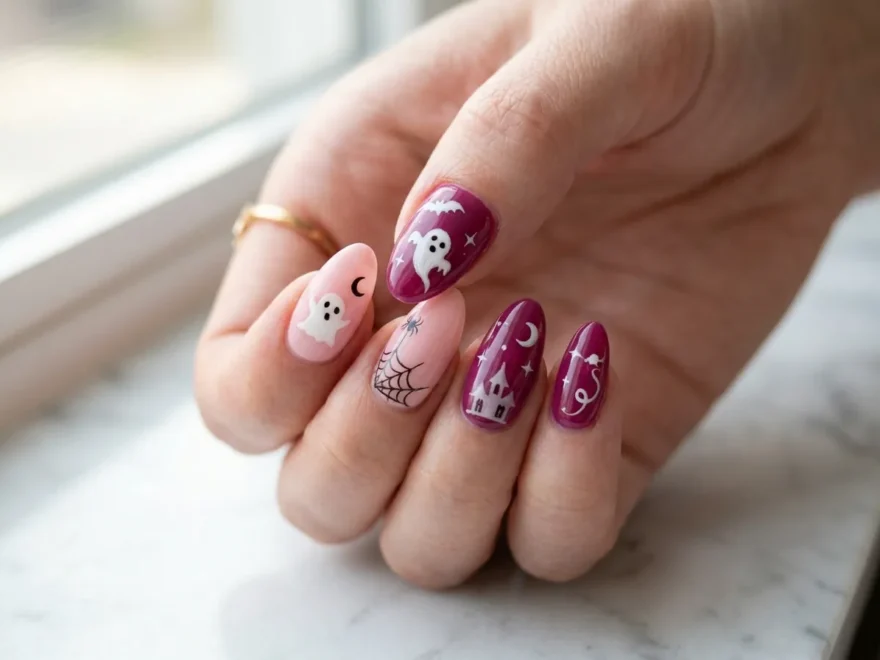
5. Pink Ombre with Black Bat Silhouettes
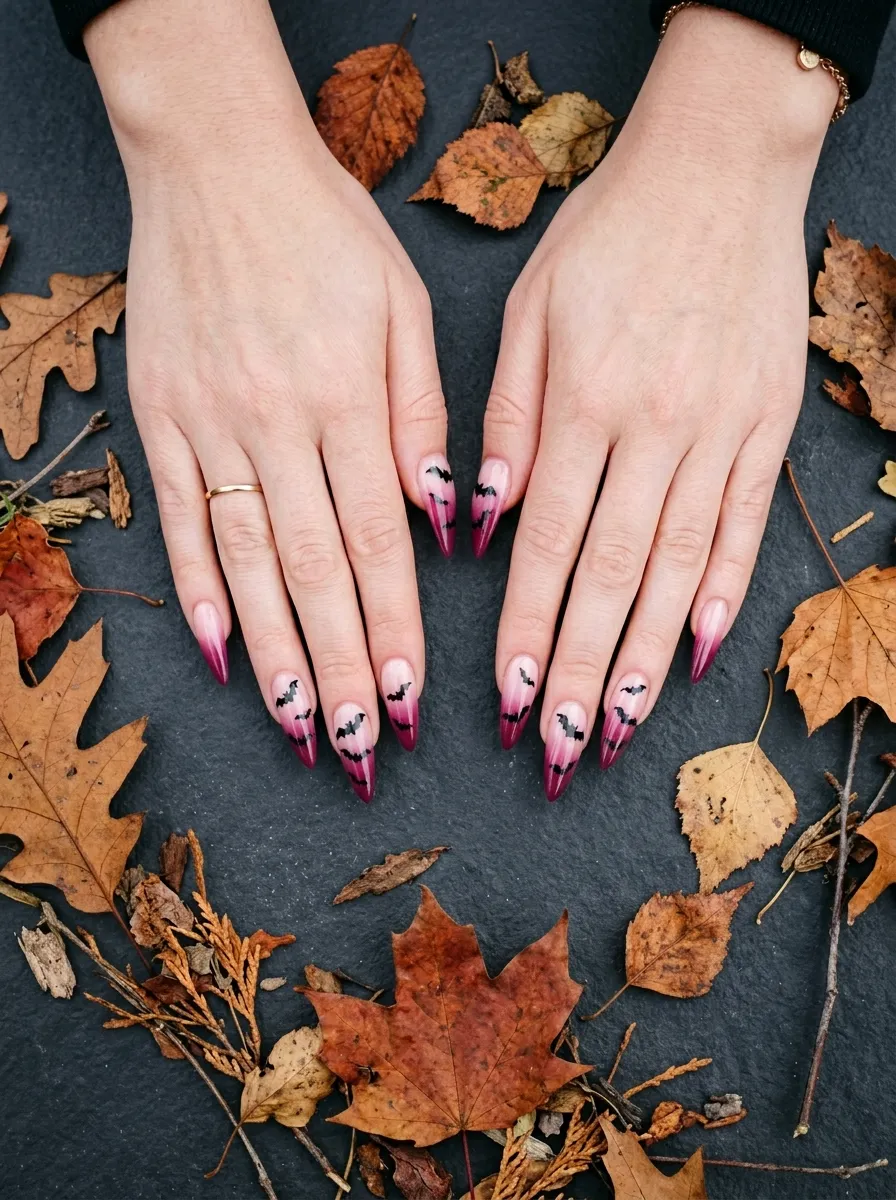
Ombre nails look expensive but take about 15 minutes to do at home with a makeup sponge.
Apply a white base coat first. Then paint two pink shades next to each other on a makeup sponge and dab it onto the nail. Repeat until you get a smooth gradient from light to deep pink.
Once the ombre is set, use a black nail art pen to stamp tiny bat shapes across the nails. Bats are just two curves meeting at a point in the middle with a W-shaped bottom wing edge.
Shortcut: Print a bat shape online, cut it into a tiny stencil, place it on your nail, paint over it, and peel off. Instant perfect bat every time.
You can scatter small bats across the whole hand or put larger bats on the accent nails only.
This design looks especially striking at night. The dark bats against the glowing pink gradient photograph beautifully under warm light.
Finish with a clear coat. Reapply a top coat every two days to keep the ombre looking fresh.
6. Pink and Black Checkerboard Halloween Nails
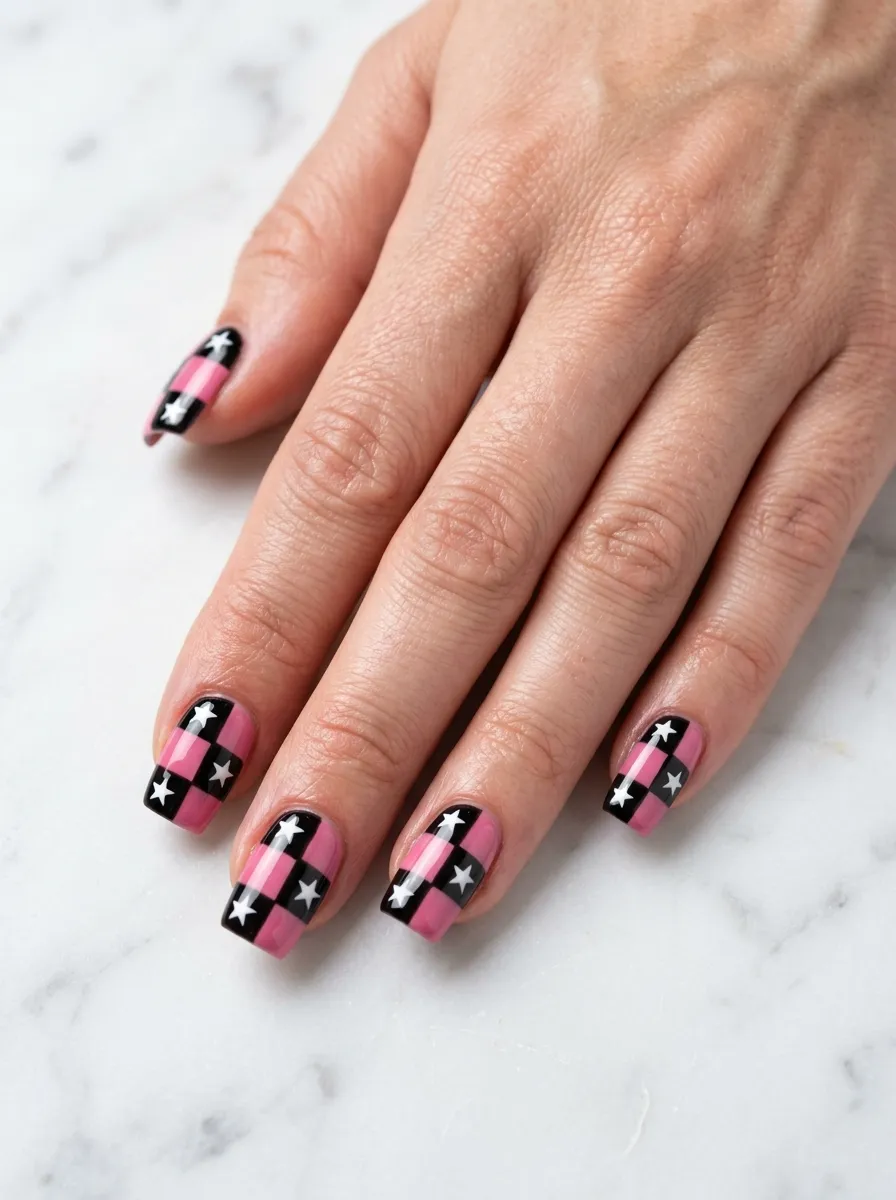
Checkerboard nails are having a major moment right now, and the Halloween version looks incredible.
Use nail tape or thin striping tape to create even squares. Apply the tape in a grid pattern on your base pink coat. Paint black over the sections you want dark, then carefully peel the tape while the polish is still slightly wet.
This takes a steady hand and a little patience, but the result looks salon-quality.
Easier option: Use a nail stamping plate with a checkerboard pattern. These cost about $5 online and make the process much faster.
Add tiny white skulls, stars, or moon shapes inside some of the black squares for an extra Halloween touch.
This design works beautifully on square or squoval nail shapes. The geometric lines look especially sharp on shorter nails.
Checkerboard nails pair well with a simple black outfit or an all-pink Halloween costume.
Seal with a glossy top coat to enhance the color contrast and keep the grid crisp. This design lasts about 7 to 10 days with proper top coat maintenance.
7. Dusty Pink Witch Hat Nails

Witch hats are simple enough to draw even if you are not artistically confident.
Start with a dusty pink or mauve base. Two coats give good coverage. Let it dry fully.
To draw a witch hat, make a triangle with a slightly curved wide brim at the bottom. Add a tiny buckle detail in the middle of the brim using yellow or gold polish. That little buckle takes the design from simple to detailed instantly.
Mini tip: Put a tiny orange star or moon next to each hat for extra charm. These can be stamped with a dotting tool or drawn freehand with a nail art pen.
Doing one hat on each nail keeps the look uniform and clean. Or mix it up with hats on three nails and plain pink on the others.
Witch hat nails look great with a witchy costume but are also subtle enough to wear to work or school in October without being over the top.
Dusty pink and black is one of the most flattering color combinations for fall. It suits all skin tones beautifully.
8. Neon Pink Frankenstein Nails
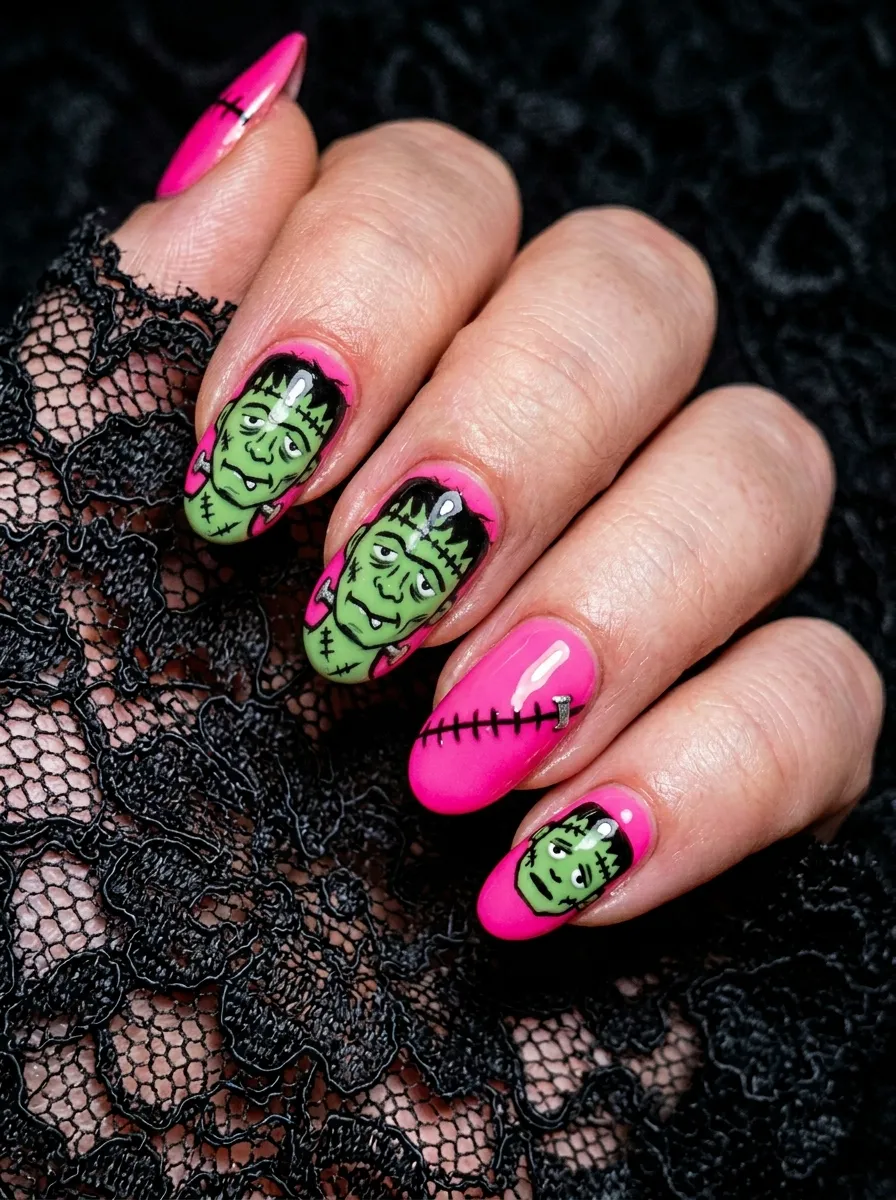
This is the fun, kitschy Halloween design that gets the most compliments.
Paint three nails in neon pink and two nails in a bright lime green. Or paint all nails neon pink and add Frankenstein face details on accent nails.
For the Frankenstein face, draw a green oval with flat top. Add small black stitch marks across the forehead. Two white rectangle eyes with black pupils. A zigzag mouth. Two small bolts on the sides of the neck area near the tip.
Tip for beginners: Use a green nail art pen on top of your pink base to draw the face outline. You do not have to switch colors entirely. The contrast between neon pink and the green drawing is part of the charm.
This design works best on nails with some length so the face has room to breathe.
It is a great conversation starter at Halloween parties. Everyone will want to look at your nails up close.
Seal with a glossy clear coat and reapply every couple of days.
9. Baby Pink Coffin Nails with Crosses
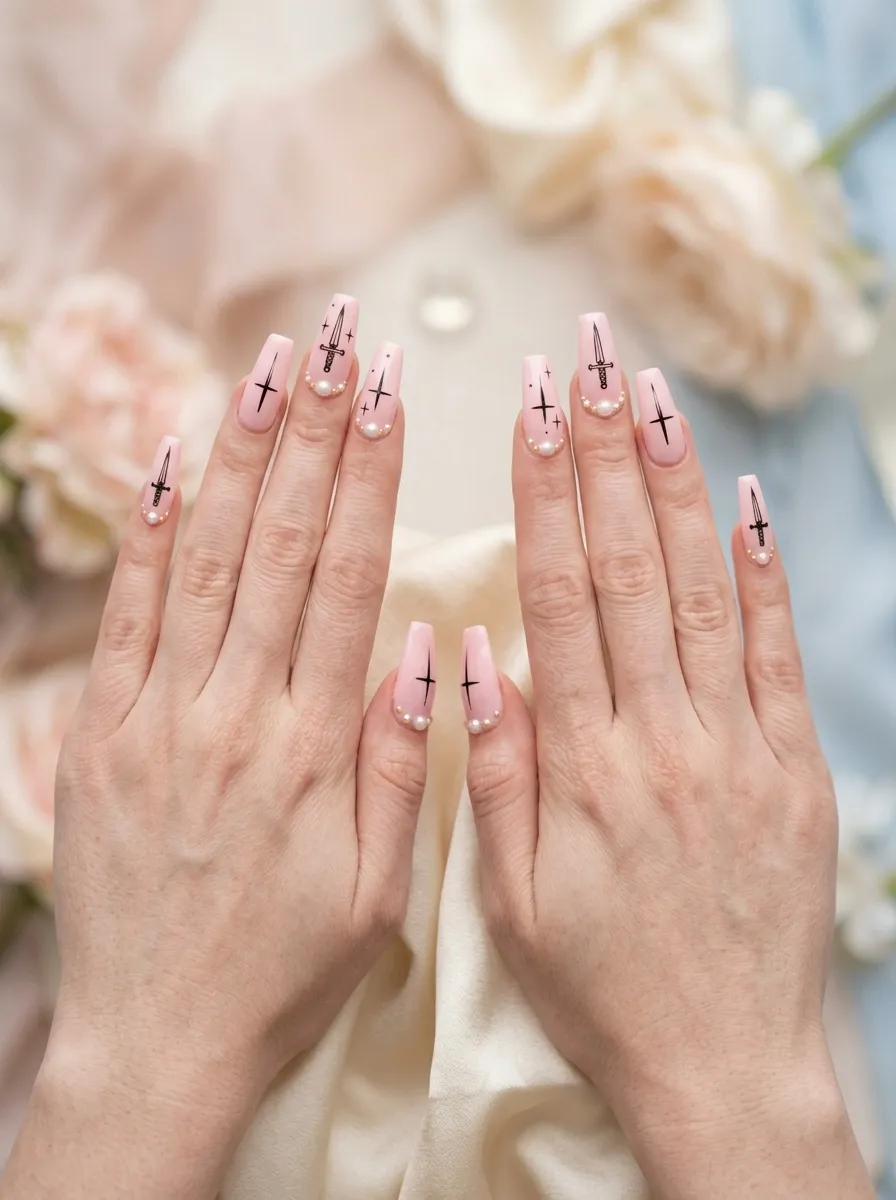
Coffin-shaped nails already have a spooky shape built in, so the design does not need to be complex.
Keep the polish a clean baby pink. Add one or two thin black crosses on accent nails using a striping brush. The cross design looks gothic and elegant without being overwhelming.
Elevate the look cheaply: Add a small pearl or rhinestone at the center of each cross. Rhinestones from the craft store cost almost nothing and you can apply them with a dot of nail glue.
The combination of soft baby pink, the coffin shape, and gothic cross details creates a high-fashion aesthetic that works beyond Halloween too.
Pair with a tiny silver or black chain ring on the same hand for a complete look.
This design is popular right now in the dark feminine or cottagecore goth aesthetic communities on social media. It photographs beautifully in natural light.
Seal with a glossy top coat and push any rhinestones down firmly before it dries.
10. Pink Cat Eye Gel with Moon Phase Art
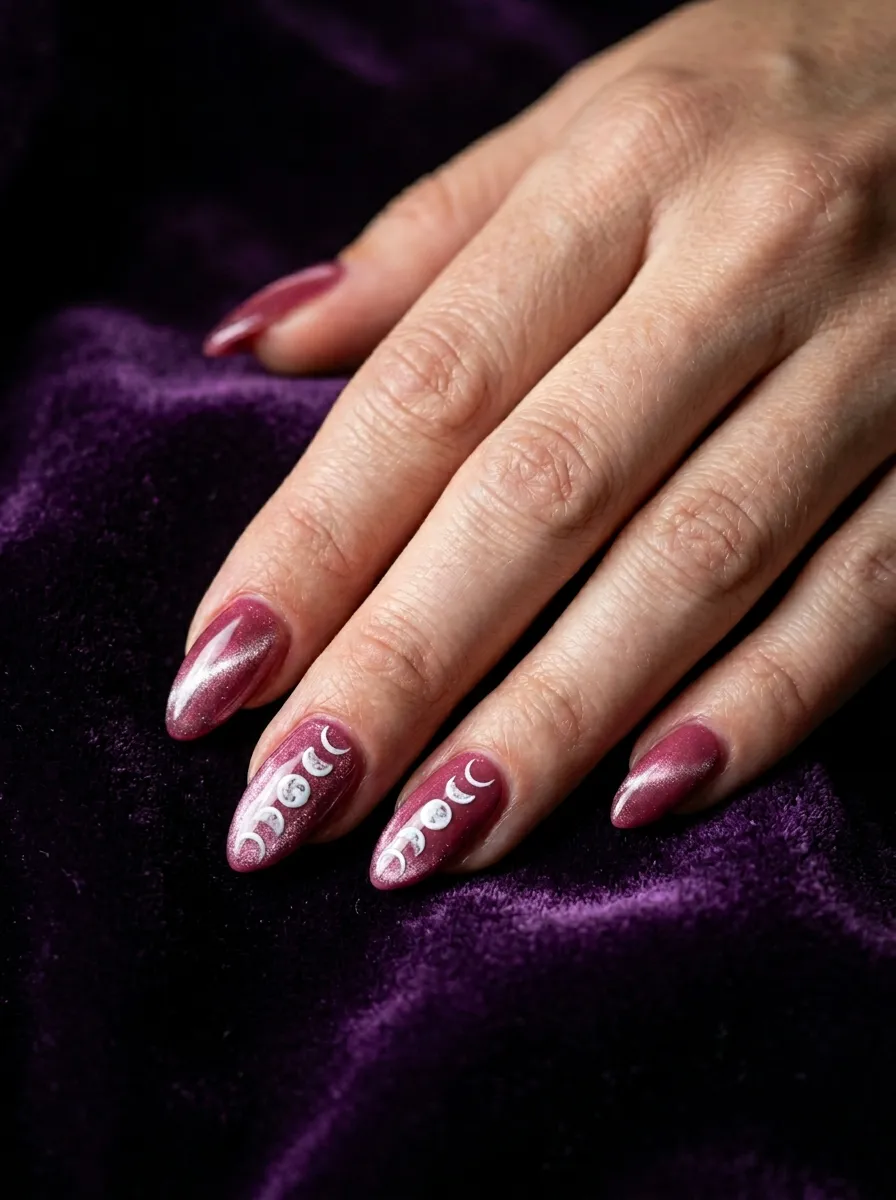
Cat eye gel polish creates a magnetic shimmery stripe that looks almost supernatural without any extra effort.
You do need a UV or LED lamp for gel cat eye polish to work properly. Starter kits with a small lamp and a few bottles run about $25 online and are worth the investment if you do nails often.
Once your deep pink cat eye base is cured, add moon phase symbols on two accent nails. The moon phases are just a series of circles going from full to crescent to new to crescent to full. Use a small white nail art pen for the symbols.
Free design reference: Search “moon phase nail art” on Pinterest for a visual guide. The symbols are easy to copy once you see them laid out.
This look feels mystical and polished at the same time. It works for Halloween but also for everyday wear in the fall and winter months.
Cat eye polish looks best under dim light where the shimmer stripe really glows.
11. Pink Mummy Wrap Nails
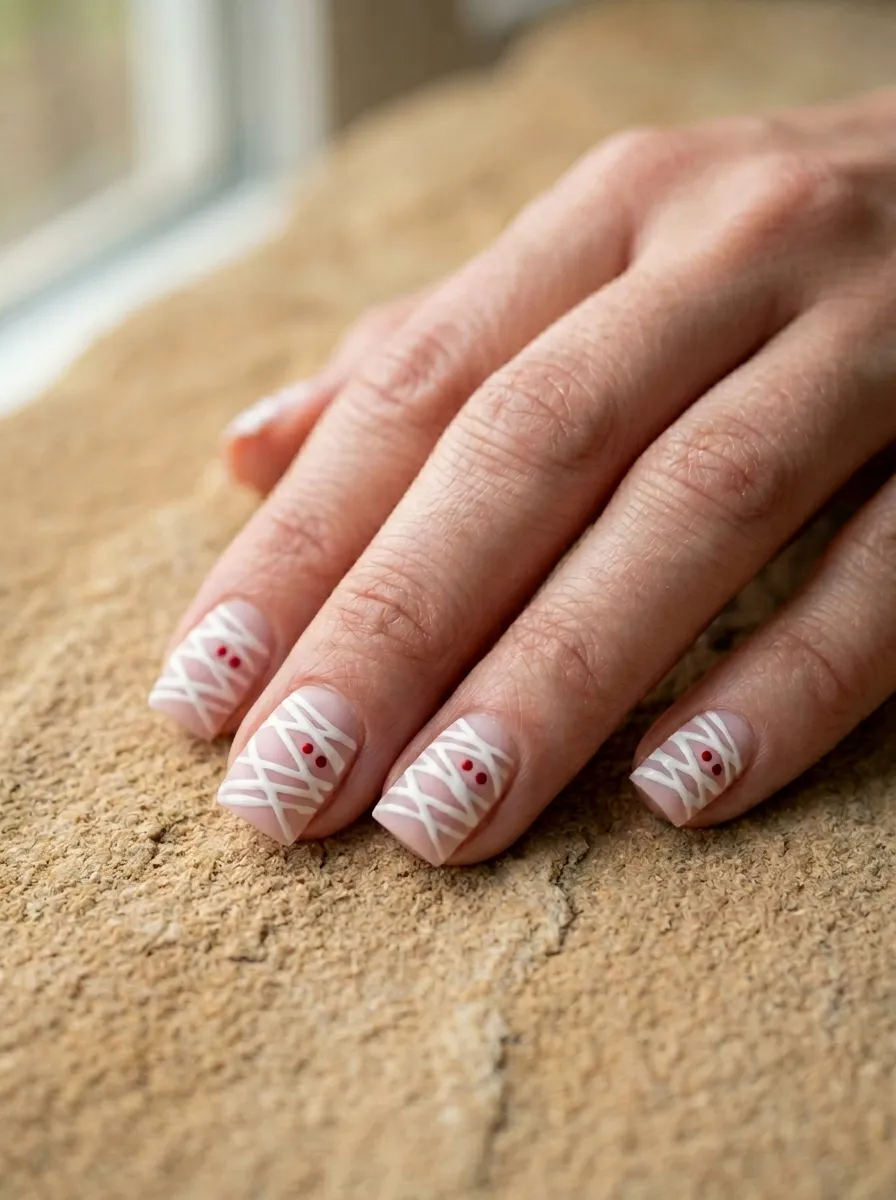
Mummy nails are deceptively simple to draw and look very detailed once finished.
Paint a pale pink base. Let it dry. Use a white nail art pen to draw overlapping diagonal stripe lines across the nail, like bandage wraps. Vary the direction slightly on each nail so they do not all look identical.
Leave a small gap somewhere on each nail and add two tiny red dots for the mummy’s peering eyes. That small detail transforms the design from abstract stripes into an actual mummy character.
No nail art pen? No problem: Use thin strips of white craft tape pressed onto the nail for the wrap lines. Paint a light gray wash over the tape, then peel it off. The tape lines show through as white wraps.
Mummy nails work on any nail length. On shorter nails, just do fewer wrap lines so it does not look too busy.
This design suits the whole of October, not just Halloween night.
12. Glittery Pink Pumpkin Nails
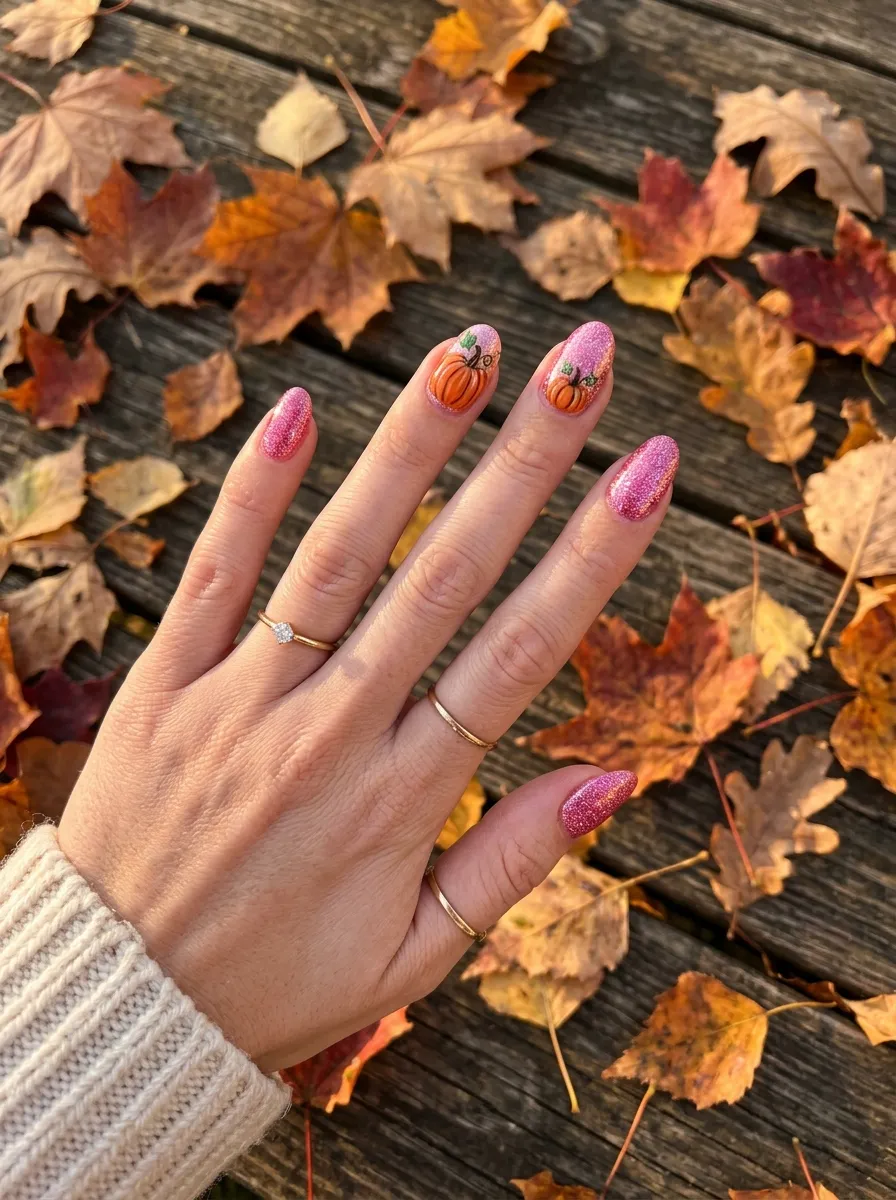
Glitter base plus pumpkin art is a combination that feels festive without being too dark or scary.
Apply a fine pink glitter polish as your base. Two coats give full sparkle coverage. Let it dry.
Draw small orange pumpkins on two accent nails. The pumpkin shape is just a slightly squashed circle with curved vertical lines. Add a green stem at the top and a tiny leaf. Optional: add a small carved face with triangle eyes and a jagged smile.
Budget find: Chunky glitter nail polish from Color Club or LA Colors runs about $2 to $3 at most beauty supply stores. The glitter looks premium even at a low price point.
Pink glitter pumpkins feel more playful and less scary, which makes them perfect for wearing to school, work, or a daytime fall event.
Add a matte top coat over the glitter for a more diffused sparkle effect. Glossy top coat over glitter makes the color more vibrant and intense.
13. Mauve Pink Haunted House Silhouette Nails
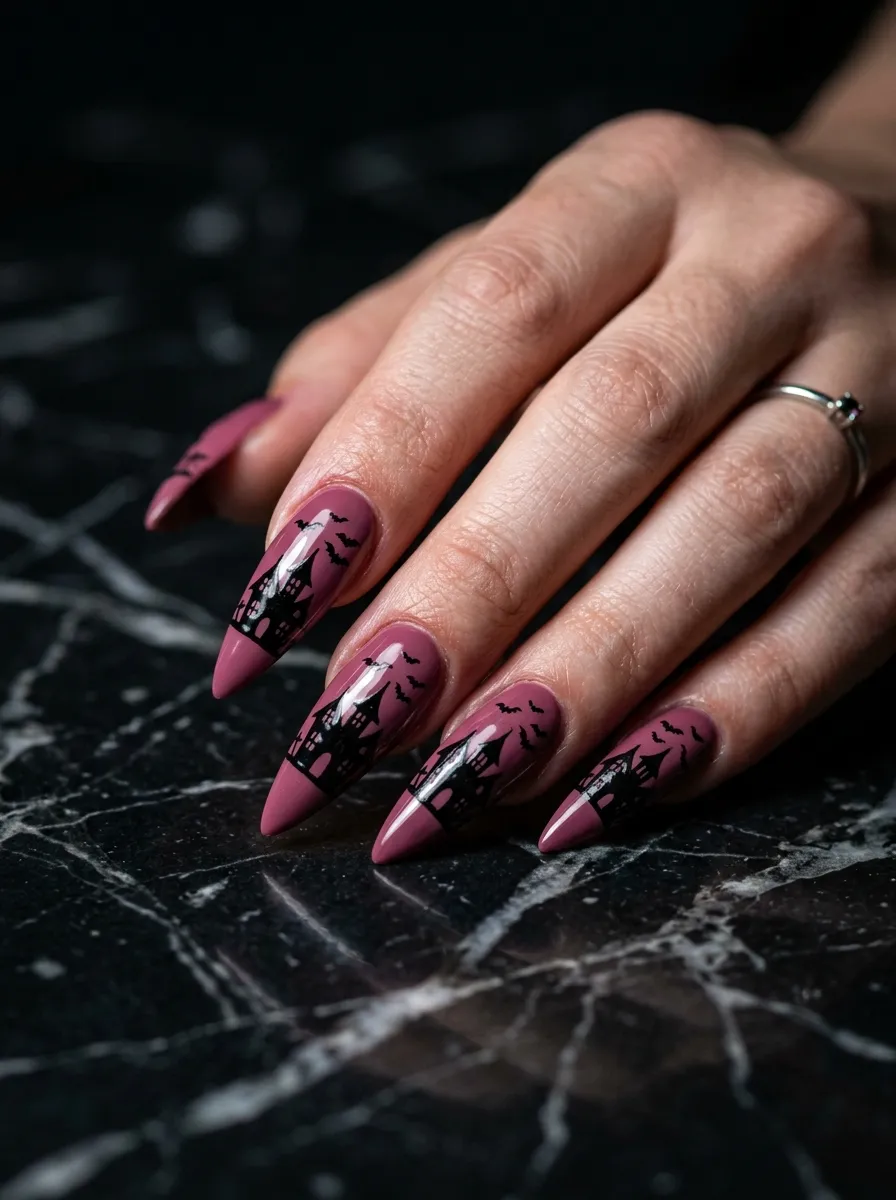
A haunted house silhouette at the tip of each nail looks like a miniature Halloween scene.
Use deep mauve or plum-tinted pink as your base. The darker the pink, the more the black silhouette will contrast.
Draw a simple haunted house shape near the tip of each nail. The house is a rectangle with a triangle roof, a small tower on one side, and a few tiny windows. Add tree silhouettes on either side and tiny bats in the sky above.
For beginners: Simplify the design to just a triangle roof and rectangle body. Add two small square windows and one arched door. Even a basic silhouette reads immediately as a haunted house.
This design works especially well on longer nail shapes like stiletto or almond because the extended tip gives more space for the silhouette art.
Use a nail art pen with a fine tip for the most control. Work slowly and in small strokes.
Seal with matte top coat for an artistic, flat graphic look.
14. Pink and Purple Galaxy Graveyard Nails
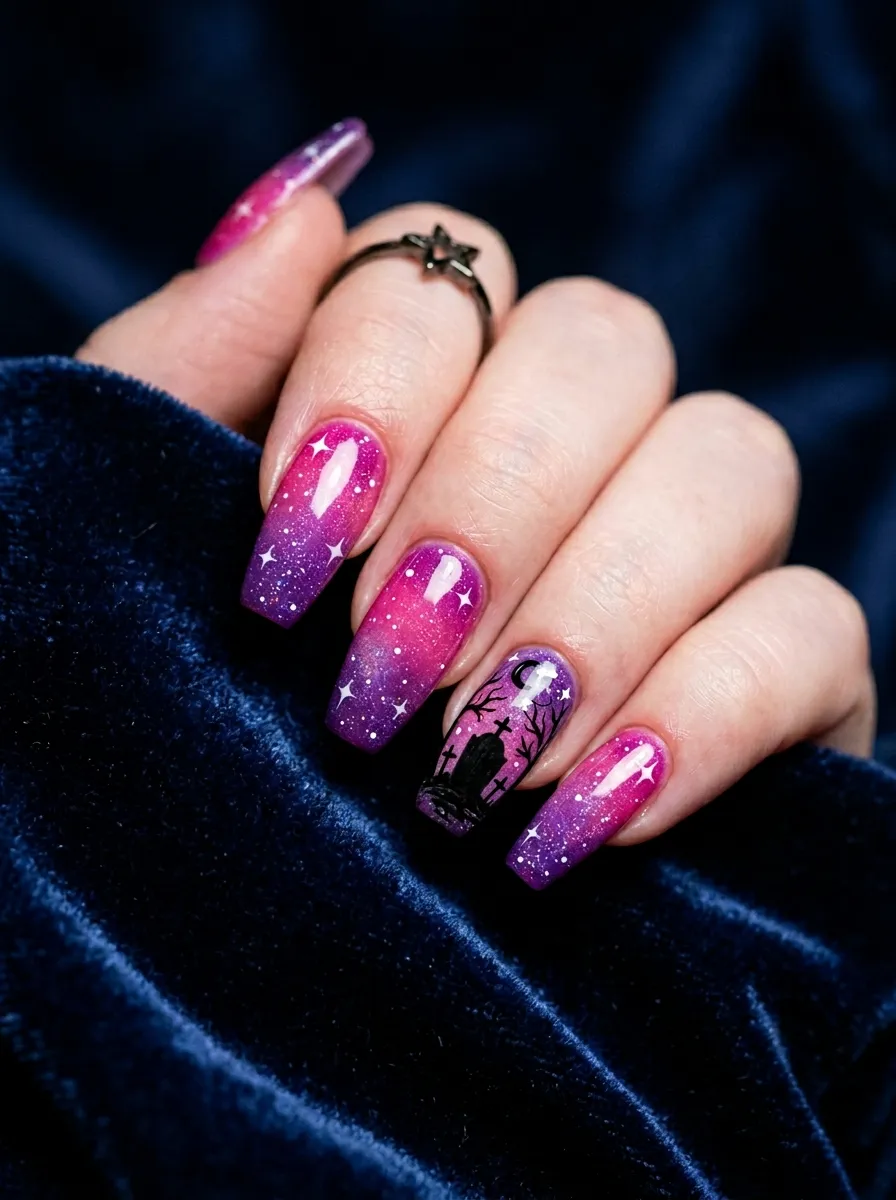
Galaxy nails give you a ready-made spooky background without extra effort. The cosmic effect does most of the work.
Create a pink-to-purple galaxy base by sponging mauve, hot pink, and violet polishes onto a black base. Add white dots for stars using a fine dotting tool.
On one or two accent nails, paint a simple graveyard scene over the galaxy base. Draw a small gray tombstone with a rounded top and a tiny carved RIP detail. Add grass blades at the bottom.
Star technique: Dip a fan brush in white polish and flick it gently over the nails to create random star spray patterns. Much faster than dotting each star individually.
This design looks complex but each element on its own is simple. Galaxy plus tombstone together just look impressive.
It suits Halloween but also works as an artsy everyday fall nail look if you skip the tombstones and just wear the galaxy design.
15. Pink Drip Candle Wax Nails
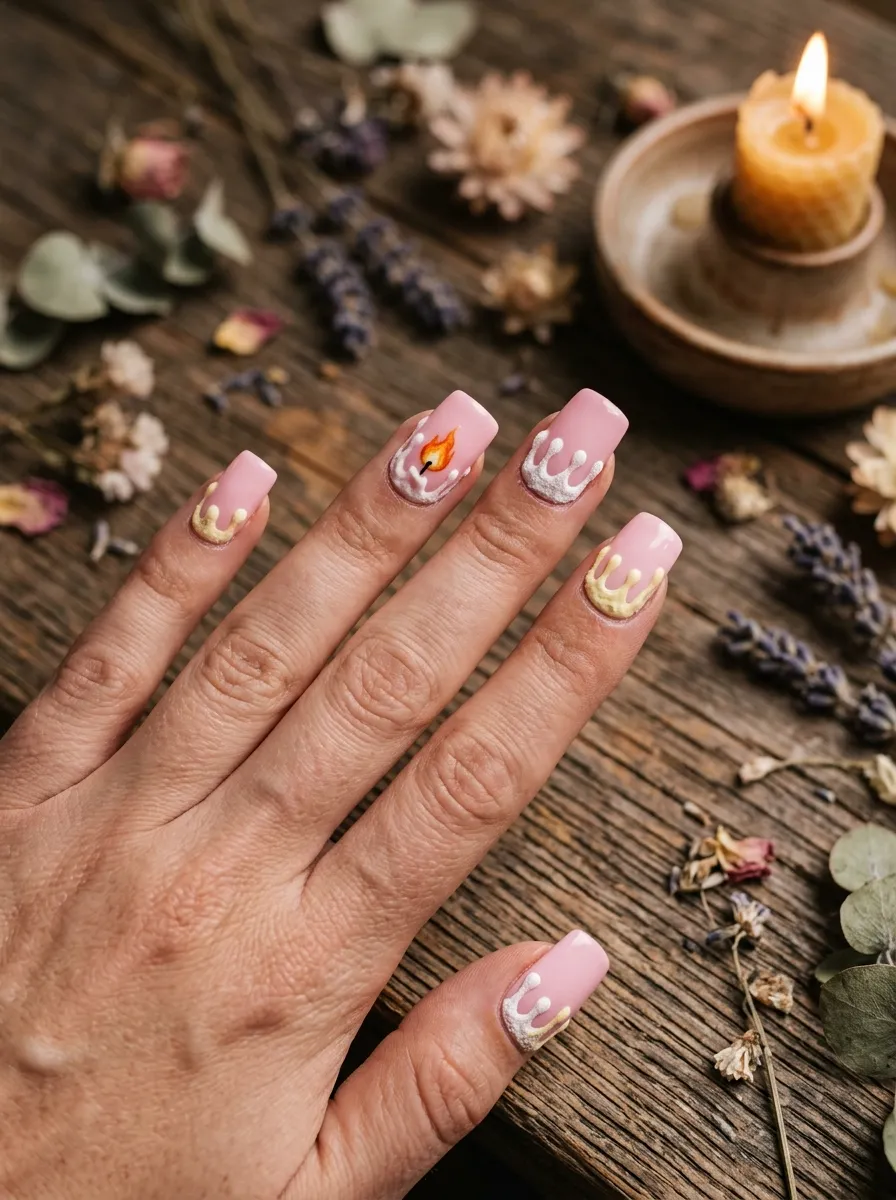
Candle nails are a newer Halloween-adjacent trend that looks very witchy and atmospheric.
Paint nails in a soft dusty pink. For the wax drip effect, mix a little white nail polish with a top coat so it is slightly translucent. Drip this from the cuticle edge down in an irregular flowing shape, like melted wax pooling at the base of a candle.
Add a tiny orange and yellow flame shape on one accent nail to tie everything together.
Texture trick: While the wax drip coat is still wet, sprinkle a pinch of fine white glitter over it. This gives the wax a crystalline texture that looks realistic and magical at the same time.
This design is subtle enough to wear anywhere in October. From a distance it just looks like an interesting nail design. Up close the candle detail comes through beautifully.
These nails feel cozy and witchy rather than scary, which many people prefer as their everyday Halloween look.
16. Hot Pink Poison Apple Nails
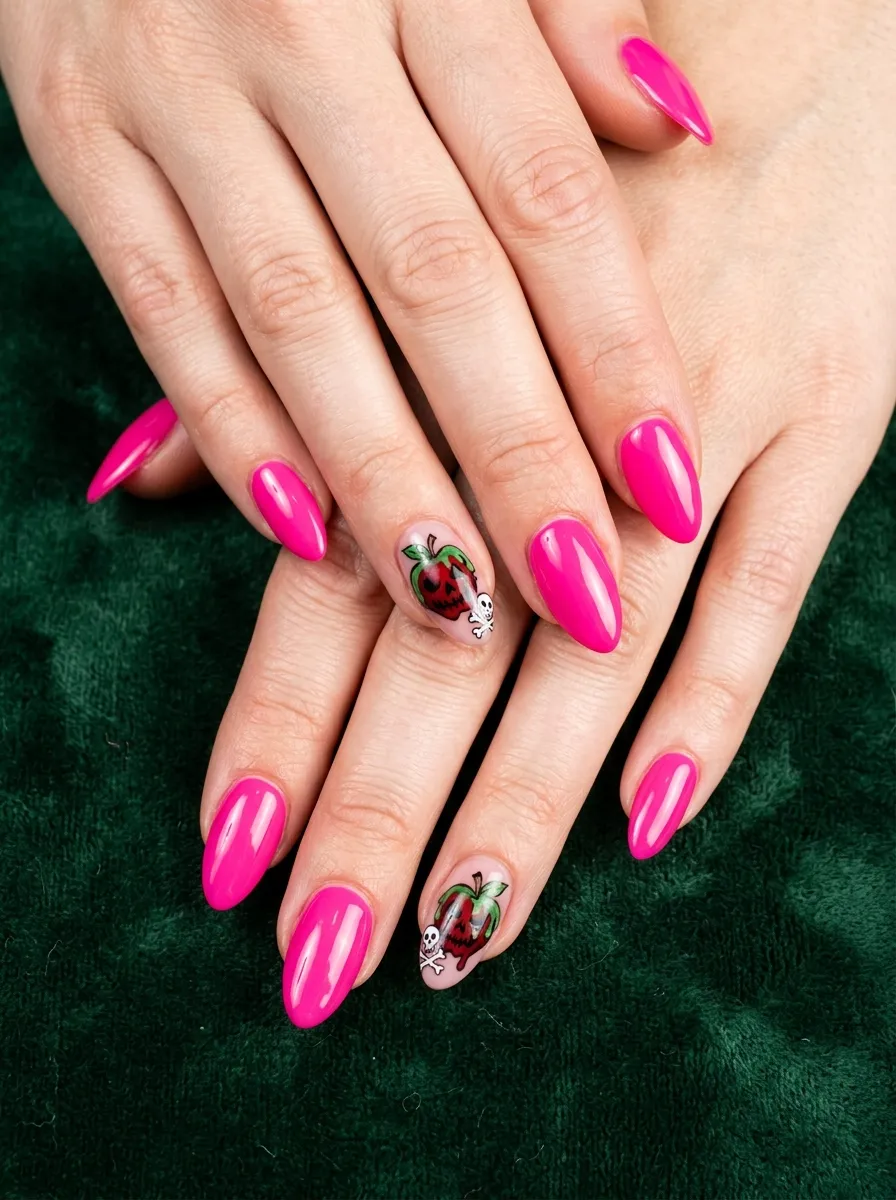
A poison apple is the perfect fairy-tale-meets-Halloween design that looks whimsical and dark at the same time.
Paint most nails in glossy hot pink. On two accent nails, draw a simple red apple shape with a green leaf and stem. Add a tiny skull-and-crossbones symbol next to the apple, or write an X through the apple to signal its poisonous nature without using words.
Simple apple shape: Paint a red teardrop pointing downward. Flip it so the rounded part is up and add a tiny green stem. That is all it takes.
A thin black outline around the apple makes the illustration stand out against the hot pink background.
This design is inspired by Snow White and gives spooky nails a storybook quality. It works great for costume parties where you want your nails to match a Disney villain costume.
Use a glossy top coat to keep the red apple looking shiny and freshly picked.
17. Pink and White Spiderweb French Tips
A French manicure is one of the most requested nail looks, and the Halloween spiderweb version makes it feel seasonal and fun.
Apply a soft pink base and a white tip as you would for a classic French. Once dry, use a fine black nail art pen to draw a small spiderweb at the corner of the white tip. The web extends from the corner inward onto the pink base.
Add a tiny rhinestone spider where the lines of the web converge.
Classic French shortcut: Use French tip guide stickers to get a perfect white line without a steady hand. These cost about $1 for a pack of 40 stickers at most beauty stores.
This design looks clean and polished enough for professional settings but adds just enough Halloween personality.
It works on any nail length. Short nails look elegant with a small corner web. Long nails can handle a larger web that spans more of the nail.
Matte top coat gives this a modern editorial look. Glossy keeps it classic and clean.
18. Pink Nails with Tiny Green Witch Potion Bottles
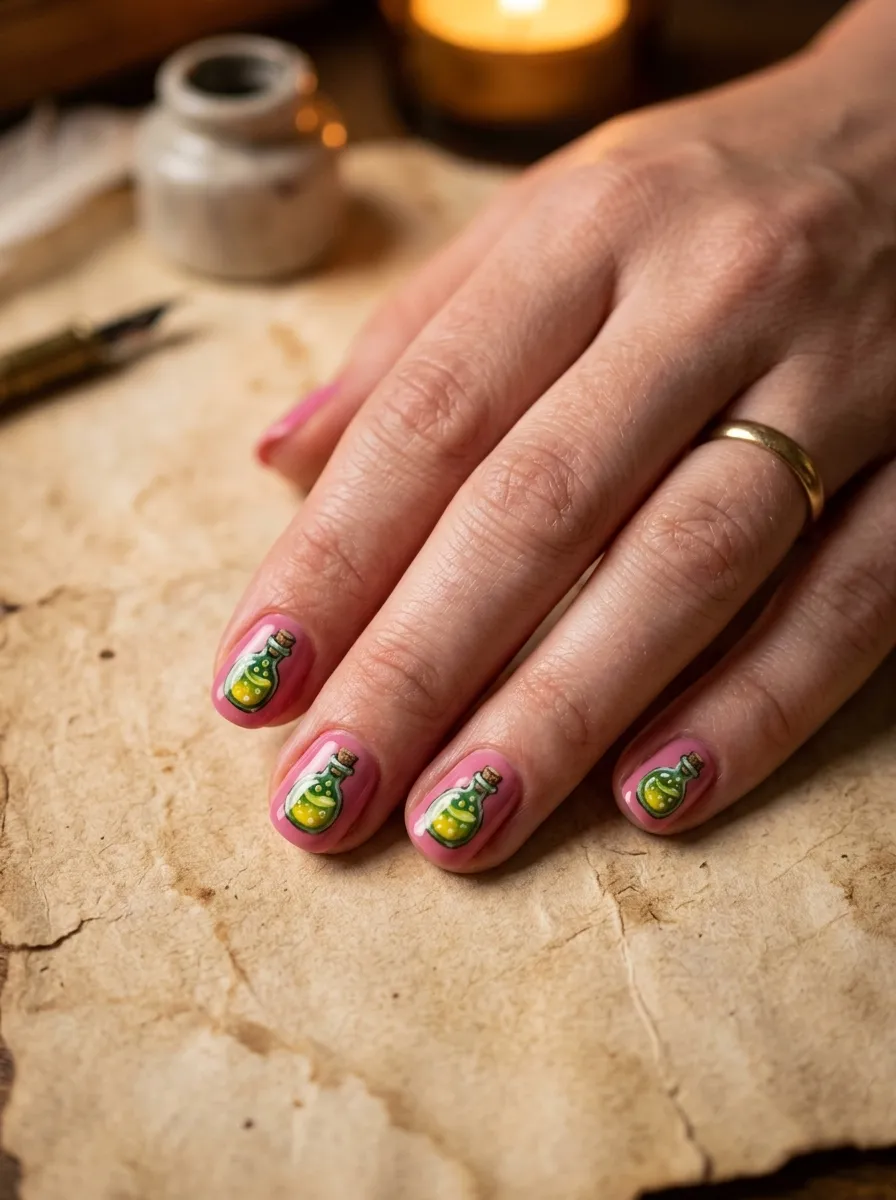
Tiny illustrated objects on nails are one of the biggest nail art trends right now, and potion bottles are perfect for Halloween.
Paint all nails in a medium pink. On accent nails, draw small green potion bottles. The bottle shape is a simple rectangle with a narrow neck and a small cork. Fill the bottle in with translucent green polish. Add tiny white dot bubbles inside and a small label area left blank.
Glowing effect: Add a tiny dot of neon yellow in the center of the green liquid to simulate a glow from within. It makes the illustration look lit up and magical.
These little bottles look incredibly detailed but each one takes only about 3 minutes to paint once you get the basic shape down.
You can also do purple or orange potion bottles for a different color combination while keeping the pink base consistent.
Seal with a glossy top coat to make the bottles look like they are filled with actual liquid.
19. Dusty Rose Ouija Board Accent Nails
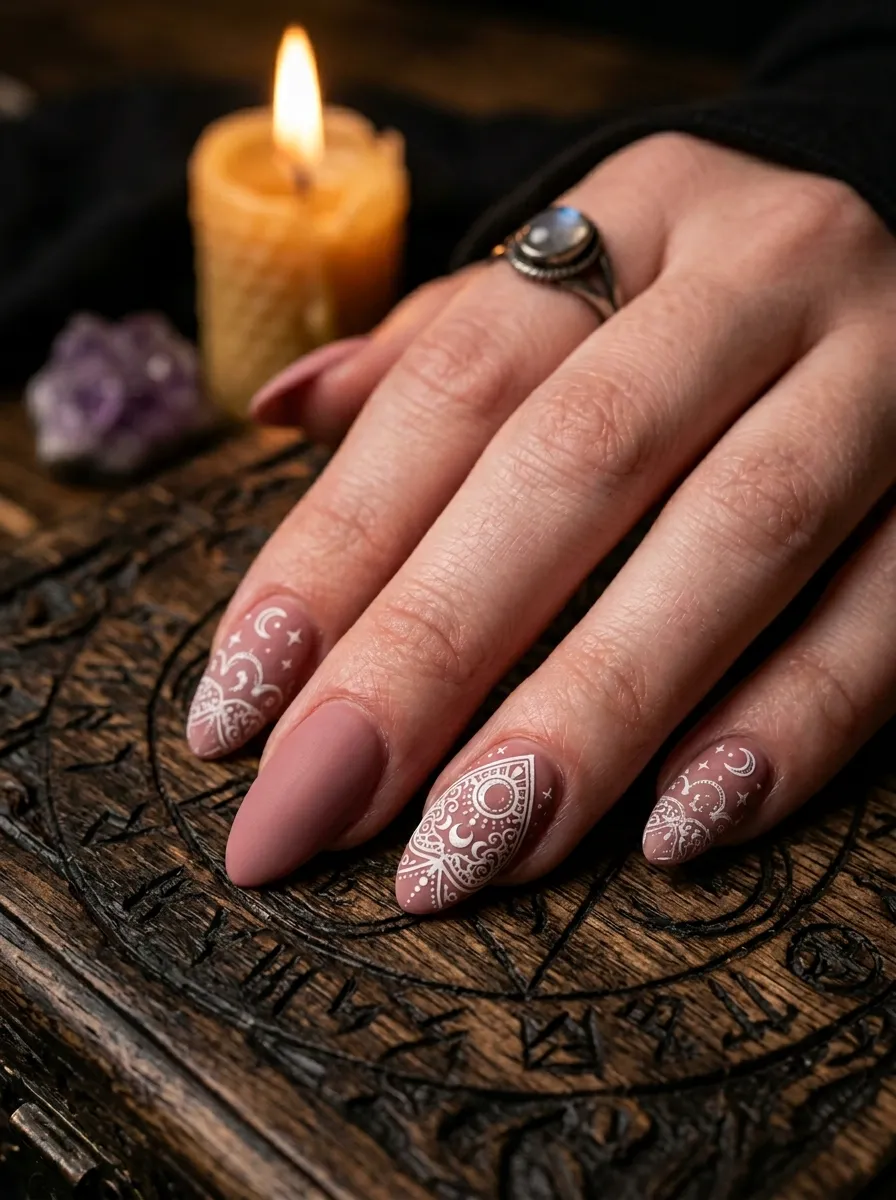
The planchette is the Ouija board pointer, and it makes a beautiful standalone nail design without needing to include the full board.
Paint your nails in a dusty rose matte polish. On the ring finger, draw a white planchette shape. It looks like a teardrop with a circular hole at the wide end. Add thin decorative lines inside and a small moon or star inside the circle window.
On the index and pinky nails, add small moon and star symbols in white for a matching mystical set.
Matte finish tip: Apply a regular nail polish and then use a matte top coat. You do not need to spend extra on specialty matte polish. Any matte top coat transforms the finish for about $3.
This design suits the dark feminine and witchy aesthetics that are popular on social media right now. It looks intentional and artistic rather than costume-y.
Reapply matte top coat every two days since it wears down faster than glossy.
20. Pink Vampire Fang Nail Tips
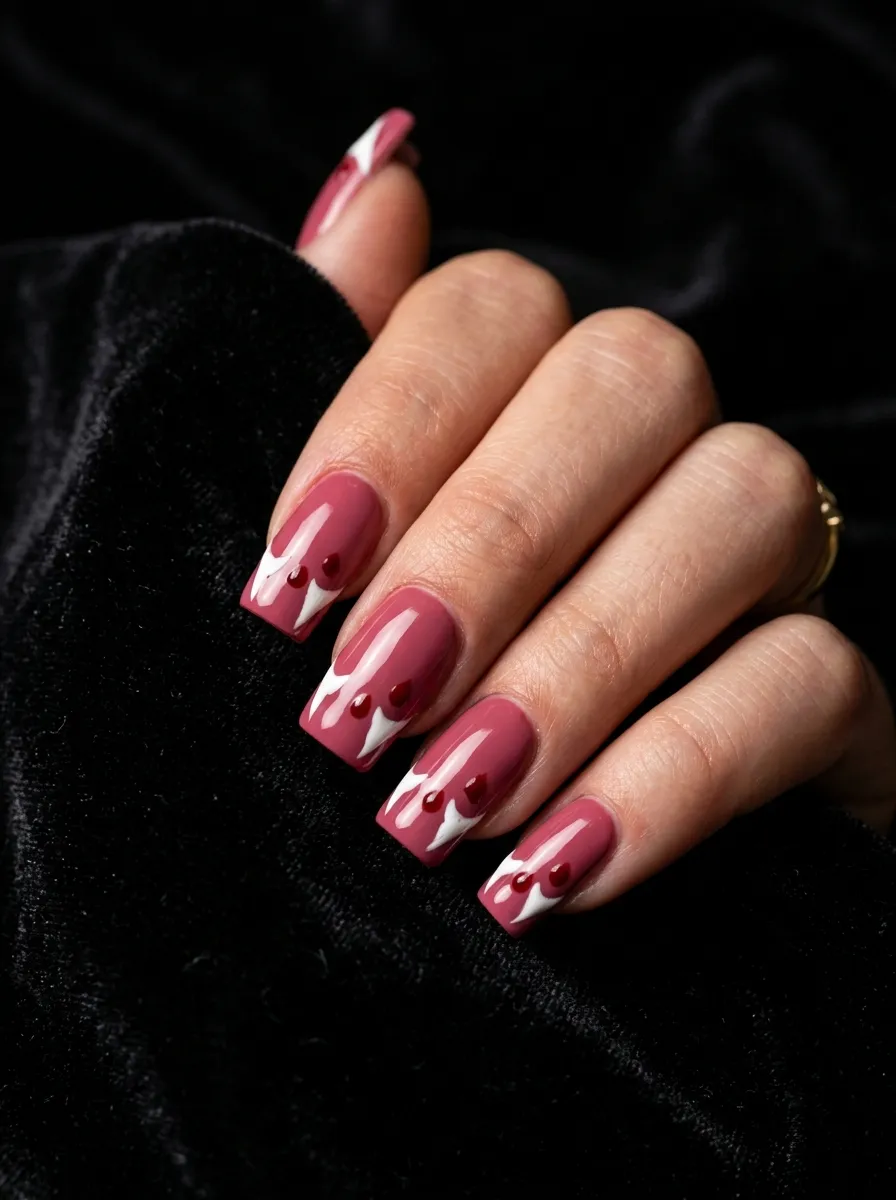
Vampire fang tips are one of the most creative takes on a French manicure for Halloween.
Apply a deep rose pink base. For the tip design, instead of a clean white line, paint two white pointed fang shapes at the center of each tip. Leave gaps between the fangs so the tip reads as teeth.
Add two small red drop shapes between the fangs to simulate blood dripping from the fangs.
Shaping the fangs: Use a thin detail brush and pull from the tip downward into a point for each fang. The trick is to keep both fangs on one nail the same width so the design looks symmetrical.
This design looks dramatic and editorial in photos. The deep pink base against white fangs and red blood drops is a striking color combination.
It works on any nail length but looks best on medium to long nails where the tip has more space to show off the design.
Apply a glossy top coat to make the red drops look wet and fresh.
21. Pink Nails with Tiny Eyeball Art
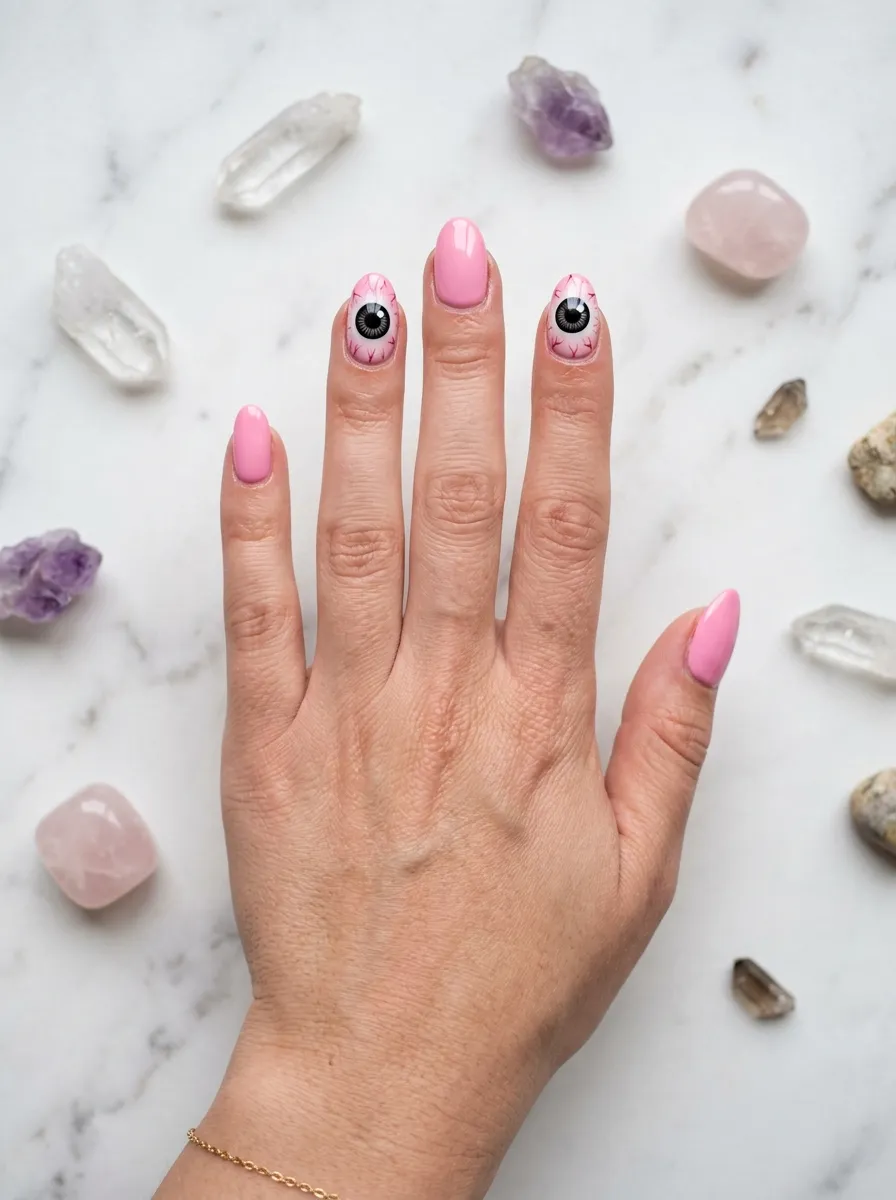
Eyeball nails are the ultimate spooky Halloween design and they look wildly realistic with just a few colors.
Paint most nails in bubblegum pink. On two accent nails, paint a white oval to represent the eyeball. While wet, add a colored iris in the center using blue, green, or brown. Add a black circle for the pupil. Add a tiny white dot highlight in the pupil for that realistic glassy look.
Use a thin red nail art pen to draw tiny red vein lines radiating from the iris toward the edge of the white oval. That detail is what makes eyeball nails look truly realistic.
Iris shortcut: Use a round toothpick to dot on the iris color. A round dotting tool gives an even circle every time.
Eyeball nails photograph spectacularly and get a strong reaction from everyone who sees them. They are genuinely creepy despite the pink background, which creates an interesting contrast.
Apply a domed glossy top coat to give the eyeball that convex glass-like appearance.
22. Pastel Pink Cauldron and Potion Nails
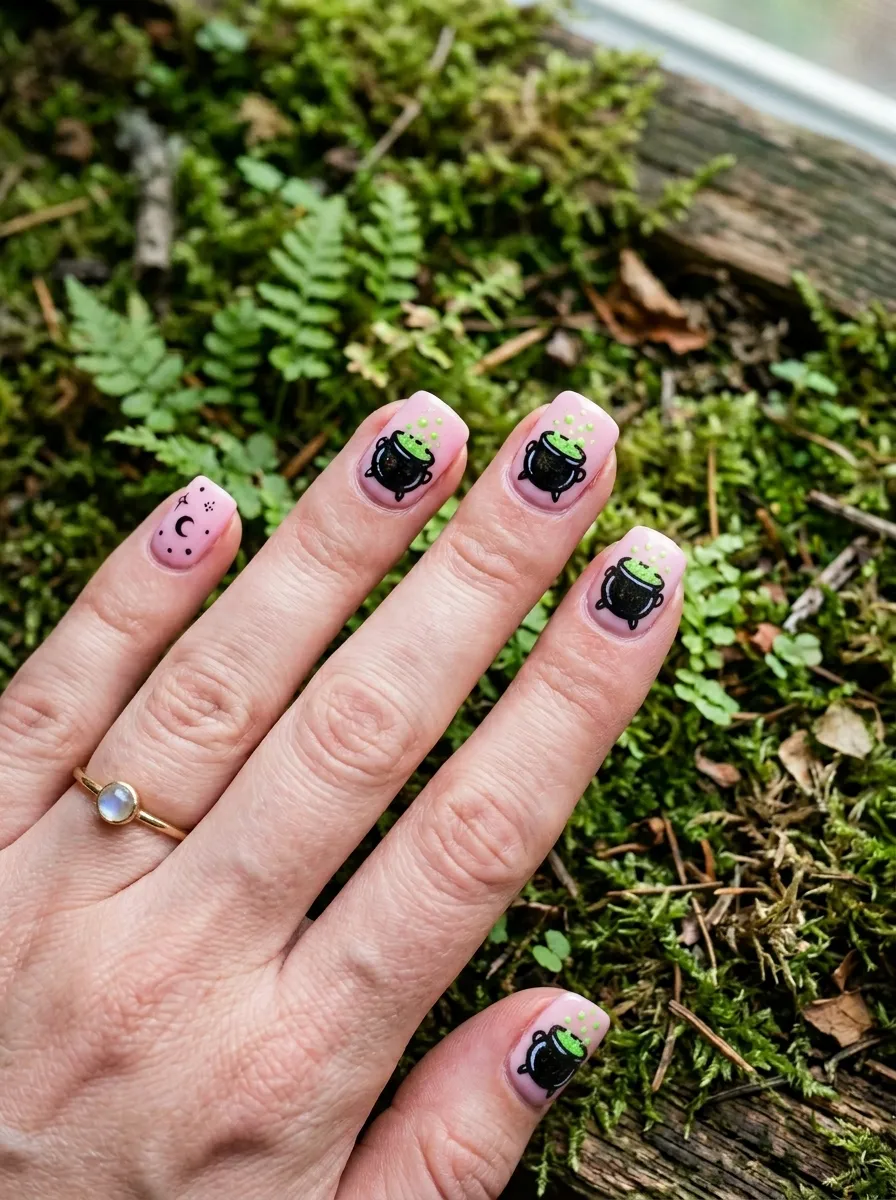
Cauldrons are an underused Halloween nail design that deserves more attention.
Apply a pastel pink base. Draw a small black cauldron on accent nails. The shape is a slightly wider circle at the top with curved sides narrowing toward a flat base. Add two small leg bumps at the bottom and two curved handles on the sides.
Fill the cauldron with green polish and add tiny dot bubbles spilling over the rim. A little green drip running down the side of the cauldron adds a nice detail.
Time saver: Draw the cauldron outline with a black nail art pen, then fill the body with black polish after. Outline first, fill second for the cleanest result.
Keep the surrounding nails clean pink or add small star and moon accents in white for a matching witchy set.
This design looks especially charming on shorter nails where the small cauldron illustration fills the nail perfectly without needing to be large.
23. Blush Pink Moons and Stars Halloween Nails
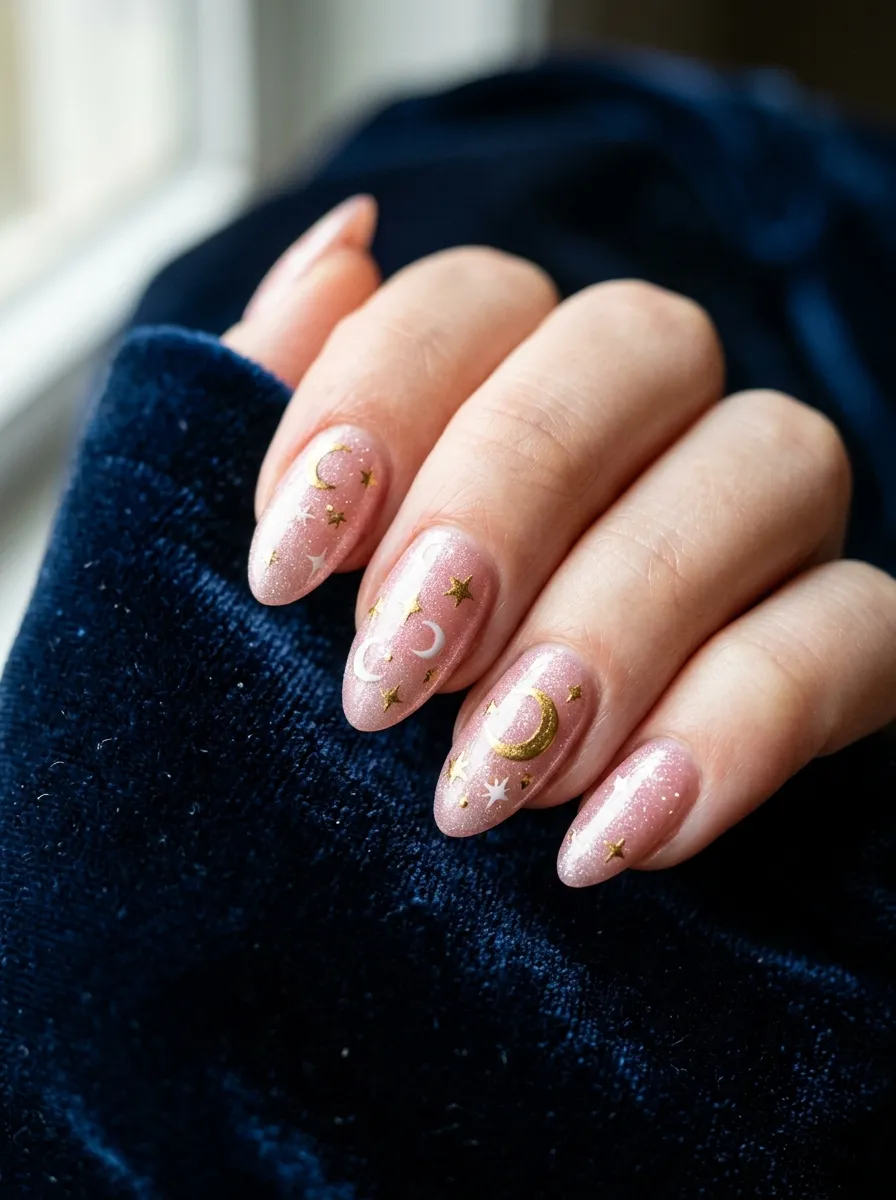
Not all Halloween nails need to be about death and monsters. Moon and star nails are spooky-adjacent in a mystical, witchy way.
Use a shimmery blush pink base for maximum elegance. Once dry, scatter gold or white crescent moons and small stars across each nail using a nail art pen. You do not need a strict pattern. Random placement looks more organic and artistic.
Gold without the price: Craft stores sell gold metallic nail art pens for about $2. These give the same effect as high-end gold nail polish without the waste.
Mix sizes. Put one large crescent moon on the ring finger nail and smaller stars on the surrounding nails for a focal point.
This design suits a wide range of aesthetics from mystical to romantic to celestial-themed Halloween costumes.
The shimmery blush base catches light beautifully and photographs well in dim lighting, making it perfect for evening events.
Add a clear glitter top coat over everything for a stardust effect.
24. Pink and Black Candy Corn Nails
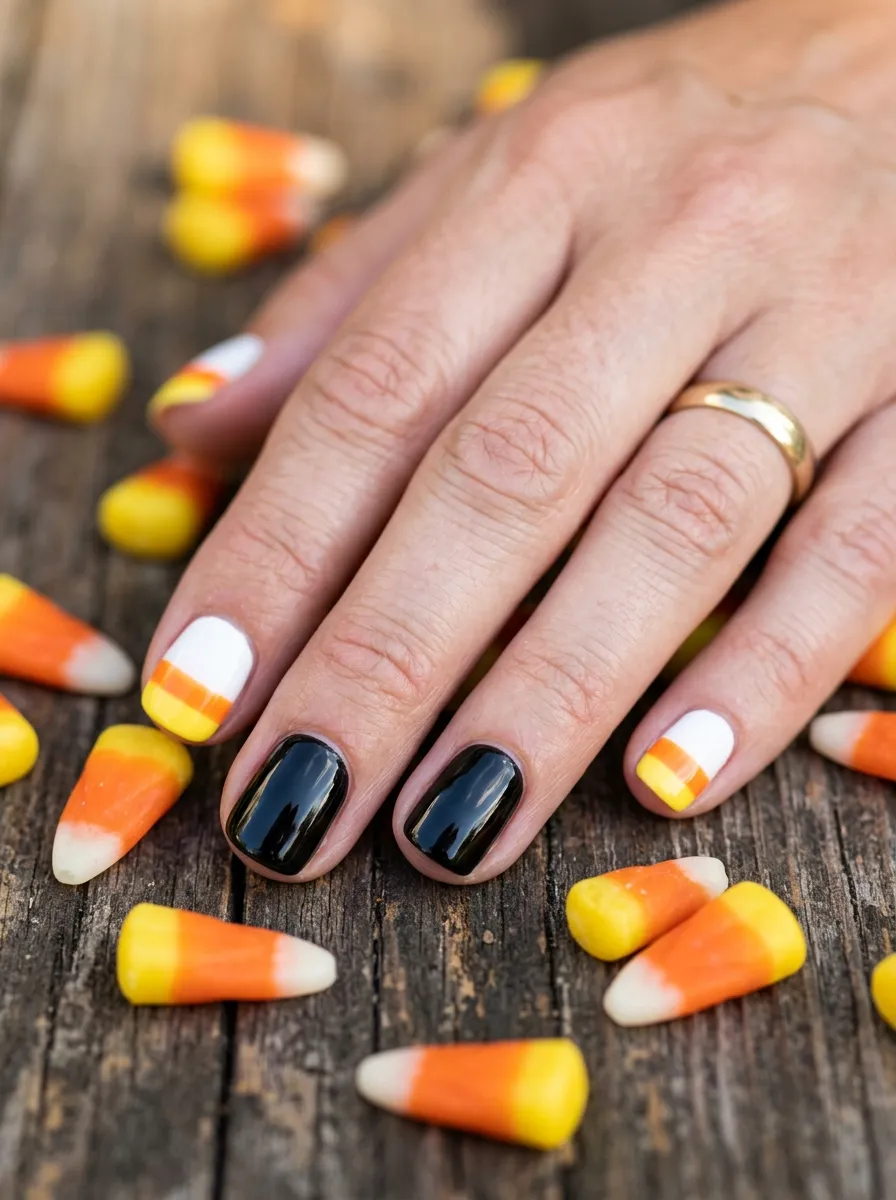
Candy corn nails mix Halloween nostalgia with a fashion-forward twist by swapping traditional candy corn orange for pink.
Paint some nails in glossy black and use the remaining nails for the candy corn design. For the candy corn tip, apply white at the very tip, then orange in the middle section, then use hot pink instead of the traditional yellow at the base.
This pink variation looks more fashion-forward and ties the design back to the rest of your pink nail set.
Tip for clean sections: Use thin nail tape between each color section while painting. Remove the tape before the polish dries completely for the cleanest lines.
Alternate candy corn nails with solid black nails across the hand for a balanced, graphic look.
This design looks great on short nails. The candy corn pattern fits perfectly on a small nail without needing to be large.
It is a fun design that leans more cute than scary, making it appropriate for all ages.
25. Pink Nails with Tiny Frankenstein Stitch Details
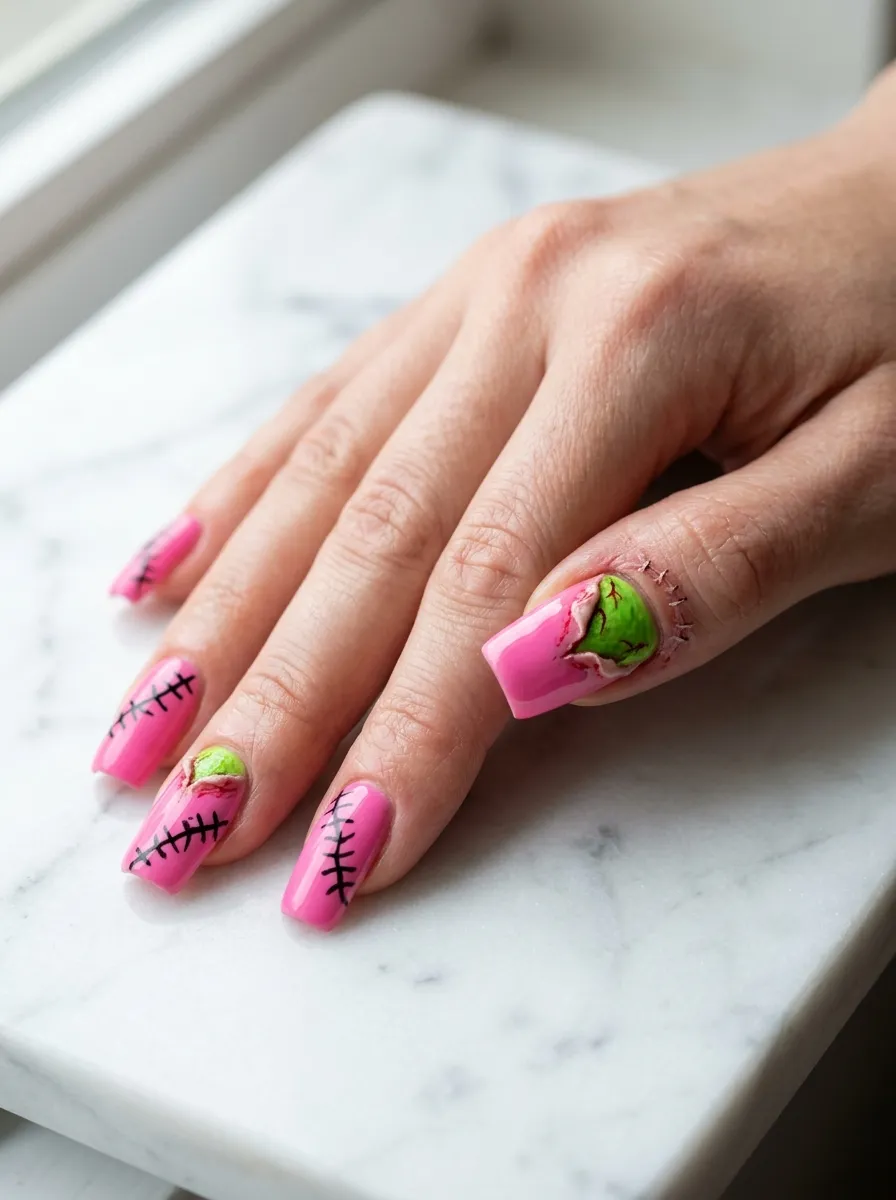
Stitches across the nail look like the nail itself has been sewn back together, which is genuinely unsettling paired with a pretty pink base.
Paint all nails in a bright pink. Once dry, use a black nail art pen to draw three or four straight horizontal stitch lines across one or two nails. Each stitch is a short horizontal line with two tiny diagonal lines on either end, like surgical sutures.
For extra drama on one accent nail, paint a patch of bright green under the pink base and draw the skin peeled back with stitches holding the opening together.
Quick stitch tip: Two short parallel lines with a connecting line between them is all a stitch is. Practice on paper first to get the proportion right before applying to your nail.
This design is subtle from across the room but looks incredibly detailed up close.
It works on any nail shape but looks especially effective on shorter, broader nail shapes where the stitch pattern has room to sit comfortably.
26. Metallic Pink Zombie Nails
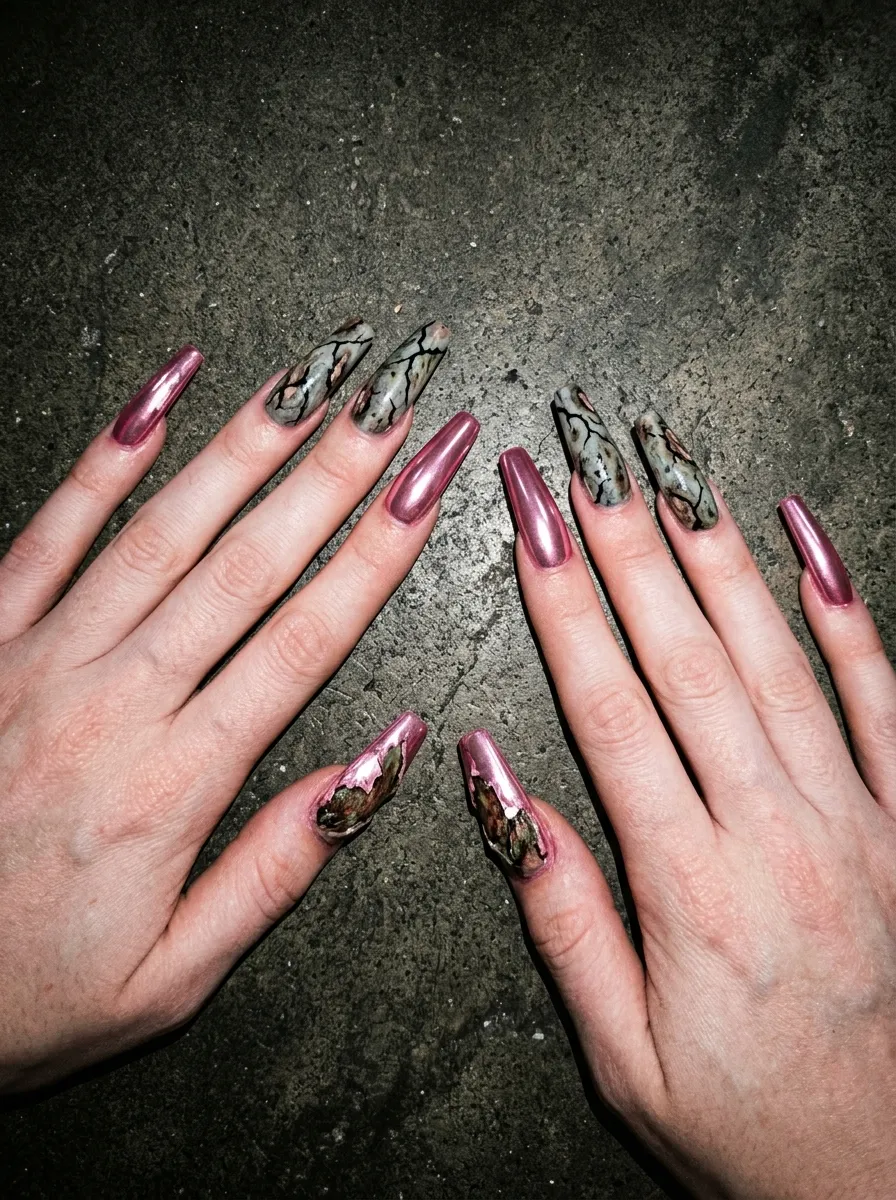
Zombie nails are underrated. The decayed aesthetic paired with a glamorous metallic pink base creates the perfect horror-beauty contrast.
Apply a chrome or metallic pink polish first. The shiny finish provides a striking contrast with the matte decayed details you will add on top.
Use gray and olive green polish to paint irregular patches across some nails to represent rotting skin. Add black crack lines through the patches. Leave other nails clean metallic pink for balance.
Chrome on a budget: Chrome powder can be applied over any cured gel polish using a rubber applicator tool. Chrome powder packets cost about $3 online and one packet does many manicures.
The patchy, irregular nature of zombie skin means imperfections in the painting actually look better. There is no such thing as too messy here.
A matte top coat over the gray patches and glossy top coat over the chrome pink nails creates an interesting contrast in finish that makes the design look even more dimensional.
27. Rose Pink Tarot Card Nails
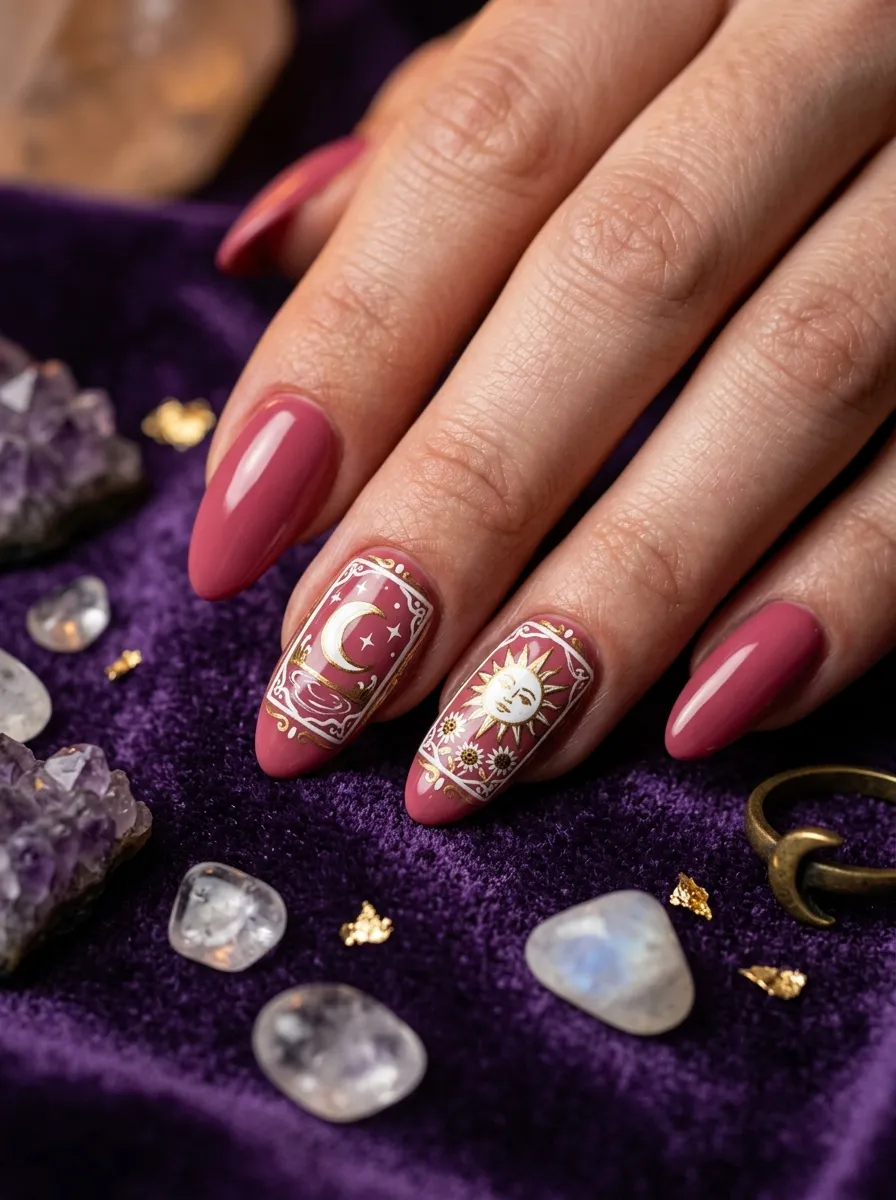
Tarot card nails combine Halloween mysticism with high fashion in a way that looks incredibly intentional.
Paint all nails in deep rose pink. On two accent nails, draw a thin rectangular border to represent a tarot card frame. Inside one card, draw a simplified moon illustration with a crescent and face. Inside the other, draw a simple sun with radiating lines.
Keep the illustrations in white or gold to stand out against the dark rose base.
Simplification note: Real tarot cards are complex. For nail art, reduce each card to its most iconic single symbol. A simple crescent equals the Moon card. A circle with lines equals the Sun card. Viewers will recognize them immediately.
Tarot card nails photograph beautifully and have a high-art quality that makes them feel like a design statement beyond just Halloween.
Add small gold dots along the frame border of each card for extra detail without extra difficulty.
28. Pink Nails with Floating Eyebrow Raise Witch Emoji Art
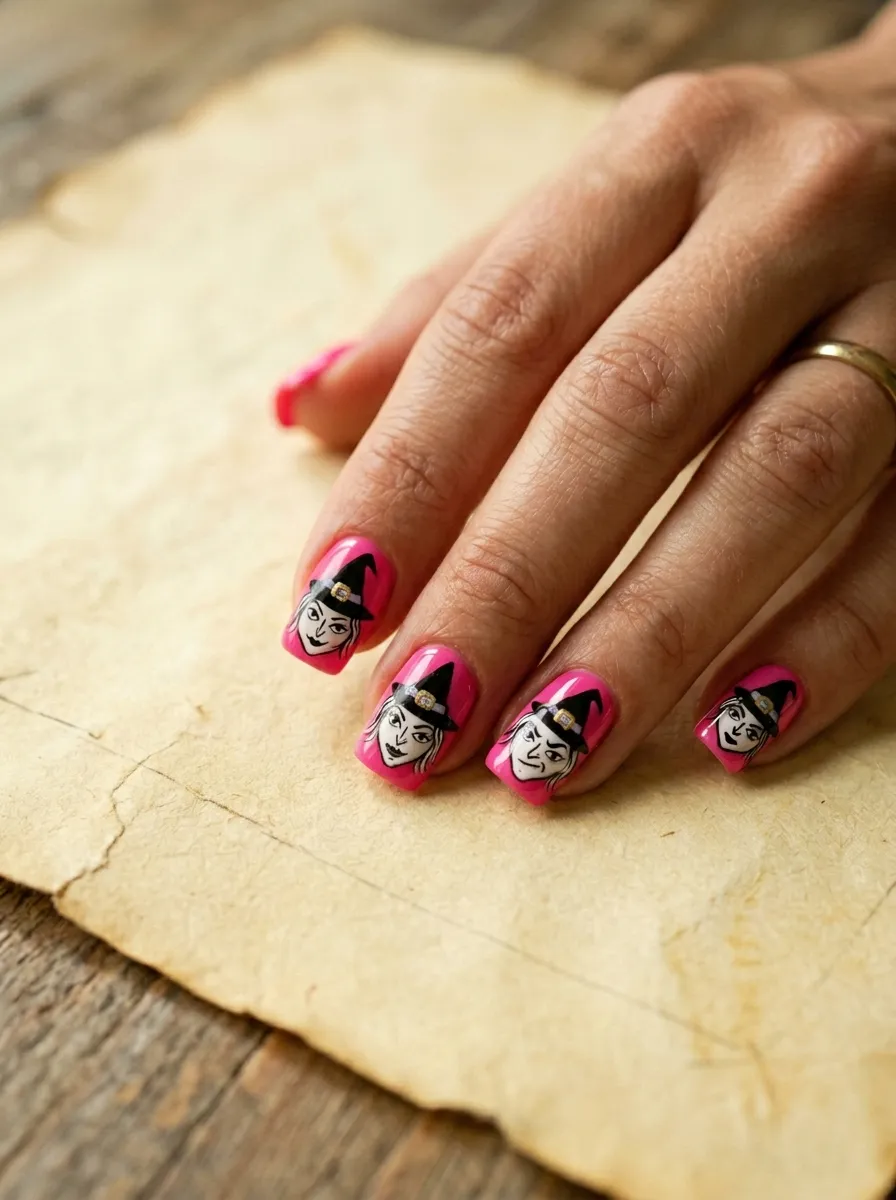
Small illustrated faces on nails are a playful trend, and a tiny witch face with a sly expression fits perfectly into the pink spooky aesthetic.
Paint all nails in hot pink. On two accent nails, draw a small oval face with a pointed witch hat on top. Give the witch face one raised eyebrow, small round eyes, and a slight smirk for a sassy expression. Add a hat buckle in gold.
Expression trick: One raised brow is all it takes to communicate attitude. Even if the face is tiny, the arched eyebrow reads clearly and gives the character personality.
Keep the face simple with just five or six pencil-width pen strokes for the features. Overworking a tiny face makes it muddy.
These nails feel playful and humorous rather than scary, which many people prefer for daytime Halloween wear.
They match well with pink Halloween costumes or a casual spooky outfit.
29. Pink Nails with Black Lace Overlay
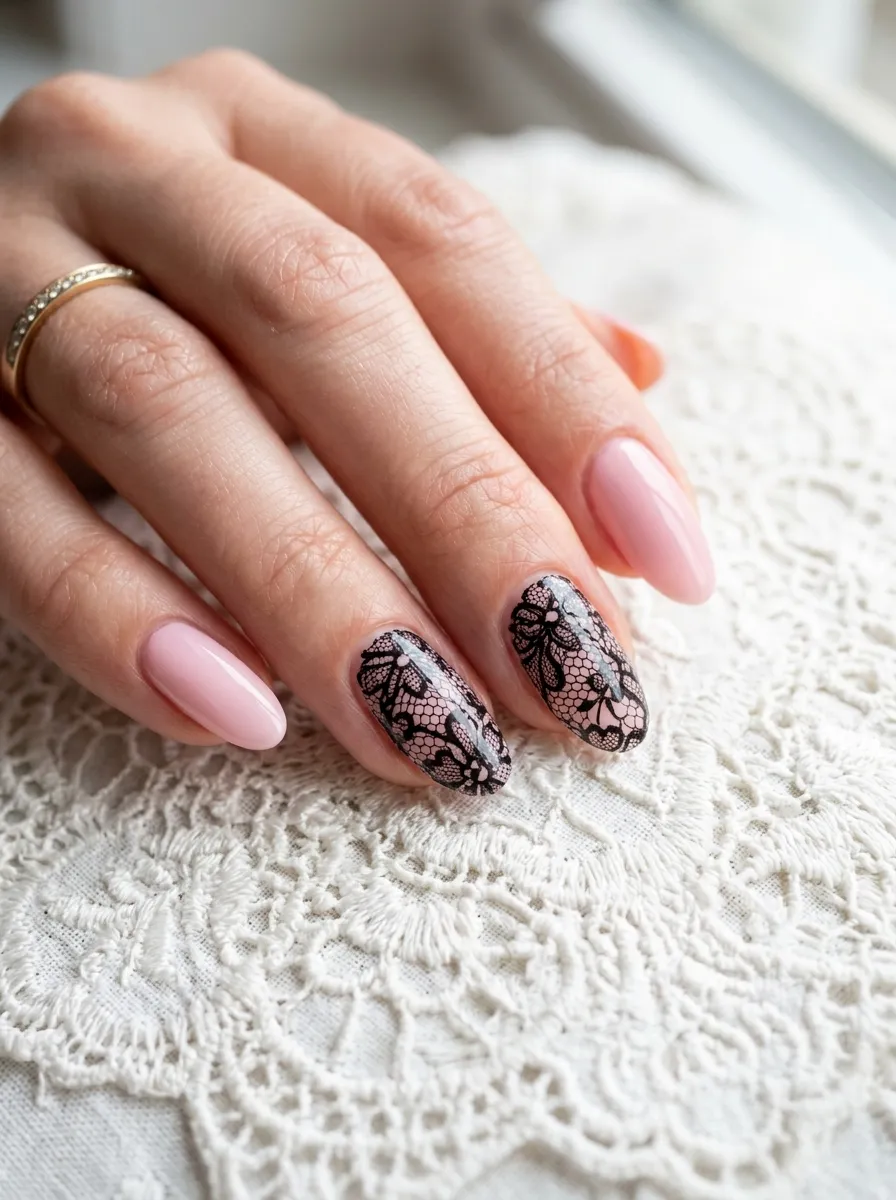
Black lace over pink is one of the most romantic Halloween nail looks and it requires almost zero nail art skill.
Buy black lace nail wraps or nail stickers online. They typically cost $3 to $5 for a full set. Apply them over a cured pink base, pressing firmly and wrapping excess under the tip. File off the excess and seal with top coat.
The lace pattern shows your pink base through the negative space of the design, creating a layered, dimensional effect.
DIY version: Cut small pieces from actual black lace fabric and embed them in a thick gel top coat for a real textile texture effect. This is a more advanced technique but produces a genuinely textured result.
Lace nails look very elegant and work for Halloween events that are more formal or grown-up in nature. They suit a vampire or Victorian ghost costume.
The pink underneath makes the whole look feel modern and feminine rather than strictly gothic.
30. Neon Pink Nails with Holographic Spider Accents
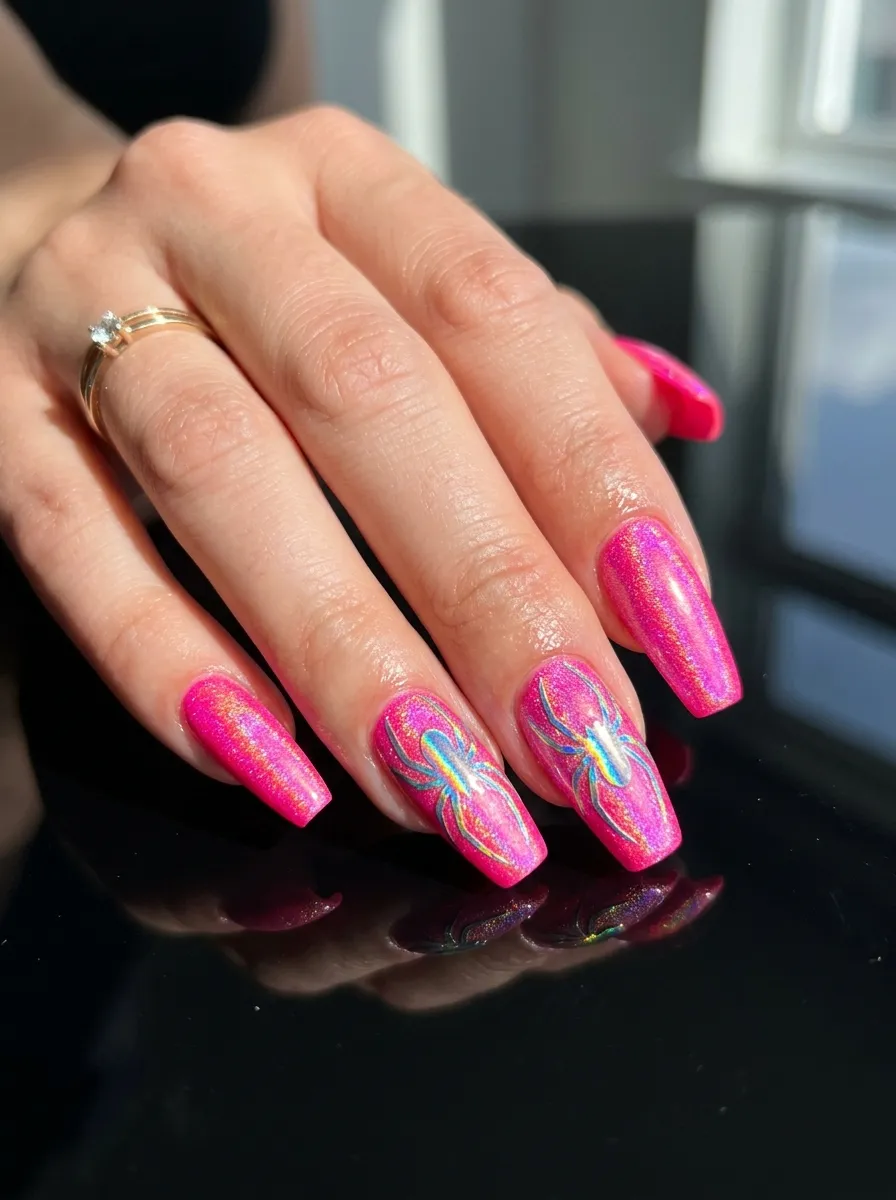
Holographic nail stickers are one of the best shortcuts in DIY nail art and they look far more expensive than they cost.
Apply two coats of neon electric pink as your base. Once fully dry, apply holographic spider stickers to two or three accent nails. Press them down firmly from the center outward. Seal with a high-gloss top coat immediately.
Holographic spider stickers catch light in every color of the rainbow, which looks especially impressive against neon pink under party lighting.
Where to find them: Search “holographic nail stickers” on any e-commerce platform. A pack of 20 mixed Halloween stickers costs about $2 to $3 and includes spiders, webs, bats, and more.
Keep the remaining nails in plain neon pink so the holographic accents stand out as the focal point.
This design requires no freehand skill at all and can be done in about 10 minutes once your base dries.
Under UV or black lights commonly used at Halloween parties, neon pink glows dramatically.
31. Pink and Silver Mirror Chrome Crescent Moon Nails
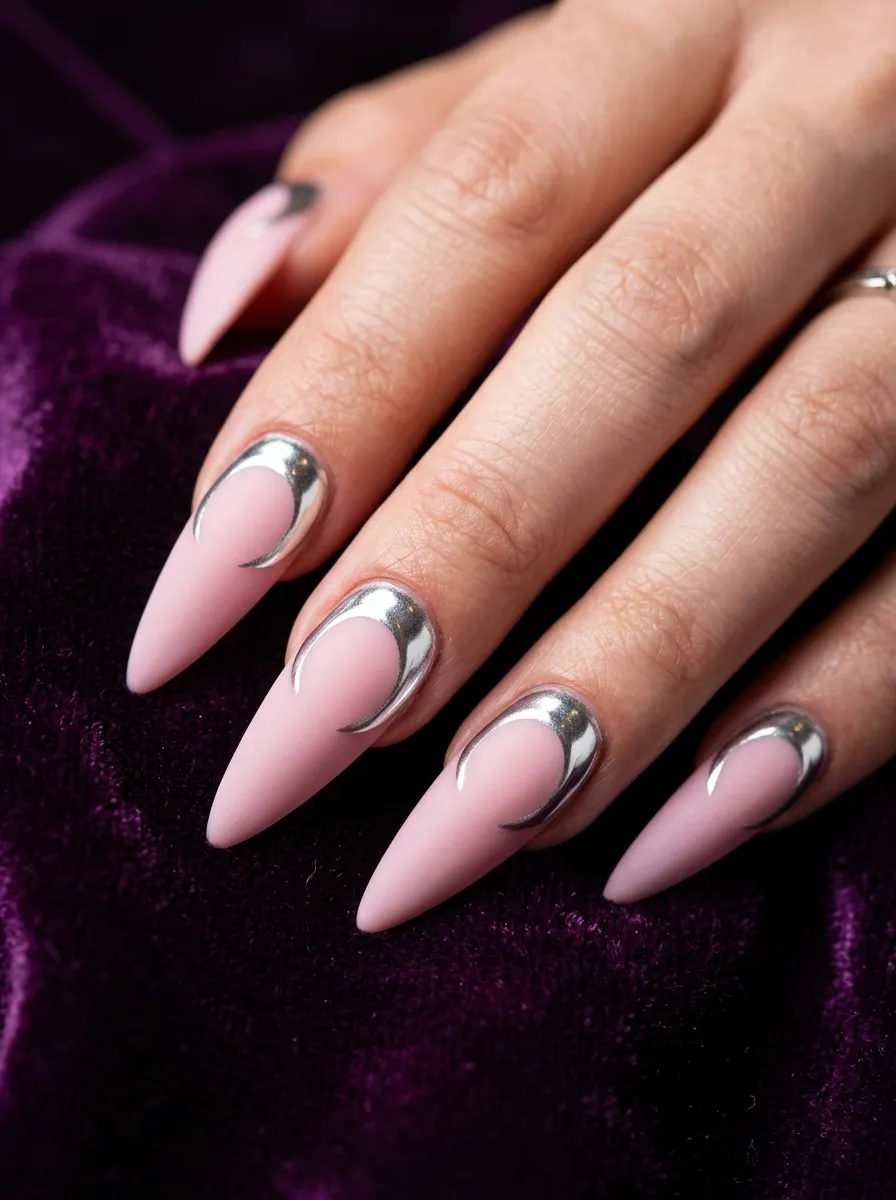
Chrome powder applied in the shape of a crescent moon creates a striking minimalist Halloween design.
Paint your nails with a soft matte pink. Cut a crescent moon shape from nail tape or use a moon stencil. Apply the stencil to the nail. Buff silver chrome powder over the exposed crescent area using a rubber-tipped applicator. Remove the stencil to reveal a perfect silver chrome moon.
Seal immediately with a no-wipe gel top coat to lock in the chrome.
Chrome powder tip: You need a gel base for chrome powder to adhere properly. If using regular polish, a special chrome-compatible top coat exists at beauty supply stores for about $5.
The contrast between the matte pink base and the mirror-like chrome crescent is visually striking even from across the room.
This design photographs beautifully in any lighting condition because chrome catches and reflects every light source it encounters.
It feels high-fashion and Halloween-appropriate at the same time.
32. Cotton Candy Pink Nails with Full Halloween Scene
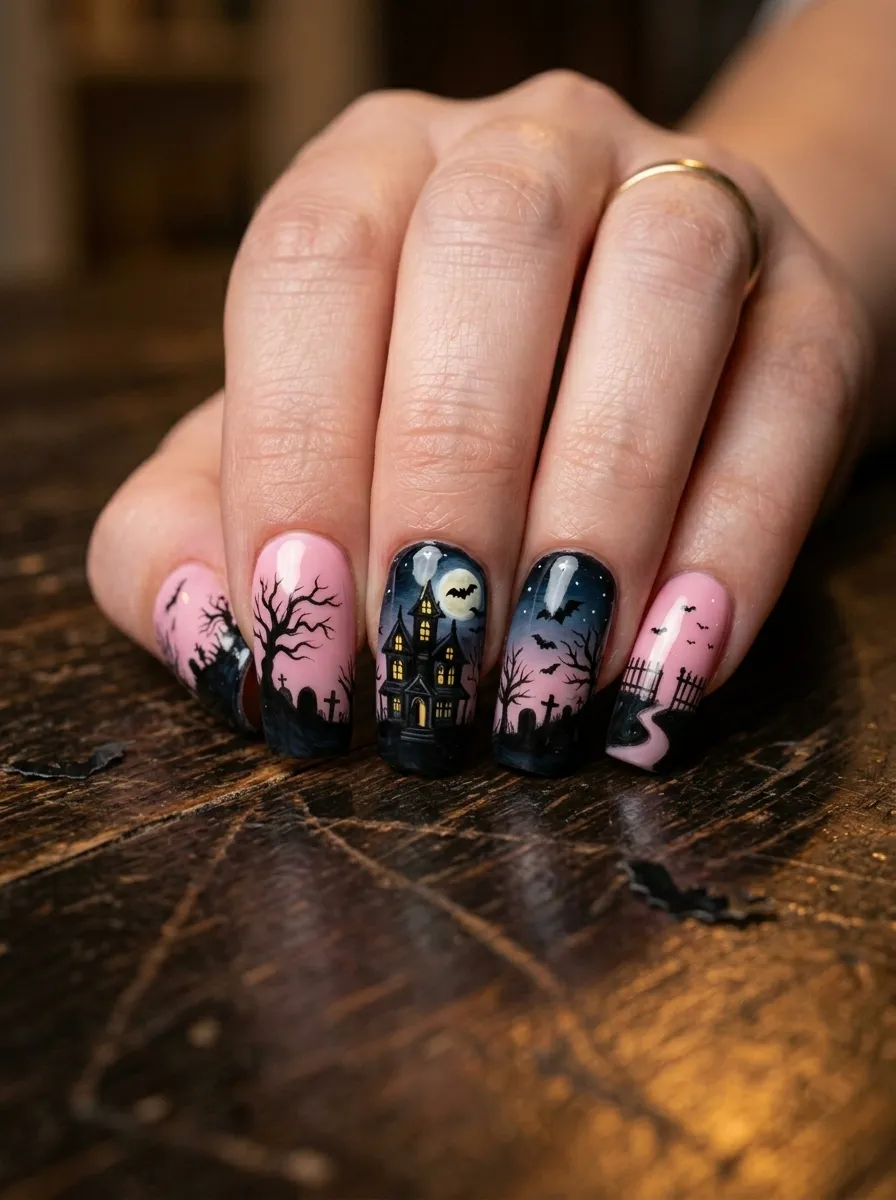
A panoramic nail scene is where all five nails together form one continuous picture. It is the most impressive design on this list and is much simpler than it looks.
Paint all nails in cotton candy pink. Sketch your scene lightly on paper first. The scene works from thumb to pinky: thumb shows a full moon in the sky, index shows bare tree branches, middle shows a haunted house, ring shows a graveyard with tombstones, pinky shows more bats flying into the distance.
The key is to match up where the design elements meet at the edges of each nail so the scene flows when nails are held together.
Planning trick: Tape five pieces of paper together to represent your nails. Sketch the whole scene on paper first. Take a photo for reference. Then transfer section by section to each nail.
Use a fine black nail art pen for all the details. The cotton candy pink sky ties everything together as a unified background.
When you hold your hand flat and look at all five nails together, the full Halloween miniature world appears.
Seal with a glossy top coat to protect all the fine detail work.
Wrapping Up Your Pink Spooky Nail Journey
You now have 32 ways to combine pink and spooky into a nail look that feels completely your own. Whether you reach for a simple ghost on a bubblegum base or spend an afternoon on a panoramic Halloween scene, the most important thing is that you enjoy the process. None of these designs require professional training or expensive tools. A drugstore pink polish, a $2 nail art pen, and a steady hand get you most of the way there. Start with whichever design caught your eye first. Take your time with the base coat and let each layer dry fully before adding detail. A good top coat at the end protects everything and keeps your art looking fresh for the whole season. Pink spooky nails prove that Halloween style does not have to be all black and orange to feel completely festive.