Red is a timeless classic, but summer gives this fiery shade a whole new energy. Whether you are lounge-chair relaxing or heading to a backyard barbecue, the right manicure keeps you looking put-together. You do not need to spend a fortune at a salon to get these vibrant looks. With a few affordable bottles of polish and basic tools, you can create stunning styles right at home. Here are 25 creative ideas to inspire your next warm-weather manicure.
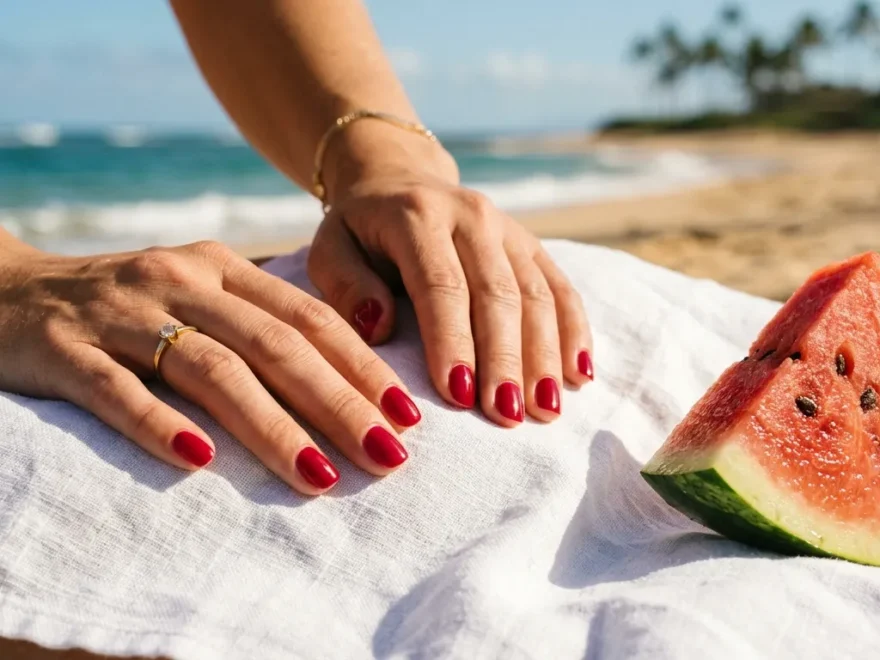
1. Classic Cherry Gloss
Nothing beats a pure, high-shine cherry red. It is bright, fun, and matches every single summer outfit you own.
To get this look on a budget, skip the gel salon visit. Buy a decent drugstore brand like Sally Hansen or Essie. The secret to the salon look is a thick, quick-dry top coat. Apply two thin coats of your red polish first. Let them dry for two minutes. Layer a generous amount of top coat on top to seal the shine.
This simple routine prevents chipping while swimming or doing outdoor chores. Clean up any messy edges using a small brush dipped in acetone. It takes ten minutes and looks incredibly professional.
2. Matte Watermelon Accent
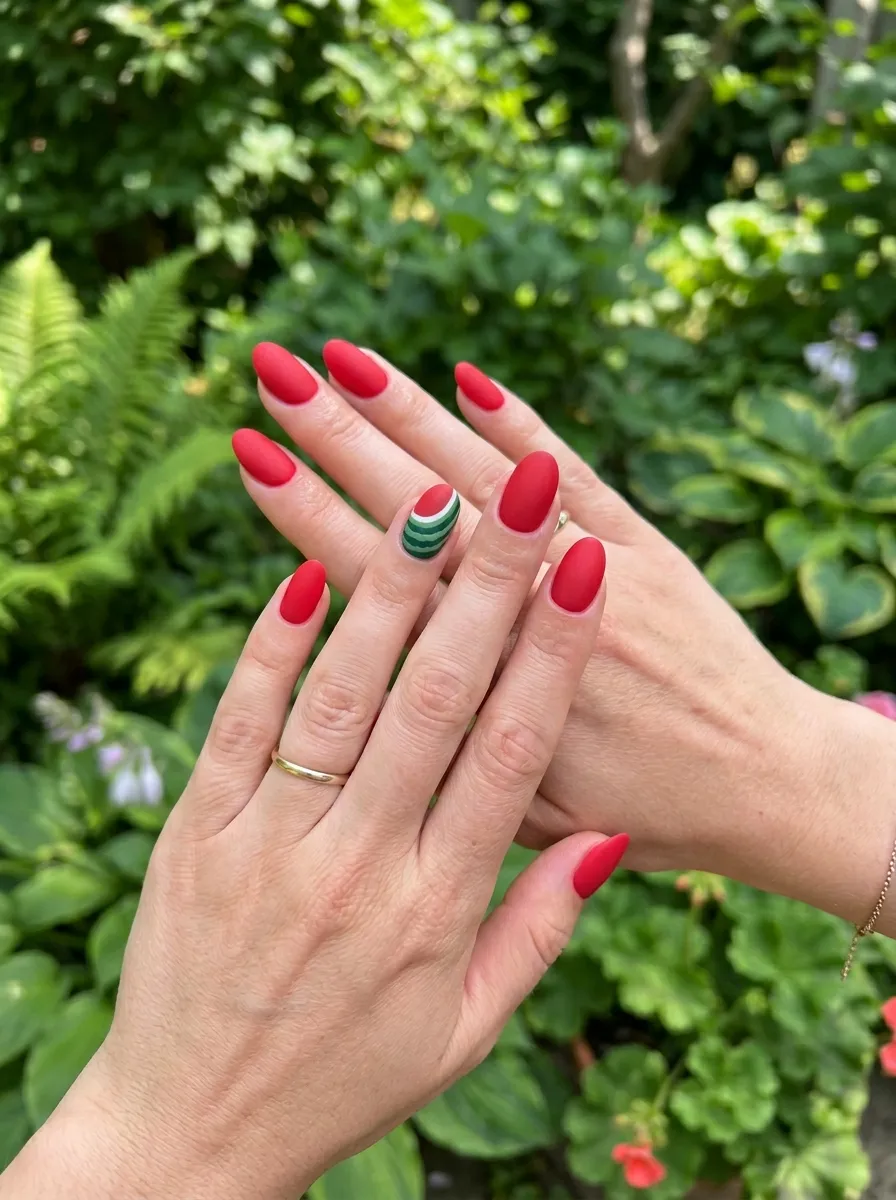
Matte finishes offer a cool, modern twist on bright summer shades. Adding a tiny watermelon detail makes it perfect for July picnics.
You only need your favorite red polish, a green polish, and a matte top coat. Paint all your nails red except for your ring finger. On that accent nail, use a toothpick to draw a thin green line at the tip. Add a tiny white line just below the green.
Once dry, apply your matte top coat over everything. The matte texture hides small nail imperfections beautifully. It gives a velvety texture that stands out in the sun.
3. Fiery Orange-Red Ombre
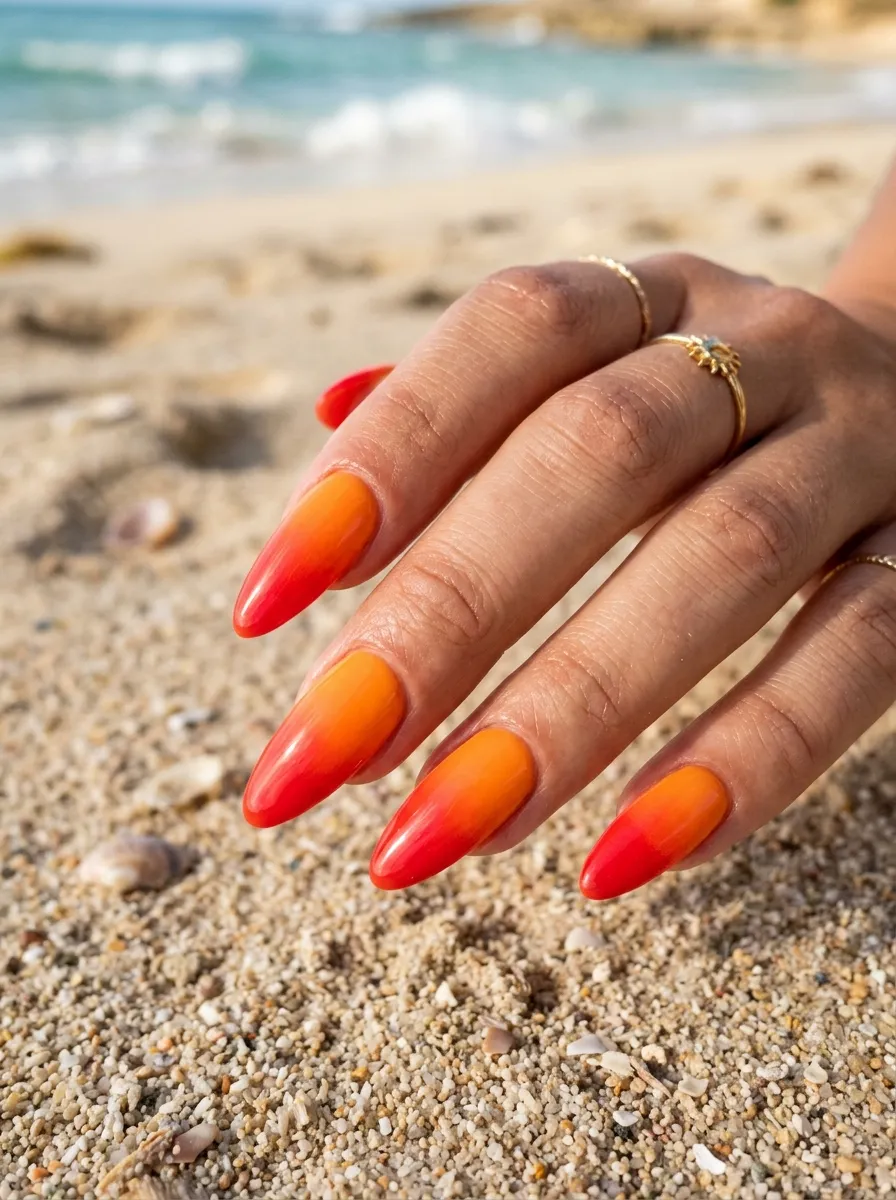
Capture the colors of a summer sunset right on your fingertips. A gradient from soft orange to deep red looks bold and warm.
This style is surprisingly easy to do with a cheap makeup sponge. Paint your nails with a solid white base coat first. This makes the bright colors pop. Next, paint parallel stripes of orange and red polish directly onto the sponge wedge.
Press the sponge lightly onto your nail several times. Repeat this step to build up the color intensity. Use a cotton swab to clean the polish off your skin. Seal with a clear top coat to smooth the texture.
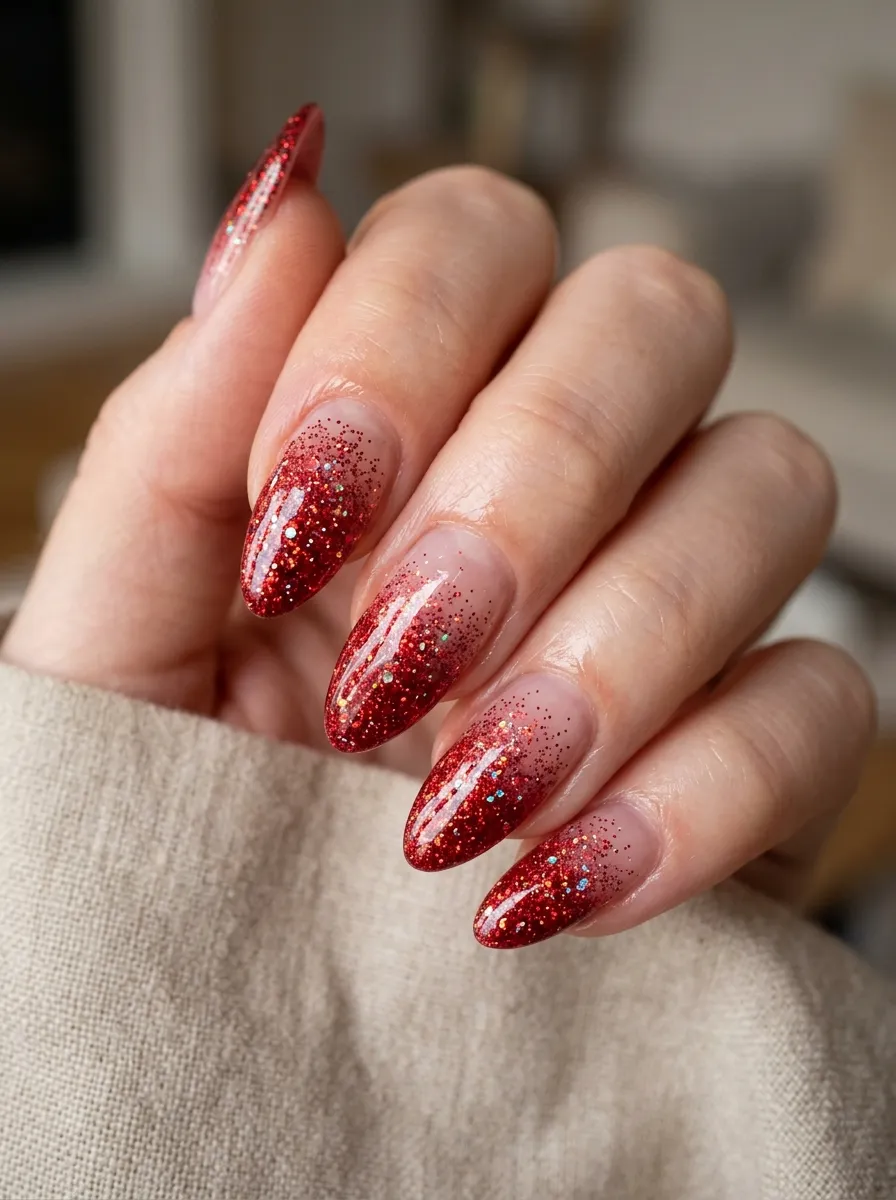
4. Crimson Glitter Topper

Glitter is not just for winter holidays. A light dusting of gold or silver over a crimson base feels festive and fun for summer nights.
Instead of buying a pricey specialty polish, look for a cheap glitter topper. Paint your nails with two coats of standard red. Let it dry completely. Then, lightly dab the glitter polish just on the tips or over the entire nail.
Dabbing works better than brushing because it distributes the sparkles evenly. This trick is excellent for hiding chips. If your manicure starts wearing off at the edges, just add glitter to mask it.
5. Minimalist Red Half-Chevrons
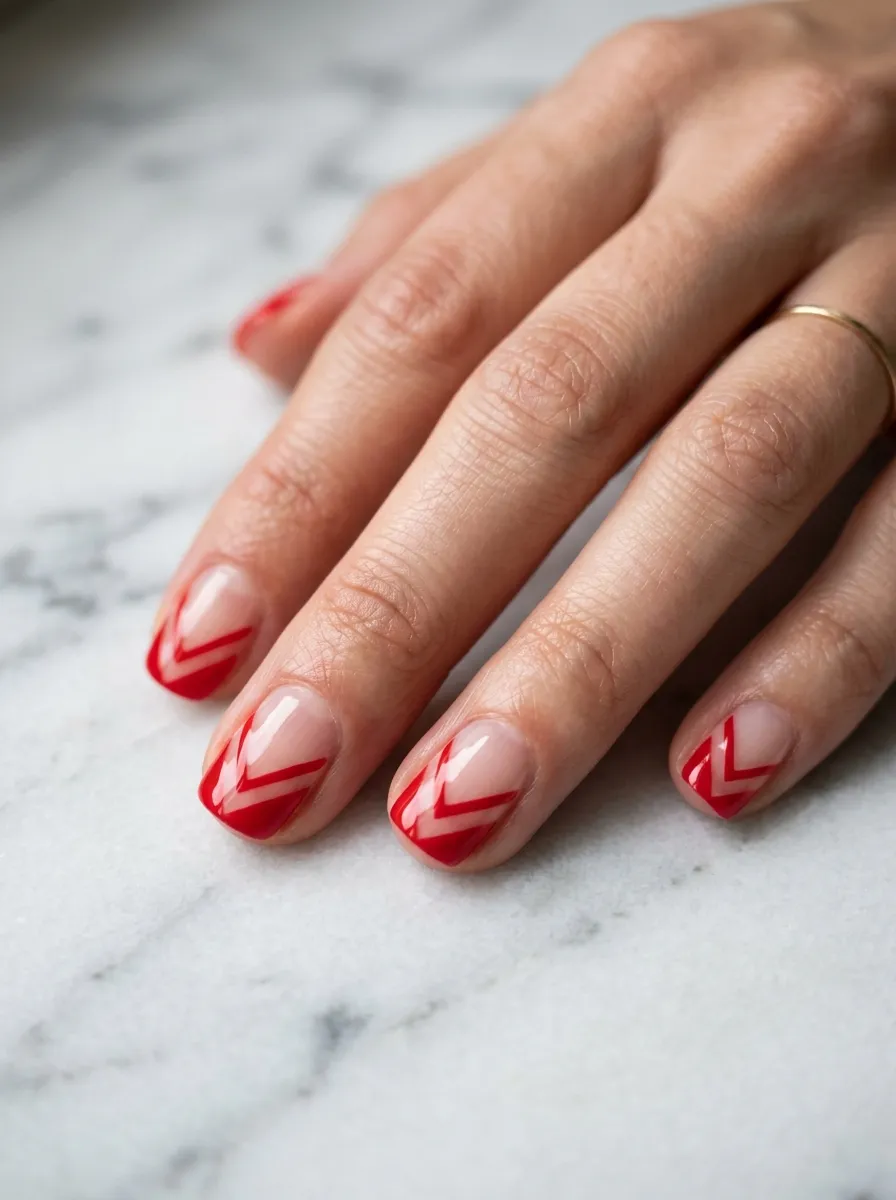
If you prefer a clean, modern aesthetic, try a minimalist geometric design. Leaving some natural nail exposed keeps the look light and airy for hot days.
You can easily achieve sharp lines using standard Scotch tape. Cut small strips of tape and press them onto your clothing first to reduce stickiness. Place the tape diagonally across your nail, leaving a triangle shape exposed.
Paint that open section with your red polish. Pull the tape away immediately while the polish is still wet. This ensures a clean, crisp line. Finish with a clear top coat to protect the design.
6. Poppy Red Micro-French Tips
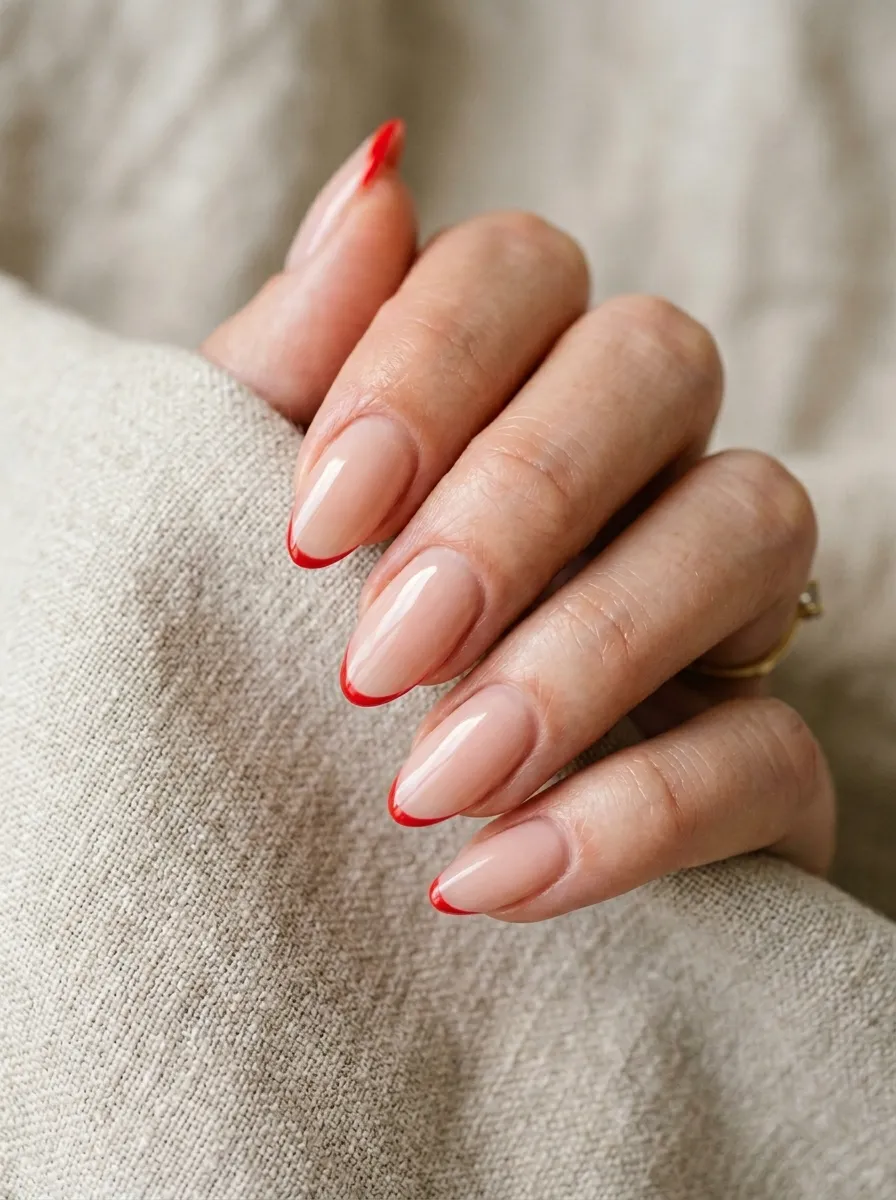
The classic French manicure gets a bold update when you swap white for a poppy red. Micro-tips are incredibly trendy and look neat on short nails.
You do not need a steady hand or expensive nail vinyls for this. Use a silicone nail stamper, which costs just a few dollars online. Apply a thin layer of red polish onto the stamper pad.
Gently push the tip of your nail into the polish at a slight angle. This creates a perfect, thin curved line across the edge. It takes seconds per finger. Wipe the stamper clean between each nail for the best results.
7. Scarlet Red with Daisies
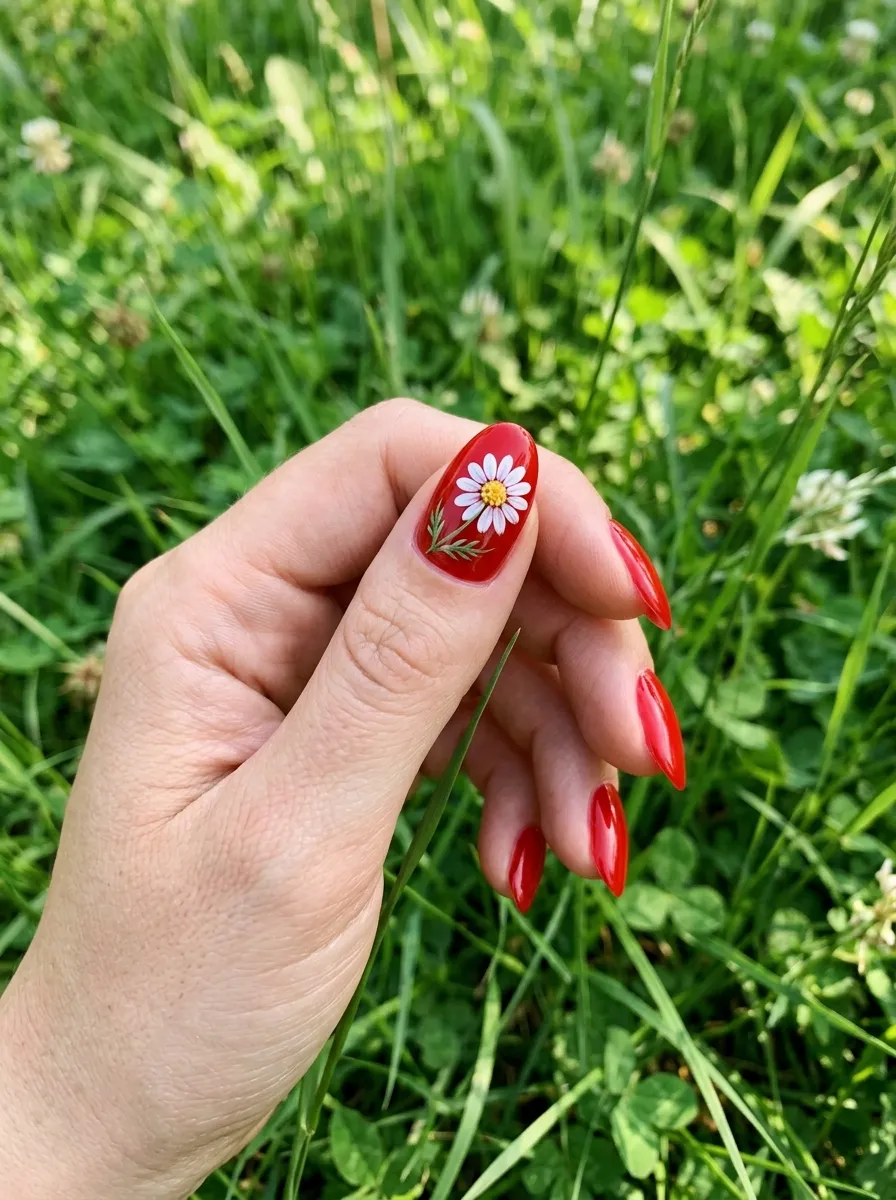
Daisies scream summertime and look gorgeous against a vibrant scarlet background. This cheerful style brings a playful, youthful energy to your hands.
To make the flowers, you only need a bobby pin or a toothpick. Paint your nails a rich scarlet red and let them dry. Dip the round end of a bobby pin into white polish. Dot five small circles in a cluster to create the petals.
Let the white dry for a minute. Then, use a toothpick to place a single yellow dot right in the center. It is an easy DIY project that looks like intricate salon art.
8. Coral-Red Jelly Nails
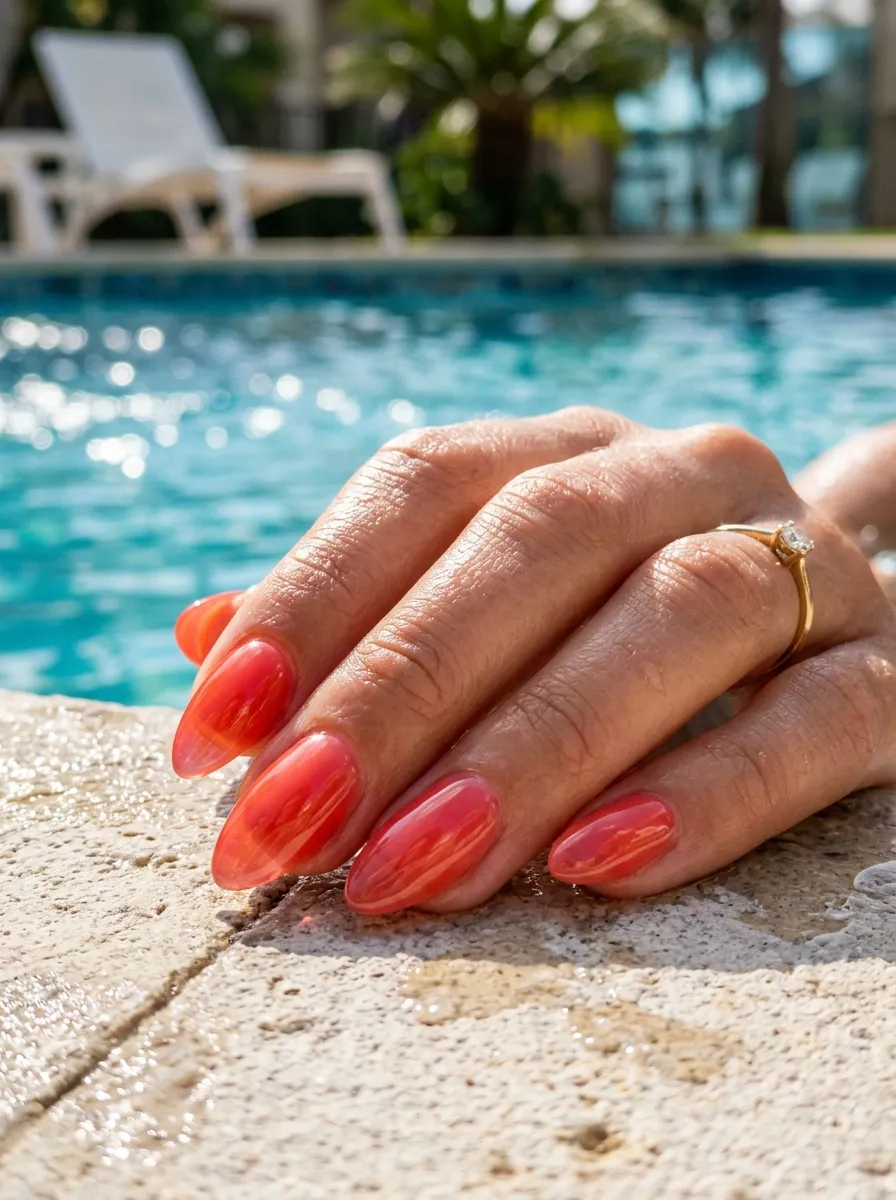
Jelly nails have a translucent, see-through finish that looks like hard candy. A coral-red shade feels juicy and incredibly appropriate for pool days.
You do not need to buy expensive jelly polishes to try this trend. You can mix your own at home. Take an empty bottle or a small plastic palette. Mix a few drops of your favorite red polish with a large amount of clear top coat.
Stir it well with a toothpick. Apply three thin coats of this mixture to your nails. The result is a sheer, glassy tint that catches the summer light beautifully.
9. Red and White Gingham
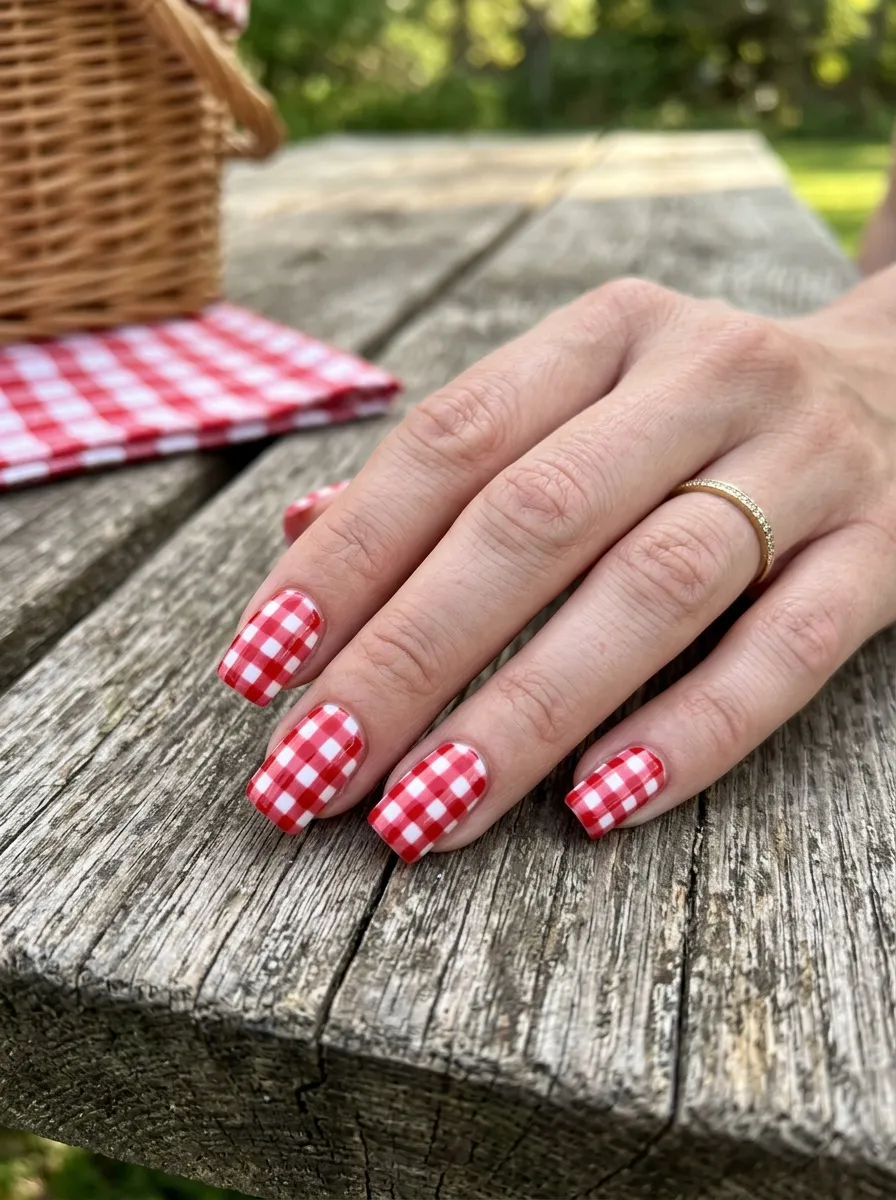
Nothing says summer picnic quite like a classic gingham pattern. It is a nostalgic, cute style that pairs perfectly with denim shorts and white sundresses.
Achieving this look requires a bit of patience but uses basic tools. Paint your nails white as the base. Use a thin striping brush or a toothpick to draw horizontal and vertical lines in a sheer red or pinkish-red shade.
Where the lines intersect, add a tiny square of darker red polish. If drawing lines feels too difficult, you can buy cheap water slide nail decals online. They apply with water and look completely flawless.
10. Chili Pepper Red Coffin Nails
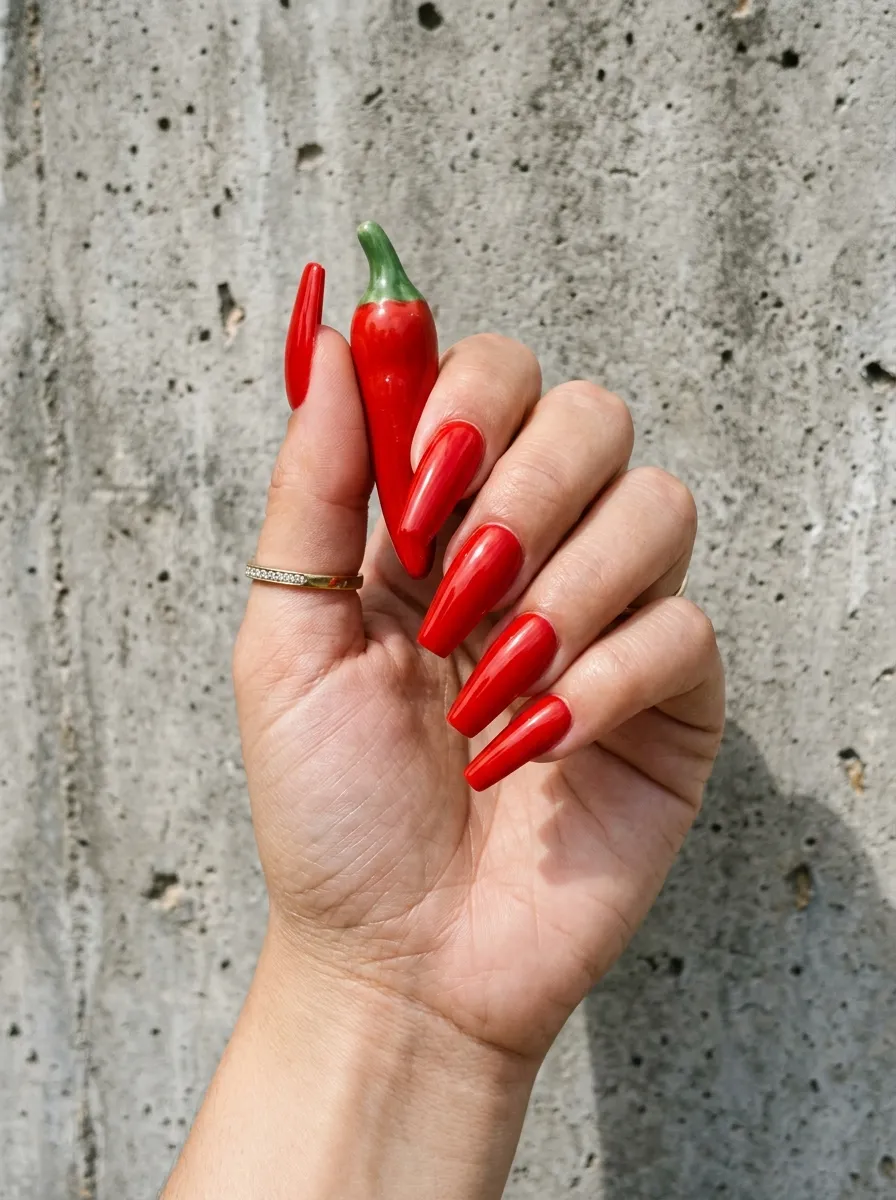
If you love long nails, a bold chili pepper red on a coffin shape makes a serious statement. It is fierce, confident, and stands out in a crowd.
Maintaining long nails can get pricey if you always go to the salon. Try using high-quality press-on nails instead. Buy a pack of plain, unpainted coffin press-ons. Glue them on carefully following the package instructions.
Then, paint them with your favorite affordable chili red polish. Press-ons can last up to two weeks with proper prep. Buff your natural nails lightly before applying glue to ensure a strong bond.
11. Tomato Red Pedicure Matching

Do not forget your toes when planning your summer style. A matching tomato red manicure and pedicure looks incredibly cohesive and polished for sandal season.
Tomato red has a slight yellow undertone that looks fantastic against sun-kissed skin. When doing your toes at home, use foam toe separators to prevent smudging. Apply a base coat to stop the red pigment from staining your nails.
Finish both your hands and feet with a UV-blocking top coat. This protects the bright color from fading or turning yellow under intense summer sunlight.
12. Ruby Red Metallic Chrome
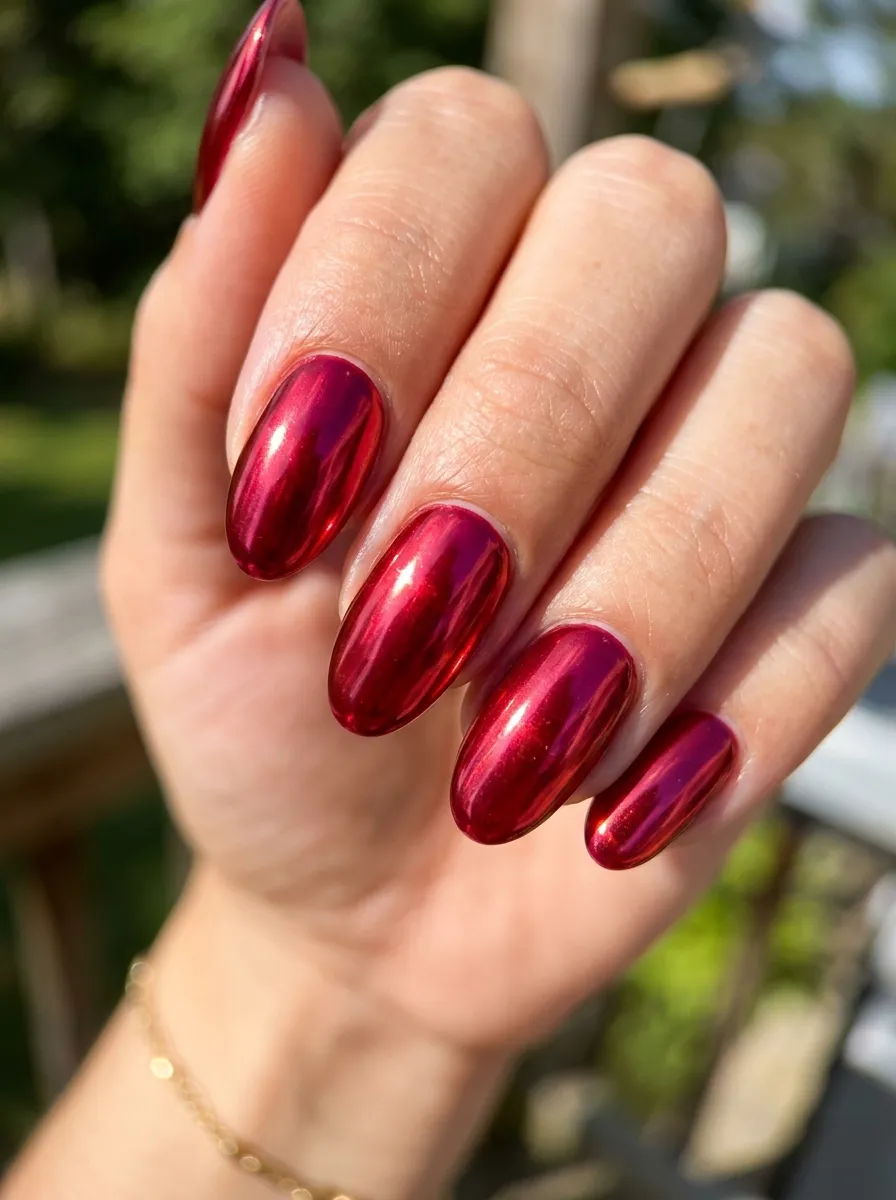
Chrome nails offer a futuristic, high-shine finish that reflects light like a mirror. A ruby red chrome look is perfect for summer concerts and festivals.
You can achieve this metallic look at home without a salon gel lamp. Buy a cheap container of red chrome powder online. Paint your nails with a standard black or dark red polish and let it dry until it is just slightly tacky.
Use an eyeshadow applicator to rub the chrome powder firmly onto the nail surface. Wipe away excess powder, then seal it with a water-based top coat so the metallic shine does not dull.
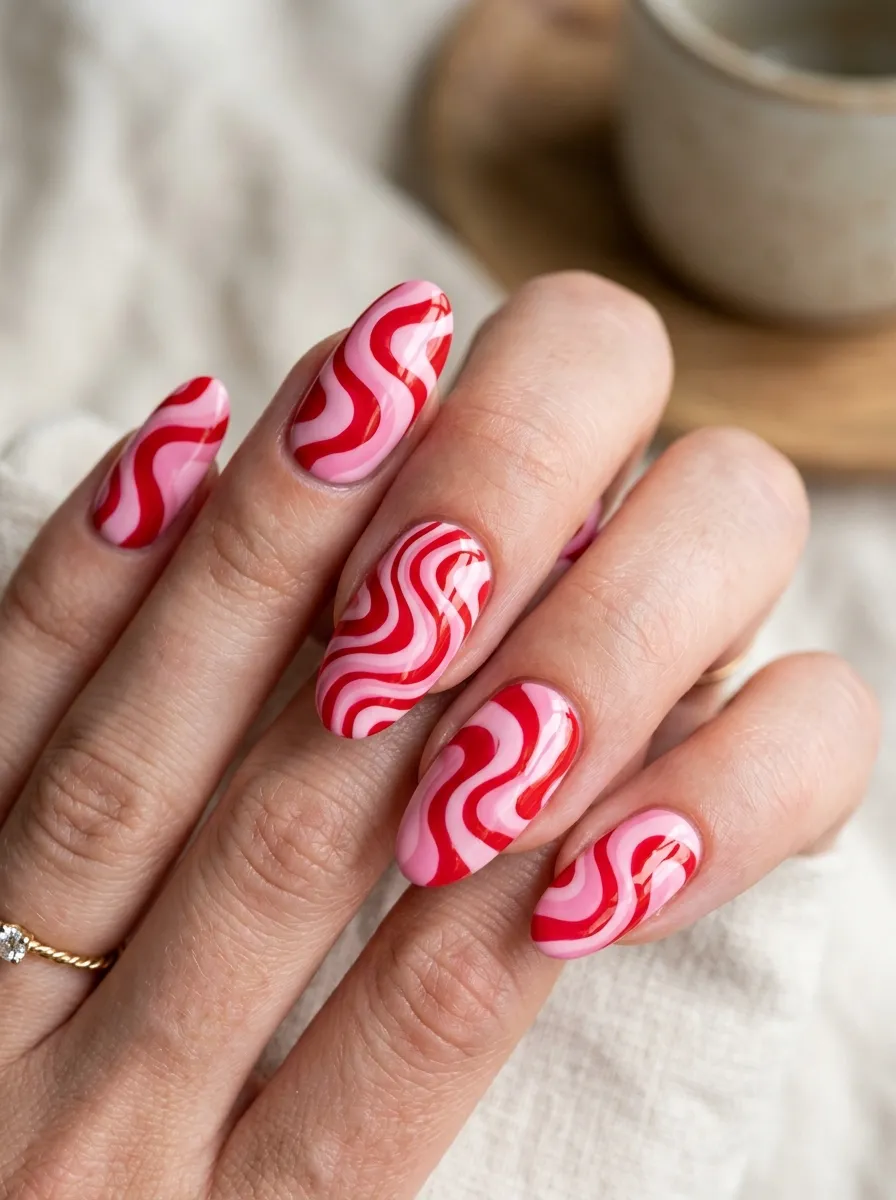
13. Abstract Red Squiggles
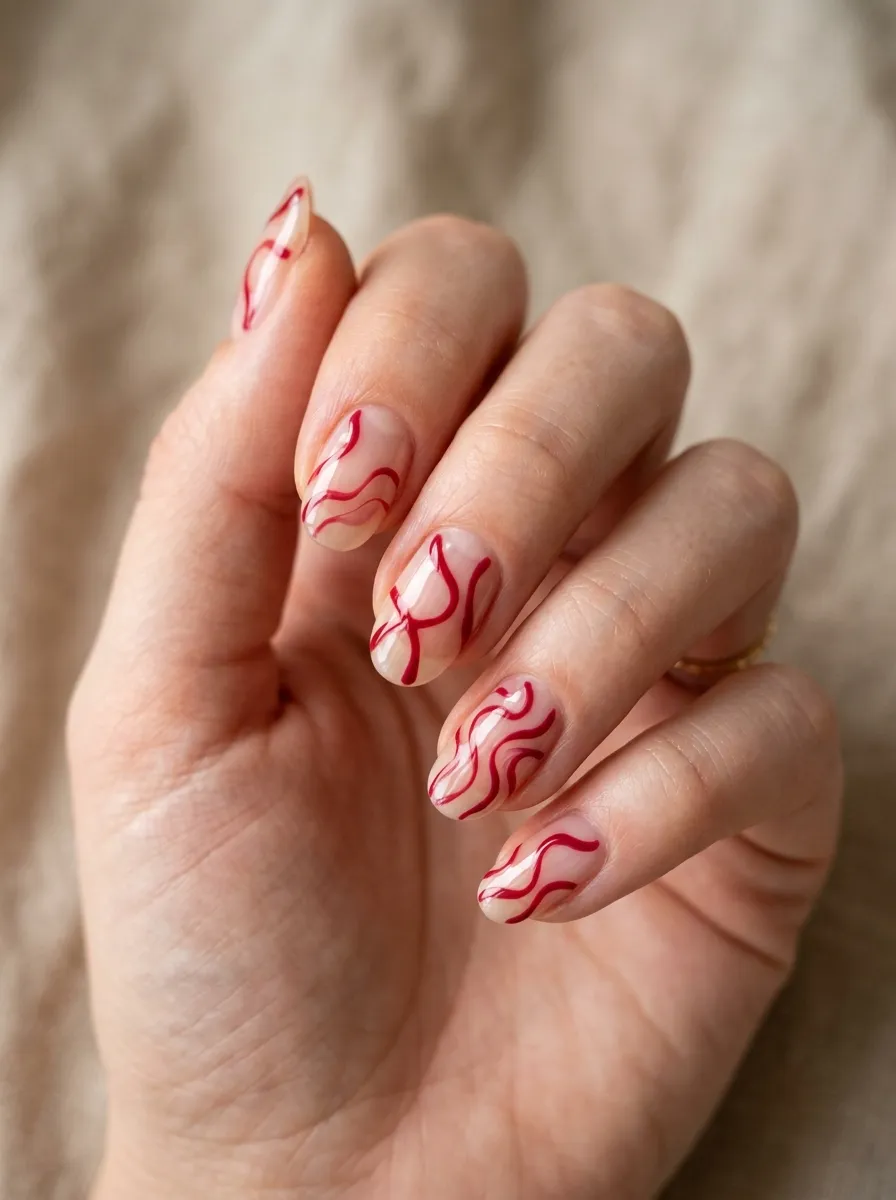
Abstract art is incredibly forgiving for beginners. Wavy lines and random shapes look trendy and do not require perfection to look great.
Start with a clean, clear base coat or a sheer nude polish. Dip a thin nail art brush into a bright red polish. Gently draw freehand wavy lines down the length of each nail.
You can make each finger look completely different. Since the lines are abstract, mistakes just look like part of the design. This saves you the frustration of trying to make both hands match perfectly. Finish with a shiny top coat.
14. Strawberry Print Accents
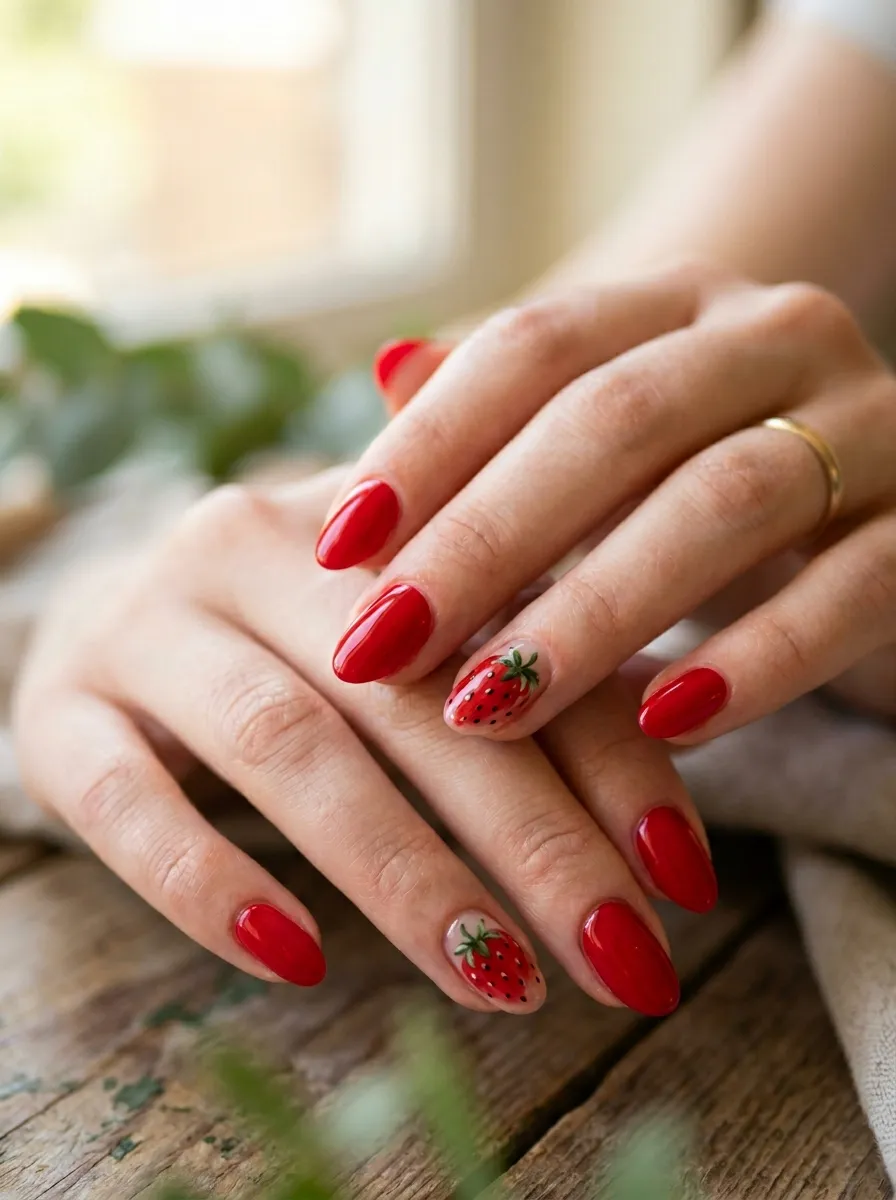
Berry motifs are a staple of summer fashion. Adding tiny strawberry details to your red manicure feels sweet, playful, and whimsical.
Paint most of your nails a bright strawberry red. On your accent nail, paint a red oval shape. Use a fine toothpick dipped in dark green polish to add two small leaves at the top of the oval.
Then, take a yellow or white polish and poke tiny dots across the red oval to represent the seeds. It takes minimal artistic skill but looks incredibly detailed and fun. Seal with a durable top coat.
15. Deep Wine Red for Summer Evenings
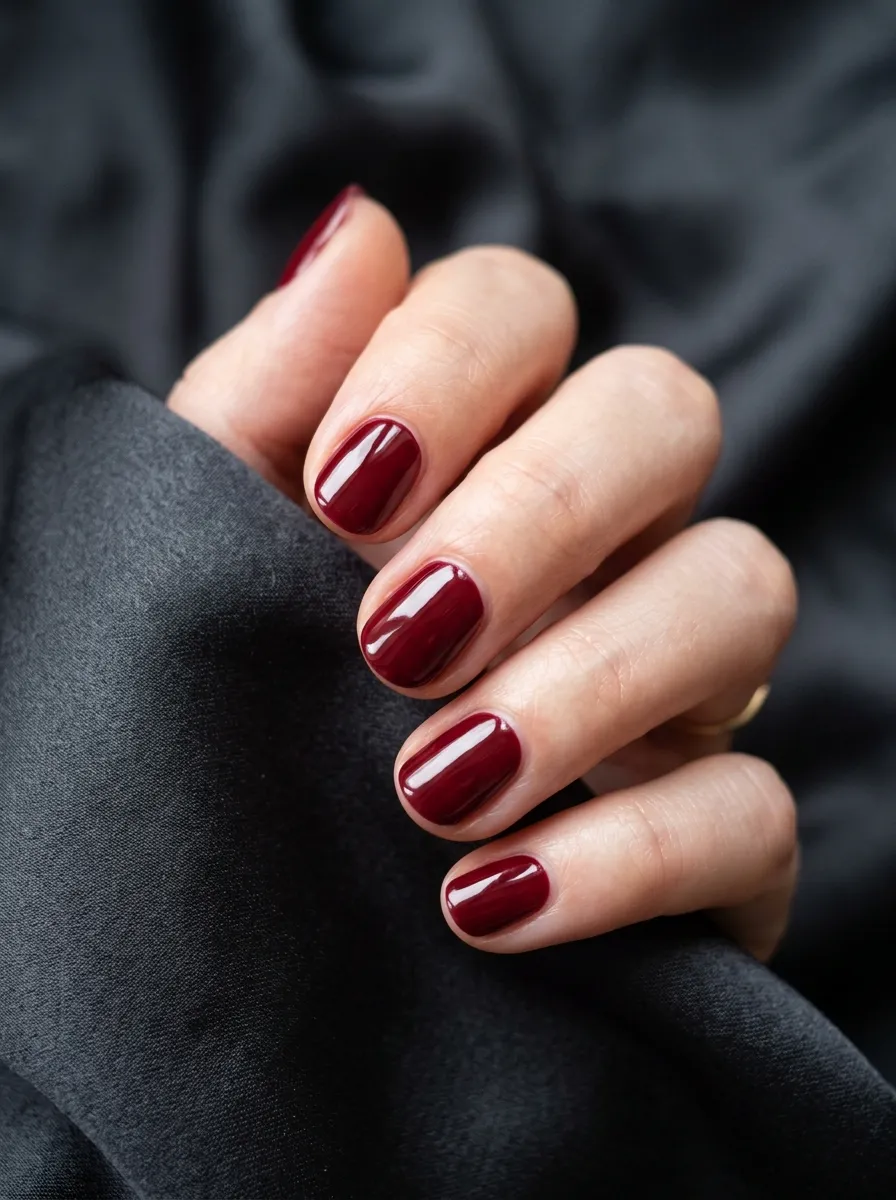
While bright colors dominate the daytime, a deep wine red adds instant sophistication to summer nights and formal events.
Dark shades can sometimes look streaky if applied incorrectly. The trick is to apply two very thin, even layers rather than one thick one. Cap the free edge of your nail by running the brush along the very tip.
This prevents white edges from showing as your nails grow. A rich wine shade looks best with an ultra-glossy finish, so don’t skip the top coat. It pairs beautifully with gold rings and jewelry.
16. Red Speckled Terrazzo

Terrazzo patterns look modern, artistic, and unexpected. A white base with red and gold flecks feels light, airy, and textured for warm weather.
You can create this speckled look using a technique called splatter art. Paint your nails a solid white. Dip an old, clean toothbrush into red polish. Lightly flick the bristles with your thumb over your nails to create tiny speckles.
Repeat with a bit of gold or black polish if desired. Use tape around your fingers before flicking to make cleanup easy. The resulting stone-like pattern is incredibly unique and stylish.
17. Neon Red Coral Burst
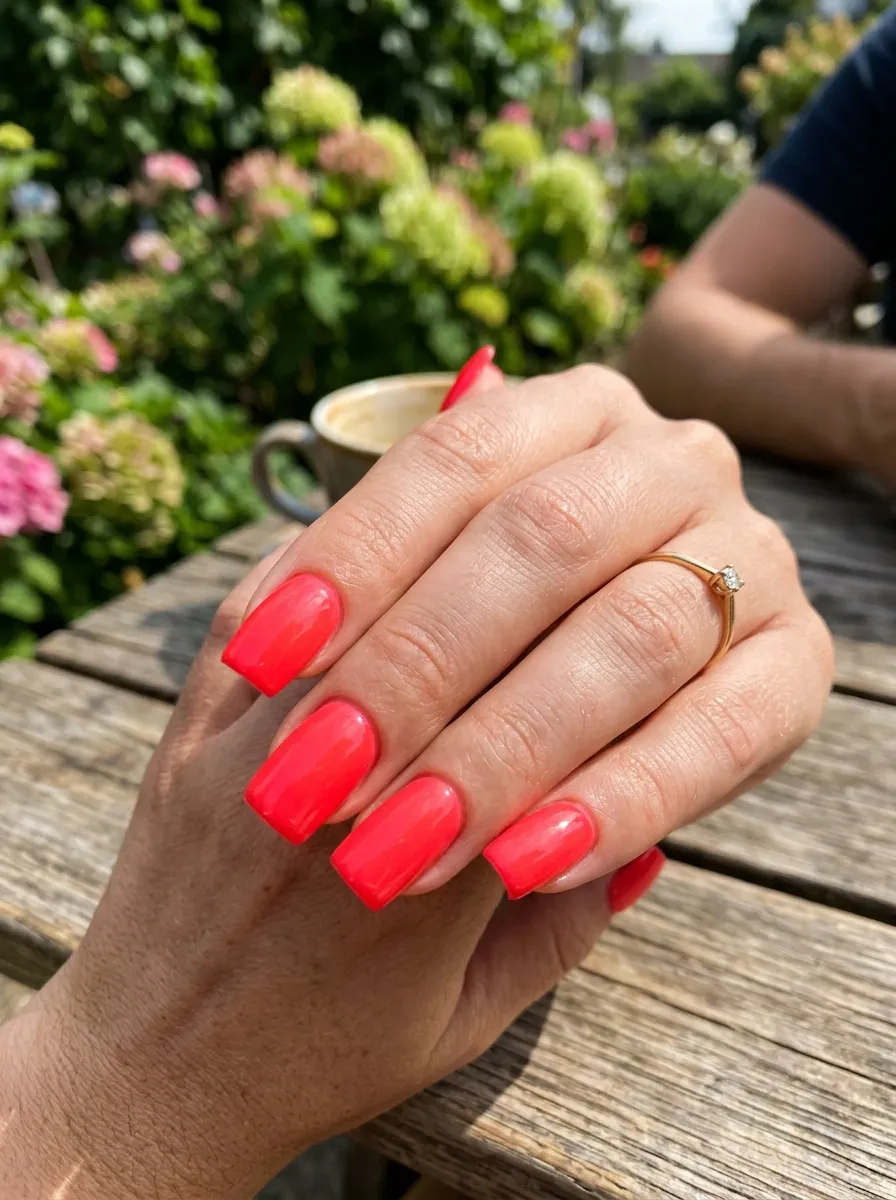
When regular red feels too quiet, step up to a neon red-coral. This high-visibility shade looks incredibly vibrant against summer tans and poolside backgrounds.
Neon polishes can sometimes dry down to a flat, matte finish and can look sheer. To make the color truly scream, always apply a solid coat of white polish first.
Once the white dries, apply two coats of your neon coral. The white background reflects light back through the neon, making it look twice as bright. Finish with a glossy, plumping top coat for maximum impact.
18. Red Foil Accents
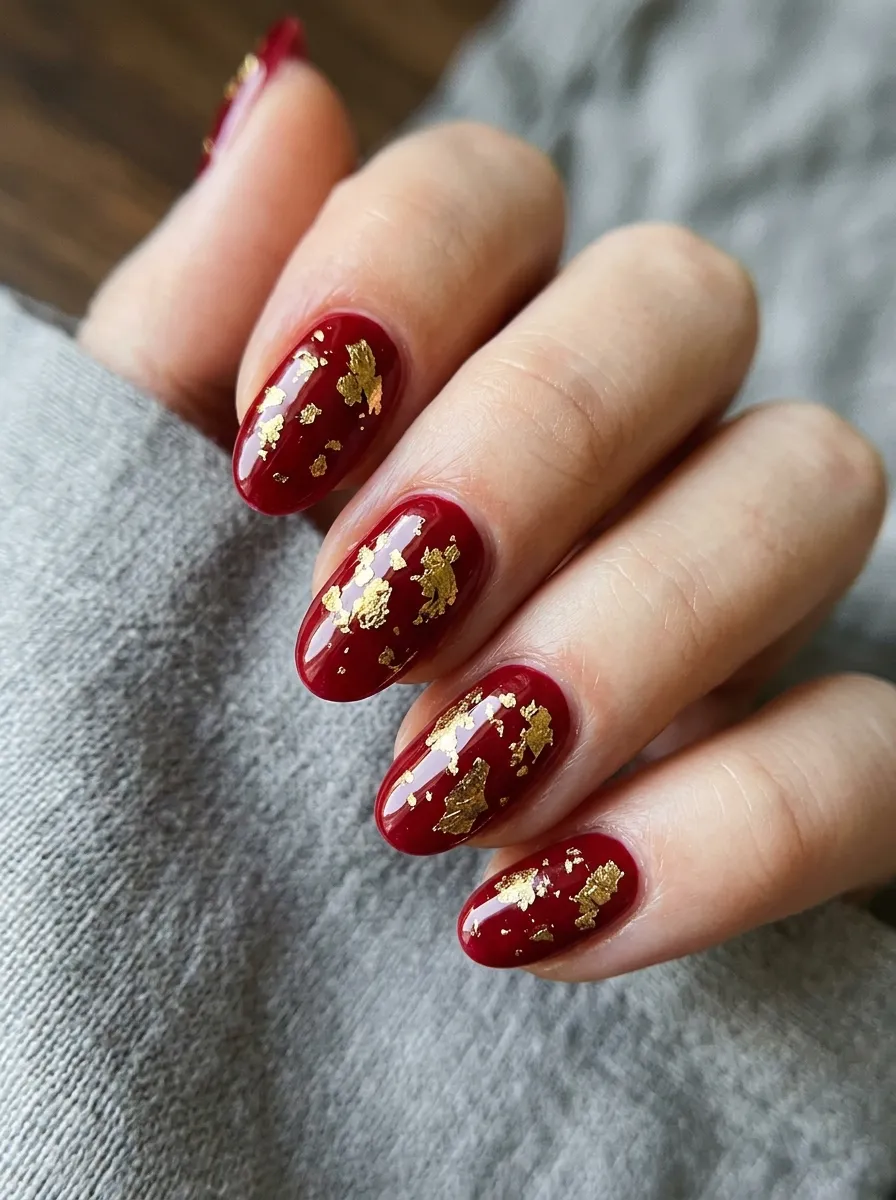
Gold foil adds a touch of luxury to a standard red manicure. The way the metallic flakes catch the summer sun is absolutely stunning.
You can buy a pack of nail art foil flakes for a couple of dollars. Paint your nails red and wait until the polish is almost dry but still slightly sticky. Use tweezers to place small flakes of gold foil onto the nail.
Press them down gently with a clean finger or a silicone tool. Apply a generous layer of top coat over the foil to smooth out the surface and lock it in place.
19. Clear to Red Glitter Gradient
A glitter gradient is a fantastic option if you want something low-maintenance. Because the base near your cuticles is clear, you won’t notice the growth.
Start with a clean, bare nail protected by a clear base coat. Take a red glitter polish and brush it heavily onto the tips of your nails.
While it is wet, use a clean brush or your finger to gently drag some of the glitter down toward the middle of your nail. This creates a faded effect. It is a foolproof method that lasts for weeks without showing obvious regrowth.
20. Diagonal Red Color-Block
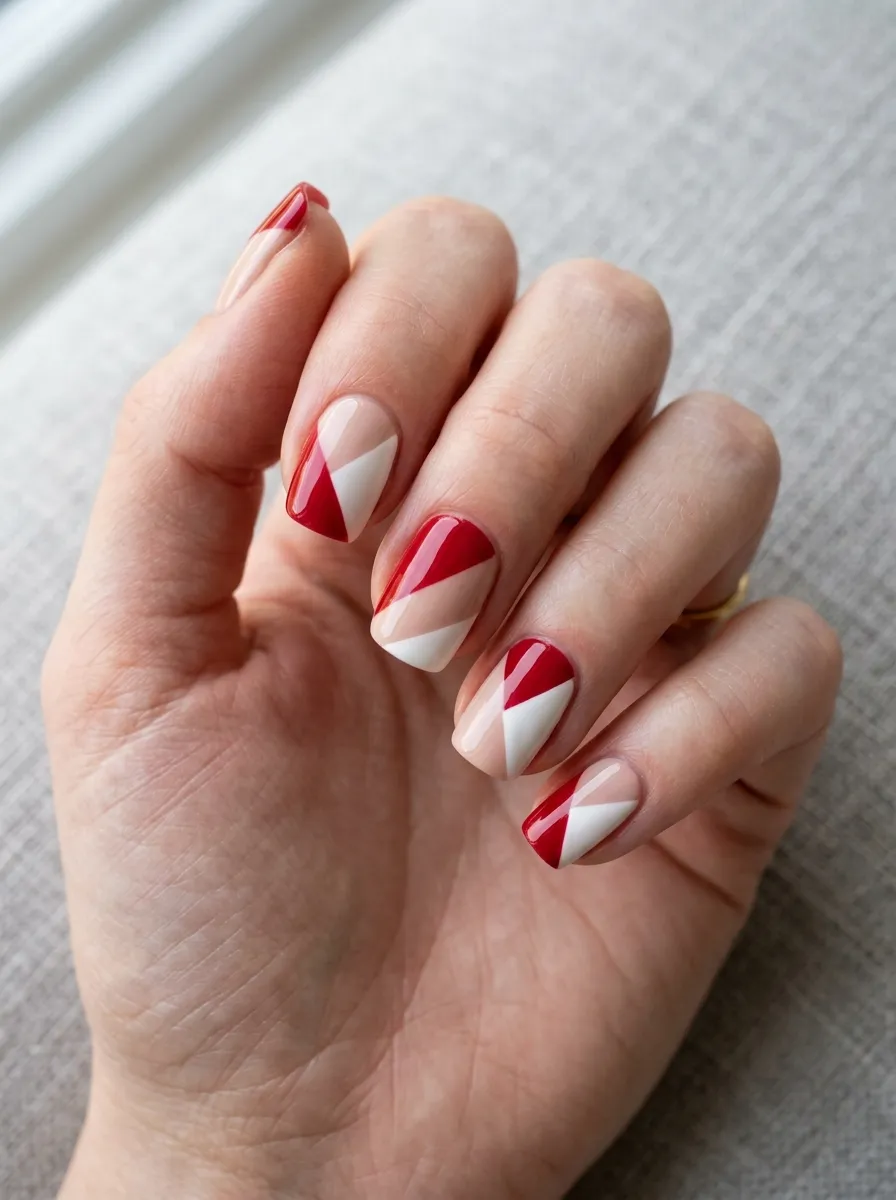
Color-blocking offers a sporty, graphic look that fits right in with active summer lifestyles. Combining red with nude and white keeps it clean.
Use striping tape or painter’s tape to section off your nails. Apply the tape diagonally across the center. Paint one half of the nail red and leave the other half nude, or paint it white.
Remove the tape immediately to keep the line sharp. If your lines aren’t perfectly straight, you can hide the seam by drawing a thin line of gold glitter polish right over it. It fixes mistakes and adds a bit of sparkle.
21. Red Double French Lines
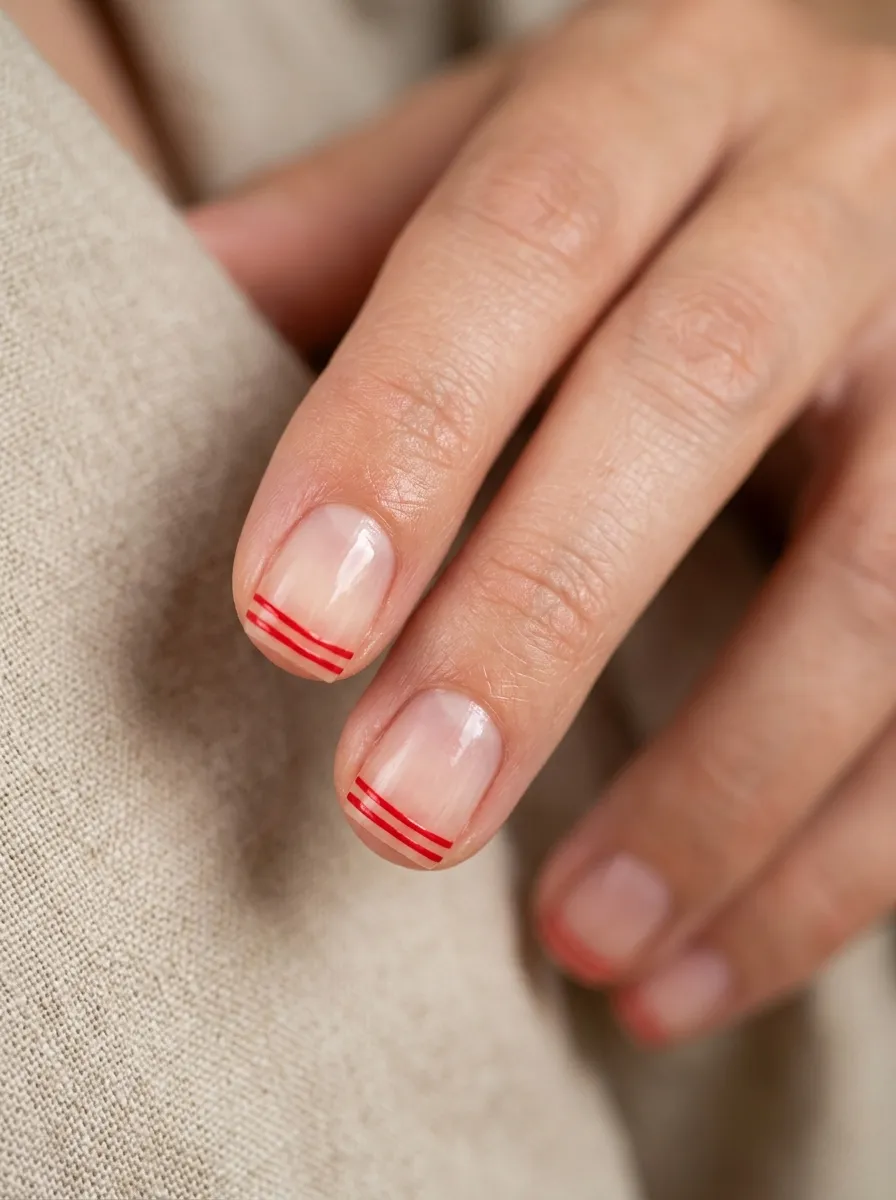
For a modern twist on the classic tip, try a double French line. This negative-space look uses very little polish but makes a big visual impact.
You will need a very thin detail brush for this style. Dip the brush into your red polish, removing any excess. Draw one thin line at the very edge of your nail tip.
Then, draw a second parallel line just a millimeter below the first one. Keeping the lines thin is the key to making this look elegant. It works best on square or squoval nail shapes and takes very little time.
22. Crimson Tortoiseshell Details
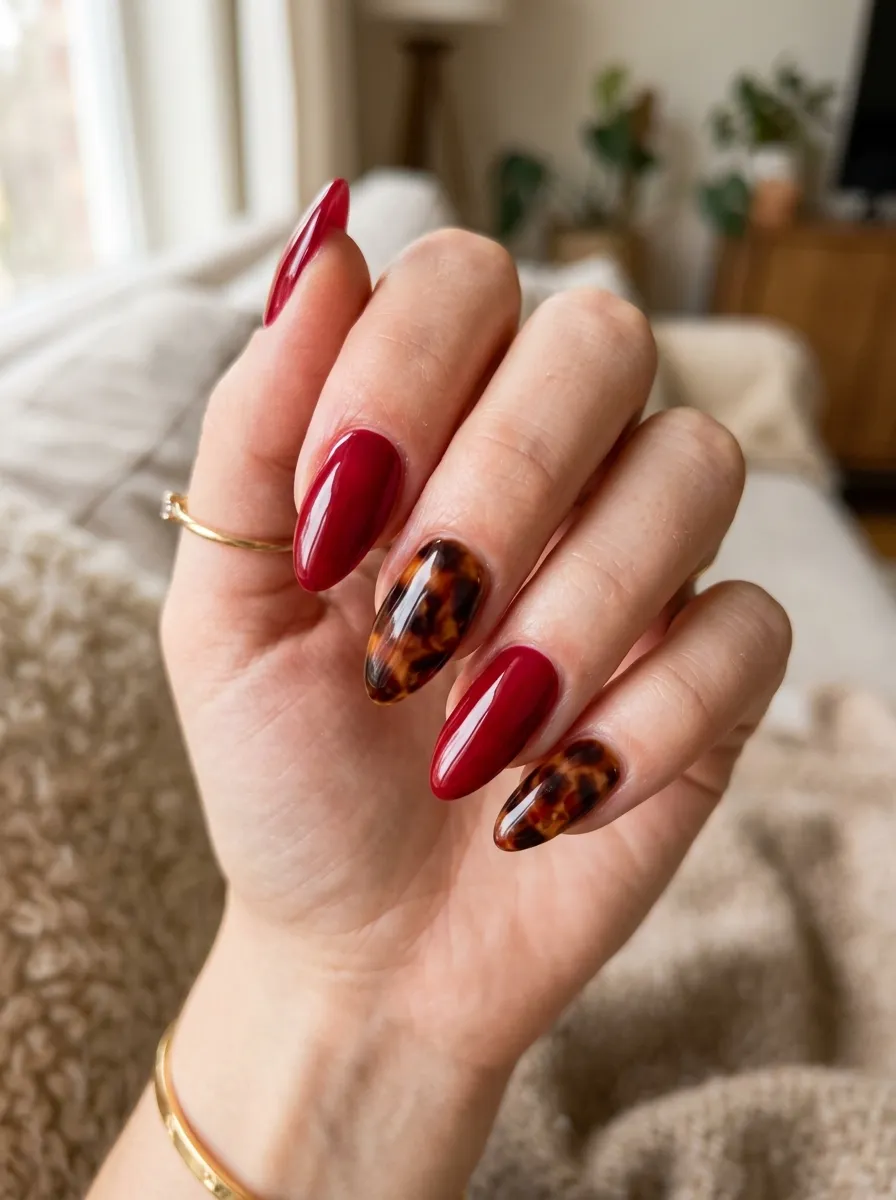
Tortoiseshell is a classic print that transitions beautifully into summer when paired with bright crimson. Alternating solid red nails with print accents looks expensive.
To create a DIY tortoiseshell effect, you need a amber jelly polish, a brown polish, and a black polish. Apply the amber base. While wet, dot small bits of brown and black onto the nail.
Let the colors bleed into each other slightly to create that natural, organic stone look. Pair these accent nails with solid crimson on your other fingers for a perfectly balanced, sophisticated summer manicure.
23. Pastel Pink and Red Swirls
Pink and red used to be a fashion taboo, but now they are one of the trendiest color combinations for summer. The contrast is cheerful and fun.
Paint your nails with a soft pastel pink base coat. Once dry, use a detail brush to paint thick, loopy swirls of bright red across each nail.
The wavy lines give off a retro 1970s vibe that feels incredibly relevant for beach season. Do not worry about making every nail identical; the asymmetry is what makes this specific style look so playful and modern.
24. Red Starburst Accents
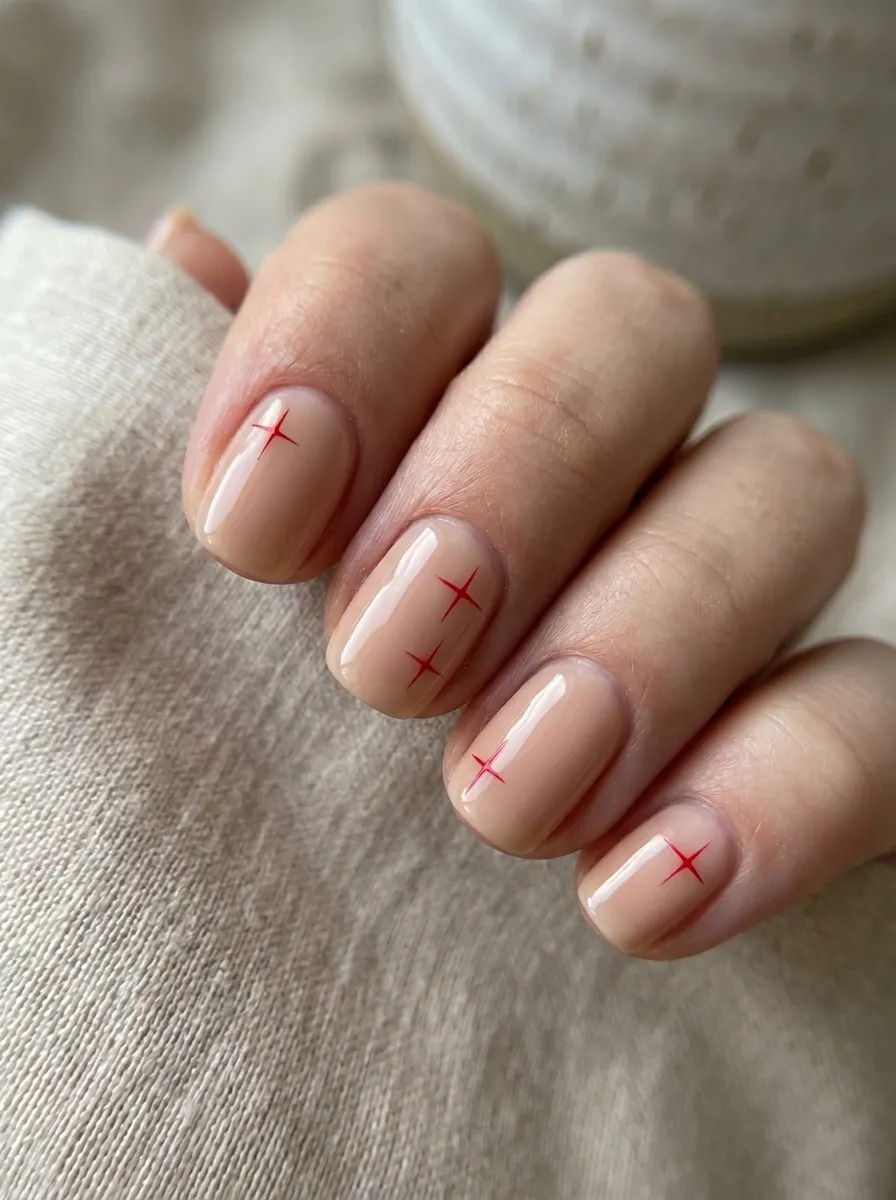
Tiny starbursts offer a celestial, magical feel that looks delicate and clean. It is a fantastic option if you want nail art that isn’t too overwhelming.
Start with a sheer nude or light pink base coat. Use a very fine nail art brush or a toothpick pulled to a sharp point. Place a single dot of red polish in the center of your nail.
Carefully pull four sharp lines outward from that dot to create a star shape. Add a tiny rhinestone to the center of the star using nail glue for an extra touch of summer sparkle.
25. Matte Red Accent with Negative Space Heart
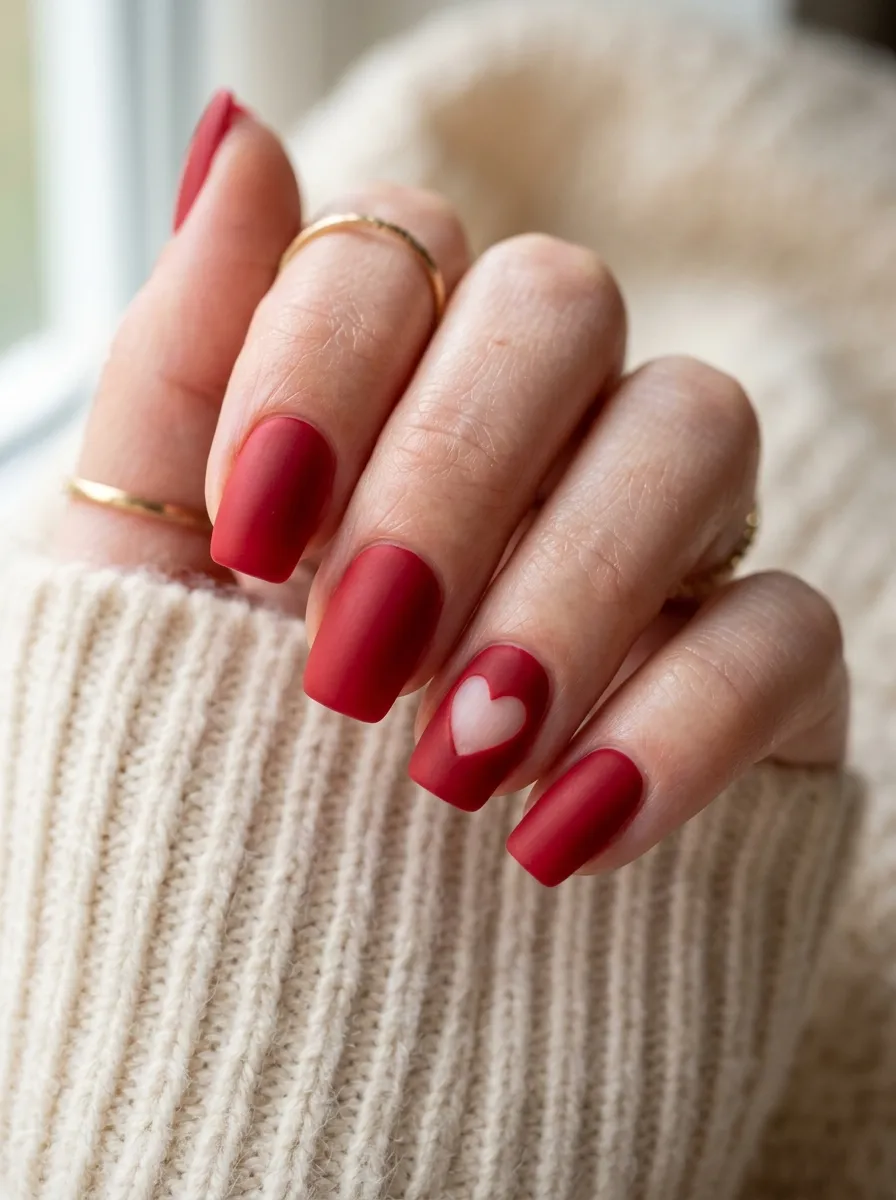
Hearts aren’t just for Valentine’s Day. A negative-space heart design feels sweet and romantic for summer dates and weekend getaways.
You can make a heart stencil at home using a piece of painter’s tape. Fold a small piece of tape in half and cut out a half-heart shape, just like making paper hearts. Unfold the tape and stick it firmly to your accent nail.
Paint over the entire nail with your red polish, then peel the tape off immediately. Apply a matte top coat over all your nails to give it a trendy, smooth texture.
Conclusion
Finding the perfect red summer manicure does not require an expensive trip to a high-end salon. With a few affordable drugstore polishes, basic household tools like toothpicks and tape, and a little bit of patience, you can recreate any of these stunning looks right at home. From classic high-gloss finishes to playful strawberry prints and modern geometric lines, there is a red style to match every mood and occasion this season. Grab your favorite bottle of crimson, try out one of these simple DIY techniques today, and show off your vibrant, budget-friendly summer nails.