Halloween nail art has taken a dark and thrilling turn, and Ghostface nail ideas are leading the charge. Whether you’re a die-hard Scream fan or just love spooky season looks, these designs hit differently. They’re bold, they’re creepy, and they make your hands look like they belong in a horror film. From simple black and white designs to full-on theatrical nail art, there’s something here for every skill level. You don’t need a salon budget to pull these off. Many of these looks can be done at home with basic tools and a steady hand. Get ready to scare everyone at the party. If you’re also exploring Spider Nail Ideas, intricate spiderwebs, tiny hand-painted spiders, glossy black finishes, and gothic accents offer another spooky yet stylish option that’s perfect for Halloween or anyone who loves dark, dramatic nail art all year long.
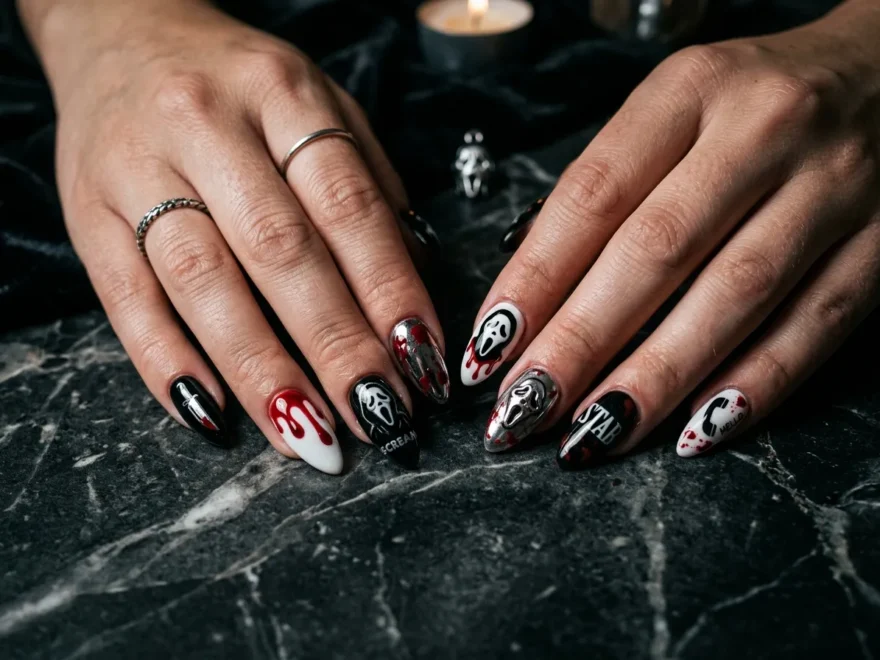
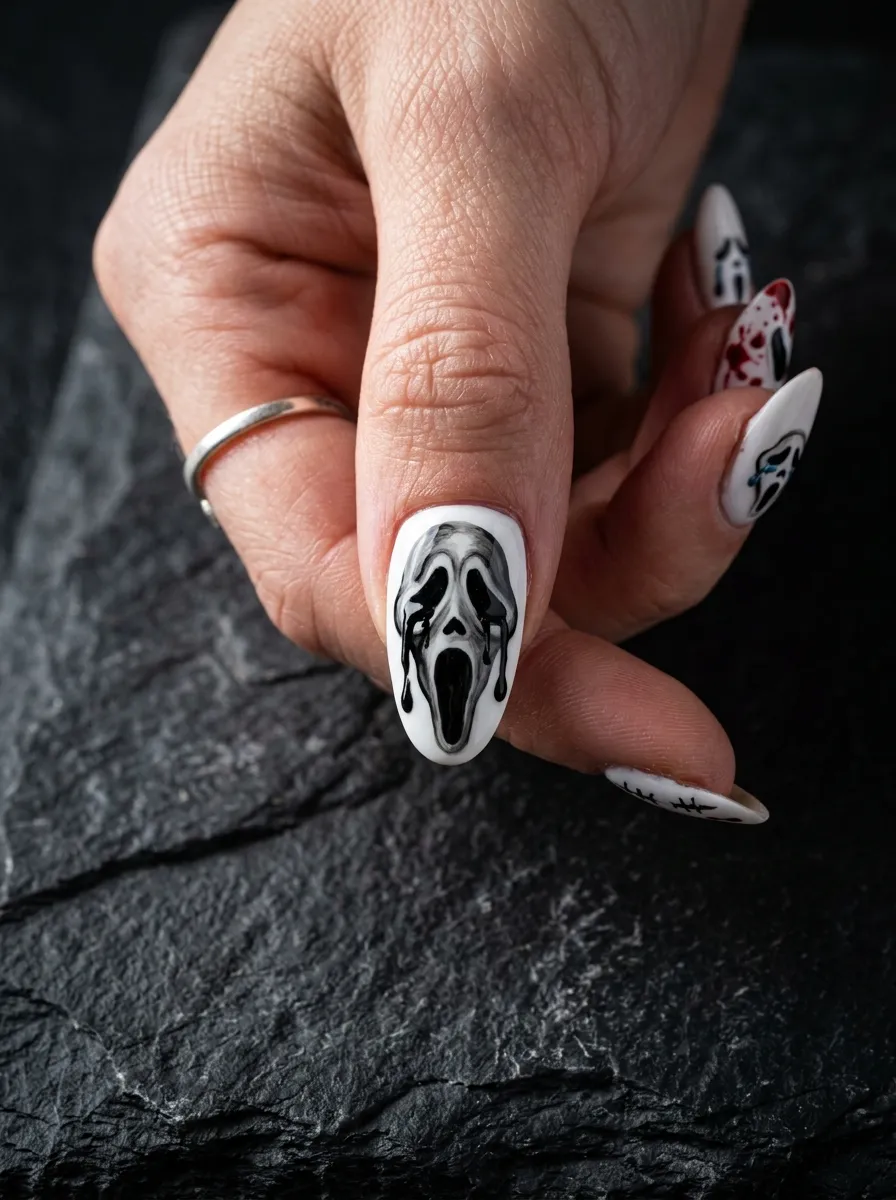
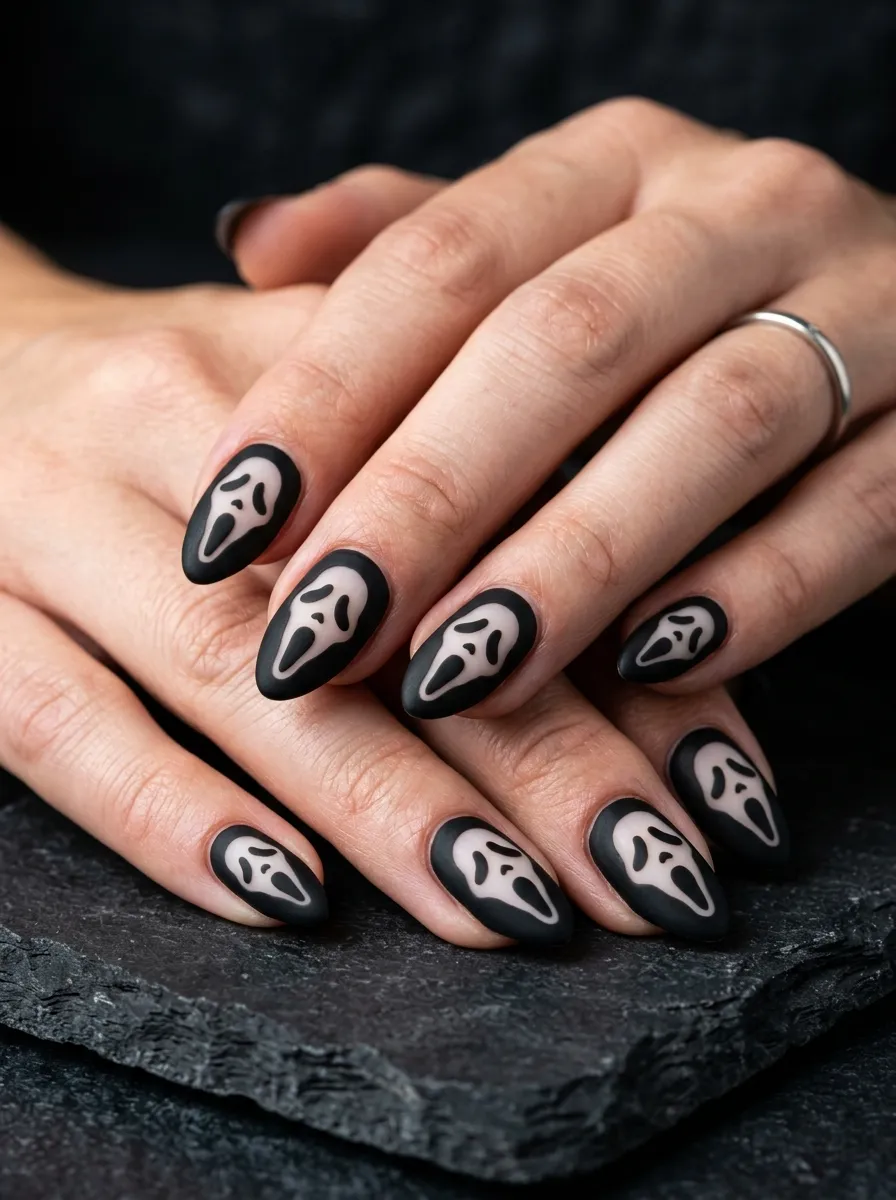
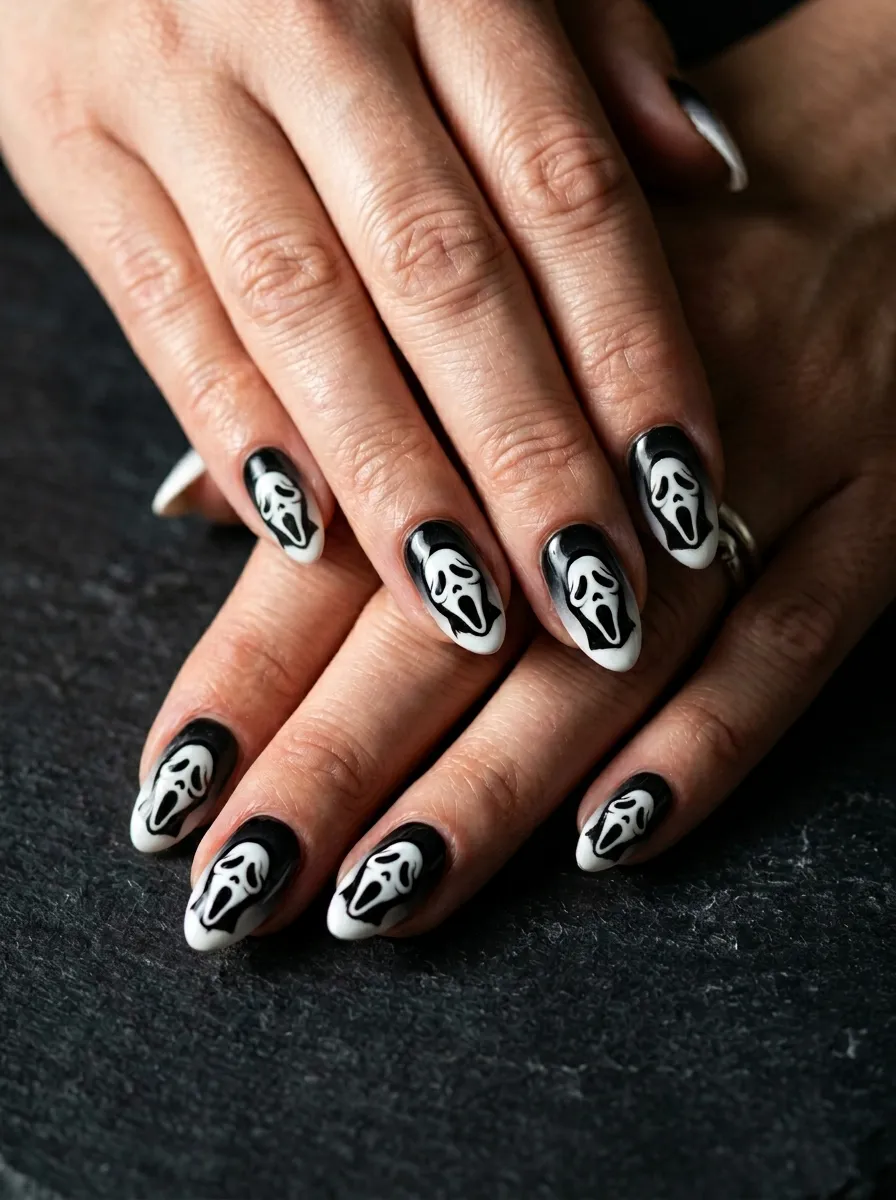
1. Classic Black and White Ghostface Mask
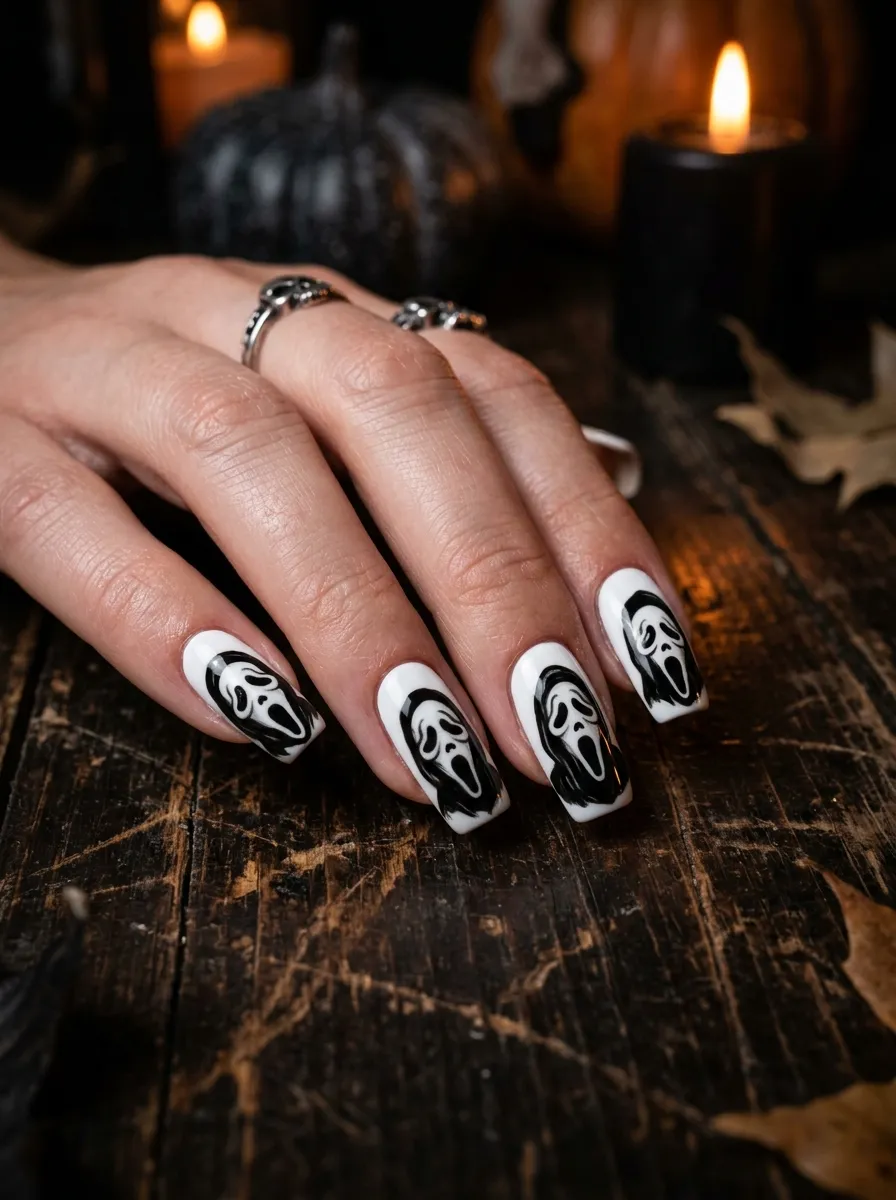
This is the one that started it all. The classic Ghostface mask is iconic for a reason.
You paint your nails white and use a thin nail art brush to draw the mask’s hollow eyes and open mouth. It’s simpler than it looks.
Start with two coats of white polish. Let it dry fully. Then grab a black nail art pen or a tiny brush dipped in black polish.
Draw two almond-shaped eyes near the top of the nail. Add the signature wide-open screaming mouth below.
Seal it with a glossy top coat and you’re done. The result looks professional and terrifying.
Budget tip: Nail art pens from the dollar store work perfectly for this. You don’t need expensive gel polish to get this look.
This design works best on medium to long nails. Short nails can still pull it off with a simplified version of the mask.
Wear this on all ten fingers or make it an accent nail on your ring finger. Either way, people will notice.
2. Dripping Blood Tips
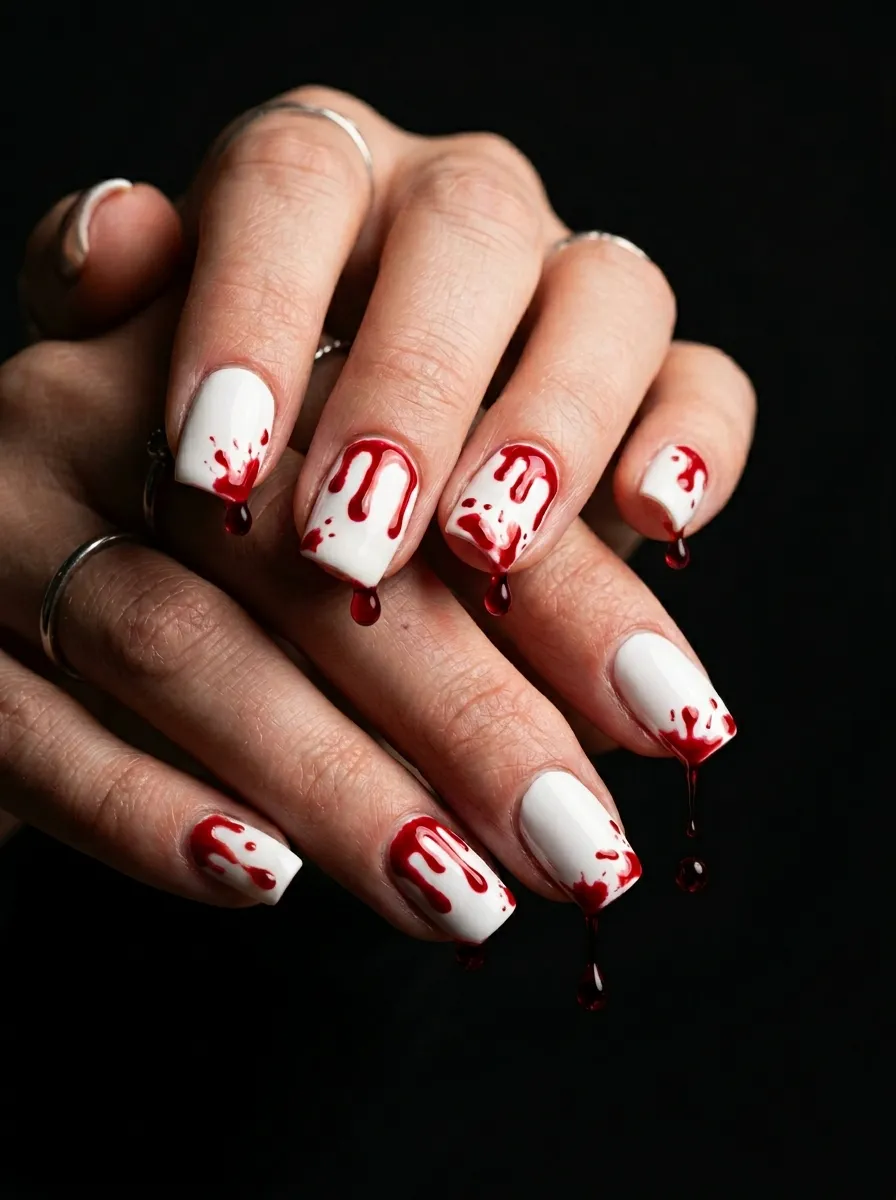
Blood drip nails are a Halloween staple. They look gruesome in the best possible way.
Start with a clean white base. Let it fully dry before adding any red.
Use a thin red nail polish or a red nail art pen. Starting from the tip of the nail, draw irregular dripping lines going downward.
Make some drips short. Make others long. Add small circular drops at the ends to make them look like real blood pooling.
Don’t try to make them perfect. Uneven drips actually look more realistic and scary.
You can also do this on a black base with bright red for a more dramatic effect. The contrast is striking.
DIY tip: If you don’t have a nail art pen, use a toothpick dipped in red polish. It gives you the thin lines you need without buying extra tools.
Finish with a glossy top coat to make the blood look wet and fresh. That glossy finish takes this look from good to genuinely unsettling.
This pairs beautifully with any Ghostface mask accent nail on another finger.
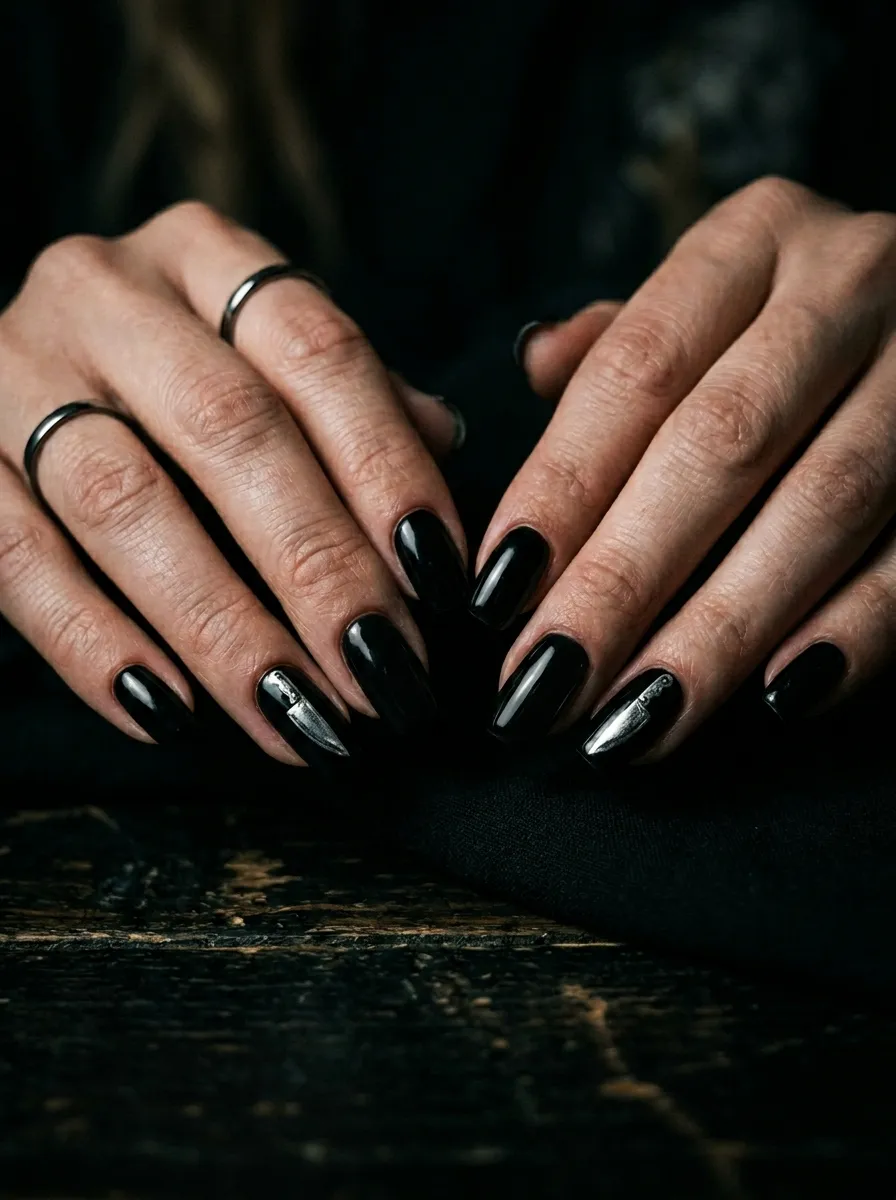
3. Matte Black Ghostface Coffin Nails
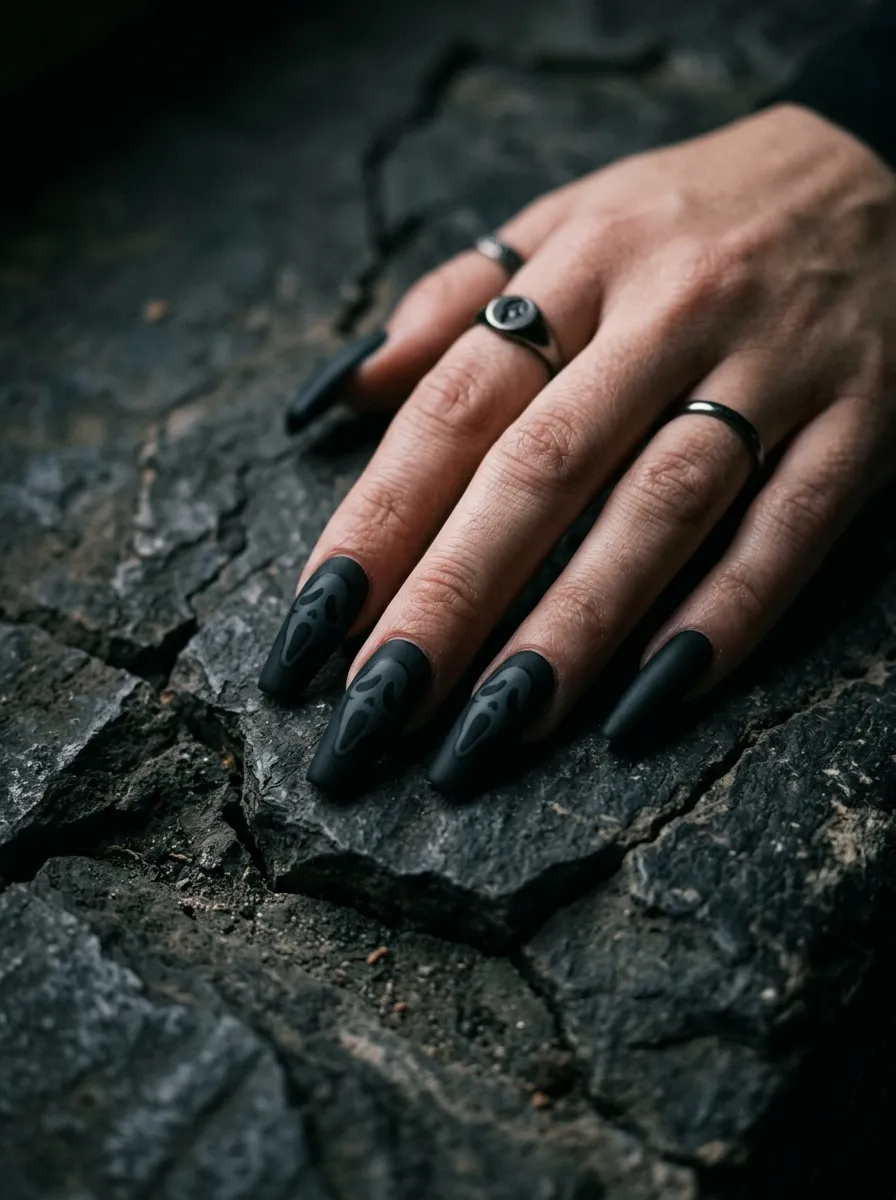
Matte black nails already feel menacing on their own. Add Ghostface details and they become next level.
Get a matte top coat from any drugstore. This is the secret to making regular black polish look like a professional salon finish.
Apply two coats of black polish. Once dry, add your matte top coat. Then use a silver or white nail art pen to sketch Ghostface mask outlines.
The contrast between the matte black base and the shiny outline creates a ghostly effect. It looks like the mask is glowing.
Coffin-shaped nails work best here. The long, flat tip gives you more surface area to draw on.
Budget tip: You can buy press-on coffin nails at the drugstore and paint them yourself. This saves money on nail shaping and filing.
Doing the mask outline in metallic silver makes this look feel more modern and edgy. White is classic. Silver is for those who want something a little more fashion-forward.
Keep the rest of your nails plain matte black to let the accent nails shine. Less is more with this design.
4. Ghost White Chrome Nails
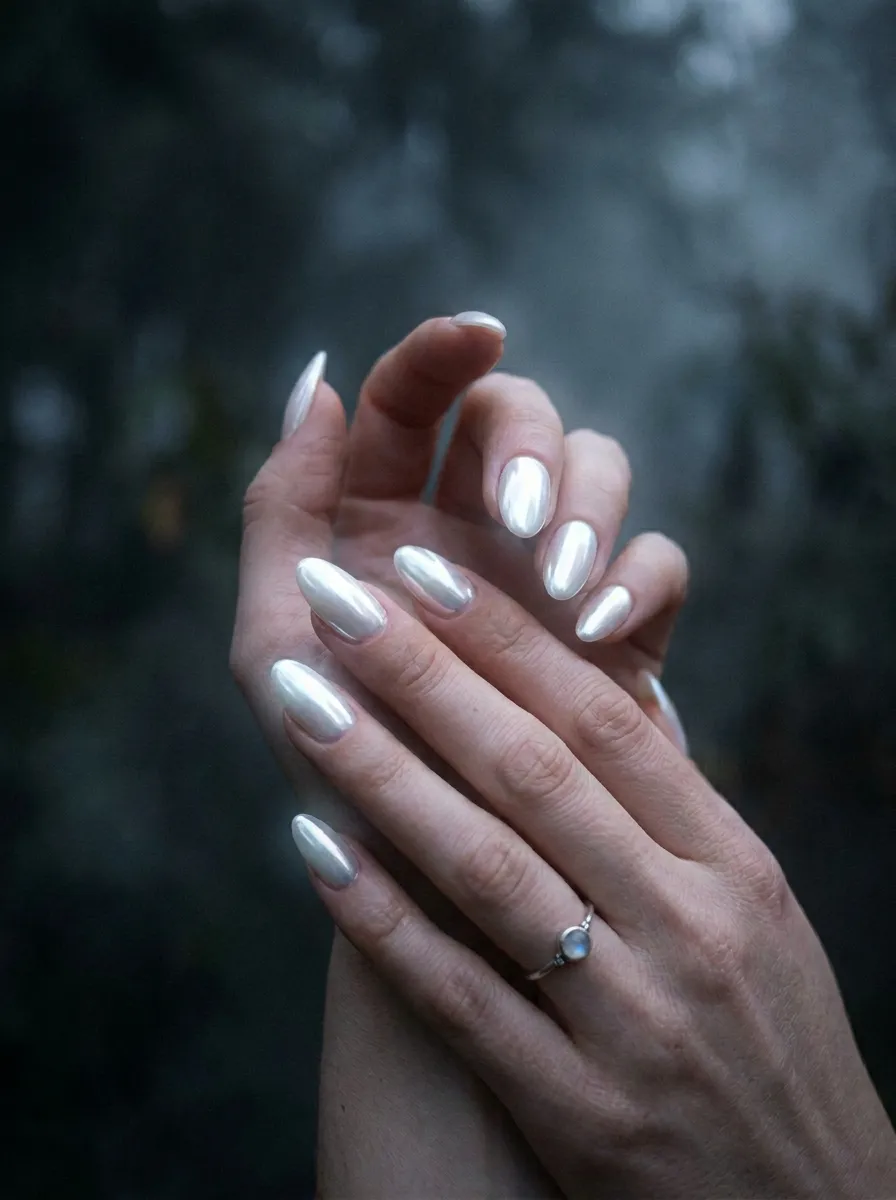
Ghost white chrome nails feel supernatural. They look like they belong on a spirit, not a person.
Chrome powder is what creates that liquid mirror effect. You can find it online for just a few dollars.
Start with a white gel base or a regular white polish. Apply the chrome powder using a silicone sponge applicator or an eyeshadow sponge.
Rub it over the dry nail in small circular motions. The chrome pigment transfers onto the nail and creates a reflective finish.
This look is minimal but eerie. No extra art is needed. The finish does all the work.
Budget tip: Chrome powders on Amazon and Etsy are much cheaper than buying chrome polish from a salon brand. A small jar goes a very long way.
You can add a single Ghostface mask drawn in thin black lines over one or two accent nails. The mask against a chrome background looks cinematic.
Seal everything with a no-wipe top coat to lock in the chrome without dulling it. Regular top coats can smear the powder.
Wear this to a Halloween party and watch everyone ask what you’re wearing.
5. Red and Black Scream Queen Nails
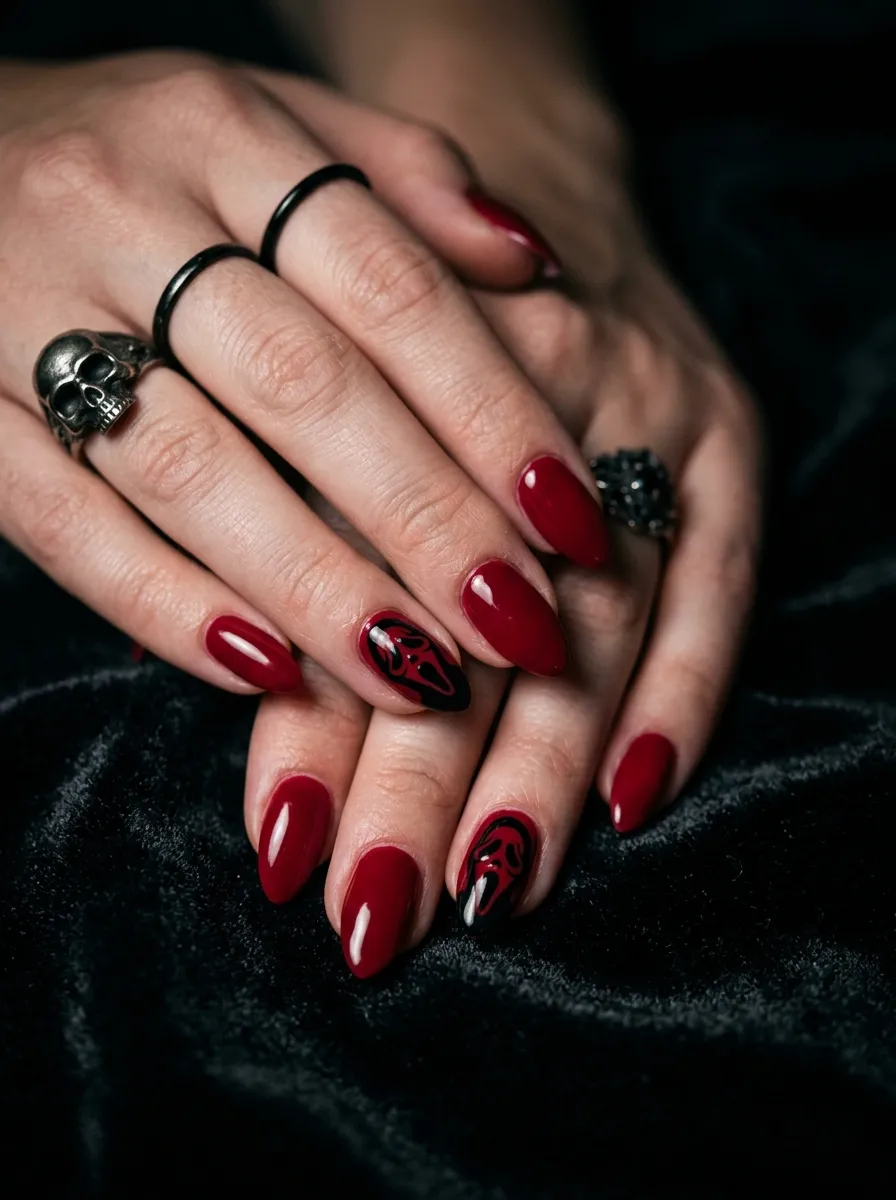
Red and black is the ultimate horror color combination. It screams danger and drama all at once.
Paint most nails deep red. Choose an accent finger, usually the ring finger, and paint it black.
On the black nails, draw the Ghostface mask in white or silver. The mask pops against the dark background beautifully.
You can also reverse it. Paint most nails black and use deep red as the accent. Both versions look stunning.
Red nails alone already feel powerful. Adding the Ghostface element makes them feel like a costume.
Budget tip: OPI, Sally Hansen, and NYX all have affordable red and black polishes at drugstores. You don’t need high-end brands.
Add a few red rhinestones near the cuticle on your plain red nails for extra drama. Small gems from a craft store are perfect for this.
Finish with a high-gloss top coat on the red nails and a matte coat on the black nails. The contrast in finishes adds visual depth.
This look works great for Halloween events, horror movie nights, or any time you want to feel powerful.
6. Ghostface with Dripping Eye Detail
Taking the classic mask a step further, this design adds dripping black tears from the eye holes.
Start with your standard white base and draw the Ghostface mask. Let that dry completely.
Then use a thin black nail art pen to draw two or three thin drip lines falling from each eye socket.
Add small drops at the ends of the drips. This creates the illusion that the mask is crying black tears or bleeding from the eyes.
It’s a small detail but it changes the whole mood of the nail.
DIY tip: Practice the drips on paper before doing them on your nails. Once you get the motion down, it’s easy to replicate.
You can also do this with deep red instead of black. Red drips from the eyes look like blood and feel even more horrifying.
Keep the rest of the nail clean and uncluttered. The dripping eye detail is the focal point. You don’t need anything else competing with it.
This design works on most nail lengths but looks most impactful on medium to long nails where the drip has room to travel down the nail.
7. Halloween Night Scene Nails
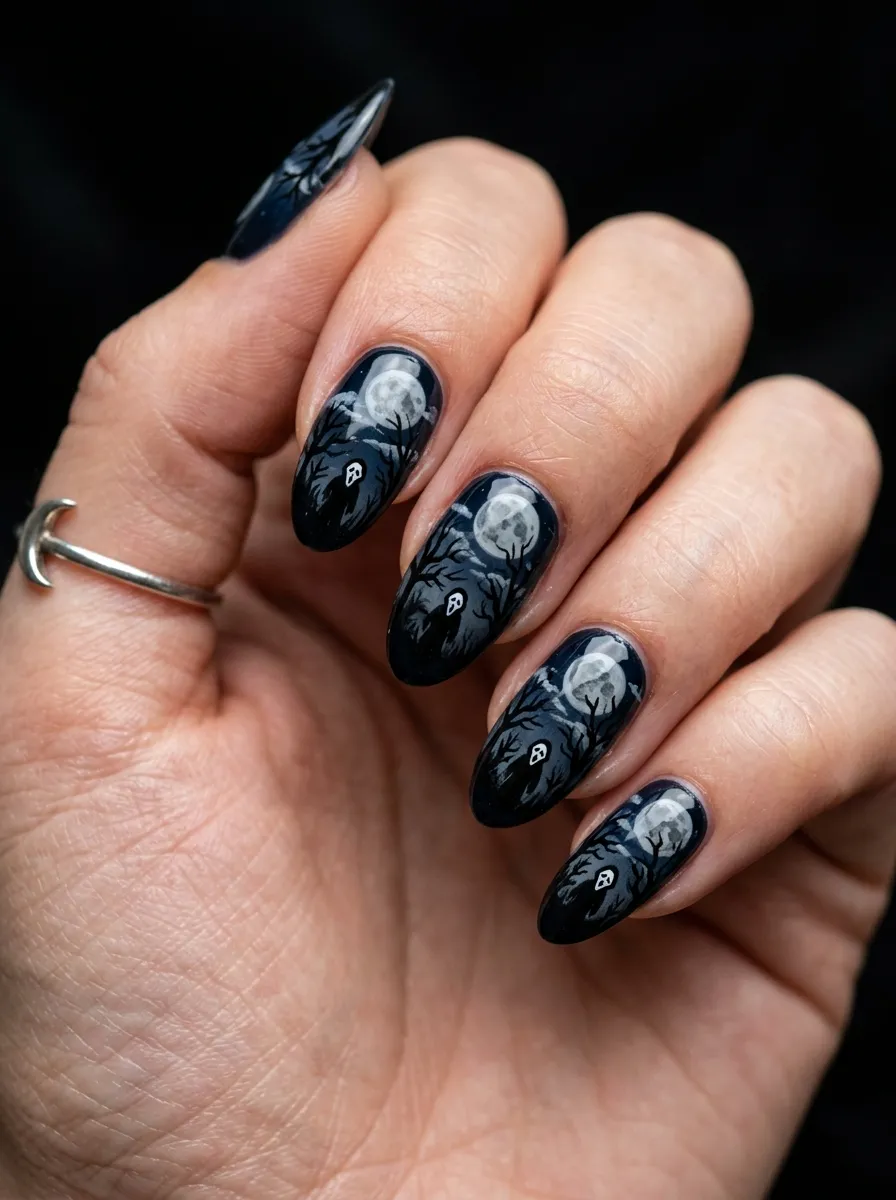
Miniature scenes on nails are a true art form. A Halloween night scene brings the horror movie to your fingertips.
Use a dark blue or black base. This becomes your night sky.
With a white nail art pen, dot in a round moon shape near the top of the nail. Add a few stars around it.
Use a thin black pen to draw bare, twisted tree branches on either side of the nail. Keep them simple.
Then, if your nail is long enough, add a tiny Ghostface silhouette standing below the trees. Just the outline is enough to recognize the shape.
Budget tip: Fine-tip nail art pens are your best friend here. A set of five colors costs around five dollars online and opens up endless designs.
This design looks incredible when each nail shows a slightly different scene. One nail has a moon. Another has a haunted house. One has only the Ghostface silhouette.
Seal with a glossy top coat to make the night sky look deep and dimensional.
This is a more time-consuming design but the payoff is enormous. It looks like wearable nail art you’d see on social media.
8. Silver Knife Accent Nails
The knife is as iconic as the mask itself. Adding a painted knife to your nails is an instant Ghostface reference.
Paint most nails a solid dark color, either black or deep grey.
On your accent nails, use a silver or metallic nail art pen to draw a kitchen knife outline. Keep the blade long and narrow. Add a simple handle at the bottom.
The knife facing different directions on different nails creates a scattered, chaotic look.
DIY tip: Look up a simple knife silhouette image before you start. Use it as a reference while drawing on your nail. Simple shapes are easier than you think.
Add a few small red dots near the tip of the knife blade to suggest blood. This tiny detail makes the whole thing feel more sinister.
Chrome silver nails as a base with a darker outline of the knife also work beautifully. The reflective surface makes the knife look almost three-dimensional.
Pair this with Ghostface mask nails on other fingers. The combination of the mask and the knife is exactly what the character is known for.
This look is bold but not over-complicated. It’s very achievable at home with just a little patience.
9. Pastel Goth Ghostface Nails
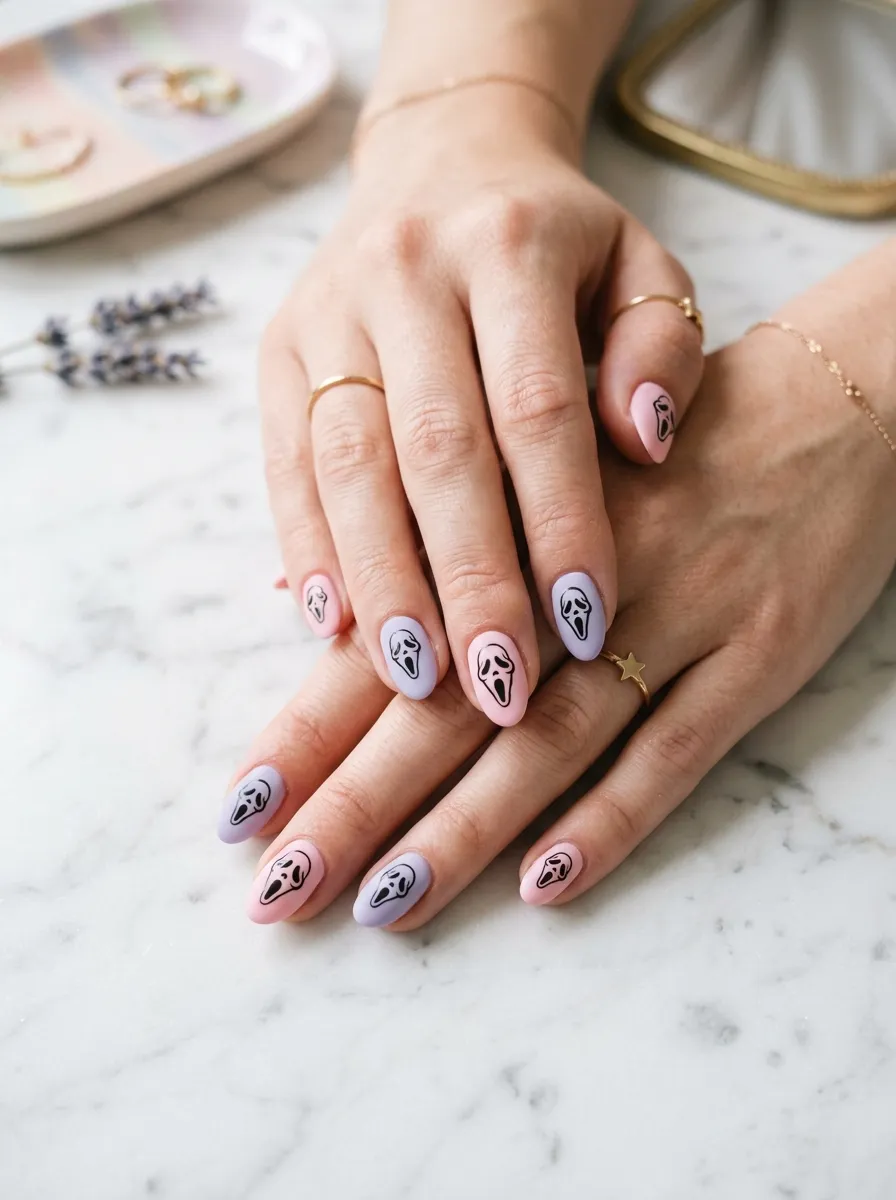
Who says Halloween nails have to be dark? Pastel goth takes scary and makes it adorable.
Use soft pink, lavender, or mint as your base colors. These feel sweet and innocent.
Then draw Ghostface mask outlines in black over the pastel base. The contrast between cute and creepy is the whole point.
You can also add small black bows, stars, or heart shapes alongside the mask for extra kawaii horror vibes.
Budget tip: Pastel polishes are everywhere in spring collections. Stock up on sale colors after spring season for cheap finds.
This style is popular on social media right now. It bridges the gap between Halloween and everyday wear.
The Ghostface mask in small, minimalist form over a pastel base looks surprisingly wearable. You could even wear this outside of October.
Seal with a satin finish top coat rather than full gloss or full matte. A satin finish feels softer and suits the pastel aesthetic.
Add a single tiny rhinestone in the center of the mask’s forehead on accent nails. Small details like this elevate a simple design into something special.
10. Negative Space Ghostface Nails
Negative space nail art uses your bare nail as part of the design. It’s modern, minimal, and deeply creative.
Paint the entire nail black. While still slightly tacky, use nail tape or a sticker to mask off the shape of the Ghostface mask.
After the tape is down, add another thin layer of black around the edges. When you peel the tape away, the bare nail shows through in the shape of the mask.
The natural nail color becomes the white of the Ghostface mask. It’s clever and striking.
DIY tip: If taping feels complicated, just paint the mask outline in a nude or clear polish over black. The contrast is subtler but still reads clearly as negative space art.
This works especially well on short and medium length nails. You don’t need length to make negative space designs pop.
The graphic, two-tone look feels very editorial. It doesn’t scream Halloween loudly, but those who know, know.
Finish with a top coat only over the black sections if you want to keep the bare nail looking natural and contrasted.
This is one of the most art-forward designs on this list.
11. Ghostface Phone Call Nails
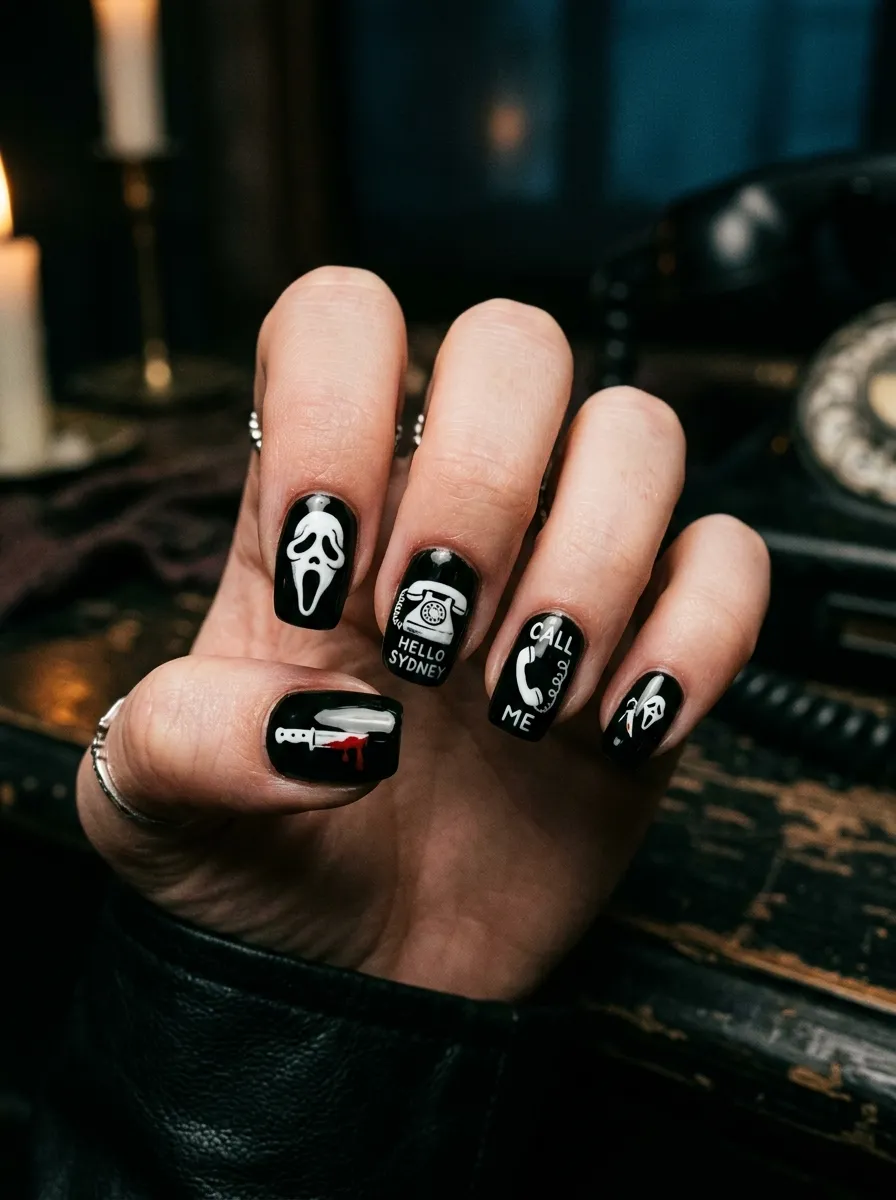
“What’s your favorite scary movie?” This design is a direct nod to the most iconic scene in Scream.
Paint nails black. On accent nails, draw a tiny old-school telephone handset in white or silver.
On other accent nails, draw the Ghostface mask in white. Together, the mask and phone tell the story without any words.
Budget tip: Simple line-art icons like a telephone are very easy to draw freehand. The more imperfect they look, the more charming the overall result.
You can also add small white dots between the phone and mask nails to represent the connection, like a signal or call wave.
Keep the remaining nails clean and plain black. Busy nails compete with your storytelling accent nails.
A glossy top coat on all nails makes the white line art pop sharply against the black base.
This design is a perfect conversation starter. Anyone who’s seen Scream will immediately get it.
It’s a fan tribute that feels personal and creative rather than generic. That’s the best kind of Halloween nail art.
12. Galaxy Horror Nails
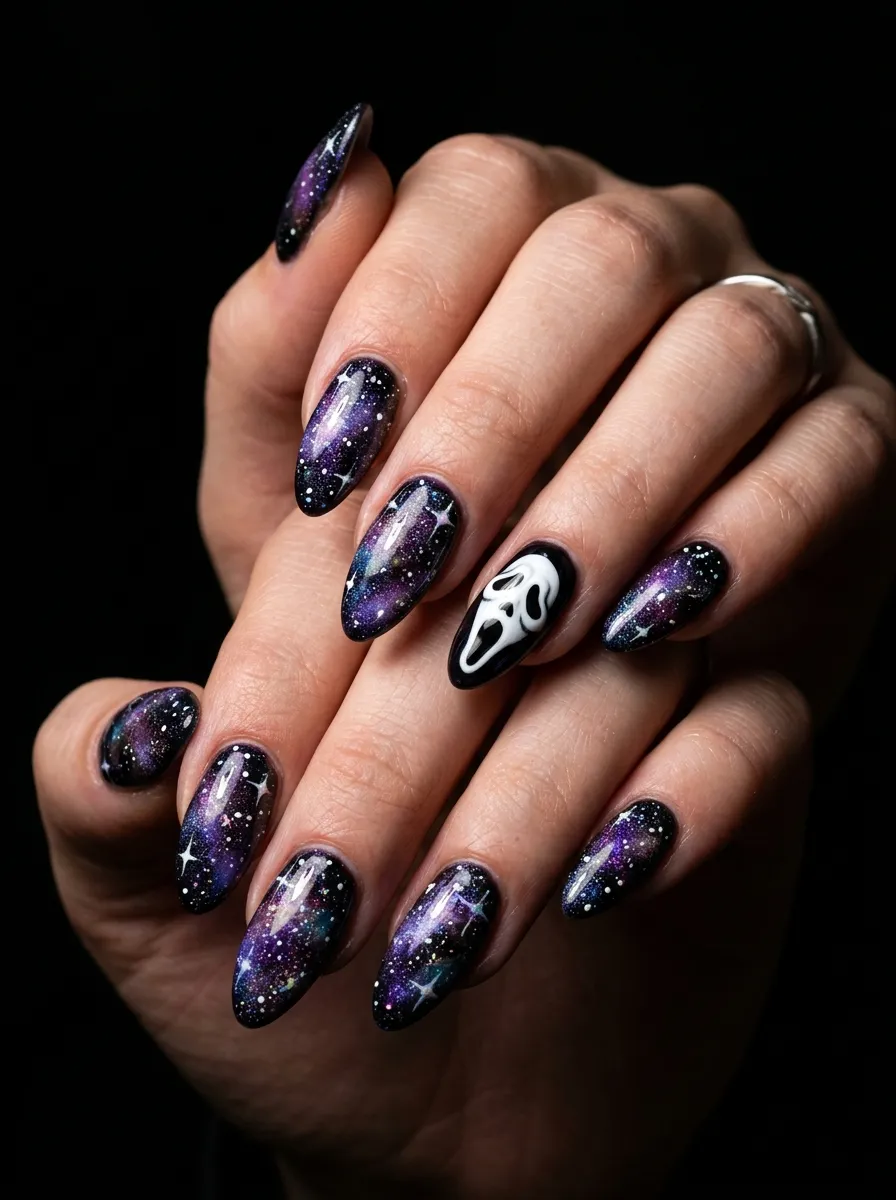
Galaxy nails already feel supernatural. Adding Ghostface to a cosmic background creates a horror-meets-space atmosphere.
Use a sponge technique to layer dark purple, navy blue, and black polish onto your nails. Dab the colors on with a small makeup sponge.
While each layer is dry, keep building depth by adding more dark blue and hints of teal near the edges.
Add tiny white speckles using a dry brush or the end of a toothpick to simulate stars.
On one or two accent nails, draw the Ghostface mask in white or silver over the galaxy background.
Budget tip: Old makeup sponges work perfectly for this technique. Cut them into small pieces for better control.
The galaxy background makes the Ghostface mask look like it’s appearing from another dimension. It feels epic and horror-movie-worthy.
Finish with a glossy top coat to deepen the galaxy colors and make them look dimensional.
This design is more time-intensive but very beginner-friendly once you understand the sponge technique. It’s hard to make it look bad.
13. Ghostface French Tips
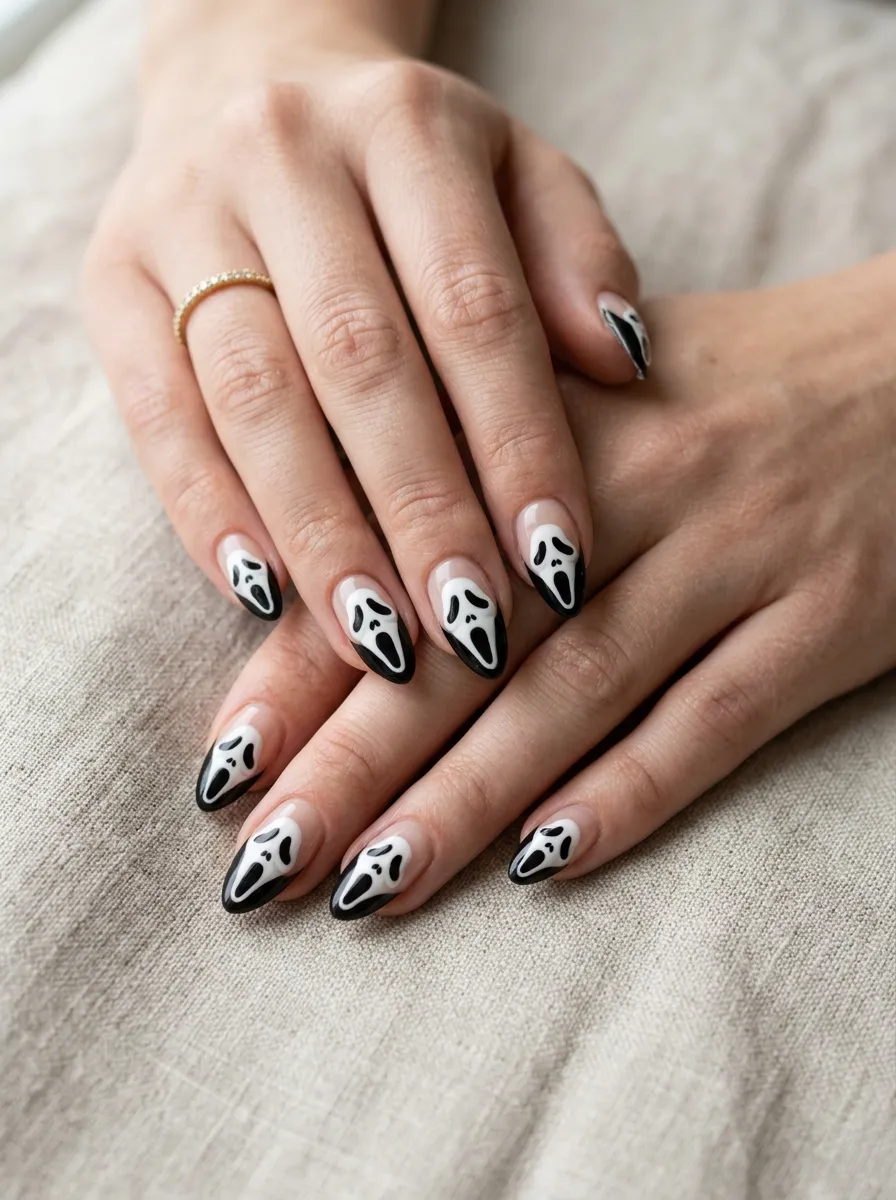
The French manicure gets a horror makeover. Instead of white tips, you get Ghostface at the top of every nail.
Start with a natural or nude base. Apply it like a normal French tip base.
Then, instead of painting a white tip, use black polish to create the tip. While it’s wet, use a thin brush to quickly sketch the Ghostface mask eyes and mouth within the black tip area.
The mask sits at the top of the nail. When your fingers are together, the row of masks looks incredible.
DIY tip: Use French tip guides, which are sticker strips sold at the drugstore, to get a perfectly clean tip line before adding your mask detail.
You can also do this with a white tip and draw the mask in black over it. That’s the more traditional-looking version.
This design is wearable enough for everyday life but clearly Halloween-themed when people look closely.
Seal with a glossy top coat for a polished, salon-quality finish that makes the tip look clean and sharp.
Great for people who want spooky nails but still need to look professional.
14. Glow in the Dark Ghostface Nails
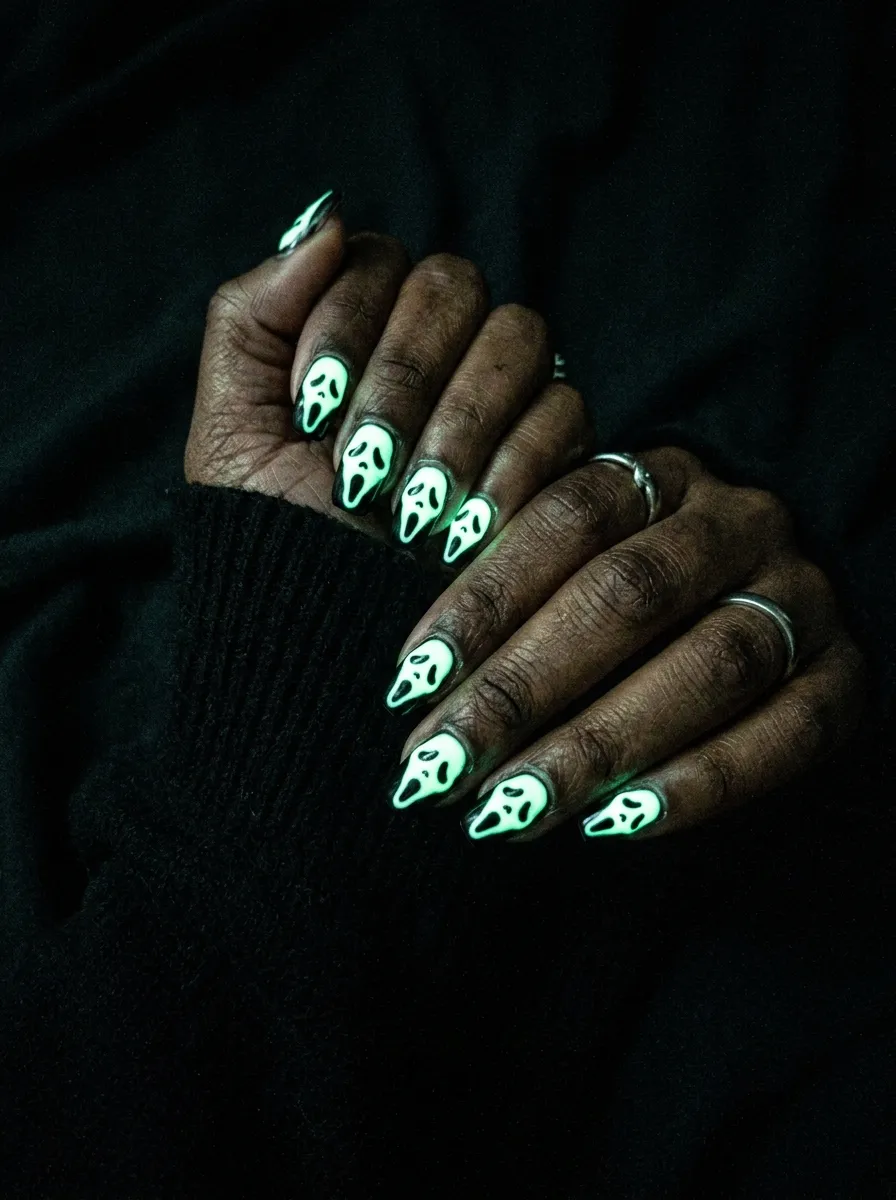
Imagine your nails glowing in the dark at a Halloween party. This is the power move of spooky nail art.
Glow-in-the-dark polish is widely available at craft stores and online for just a few dollars.
Paint your nails with a white or light base first. This helps the glow pigment show up more strongly when lights go out.
Apply your glow polish over the base. Then use a regular black or dark polish to draw the Ghostface mask outline on top.
In regular light, the nails look like standard white or cream nails with a mask. In darkness, they glow an eerie green.
Budget tip: Glow-in-the-dark nail powder also exists and can be mixed into clear topcoat. A small jar lasts for multiple manicures.
Charge your nails under a bright light or UV lamp before showing them off in the dark. The glow lasts longer with more light exposure.
This design is absolutely made for Halloween parties, haunted houses, and horror movie nights. The reveal moment when the lights go out is genuinely startling.
15. Bloody Handprint Nails
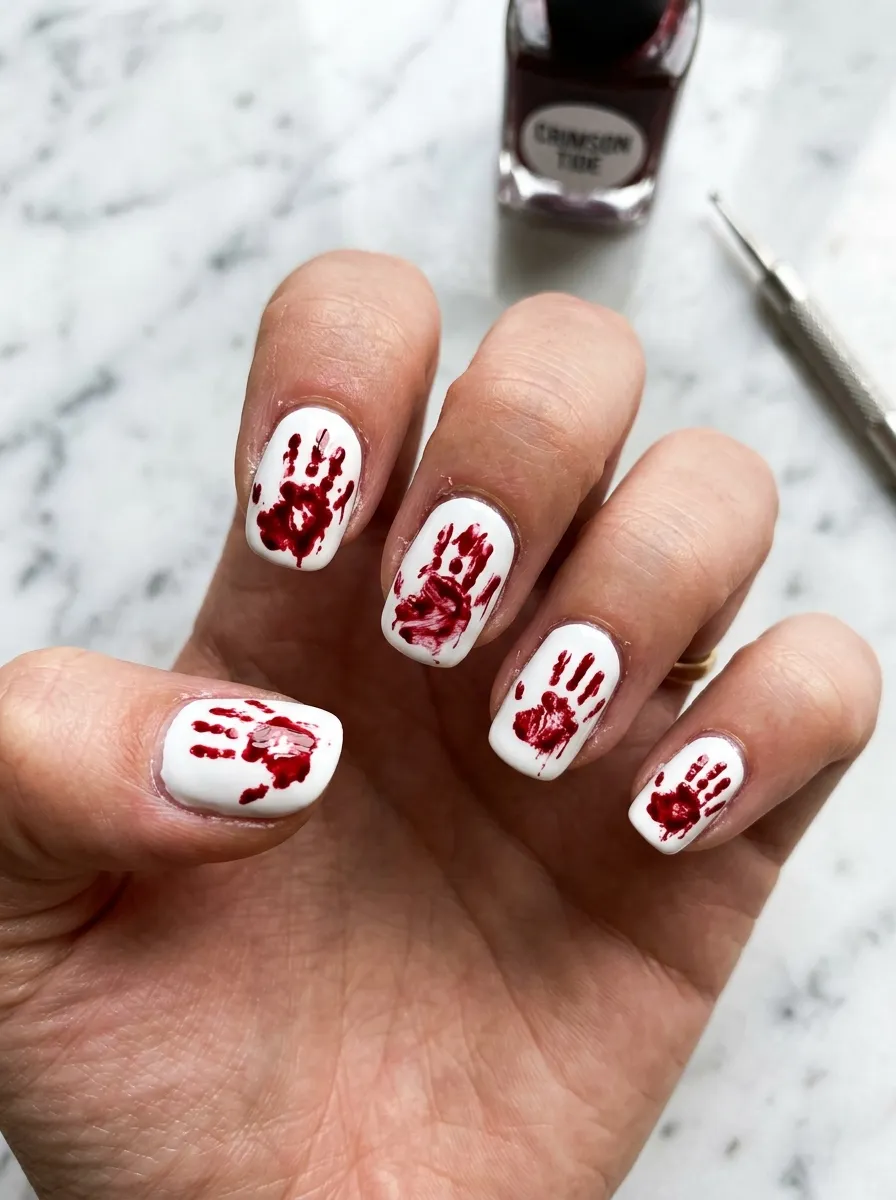
A bloody handprint is one of horror’s most recognizable images. Miniaturizing it onto a nail is both disturbing and genius.
Start with a white or cream base. Let it fully dry.
Use a red nail art pen or thin brush to paint a tiny handprint. Draw a small palm shape and five thin lines extending out as fingers.
Make the edges of the handprint slightly smudged. Real handprints are never perfectly clean, and this imperfection makes it look more authentic.
Budget tip: Look at your own palm for reference. Draw what you see. It’s the simplest and most accurate model you have.
You can do one handprint per nail or scatter multiple small prints across the nail surface like someone was pressing their hand repeatedly.
Pair handprint nails with Ghostface mask nails on other fingers. The combination tells a whole horror story across your hand.
Seal with a glossy top coat to make the red handprint look wet and recent. The glossy finish on red always looks more realistic and unsettling.
This is one of the most impactful designs on the list with the least technical difficulty.
16. Torn Flesh Texture Nails
This is for those who want their nails to look genuinely horrifying. Torn flesh nails are theatrical body horror art.
Use pinkish-red as your base to simulate skin tone. While wet, drag a dry brush with slightly darker pink across it to create a streaky texture.
Let it dry. Then use a thin black nail art pen to draw jagged, irregular lines across the nail. These are the “tears” in the flesh.
Fill in the torn sections with bright red to simulate exposed muscle or blood beneath.
Budget tip: This effect uses very little polish. You only need three or four colors and a dry brush. The technique is everything.
Add tiny white highlights along the torn edges using a white nail art pen. This creates the illusion of curled-up skin edges and adds depth.
This design is not for the faint-hearted. It looks deeply unsettling up close.
Seal with a matte top coat on the flesh areas and glossy on the red sections. The contrast in finish makes the wound look three-dimensional and real.
Wear this design for maximum scare factor at any Halloween event.
17. Spider Web Ghostface Nails

Spider webs and Ghostface are a perfect Halloween pairing. They come from different horror traditions but look beautiful together.
Paint nails black. Use a white nail art pen to draw simple spider webs on some nails.
To draw a web, start with a small dot in one corner. Draw straight lines radiating outward from that dot. Then connect the lines with curved arcs going from the center outward.
On other nails, draw the Ghostface mask in white.
Budget tip: Nail art brushes or even a clean toothpick dipped in white polish can draw spider webs precisely. You don’t need specialized tools.
Add a tiny black spider dangling from one of the web nails using a small black dot with eight thin legs. It’s a fun small detail that adds character.
The combination of webs and the Ghostface mask across different fingers creates a cohesive horror theme without being repetitive.
Seal everything with a glossy top coat to make the white lines pop sharply against the black base.
This design is beginner-friendly and one of the fastest spooky nail looks to execute.
18. Rose and Ghostface Gothic Nails
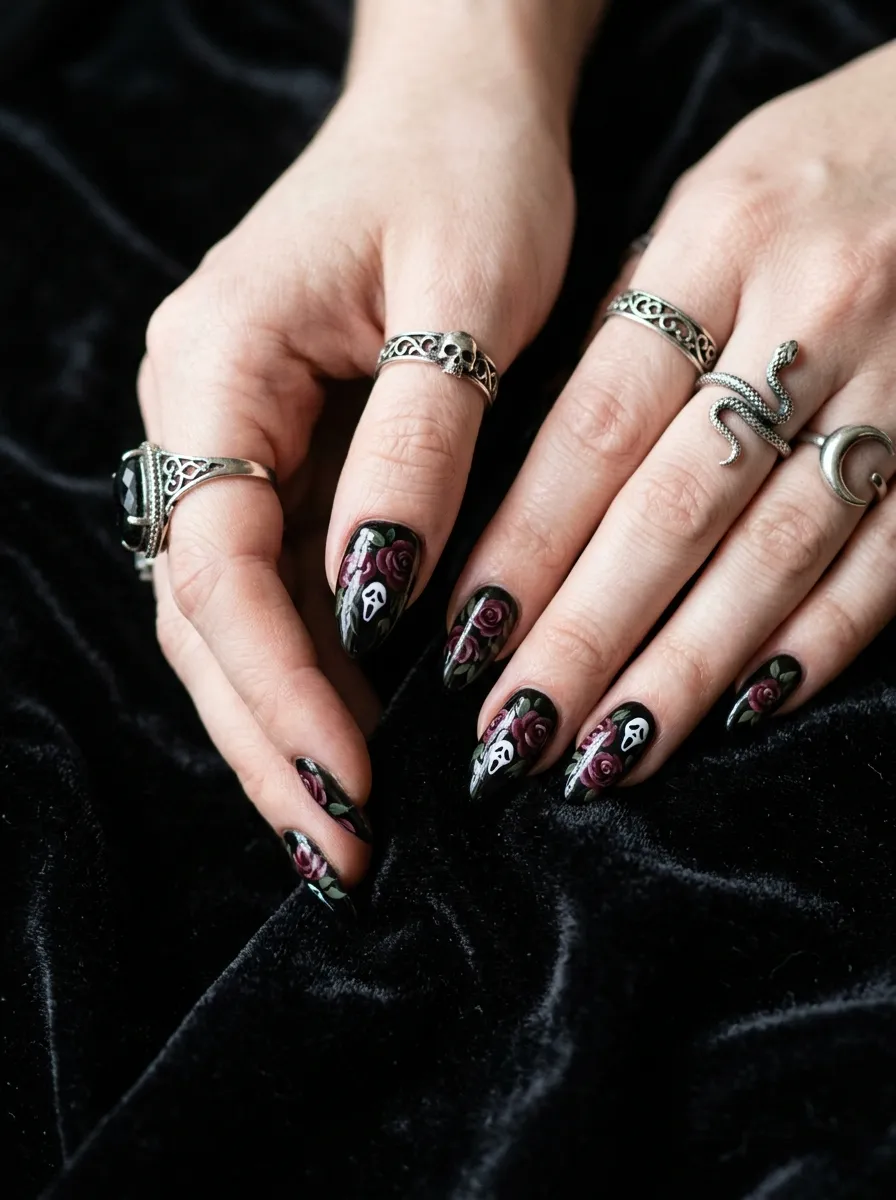
Gothic romance meets horror. This design puts dark roses and the Ghostface mask side by side.
Paint nails black. Use a deep red nail art pen to draw simple roses on some nails. A rose can be as simple as a swirl with a few curved petals around it.
On accent nails, draw the Ghostface mask in white or silver. The contrast between the romantic roses and the terrifying mask is striking.
Budget tip: Nail stickers shaped like roses also work here if freehand drawing feels difficult. Layer them over black polish and add a Ghostface mask on a separate finger.
Add a few small green leaves around the roses using a thin green line. Even just two or three small strokes suggest a leaf without needing to be detailed.
The gothic rose-and-mask combination works beautifully for Halloween but also fits a dark romantic aesthetic beyond October.
Seal with a glossy top coat to give the roses a lush, vivid finish and the mask a clean, sharp look.
This design feels romantic and terrifying at the same time, which is exactly the energy Halloween nail art should have.
19. Ghostface Ombre Nails
Ombre adds dimension. When paired with a Ghostface mask, it creates a fade-into-horror effect.
Use a small sponge to dab black polish on the bottom half of the nail and white polish on the upper half. Where they overlap in the middle, blend them together with a clean sponge while both are wet.
Once dry, use a black nail art pen to draw the Ghostface mask on the white upper portion of the nail.
The mask appears to emerge from the white section, as if rising from light into darkness.
Budget tip: A small kitchen sponge cut into a thin strip works perfectly for ombre. Wash and reuse it between color changes.
You can reverse the gradient and put black on top, white on the bottom. The mask drawn in white on the black upper section looks ghostly and ethereal.
Adding a glitter gradient along the blended line between black and white gives this design an extra sparkle that catches light beautifully.
Seal with a glossy top coat to smooth out the sponged texture and blend the ombre transition visually.
This is a medium-difficulty design that looks extremely impressive once mastered.
20. Stamped Ghostface Pattern Nails
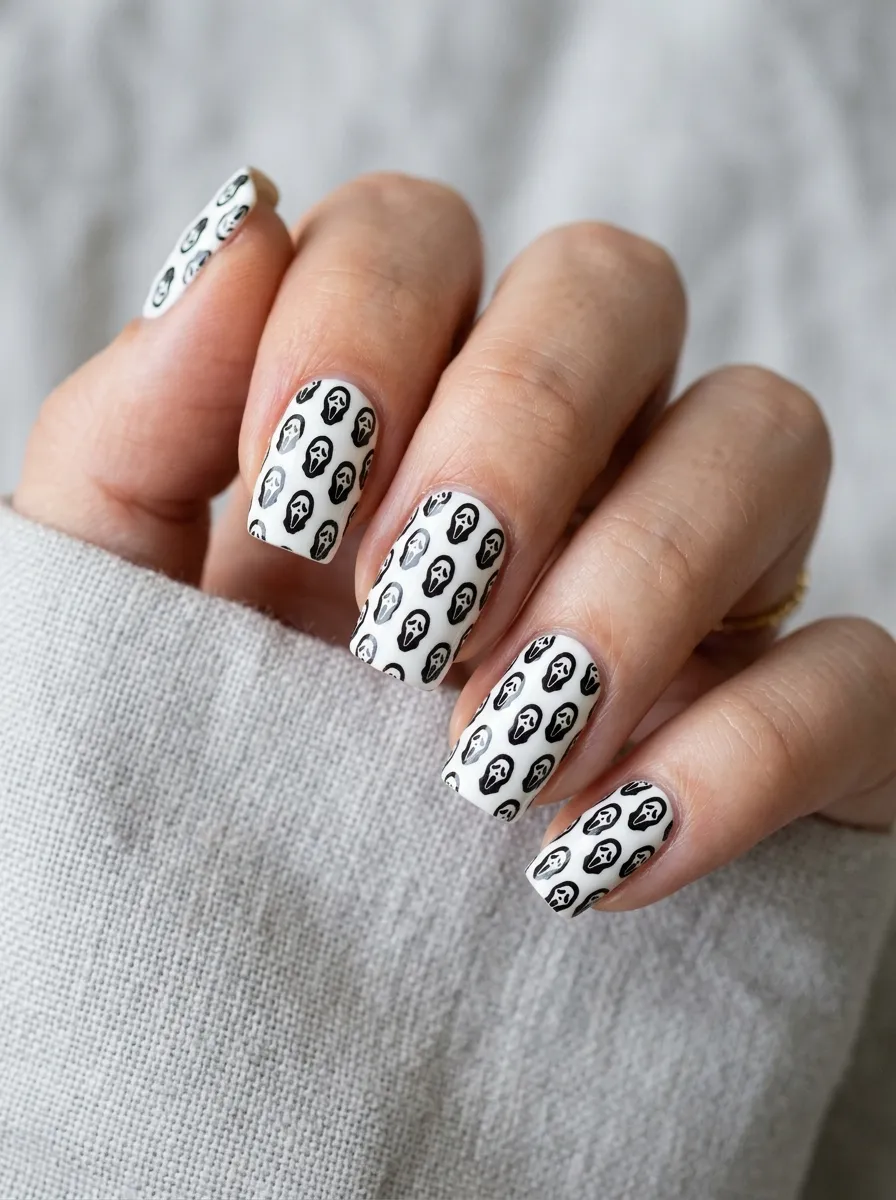
Nail stamping is a technique that uses a metal plate and a special stamp roller to transfer designs onto the nail. It’s fast, precise, and addictive.
Buy a Ghostface or Halloween nail stamping plate online. These cost just a few dollars and have multiple designs per plate.
Apply your base color. Let it dry fully. Then apply a special stamping polish to the design on the plate. Scrape off excess with a flat card.
Press the stamp roller onto the plate, then roll it onto your nail. The design transfers cleanly.
Budget tip: Full starter stamping kits, including the plate, stamper, and scraper, are available on Amazon for around $8-10. They’re worth every dollar.
You can stamp Ghostface masks in a repeating all-over pattern across each nail. This creates a printed fabric effect that looks extremely professional.
Use contrasting colors for maximum impact. Black masks on white nails. White masks on black nails. Red masks on black nails.
Seal with a top coat and your nails will look like they were done in a professional salon in a fraction of the time.
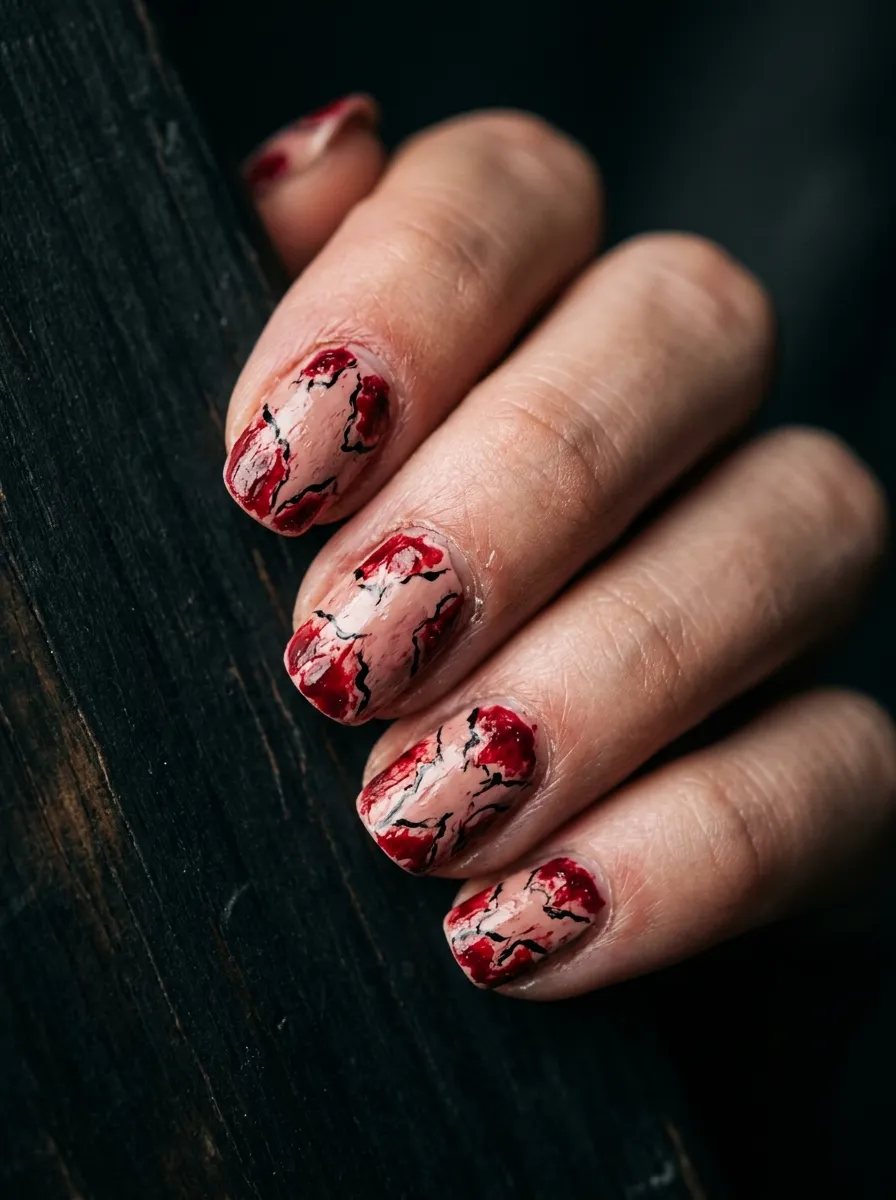
21. Cracked Porcelain Horror Nails
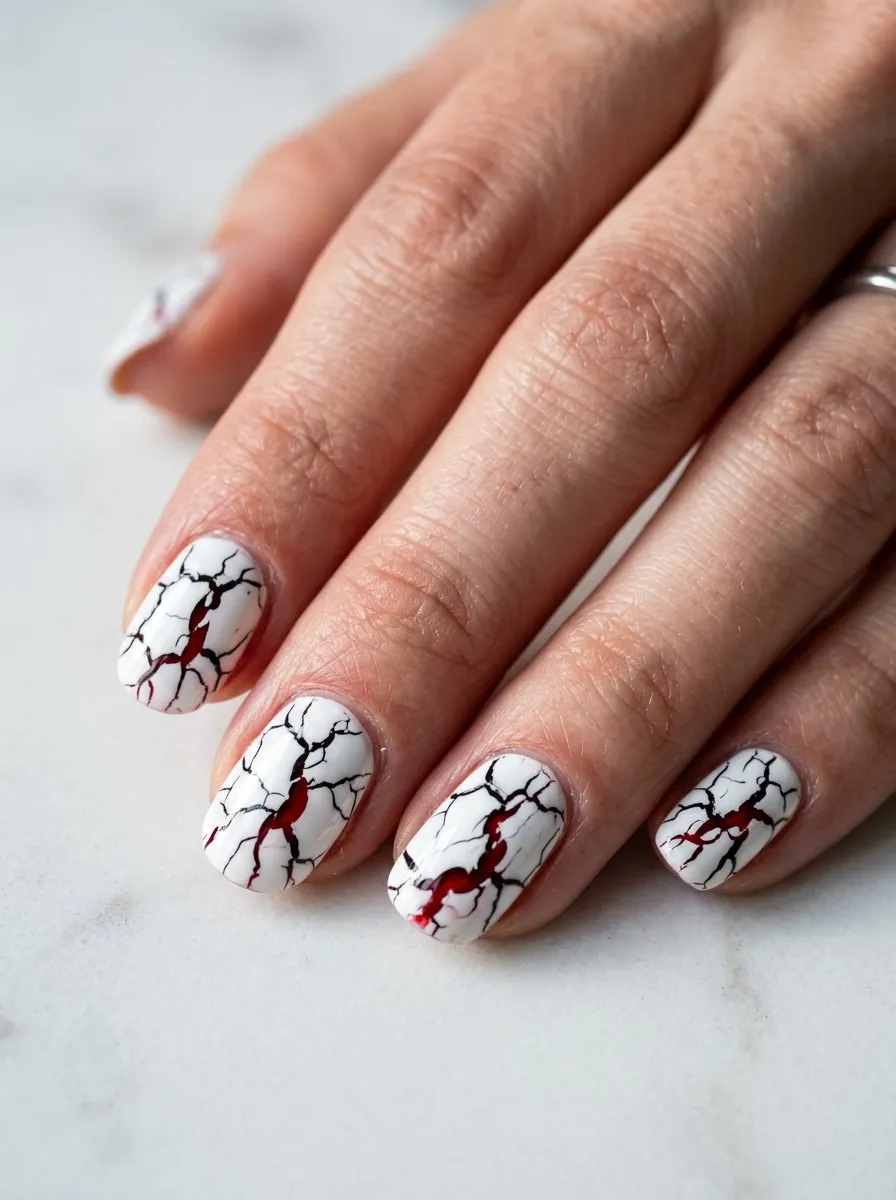
The Ghostface mask is white. Cracked porcelain nails take that connection and push it into disturbing territory.
Start with a pure white base. Let it dry completely.
Use a thin black nail art pen to draw irregular crack lines across the nail. Cracks radiate outward from a central point. They’re never perfectly straight.
In the widest crack gaps, fill in with deep red polish to suggest something bleeding or glowing beneath the white surface.
Budget tip: Look at images of cracked porcelain or cracked phone screens for reference. These are easy to find and give you a realistic crack pattern to copy.
The effect is stunning because it combines elegance with horror. White nails are classic and clean. Cracks through them suggest something broken and threatening underneath.
You can also do this on a pearl or iridescent white instead of flat white. The shimmer in the base makes the cracks look even more dramatic.
Seal with a glossy top coat to finish. The shine makes the white look like actual porcelain and deepens the red beneath the cracks.
This is a quiet, refined horror look that works for people who want spooky but sophisticated.
22. Black Lace Overlay Ghostface Nails
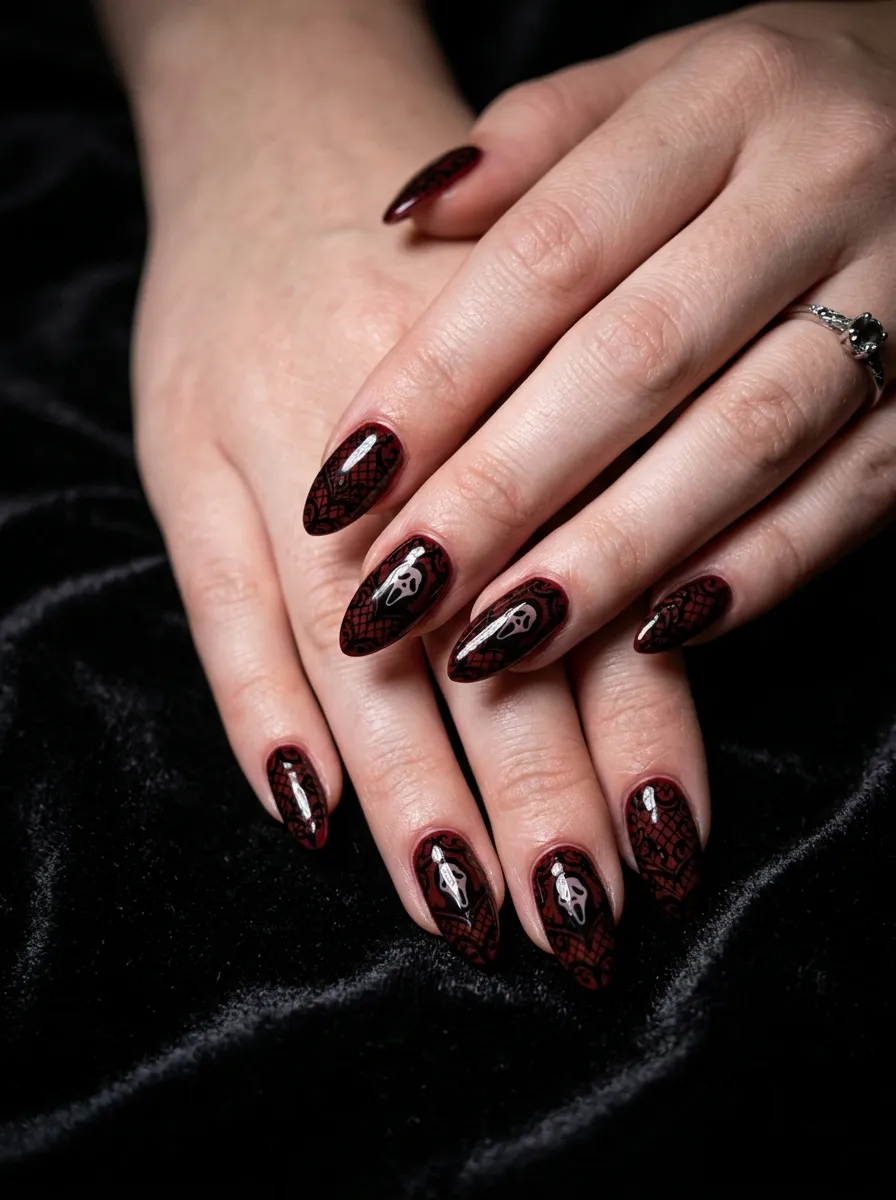
Lace patterns are traditionally delicate and feminine. Over a dark red or black base with Ghostface hidden inside, they become deeply unsettling.
Use dark red or burgundy as your base. Let it dry.
With a thin black nail art pen, draw a lace-like border along the top of the nail. Lace can be simplified into small loops, diamonds, and connecting lines.
Within the lace pattern, on your accent nail, incorporate the Ghostface mask as part of the design. Let the mask be framed by the lace around it.
Budget tip: Lace nail stickers also exist and can be layered over your base color. They’re sold at beauty supply stores and online for very little money.
The hidden Ghostface inside the lace means the nail has a secret horror element. It doesn’t scream Halloween from a distance but reveals itself up close.
Seal with a glossy top coat to make the dark base rich and the black lace lines crisp.
This design suits people who love dark romantic aesthetics year-round and not just for Halloween.
23. 3D Ghostface Mask Nails

For the most theatrical look on this list, nothing beats actual 3D elements on your nails.
Ghostface mask nail charms are available on Etsy and Amazon for just a few dollars each. They come pre-made and detailed.
Apply them to your nails using nail glue or a strong gel top coat. Press them firmly at the base of the charm and hold for 30 seconds.
The mask sits on your nail like a tiny sculpture. It looks dramatic, cinematic, and fully committed to the horror aesthetic.
Budget tip: If you can’t find Ghostface-specific charms, small white mask charms work similarly. You can paint the Ghostface expression on them yourself using a nail art pen.
Keep the rest of your nails simple and dark. Plain black or red nails around a 3D accent nail look intentional and polished rather than overwhelming.
Avoid using the 3D charm on nails you type with frequently as it will pop off faster with heavy use. Save it for accent fingers.
Seal the surrounding nails with a glossy top coat to complement the dimensional charm and tie the look together.
This is the most bold and committed Ghostface nail design you can wear.
24. Abstract Horror Brushstroke Nails
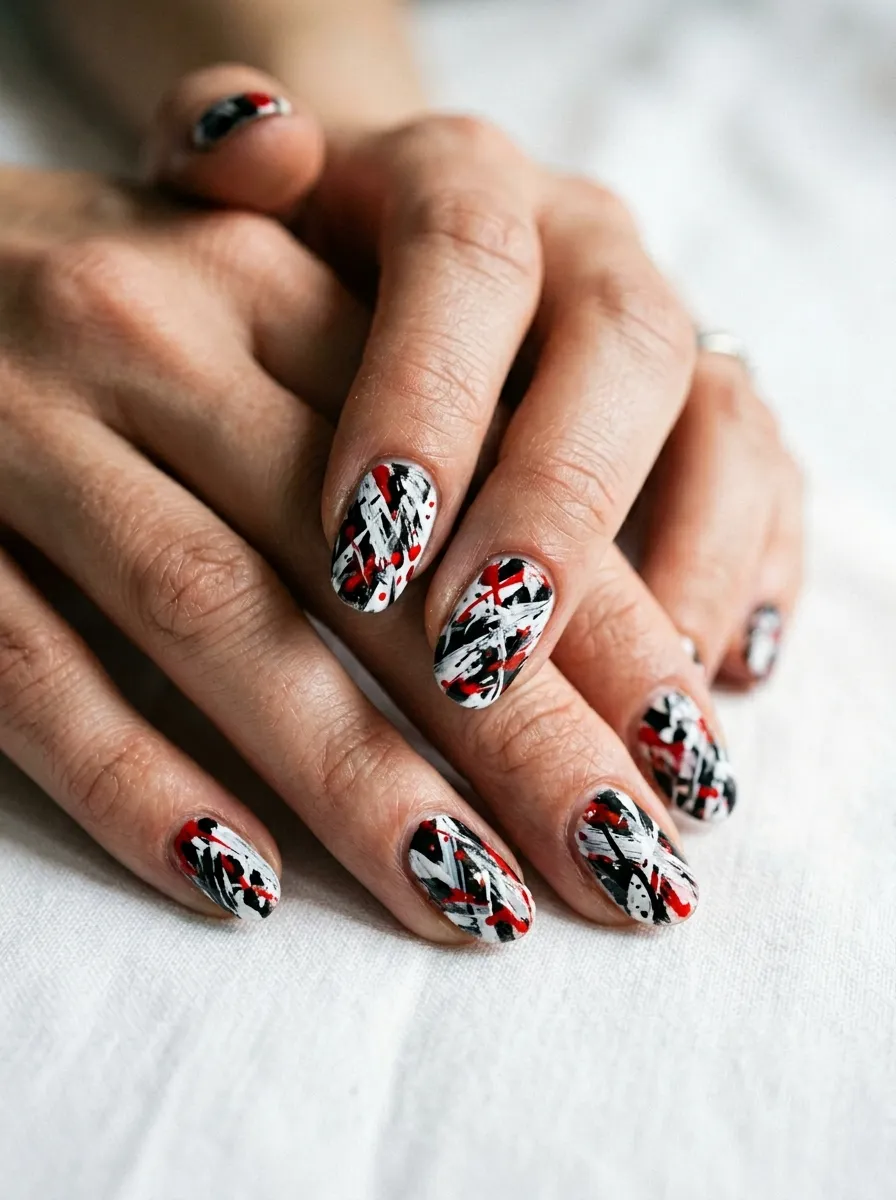
Not all Ghostface nails need to be literal. Abstract horror nails suggest the feeling of a horror film without spelling it out.
Use black, white, and red as your palette. These three colors are the visual language of Ghostface.
Apply them in loose, expressive brushstrokes across each nail. Let them overlap. Let them drip slightly. Let them be imperfect.
The result should feel more like a painting than a graphic nail design. The chaos IS the design.
Budget tip: Old nail polish brushes that are slightly frayed actually work better for this. The jagged, rough strokes add to the abstract texture.
On one or two nails, if you look closely, you might see the suggestion of a mask or a drip. But it shouldn’t be obvious. Let it be subtle.
This design is for those who want a fashion-forward, artsy interpretation of the Ghostface theme rather than a literal costume.
Seal with a matte top coat to give the look a painted-on art quality. Matte finishes suit abstract designs beautifully.
Abstract horror nails are deeply personal. Every set will look different. That uniqueness is the entire appeal.
Conclusion
Ghostface nails prove that Halloween beauty can be just as creative and committed as any costume. Whether you go for the literal mask, abstract horror brushstrokes, or a blood-drip French tip, there’s a design here that suits your style, budget, and skill level. Most of these looks can be done at home with inexpensive tools. You don’t need a salon appointment to have terrifying, head-turning nails this Halloween. Start with something simple like a classic black and white mask or blood drip tips. Build your skills and confidence from there. The most important thing is having fun with it. Pick a design, grab your nail art pen, and get to work. Your hands deserve to be part of the horror story.