
If you love nails that stop people in their tracks, spider nail ideas art is exactly what you have been waiting for. These designs bring a dark, eerie energy that works perfectly for Halloween, gothic seasons, or any time you want your manicure to say something bold. From tiny hand painted spiders to full webs dripping across every finger, the options are wild and surprisingly doable at home. Whether you are a nail art beginner or someone who has been painting their nails for years, there is a spider nail look here that fits your skill level and your budget. If you’re also exploring Frankenstein Nail Ideas, stitched details, electric green shades, dark gothic accents, and monster-inspired artwork can help you create a spooky manicure that feels playful, dramatic, and perfect for horror season.
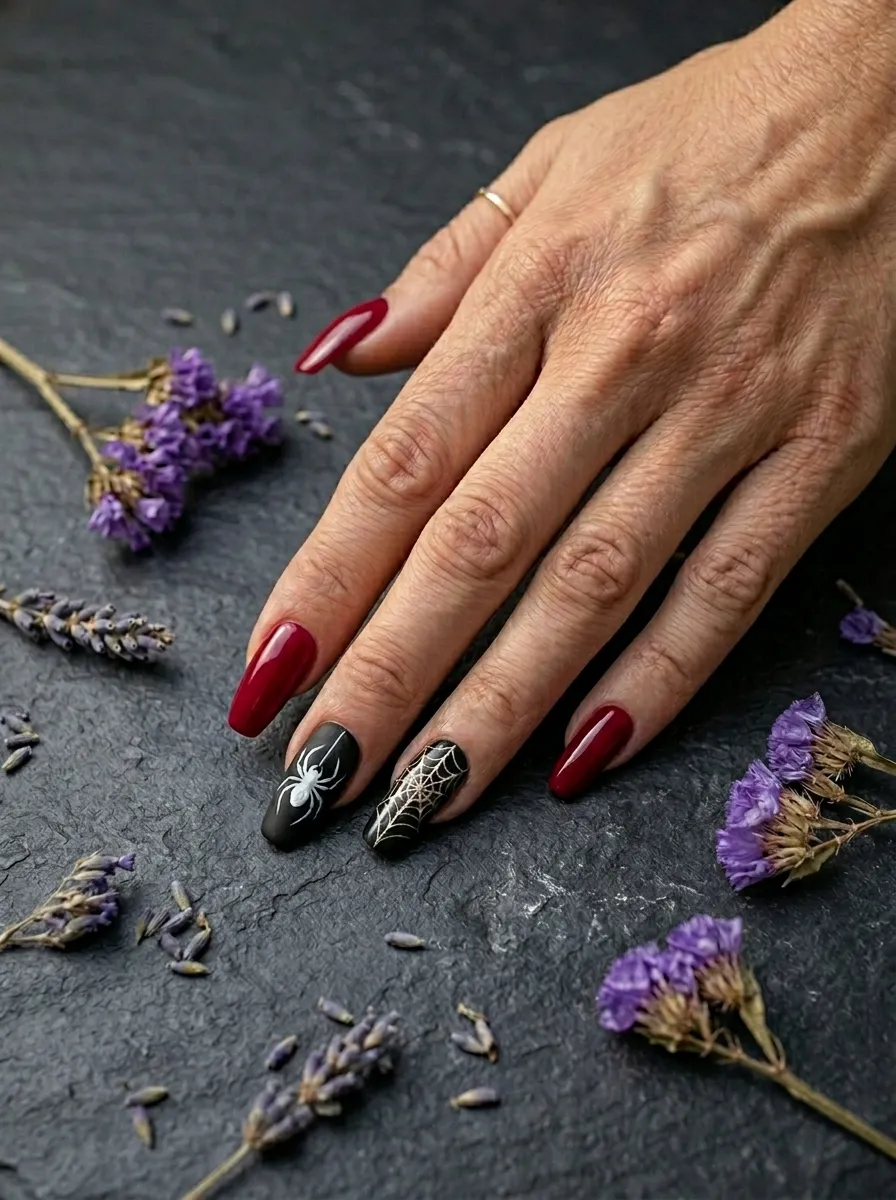
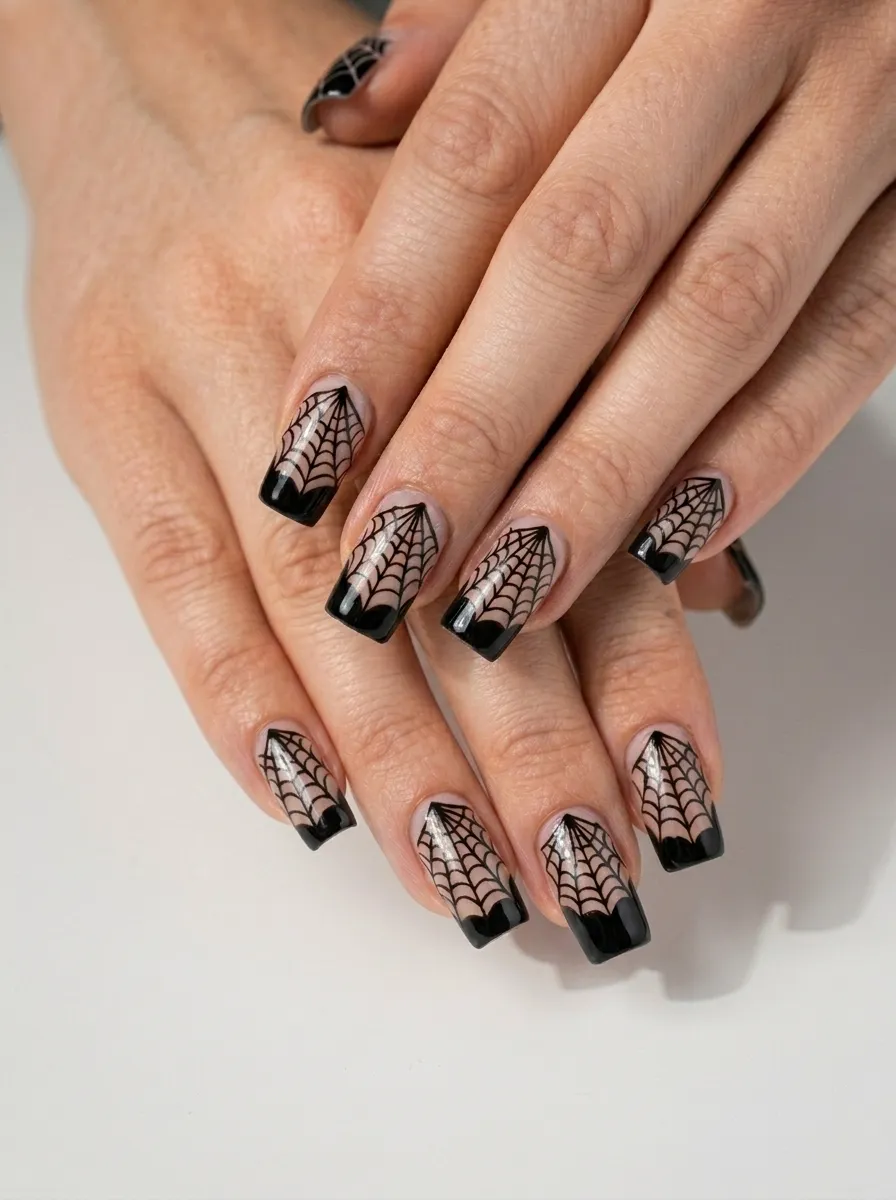
1. Classic Black Spider Web Nails
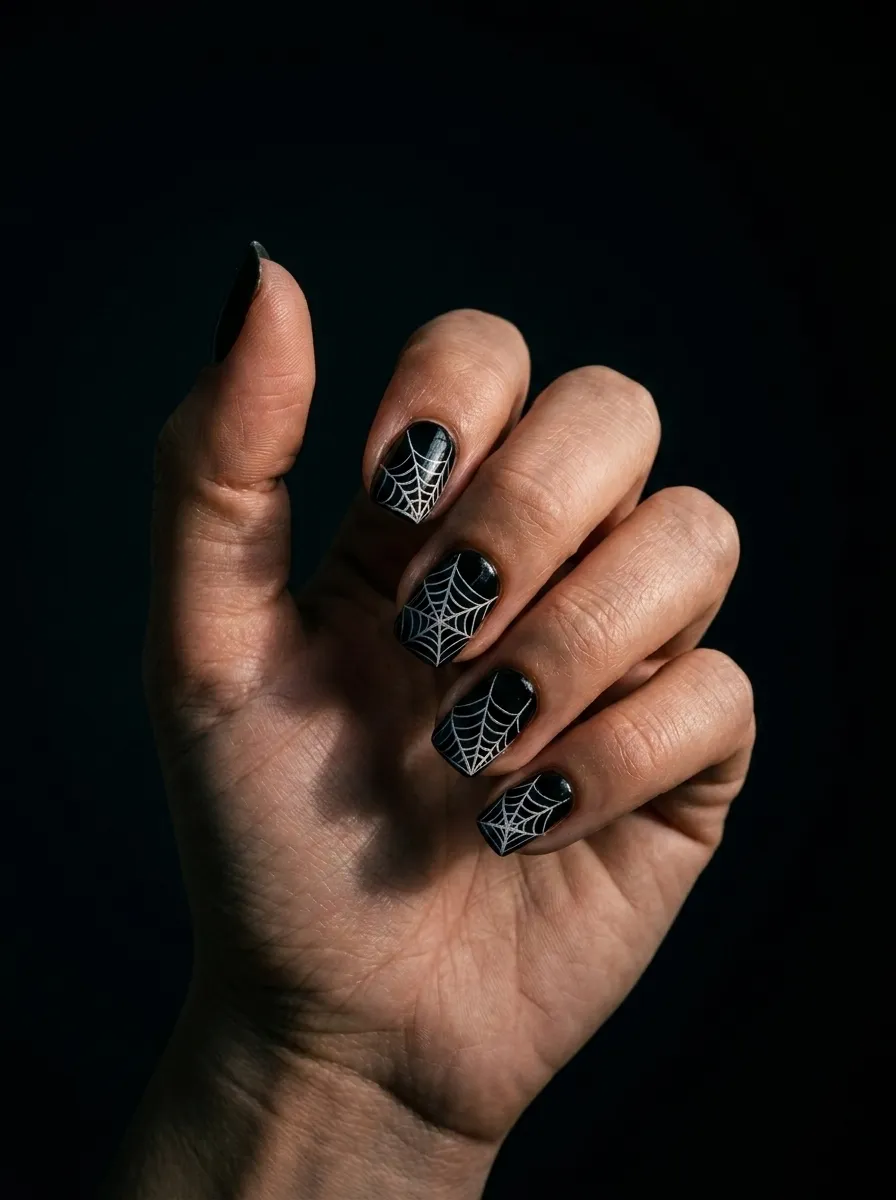
This is where most people start, and for good reason. A simple black base with a white web drawn on top looks sharp, scary, and totally put together.
You do not need a nail salon for this. Grab a black nail polish and a thin nail art brush or a toothpick. Dip the toothpick in white polish and drag lines from one corner of the nail outward. Then connect those lines with curved arches to complete the web shape.
Start with just one accent nail if the full hand feels overwhelming. The pointer finger or ring finger works great as a focal point.
This design takes maybe 20 minutes once the base coat is dry. Use a matte top coat to give the web a dusty, aged look. Or go glossy for something more dramatic.
Budget tip: Dollar store nail polish in black and white gets the job done. You do not need expensive gel polish to pull this off at home.
2. Glitter Web with a Matte Black Base
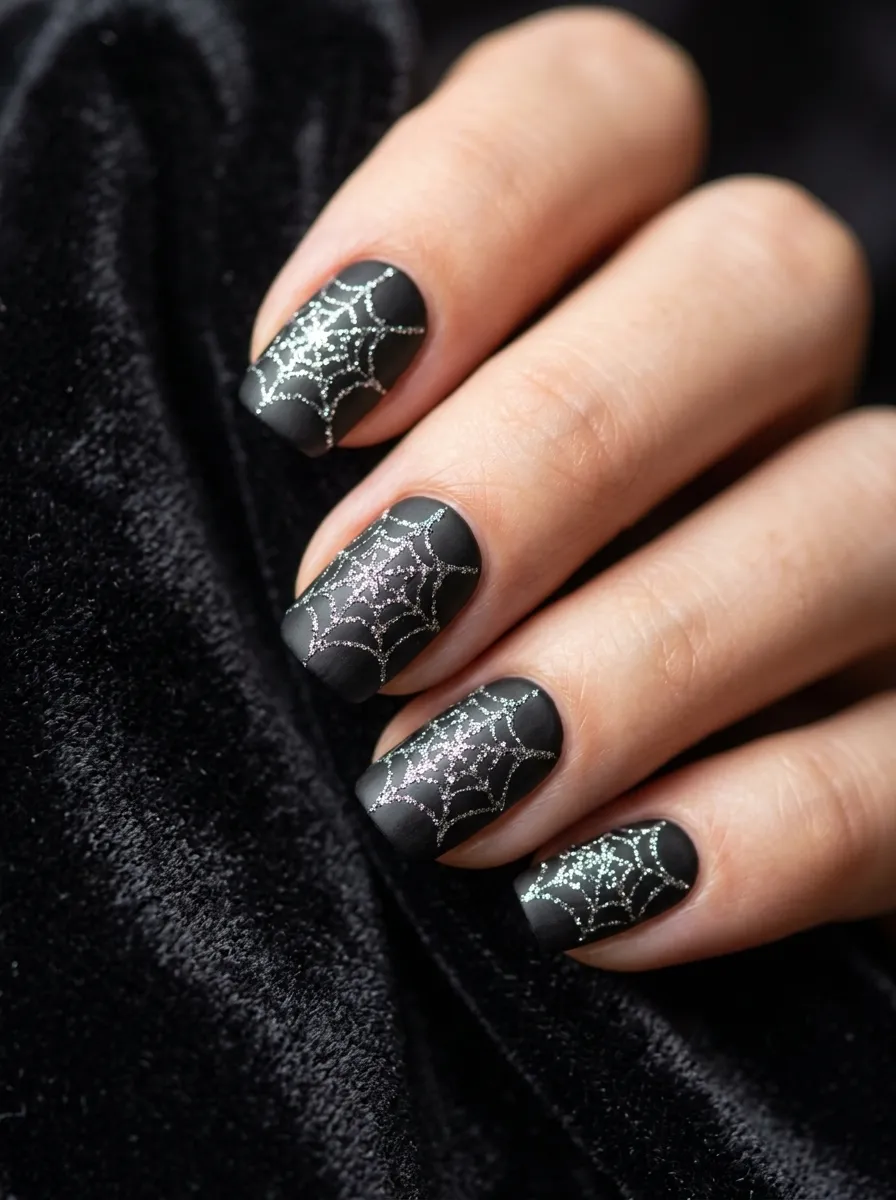
This version adds a little sparkle to the creepy factor, which sounds contradictory but looks amazing in real life.
Paint your nails with a matte black base first. Let that dry completely. Then use a fine glitter nail polish or a glitter gel liner to draw your web on top. The glitter catches the light as you move your hand and gives the web a shimmery, almost magical quality.
It is the kind of design that looks scary in dim lighting but absolutely stunning when the sun hits it.
Silver and holographic glitters work best here. Gold glitter gives a more vintage, haunted look if that is the vibe you are going for.
This works well on longer nails because you have more surface area for the web detail. But short nails can do a simple corner web just as well.
Top it off with a clear matte top coat to keep the base matte while letting the glitter pop. This is a beginner friendly design that looks like you spent real time on it.
3. Orange and Black Halloween Spider Nails
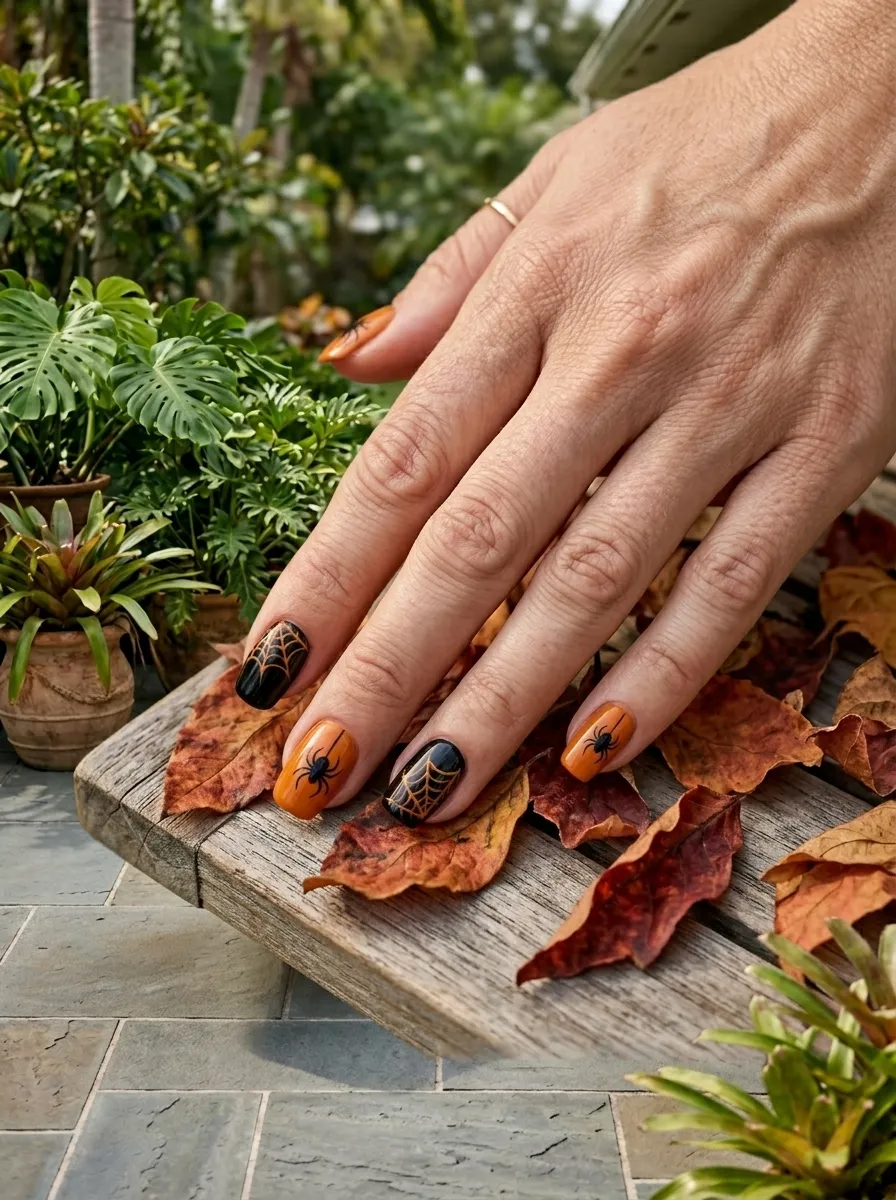
Orange and black is the ultimate Halloween color combination, and it works beautifully with spider nail art.
Paint alternating nails orange and black. On the orange nails, paint tiny black spider bodies with little legs extending outward. On the black nails, draw orange webs in the corner. The contrast between the two makes the design pop from across the room.
This is a great choice if you want something that screams Halloween without being overly complicated.
Use a nail art pen for the spider bodies since pens give you better control than a brush for tiny details. The legs are just short thin lines extending from a small oval or circle shape.
Want to take it further? Add a tiny white dot to each spider body to give it a shiny, creepy eye. That small touch makes a huge difference.
This design looks great on both natural nails and press ons. If you are doing press ons, paint them flat before applying for easier handling. Budget friendly and very wearable for the whole month of October.
4. Spooky Spider Dangling From a Web
This design tells a little story. One nail shows a spider hanging mid air from a thin web thread, as if it just dropped down from the ceiling. It is unsettling in the best possible way.
Choose one accent nail, usually the ring finger, for the dangling spider. Keep the rest simple with corner webs or a solid dark color. This lets the spider nail be the star of the show.
Draw a vertical line from the top of the nail down toward the center. At the bottom of that line, add a small round body and eight tiny legs. Done. It is simpler than it looks.
A deep burgundy, black, or dark plum base sets the scene perfectly. The spider pops best in white or a contrasting bright color against a dark background.
You can even add a tiny rhinestone to the spider body for a 3D jeweled effect. Craft stores sell nail rhinestones in bags for just a couple of dollars, and they stick easily with a dot of clear polish. This design gets serious attention and is worth the extra five minutes.
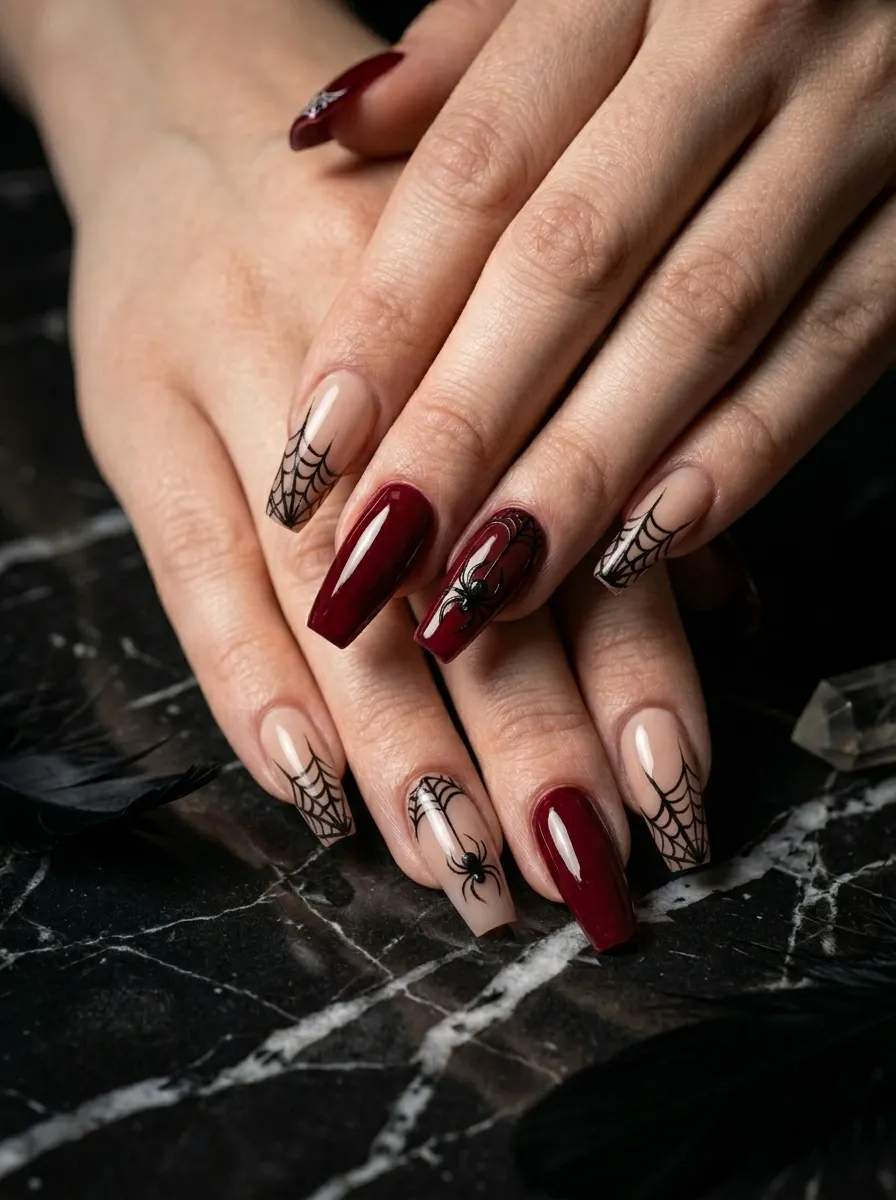
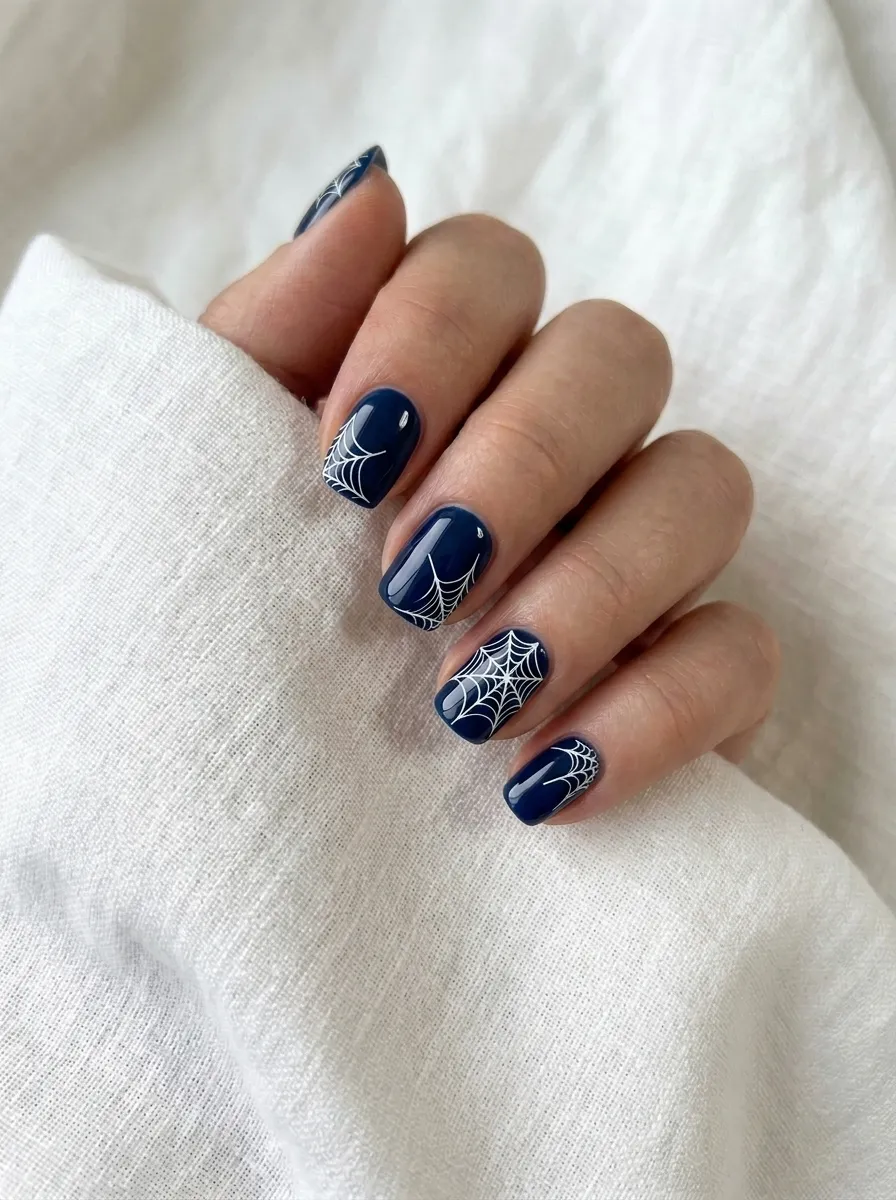
5. Red and Black Spider Web French Tips
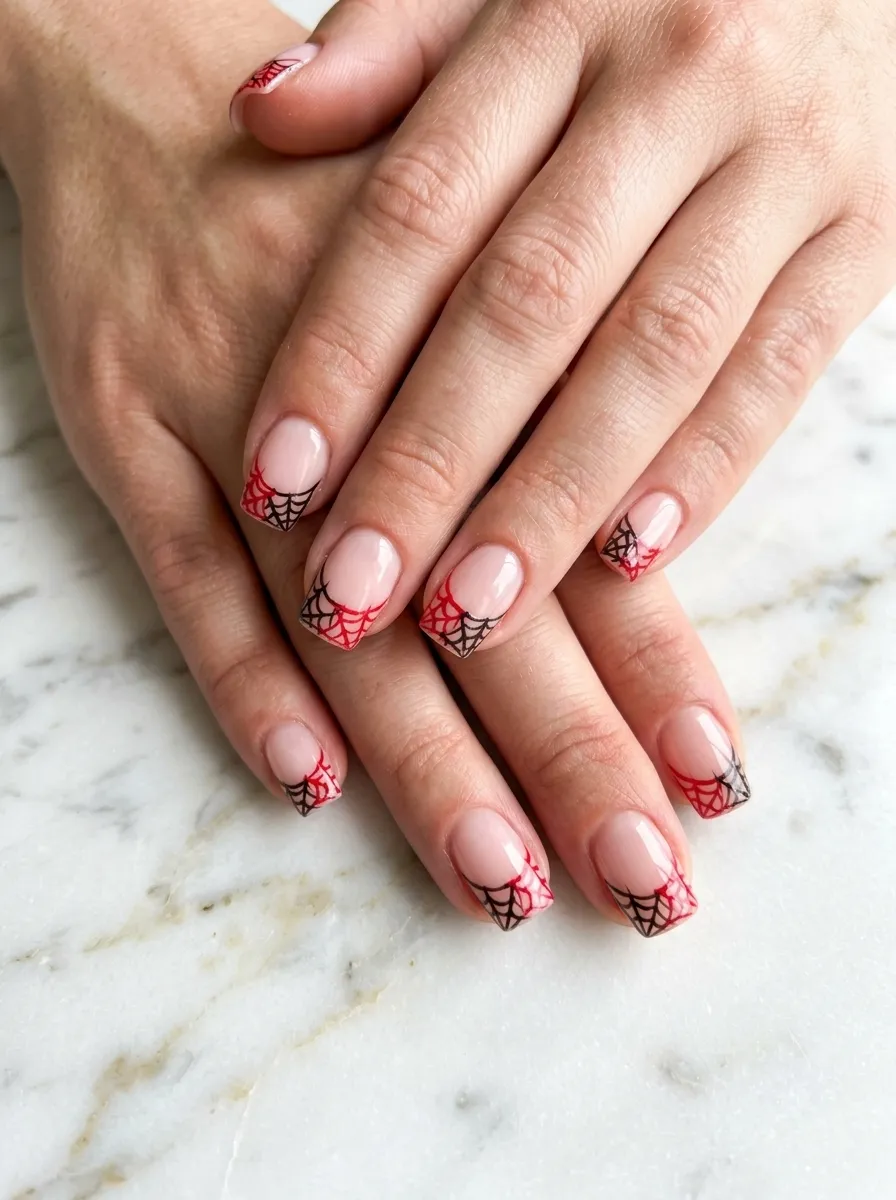
French tips get a dark makeover with this spider web version. Instead of the classic white tip, replace it with a red and black web design.
Start with a clean nude or pale pink base. Then use a thin nail art brush to draw a red curved tip line. Add black web lines extending down from that tip into the nail body. The result is a grown up, slightly gothic take on the French manicure that still looks polished enough for everyday wear.
This works especially well for people who want edgy nails that are not completely over the top. You can wear these to work or a dinner out and still get compliments without looking like you are in full costume.
Red is a bold color choice, but dark navy or forest green also look incredible for a different seasonal feel.
The key here is keeping the web lines thin and spaced evenly. Less is more with this design. Two or three web lines per nail look cleaner than a dozen crowded ones. Practice on a piece of paper first before applying to your actual nail.
6. Glow in the Dark Spider Nails
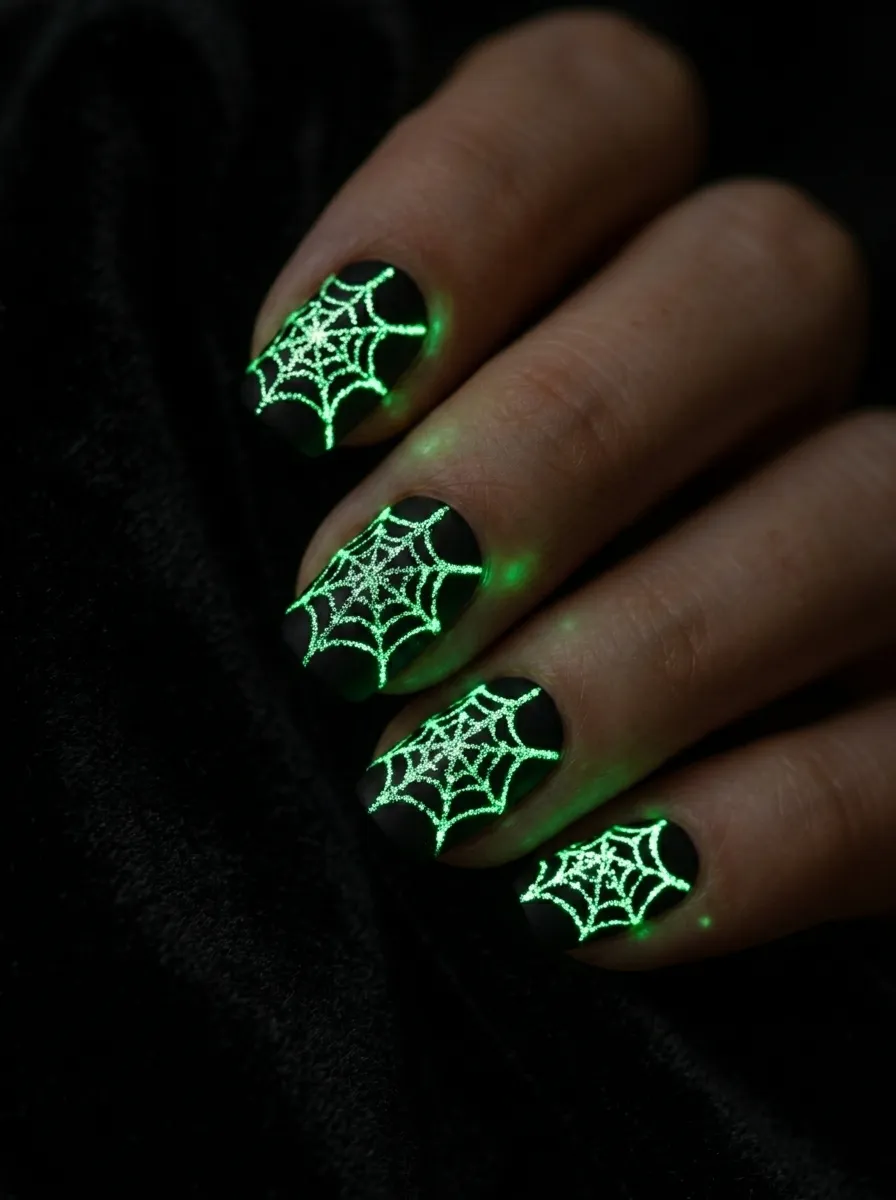
These nails are terrifying in the best possible way. Regular light makes them look like standard dark nails. Turn off the lights, and suddenly glowing green webs appear across every finger.
Glow in the dark nail polishes are easy to find online and in Halloween supply stores. They are not expensive and they work exactly as advertised. Apply a black or dark base, then paint your webs using the glow polish on top.
The spider web shapes do not need to be perfect here. In the dark, the glow effect hides any shakiness in the lines and everything still looks great.
This design is a party trick that pays off all night. At a Halloween party, dimmed lighting will make your nails come alive in the most dramatic way.
Charge the glow polish under a lamp or phone flashlight for maximum effect before heading out. The charge fades after about 30 minutes but recharges with any light source.
For the spiders, draw small spider shapes in regular glow polish on one or two nails for an extra creepy detail. Total cost for a glow in the dark nail set is usually under five dollars with craft store supplies.
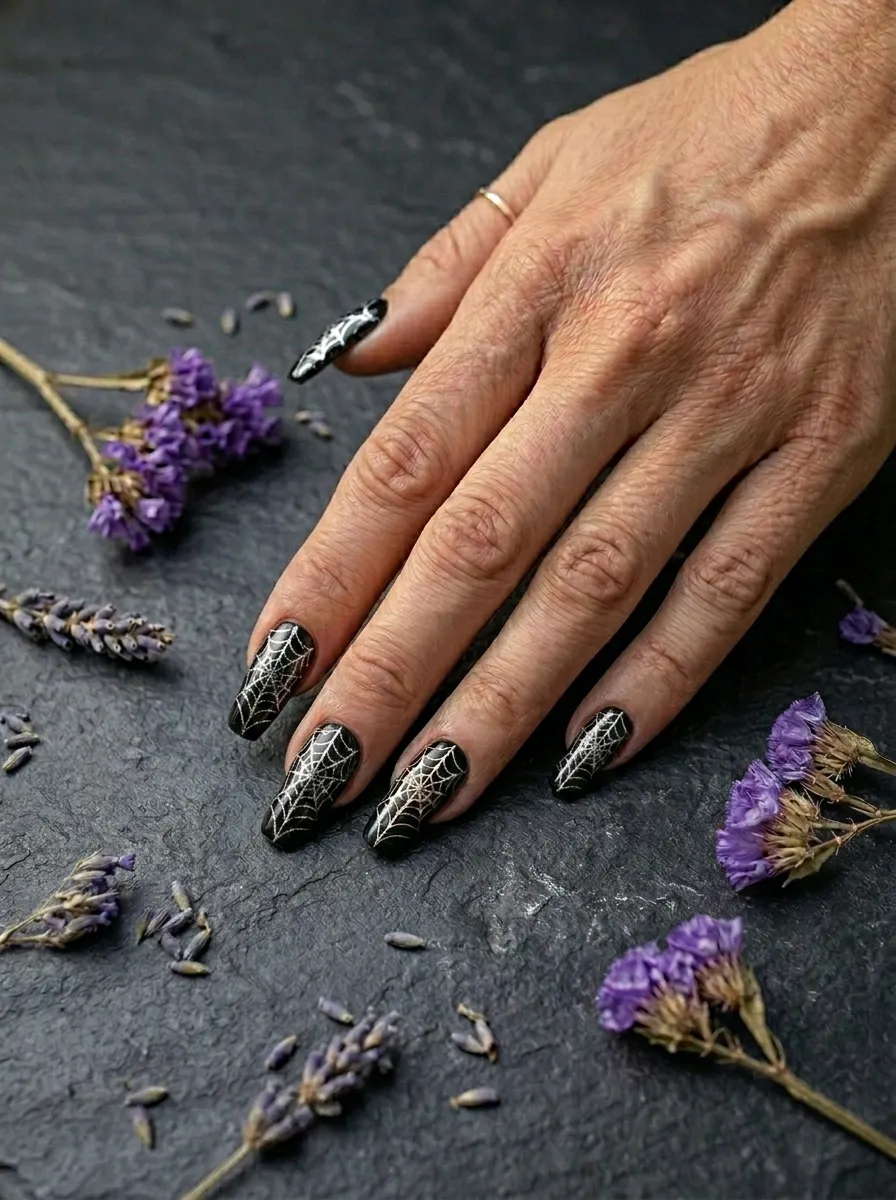
7. Coffin Nails with Full Web Coverage
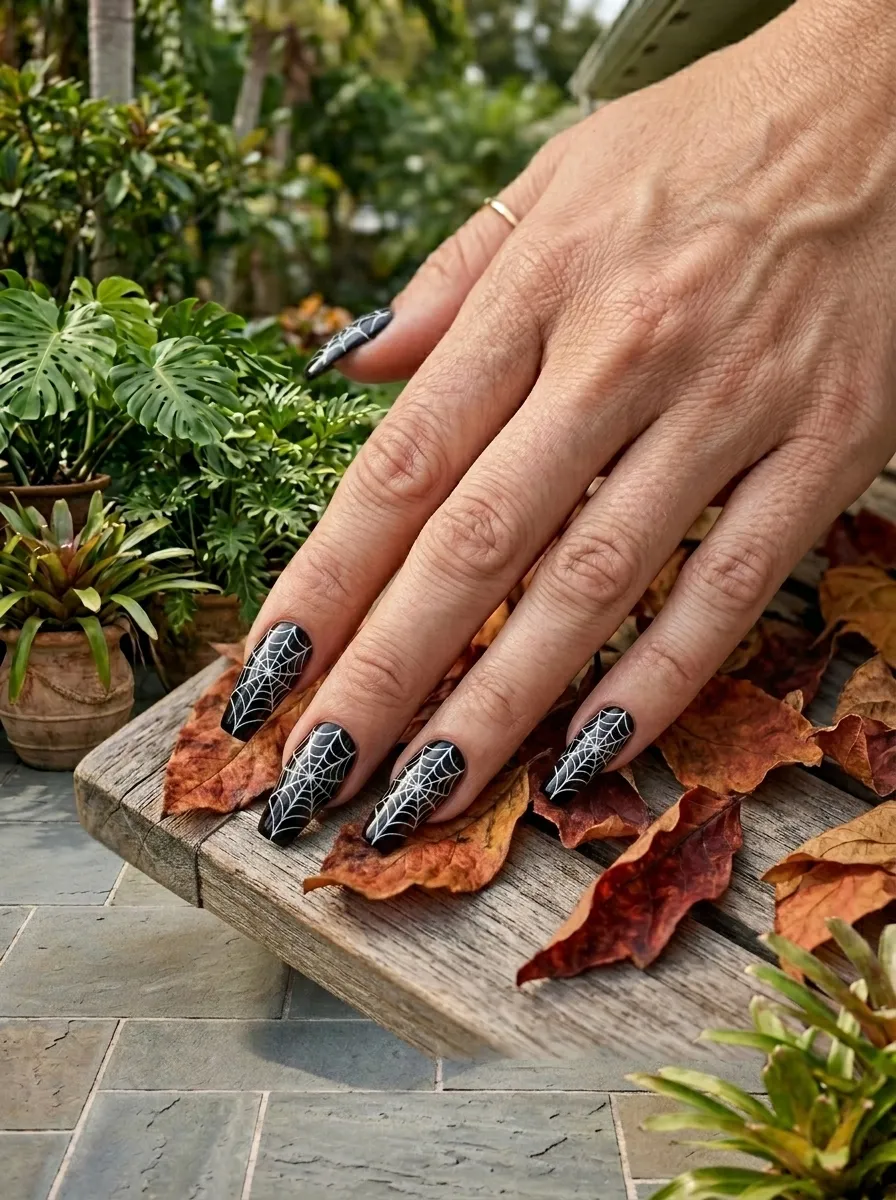
If you have long coffin nails or love the look of press ons in that shape, full web coverage is the way to take this design to the maximum level.
Instead of just a corner web or a single spider, the web covers the entire nail surface. Lines radiate from the cuticle outward, connected by curved arch shapes, filling every inch of the nail.
This requires a bit more patience than simpler designs but the payoff is major. It is dramatic, cohesive, and extremely eye catching.
Use a thin nail art brush or a nail detail pen. Start from the center and work outward in sections. Draw your radiating lines first, then add the connecting arches one ring at a time moving from the center to the tip.
A bright white web on jet black nails is the most striking version. But silver web on dark purple, or gold web on black, are equally beautiful for a slightly elevated gothic aesthetic.
If freehand feels too stressful, nail web stickers and stencils exist and are widely available at beauty supply stores for under three dollars. Apply the sticker, paint over it, peel, and you have a perfect web every time.
8. Neon Spider Web Nails
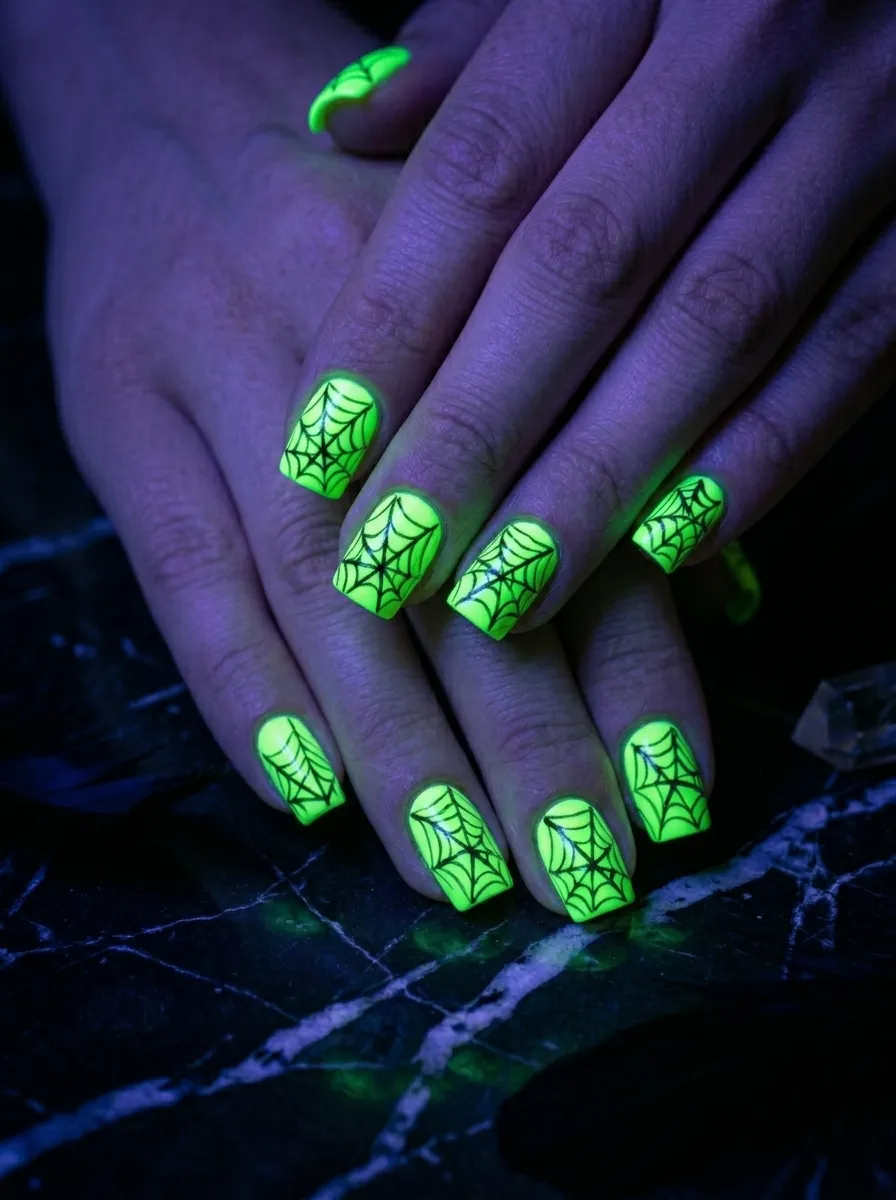
Who says spider nails have to be dark? Neon spider web nails flip the script completely and make the design look electric and almost psychedelic.
Use a neon base, think bright green, electric pink, or vivid orange, and draw black webs on top. The contrast is wild. It looks creepy and fun at the same time, which is a hard combination to pull off.
Neon nails also look incredible under black lights, making them perfect for club nights, Halloween raves, or any event with colored lighting.
For the spiders, small black bodies with legs sit beautifully against a neon background. Add a tiny neon dot for the spider’s eye and it almost looks like it is watching you.
This design works on any nail length. Short nails with a simple corner web in black on a neon base can look just as good as a full web on a longer nail.
Neon nail polish is affordable and widely available at drugstores. Pair it with a glossy top coat to make the color even more vivid. This is a good option if you want spider nails that feel playful rather than purely spooky.
9. Minimalist Single Spider Nail
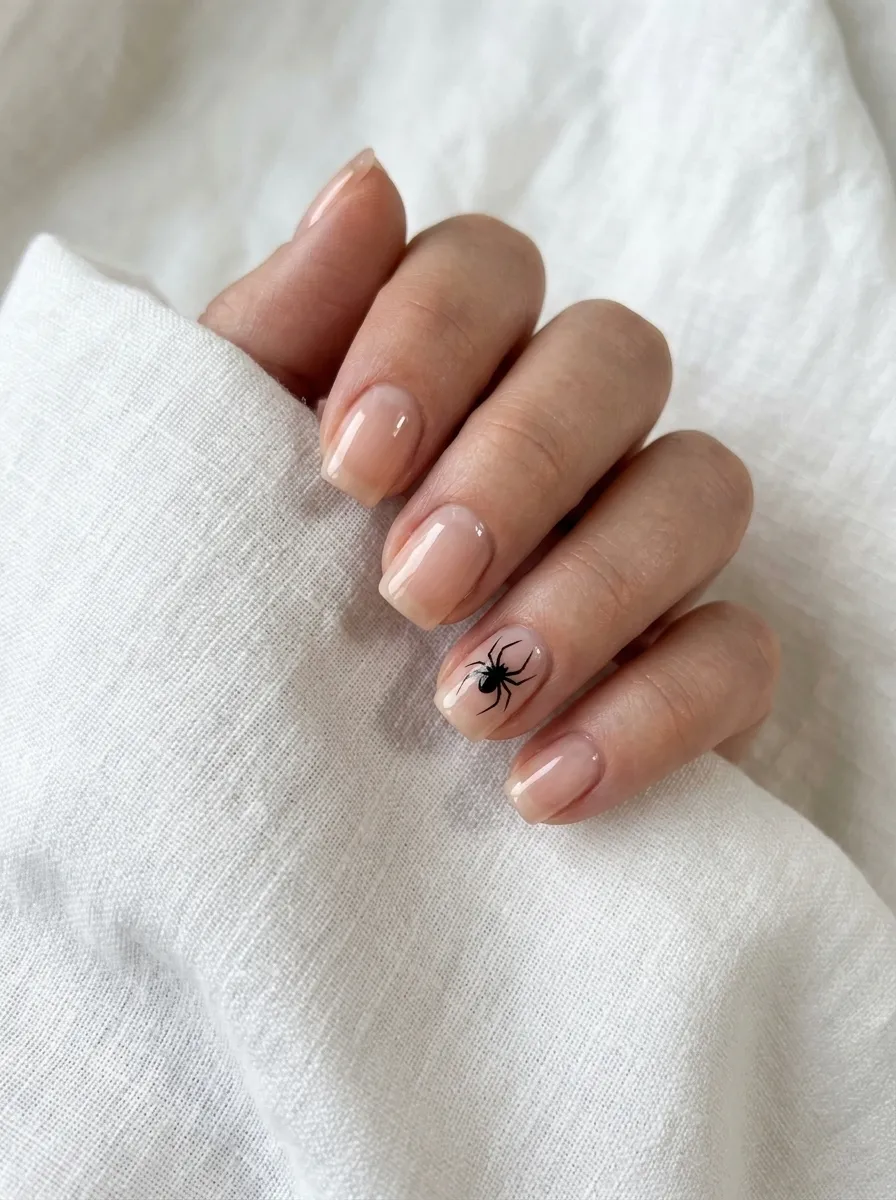
Sometimes less really does deliver more. One tiny spider on a single accent nail against a clean nude background is restrained, modern, and still creepy.
Choose your ring finger or middle finger for the spider. Keep every other nail plain with just a sheer gloss coat. The single spider becomes the entire focus and draws attention in a quiet, surprising way.
This is the spider nail design for people who love nail art but prefer something they can wear to the office or a formal event without going full Halloween costume.
The spider itself is simple. A small round body, two slightly larger sections, and eight legs drawn with a toothpick or thin brush. Add a tiny white dot on the body for the eye if you want to make it feel more alive.
Black on nude is the most classic combo here. But a red spider on a white base has a more graphic, almost editorial quality that looks incredibly clean.
Budget tip: You can get a full set of nail art brushes at beauty supply stores for about two to three dollars. The detail brush is worth every penny for designs like this one that rely on precision over coverage.
10. Dripping Web Nails
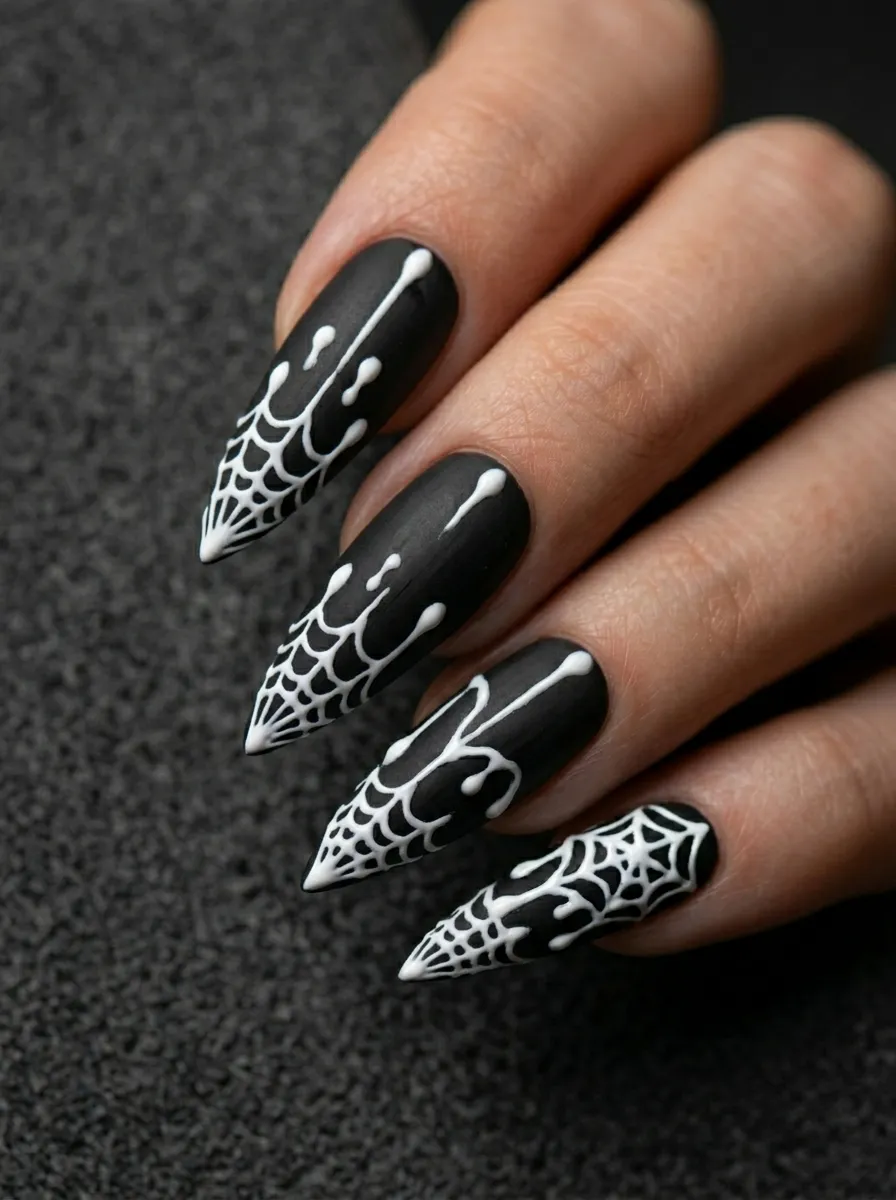
This design takes the regular web concept and gives it a melting, drippy twist that looks genuinely unsettling.
The web lines at the top of the nail look normal. But as they move toward the tip, they extend into long drips that seem to ooze off the end of the nail. On a stiletto or almond shape, the effect is especially dramatic.
Draw your base web near the cuticle area. Then extend two or three of the lower web lines into elongated, slightly curved drips that reach the nail tip. The drips do not have to be perfectly even. Slightly different lengths actually make them look more natural and creepy.
White on black is classic here. But try a red dripping web for a blood soaked horror look that goes perfectly with Halloween season.
This works best on longer nails where the drip has room to stretch. If you have shorter nails, just keep the drips subtle and tight to the tip.
A glossy finish on this design makes the drips look wet. That small finishing touch elevates the whole look. This is a moderately easy design once you are comfortable drawing basic web shapes.
11. Purple and Black Gothic Spider Nails
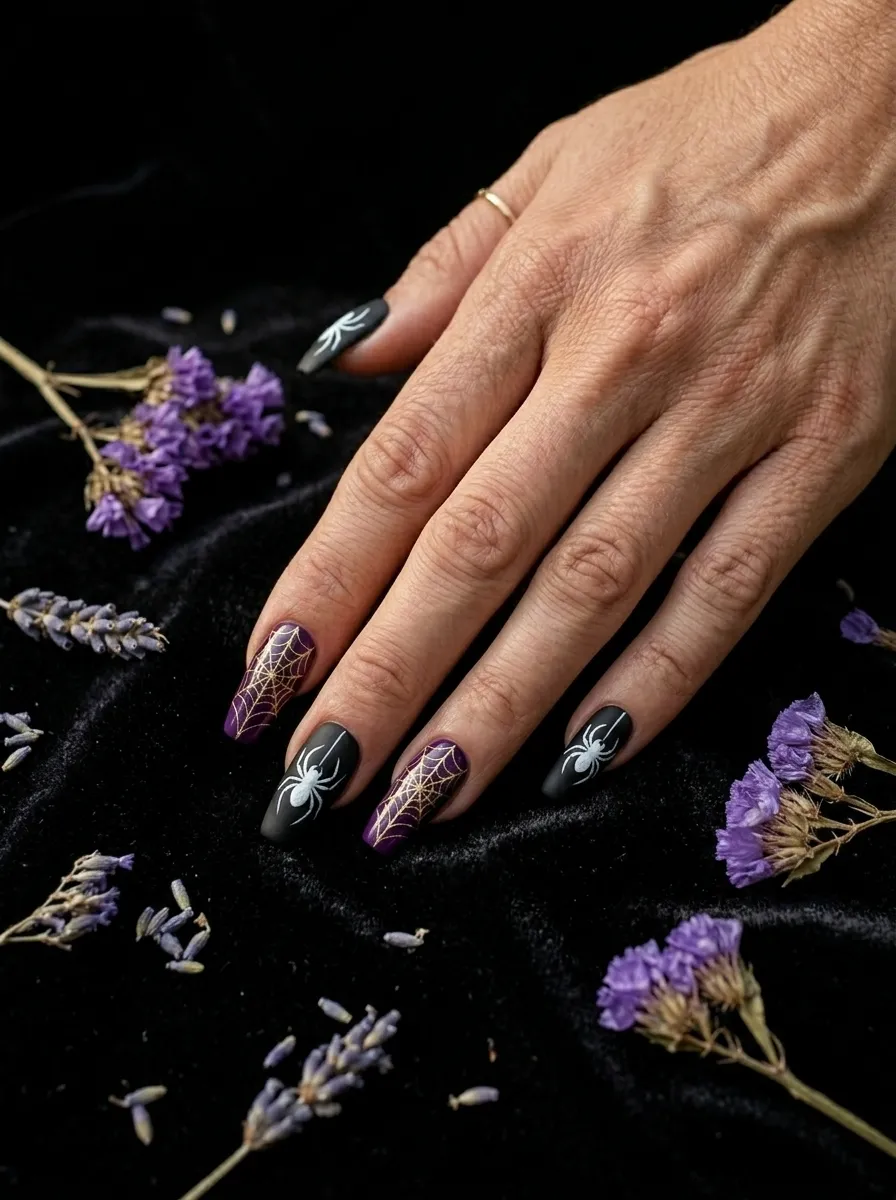
Purple and black is peak gothic aesthetic, and it pairs beautifully with spider designs for a look that feels witchy and theatrical.
Alternate between deep purple and black nails across the hand. On the black nails, draw thin purple or gold webs. On the purple nails, add small black spider silhouettes. The combination feels dark and intentional.
Deep plum, grape, or eggplant purples work better than bright purples for this look. You want something that feels rich and moody.
Gold web lines on deep purple are especially striking. They have a vintage gothic quality, like something you would find on an antique ring or piece of Victorian jewelry.
Add a tiny gold rhinestone at the center of each web for a little extra glamour. It takes the design from spooky to spooky and beautiful at the same time.
This color palette works year round, not just during Halloween. Gothic aesthetics are always in style and purple and black together never look out of place for evening events, dark academia fashion, or anyone who gravitates toward darker personal style. Budget kits with purple and black nail polish are easy to find in any drugstore beauty section.
12. 3D Resin Spider Nails
If you want your spider nails to literally stand out, 3D resin spider charms take the concept into a whole new physical dimension.
Tiny plastic or resin spider figures are sold in craft stores, nail supply shops, and online for a few dollars per pack. You can attach them directly to your nails using nail glue or a gel top coat as an adhesive.
Place a single spider on each nail near the cuticle or in the center of the nail. Cover with a layer of thick clear gel top coat to partially embed the spider and keep it secure.
The result is a nail that has an actual three dimensional spider sitting on top of it. It is genuinely startling when someone notices it up close.
Keep the base color simple when doing 3D designs. Black or white bases let the charms do all the work.
Be careful with 3D nails in daily life. They can snag on fabric or get knocked off if you are hard on your hands. They are better suited for short term wear at events rather than everyday functional nails.
This option requires zero nail art skill. You just glue, position, and seal. Anyone can do it, and it looks professionally done every time.
13. Watercolor Spider Web Nails

Not every spider nail has to be dark and intense. Watercolor spider webs are soft, dreamy, and still creepy if you look closely enough.
Create a soft watercolor base by watering down two or three polish colors slightly and dabbing them onto the nail with a sponge or brush in loose, overlapping strokes. Let the colors bleed into each other naturally. Pale blue, lilac, and soft pink work beautifully together.
Once dry, use a thin nail art brush with black polish to draw a delicate spider web over the top. The contrast between the soft pastel background and the sharp black lines creates a hauntingly beautiful effect.
This design feels feminine and editorial at the same time. It is the kind of nail art that reads as artistic rather than costumey, making it wearable outside of Halloween season.
The watercolor technique takes a little practice to get the blending right. Start with two colors before adding a third. Less blending actually looks better since it keeps the colors distinct.
Add a tiny spider in one corner of one or two nails for a finishing detail. The spider does not need to be perfectly drawn. On a watercolor background, slightly loose lines actually look more natural and artistic.
14. French Ombre Spider Nails

Ombre nails that fade from a natural nude into deep black at the tips already look stunning. Add a spider web into the dark section and it becomes something completely different.
Sponge the black onto the tip of the nail and let it fade softly into the nude base. Once dry, draw a small web inside the dark section using a white nail art pen. The web blends naturally into the dark area and looks almost like it grew there.
This is one of those designs where the background does most of the work for you. The ombre transition already looks intentional and polished, so even a rough web sketch looks good against it.
Use a makeup sponge to apply the ombre effect. Dab gently and build up color slowly for a smooth fade. It takes a few coats to get the density right but the result is worth it.
For the web, keep it small and contained within the darkest part of the nail near the tip. Extending the web into the lighter nude section muddies the look.
Seal with a matte top coat over the dark section and a glossy top coat over the light section for a contrast finish that looks like a professional design.
15. Spider Web Accent Nails with Solid Pairs
You do not have to do spider art on every single nail to make a statement. Two accent nails with spider designs surrounded by solid color nails can look more thoughtful and polished than a full set.
Choose two fingers, typically the ring finger and one thumb or pointer, for your spider designs. Paint the rest of the nails in a deep solid color like black, red, or dark green. The accent nails stand out naturally because of the contrast.
On one accent nail, draw a web. On the other, paint a spider. The matching spider and web pairing across the hand tells a visual story without cluttering every nail.
This approach is also far less time consuming than doing full nail art on all ten fingers. It is a good middle ground for people who want something special without a two hour commitment.
The solid color nails still tie the set together, so even if the spider designs are not perfectly symmetrical, the overall set looks intentional and curated.
Matte solid nails paired with glossy spider accent nails add another layer of visual interest. The texture contrast pulls the eye toward the accent nails immediately and makes the spider detail even more noticeable.
16. Bloody Spider Web Nails
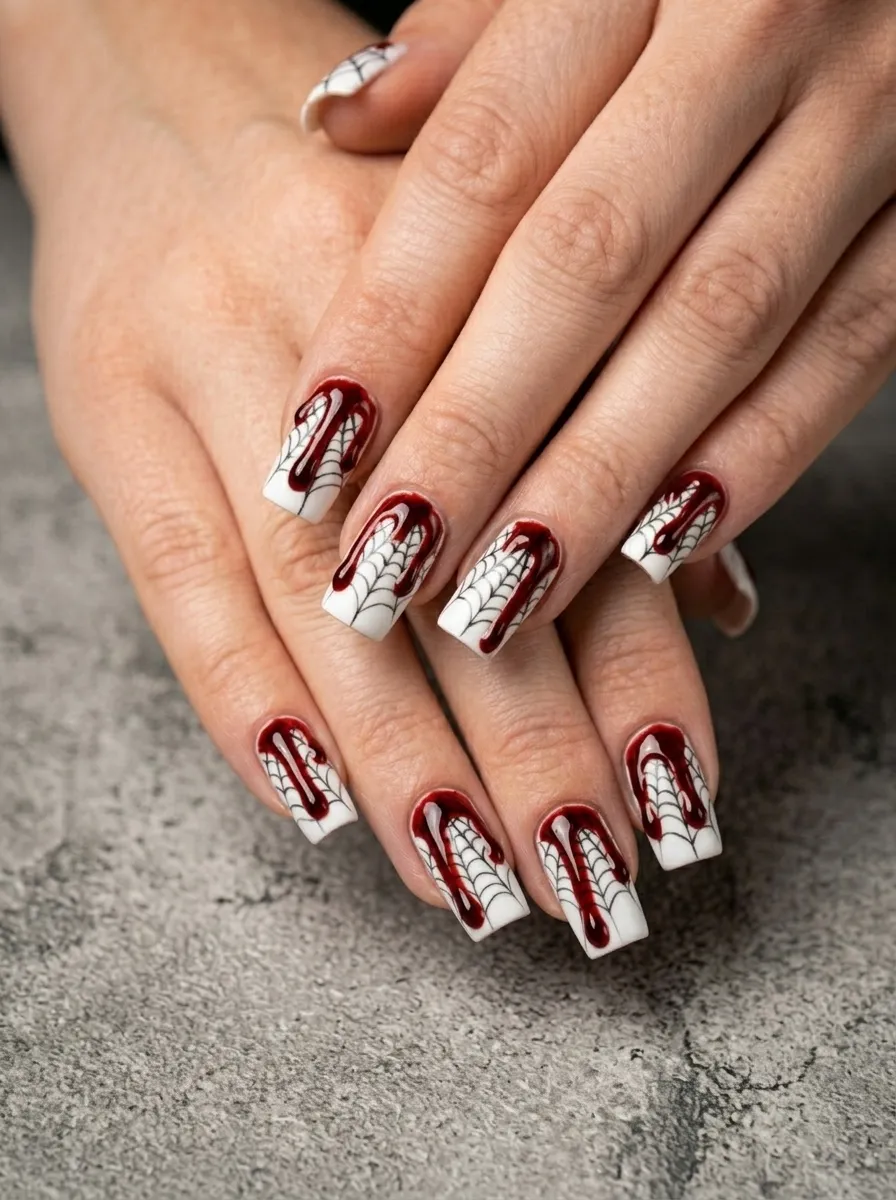
This design combines spider webs with the classic bloody drip nail trend for something that is almost too creepy to look at for long.
Start with a white base. Draw a thin black spider web across the top half of each nail. Then using a deep red polish, paint a few irregular drip shapes starting at the top edge of the nail and extending downward over the web. Some drips should be long, some short. Uneven looks more realistic.
Finish the drips with rounded bottoms instead of sharp points to mimic how a real liquid drop would hang.
Use a glossy top coat over the red drips only, leaving the white base and black web matte. The glossy red will look wet and visceral against the flat background.
Red nail polish is the easiest and most affordable supply for this design since you likely already own a red shade. Dark red polish like wine or deep crimson reads more like blood than a bright fire red.
This look is extremely popular for haunted house events, Halloween parties, and horror themed photo shoots. It photographs well and catches attention immediately. Not for the faint of heart, which is exactly the point.
17. Spiderweb Nail Stamping Design
Nail stamping plates are a secret weapon for people who love detailed nail art but struggle with freehand designs. Spider web stamping plates are widely available and produce a perfectly even, professional looking web every single time.
The process involves applying nail polish to a metal stamping plate that has a web design etched into it, scraping off the excess, and rolling a stamping tool over it to pick up the design. Then you press the stamper onto your nail and the design transfers perfectly.
It sounds complicated but takes about two minutes once you have the technique down. The first attempt may not be perfect but by the third nail, it clicks.
Stamping plates with multiple spider web designs are available online for under five dollars. A basic stamping kit with a scraper and stamping tool is another three to five dollars. It is a one time purchase that you will use again and again.
The stamped web looks very clean and graphic compared to freehand designs. Use it over a colored base for maximum contrast. White on black, gold on navy, and red on white are all excellent combinations.
For variety, stamp the web on just the upper half of the nail or angle it so it starts from a corner. The same stamping plate can produce several different looking designs depending on placement.
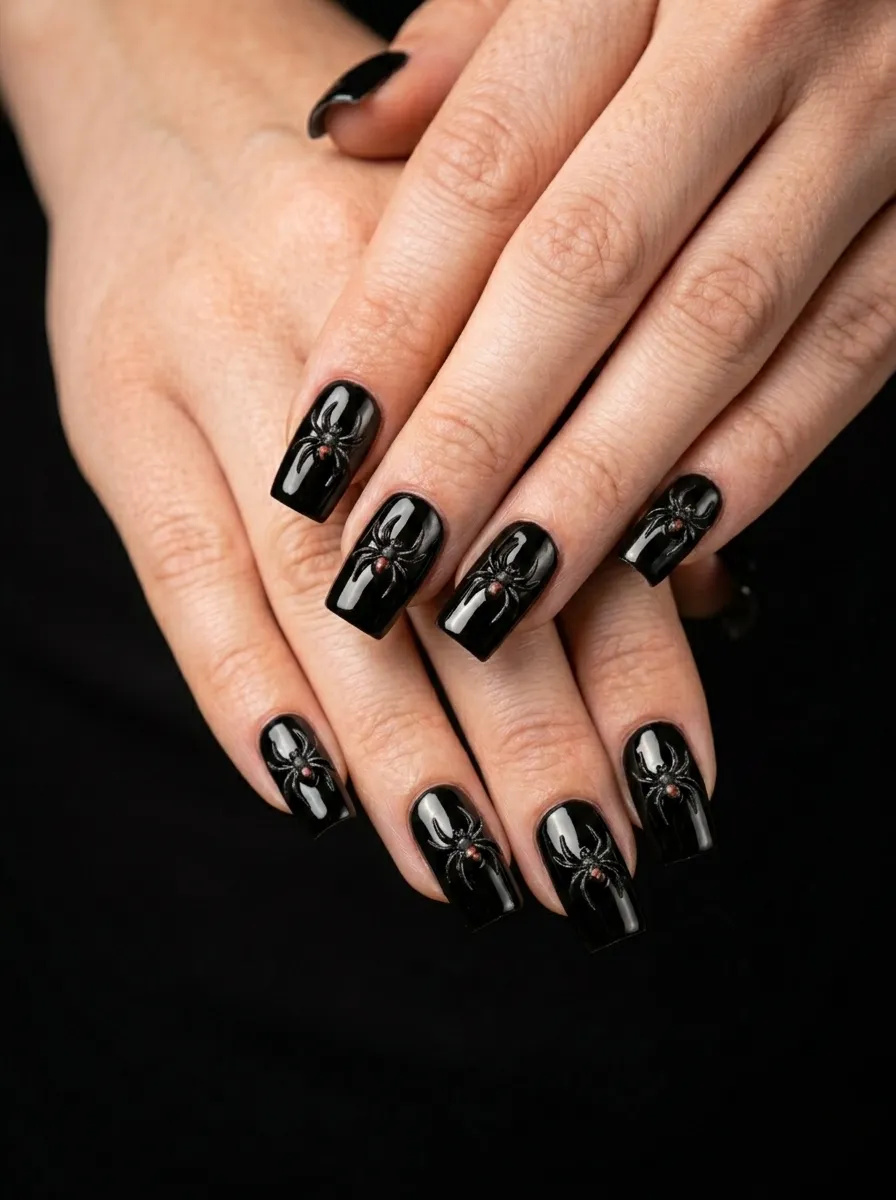
18. Black Widow Accent Nails

The black widow spider is one of the most recognizable and feared spiders in the world, and that iconic red hourglass marking translates perfectly to nail art.
Paint all your nails solid matte black. On one accent nail, paint a small red hourglass shape in the center of the nail. That is the entire design. Simple, minimal, and extremely recognizable.
The red on black contrast is bold and clean. It reads immediately as a black widow reference to anyone who knows what it is and looks like a cool abstract shape to anyone who does not.
Add a small black spider body over the red marking on the accent nail to complete the black widow look. The body sits on top of the red hourglass shape just like the real spider.
You can also add the red marking to a few different nails for a more repeated, pattern based approach. The marking does not have to be perfectly symmetrical. Real black widow markings vary from spider to spider anyway.
This design is one of the most wearable in the spider nail category because it is subtle enough for people who want edge without full on Halloween vibes. The matte black base keeps it sophisticated rather than costumey.
19. Spider Cracked Glass Nails
The cracked glass nail effect and spider web designs have a lot in common visually. When you combine them, the result looks like something shattered and creepy at the same time.
Cracked glass nail polish is an older nail trend that is making a big comeback. Apply it over a base color and it dries with an irregular cracked pattern that looks exactly like broken glass with spaces between the cracks.
On its own, the cracked effect already resembles a web. But you can enhance it by using a dark silver cracked polish over a black base so the cracks appear as web like lines radiating from a center point.
Paint the base color first. Once dry, apply the cracked polish and watch it pull apart as it dries to create the glass effect. The faster it dries, the larger and more dramatic the cracks.
You can control the look slightly by applying a thicker coat for larger cracks or a thinner coat for a more delicate, web like texture.
Add a tiny spider painted at the center of the cracked area on one or two nails to tie the design back to the spider theme intentionally. This makes the connection between the web and the spider feel complete and planned.
20. Holographic Spider Nails
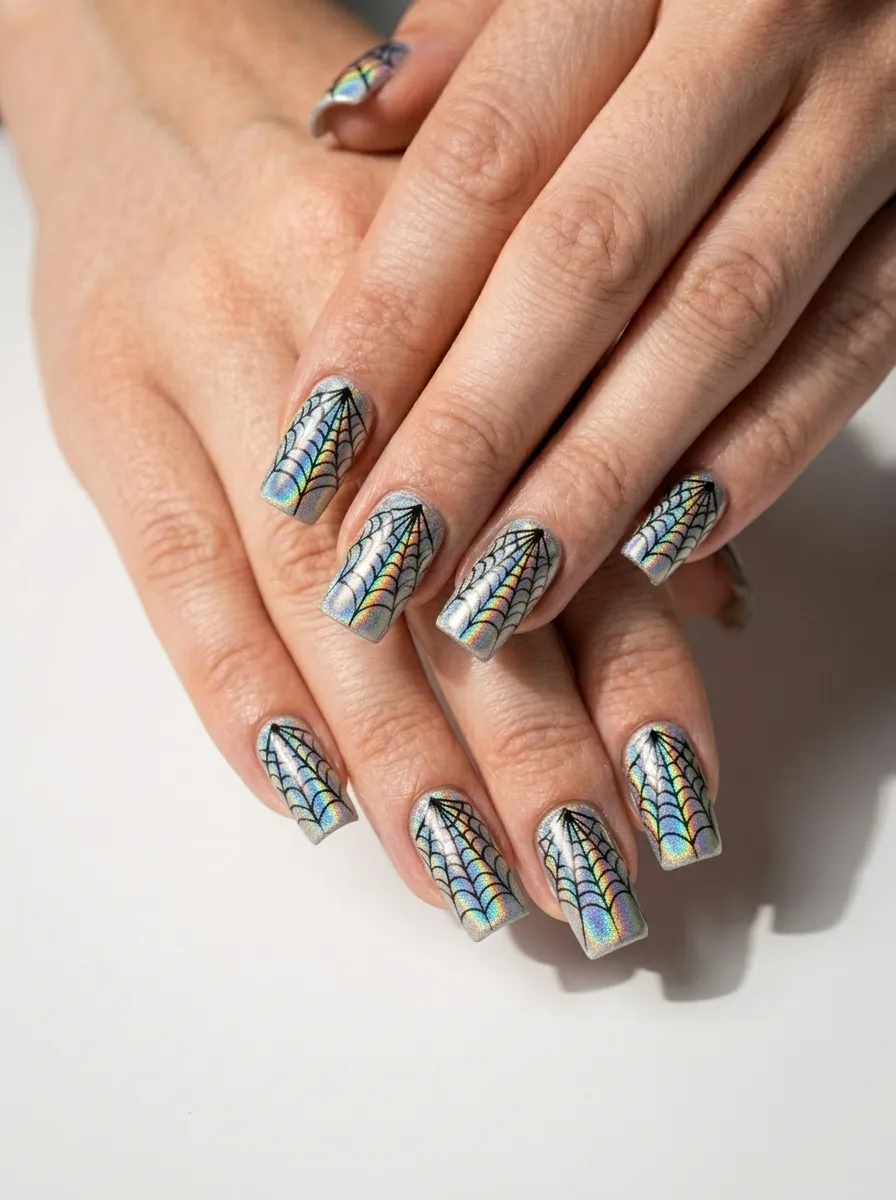
Holographic nail polish shifts between every color of the rainbow depending on how the light hits it. Add a spider web on top and you get a design that is simultaneously magical and creepy.
Apply a holographic silver base coat. These polishes are widely available in beauty supply stores and online for a few dollars. Let it fully dry before adding any design on top.
Use a thin nail art brush with black polish to draw your spider web over the holographic base. The dark web lines sit beautifully against the shifting rainbow background and make the web look like it is floating on a prismatic surface.
In sunlight or under party lighting, the holographic base catches every color and glows intensely. The effect is genuinely stunning in person and photographs beautifully.
The spider web does not need to be elaborate here. The base does most of the visual work. A simple corner web or a three line web is enough to create the full effect.
Add a single spider in black somewhere on the web, either hanging from a line or sitting at the center. The contrast between the iridescent background and the flat black spider makes both elements stand out even more.
21. Skeleton Hand Holding a Spider Web Nails
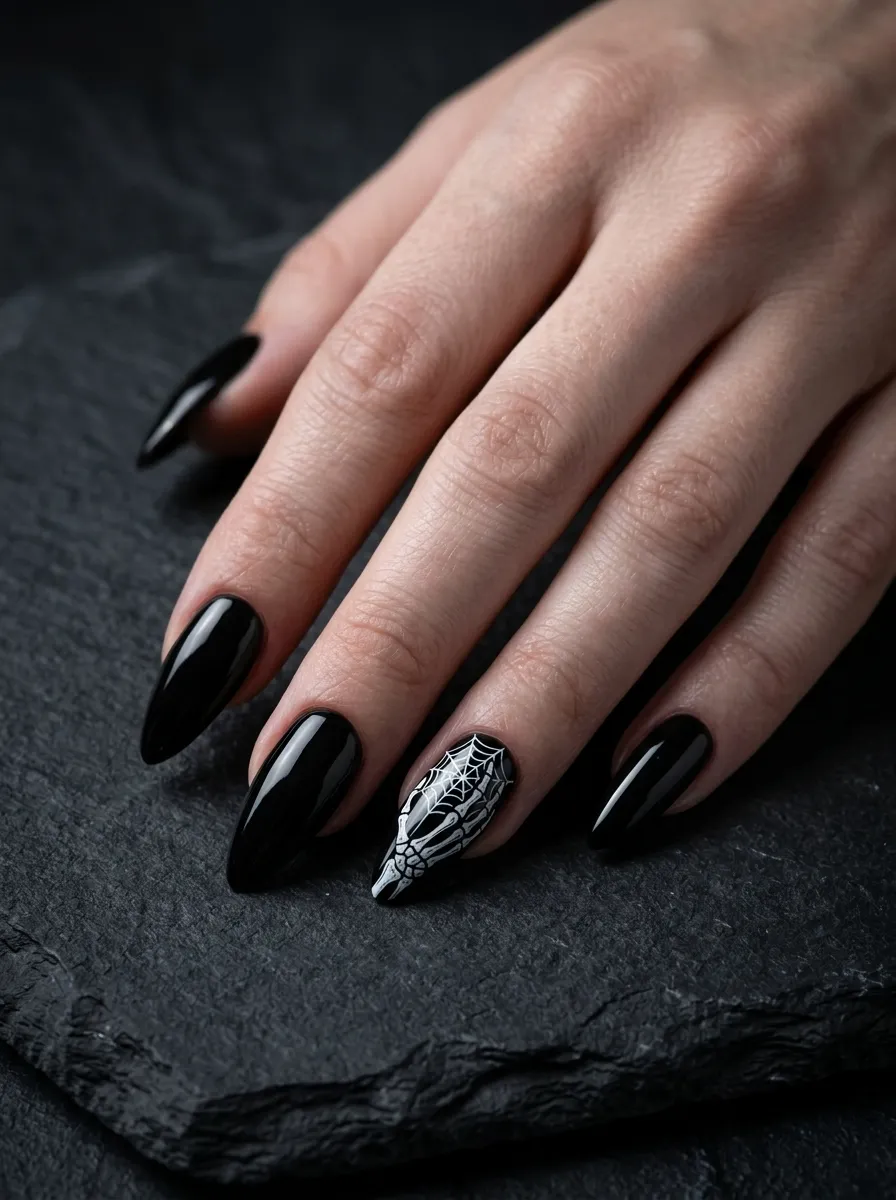
This design requires a little more skill but the result is absolutely show stopping. A tiny skeleton hand appears to be holding a spider web across one accent nail.
Paint your base coat in black. On your accent nail, use a thin white nail art brush to draw a small skeleton hand starting from the cuticle end of the nail. The skeleton reaches toward a small web you draw on the lower half of the nail.
The skeleton hand does not have to be anatomically perfect. Thin rectangular bone shapes with small circles at the joints read immediately as skeleton without needing to be realistic.
Position the hand so the fingers are reaching toward the web or already touching its edges. This creates a narrative within a very small space and makes the design look like a tiny piece of art.
You can also do this design across two nails, with the hand on one nail and the web on the adjacent finger, so it looks like the skeleton reaches from one nail to the next.
This design pairs well with dark base colors across the rest of the nails. Deep red, black, or dark plum on the remaining nails let the skeleton and web accent nail stand out without competing for attention.
22. Spider Nails with Rhinestone Eyes
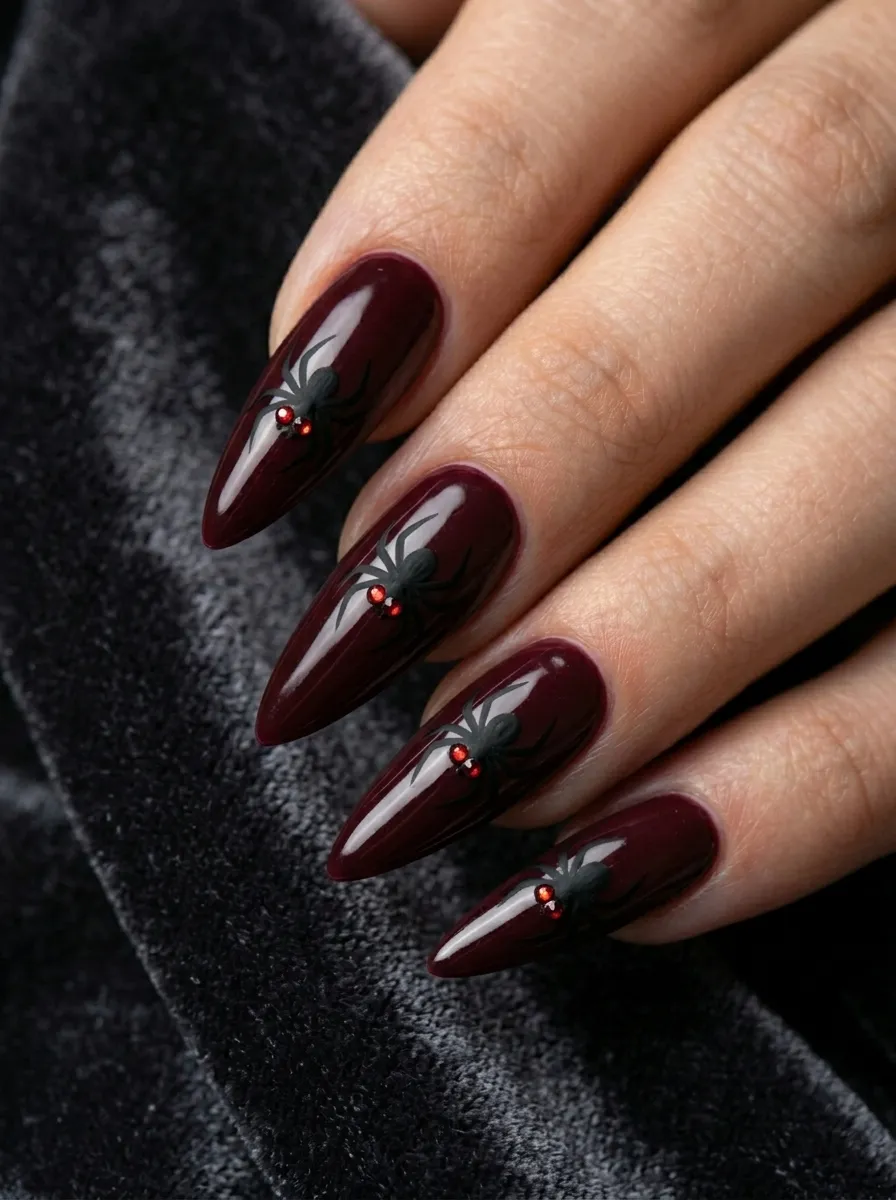
A tiny rhinestone placed on a painted spider as its eye turns a flat design into something that looks three dimensional and genuinely creepy.
Paint a dark base and add your spider shapes in either black or white, depending on which contrasts better with your base color. Before the spider polish is fully dry, press a single tiny rhinestone onto the spider body where the eye would be.
Red rhinestones on a black spider look like glowing eyes. Clear rhinestones catch the light and look glossy and alive. Even a single tiny rhinestone at the center of a spider body adds incredible detail.
Nail rhinestones come in enormous bags from craft stores and nail supply shops for very little money. A bag of mixed sizes lasts for dozens of manicures.
Use a dotting tool, a toothpick, or even a piece of dry sponge to pick up and place the rhinestones precisely. Wet the tip of the tool slightly so the rhinestone sticks to it for easier placement.
Seal everything under a layer of clear top coat once the rhinestone is positioned, but be careful not to knock it off before the top coat covers it. This design makes even the simplest spider drawing look finished and professional.
23. Spiderweb Tips on Almond Nails
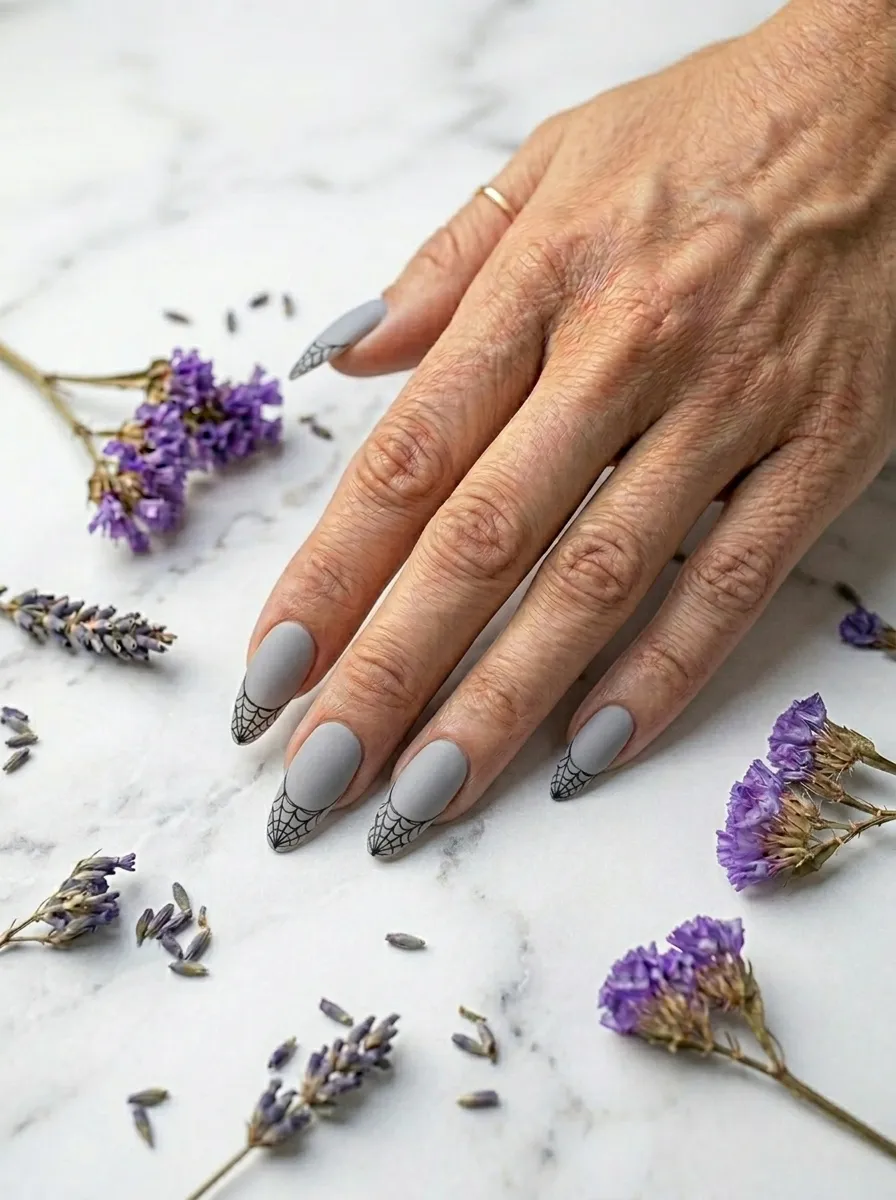
Almond shaped nails have a naturally elegant silhouette. A delicate spider web design placed only at the very tip of each nail keeps that elegance while adding a dark edge.
Paint a soft, neutral base. Grey, pale blush, or even a soft taupe work well. Let it dry fully. Then using a very thin nail art brush or a fine detail pen, draw small web sections in the top quarter of each nail only near the tip.
The web should curve with the natural line of the nail tip. Start lines from just inside the tip and connect them with a curved arch. Two or three arches are enough for this small space.
This placement gives you a lot of visual interest right where people notice it most. When you gesture or type, the web tip detail catches attention.
Keep the webs very delicate and lightweight looking. Heavy lines overwhelm the design on this nail shape. Fine lines at about the thickness of a strand of hair look the best.
A glossy top coat makes the lines look clean and polished. You can also seal just the tips with a gel top coat to protect the detail from chipping since tip areas tend to wear faster than the rest of the nail.
24. Negative Space Spider Web Nails
Negative space nails use the bare natural nail as part of the design, and this concept creates truly striking results when applied to spider webs.
Instead of painting a web on top of a colored base, you leave the web shape bare and fill in all the spaces between the web lines with black polish. The natural nail becomes the web itself.
To do this, paint all the negative space areas black while leaving thin strips of bare nail in a web pattern. This is easier than it sounds with nail tape or thin strips of scotch tape used as guides.
Place your tape strips in a star burst pattern from the center of the nail, then fill in around them with black. Remove the tape while the polish is wet to reveal the web lines underneath.
The contrast between the natural nail and the dark polish gives this design a graphic, modern quality that looks completely different from traditional spider web art.
This design works especially well for people with naturally healthy, well shaped nails since the bare nail becomes a feature rather than something that needs to be covered.
Practice the tape placement on a few nails before committing to all ten. The angle and spacing of the tape strips determine how realistic the web looks in the final result.
25. Full Gothic Spider Set with Mixed Textures
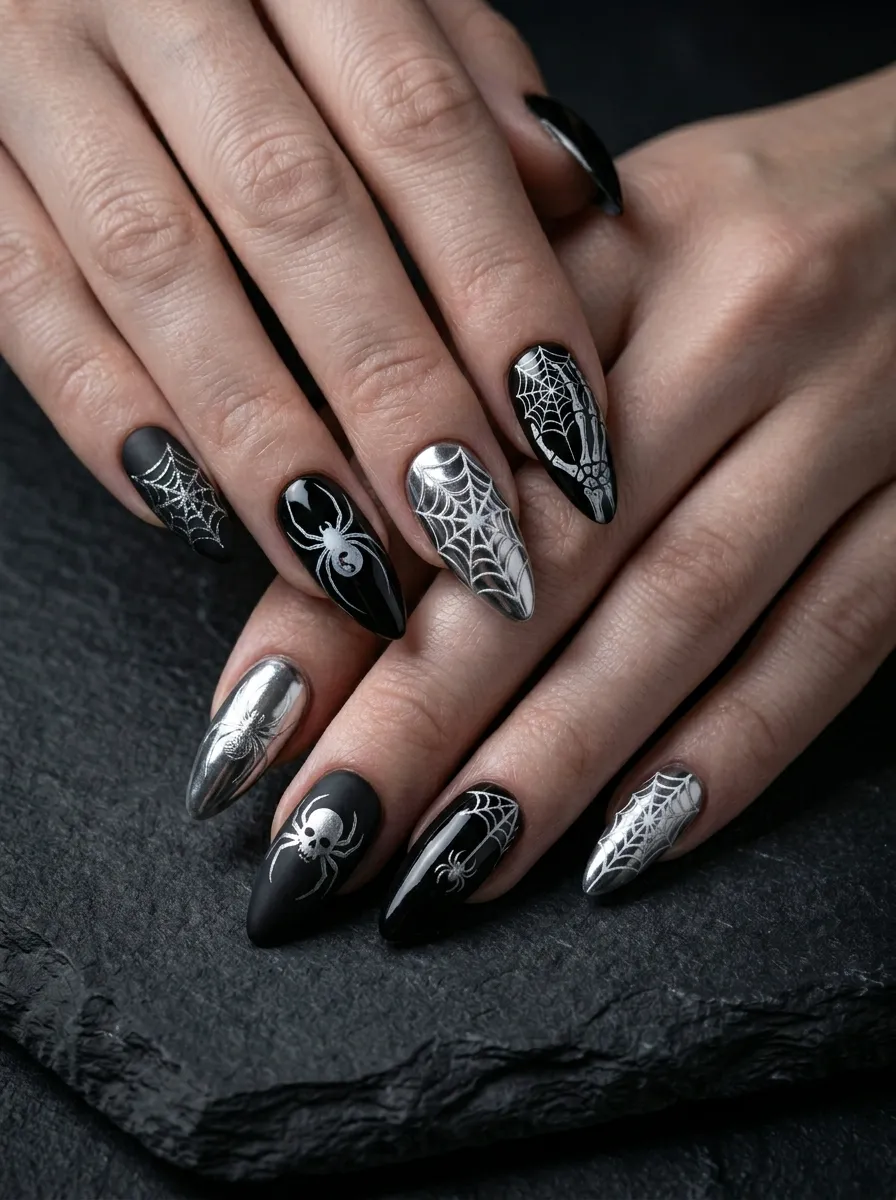
For maximum impact, a full gothic spider set mixes different textures and finishes across all ten nails, each one featuring its own unique spider or web detail.
Alternate between matte black, glossy black, and dark chrome finishes across the nails. No two nails need to match exactly. Each one can tell its own part of the spider story.
Thumbnail: a full web from corner to corner. Pointer finger: a single hanging spider. Middle finger: cracked glass with spider overlay. Ring finger: three dimensional rhinestone spider. Little finger: simple corner web with glitter center.
Repeat a similar sequence on the other hand, mirroring rather than copying exactly. The set reads as cohesive because of the consistent color palette even though no two nails are identical.
This kind of set takes more time but it does not have to be done all at once. Work through a few nails per day or set aside an evening for the full treatment.
The mixed texture approach, matte versus glossy versus chrome, adds visual depth that makes the set feel professionally designed rather than a simple home manicure.
This is the spider nail concept for someone who wants to go all the way. It is bold, creative, completely over the top in the best possible way, and absolutely unforgettable.
Spider nails are one of those rare nail art categories where there is truly something for everyone, from a single minimalist spider on one accent nail to a full gothic set with mixed textures and three dimensional charms. You do not need a salon budget or professional training to try any of these looks. A thin brush, a toothpick, and a few bottles of nail polish at home are enough to get started. Pick one design that feels like your level and try it this weekend. The worst that can happen is you repaint your nails. The best that can happen is you show up somewhere and completely freak everyone out in the most stylish way possible.