Halloween nail art has a loyal following, and Frankenstein nail ideas sit right at the top of the most-loved spooky styles. Whether you want something subtle with a tiny green accent nail or a full-on monster manicure with stitches, bolts, and gory details, there is a look here for every skill level and budget. These ideas work for beginners using drugstore polishes and for nail art lovers who want to show off their brush skills. You do not need a salon appointment to pull off something that looks amazing. With a steady hand, some nail tape, and the right shades of green, black, and purple, you can create a manicure that gets compliments all season long. From cute and minimal to dark and dramatic, every idea on this list is designed to help you get there fast. If you’re also exploring mummy nail ideas, simple wrapped bandage effects, white striping details, and subtle spooky accents can help create an easy yet striking Halloween manicure.
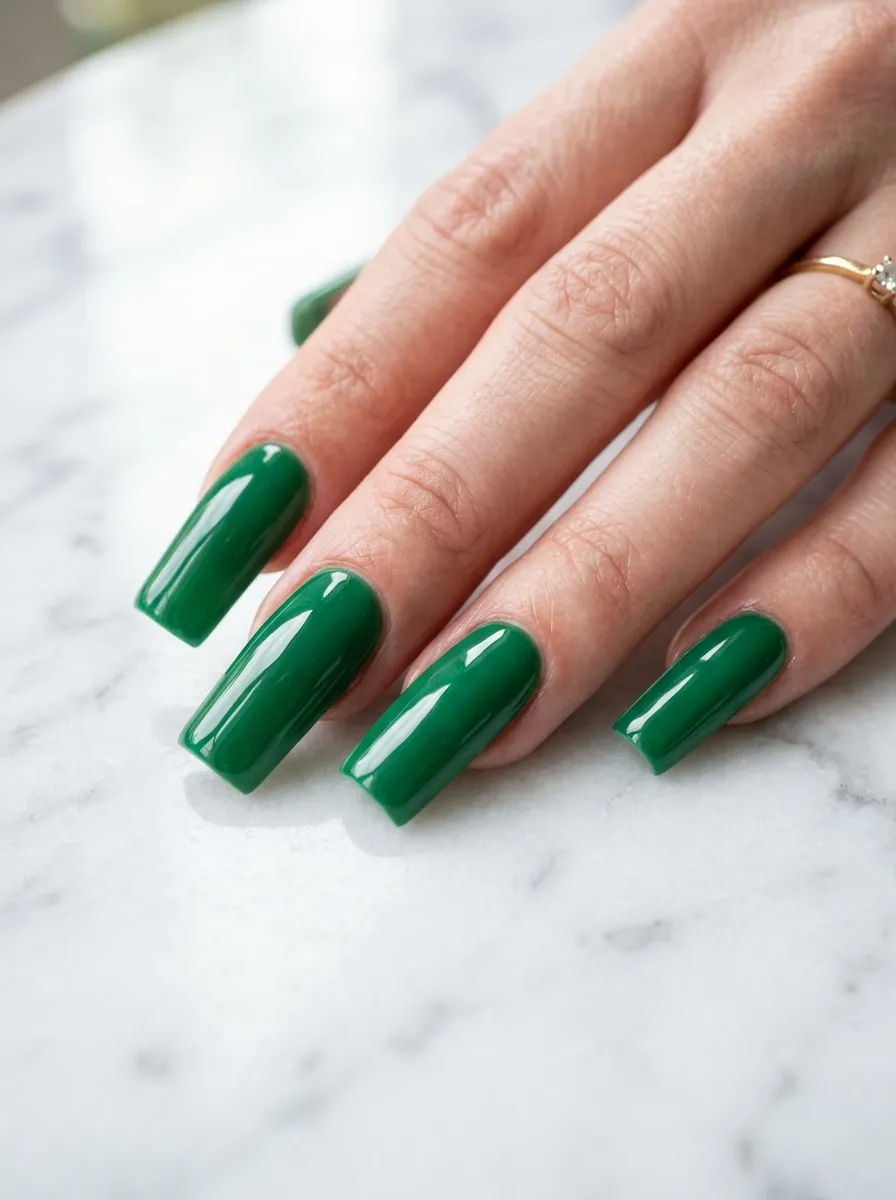
1. Classic Green Monster Base
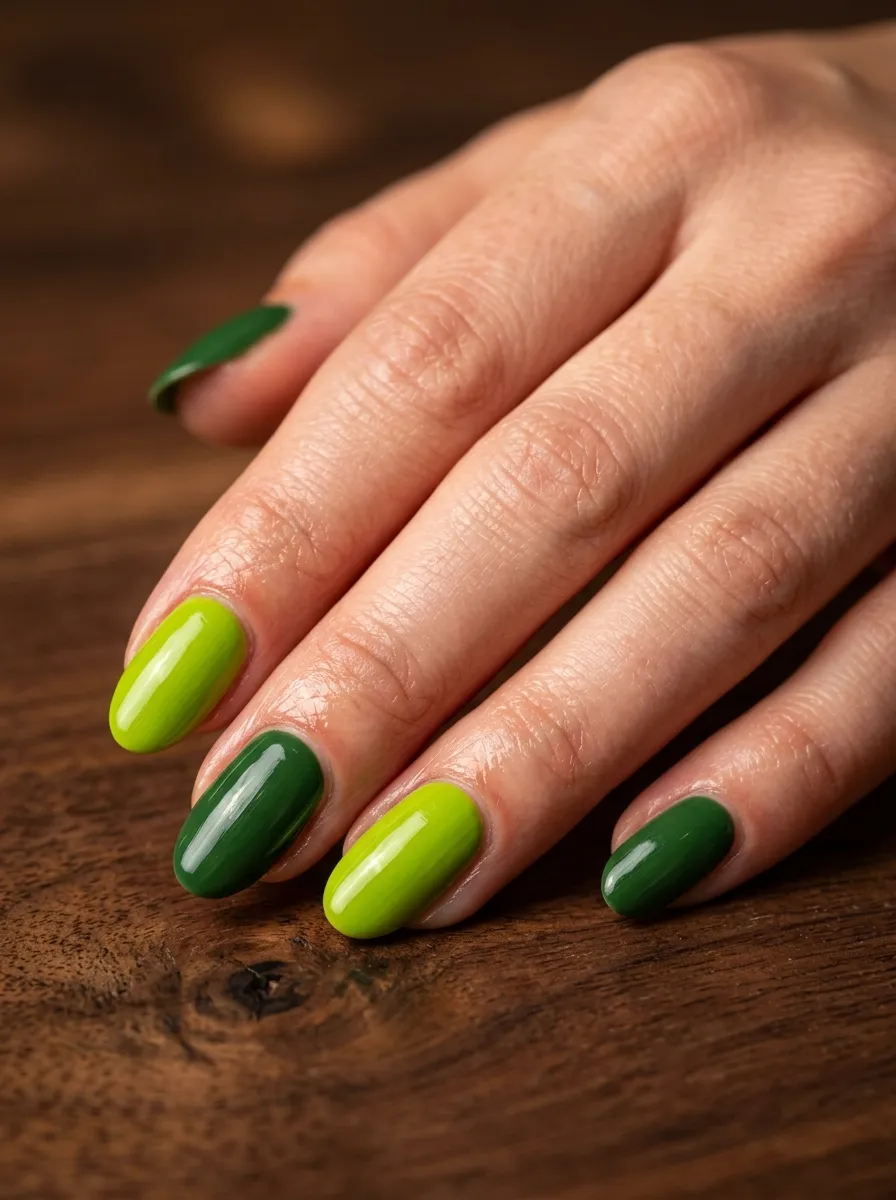
The easiest place to start is a solid Frankenstein green base. Pick two shades of green, one lighter and one darker, and alternate them across your nails. This alone reads as a Frankenstein manicure without any extra steps.
Use a lime green on your index and ring fingers. Go with a deeper olive or forest green on the others. The contrast does the work for you.
This style works on any nail shape. Oval, square, almond, it all looks great.
You can find great drugstore greens from brands like Sally Hansen or NYX. They cost around two to four dollars per bottle and cover in two coats.
Pro tip: Add a high-gloss top coat to make the colors pop. It makes even cheap polish look expensive.
If you want a little more character, paint one accent nail in a blackened green. That small change adds depth without extra tools or skill.
This is the perfect base if you plan to add details later. It is also a complete look on its own if you want something quick and easy. Start here and build from it.
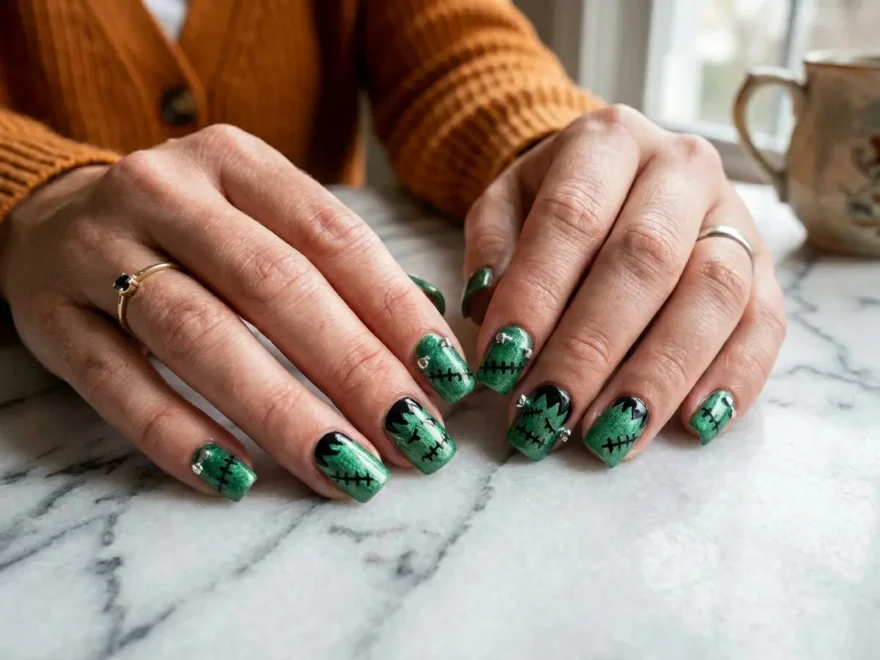
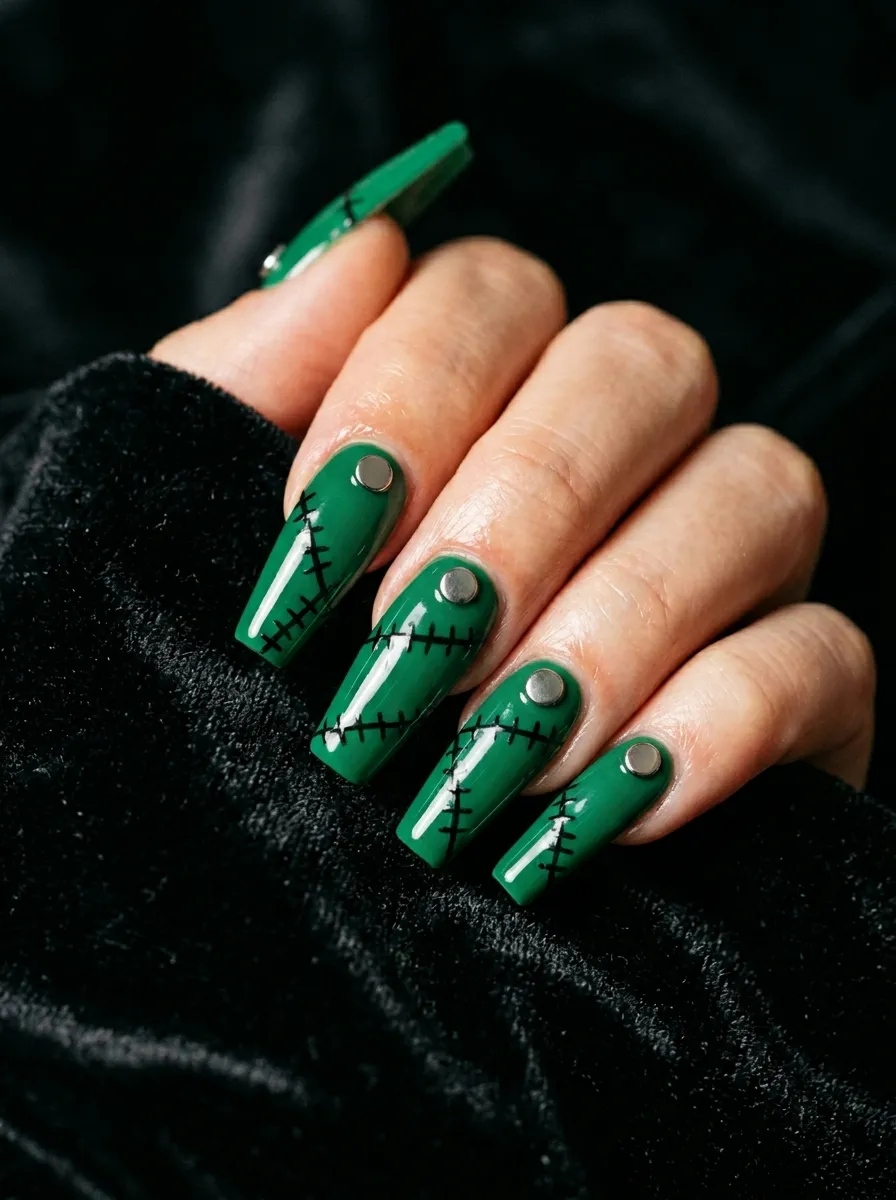
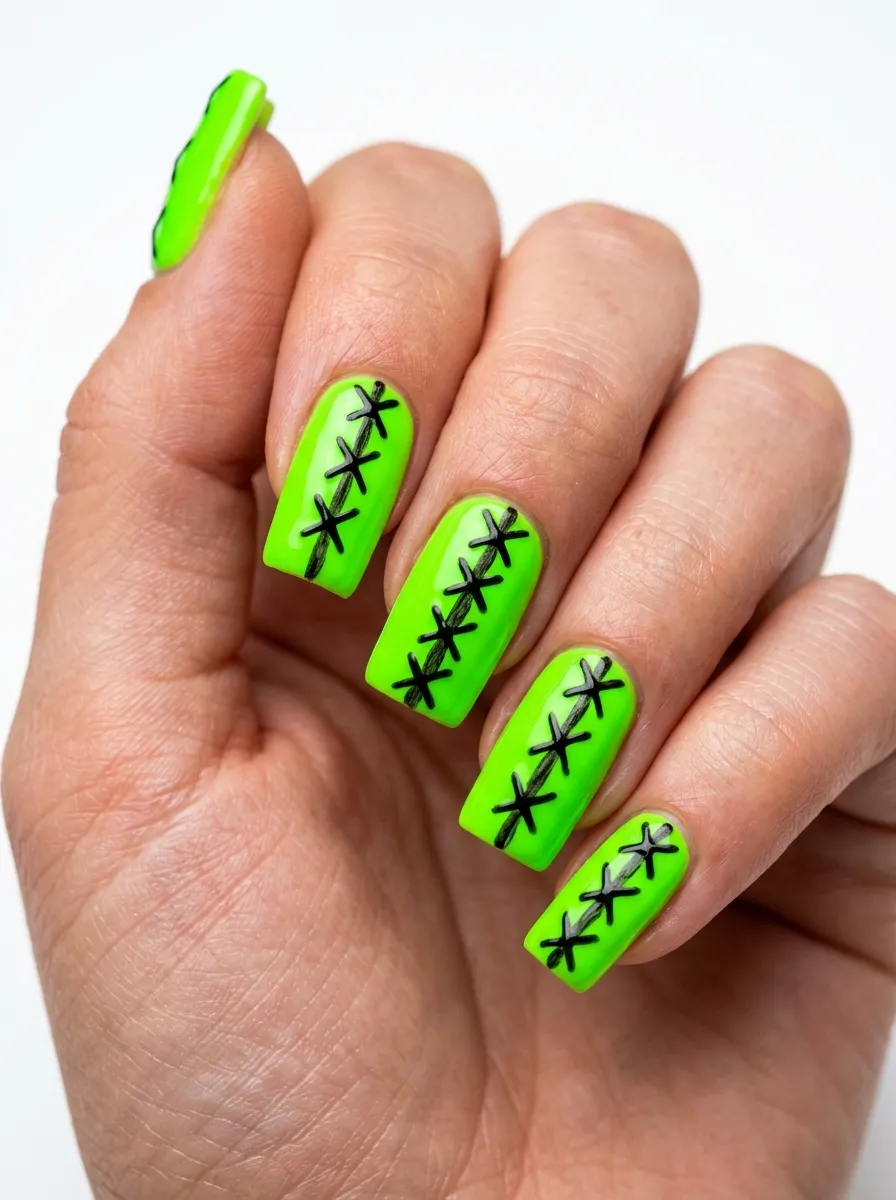
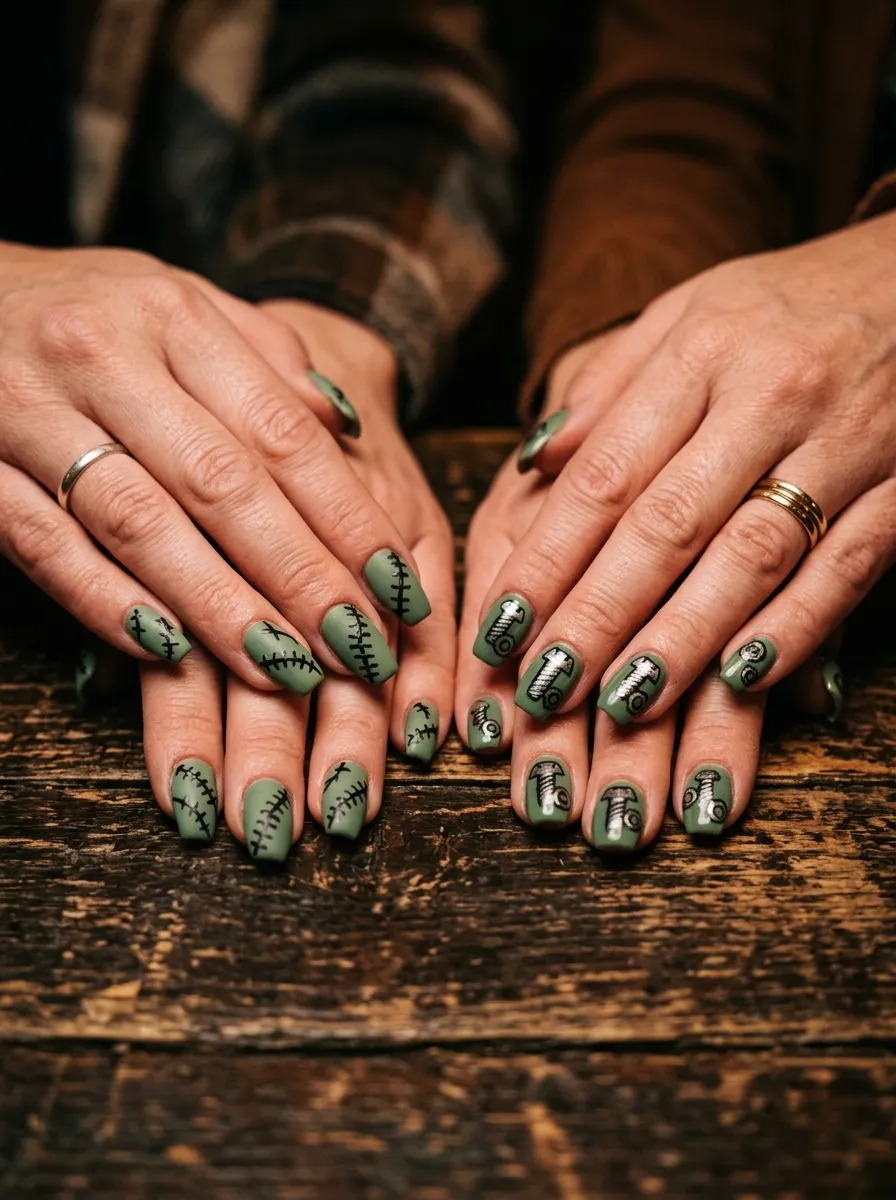
2. Black Stitch Accent Nails
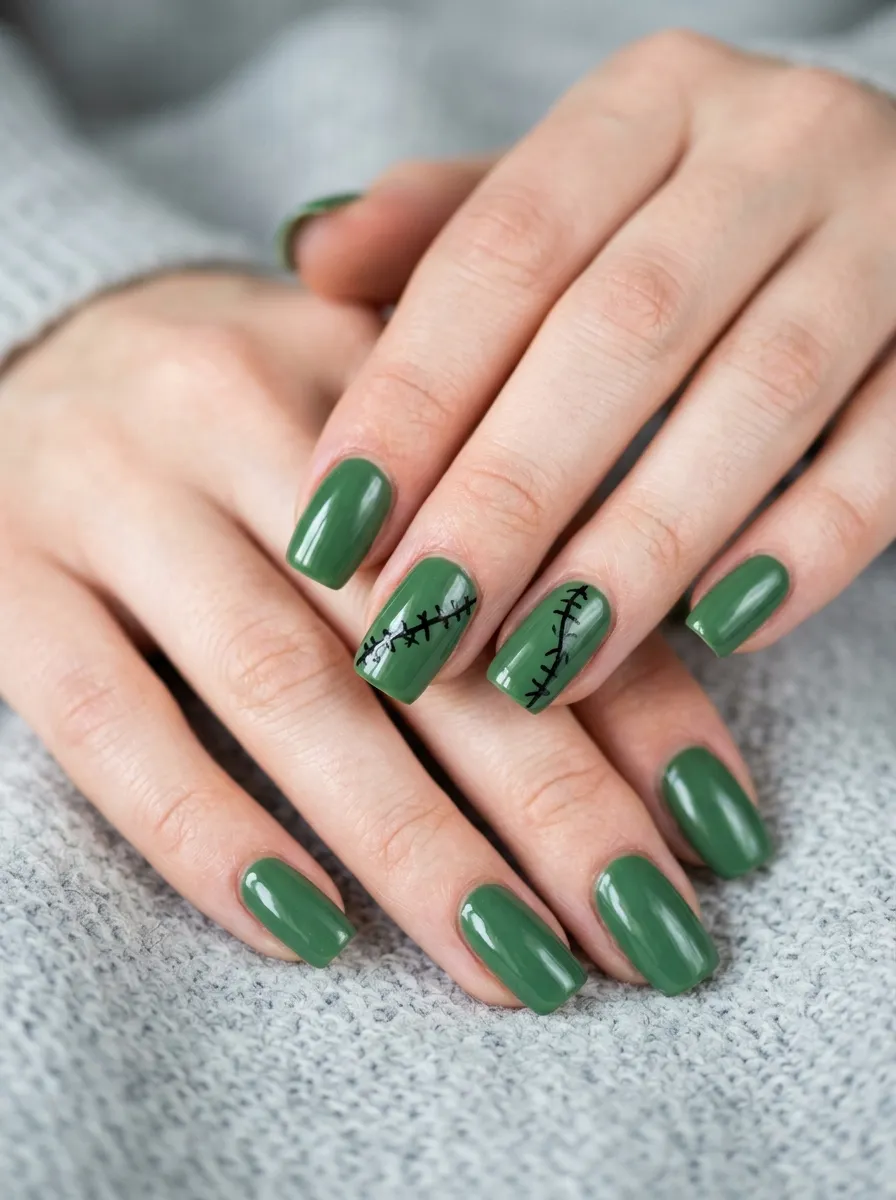
Stitches are the most recognizable part of Frankenstein’s look. Adding them to one or two nails instantly tells everyone what your theme is.
Use a thin nail art brush or a striping brush dipped in black polish. Draw a horizontal line across the center of the nail. Then add short vertical dashes crossing over it, like actual suture marks.
You do not need to be perfect. Slightly wobbly stitches look more authentic. They mimic the rough, hand-done stitching of the monster.
A striping brush costs about two dollars at a beauty supply store or online. If you do not have one, a toothpick dipped in black polish works just as well.
Key move: Put the stitches only on your ring fingers as accent nails. The rest of the manicure stays clean and green.
This keeps the look balanced. Too many stitches on every finger can feel overwhelming. Less is more here.
You can also place stitches near the tip of the nail instead of the center. This gives a different feel, almost like the color is being held together with thread.
Practice on paper before you go to your nails. Draw a few lines until you feel confident. Then do it live.
3. Bolt and Nut Detail Nails
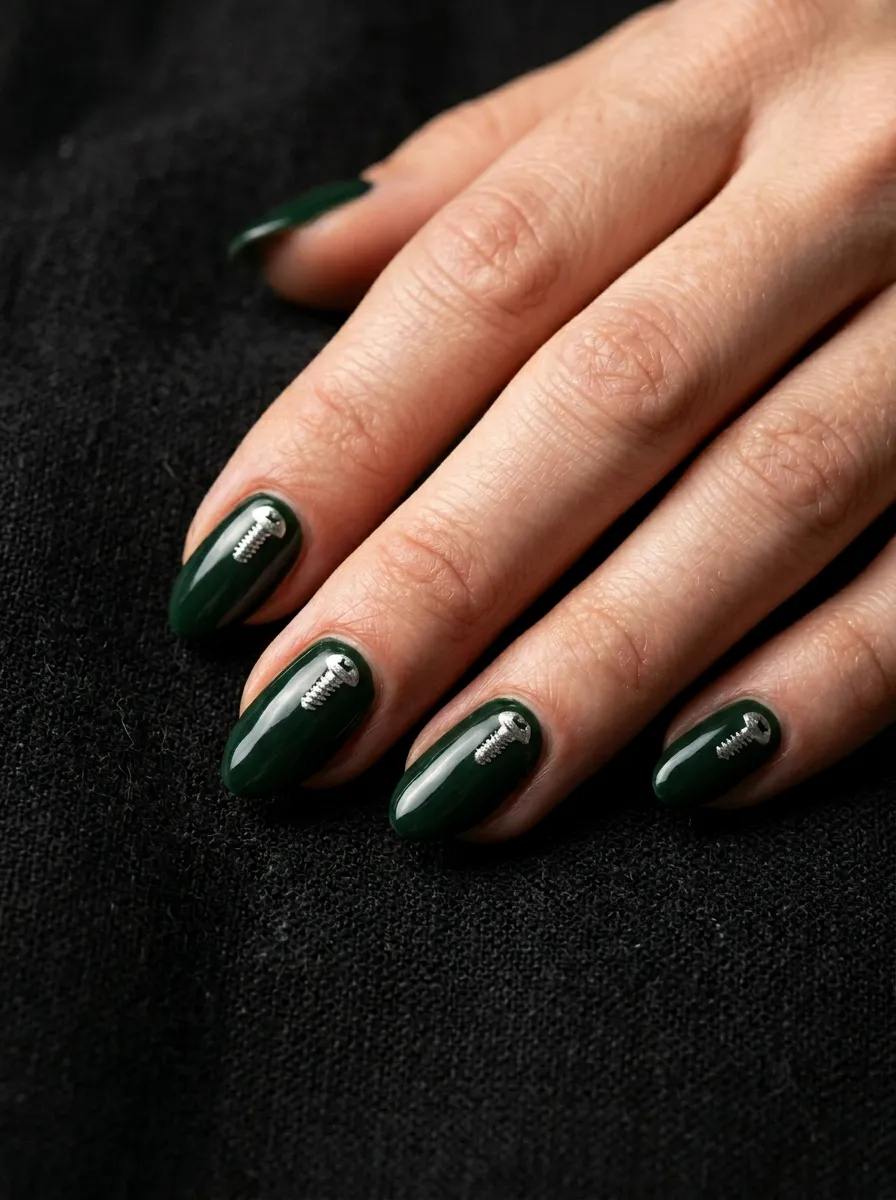
Frankenstein’s neck bolts are iconic. Bringing that detail to your nails is easier than it sounds.
Use a dotting tool or the round end of a bobby pin dipped in silver or metallic gray polish. Press it onto the lower corner of the nail near the base. That circle becomes the bolt head.
Add a small rectangle or cylinder shape above it using a thin brush and the same silver. This creates the bolt shaft.
Two dots on each nail, one on each side, works really well on shorter nails. On longer nails, you can make the bolt taller and more detailed.
Budget pick: Silver chrome nail powder from Amazon costs about three dollars and adds a metallic finish that regular polish cannot match. Apply it over a sticky top coat with a sponge applicator.
You can also use metallic silver nail stickers shaped like studs. These require zero artistic skill and look polished and intentional.
Place the bolts on your thumb nails for a statement look. Or use them only on one accent nail paired with stitches on another.
Mix these techniques and each finger tells a different part of the monster story. This kind of layered approach makes a manicure feel thought out.
4. Purple and Green Color Block
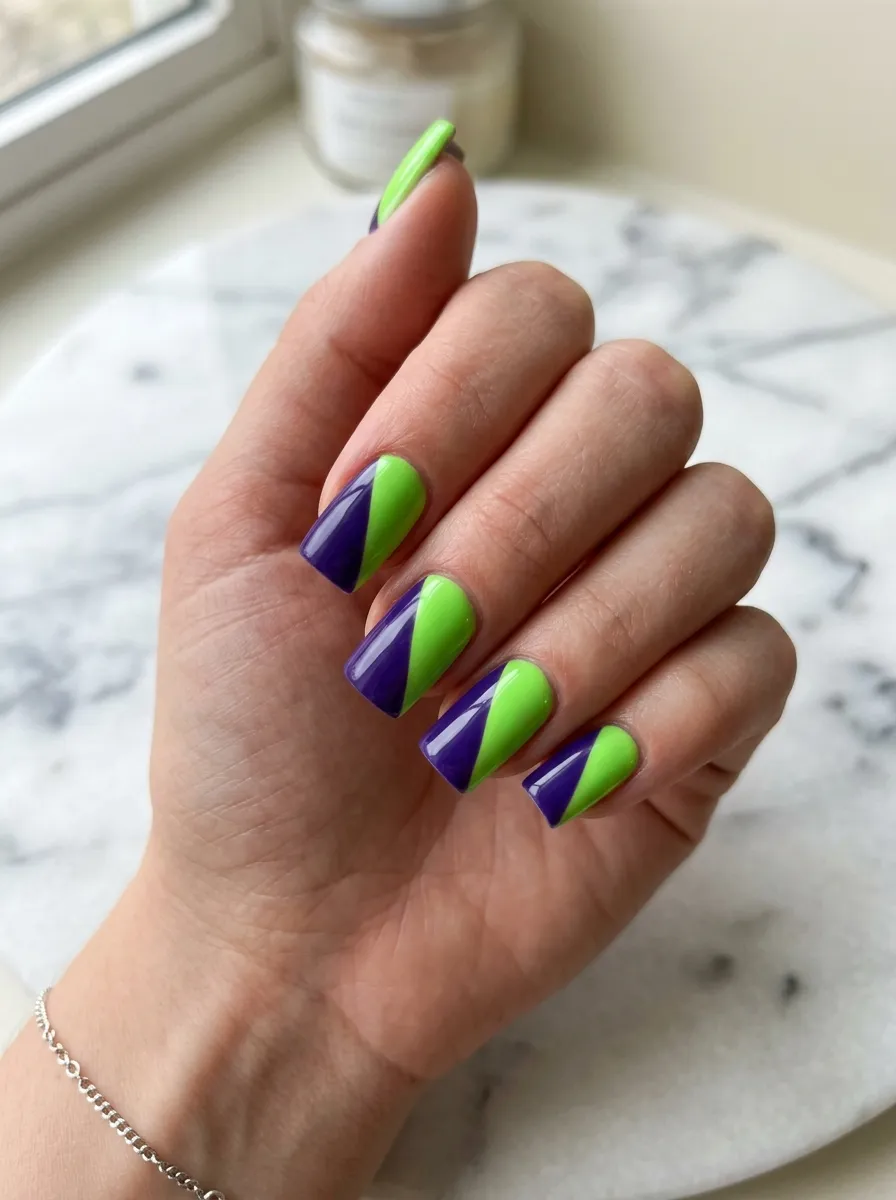
Purple and green are the colors of Frankenstein’s world. Together they make a bold, Halloween-ready statement.
Color blocking means painting two colors in clear, separate sections. The simplest version splits the nail diagonally, half green, half purple.
Use nail tape or striping tape to get a clean line. Press it diagonally across the nail. Paint one side green, let it dry, then remove the tape and paint the other side purple. Peel carefully.
You can also do a horizontal split, green at the base and purple at the tip, like a Frankenstein French manicure.
Cheap option: Nail tape costs about one dollar at dollar stores. It creates professional-looking lines every time.
This design photographs really well. The contrast between green and purple is strong and graphic. It reads well in photos and in person.
Try a matte top coat on the purple and a glossy one on the green. The texture difference adds another layer of visual interest.
This is one of those designs that looks complicated but takes only a few extra steps. The tape does the hard part. You just fill in the color.
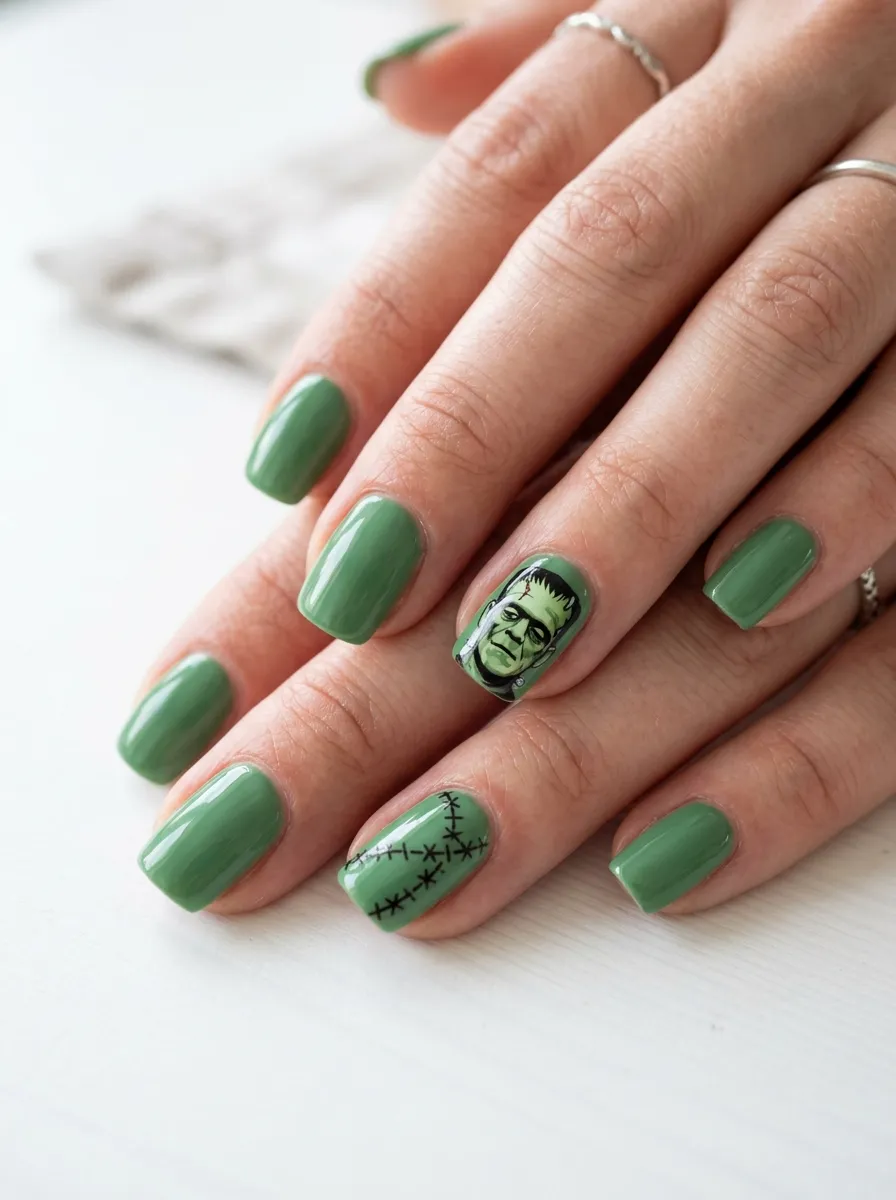
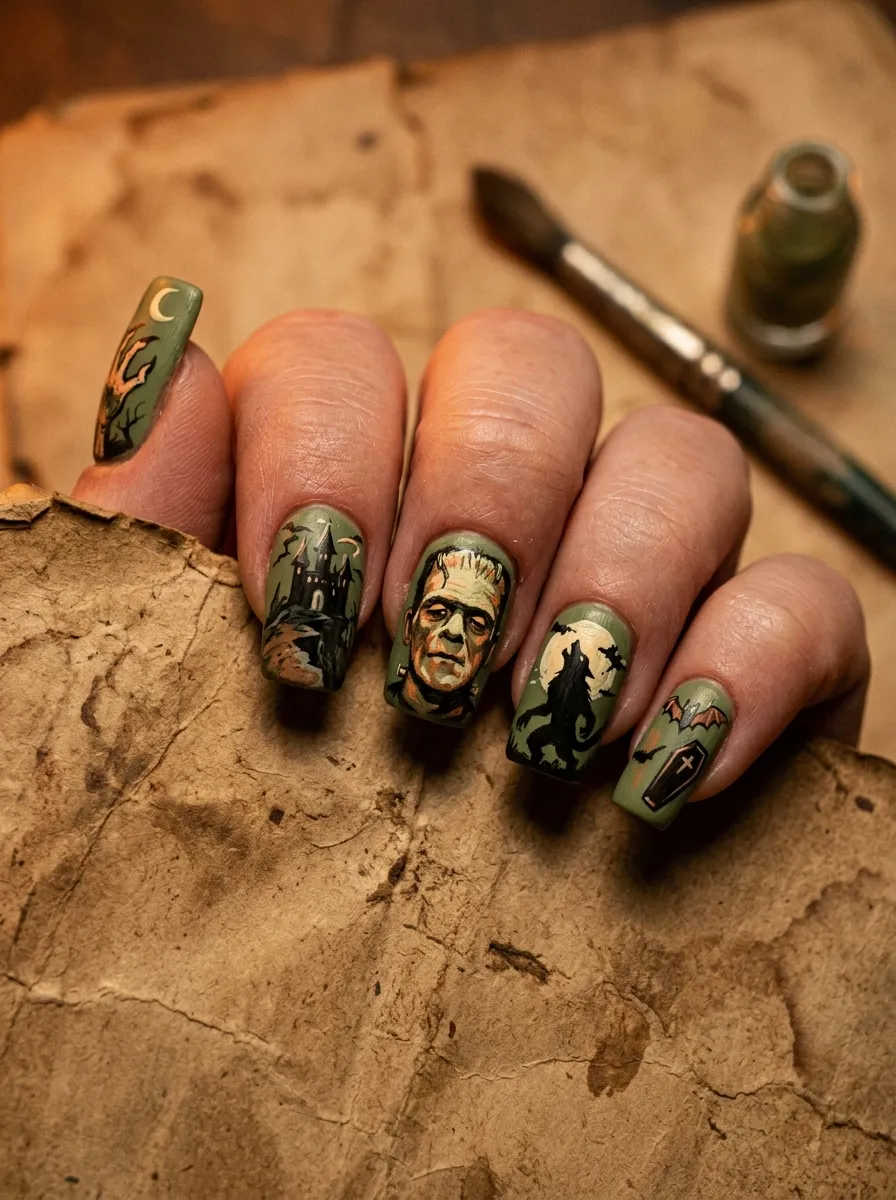
5. Frankenstein Face Nail Art
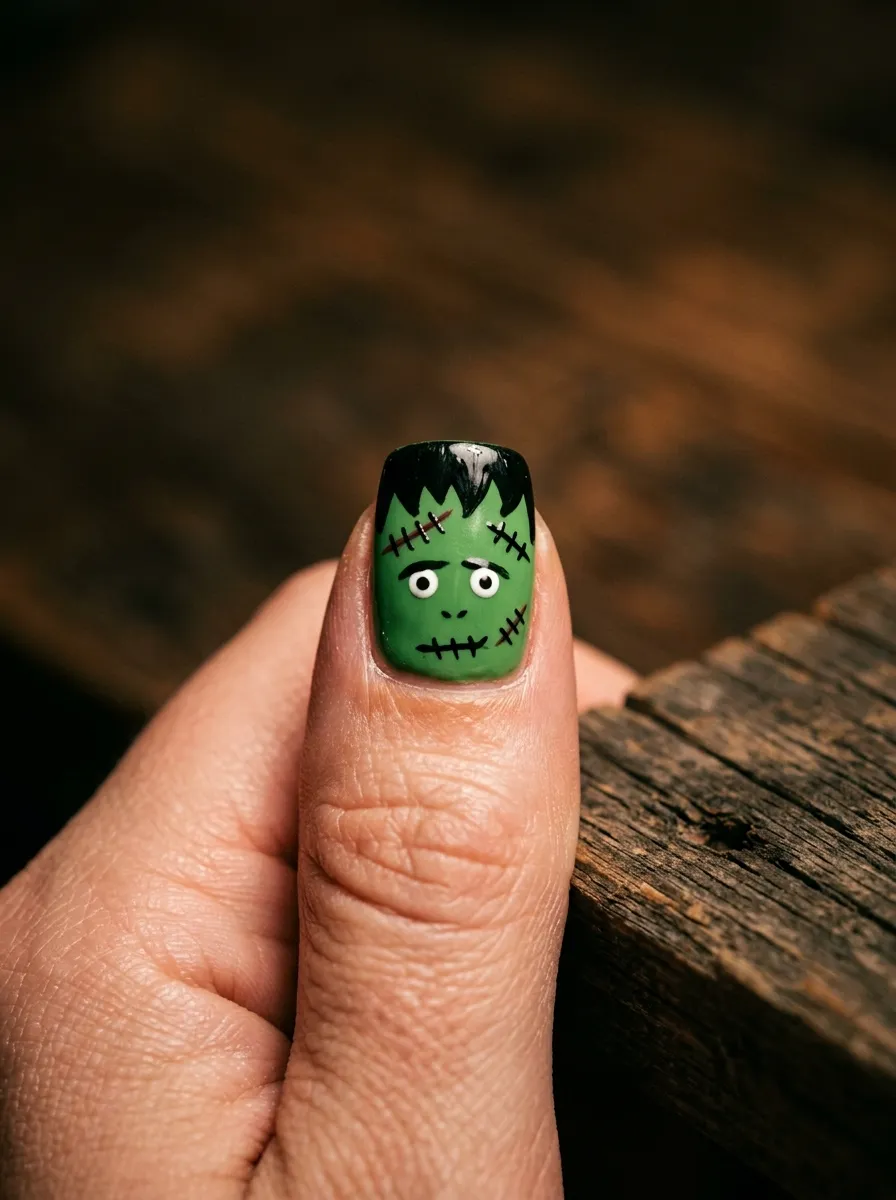
Painting an actual face on a nail sounds intimidating but it is very doable, especially on the thumb where there is more surface area.
Start with a flat green base. Add two small white ovals near the center for eyes. Fill them in with a black dot pupil using a toothpick.
Use black polish and a thin brush to paint a flat-top hairline. This is the square Frankenstein hairline and it is what makes the face instantly recognizable.
Add a small mouth with two or three small dots or a jagged line. Keep it simple.
Finish with tiny bolt marks on each side at the base of the nail.
Practice first: Do a test run on paper. Sketch the face out lightly with a pencil so you know how to space the features before committing to your nail.
This works best as a single accent nail. Put it on your thumb or middle finger. Surround it with simple green nails so the face gets all the attention.
If freehand feels too scary, look for Frankenstein nail stickers. They come in sheet form and are very affordable, usually under three dollars.
6. Matte Green Monster Mani
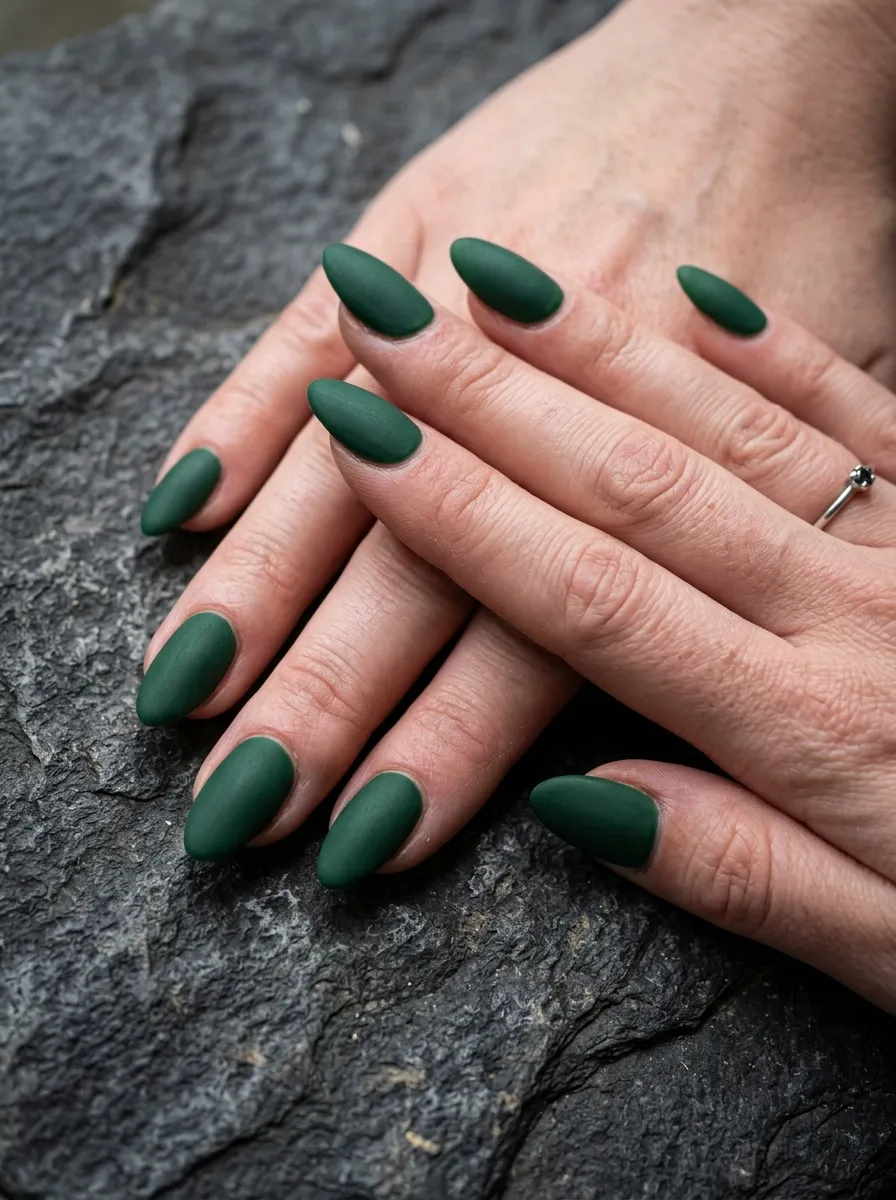
Matte nail polish changes the mood of a manicure completely. A matte green Frankenstein look feels darker, edgier, and more dramatic than a glossy version.
You can buy matte green polish directly or buy a matte top coat and apply it over any green you already own. Matte top coats cost about three to five dollars and work on any color.
The matte finish hides small brush strokes and imperfections. This actually makes it easier for beginners because every little flaw becomes less visible.
Texture tip: Apply the matte top coat in a single smooth stroke per section. Going back over it while it is tacky leaves streaks.
Pair matte green nails with one glossy accent nail for contrast. The difference in finish draws the eye exactly where you want it.
Matte nails also photograph beautifully. They pick up light differently from glossy polish and the flat color looks rich and intentional in photos.
This is a great everyday Halloween look. It is subtle enough to wear to work or school but still clearly themed. You can dress it up with stitch details or keep it totally plain.
Matte green is one of the most wearable Frankenstein nail looks on this whole list.
7. Glitter Green Tips

Glitter tips take the classic French manicure and make it Halloween-ready. Replace white tip polish with chunky green or multi-tonal Halloween glitter.
Paint your nails with a sheer or nude base. Let it dry. Then dip your fingertips lightly into loose glitter or apply chunky glitter polish to just the tip area.
Use a flat nail brush to press the glitter down so it sticks evenly. Seal it with a thick top coat to lock everything in and smooth the texture.
Budget win: Loose chunky glitter from a craft store costs under two dollars for a jar that will last through many manicures.
You can also press the glitter on while the top coat is still tacky. That traps it perfectly without needing extra adhesive.
Glitter tips look amazing with a matte or satin base underneath. The contrast between the flat base and sparkly tip is eye-catching.
Add a tiny bolt sticker near the base of each nail to bring in the Frankenstein theme without painting anything freehand.
This design appeals to people who love glamour and Halloween at the same time. It is festive without being too costume-like. You can wear this to a party or just for daily fall fun.
8. Zombie Green Ombre
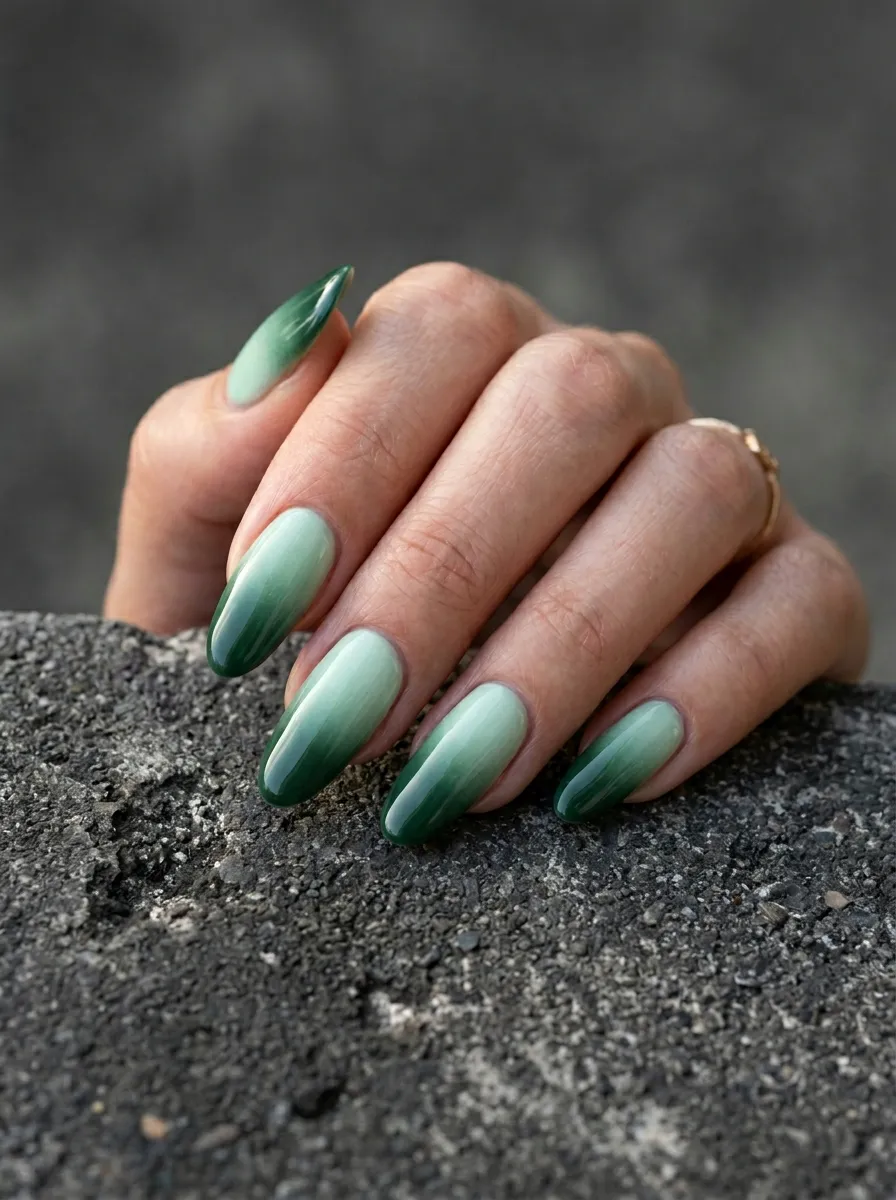
Ombre nails look expensive and complicated. They are actually one of the easiest styles to do at home with a makeup sponge.
For a Frankenstein ombre, pick two or three green shades. A pale mint at the base, a mid lime in the middle, and a deep forest green at the tip works perfectly.
Paint all three colors side by side on a makeup sponge. Then press and dab the sponge onto the nail. The colors blend naturally where they meet.
Repeat two or three times for full coverage. Clean up the edges with a small brush dipped in acetone.
Sponge tip: Use a wedge makeup sponge cut into a small piece. The firmer foam ones work better than the soft round ones.
Seal with a top coat. The ombre looks cleaner and smoother after the top coat settles.
This style reads as Frankenstein just from the green family of colors. Add one stitch detail on an accent nail to make the theme crystal clear.
Ombre nails look great on any length. Longer nails give more room for the gradient to stretch, but short nails can still pull off a nice transition between two shades.
9. Halloween Stamping Plates
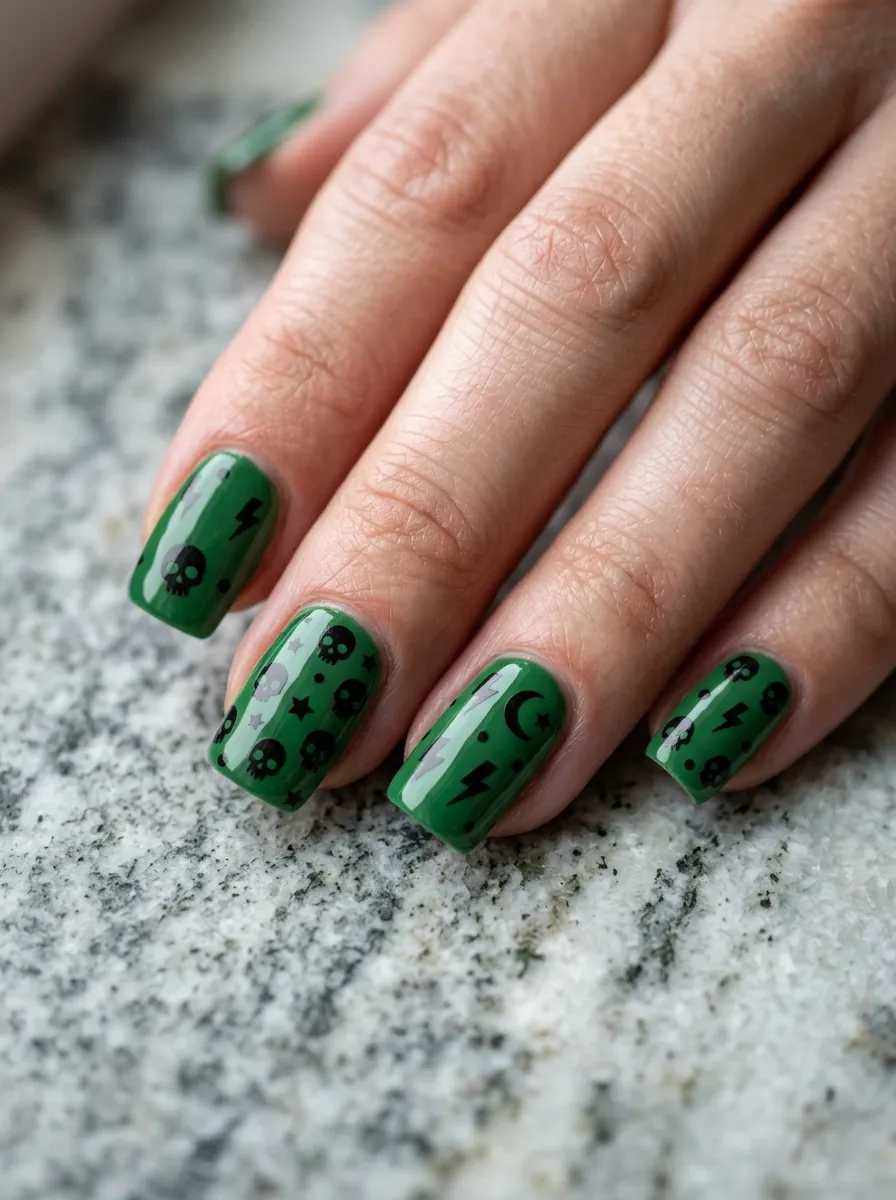
Nail stamping is a method that lets you transfer detailed designs onto your nails using a pre-engraved plate and a stamper tool. No freehand skills required.
Halloween stamping plates often include stitches, monsters, lightning bolts, and spooky imagery. They cost around five to ten dollars for a full set online.
Paint your nails green. Let them dry completely. Apply a bold black polish to the plate design, scrape off the excess, then roll the stamper over it. Press the stamper onto the nail and lift straight up.
The image transfers cleanly. It looks like it was printed on.
Best black for stamping: Use a stamping-specific polish labeled as a stamping polish. Regular polish dries too fast and does not transfer well. Stamping polishes stay wet longer and give crisp lines.
You can stamp one nail or all ten. Mixing stamped accent nails with plain solid nails is a great balance.
Frankenstein-themed plates exist specifically for this. Search “Halloween monster nail stamp plate” online to find dozens of options.
Stamping takes a little practice but once you get it, every design comes out looking professional without any real artistic skill needed.
10. Textured Skin Effect Nails
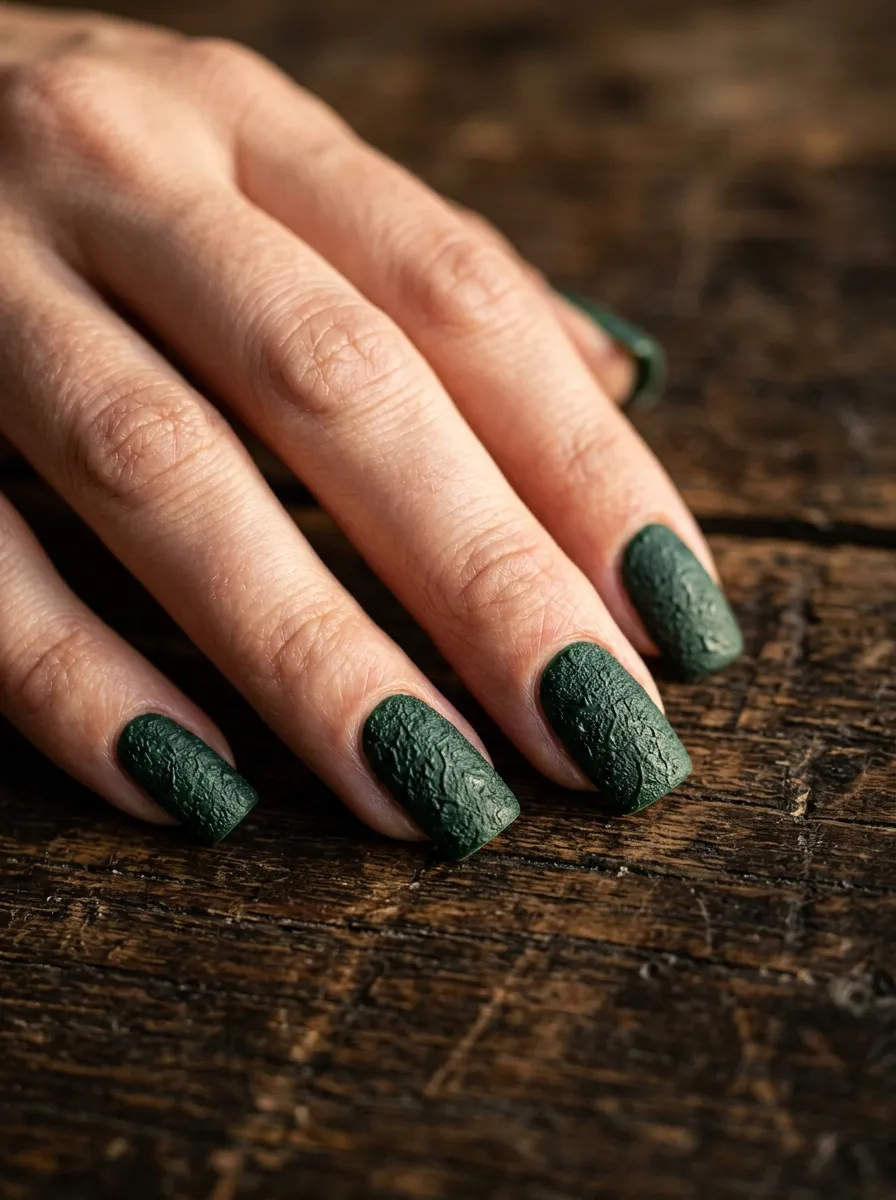
Frankenstein’s monster has rough, uneven skin. Recreating that texture on your nails makes for a uniquely creepy and realistic look.
Sand-finish nail polishes or sugar-finish polishes give your nails a rough, bumpy texture. These polishes have tiny particles in them that create an uneven surface when dry.
Look for textured nail polishes from OPI, Essie, or China Glaze. They sell for about five to eight dollars.
You can also create texture yourself by dabbing a green sponge lightly over a base coat while it is still slightly tacky. The sponge leaves behind an uneven surface.
Add-on detail: Press tiny black dots into the texture using a toothpick while the polish is still soft. These mimic pores or stitching holes.
The rough surface catches light differently across the nail. Some areas look darker, some lighter. This natural variation makes the nails look more like actual monster skin.
Finish with a matte top coat, not a glossy one. Gloss over texture flattens it and takes away the effect.
This design works especially well paired with smooth, shiny accent nails. The contrast between rough and smooth across your hand makes the whole manicure more interesting.
11. Glow in the Dark Green Nails
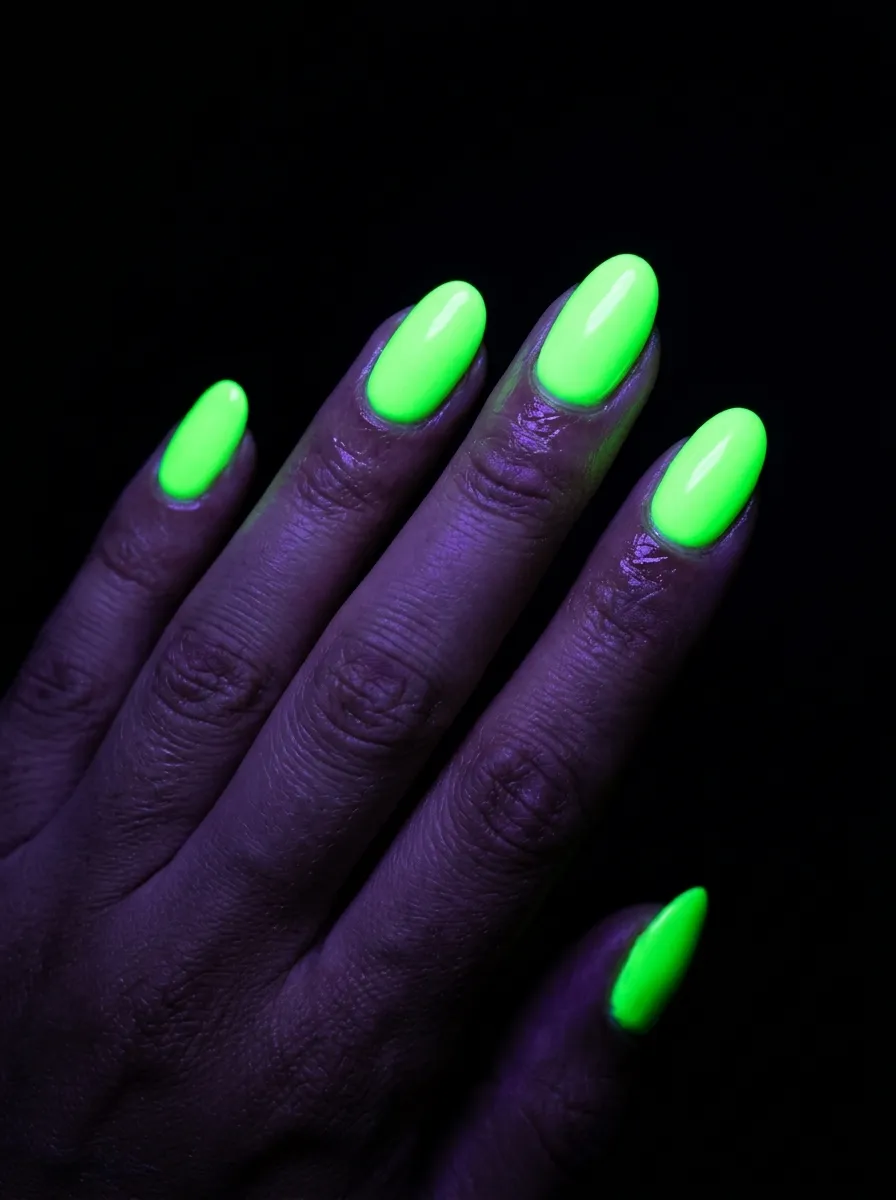
Glow in the dark nails are perfect for Halloween parties. Under normal light they look like regular green polish. Under black light or in the dark, they glow a radioactive green that fits Frankenstein perfectly.
Glow in the dark nail polish is sold at drugstores and online for about three to six dollars. Some brands, like Orly or Sally Hansen, carry seasonal glow versions.
Apply two to three coats for the strongest glow effect. Charge the nails under a lamp for a few minutes before showing them off in the dark.
Party move: Wear these to a black-light Halloween party. Your nails will genuinely glow and they always get a reaction.
You can layer glow polish over a regular green base to intensify the daytime color and still get the nighttime effect.
Add stitch details in white polish over the glow base. Under black light, white polish glows bright blue, which makes the stitches stand out dramatically.
This is one of the most fun Frankenstein nail ideas on this list because it is interactive. The nails transform depending on the lighting around you, which makes them a conversation starter all night long.
12. Dripping Slime Nails
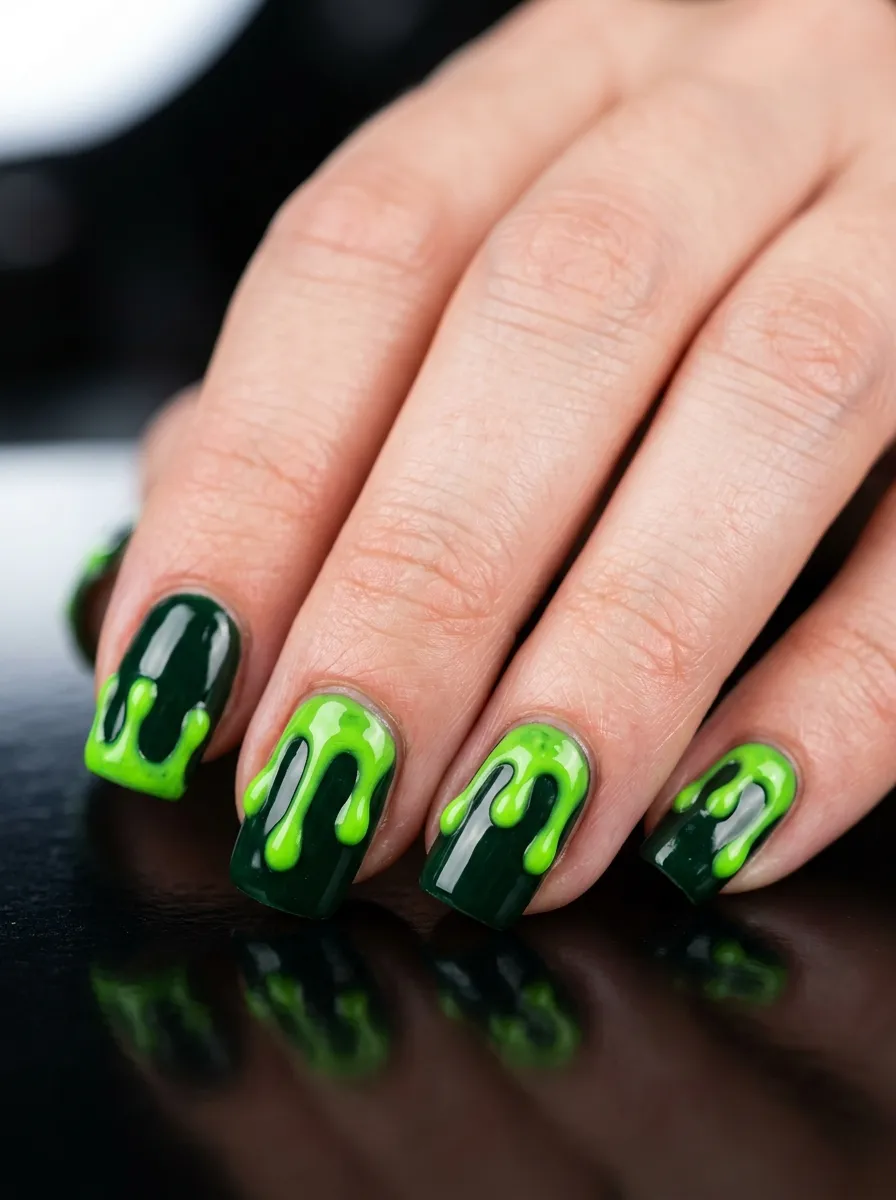
Slime drip nails combine Frankenstein green with the popular drip trend. They look like radioactive goo is dripping down from the tip of each nail.
To create this, paint a dark green base and let it dry fully. Then use a thin brush dipped in bright lime green or neon green to paint thick teardrop shapes hanging down from the free edge.
The teardrops should have a flat top at the tip and a rounded bottom. Add two or three per nail, varying the lengths so they look like actual drips.
Easy version: Use a nail art pen with a built-in thin brush. These cost around two dollars and make the drip shapes much easier to control.
Let each drip dry fully before adding the next layer. Add a second pass of the same color for opacity.
Seal everything with a thick glossy top coat. The gloss makes the drips look wet and shiny, which amplifies the slime effect.
You can make some drips longer and some shorter for a more organic look. Or place them only on two accent nails for a less intense version.
This style is bold and playful. It works great on square or coffin-shaped nails where the flat tip gives the drips a clean starting point.
13. Black and Green Plaid Nails
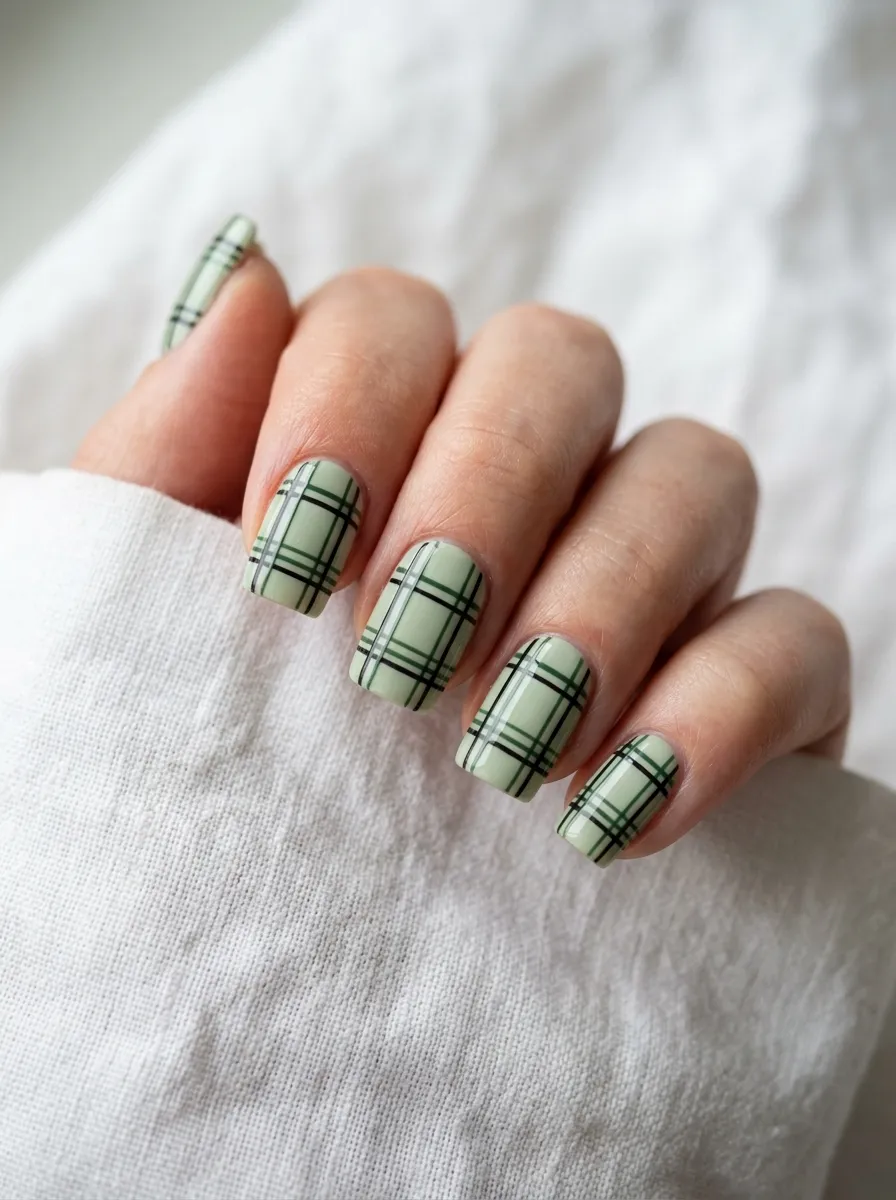
Plaid is usually associated with fall. A green and black plaid on your nails adds a stylish twist to the Frankenstein theme without being too costume-like.
Start with a light or mid green base. Let it dry. Use a striping brush and black polish to paint two or three evenly spaced horizontal lines. Then paint the same number of vertical lines crossing over them.
This creates a grid. Plaid is really just a layered grid, so even spacing is the only thing that matters.
Tape trick: Use thin striping tape as a guide. Lay it across the nail where you want the lines, paint over it, and remove it while the polish is still slightly wet.
You can add a third color, like deep purple or white, for a more complex plaid. But two colors work well and look cleaner.
Plaid nails pair nicely with solid green or solid black nails on the other fingers. This gives the manicure a fashion-forward look rather than a full costume look.
This design is great for people who want Halloween nails that can also work at the office or school. Plaid reads as seasonal, not necessarily spooky.
14. Spider Web Accents on Green
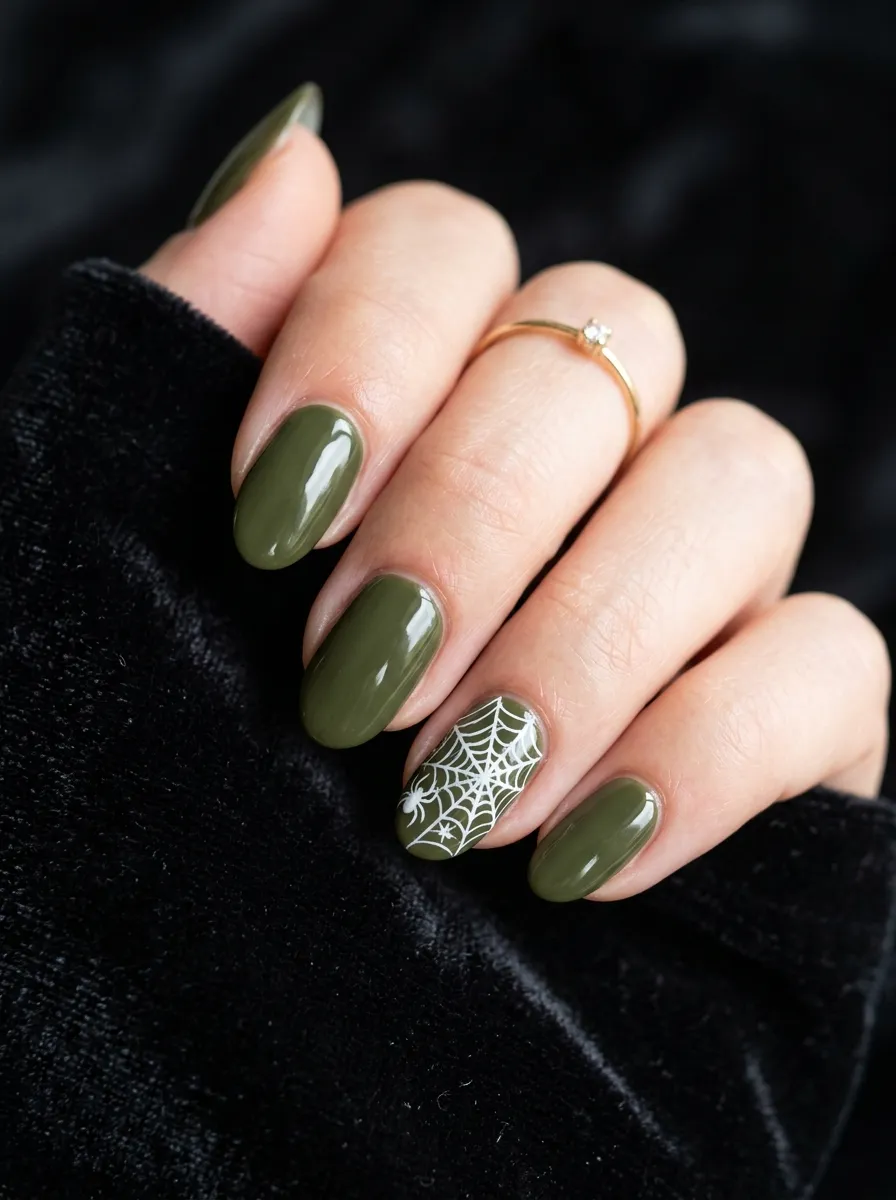
Adding a spider web to one or two green nails bridges Frankenstein with the broader Halloween world. It keeps the green monster base but adds extra spooky texture.
To paint a basic web, start with a dot in the corner of the nail. Draw lines radiating out from that dot like spokes on a wheel. Then connect those spokes with curved arcs at even intervals.
Use a fine liner brush or a toothpick dipped in white or black polish.
Fast option: Spider web nail stickers are everywhere in October. They cost about one to two dollars per sheet and require no artistic skill.
White webs on dark green look striking. Black webs on lime green look more graphic and bold.
Add a tiny spider at the corner of the web using two dots for the body and thin curved lines for legs.
This works best on longer nails where there is space to fit the web without it looking cramped. On short nails, stick to a corner web that takes up just a portion of the nail.
Place the web on your ring finger or pinky. Keep the rest of the nails solid green or with a simple stitch detail to maintain the Frankenstein theme.
15. Negative Space Stitches
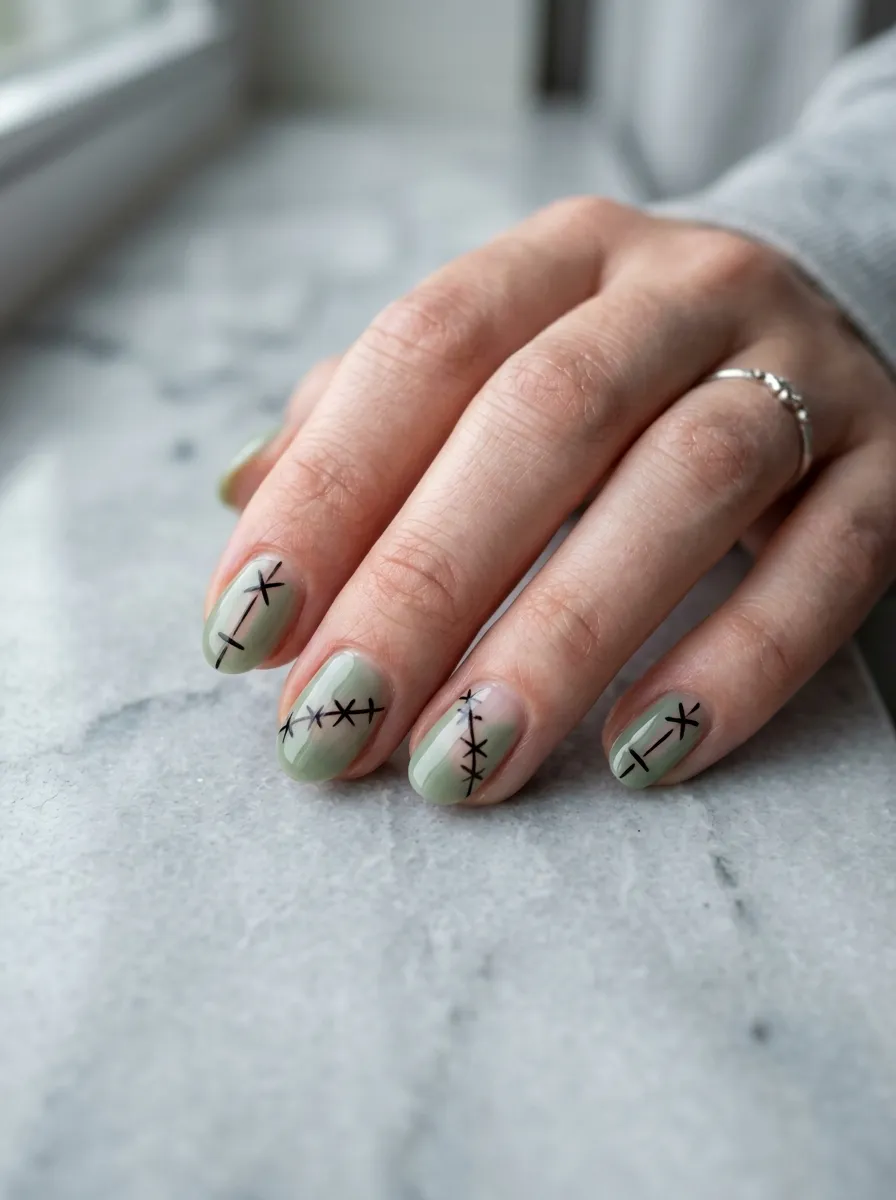
Negative space nail art uses the bare nail itself as part of the design. It is a modern nail art technique and it looks really clean and editorial.
For a Frankenstein stitch version, paint your nails in a sheer or solid green. Before it dries, lay thin pieces of nail tape across the nail horizontally. Let the polish dry fully and remove the tape.
The bare strips where the tape was create the stitch lines automatically. No painting required.
Then use a fine brush to add tiny vertical dashes crossing over the bare lines. These are the suture marks.
Alternative: Apply a full green coat first. Then use a thin brush and nail remover to drag thin lines off, exposing the bare nail underneath.
The result looks intentional and artistic. It is one of those looks that seems like it took hours but actually comes together in minutes once you understand the technique.
Pair negative space stitches on two fingers with solid bold green on the rest. This creates visual contrast and makes both designs stand out more.
This style is great for people who love modern, design-forward nail art. It blends Halloween themes with a clean aesthetic.
16. Foil Green Monster Nails
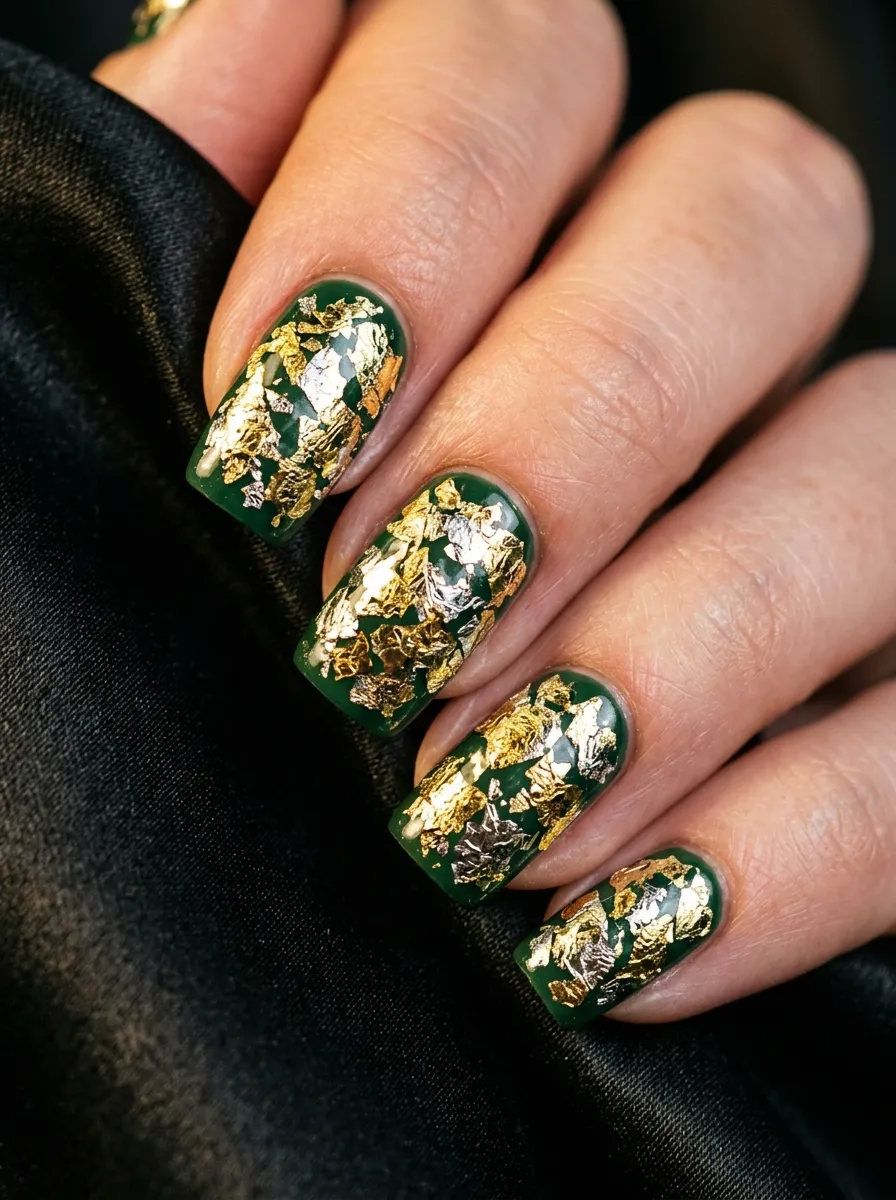
Nail foils are thin metallic sheets that stick to your nails and create a mirror-like or crinkled metallic look. They are having a major moment in nail art right now.
For Frankenstein nails, choose foil in copper, silver, or gold. Press torn pieces onto a green base while the top coat is still tacky.
Tear the foil into irregular shapes. Press each piece down and peel back the backing. The metallic layer stays on the nail.
Budget buy: Nail foil transfer sheets cost one to three dollars for large rolls online. One roll lasts for dozens of manicures.
The torn edges make each nail look unique. No two nails will look the same, which gives the manicure a handmade, artsy quality.
You can cover the whole nail in foil or just press small patches here and there. Partial coverage looks edgier.
Add black stitch lines over the foil with a thin brush. The stitches on top of the metallic background look incredible and very polished.
This design photographs exceptionally well because the foil reflects light in interesting ways. Under flash or sunlight, every nail looks different.
17. Frankenstein Gel Polish Look
Gel polish gives a longer-lasting manicure with a thick, glossy finish that regular polish cannot match. If you have a UV or LED lamp at home, you can do your own gel Frankenstein nails for a fraction of the salon cost.
Gel polish starter kits come with a base coat, a UV lamp, and a few colors for around twenty to thirty dollars online. Replacement gel polishes cost three to six dollars each.
Apply a green gel polish in thin layers, curing each layer under the lamp for sixty seconds. The result is a deep, mirror-like finish that lasts two to three weeks without chipping.
Key step: Always cure the base coat first before adding color. Skipping this step causes lifting and peeling later.
Once the green base is cured, add stitch details or bolt accents using black gel polish. Cure again after each detail layer.
Gel art stays crisp for weeks. Regular polish nail art can smudge within days, especially on details.
If you do not own a lamp yet, a basic LED lamp costs about ten dollars on Amazon and works with most gel brands.
Gel Frankenstein nails are worth the small upfront investment if you do your nails regularly. The cost per manicure drops significantly after the first use.
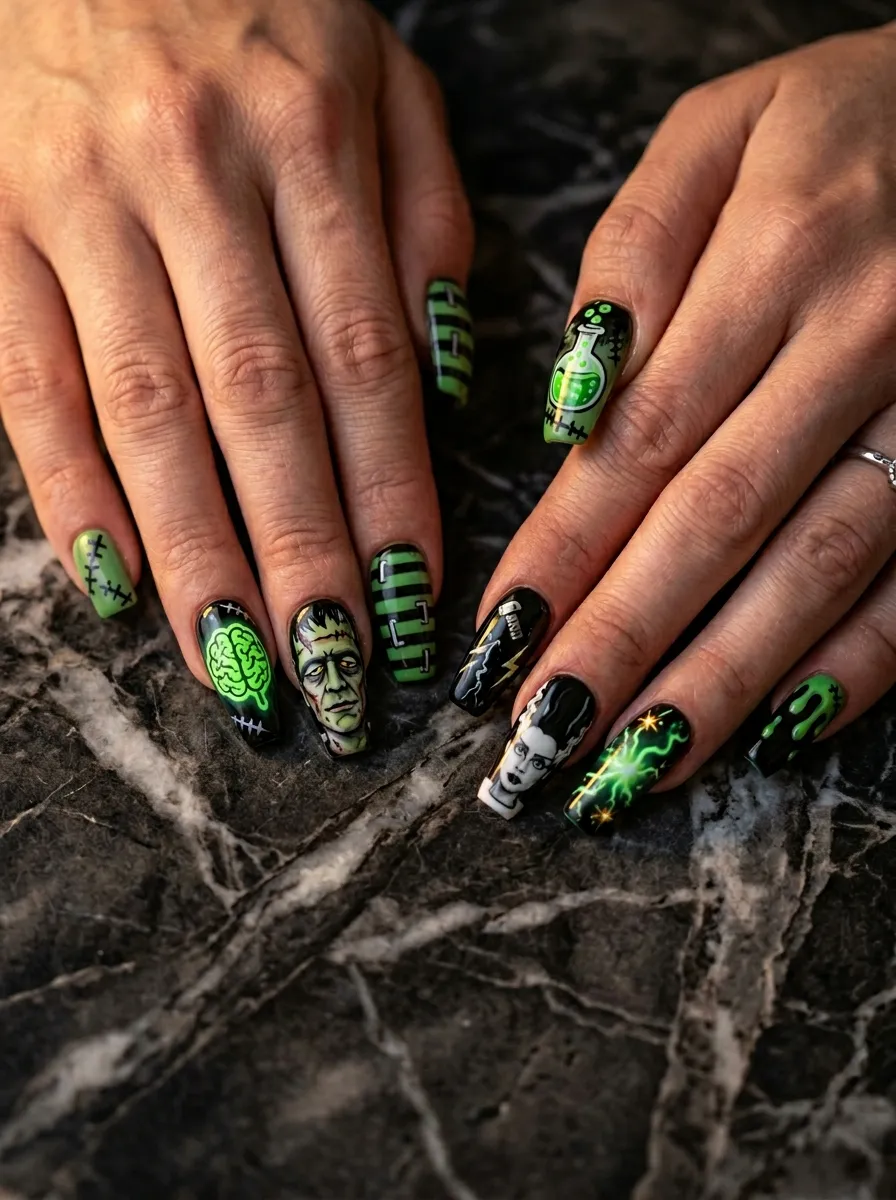
18. Haunted Forest Nail Scene

Scene nails treat all ten fingers as a single canvas. Instead of repeating the same design on every nail, you paint one connected scene spread across your hand.
For a Frankenstein haunted forest scene, use dark green and black to paint a stormy night sky across most nails. Then add bare, gnarled tree silhouettes on two or three fingers using a thin striping brush.
On the thumb or ring finger, paint a tiny Frankenstein castle or the monster himself walking through the trees.
Planning tip: Sketch the scene on paper first. Map out which element goes on which finger before you pick up any polish.
This works best on medium to long nails. Short nails do not give enough surface area for detailed scene work.
Use different values of green for depth. A lighter green on the sky gradient and a darker one for ground shadows makes the scene feel three-dimensional.
Seal the whole scene with a top coat and add a few white dots for stars. The tiny stars tie the entire scene together.
This type of nail art takes time. Plan for about forty-five minutes to an hour for the full design. But the result is something completely one-of-a-kind that you painted yourself.
19. Coffin Shape Frankenstein Nails
Coffin nails are long nails filed into a shape that is wide in the middle and flat at the tip, like the end of a coffin. This shape has extra surface area for nail art and looks very dramatic.
If you have natural nail length, you can file your nails into this shape yourself with a medium-grit nail file. File the sides straight and the tip flat.
If you prefer press-on nails, coffin press-ons come in packs of twenty-four for about five to ten dollars. These come bare and ready to paint.
Polish choice: Choose a deep, opaque green for coffin nails. The extra nail real estate means thin or streaky polish shows every flaw.
Frankenstein stitches running down the center of a coffin nail look striking. The long shape gives the stitch line room to breathe and look intentional.
Add bolt accents at the base corners where the nail meets the finger. On a coffin shape, this mirrors the bolts in Frankenstein’s neck closely.
Coffin nails make a statement on their own, even before any art is added. Start with the shape and let it do a lot of the work for you.
20. Grunge Distressed Green Nails
The grunge aesthetic and Frankenstein go together naturally. A distressed, worn-down looking manicure fits the monster’s rough and cobbled-together character.
To create a distressed effect intentionally, paint a dark green base and let it dry. Then use a small torn sponge to dab black polish lightly around the edges and tips of each nail. This mimics chips and wear.
Smudge the black slightly with your finger while it is still wet. This softens the harsh edges and makes the distress look more natural.
Smudge control: Do this with a very lightly loaded sponge. Too much polish at once creates a muddy mess rather than a distressed effect.
Add visible brush strokes on purpose using a dry brush technique. Dip a stiff brush in polish, wipe most of it off, then drag it across the nail lightly. The bristles leave streaky texture.
Finish with a matte top coat. Grunge and gloss do not belong together. The matte finish reinforces the worn, rough aesthetic.
This design suits people who want a nail look that feels raw and artistic. It has an underground quality that separates it from more polished Halloween manicures.
21. Frankenstein Nail Stickers and Decals
Nail stickers and decals are the easiest way to get detailed Frankenstein nail art without any freehand skills at all.
These come in several styles. Waterslide decals, adhesive stickers, and gel stickers are the main types.
Waterslide decals get soaked in water, slid off the backing, and placed on the nail. They are very thin and lay flat under top coat so they look painted on.
Adhesive stickers peel and stick directly to the nail. They are the fastest option but can lift at the edges if not sealed well.
Sealing tip: Always apply a thick layer of top coat over any sticker. Go past the edges of the sticker to lock it down. This prevents peeling and adds at least a week of extra wear.
Gel stickers are self-adhesive and cure under a UV lamp. They last the longest and look the most professional.
Search for Frankenstein or monster nail stickers on Etsy, Amazon, or your local beauty supply store. Expect to pay about two to five dollars per sheet.
One sheet is usually enough for two or three full manicures depending on how many stickers you use per nail.
This is the most beginner-friendly option on the entire list. If you can peel and stick, you can do this design.
22. Gradient Purple Storm Sky Nails
A purple storm sky gradient looks like the sky above Frankenstein’s castle, dramatic, dark, and electric.
Mix purple at the base with a dark green at the tip using the sponge method described earlier. Use a deep violet or eggplant purple for the darkest effect.
The colors meet in the middle and create a murky, stormy tone where they overlap. This overlap zone is actually the best part of the gradient.
Sponge tip: Apply three to four layers of sponge dabbing for full coverage. Thin layers build up more smoothly than thick ones.
Add tiny white dots scattered across the nails after the gradient dries. These represent lightning sparks or stars in the stormy sky.
You can also use a thin brush and white polish to paint one jagged lightning bolt on an accent nail. Keep it small so it does not overpower the gradient.
Seal with a glossy top coat to make the gradient look deep and dimensional.
This is one of the most atmospheric Frankenstein nail looks on this list. It does not rely on specific monster imagery. The colors and mood tell the whole story by themselves.
It is also a great choice for people who want Halloween nails that feel more grown-up and less costume-like.
23. Yellow Starburst Eye Nails
Frankenstein’s monster is often shown with pale yellow or glowing eyes. Adding that detail to your nails as a starburst eye motif is graphic and striking.
Paint your base nails in deep green. On two accent nails, use yellow polish to paint a circle. Outline that circle in black. Add a black pupil dot in the center.
Around the outside of the circle, paint short lines radiating outward like rays of a sun. These create the starburst effect.
Color swap: Try red or white instead of yellow for a creepier eye effect. Red on dark green looks almost demonic.
This design looks great on the middle finger or ring finger. It draws the eye immediately and acts as the focal point of the whole manicure.
Use a nail art pen for the outline and starburst lines. These pens have very fine tips and do not require brush skill. They cost about two dollars each and come in multipacks.
Add a thin white highlight dot inside the pupil. This small detail makes the eye look three-dimensional and alive.
This style mixes nail art with illustrative design. Even a rough version looks intentional and creative.
24. Press-On Frankenstein Set
Press-on nails have come a long way. The modern versions look incredibly natural and last up to two weeks with the right application.
You can buy blank press-on sets and paint them yourself before applying. This is much easier than painting on your actual nails because you can take your time and even use a magnifying glass.
Blank short coffin or square press-on sets come in packs of twenty-four for around four to eight dollars.
Paint each nail while it is still off your hand. Add your green base, stitches, bolts, and any details you want. Let them dry fully.
Application tip: Use nail glue tabs rather than nail glue if you want to remove them easily. Tabs allow clean removal without damage to your natural nail.
If you want a pre-made set, search for Frankenstein press-on nails on Etsy. Independent nail artists sell hand-painted custom sets for around ten to twenty-five dollars, which is far below what a salon would charge.
Press-on nails are especially great for special events. You can create an elaborate design at home and apply it the morning of a Halloween party in under ten minutes.
This option works for all nail lengths and shapes. Trim or file any press-on to the length and shape you want before painting or applying.
25. Chrome Green Nails
Chrome nails have a mirror-like finish that reflects light like a polished metal surface. In green, they look like radioactive, otherworldly monster skin.
Chrome powder is applied over a special sticky gel top coat. You rub the powder onto the nail with a sponge applicator and it buffs to a mirror finish.
Green chrome powder sets cost about three to six dollars online and come with an applicator. You also need a UV lamp and a no-wipe gel top coat to make this work properly.
Key step: The stickier the gel layer, the more brilliant the chrome effect. Do not cure the top coat fully before applying powder. Leave it slightly tacky.
After rubbing in the chrome, seal it with a final top coat. This prevents the powder from rubbing off during wear.
Chrome nails photograph stunningly. Every photo picks up different reflections in the surface. Under sunlight they look electric.
Add a single black stitch line over the chrome with nail art polish. The contrast between the matte black stitch and the mirror green surface is visually stunning.
This is one of the more involved looks on this list in terms of materials, but the result is completely unlike anything regular polish can create. For under ten dollars total, you get a salon-quality finish.
26. Vintage Monster Poster Nails
Classic Universal Monsters movie posters have a specific color palette: muted olive greens, warm oranges, creamy yellows, and deep blacks. Using this palette for your Frankenstein nails gives them a retro, artistic quality.
Skip the bright lime green. Go for an army green or sage base instead. These muted tones feel like vintage print ink rather than fresh nail polish.
Add cream or off-white details rather than pure white. Use a burnt orange for accent shapes or tiny lightning bolt details.
Color guide: Olive or sage green for the base, black for outlines, warm cream for highlights, and burnt orange for accents.
Matte top coat is essential here. A glossy finish will kill the vintage feel. Matte makes the colors look flat and aged, like an old poster.
This look suits nail art fans who love design history and typography-inspired aesthetics. It is Halloween nail art for people who also appreciate graphic design.
The finished result looks like a miniature art piece on each finger. It is subtle enough that not everyone will immediately recognize the Frankenstein reference, but those who do will be genuinely impressed.
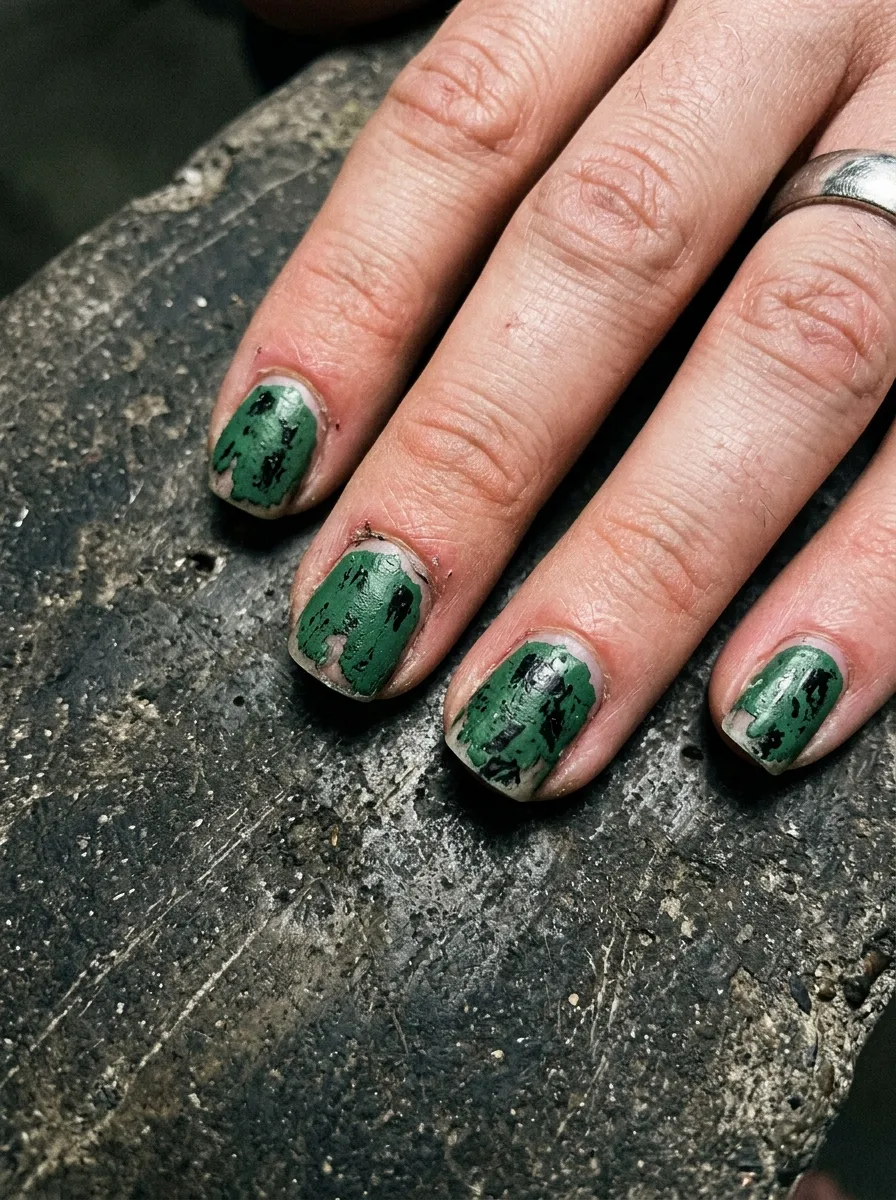
27. Torn Skin Texture Nails
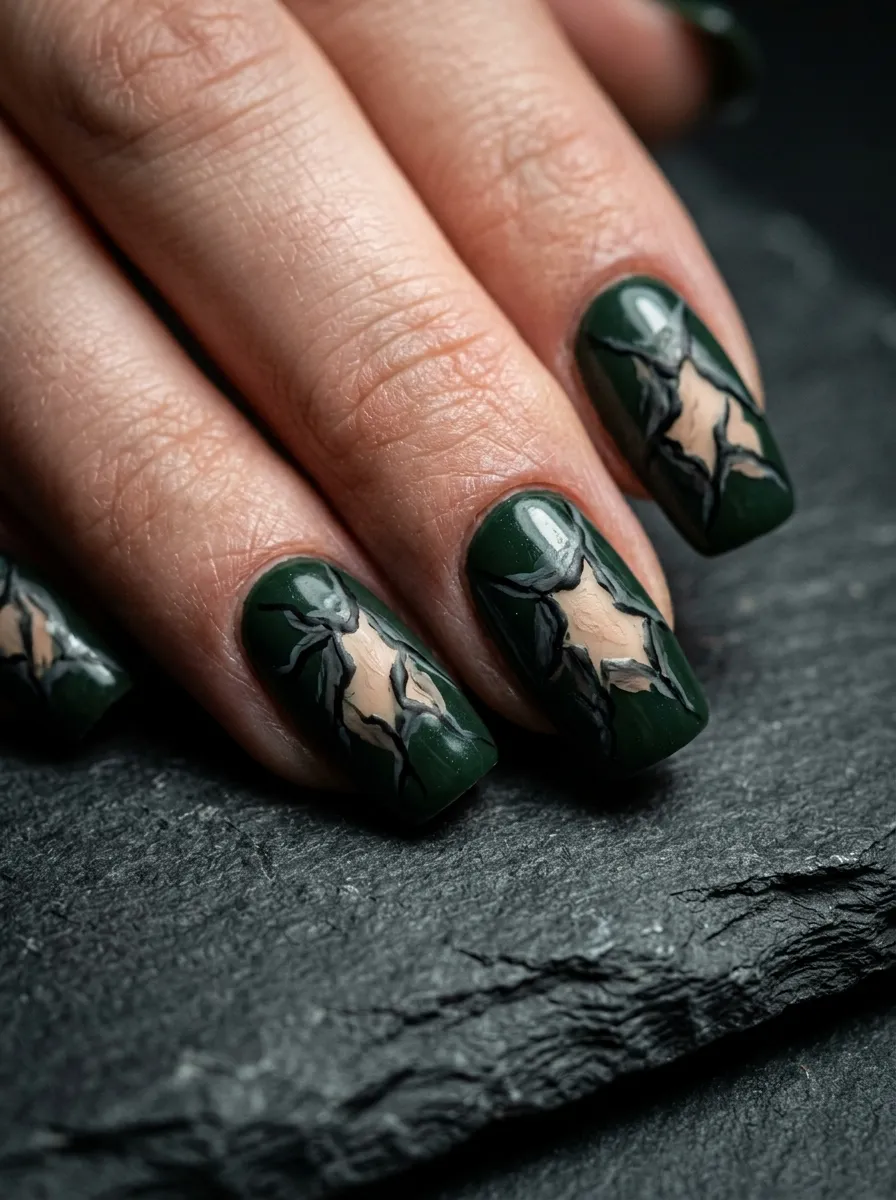
Torn skin nail art is a popular Halloween technique that makes it look like the skin of your nail is peeling away to reveal something underneath. Applied to Frankenstein nails, it looks like the monster’s patchwork skin coming apart at the seams.
Start with a green base. Let it dry. Then use a slightly lighter skin-tone peach or pale green underneath to paint an irregular torn shape in the center of the nail.
Outline the torn edge with black polish using a thin brush. The outline is what creates the illusion of depth and makes the skin look like it is actually lifting.
Depth trick: Add a thin shadow line in dark gray or brown just inside the torn edge. This shadow reinforces the three-dimensional illusion.
Add visible red veining inside the revealed area for a more intense look. Keep the lines thin and organic.
Seal with a glossy top coat over the whole nail. Gloss enhances the depth of the torn skin illusion.
This design is dramatic and creepy. It gets reactions from people who look at it closely. At first glance the nails look like they are crumbling, and then the artistry becomes clear.
It works best on medium to long nails. Short nails do not have enough surface area for the illusion to read clearly.
28. Frankenstein Meets Abstract Art
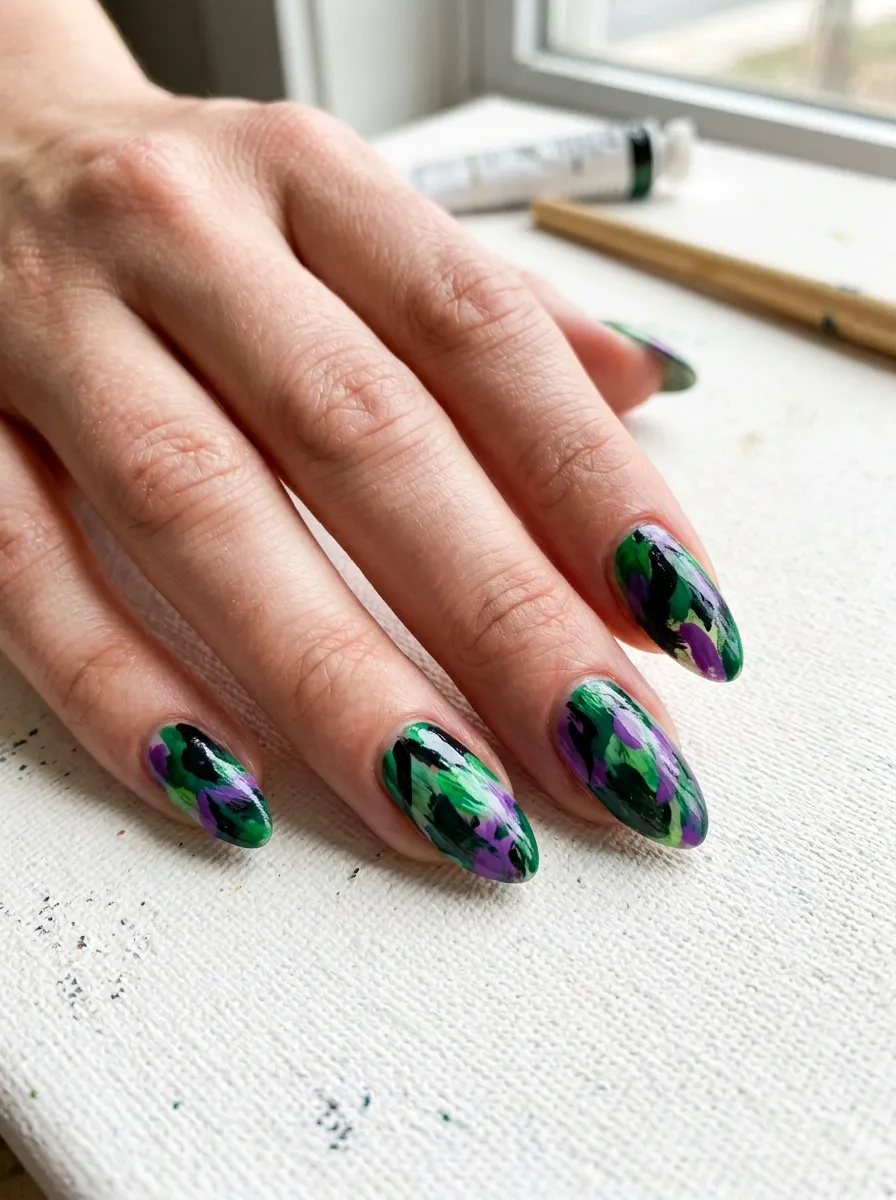
Abstract nail art takes inspiration from a theme without being literal about it. You do not need to paint a face or stitches to make Frankenstein nails.
Use the monster’s color palette as your guide. Green in many values, black, purple, and small pops of yellow or copper. Layer abstract shapes, drips, and brush strokes across each nail.
No rules, no symmetry. The goal is energy and movement that feels dark, electric, and strange.
Brush technique: Use a flat brush and drag it sideways across the nail to create wide, graphic strokes. Overlap colors while they are wet for organic blending.
Add jagged shapes with a thin brush that suggest lightning or torn edges without being literal.
Finish with a matte top coat to make the whole thing look like a real abstract painting.
This approach appeals to people who love art but find realistic nail art too stressful. You cannot make a mistake with abstract. Every unexpected mark adds to the design.
The manicure looks different on every nail, which makes the whole hand feel like a cohesive but varied artwork.
If you love painting but are new to nail art, abstract is the most forgiving style to start with. Just pick your colors and let yourself play.
29. Green French Manicure with Black Tips
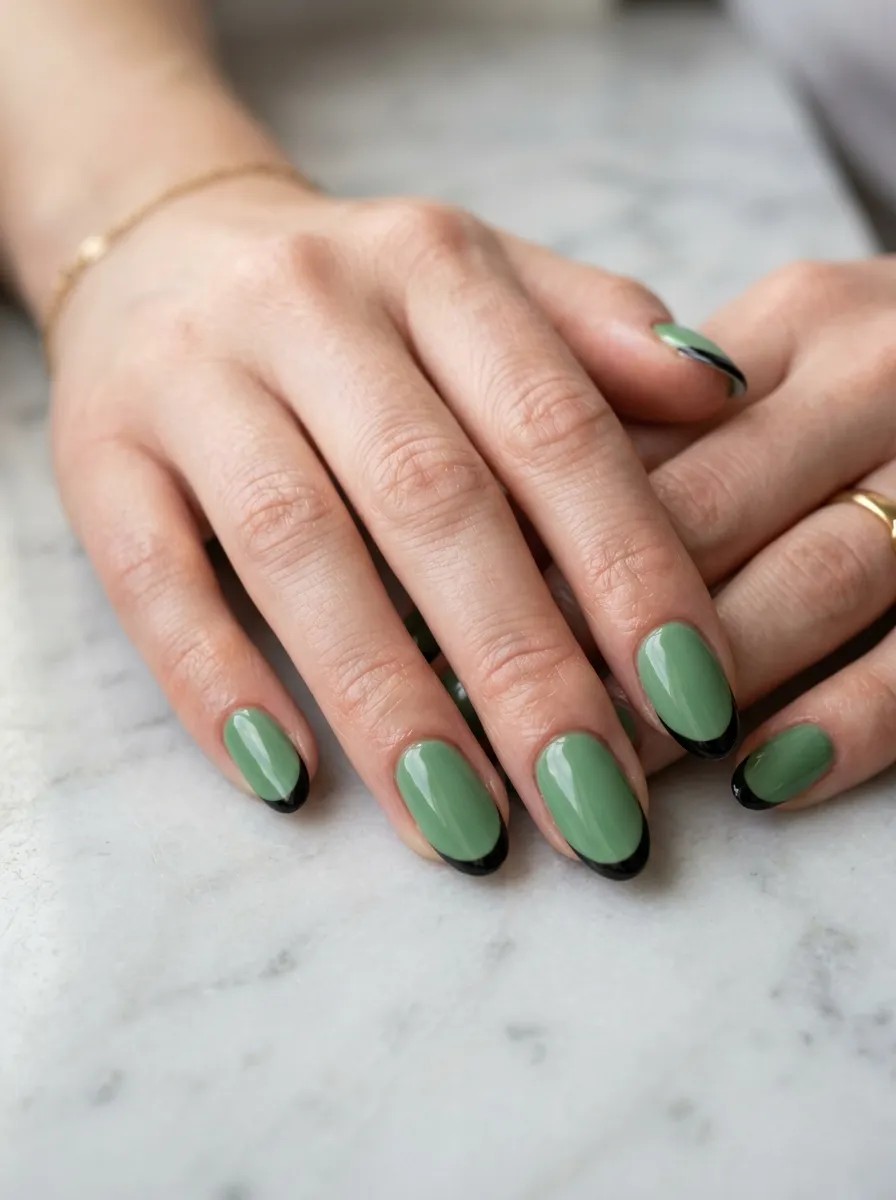
The French manicure gets a Frankenstein upgrade by swapping the classic white tip for black and the nude base for green.
Apply a sheer or mid-tone green all over the nail. Let it dry. Then use tip guides or nail tape to mark the smile line where the white tip would normally go.
Paint the tip section with opaque black polish. Remove the tape slowly while the polish is still slightly wet.
Clean edge tip: If the line is not perfect, dip a thin brush in acetone and drag it along the line to sharpen it. This trick works on any line-based nail art.
Seal with a glossy top coat to give the French manicure its classic polished look.
This design is clean, graphic, and wearable. It reads as Halloween without being over the top. You could wear this to work and still have it feel appropriately seasonal.
Add a tiny white bolt or stitch detail near the base on one accent nail if you want to bring in the Frankenstein reference more clearly.
This is also a great design for people who have shorter nails. The tip line can be drawn anywhere along the nail, not just at the very edge.
30. Lightning Bolt and Stitch Combo
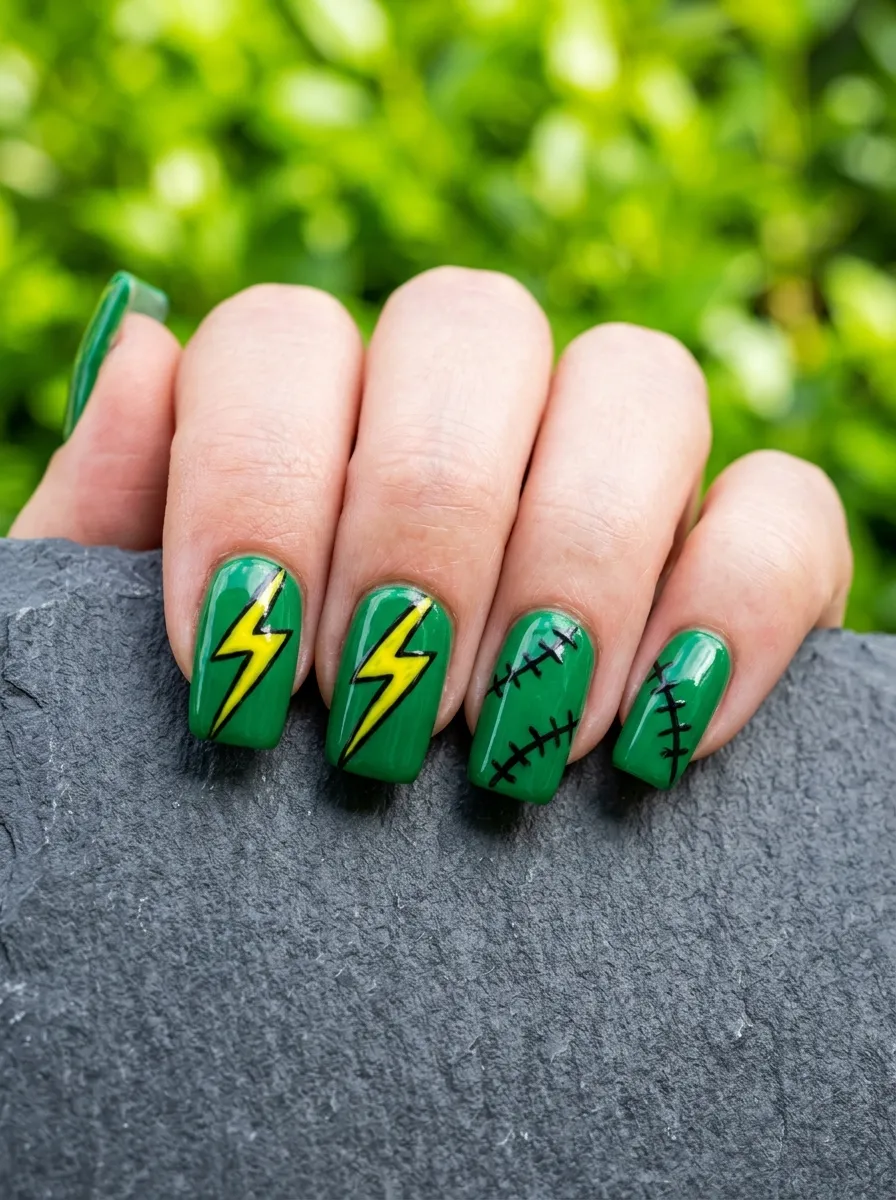
Lightning bolts and stitches together create the ultimate Frankenstein manicure. These two symbols say everything about the monster without needing a face or a scene.
Paint all nails green. On two nails, use a thin brush and yellow polish to paint a zigzag lightning bolt from the base to the tip. On two other nails, paint horizontal stitch lines in black.
Leave the thumb nail plain or add a small bolt sticker there.
Symmetry option: Mirror the design so the same fingers on each hand have the same design. Lightning bolts on middle fingers, stitches on ring fingers.
Use a bright yellow for the bolts so they pop against the green. Deep yellow or white also work well depending on the specific green you choose.
Outline the lightning bolts with a very thin black line. This sharpens them and makes them look intentional rather than wobbly.
Both of these elements can be done with a striping brush or a nail art pen. You do not need advanced skills for either.
This manicure tells a full visual story across all ten nails. Every finger contributes to the overall Frankenstein theme, but each nail has its own distinct role. The result feels complete and cohesive.
31. Neon Frankenstein Nails
Neon nails are loud, bright, and impossible to ignore. Neon green in particular has a radioactive quality that makes it perfect for Frankenstein.
Neon polishes often look streaky in the first coat. Always use a white base coat underneath neon shades. The white base makes the neon color appear much brighter and more opaque.
Apply neon polish in thin layers. Three coats over white will give you a vivid, opaque result.
Top coat note: Use a non-yellowing top coat over neon. Some glossy top coats dull neon colors slightly. Look for top coats labeled as neon-safe or UV-resistant.
Once the base is done, add any Frankenstein detail you like. Stitches in black, bolts in silver, or drips in a darker green.
Neon nails look especially good at night under artificial lighting. They practically glow without any special effects.
This is a great look for people who want something that does not just fit Halloween aesthetics but also turns heads on its own as a bold fashion choice.
Neon Frankenstein nails say you take your manicure seriously and you are not afraid to be seen.
32. Watercolor Wash Nails
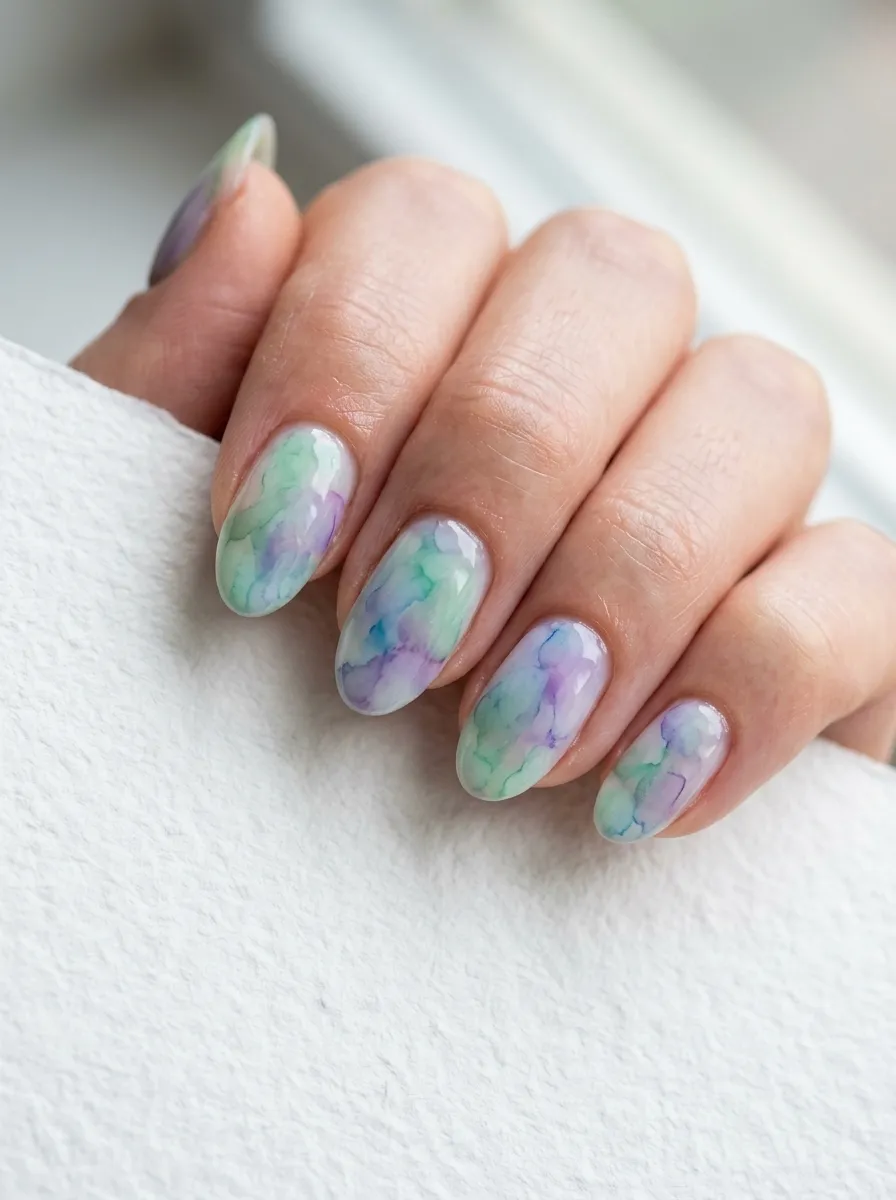
Watercolor nails use sheer, diluted-looking polish to create a soft, artistic effect that resembles actual watercolor painting.
Mix a small amount of green polish with a drop of clear top coat on a palette or piece of foil. This dilutes the color. Apply it in loose, uneven strokes across the nail.
Layer multiple diluted colors. A wash of mint green, then a patch of teal, then a touch of pale purple at the edges. Let each layer show through the next.
Water technique: Apply isopropyl alcohol to the nail before the polish and work fast. The alcohol keeps the polish from settling too quickly, allowing it to spread and pool like actual watercolor.
The result is dreamy and soft. It does not look like traditional nail polish. It looks like a miniature painting.
Add a clean black stitch line over the watercolor base using a regular polish and thin brush. The hard black line against the soft washed background creates a striking contrast.
This style takes some practice to control but is very forgiving. Because the colors are sheer, nothing looks too heavy or overwhelming.
Watercolor Frankenstein nails are for people who love art and want a manicure that feels genuinely creative and unique.
33. Mixed Nail Lengths and Shapes
Not every nail needs to be the same length or shape. Mixing lengths and shapes across the hand is a trend that has been growing fast.
Keep your shorter nails in rounded square shapes with simple solid green or stitch designs. Let one or two nails grow longer for more detailed art.
Or use press-ons of different lengths. Buy a pack that includes multiple sizes and mix the short and long ones across different fingers intentionally.
Design rule: Let the longer nails carry the detailed art. Simpler designs on shorter nails. This makes the whole hand look intentional rather than like you just have uneven growth.
Coffin shaped on the middle and ring fingers with short square on the rest is a popular combination. It draws attention to the center fingers while keeping the outer fingers practical and low-maintenance.
Paint the longer nails with the Frankenstein face, lightning bolts, or detailed scenes. Use solid green or stitches only on the short nails.
This approach gives you the dramatic look of long nails without maintaining that length across all ten fingers. It is also more comfortable for everyday tasks.
Mixed length nails are one of the biggest nail trends right now and Halloween is the perfect time to experiment with the look.
34. Frankenstein Nail Ideas Couples or Group Manicure
Matching Halloween nails with a friend, partner, or family member is a fun way to extend the theme. Each person gets a different element of the Frankenstein world.
One person wears the stitches and green monster skin. The other wears the lightning bolt and storm sky. Together, your nails tell the full story.
Or one person wears the monster’s face nails and the other wears the castle scene nails.
Budget note: Split the cost of nail supplies between two people. Buy one set of Halloween colors and tools and share them. Two manicures for the price of one.
Coordinate beforehand so the designs complement each other. Decide on a shared color palette so everything ties together even if the specific designs differ.
This idea extends to families with children. Give the kids simple solid green nails with bolt stickers. Adults take on the more detailed designs. The whole group has matching Halloween nails without anyone feeling overwhelmed.
Group nail art photos are extremely shareable. A flat-lay photo of everyone’s hands together always gets attention.
This is also a sweet activity to do together while watching Halloween movies. It turns a solo hobby into a shared experience.
35. Minimalist Single Stitch Nail

Sometimes less is the most powerful choice. A single stitch detail on one accent nail against a solid green background is quietly brilliant.
Paint all ten nails in a sophisticated green, something muted like sage or army green rather than neon. Keep them clean and even.
On one nail, the ring finger works best, draw one horizontal stitch line with two or three tiny crossing marks using a thin brush or a nail art pen.
That is the whole design.
Why it works: The restraint makes the stitch feel intentional rather than accidental. One detail draws more attention than ten details competing with each other.
This look is the most wearable design on this entire list. It works at the office, at school, at a party, and for everyday life throughout October.
It is also the most beginner-friendly option for freehand nail art. One line and a few small marks. That is all you need.
People who appreciate subtle, thoughtful fashion choices will notice this immediately. It is the kind of manicure that rewards close attention without needing to shout.
Minimalism in nail art is not about doing less work. It is about making one precise, confident choice and committing to it fully.
Frankenstein nails are one of the most expressive Halloween nail themes out there because they give you so much to work with. From glow-in-the-dark green to torn skin textures, from minimalist stitches to full haunted scene manicures, every idea on this list is accessible, affordable, and doable at home. The key is to pick one or two elements that excite you most and start there. You do not need a full kit or professional skills to create something that looks genuinely great. A two-dollar brush, some green polish, and a little patience are enough to make nails that get noticed. Grab what you have, pick your favorite look, and get started before Halloween slips away.