If you love Halloween and want your nails to match the magic, Hocus Pocus nail ideas are the perfect theme to pull from. Think Sanderson Sisters energy, glowing cauldrons, spell books, and all things witchy. These nail ideas work for beginners and seasoned nail art lovers alike. You can get the look with basic tools, drugstore polishes, and a little patience. Whether you want something simple or full-on dramatic, there is something here for every skill level and budget. If you’re also exploring Spooky nail ideas, classic Halloween themes like ghosts, pumpkins, dark tones, and eerie accents can help you create bold, seasonal nail designs that feel fun, creative, and perfectly festive.
1. Black Flame Candle Nails
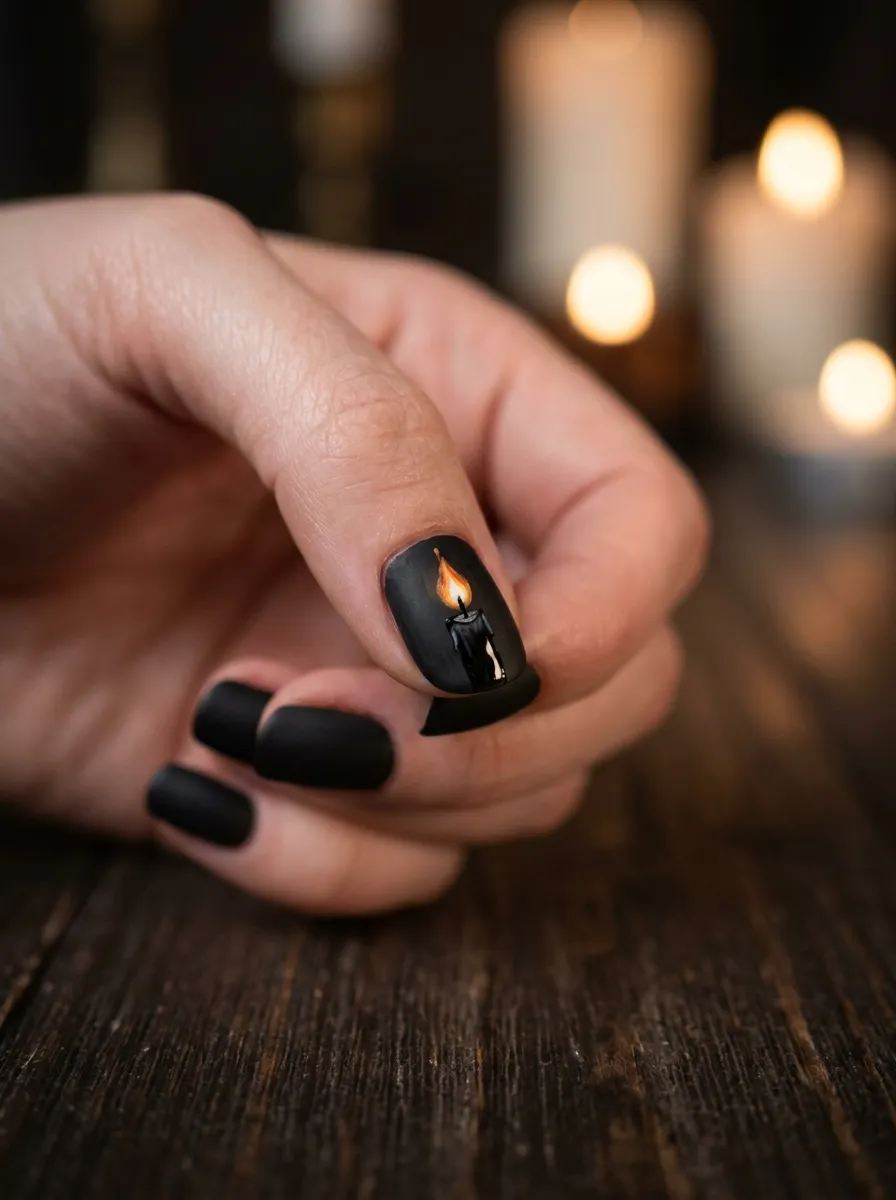
The black flame candle is one of the most iconic symbols from Hocus Pocus. Painting it on your nails is easier than it sounds.
Start with a matte black base coat on all nails. Pick one accent nail, usually the ring finger, and use a thin nail art brush to draw a simple candle shape in white or grey. Add a flame tip using bright orange and yellow polish.
You do not need to be an artist for this. A simple silhouette looks great even if the lines are not perfect. The contrast between the matte black background and the glowing flame does all the heavy lifting.
Budget tip: Pick up a black nail art pen and an orange striper brush from a dollar store. They give you enough control to draw clean, small shapes without spending much.
Seal everything with a glossy top coat over the accent nail and matte top coat over the rest. The mixed finish makes the candle pop even more and gives your manicure a professional look with minimal effort.
2. Sanderson Sisters Color Palette Nails
Each Sanderson Sister has her own color signature. Winifred is known for deep red and purple. Sarah brings pastel lavender. Mary leans into warm orange and earthy tones. Painting each nail in a different sister color is a fun, eye-catching way to celebrate the trio.
Use one rich shade per nail and keep the finish glossy for a polished look.
For Winifred, go with a deep plum or burgundy. For Sarah, a dusty lavender or soft lilac works beautifully. For Mary, try a burnt orange or cinnamon brown.
This idea is incredibly low effort since you are just painting solid colors. No nail art tools needed. It is perfect for beginners or anyone short on time.
Budget tip: Check the Halloween seasonal displays at drugstores like CVS or Walgreens. They often stock the exact shades you need for under three dollars each.
You can also add a tiny star or moon sticker to one nail to tie the look together without drawing anything freehand.
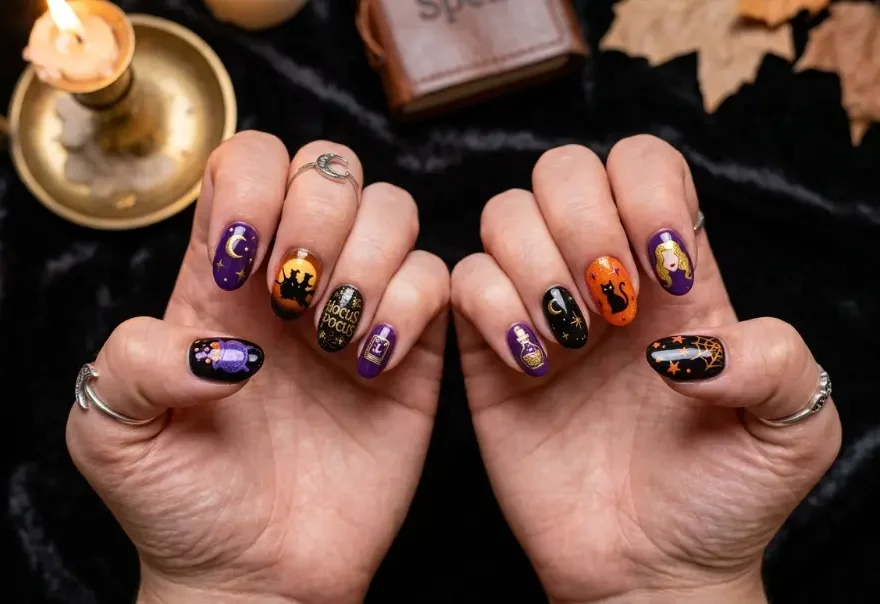
3. Spell Book Nails
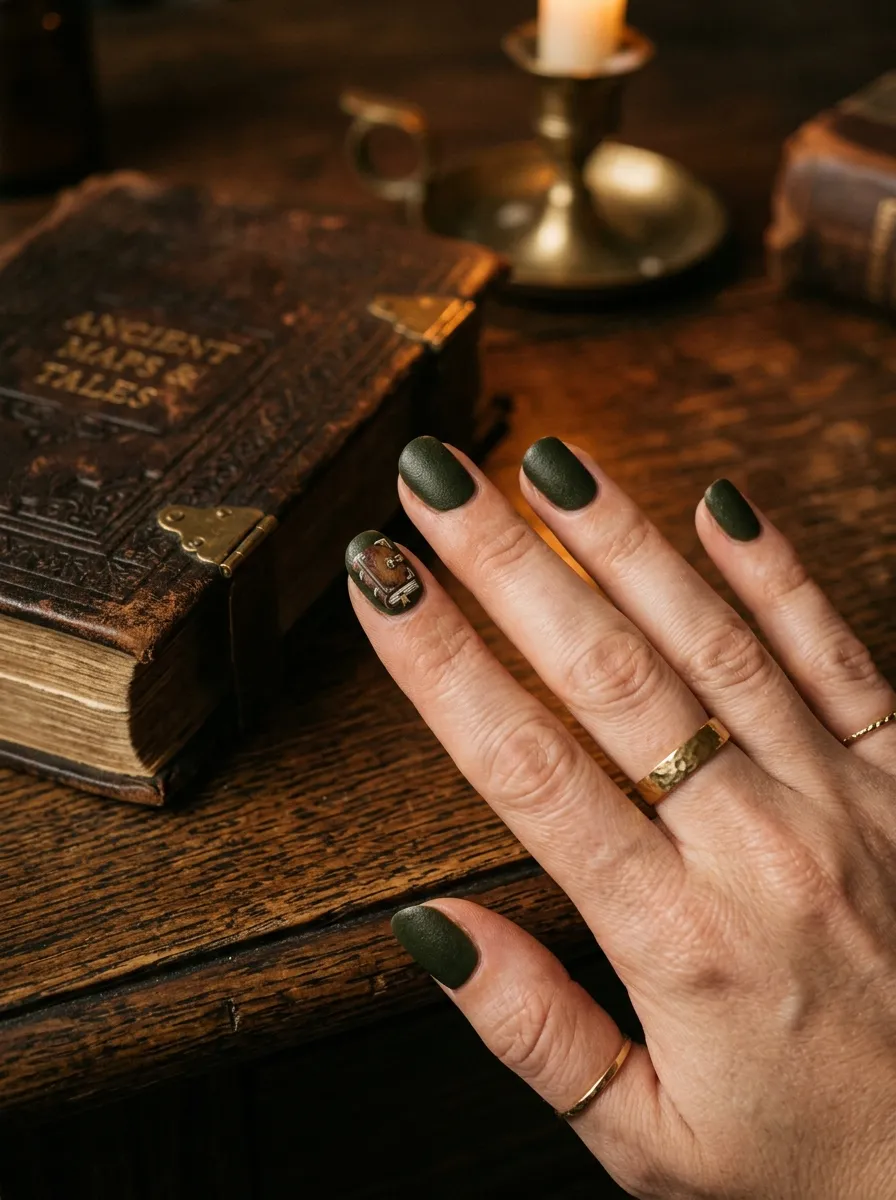
The Sanderson Sisters’ spell book is one of the creepiest props in Halloween movie history. The eye on the cover, the aged leather look, and the golden accents make it instantly recognizable.
To get this nail design, start with a dark olive or forest green base on all nails. On your accent nail, use a thin brush to sketch a small rectangular book shape in brown or tan. Add golden dots or lines for the clasp and page edges.
If painting a tiny eye feels too tricky, skip it and just focus on the book shape. It still reads clearly as the spell book and looks amazing with the green base.
Budget tip: A toothpick dipped in gold nail polish works perfectly for adding tiny dot details. It costs nothing extra and gives you more precision than a regular brush.
Finish with a matte top coat over the book nail for a leather-like texture. Use a glossy coat on the rest for contrast. The combination looks intentional and polished.
4. Purple Ombre Witch Nails
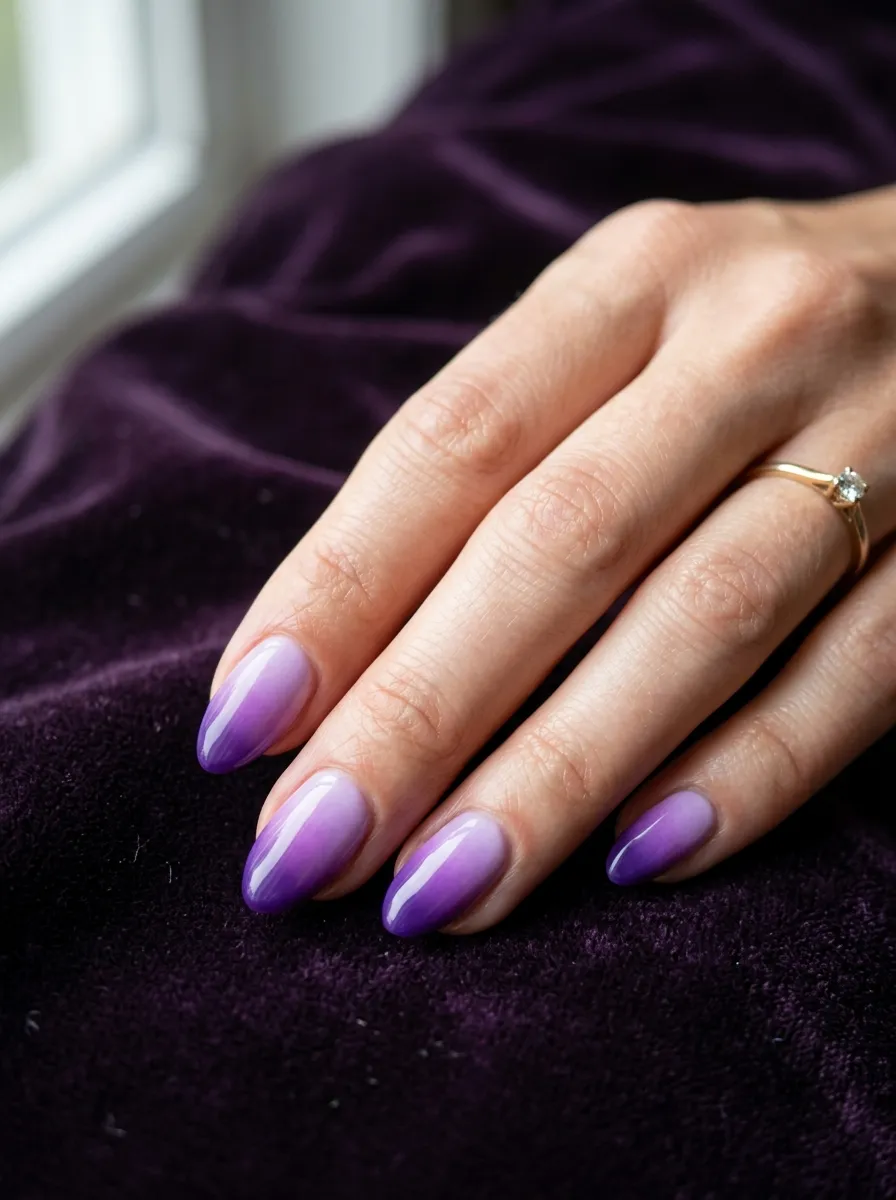
Purple is the signature Halloween color and it connects directly to the Hocus Pocus aesthetic. A purple ombre nail gives you that witchy look without needing any nail art skills at all.
Pick two shades of purple: one light and one dark. A pale lavender and a deep grape or violet work great together.
Apply the lighter shade all over the nail first. While it is still slightly wet, dab the darker shade onto a makeup sponge and press it gently onto the tip of each nail. Blend where the two colors meet by lightly pressing and lifting.
This technique is forgiving. The sponge softens any hard edges naturally. The more you dab, the smoother the gradient looks.
Budget tip: Any eyeshadow sponge or torn piece of a cheap cosmetic blender works for this. You do not need a special nail ombre tool.
Finish with two coats of glossy top coat. It pulls everything together and makes the ombre look seamless. Add a single crystal gem near the cuticle for a witchy jewelry effect.
5. Glittery Cauldron Nails

A bubbling cauldron is the heart of every witch’s practice. Getting this look on your nails takes about ten minutes once you have the right tools.
Paint all nails in matte black first. On the accent nail, use a round-tipped nail art brush to paint a small round pot shape in dark grey or black with a slightly lighter rim along the top.
Fill the top of the cauldron with bright green polish to look like a glowing potion. While the green is still wet, add a tiny dot of white in the center for a bubble effect.
Surround the accent nail with a green shimmer polish on the neighboring nails. It gives the impression that the cauldron glow is reflecting outward.
Budget tip: Green nail glitter pressed over tacky top coat creates the same magical glowing effect as shimmer polish. Most dollar stores carry loose nail glitter in Halloween colors during the season.
Top everything with a high-gloss coat and your nails will look lit from within. Pair this with a dark lip and you have a full witch-inspired look going.
6. Full Moon Night Sky Nails
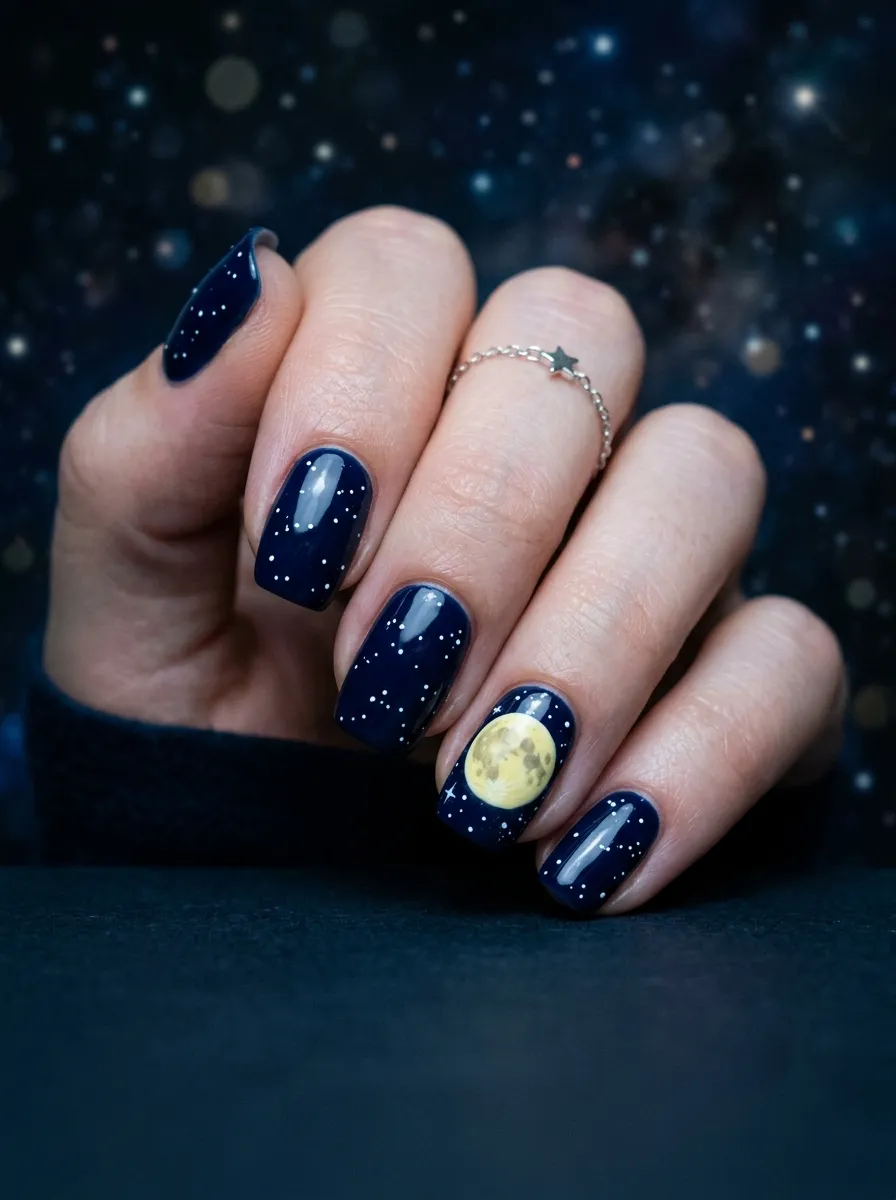
There is something hauntingly beautiful about a full moon over Salem, Massachusetts. That image from Hocus Pocus is iconic, and you can recreate it right on your nails.
Start with a deep navy or midnight blue base on all nails. Use a small dotting tool or the back of a bobby pin dipped in yellow or pale gold polish to stamp a circle on your accent nail.
While the circle dries, scatter tiny white dots across all the nails using the same dotting tool or a toothpick. The dots represent stars and add depth to the design.
Add a subtle grey smudge around the edges of the moon circle using a small fan brush or a Q-tip. It creates a glow effect that looks realistic without needing any special products.
Budget tip: A bobby pin head dipped in yellow polish makes a perfect moon circle for free. Practice on a piece of paper first to get the size right before applying it to your nail.
Seal with glossy top coat and you have a full Halloween night sky on your fingertips.
7. Orange and Black Halloween Checkerboard Nails
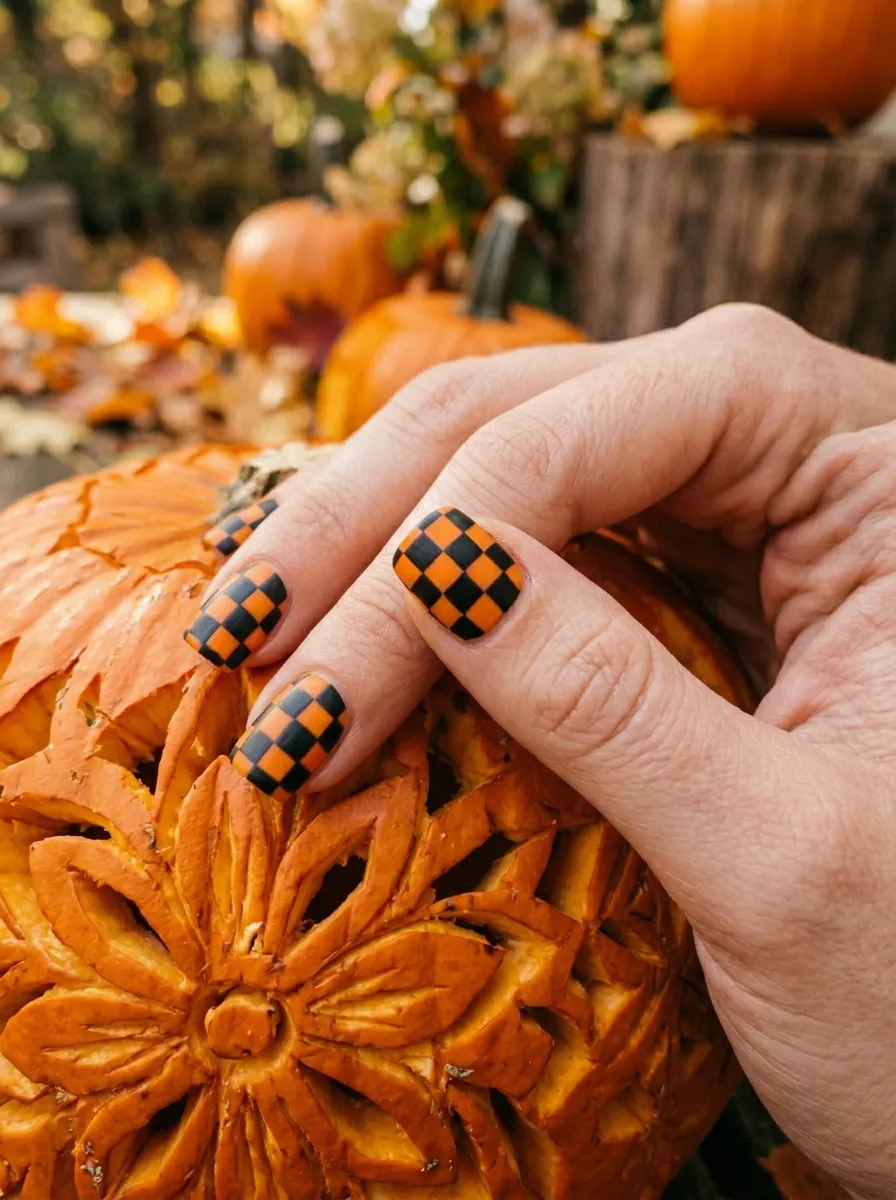
Checker board nails are having a serious moment right now, and in Halloween colors they look absolutely electric. The orange and black combination screams Hocus Pocus season without needing any specific imagery.
Use striping tape to get clean lines without painting freehand. Apply your black base first and let it cure fully. Press down small squares of tape in a grid pattern and paint orange over the top. Peel the tape off before the orange fully dries for crisp edges.
If you do not have striping tape, use thin pieces of regular scotch tape. It works just as well.
The checkerboard pattern looks great on short square or squoval nails because the angles of the pattern mirror the nail shape naturally.
Budget tip: Nail striping tape costs about two dollars for a large roll on Amazon. It is one of the most useful tools for DIY nail art and lasts for dozens of manicures.
Add a matte top coat over the orange squares and a glossy coat over the black squares for a dimensional finish that makes the design feel intentional and editorial.
8. Salem Witch Silhouette Nails
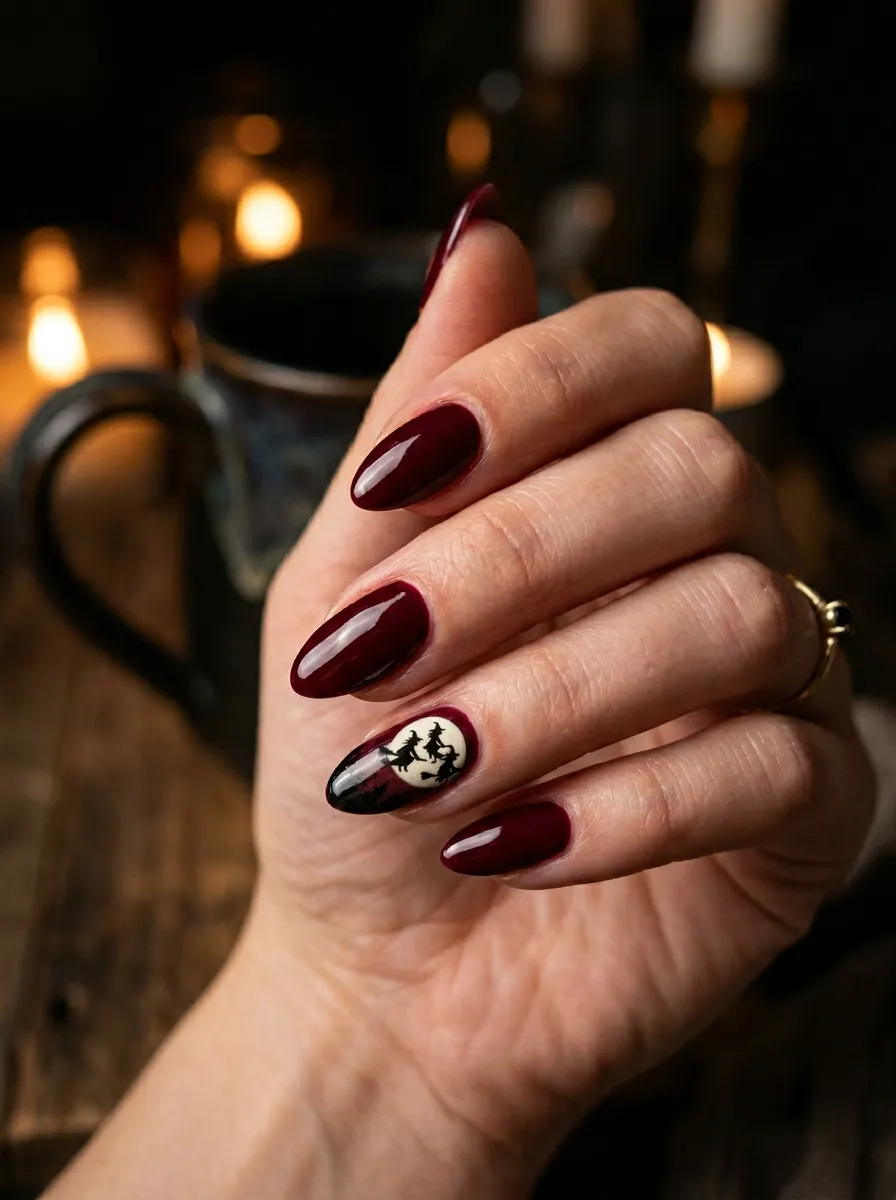
Three witches flying across a glowing moon is one of the most famous images in Halloween pop culture. Recreating this silhouette on your nails is simpler than you think.
Paint all nails in deep burgundy or wine red. On the accent nail, first stamp or paint a pale yellow circle using a dotting tool for the moon. Let it dry.
Using a fine nail art brush or a black nail art pen, draw tiny stick-like witch silhouettes flying across the moon. They do not need detail. A simple curved line body and tiny broom shape is all you need.
The silhouette style is forgiving. Because everything is in black over a lighter circle, small imperfections actually make it look more hand-drawn and charming.
Budget tip: A black nail art pen from the drugstore gives you more control than a brush for tiny line work. They cost around three dollars and make this design much easier to execute.
Finish with a glossy top coat and you have a cinematic Halloween moment right on your fingertips.
9. Spider Web Nail Art
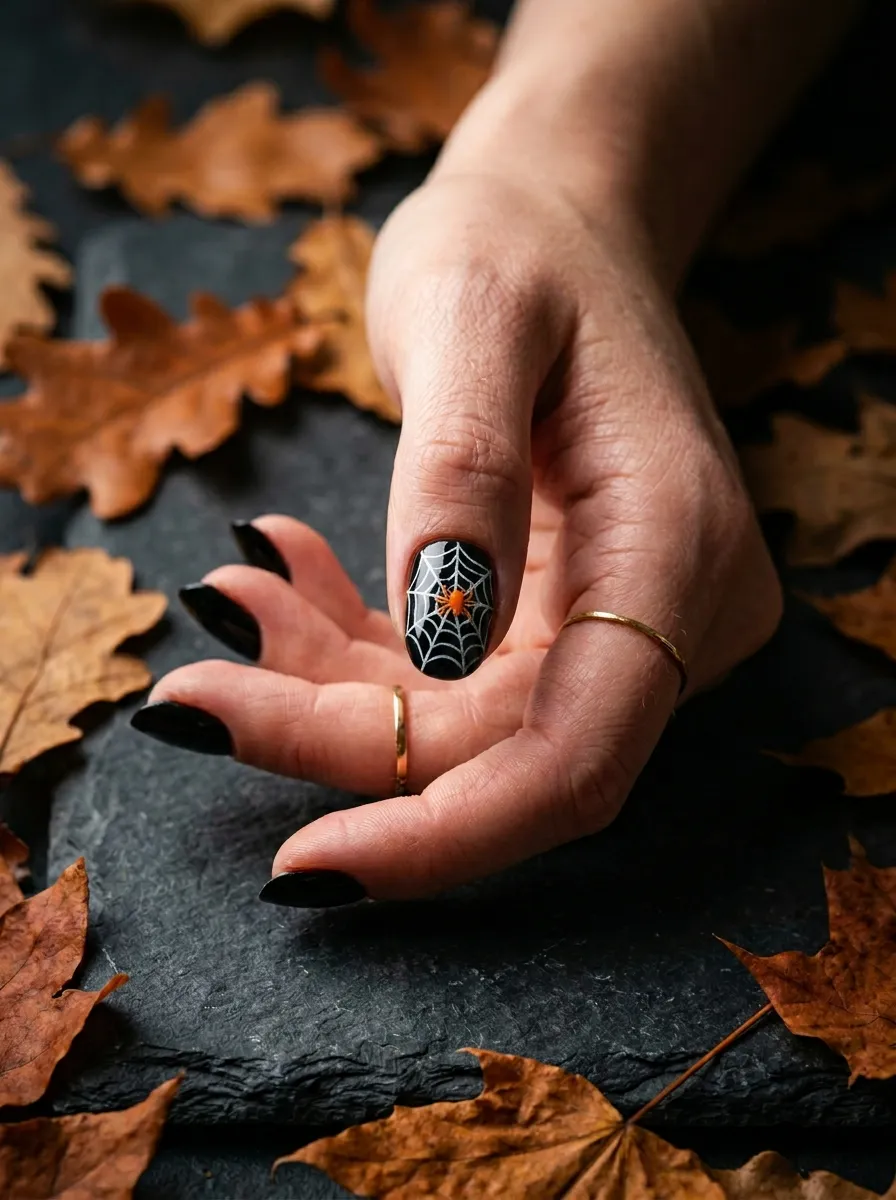
Spider webs are a classic Halloween motif that fits perfectly into the Hocus Pocus aesthetic. They are also one of the easiest designs to paint once you understand the basic technique.
Start with a black base coat on all nails. On your accent nail, make a small dot in the center using white polish. From that dot, draw four or five straight lines radiating outward to the edges of the nail.
Then connect those lines with curved arcs, working your way out from the center dot. Each arc should gently curve between two neighboring lines. The result is a clean spider web.
Add a tiny orange dot or small painted spider body at the center or along one of the lines.
Budget tip: A regular toothpick dipped in white polish is the perfect tool for drawing spider web lines on small nails. It is more controllable than most brushes and costs nothing extra.
Keep the surrounding nails simple in solid black or dark purple so the web design on the accent nail becomes the clear focal point. Seal with a glossy top coat for maximum impact.
10. Potion Bottle Nail Art
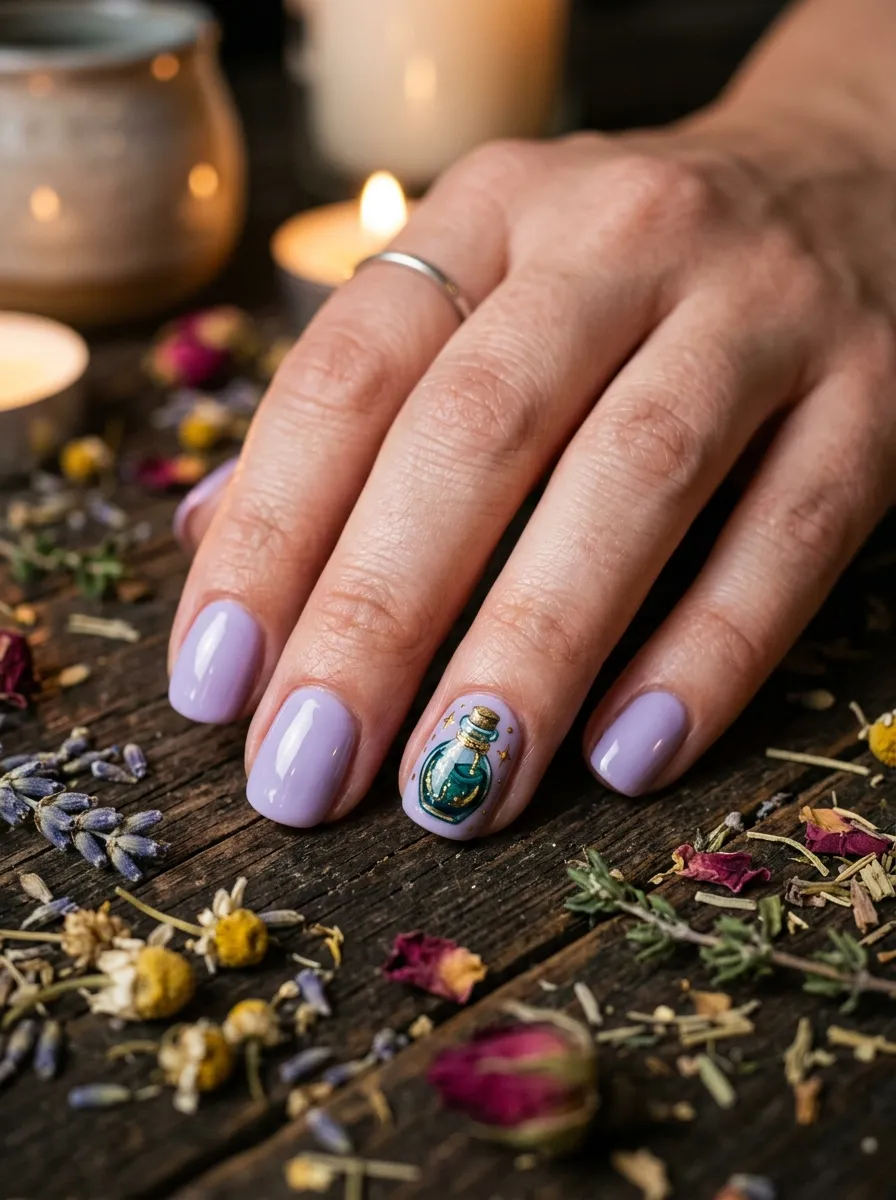
Potion bottles are a witchy staple that translate beautifully onto nails. The small size of a nail actually works in your favor here because even a rough little bottle silhouette reads clearly.
Use a soft lavender or sage green base on all nails for a magical apothecary feel. On the accent nail, paint a simple round or elongated bottle shape in teal or cobalt blue. Add a tiny brown or tan rectangle at the top for a cork stopper.
While the bottle is still slightly wet, drag a thin streak of white down one side using a toothpick. It mimics a glass highlight and makes the bottle look three-dimensional immediately.
Fill the inside of the bottle with a slightly different shade of the same color to suggest liquid sloshing inside.
Budget tip: You only need three or four polishes for this design. Teal, white, tan, and your base color are all you need. Most of these are available in small bottles for under two dollars each.
Top with a glossy coat and your nails will look like little magical collectibles.
11. Glitter Gradient Witch Nails
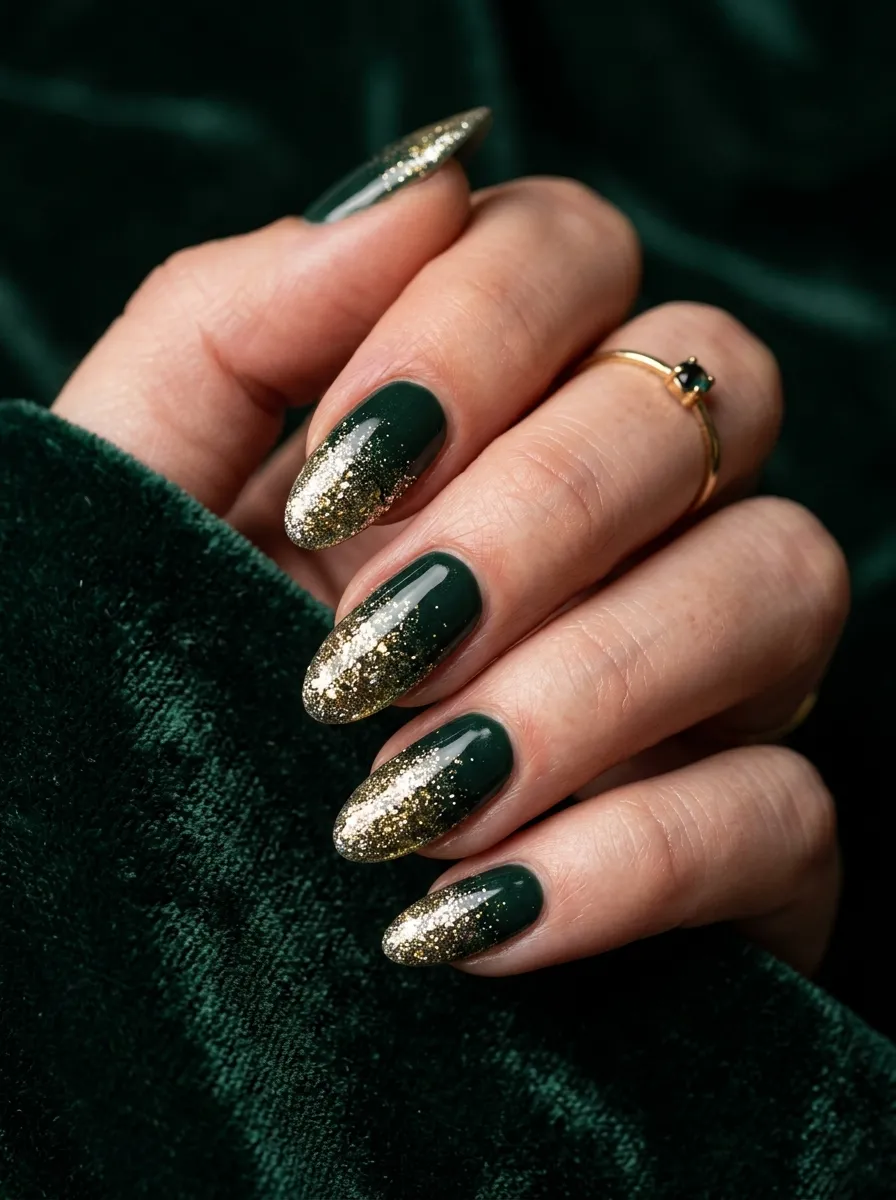
Glitter gradient nails are one of the easiest ways to get a magical look without any drawing skills. The witch connection comes through with deep jewel-toned base colors and gold or green glitter.
Paint all nails in a deep forest green or midnight purple. While the base is still slightly tacky, apply chunky gold or holographic glitter to the tips of each nail using a small brush or your fingertip.
Concentrate the glitter at the very tip and let it thin out naturally as it moves toward the cuticle. The gradient happens almost automatically.
Press the glitter down firmly and seal immediately with top coat before it shifts or falls off.
Budget tip: Loose glitter from a craft store costs almost nothing and works beautifully on nails. Mix it with a clear top coat in a small container and brush it on like regular polish for easy application.
Layer two coats of top coat for a smooth finish. Without sealing properly, glitter nails can feel rough and chip quickly. With two good coats they can last a week or more.
12. Black Cat Nail Art
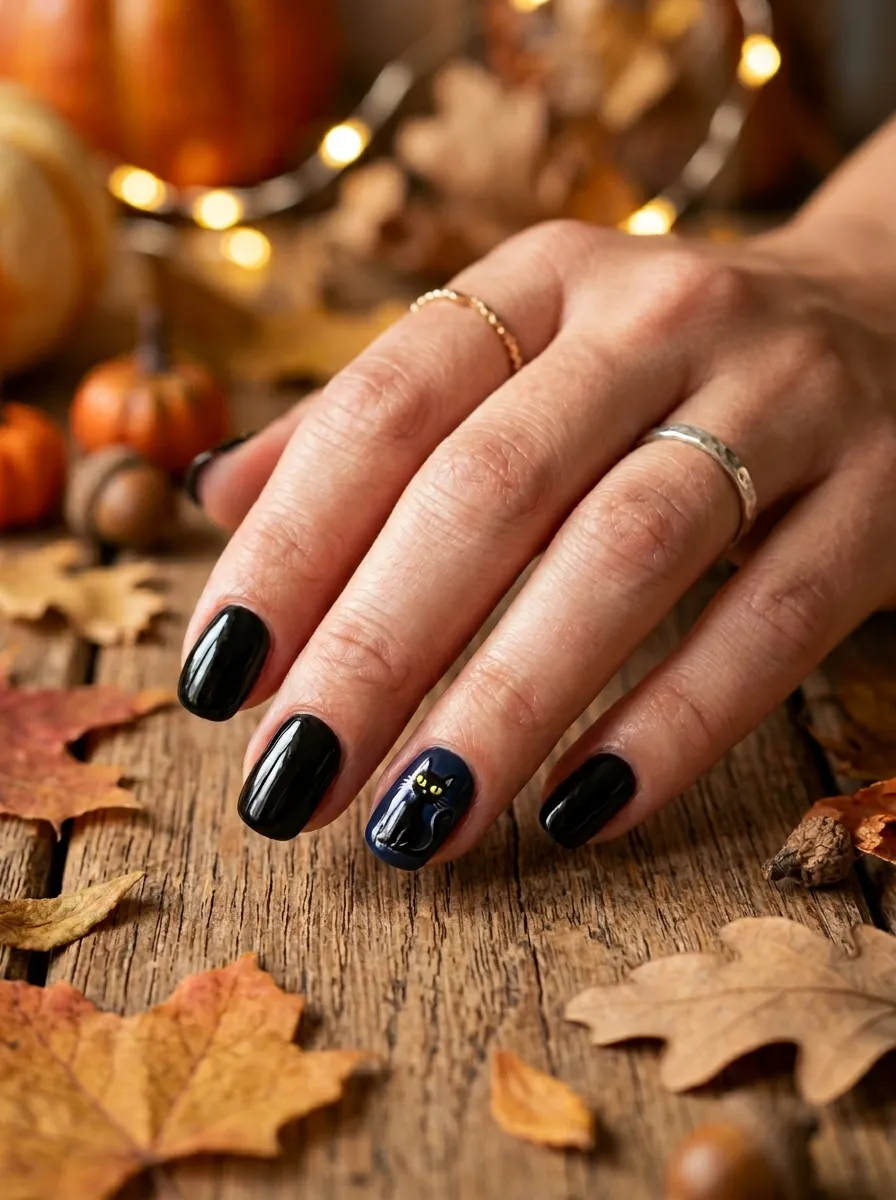
Binx the black cat is one of the most beloved characters in Hocus Pocus. A tiny cat painted on your nails is an adorable nod to the film without being too literal.
Paint all nails in glossy black. On the accent nail, use a slightly lighter shade of black or dark charcoal to paint a small cat silhouette. A seated cat with a curved tail and two small pointed ears is simple enough for beginners.
Use a yellow or amber polish and a toothpick to add two tiny dots for the eyes. That detail alone makes the whole design recognizable.
You can also add a small crescent moon above the cat using white or silver polish for extra witchy energy.
Budget tip: Cat nail stickers are widely available at dollar stores and online for very cheap. If freehand painting feels too tricky, a sticker over a black base gives you the same effect in under two minutes.
A glossy top coat makes the black look deeper and richer. Two thin coats work better than one thick one for maximum shine.
13. Skull and Crossbones Nails
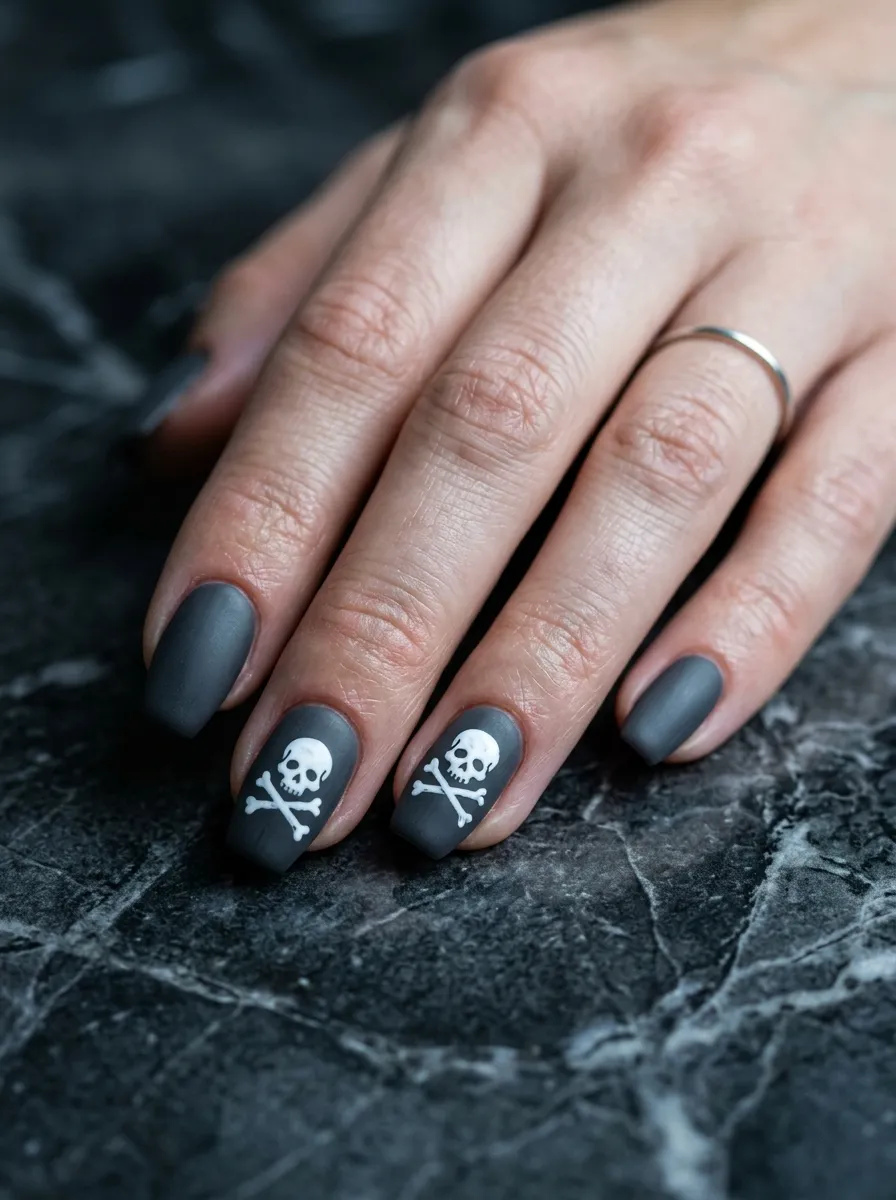
Skulls are a timeless Halloween symbol and they fit the darker, more gothic side of the Hocus Pocus universe. Simple skull designs are very achievable even without much nail art experience.
Paint all nails in matte charcoal or deep slate grey. On one or two accent nails, use a white nail art pen or fine brush to draw a small skull. Start with a rounded circle for the cranium and add two small oval eyes and a rectangular mouth below.
Crossbones underneath are just two short crossed lines. Even slightly imperfect lines read as crossbones because our brains fill in the rest.
Try doing all ten nails in charcoal with two skull accent nails for balance. Or paint every nail with a different spooky symbol like a star, moon, eye, or candle.
Budget tip: White nail art pens are sold at most beauty supply stores for around three dollars. They make line work on dark polishes so much easier than trying to use a brush with regular polish.
Seal with a matte top coat to keep that edgy, flat finish going. The matte look makes the white skull details stand out sharply.
14. Bat Wing Nails
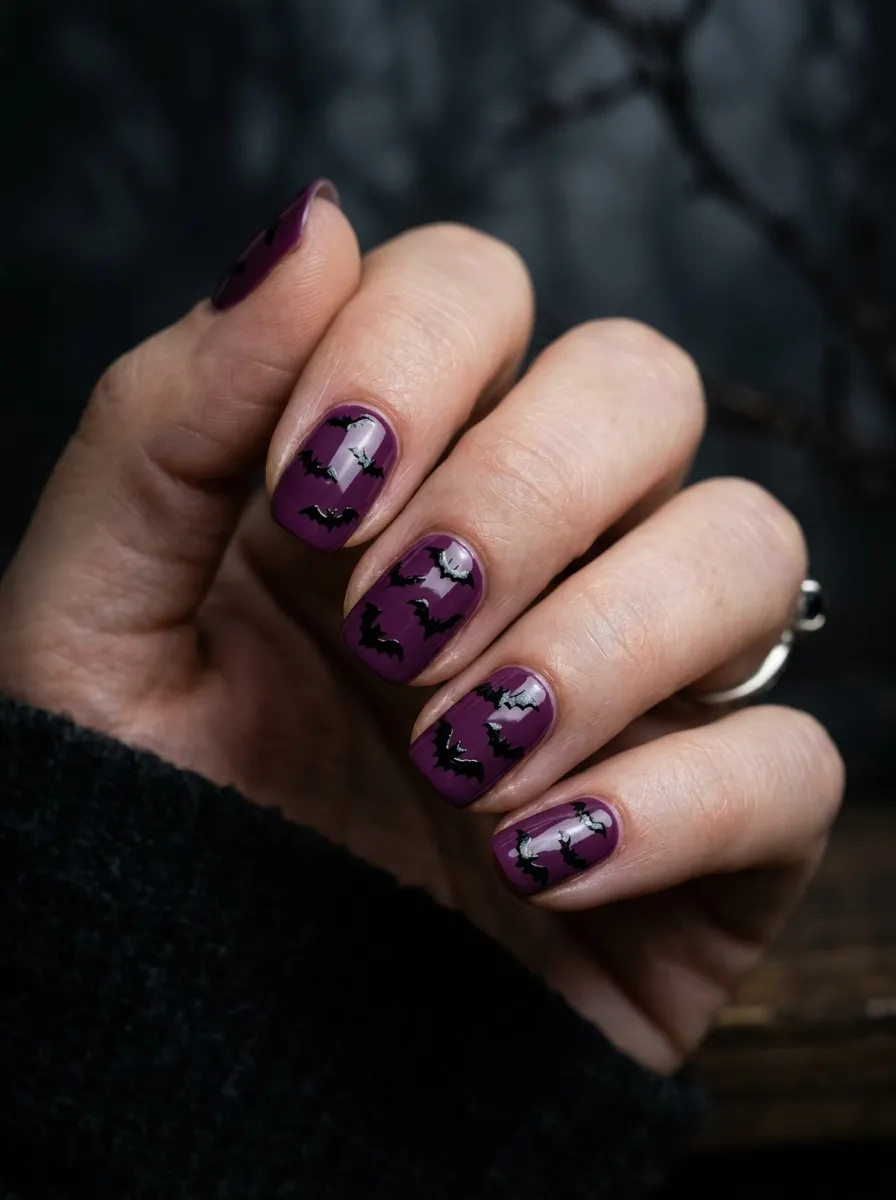
Bats are everywhere in Hocus Pocus and painting them across your nails is an easy way to get a cohesive Halloween set.
Use deep purple or midnight blue as your base. Once fully dry, use a black nail art pen or a thin brush loaded with black polish to paint small bat shapes across several nails. A bat is really just a small body with two curved wings on each side.
Vary the sizes and angles of your bats so they look like they are actually flying rather than stamped in identical positions. Some can have wings spread wide. Others can show a slightly folded wing position.
You do not need to do this on every nail. Three bats scattered across five nails looks more dynamic and realistic than cramming one perfectly centered bat on each finger.
Budget tip: Bat nail stamps are extremely affordable and widely available. A full stamping kit with multiple Halloween plates can cost as little as eight dollars and produces salon-quality results instantly.
Seal with a glossy top coat and the bats will look dimensional against the purple background.
15. Coffin-Shaped Purple Nails with Gold Accents
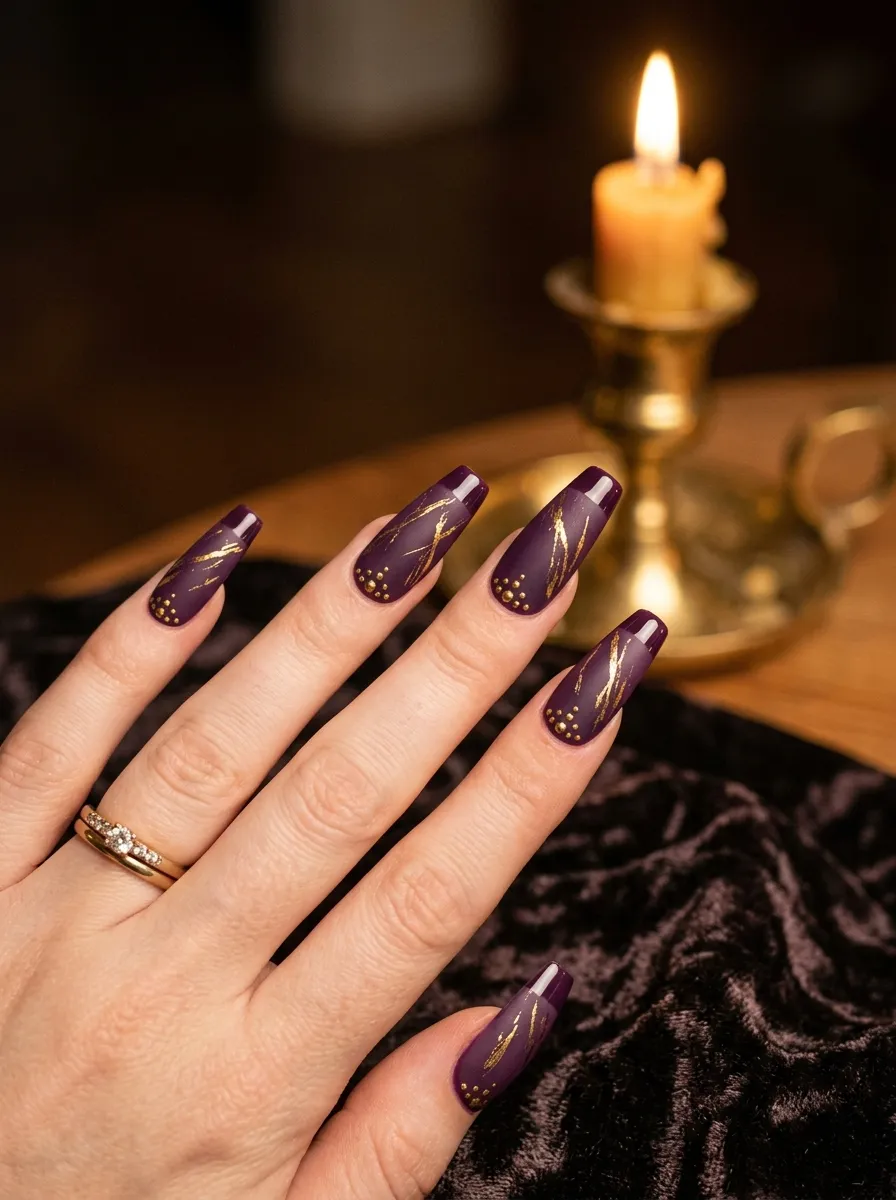
Coffin nail shapes are dramatic, witchy, and perfect for a Hocus Pocus-themed manicure. Even without nail art, this shape alone communicates the right energy.
Paint coffin-shaped nails in deep matte purple from base to tip. While the matte coat is still slightly soft, press down tiny pieces of gold foil using a silicone tool or an orange stick. The foil sticks where the polish has slight tack and creates gorgeous organic gold streaks.
Add a few tiny gold dots near the cuticle line using a dotting tool dipped in gold chrome or gold glitter polish.
You do not need to create a full design. The shape plus the matte purple plus the gold accents is already a complete and editorial-looking manicure.
Budget tip: Nail foil sheets are available in bulk for just a few dollars online. They are reusable across multiple manicures and give a luxe look that would cost significantly more at a nail salon.
Seal with a glossy top coat only over the tips to create a subtle mixed finish that looks high-end and intentional.
16. Crescent Moon Nails
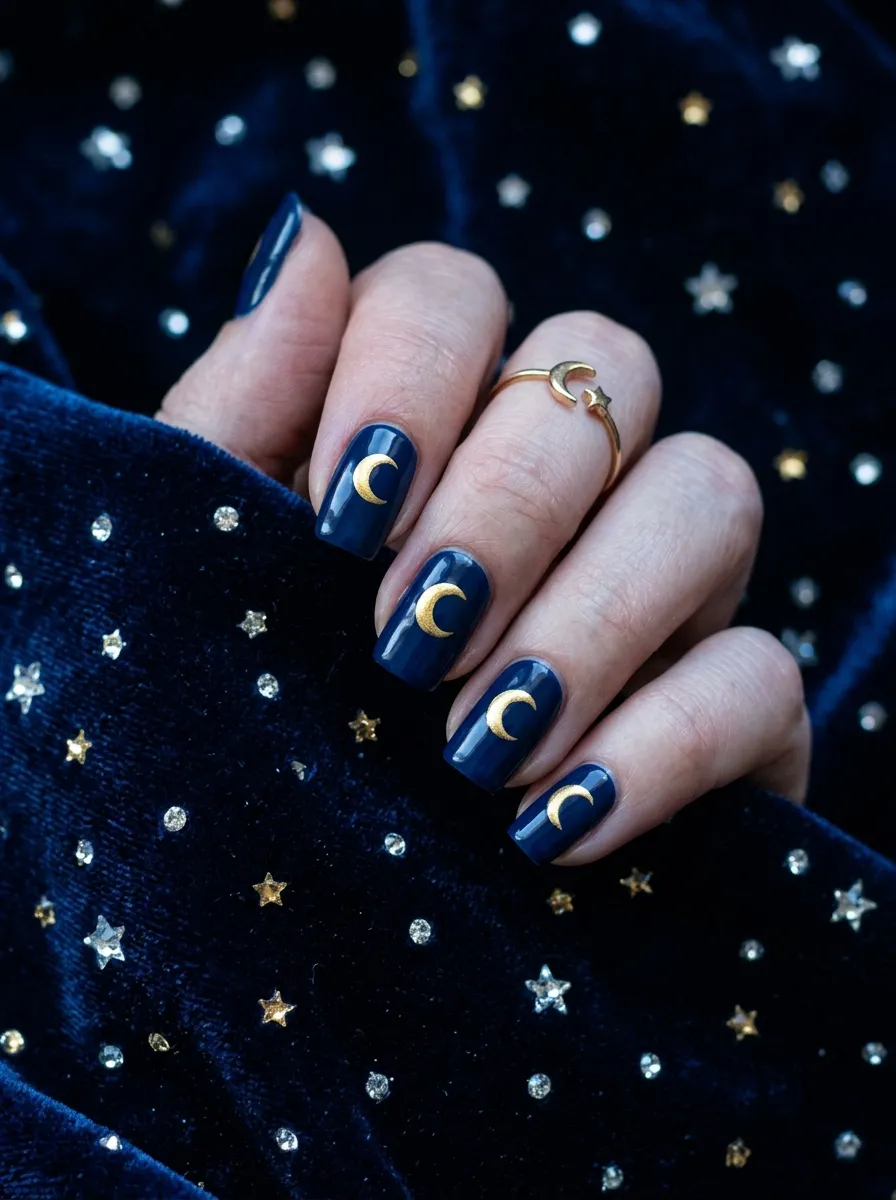
Crescent moons are a classic symbol of witchcraft and they connect beautifully to the Hocus Pocus world of magic and mystery. Painting a small crescent on each nail is a simple way to get a cohesive, intentional look.
Use deep navy or black as your base. Once fully dry, use a gold nail art pen to draw a small crescent moon shape near the center of each nail. A crescent is essentially a circle with a slightly smaller circle overlapping one edge. The visible sliver is your crescent.
Doing the same symbol on every nail creates a unified, intentional set. It reads as a nail design rather than a random accent.
Add tiny gold star dots scattered around each crescent using a toothpick for a full night sky effect.
Budget tip: Gold nail art pens from the drugstore are around three to four dollars and last for many uses. They are one of the highest-value tools for anyone who regularly does nail art at home.
Seal with a glossy top coat and the gold moons will look like they are actually glowing against the dark background.
17. Vintage Halloween Postcard Nails
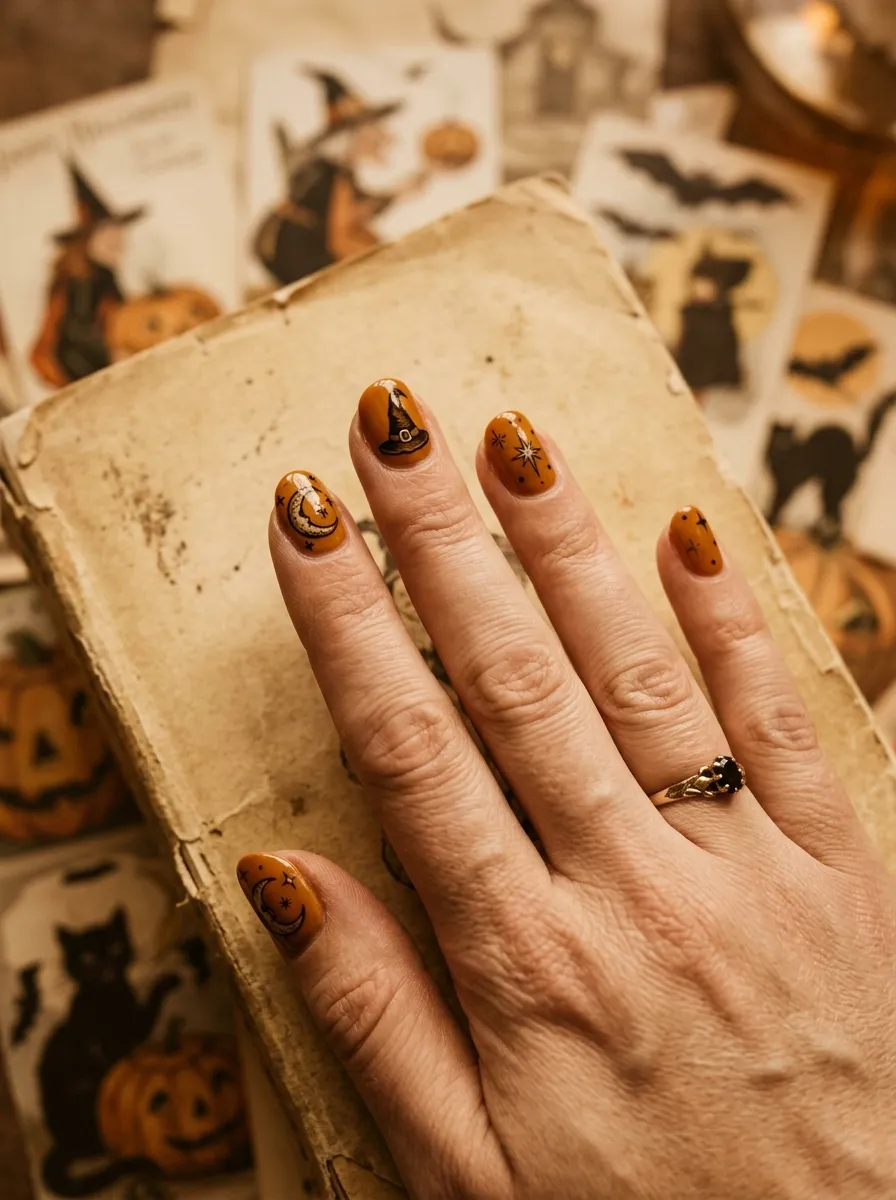
Vintage Halloween art has a warmth and nostalgic quality that pairs perfectly with the Hocus Pocus storyline, which is set in the 1600s with flashbacks to the 1990s.
Use an amber, rust, or warm caramel base to mimic aged paper or old book pages. On different nails, paint small vintage-inspired Halloween symbols in dark brown or black. Think witch hats, crescent moons, small stars, and simple leaf shapes.
Keep each symbol simple and slightly imperfect on purpose. The hand-drawn quality adds to the vintage feel and actually makes this easier to pull off than a polished graphic look.
No two nails need to match. Each nail is its own little vintage stamp and the variety is what makes the full set look cohesive.
Budget tip: Thin striper brushes sold in nail art sets for around five dollars are perfect for this kind of linework. A single inexpensive set usually comes with four or five different brush types.
Seal with a matte top coat to push the vintage aesthetic even further. It makes the nails look almost like they have aged paper texture.
18. Green and Black Witch Nails
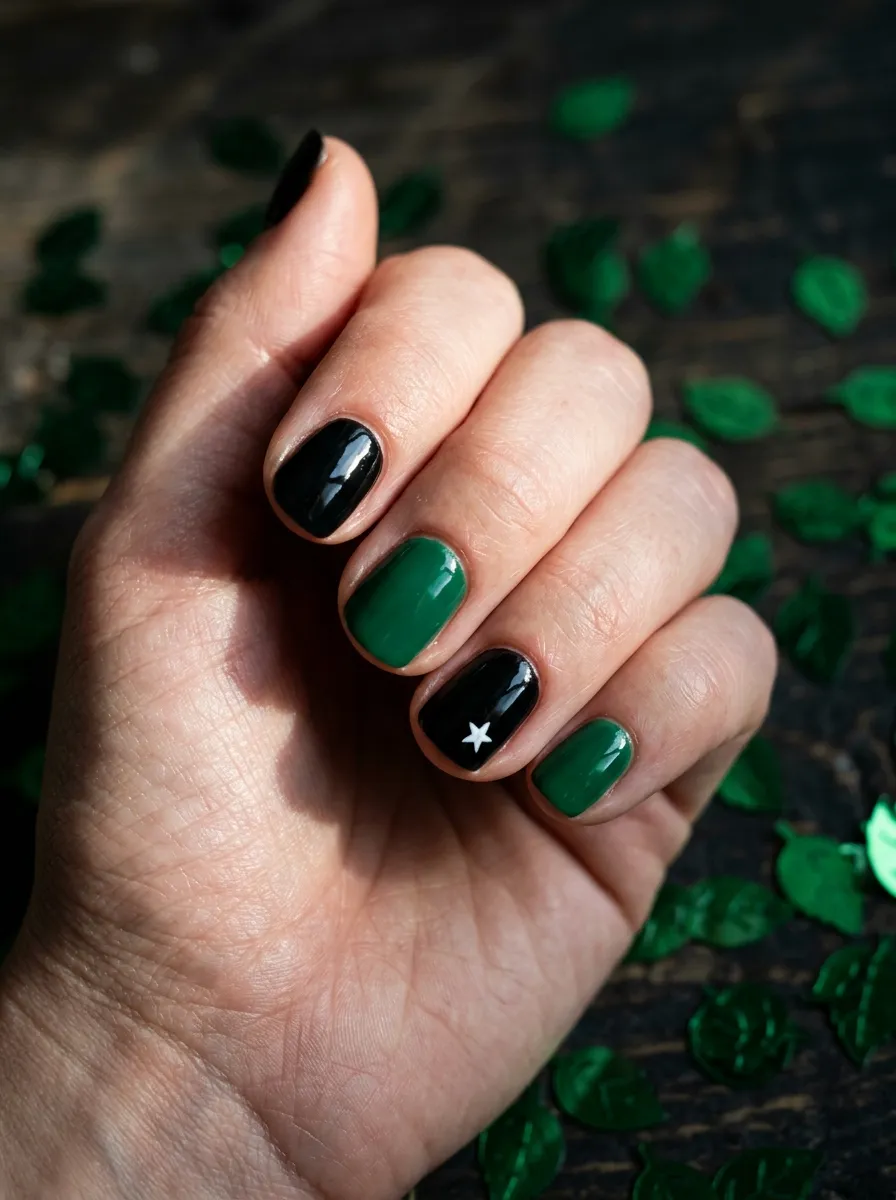
The green and black color combination is deeply witchy and connects directly to the cauldron, the forest, and the dark magic in Hocus Pocus. Alternating the two colors across your nails is a fast, zero-skill look that still makes a strong statement.
Paint every other nail in glossy deep green and fill the remaining nails with glossy black. The alternating pattern creates natural contrast and makes each color appear more vibrant.
If you want to add one small detail, use a white nail art pen to draw a tiny star or moon on one of the green nails. It adds just enough interest without overcomplicating the design.
This look works on any nail shape and any length. Short nails actually carry this color-block approach beautifully because the colors are the main event.
Budget tip: You only need two polishes for this look. Buy both in small bottles and the whole manicure costs under six dollars at most drugstores, especially during Halloween season.
One coat of glossy top coat over everything makes the green and black look deep and rich, like they are lit from within.
19. Dripping Poison Apple Nails
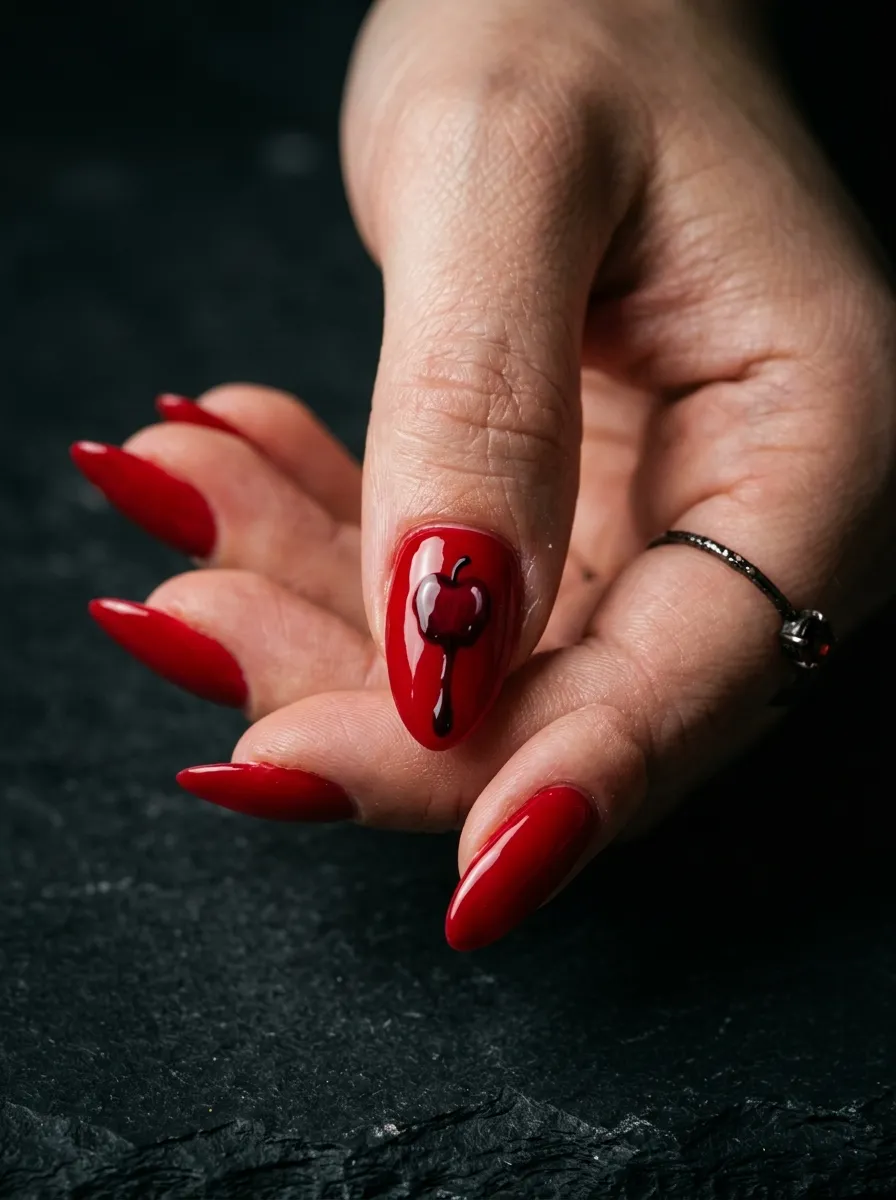
Poison and potions are central to the Hocus Pocus story. A dripping poison apple nail design plays into that dark fairy tale world perfectly.
Paint all nails in deep glossy red. On two accent nails, use black polish and a thin brush to paint a small drip shape starting near the tip and trailing downward. Let the drip have a teardrop shape at the bottom for a realistic liquid effect.
Add a tiny leaf or stem at the very top of the nail near the cuticle using dark green. This suggests the apple shape without needing to paint the full fruit.
The red plus the black drip against a matching red background creates an eerie, moody look that is more sophisticated than a literal painted apple.
Budget tip: The drip effect is one of the most forgiving nail art techniques because imperfect lines look intentional. A toothpick gives you full control over where each drip starts and ends.
Seal with extra glossy top coat to make the red look wet and dangerous. Two coats of top coat will push the glossiness into almost gel-like territory.
20. Eye of Newt Nails
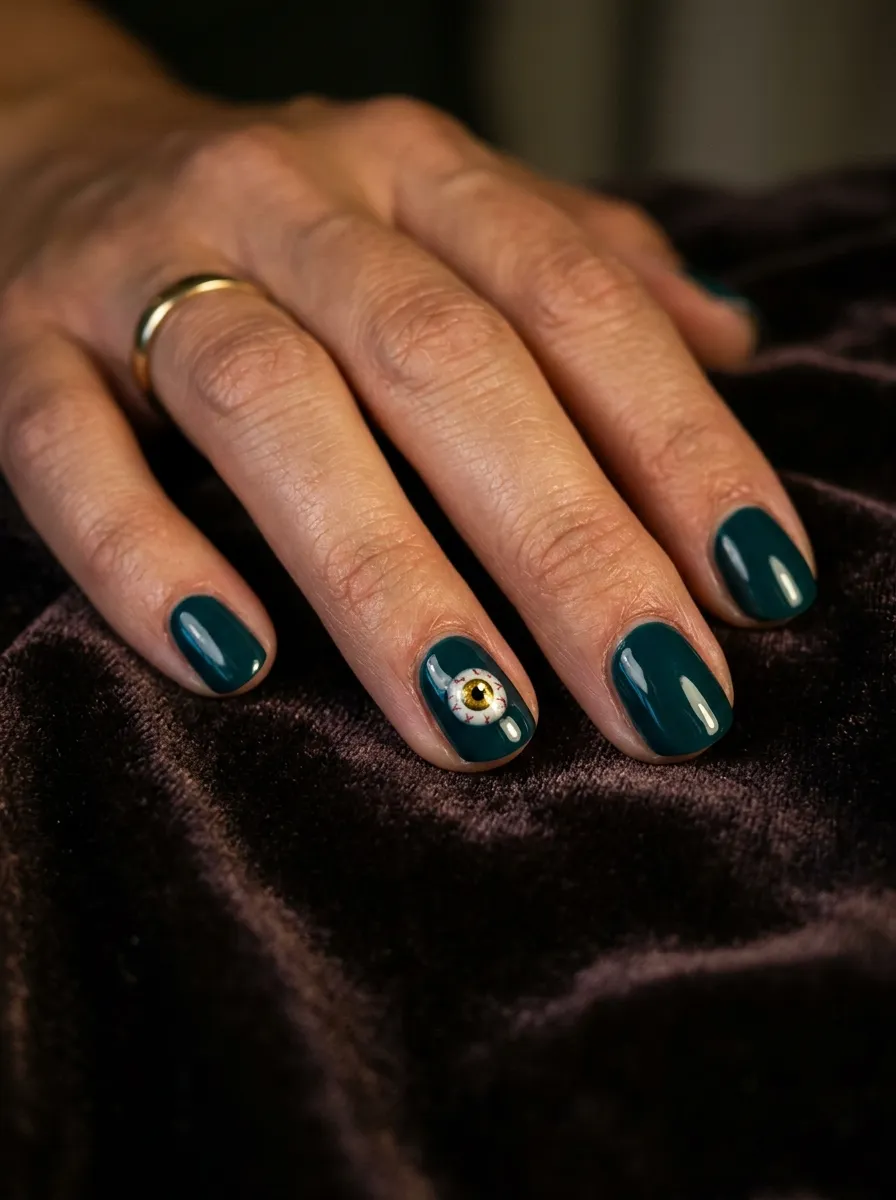
Eye of newt is the kind of ingredient that belongs in a Sanderson Sisters potion. An eyeball nail design is spooky, quirky, and surprisingly fun to paint.
Paint most nails in dark teal or forest green for a potions-cabinet feel. On the accent nail, use white polish to paint a rough circle. Let it dry, then add a smaller circle in amber or gold for the iris. Top that with an even smaller black dot for the pupil.
Use red polish and a very thin brush or toothpick to drag a few tiny vein lines out from the edges of the white circle. Even two or three thin lines complete the look.
The surrounding teal nails ground the eyeball accent without competing with it.
Budget tip: You can buy individual nail eyeball stickers very cheaply online if the freehand version feels intimidating. They come in packs of twenty or more for just a couple of dollars and look impressive with almost no effort.
Seal with a glossy top coat and the eye will look eerily lifelike against your dark base color.
21. Haunted Forest Nails

The haunted Salem forest in Hocus Pocus is moody, atmospheric, and visually stunning. Bringing that forest onto your nails creates a genuinely eerie nail art set.
Use a dark grey-green or deep olive as your base for a misty forest feel. On each nail, use a black nail art pen to draw a simple bare tree silhouette. Bare trees are just a vertical line with a few jagged branches coming off the sides at angles. They look gnarled and witchy even when drawn quickly.
On your accent nail, paint a small orange or yellow circle behind the tallest tree to represent the moon peeking through the branches.
You do not need to fill every nail with a tree. Scattering one or two across each nail in different sizes creates depth and makes the set feel like a full forest scene.
Budget tip: A black nail art pen is the best tool for this design. Look for a fine-tip pen specifically, as they give you the thin branching lines this design needs. They are available at most beauty supply stores for around three dollars.
Seal with matte top coat for a moody, atmospheric finish.
22. Amethyst Crystal Nails
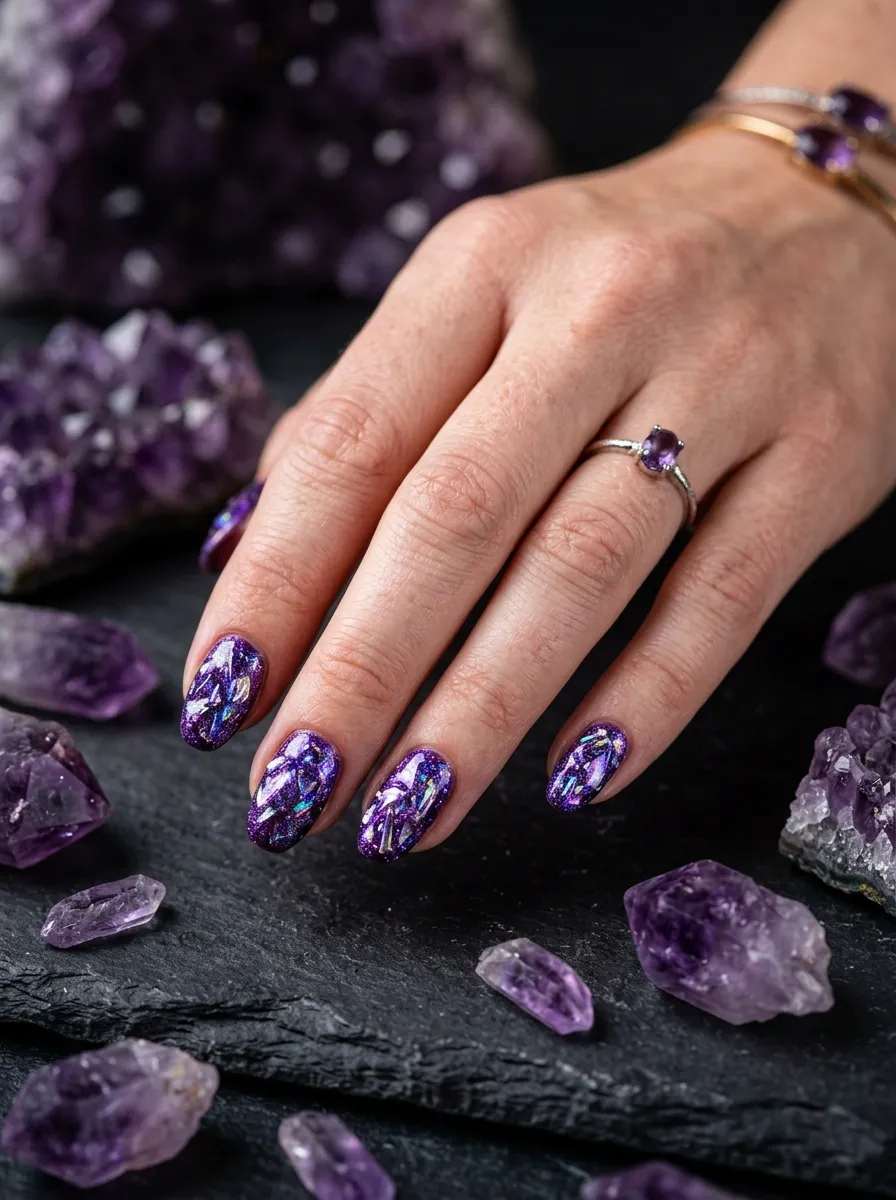
Crystals are a staple of witch aesthetics and amethyst is one of the most magical-looking stones. Achieving a crystal-look nail at home is easier than it looks.
Start with a deep purple base and let it fully dry. Press strips of holographic or purple foil onto the nail surface using a silicone tool or your fingertip. Let the foil land at slightly different angles on each nail so the facets of light are not uniform.
Add a thin coat of purple shimmer polish over the foil to tie the texture together and add depth. The layering of shimmer over foil is what creates the illusion of dimensional crystal facets.
You can also press a small flat-back rhinestone at the base of one nail to mimic a real crystal point emerging from the polish.
Budget tip: A pack of holographic nail foils in multiple shades costs around five dollars online and contains enough material for dozens of manicures. They are one of the most cost-effective nail art supplies available.
Seal with two layers of glossy top coat for maximum sparkle. The more top coat, the more the foil catches light from every angle.
23. Gothic Lace Nails
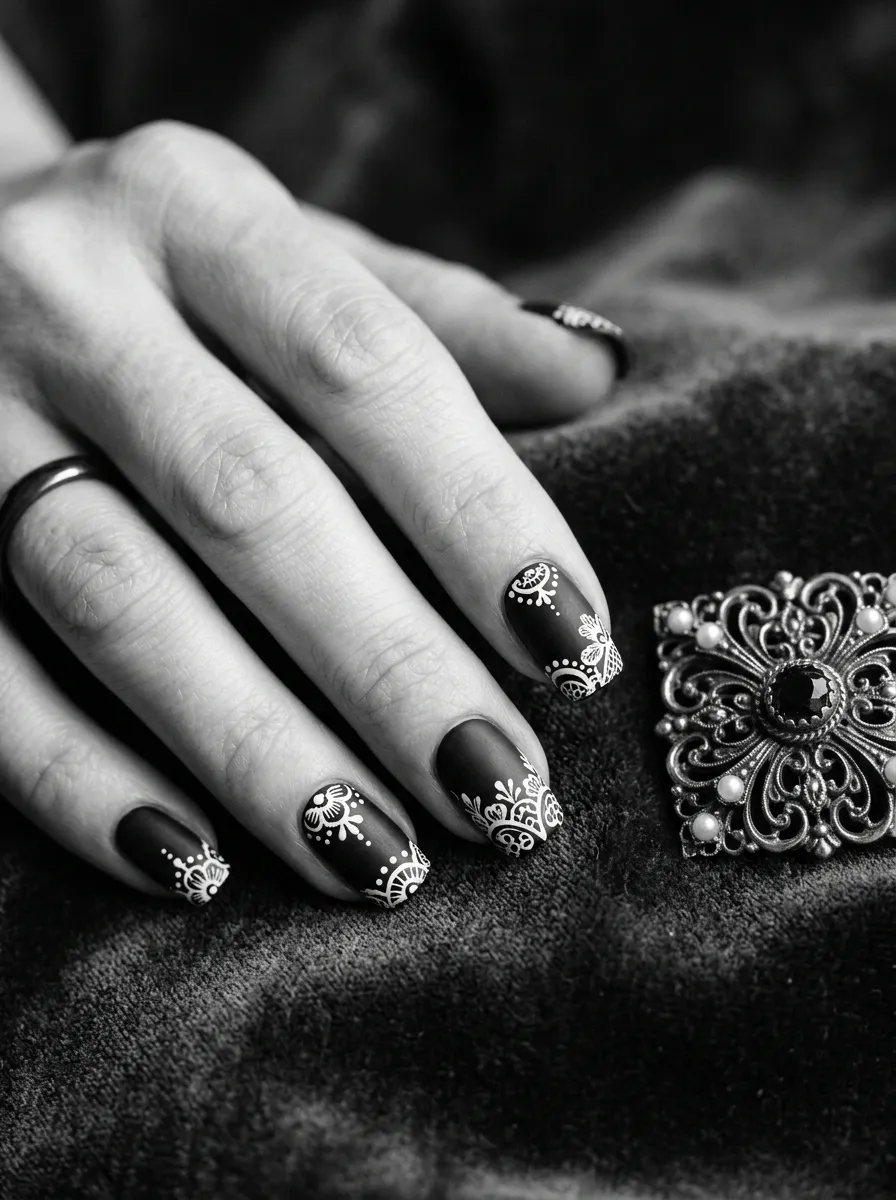
Gothic lace nails pull from the Victorian witchcraft aesthetic that runs through the Hocus Pocus world. They look complex but the trick is keeping each element small and repeating a simple pattern.
Paint all nails in matte black. Using a white nail art pen, draw a simple curved scallop line near the tip of each nail. Below the scallop, add tiny dots in a row. Above it, draw a few simple leaf or teardrop shapes pointing upward.
That combination of scallop plus dots plus simple leaves is all it takes to suggest lace. Our brains recognize the pattern even when the individual elements are simple.
Practice the pattern on a piece of paper or a plastic bag before going to your nails.
Budget tip: A white nail art pen with a fine tip is essential for this design. Most of the work is done with just that one tool over a matte black base, so the total cost of this manicure can be under five dollars.
Seal with a glossy top coat only over the white lace sections if you want to keep the rest matte. The contrast between matte black and glossy white creates a stunning depth that looks highly intentional.
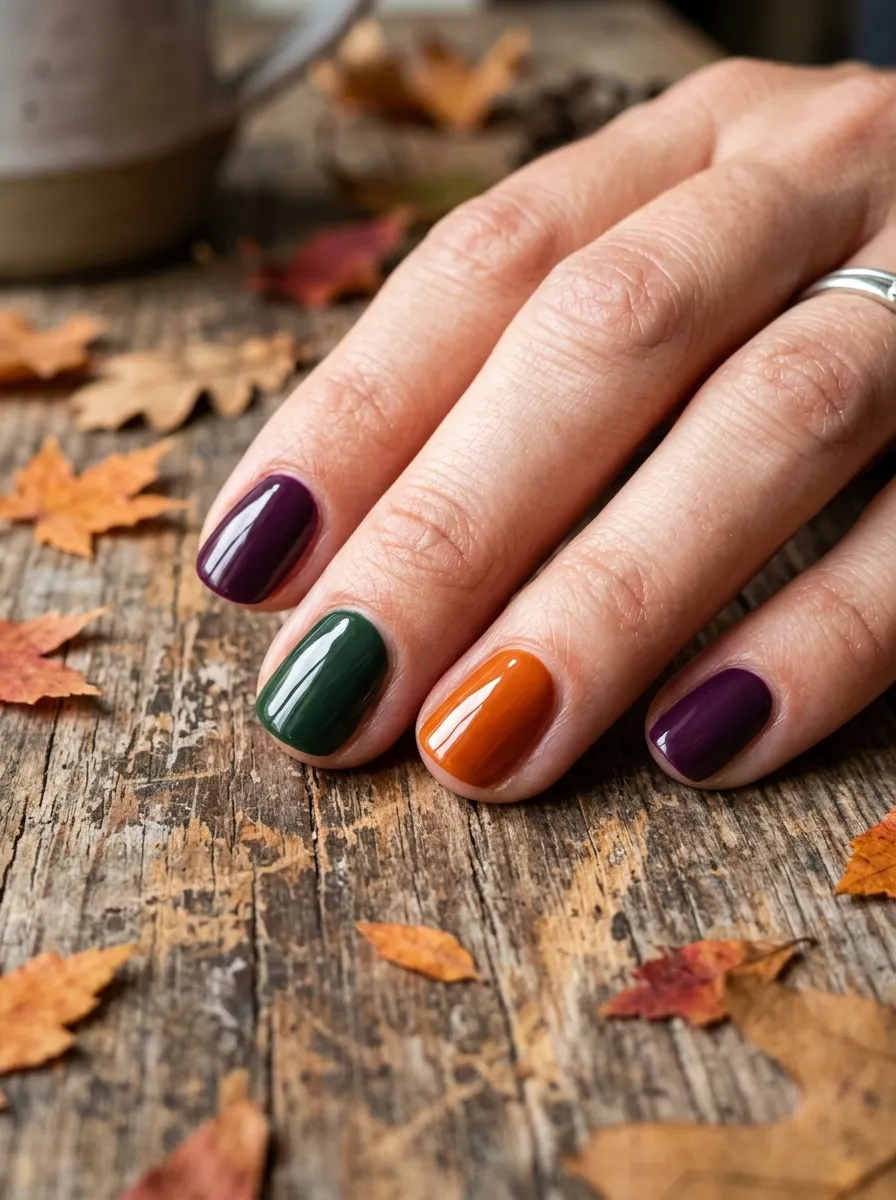
24. Dark Rainbow Nails
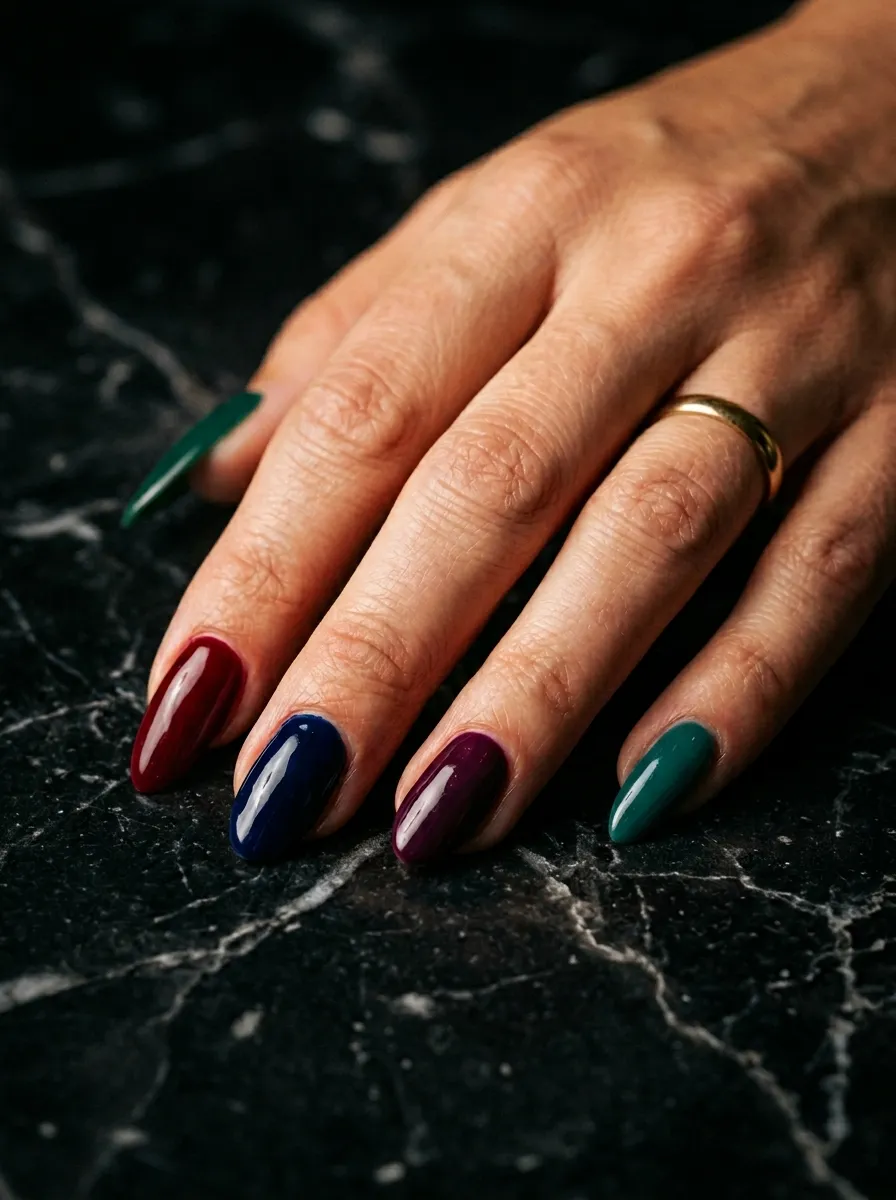
A dark rainbow nail set takes the classic multi-color manicure and filters it through a witchy lens. Instead of bright primary colors, everything shifts into deep jewel tones.
Paint each nail a different rich, saturated shade. Try deep ruby on the thumb, dark emerald on the index finger, midnight blue on the middle finger, plum on the ring finger, and dark teal on the pinky. Use the same formula on the opposite hand.
No art skills needed. Just five different polishes and steady hands for clean edges along the cuticle.
The jewel tone palette immediately reads as magical and intentional rather than random. Every color feels connected even though they are all different.
Budget tip: Check the nail polish clearance sections at beauty supply stores. Deep jewel tones are often stocked during the Halloween season and then heavily discounted afterward. Stocking up after Halloween means you have them ready for next year at a fraction of the cost.
Seal with a glossy top coat and let the richness of each color do the work. No accents or art needed.
Hocus Pocus nail ideas are a way to carry that Halloween magic with you all season long. Whether you paint one accent nail with a tiny black cat or go all out with a full cauldron and spell book set, every idea on this list is achievable at home with basic tools and affordable polish. Start with whichever design feels most exciting to you and build from there. The best part about nail art is that it grows back. If one attempt does not go as planned, you have another chance in two weeks. Pick a design, gather your supplies, and let your hands tell the story of the most magical night of the year.