Halloween is the one time of year when darker, wilder, more dramatic nails are not just acceptable, they are expected. Whether you are heading to a costume party, want to get into the spirit at work, or just love bold nail art year-round, spooky nail ideas give you a reason to go all out. The best part is you do not need a professional nail tech or a big budget to pull these off. Many of these looks work with drugstore polishes, nail stickers, and a steady hand. From classic black cats to dripping blood tips, there is a design here for every skill level. Read on and find the look that makes your fingers feel like a haunted house. If you’re also exploring Black cat nail ideas, sleek black designs, subtle feline accents, and playful cat-inspired details can help you create a spooky yet stylish manicure that fits perfectly into Halloween vibes or everyday edgy looks.
1. Classic Black Coffin Nails

Black coffin nails are the foundation of every spooky manicure wardrobe. The coffin shape, flat at the tip and tapered on the sides, is dramatic on its own. Pair it with a matte black polish, and the look becomes instantly gothic.
You do not need acrylics to get this shape. Press-on coffin nails from the drugstore cost around five dollars and come pre-shaped. Just file the edges if needed and apply your matte topcoat over them.
Matte topcoat is everything here. A glossy black nail reads chic. A matte black nail reads haunted. The finish changes the whole mood.
This is a great base look if you are nervous about nail art. No detail work required. Just clean edges, a solid matte black, and you are done.
For extra drama, leave one nail bare or do a single accent nail in deep burgundy. The contrast adds dimension without extra effort.
This style works with any outfit, from all-black ensembles to colorful Halloween costumes. It is simple, bold, and undeniably spooky.
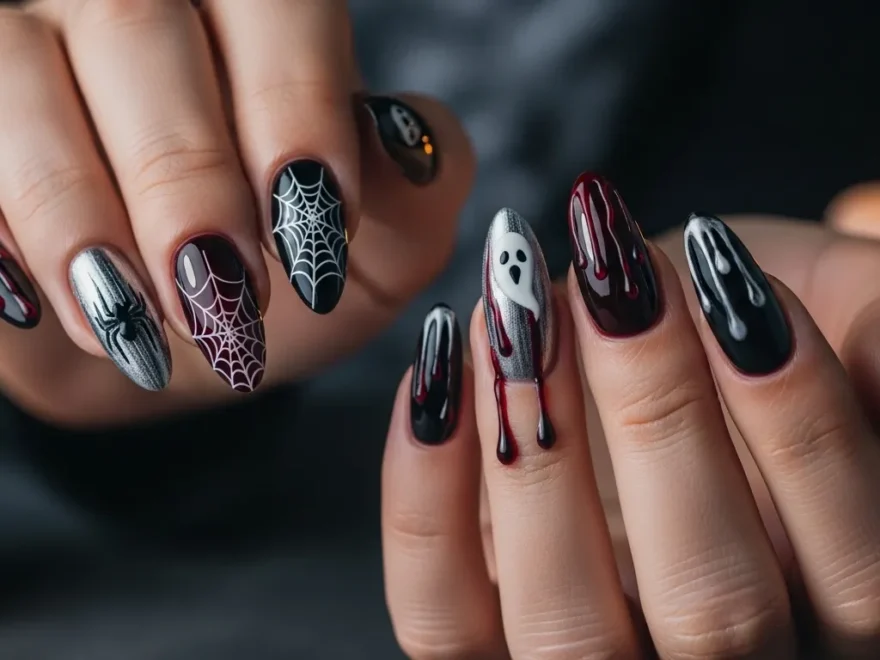
2. Dripping Blood Tips
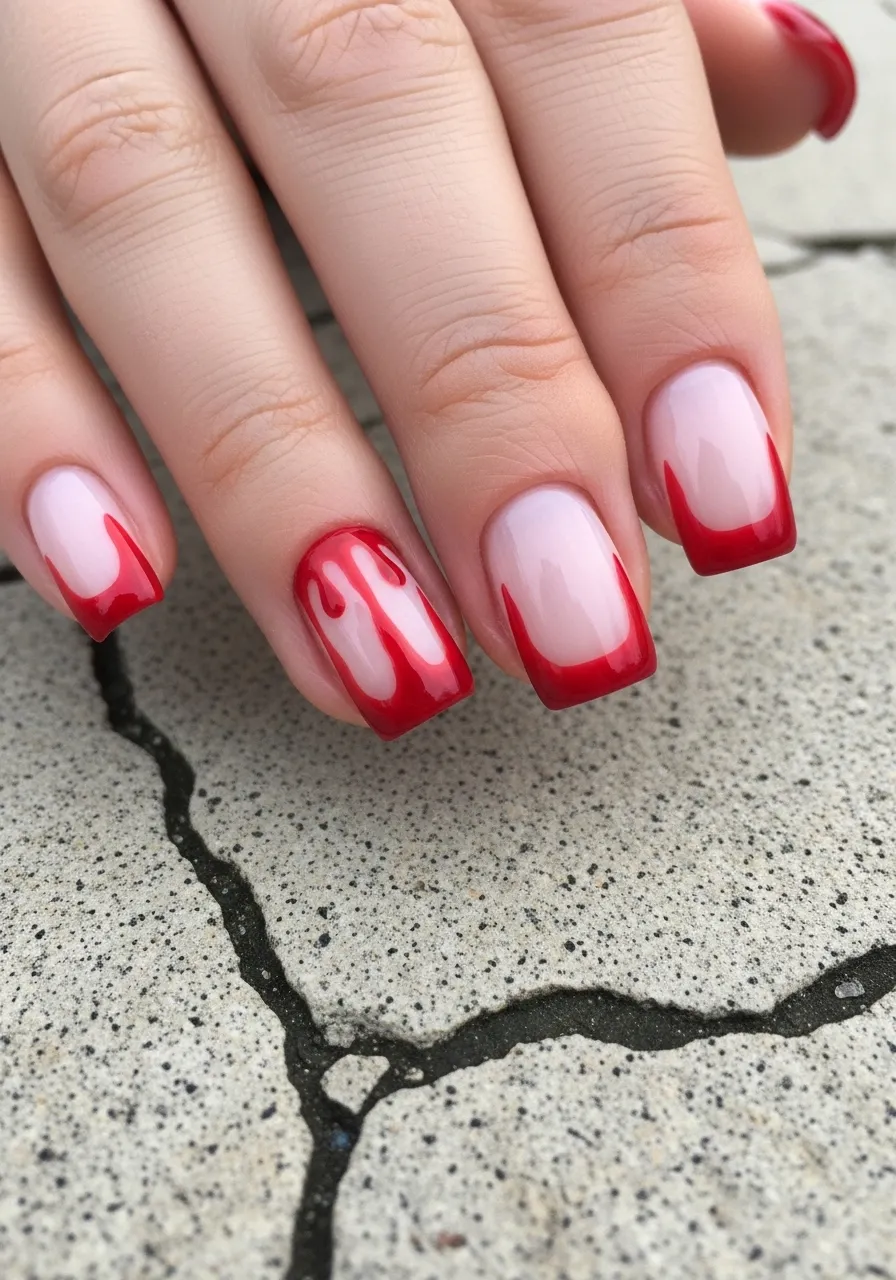
Dripping blood tips are one of the most recognizable Halloween nail looks. They are surprisingly easy to do at home and they always get a reaction.
Start with a white, nude, or pale pink base. Let it dry completely. Then use a thin nail art brush or a toothpick dipped in red gel polish or regular polish to draw the drips.
The key is irregular drip lengths. If every drip is the same height, it looks cartoon-like. Make some drips long, some short, and let a few pool near the cuticle line.
Red nail art pens from the craft store make this easier for beginners. They give you more control than a brush.
Seal everything with a glossy topcoat so the red looks wet and fresh. Skip the matte coat on this one.
You can also reverse the look and do a red base with white drips for a ghostly variation. Both versions are bold and budget-friendly with just two polishes and a toothpick.
3. Ghost Accent Nails
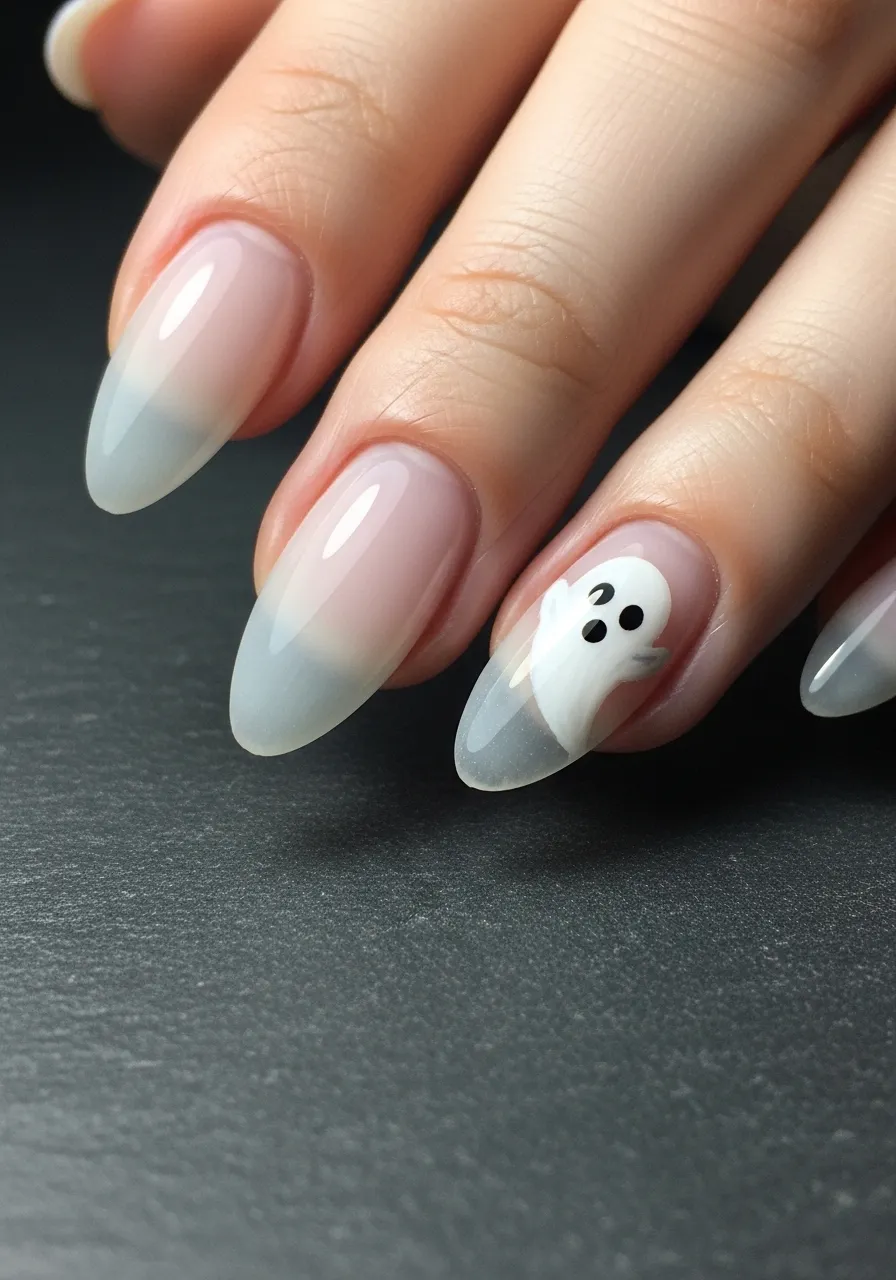
Ghost nails are cute, spooky, and accessible for beginners. You do not need to be an artist to paint a tiny ghost. A ghost is basically a white blob with two dots for eyes.
Use a thin nail art brush or the tip of a bobby pin dipped in white polish to create the ghost body. A rounded top, a slightly wavy bottom edge, and two tiny black dots is all it takes.
One ghost accent nail on a sheer or nude base looks intentional and polished. You do not need ghosts on all ten fingers to make the look work.
For a more advanced version, add a tiny shadow under the ghost using a light grey polish. This gives it a floating, dimensional look.
Ghost nail stickers are also widely available if freehand painting feels like too much. Check online marketplaces for affordable sheets with multiple sizes.
This look works well on shorter nails because the ghost fits easily on a smaller canvas. It is one of the friendliest spooky nail designs for natural nail wearers.
4. Spider Web French Tips
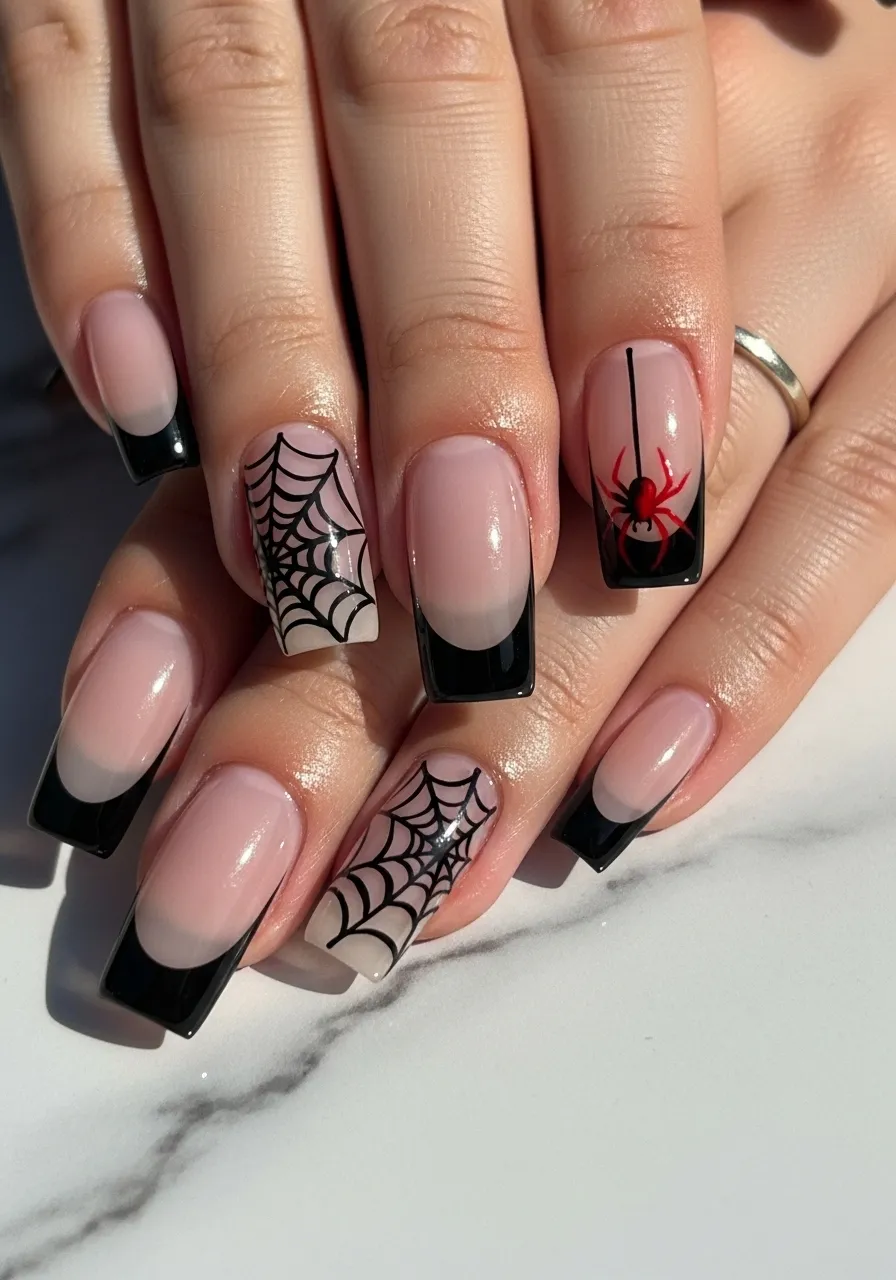
Spider web French tips take the classic manicure and give it a Halloween makeover. The shape stays clean and wearable. The design adds just enough edge.
Use a black polish for the French tip line instead of white. Then use a thin nail art brush to draw thin radiating lines from the tip down, followed by curved connecting lines to form the web.
The spider web does not need to be perfect. Real webs are asymmetrical and irregular. Imperfect lines actually look more realistic and organic.
Add a tiny red or black spider near the cuticle using a dotting tool or a toothpick. This tiny detail ties the whole design together.
This look is great for the workplace because the base nail is still clean and professional. The spooky element is subtle enough for daytime.
Nail art pens with a fine tip make drawing the web lines much easier than a brush. They cost around three dollars at most beauty supply stores. This is one of the most time-efficient spooky designs to recreate at home.
5. Matte Black With Gold Skull Accents
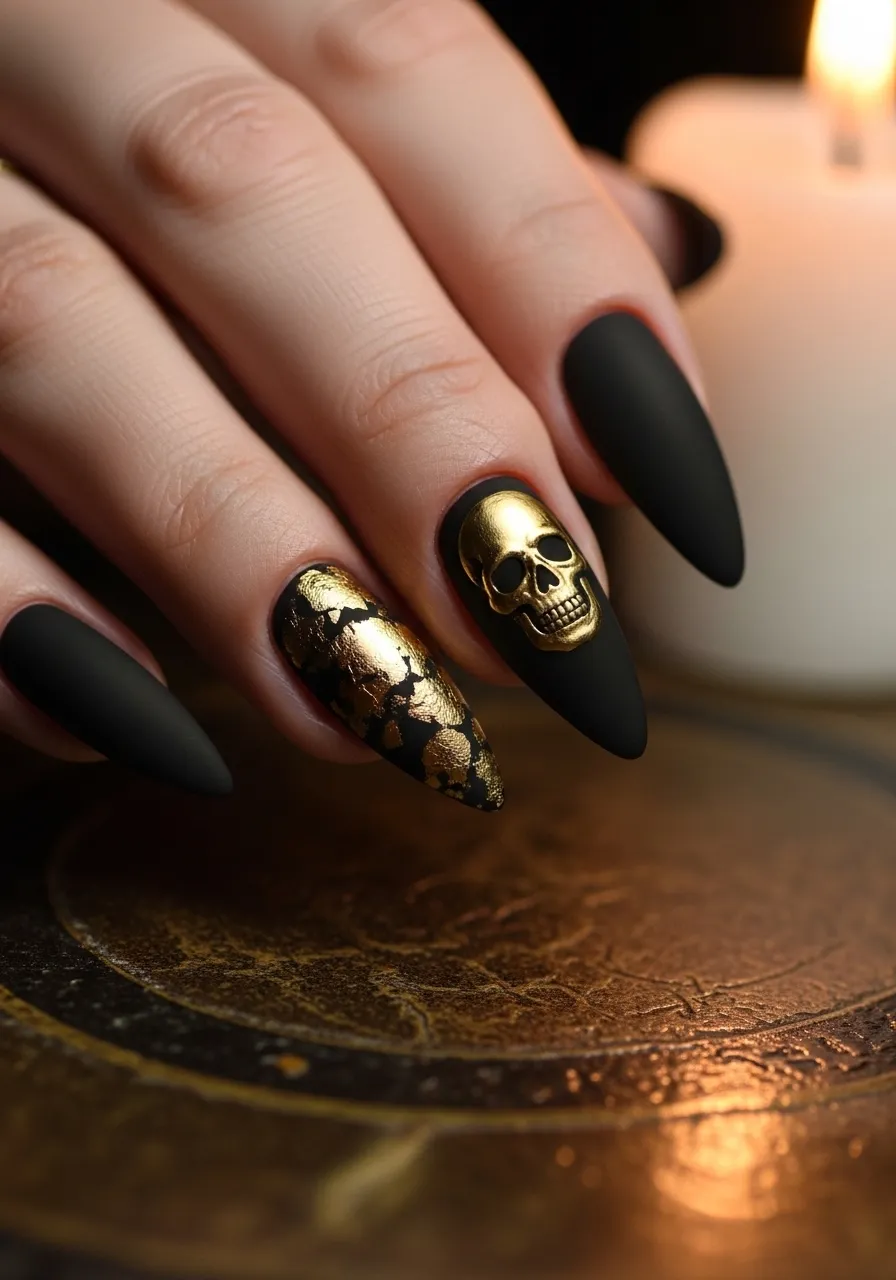
Combining matte black with gold skull accents turns a simple Halloween look into something that feels genuinely luxurious. The contrast between a flat matte base and a shiny gold detail is striking.
Apply matte black to all ten nails first. Let them fully cure. Then use a gold nail art pen or a thin brush with gold chrome powder to paint a small skull on one or two accent nails.
Gold skulls read more elegant than cartoonish. This is the version you wear to a grown-up Halloween party, not a kid’s costume event.
If freehand skull art feels too advanced, use gold skull nail stickers. They are cheap, easy to apply, and look surprisingly realistic under topcoat.
Seal the skull with a glossy topcoat on just the accent nail. This creates a mixed-finish look where matte and shine coexist on the same hand, which looks intentional and editorial.
This design photographs beautifully, especially in candlelight. It is one of the more glamorous options on this list and still completely doable at home.
6. Neon Orange and Black Gradient
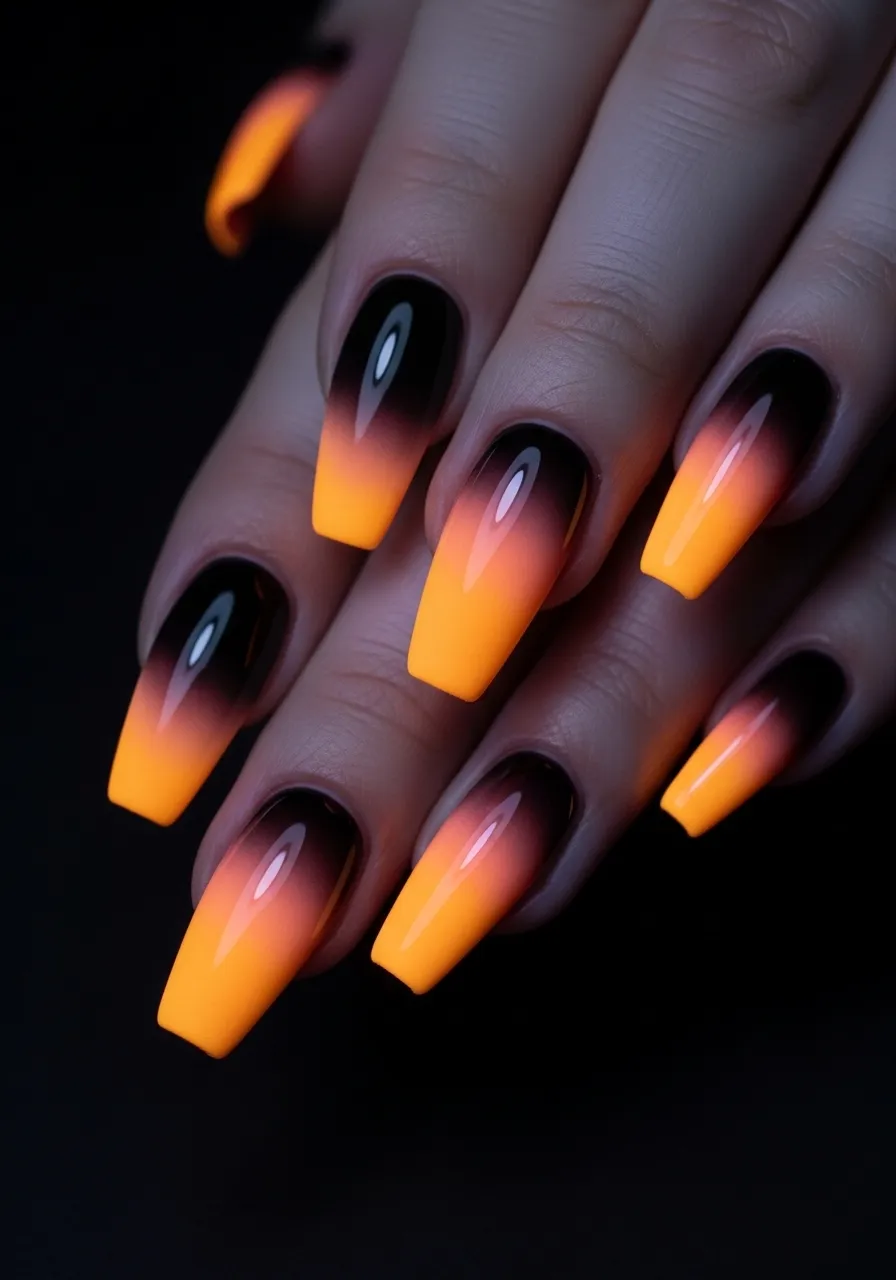
Neon orange and black is the most classic Halloween color combination and it translates beautifully into a gradient nail look. The contrast is bold without requiring any detailed nail art.
Use a makeup sponge to blend neon orange and black together. Apply black at the base, dab neon orange at the tip area, and press the sponge where the colors meet to create a diffused gradient.
Neon orange shows up dramatically on dark nails under UV lights. If you are going to a Halloween party with black lights, this look will literally glow.
Repeat the sponging two to three times per nail to build up opacity. Seal with a glossy topcoat to blend the texture and intensify the colors.
This technique works on any nail length or shape. You need just two polishes and a small piece of cosmetic sponge. Total cost for a DIY version is under ten dollars if you start from scratch.
Add a tiny black bat stamp or sticker on the accent nail to push the Halloween theme further without extra painting effort.
7. Translucent Jelly Nails With Floating Eyeballs

Jelly nails have a satisfying, glass-like quality. When you add floating eyeball details inside the layers, they become one of the creepiest and most unique Halloween nail looks around.
Start with a sheer, milky-white or clear base coat. Add your eyeball stickers or hand-drawn eyeball designs before they fully cure. Then seal them under another layer of clear or sheer polish. This traps the design inside the nail, creating a floating effect.
The creepy factor here is in the layering. The eyeball looks like it is genuinely suspended inside your nail, not just on top of it.
Eyeball nail stickers are widely available on online craft marketplaces. A sheet with dozens of them costs about two dollars.
For a DIY painted version, use a white base, then add a colored iris and a black pupil with a toothpick. A tiny red line detail around the iris makes it look bloodshot and spooky.
This look works best on shorter nails where the sticker sits flat. Long nails may cause the trapped element to buckle slightly at the edges.
8. Dripping Slime Green Nails
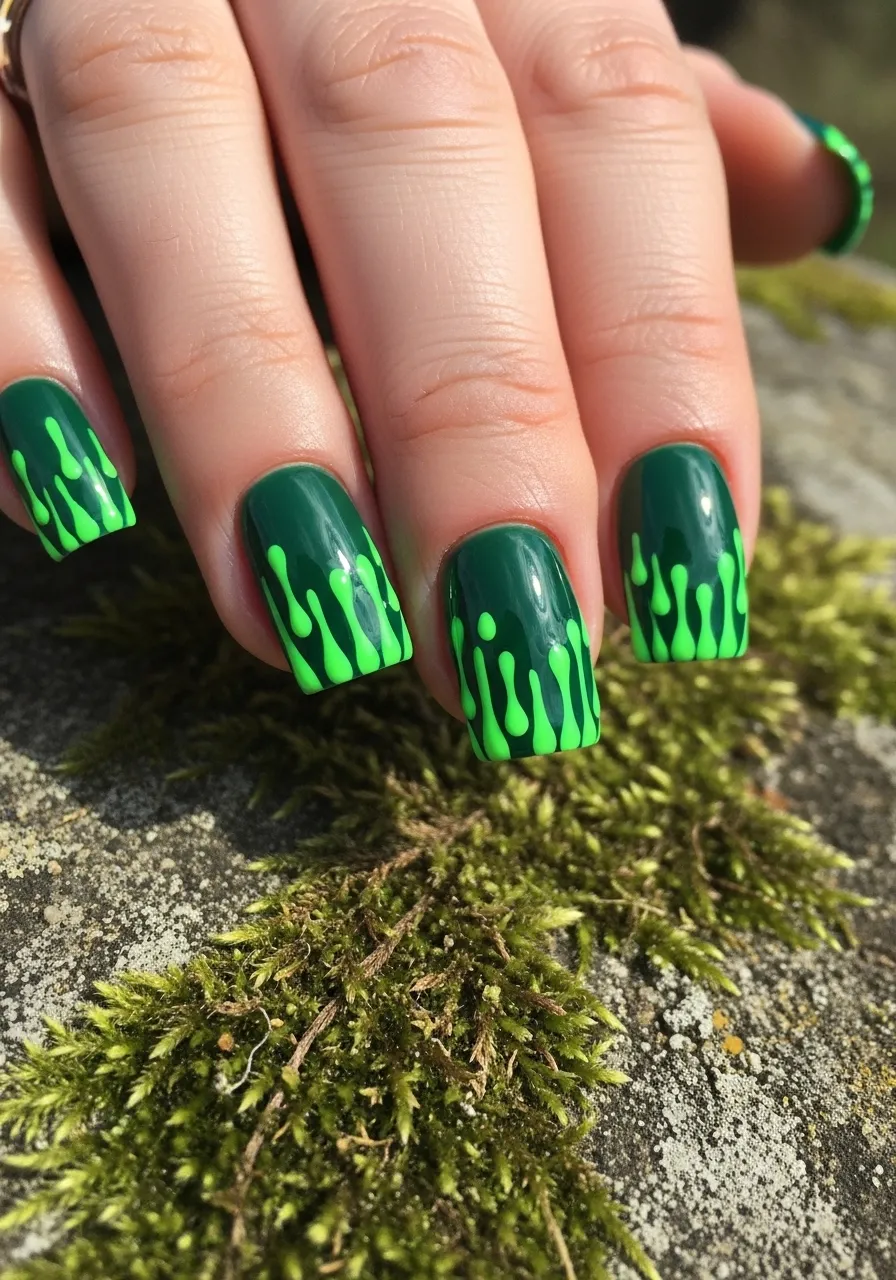
Slime green nails lean into the witchy, potion-brewing side of Halloween. The color alone is arresting, and adding a drip detail in a brighter or darker shade makes the whole look feel like something bubbling out of a cauldron.
Start with a deep forest green or black base. Then use a neon or toxic green nail art pen or thin brush to create irregular drips from the tip down.
Vary the thickness of the drips. Some should look like thin trails and others should look like thick, globby drops. That variance is what makes it look like actual slime.
Seal with a super glossy topcoat. The wetter and shinier the final look, the more convincing the slime effect becomes.
This design works exceptionally well on short, square nails. The shape looks like a petri dish, which reinforces the creepy chemistry vibe.
For a budget version, all you need is one dark green and one neon green polish. Both are easy to find at drugstores, especially around October when Halloween seasonal polishes hit shelves.
9. Black Cat Silhouette Nails
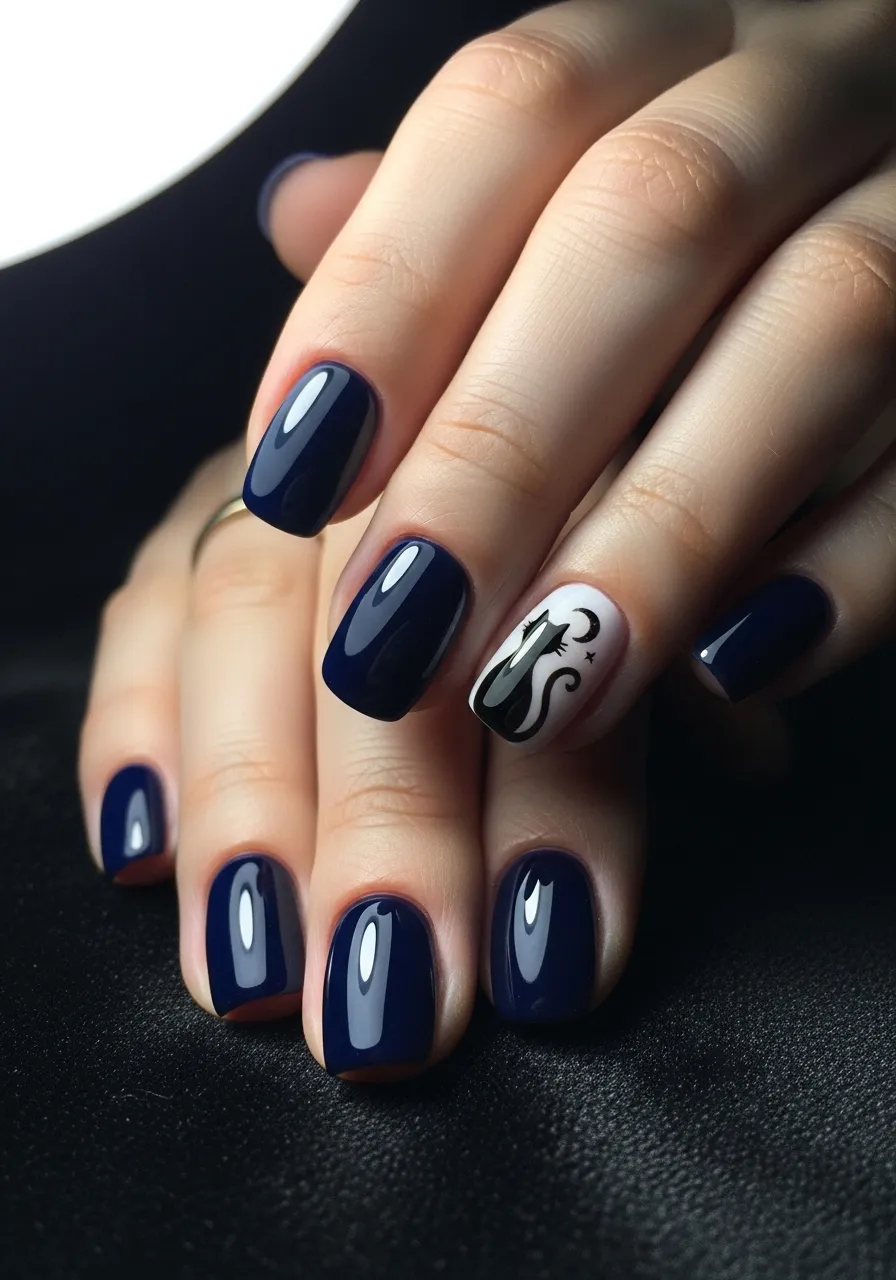
Black cat nails are a Halloween classic that never feels overdone. A simple cat silhouette on a rich, dark base is enough to make a statement without being too heavy.
Use a deep navy, dark purple, or black base. On the accent nail, use a thin brush dipped in black polish to paint a small arched-back cat silhouette. Add a crescent moon beside it for extra atmosphere.
The silhouette does not need to be detailed. Two pointed ears, a curved back, and a long tail is all a black cat requires. Simplicity reads as intentional.
Cat-shaped nail stamps are a great alternative if you want clean edges without freehand painting. Nail stamping kits are sold online starting at around six dollars and include dozens of Halloween designs.
This look pairs naturally with a dark berry or midnight blue base polish. On shorter nails, the silhouette size stays small and still reads clearly.
You can repeat the cat on every nail for a bolder look or keep it as a single accent. Both work well. This is one of the most approachable Halloween designs on this list.
10. Metallic Purple Witch Nails
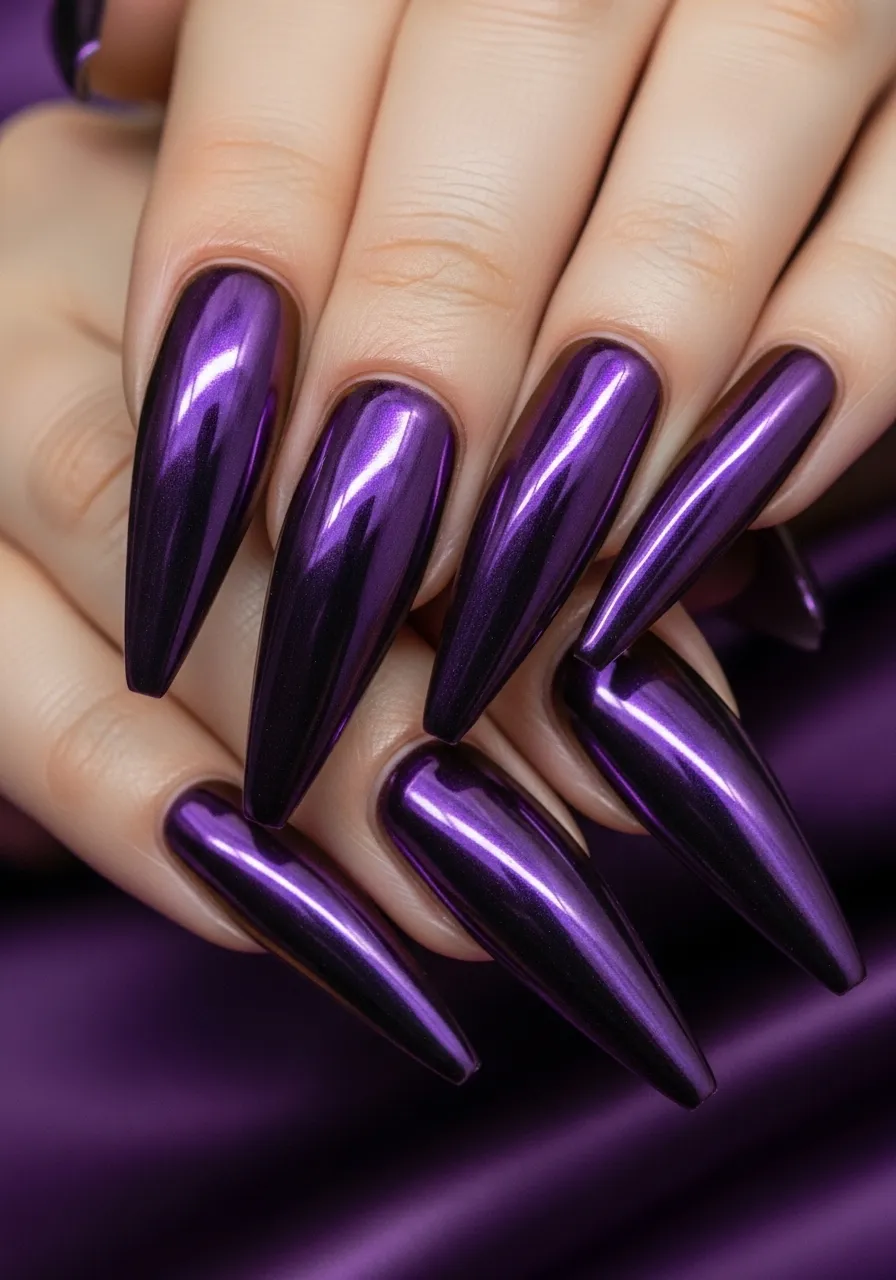
Witch nails do not have to mean warts and wands. A deep metallic purple on long, pointed stiletto nails looks genuinely witch-coded in the most glamorous way possible.
A duochrome or chrome purple polish shifts between dark plum and electric violet depending on the angle and lighting. This shifting quality gives the nails an otherworldly, almost magical feel.
Long stiletto nails in this color look like talons. That is absolutely the point. The shape and color work together to build the whole mood.
Chrome or metallic purple polishes are available at most beauty supply stores for under eight dollars. Apply over a dark purple or black base for maximum depth.
To make chrome powder work at home, apply it to a tacky gel layer and rub with a silicone finger tool or makeup sponge. The effect is a mirror-like metallic finish that photographs stunningly.
This look requires no nail art skills. Just a good quality polish and clean application. The color does all the work.
11. Frankenstein Stitched Nails
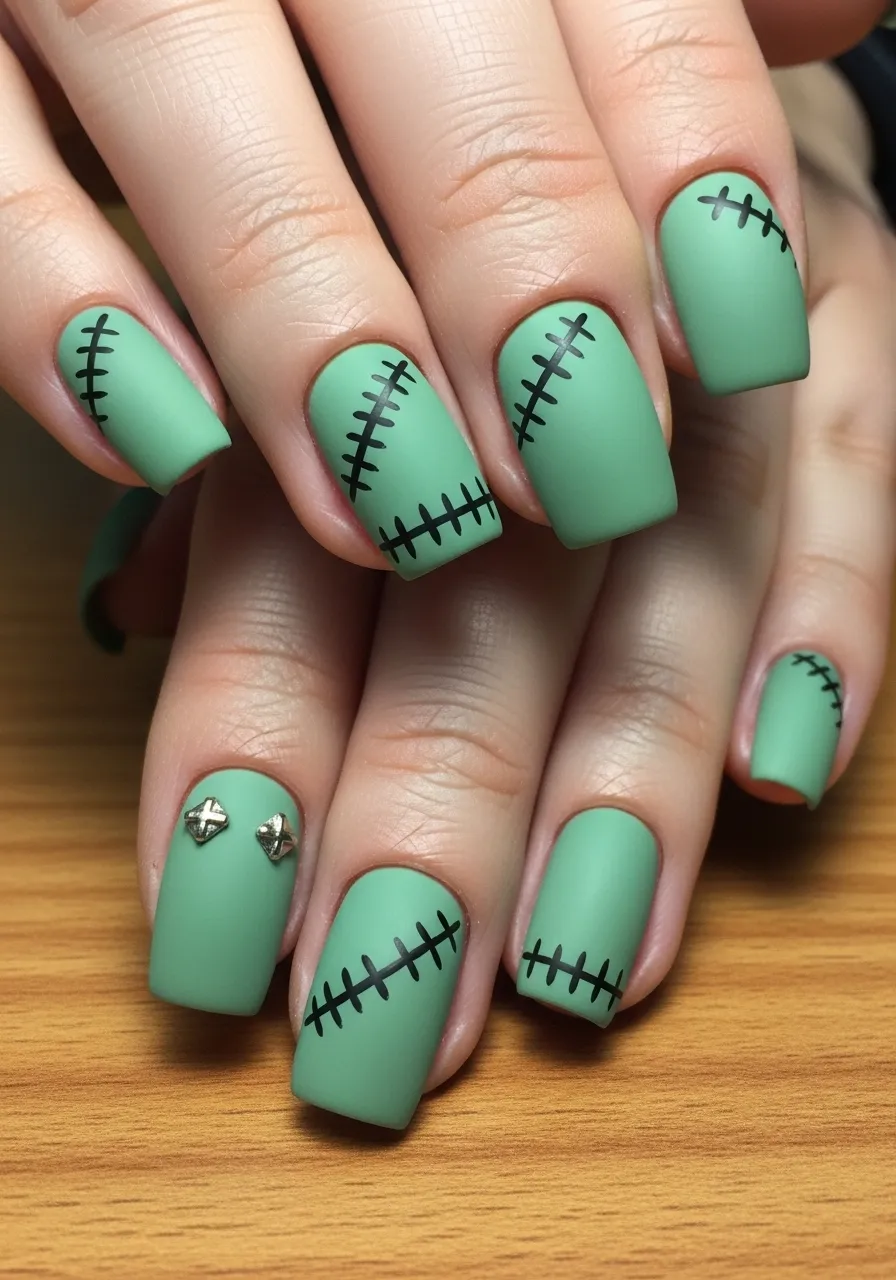
Frankenstein nails are one of the more playful entries on this list. They are graphic, funny, and immediately recognizable — without requiring any advanced painting skills.
Use a flat, matte sage or lime green base. Once dry, use a thin nail art brush or black nail art pen to draw a horizontal line across the middle of each nail. Then add small vertical tick marks over the line to mimic surgical stitches.
Keep the stitches uneven. Perfect spacing looks like a pattern. Uneven stitches look like an actual rushed surgery, which is much more on-theme.
Add tiny silver or black bolt accents near the cuticle on one or two nails to nod to Frankenstein’s monster without being too literal.
This design takes about ten minutes per hand once the base is dry. The stitch detail is done entirely with a black nail art pen, which costs around two dollars at most craft stores.
Seal with a matte topcoat to keep the green flat and the stitches looking drawn-on rather than painted. The matte finish reinforces the graphic, illustrated quality of the design.
12. Mummy Wrap Nails
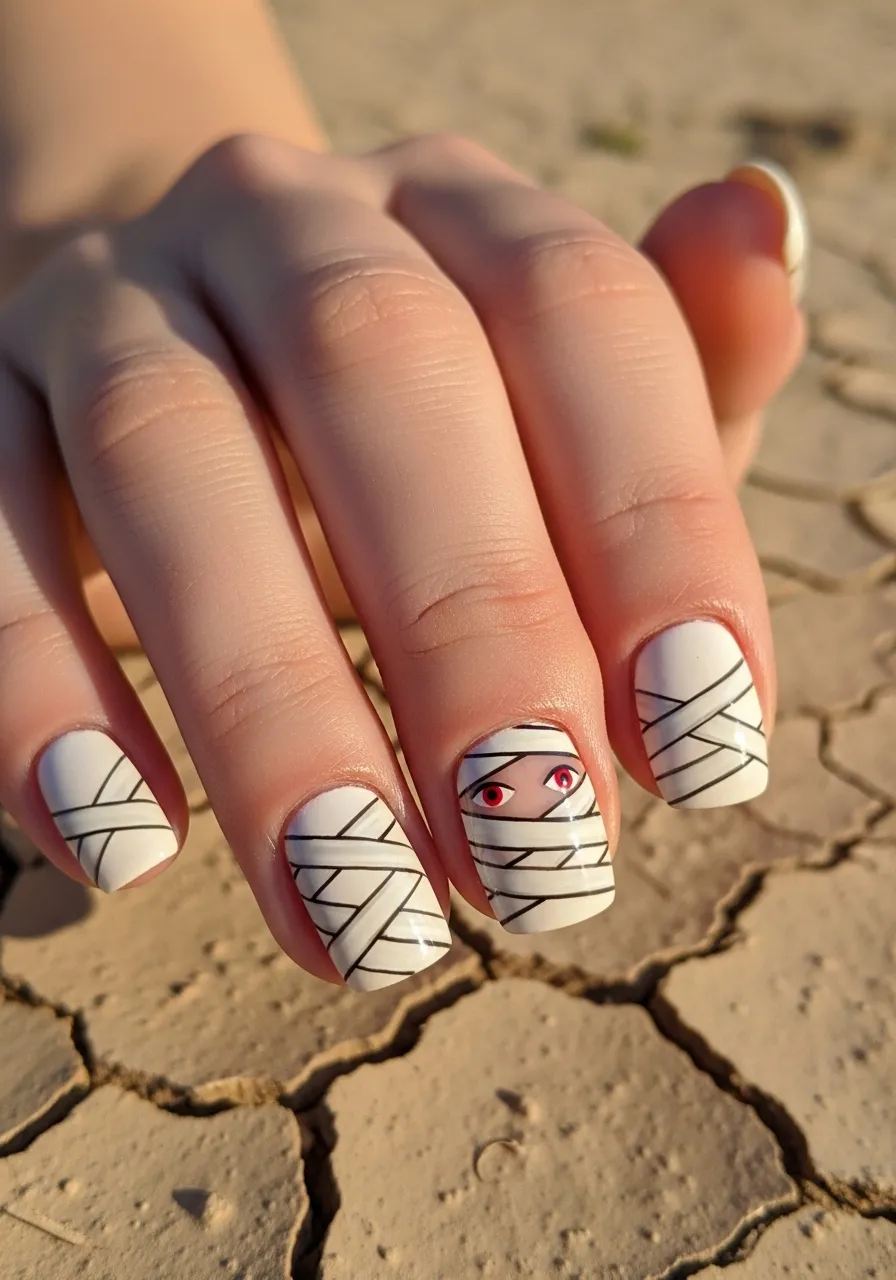
Mummy nails are charming and eerie at the same time. The bandage wrap pattern gives white or cream nails a lot of visual texture and storytelling.
Start with a cream or off-white base. Use a thin brush with a light grey polish to paint diagonal crossing lines across the nail in an irregular pattern, like bandage strips overlapping each other.
Leave small gaps between the strips. The gaps suggest something underneath the wrappings, which is the creepy part.
On the accent nail, paint two tiny red dots inside the bandage gaps to look like glowing eyes. This tiny detail transforms a subtle look into a full Halloween story.
Seal with a slightly satin or matte topcoat. Glossy topcoat makes the bandages look wet and modern. A low-sheen finish looks more antique and tomb-like.
All you need for this look is white or cream polish, light grey polish, and red for the eyes. Three polishes, no special tools required. This is one of the most budget-friendly options on the list.
13. Starry Night Witchcraft Nails
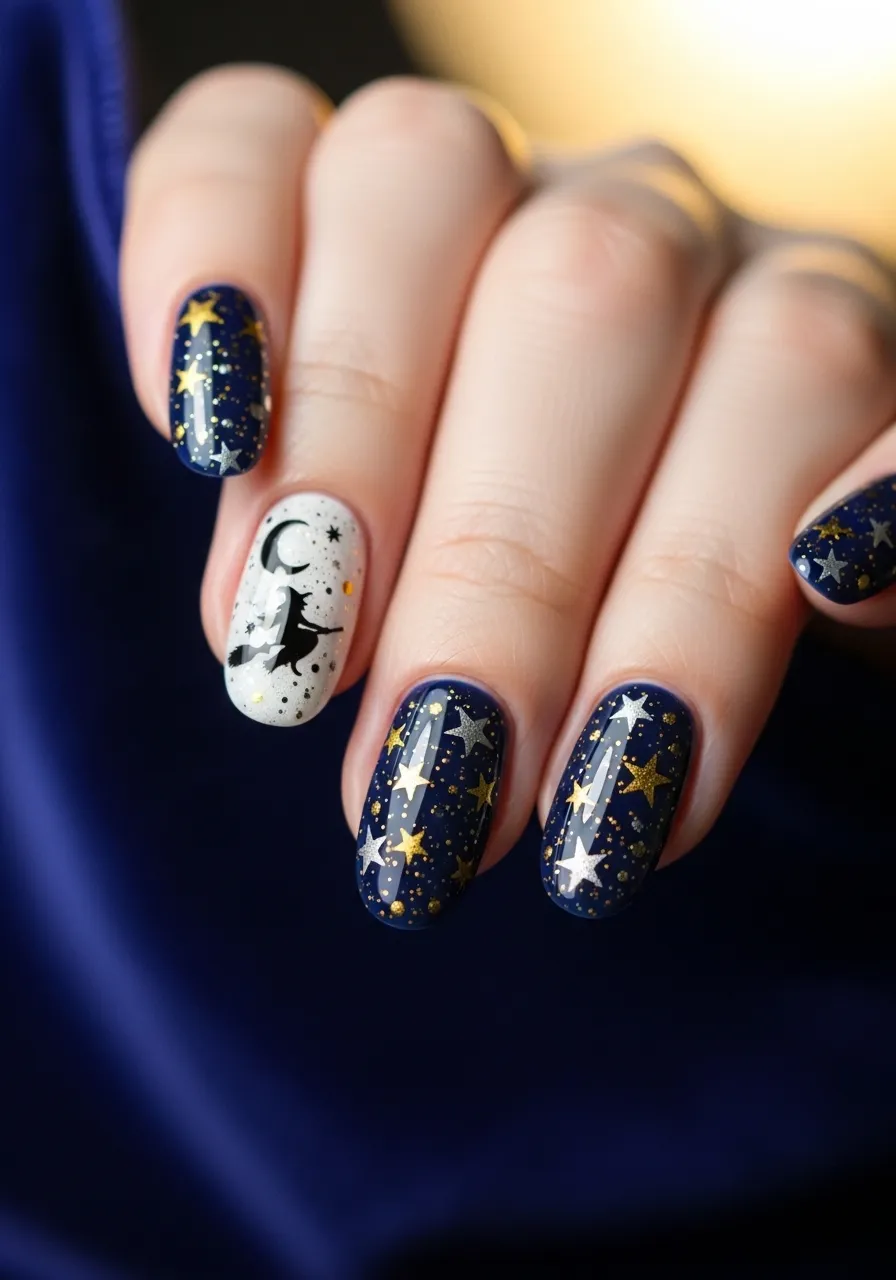
Starry night nails combine celestial beauty with Halloween mystery. This look leans into the astrology witch aesthetic that feels current and timeless at once.
Use a deep navy or near-black base. Dot on tiny gold and silver stars using a dotting tool or the tip of a bobby pin dipped in metallic polish.
Scatter the stars randomly rather than evenly. A random distribution looks like an actual night sky. Evenly spaced dots look like a pattern.
On the accent nail, add a crescent moon shape using a thin brush and gold polish. Below the moon, paint a tiny stick-figure witch on a broomstick silhouette. The scale is small enough that precision is not required.
Star stickers or nail foils in gold and silver are an easy shortcut if freehand dots feel tedious. Press them on over the dry base and seal with topcoat.
This look photographs beautifully and feels slightly elevated compared to more cartoon-heavy Halloween designs. It is spooky without being gory and works well for the office.
14. Red Velvet Vampire Nails
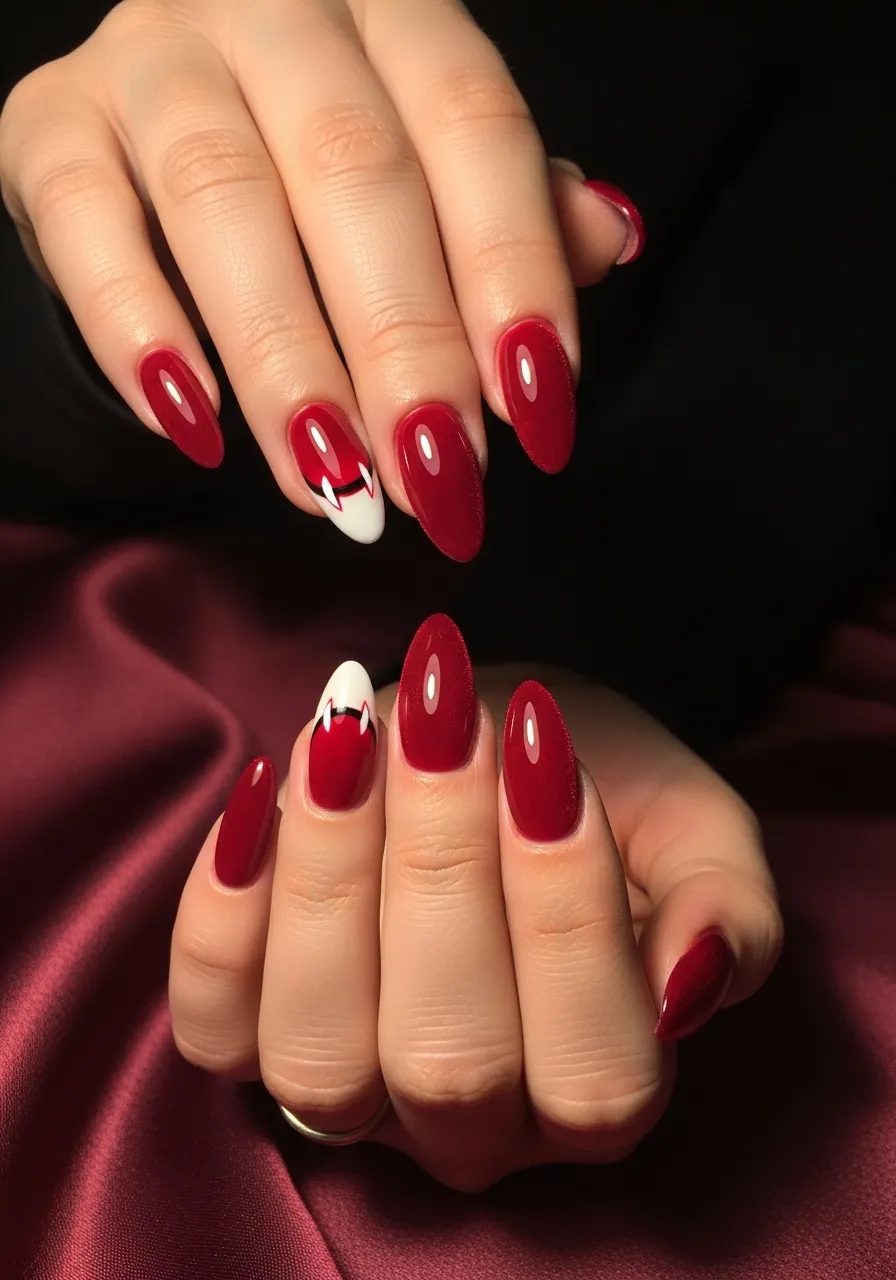
Vampire nails channel old Hollywood darkness through a rich, blood-red velvet finish. This is one of the most wearable Halloween looks because deep red nails read as glamorous in any context.
Use a deep blood red or burgundy polish. Apply a velvet or suede topcoat to give the finish a plush, matte texture that absorbs light rather than reflecting it.
Velvet topcoats are sold at most nail supply stores for around five dollars. They transform any regular polish into a fabric-like finish.
For the vampire detail, paint two small white curved fang shapes near the cuticle on the accent nails using a thin brush or nail art pen. The tiny fang detail is subtle enough that it reads as intentional nail art rather than a costume accessory.
Deep red works on every nail shape and length. If you do not want to add the fangs, plain velvet red nails are still fully Halloween-appropriate and completely professional.
Seal the entire nail with a matte topcoat to preserve the velvet quality. Glossy topcoat will undo the matte velvet effect.
15. Candy Corn Ombré Nails
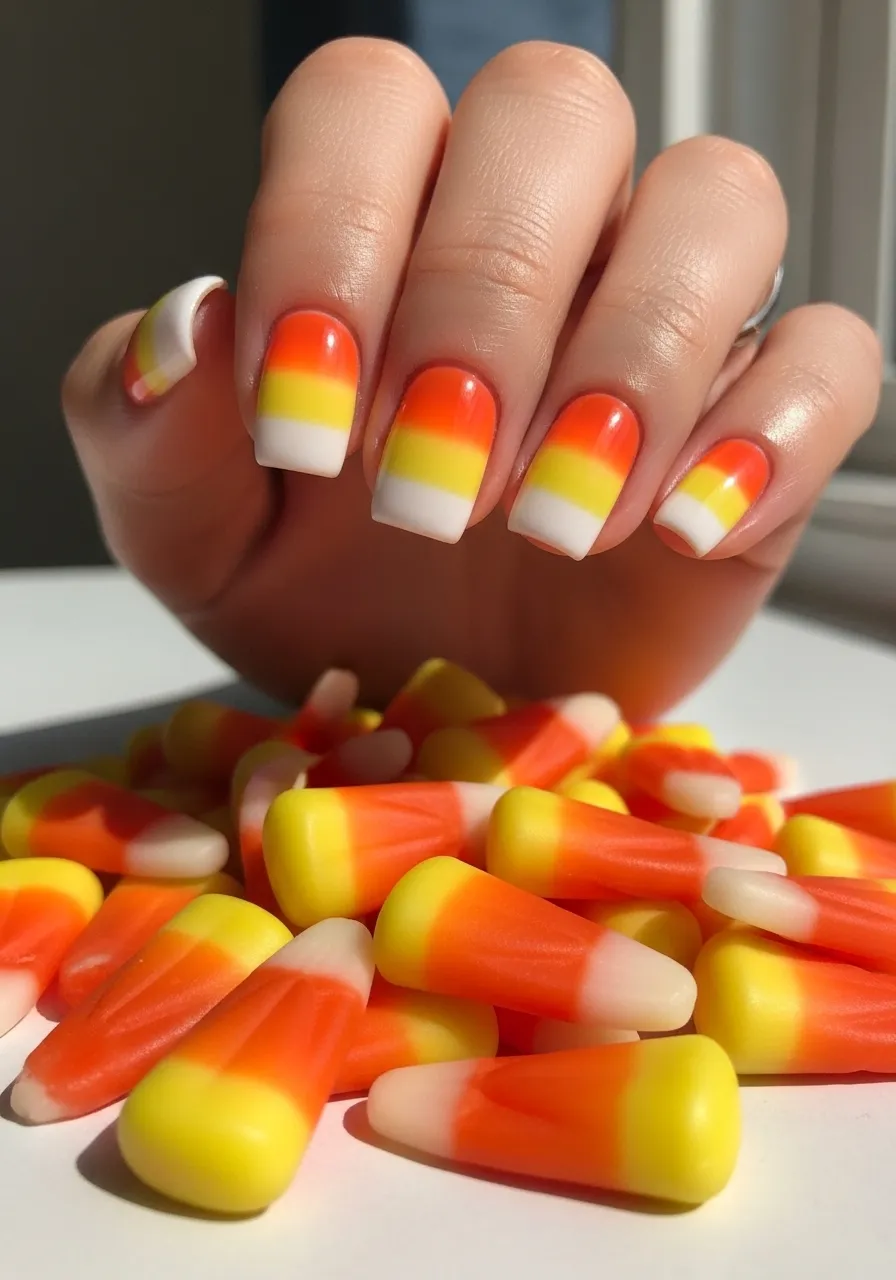
Candy corn nails are Halloween without being scary. They are bright, nostalgic, and surprisingly striking when done with clean color zones.
Use a sponge to create a three-part ombré: white at the tip, orange in the middle, yellow near the cuticle. This mirrors the iconic candy corn color pattern.
The zones do not need to be perfectly separated. A soft blur between white and orange actually looks more polished than a harsh dividing line.
This look is most effective on shorter, squarish nails where the three zones each get enough space to show up clearly.
Seal with a high-gloss topcoat. The glossy finish makes the colors look saturated and candy-like, which is absolutely the right reference here.
You need just three polishes: white, orange, and yellow. All three are available in any drugstore or dollar store, especially in October. This is one of the most affordable looks on the list.
16. Glittery Jack-o-Lantern Nails
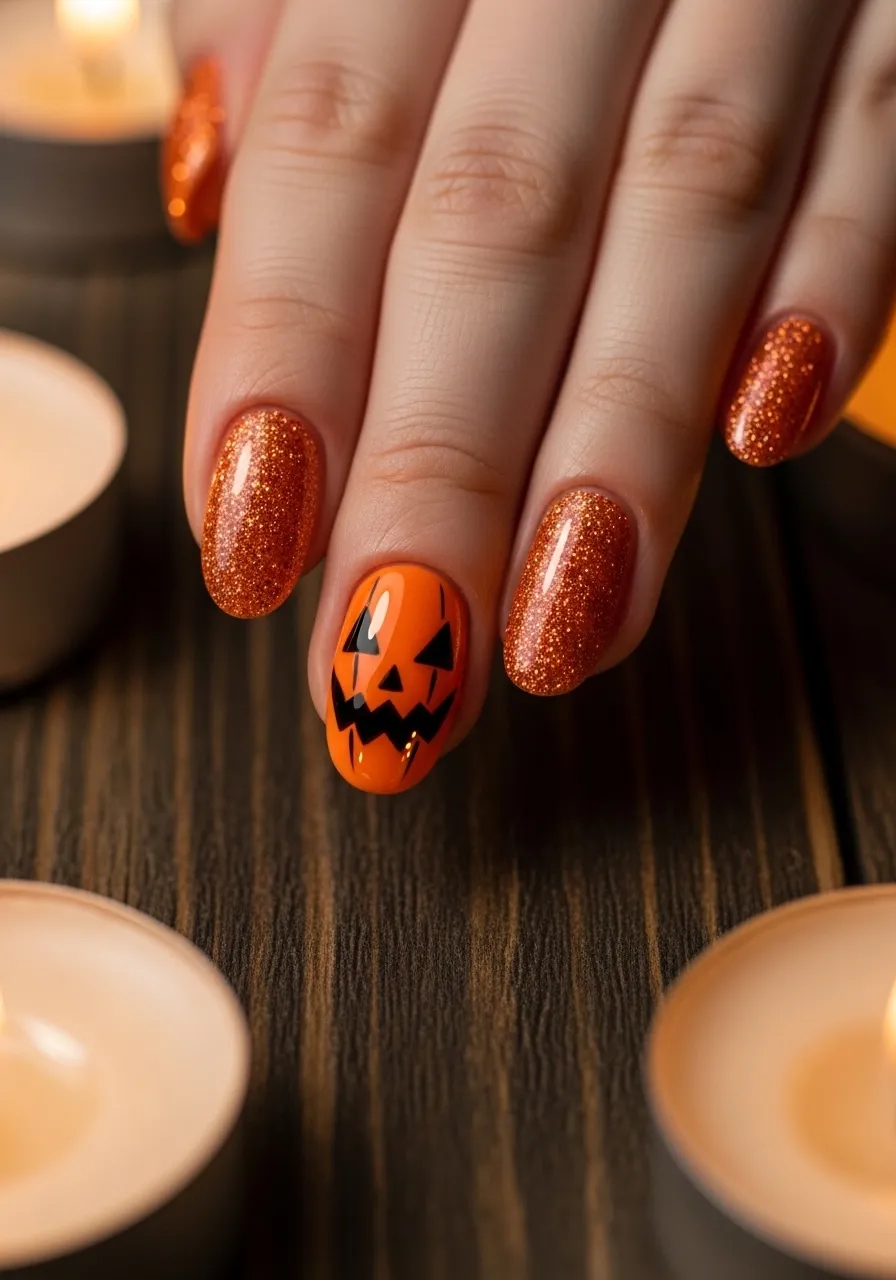
Glittery Jack-o-lantern nails combine two of Halloween’s best elements: sparkle and classic imagery. The glitter orange base makes every nail feel festive and the painted face ties it all together.
Use a chunky or fine glitter orange polish for the base. Once dry, use a black nail art pen on the accent nail to draw the classic Jack-o-lantern face: two triangle eyes and a jagged grin.
Keep the face simple. Two triangle eyes and an uneven toothy mouth is all you need. More detail makes it harder to execute cleanly at small scale.
The glitter base catches light in a way that plain orange cannot, giving the whole look extra dimension.
If painting the face feels too detailed, Jack-o-lantern nail stickers are cheap and widely available in Halloween seasonal displays at drugstores and craft stores starting in September.
Seal everything with a glossy topcoat. For the glitter base, use a thick topcoat to smooth out any texture from the glitter particles and give the nails a clean, finished surface.
17. Cracked Porcelain Doll Nails

Cracked porcelain doll nails tap into the unsettling beauty of old, broken things. They look complex but are one of the easiest designs on this list to achieve.
Apply a pale ivory or white base. Once dry, use a thin black nail art brush or pen to draw thin branching crack lines across the surface. The pattern should radiate from one focal point on each nail, like a shatter point.
Start with one central point and branch outward in irregular directions. Do not trace a symmetrical pattern. Asymmetry is what makes it look like a real crack rather than a sticker.
Seal with a slightly satin topcoat. This gives the nails a slightly ceramic or glazed quality that reinforces the porcelain reference.
For a more dramatic version, add a faint grey or blue wash under the cracks using a dry brush technique to suggest depth and shadow inside the breaks.
This look is subtle enough for daily wear but reads as clearly Halloween when someone looks closely. It is one of the more quietly spooky options on this list.
18. Poisoned Apple Nails
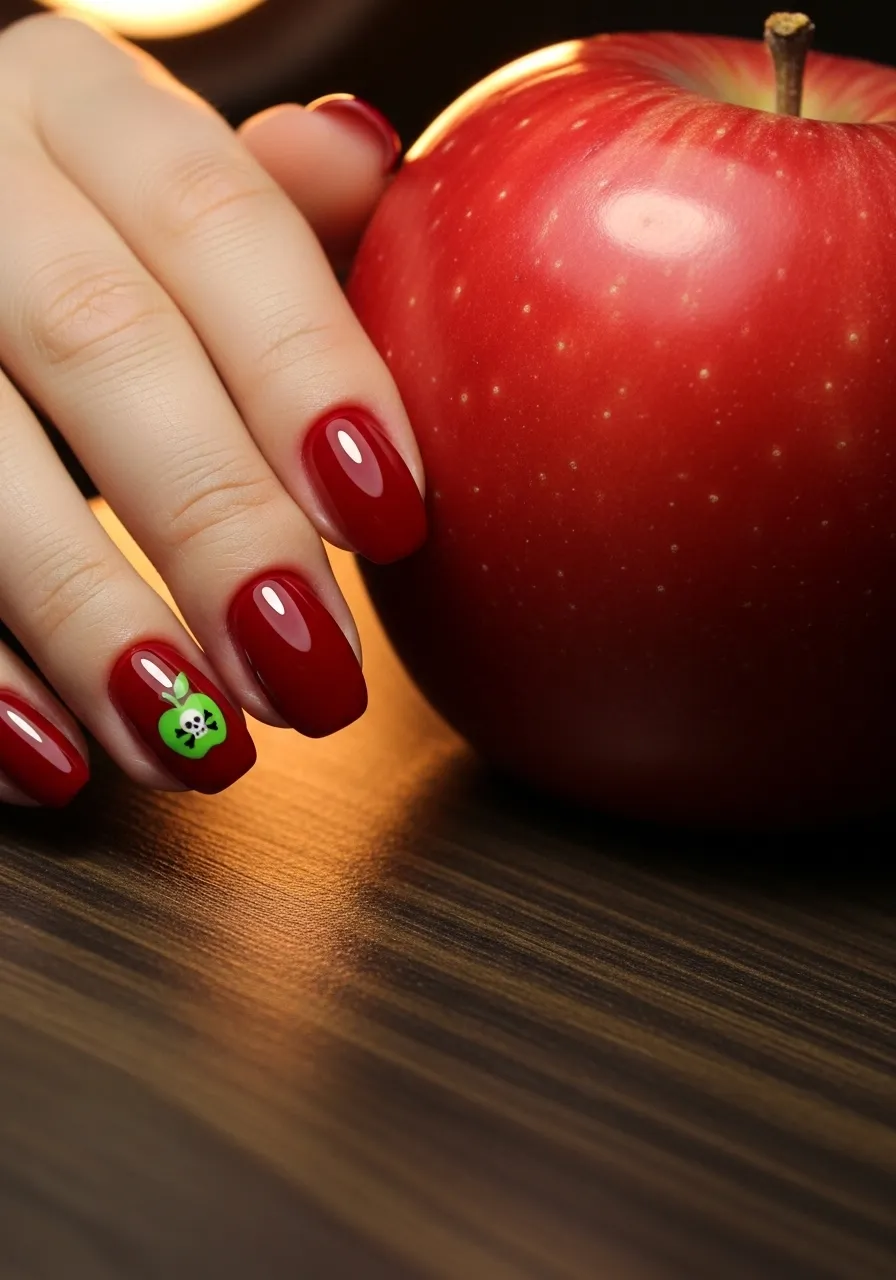
Poisoned apple nails are for anyone who wants their Halloween to feel like a dark fairy tale. The look references Snow White’s iconic moment but filters it through a gothic lens.
Use a deep glossy cherry red or crimson base on all nails. On the accent nail, use a white or green nail art pen to draw a tiny apple silhouette. Add a tiny skull or crossbones detail on the apple surface.
The apple can be very small. Even a ten-pixel-scale apple with a basic round shape reads clearly on a nail. Scale matters here — keep it minimal.
The high-gloss red base is what does most of the heavy lifting in this design. The shininess gives the nails a poisoned, too-perfect quality on its own.
Seal with a mirror-finish glossy topcoat for maximum lacquer effect. The higher the shine, the more dramatic and luxurious the whole design looks.
This is a great option for anyone who wants a Halloween look that reads as glamorous rather than gory.
19. Haunted House Silhouette Nails
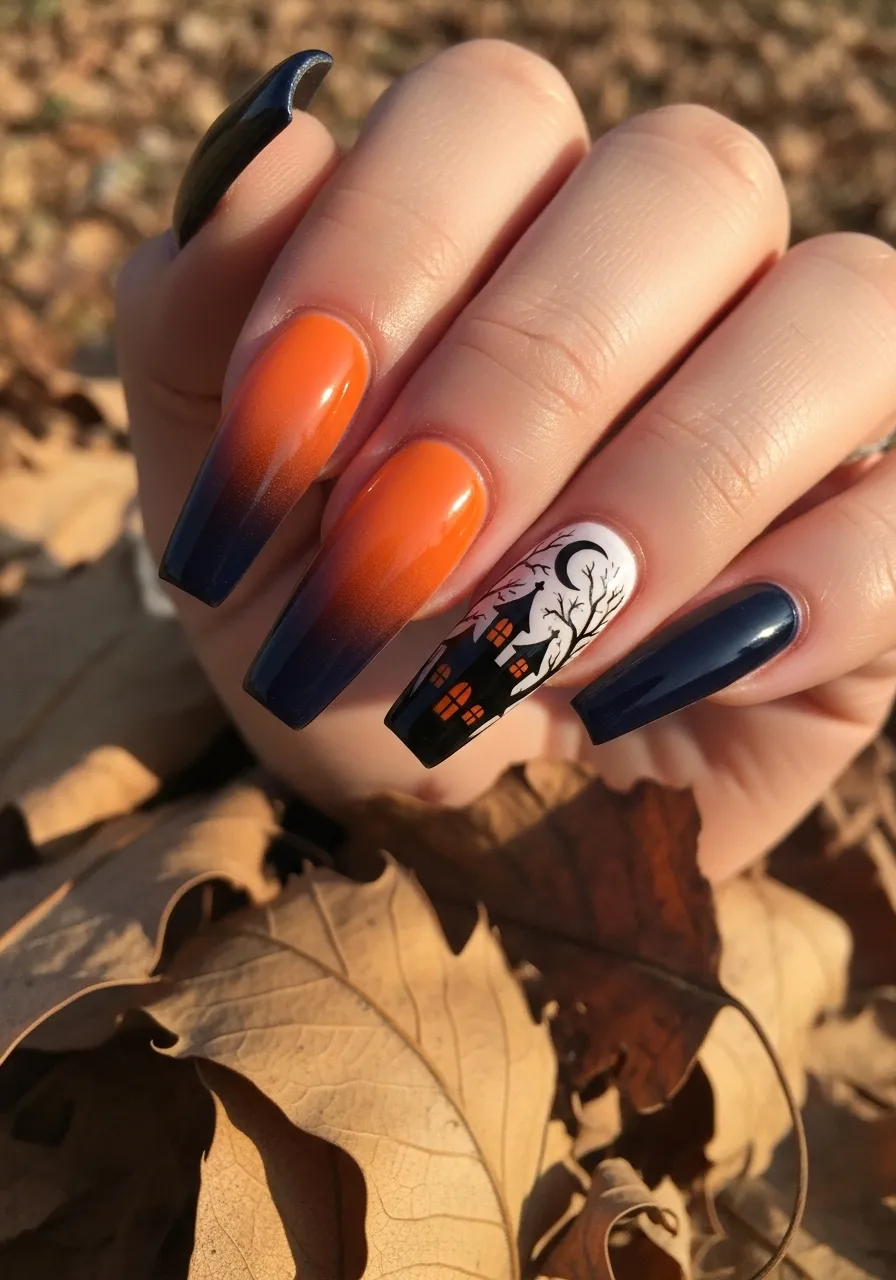
Haunted house nails turn your fingertips into a Halloween landscape. This is one of the most storytelling-rich nail designs you can do at home.
Create an ombré background using orange at the base and dark navy or black at the tip. Use a sponge to blend the two colors in the middle. This mimics a Halloween sunset sky.
On the accent nail, use a thin brush with black polish to paint a simple haunted house silhouette near the free edge, with a crescent moon and a bare tree beside it.
The silhouette works best when kept simple. A pointed rooftop, a few windows, and a crooked chimney is enough. Over-detailing at nail scale creates visual noise rather than clarity.
The orange-to-navy background is dramatic enough on its own as a base for all other nails. You only need the silhouette on one or two accent nails.
This look photographs especially well outdoors in autumn light. If you are attending an outdoor Halloween event, it will look extraordinary in photos.
20. Galaxy Brain Skull Nails
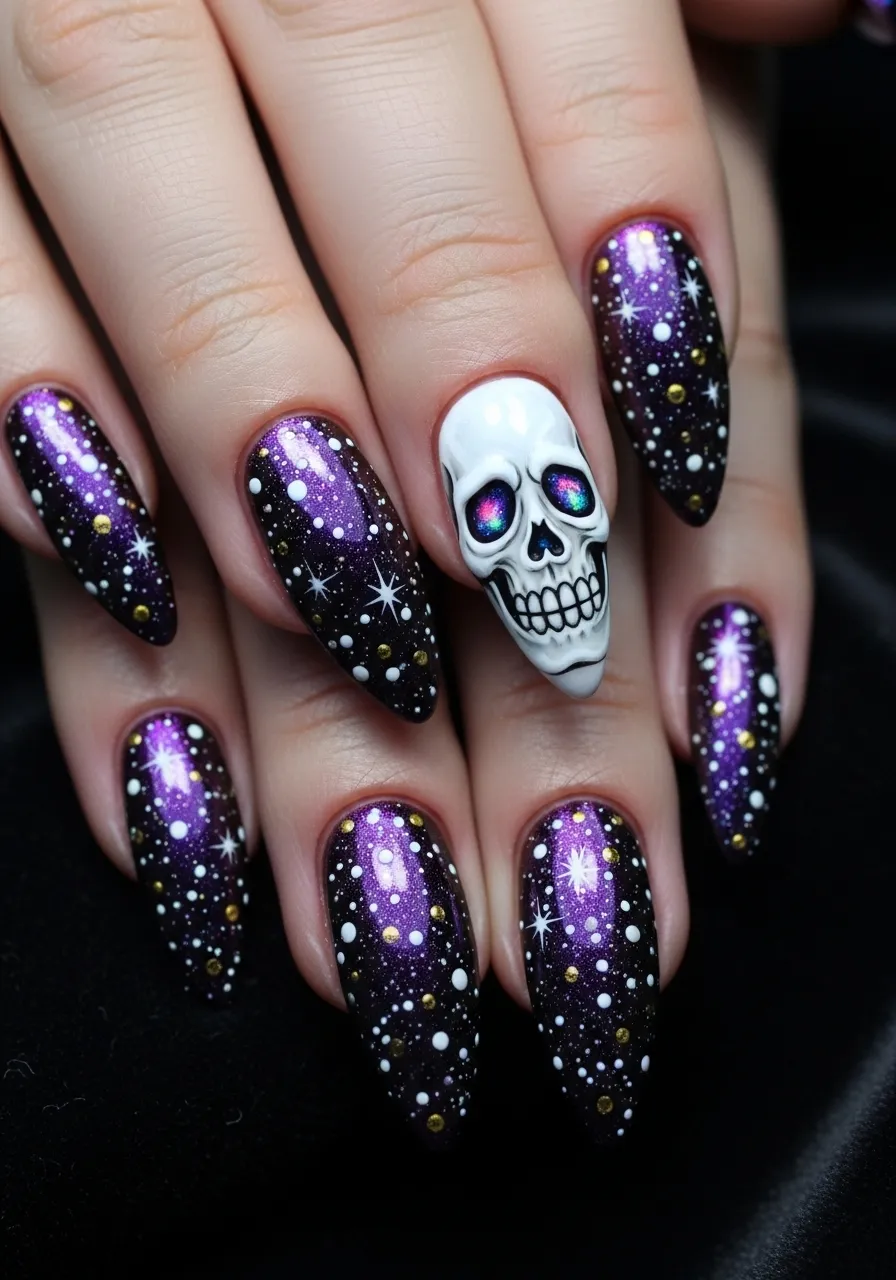
Galaxy skull nails combine cosmic beauty with Halloween iconography. The result is deeply dramatic and unlike most of the designs you will see on other people at the same event.
Use a dark purple or black base and add galaxy-style dots in white, gold, blue, and pink using dotting tools or a dry fan brush technique. This scattered star effect is forgiving because imperfection reads as natural.
On the accent nail, paint a white skull outline. Inside the eyes and nose cavity of the skull, add small spots of galaxy color using a thin brush. This makes it look like the skull is made of stars.
Galaxy brush work is beginner-friendly because random placement is the goal. There is no wrong way to scatter stars.
Iridescent or holographic glitter polishes in purple and blue also work beautifully as a shortcut for the galaxy background effect. A single coat gives you that cosmic shimmer without detailed painting.
Seal with a glossy topcoat to make the galaxy colors pop. This is one of the most photographically striking looks on this list and works just as well for everyday wear as it does for a Halloween event.
Conclusion
Spooky nails do not require a professional salon, expensive products, or hours of practice. Most of the looks on this list come down to two or three polishes, a nail art pen, and a little patience. Start with the designs that match your skill level and work up to the more detailed ones over time. Whether you lean toward gothic glamour, playful cartoon characters, or eerie minimalism, there is a Halloween nail look here that fits your style. Pick one, grab your supplies, and let your nails do the haunting.