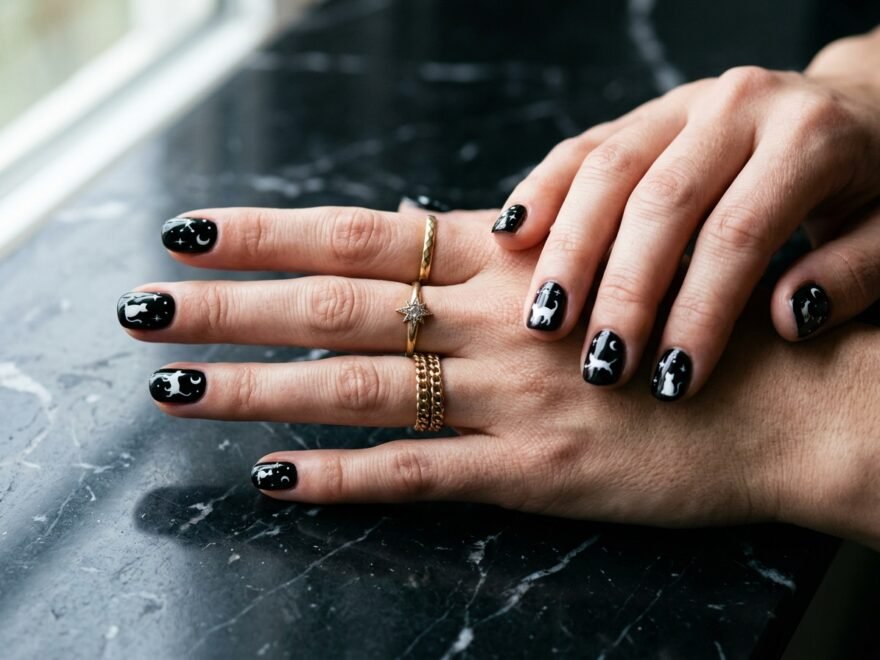
1. Classic Glossy Black Cat Silhouette

This is the go-to look for anyone starting their black cat nail journey.
Paint your nails with two coats of glossy black polish. Once dry, use a thin nail art brush or a toothpick dipped in white acrylic paint to draw a small sitting cat on your ring finger or accent nail.
The silhouette doesn’t need to be perfect. A rounded body, two pointy ears, and a curved tail is all it takes. The imperfection actually adds charm.
Budget tip: Grab a black polish from Sinful Colors (under $2) and use a Bobby pin dipped in white polish to stamp the shape.
Seal everything with a glossy topcoat to make the design pop. This look reads elegant rather than costume-y, so it works year-round. Wear it to work, a dinner out, or just because you felt like it today. Simple, striking, done.
2. Matte Black with Gold Moon Accents
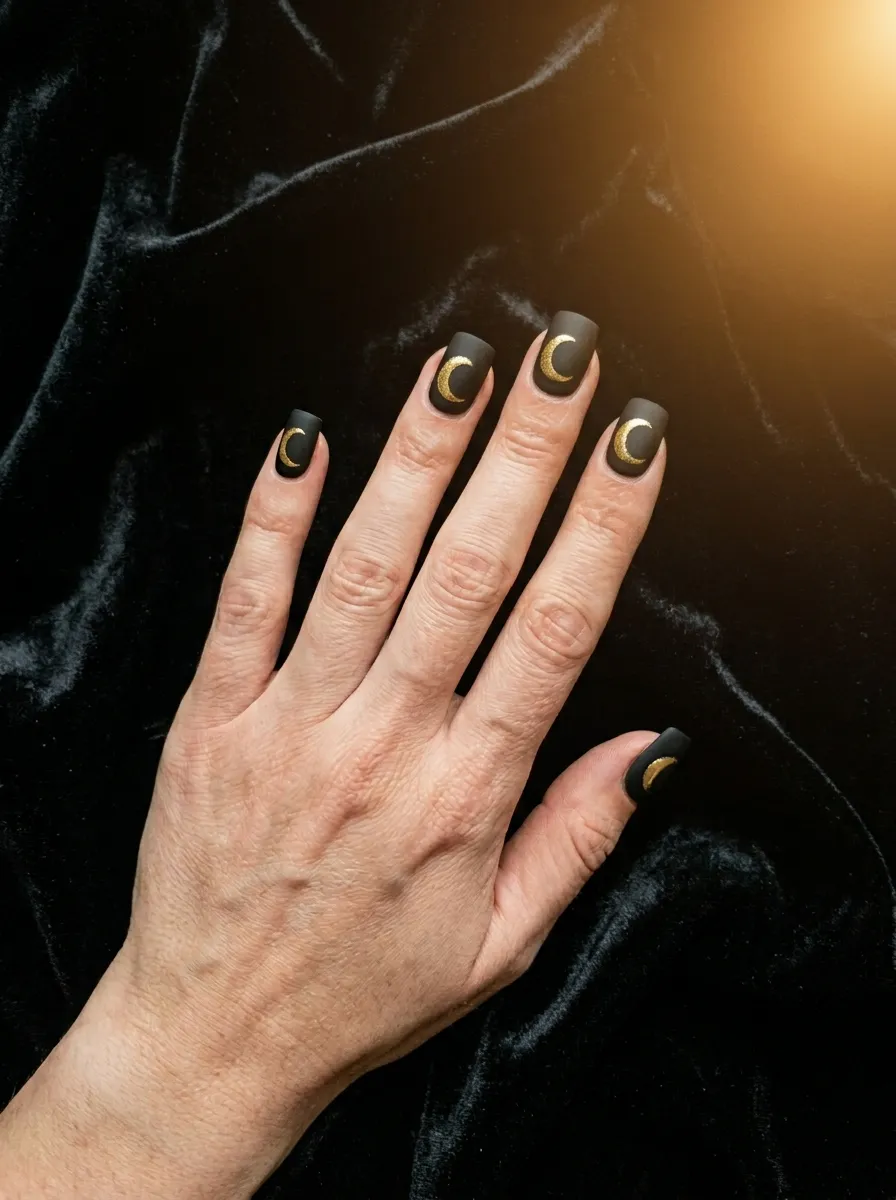
Matte black polish hits different. It has a moody, velvety quality that glossy polish can’t replicate.
Start with matte black as your base. Then add a crescent moon in gold using a dotting tool or a thin striper brush. Place it off-center near the tip of each nail for a magical, celestial feel.
You can use gold nail foil, chrome powder, or even gold acrylic paint to get that moon detail. Chrome powder gives the most reflective finish but requires a gel base. Foil works great over regular polish.
DIY tip: Apply the foil while your top coat is still slightly tacky. Press and peel slowly.
This design pairs beautifully with gold rings and dark clothing. It’s the kind of nail art that looks expensive and complicated but actually takes less than an hour once your base is dry.
Add a tiny star dot near the moon for extra drama. Keep the rest of the nails clean and matte so the accent stands out without overwhelming the whole look.
3. Black Cat Eyes Using Cat-Eye Gel Polish
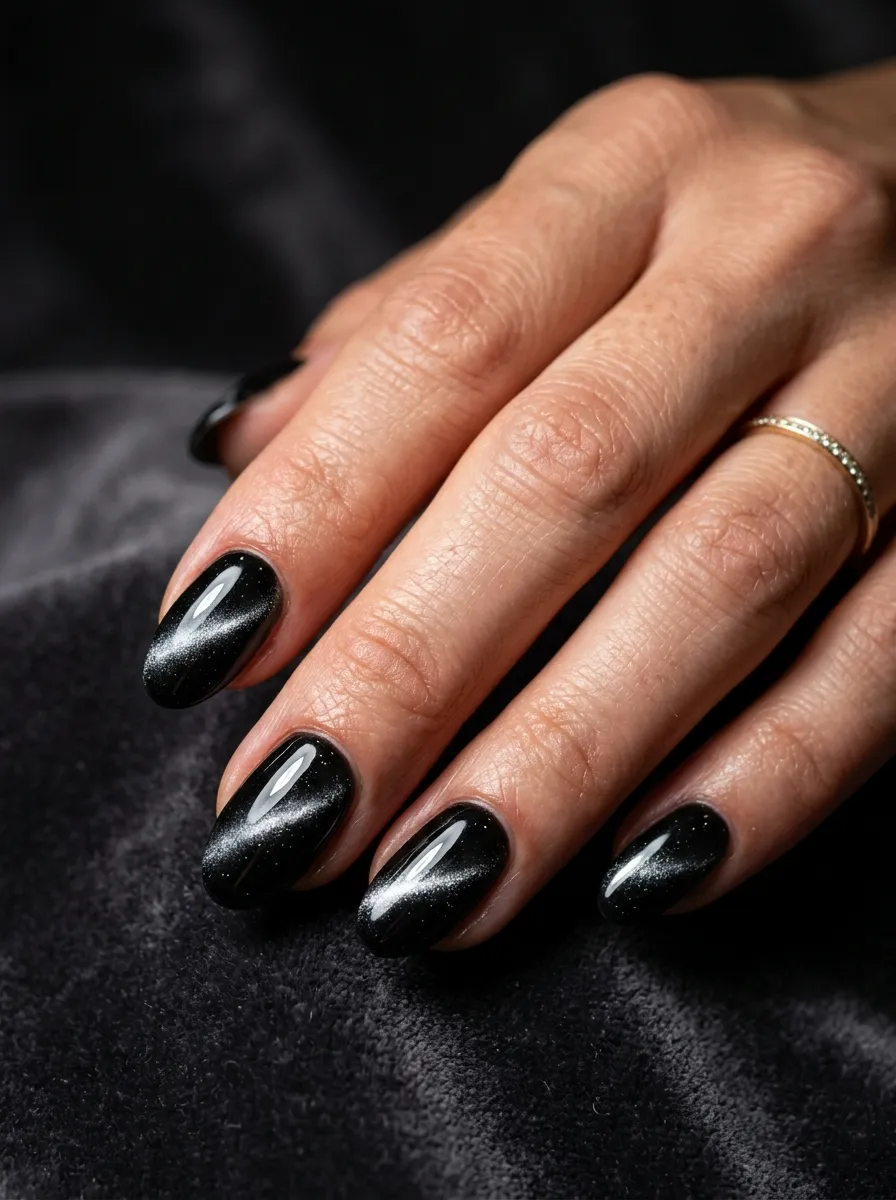
Cat-eye gel polish is one of the coolest nail trends and it fits this theme perfectly.
The polish contains magnetic particles that shift when you hold a magnet over the wet gel. The result is a glowing stripe that looks like — you guessed it — a cat’s eye.
Use a black base and apply the cat-eye gel on top. Before curing under your lamp, hold the magnet just above (not touching) each nail for about 10 seconds. The line forms right before your eyes.
Budget-friendly pick: Beetles Gel Polish has affordable cat-eye sets that come with the magnet included.
You can angle the magnet differently on each finger to create unique streaks — horizontal on the thumb, diagonal on the middle finger, vertical on the pinky.
This is a gel look, so you’ll need a UV or LED lamp. If you don’t have one, some brands make no-lamp cat-eye polishes that air dry. The effect isn’t identical but it’s still striking.
The shimmer reads as dark and mysterious in regular light and absolutely glows under spotlight or flash photography.
4. Halloween-Style Black Cat with Orange Tips
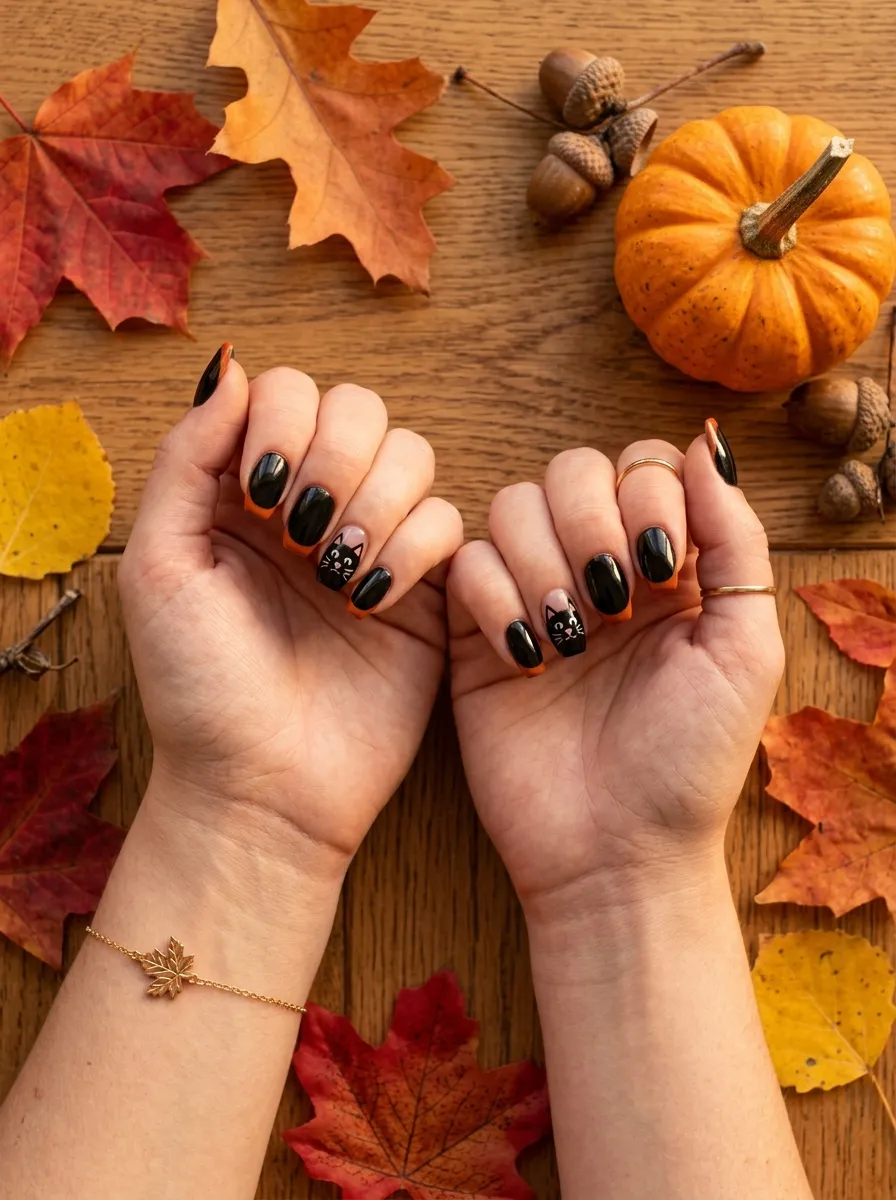
This one leans into the Halloween energy without going full costume.
Paint your nails solid black and add burnt orange tips using a thin angled brush or French tip guides. The orange-on-black reverse French tip is striking and seasonal.
On one or two accent nails, paint a simple cat face: two white dots for eyes, a tiny triangle nose, and three thin lines on each side for whiskers. You don’t need to be an artist — keep it minimal and it reads as intentional.
Timing tip: Do this design the week before Halloween and wear it through the holiday weekend. It photographs beautifully and gets tons of compliments.
Use orange glitter polish instead of solid orange if you want a little extra sparkle on the tips.
This is a great design to do with a friend. One person can do the base coats while the other handles the art. Grab some cheap Halloween-themed polishes from the drugstore seasonal section — they’re usually marked down by mid-October.
5. Minimalist Black Cat Line Art
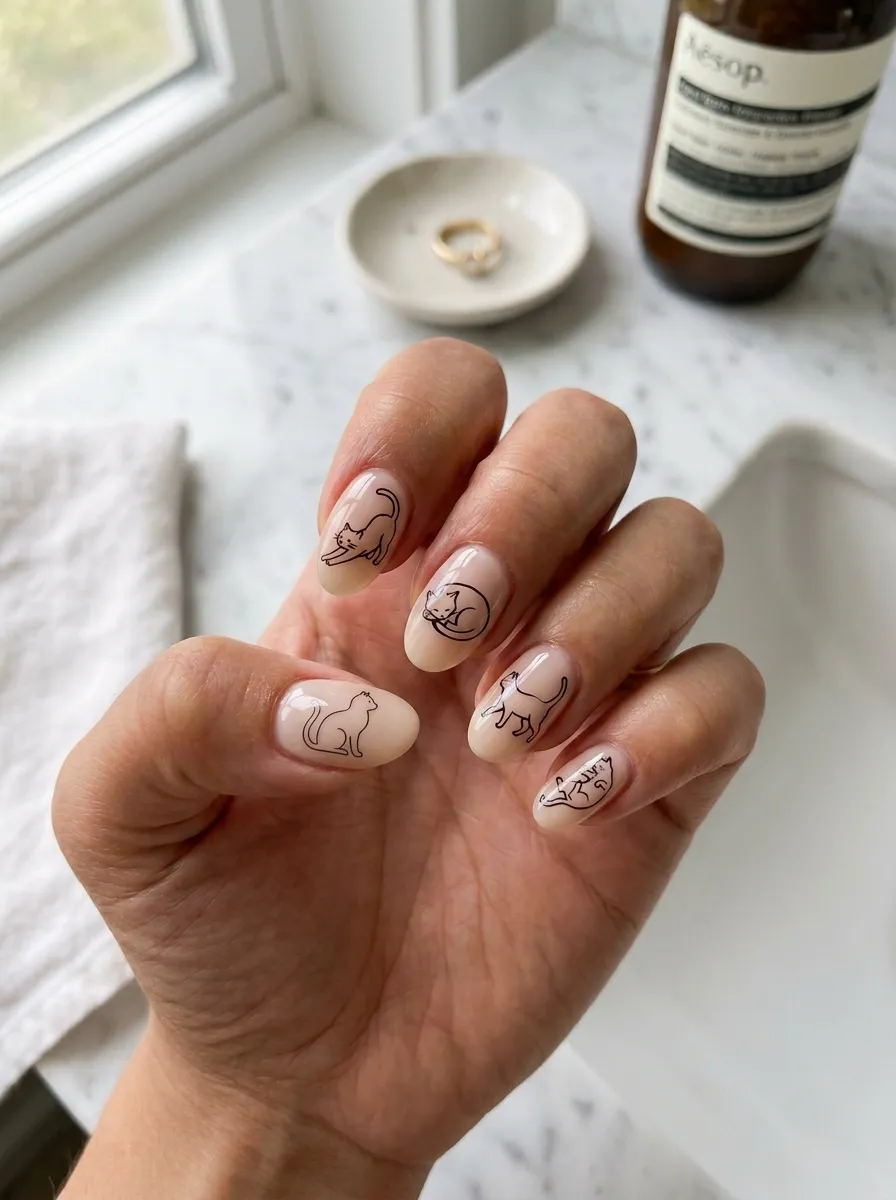
Not everyone wants an all-black nail. This design is for people who love the cat theme but prefer something lighter.
Start with a nude or sheer pink base. Then use a super-fine nail art liner or a thin brush dipped in black acrylic paint to draw minimal cat outlines on each nail.
Think: a cat sitting with its tail wrapped around its body. Just a few curved lines. No fill, no color — just the outline.
The trick is thin lines. Practice on a piece of paper first before applying to your nail. Draw the outline in one slow, confident motion rather than sketching with many short strokes.
This style looks very intentional and modern. It’s the kind of design that makes people look twice because it seems too detailed to be DIY.
Budget option: Buy a black nail art liner pen — they run about $3-$5 and give you the control of a fine-tip marker directly on your nail.
Finish with a matte topcoat to give the whole look a clean, illustration-like finish. This pairs great with casual or office-appropriate outfits.
6. All-Black with a Single Glitter Cat Paw Print
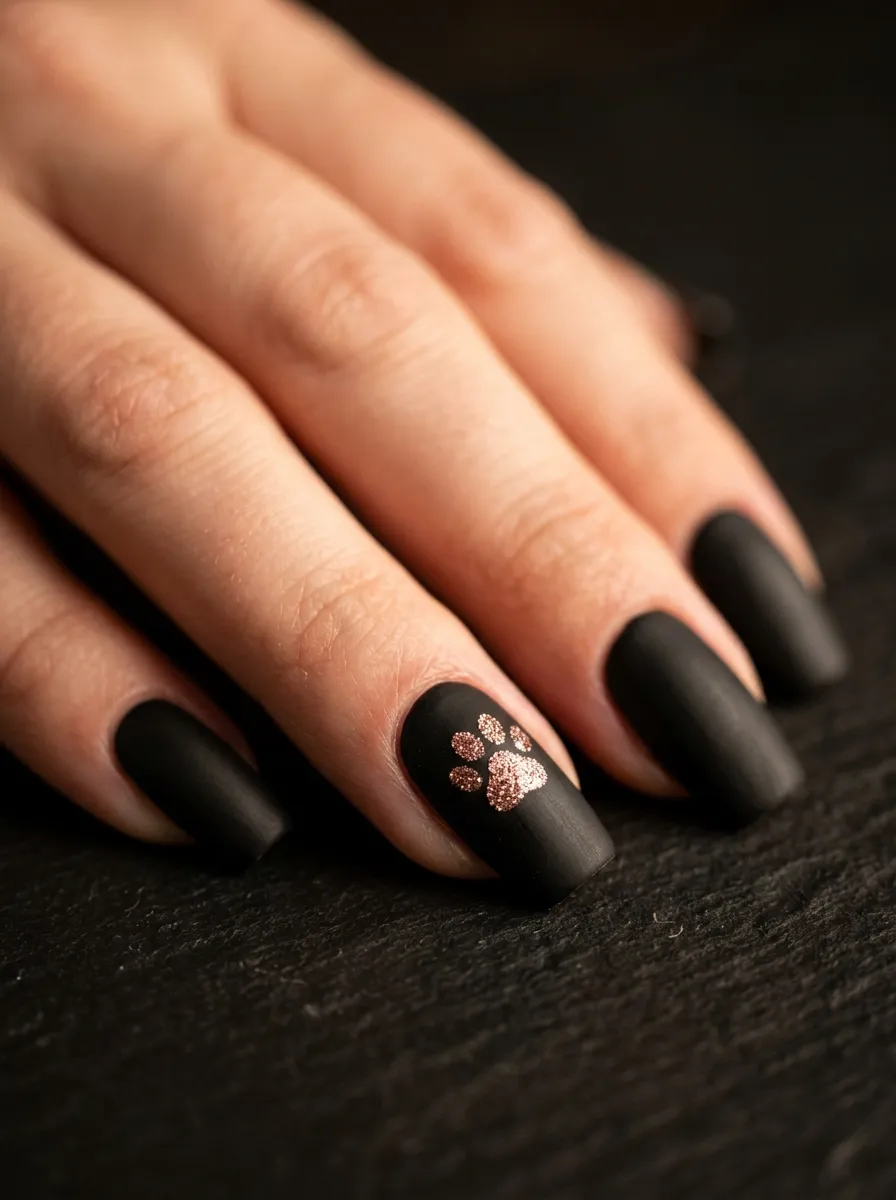
A paw print is the gentler, more subtle cousin of the full cat face — and it lands just as well.
Paint all nails matte black. On your ring finger or thumb, use a dotting tool with rose gold or holographic glitter polish to stamp a tiny paw print. One large circle for the pad, four smaller circles above it.
That’s it. The contrast between the matte black and the metallic glitter is genuinely beautiful.
Dotting tool tip: A bobby pin or the end of a pencil eraser works just as well as a store-bought dotting tool. Dip, dot, lift — repeat.
Use a quick-dry topcoat only over the base nails to preserve the matte finish, and a glossy topcoat on just the paw print finger to make the glitter pop.
This is a great everyday nail for cat lovers who want something personal and wearable at the same time. It’s subtle enough for an office but personal enough to feel like a statement.
Cost for this entire look: under $10 if you’re shopping at a dollar store or drugstore.
7. Spooky Black Cat Galaxy Nails
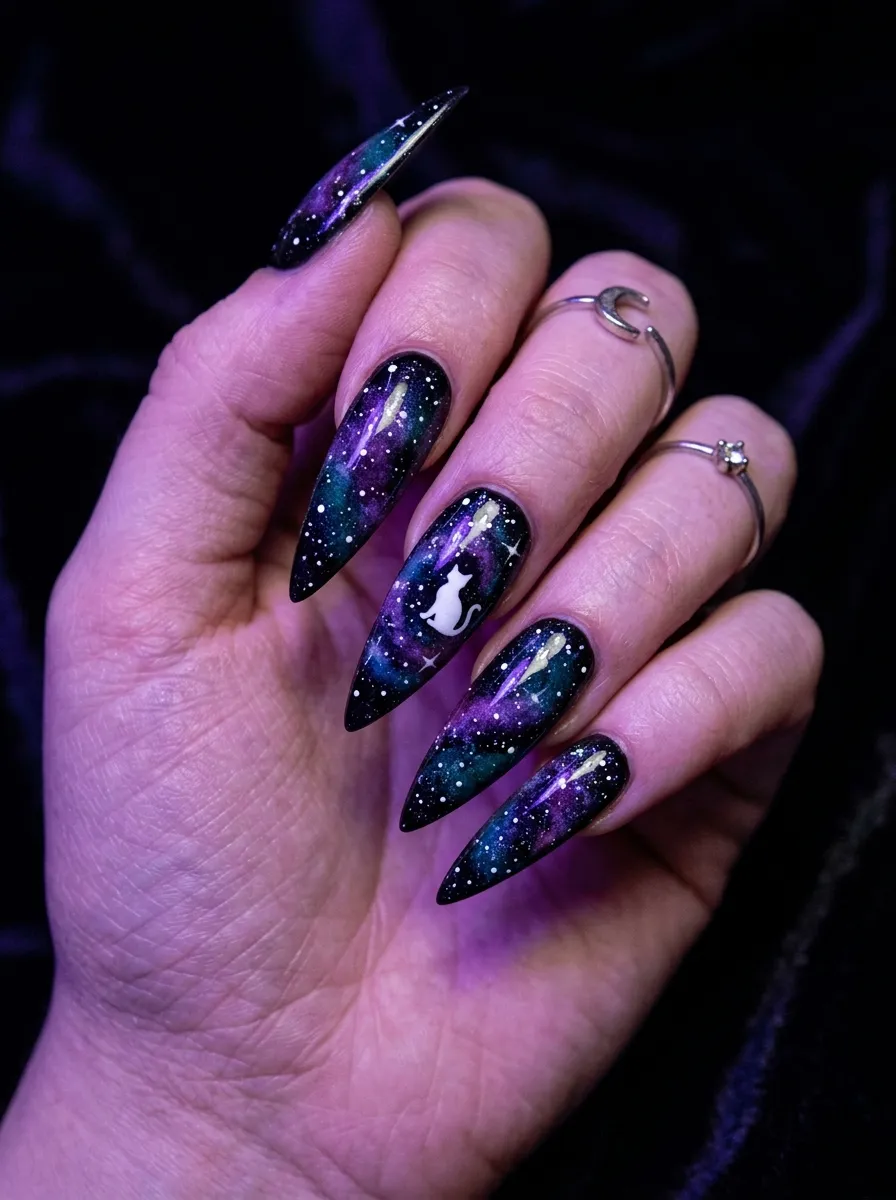
Galaxy nails and black cats were made for each other.
Start with a black base coat. Then use a small makeup sponge to dab on patches of deep purple, navy blue, and dark teal polish. Layer them loosely — don’t blend too smoothly. You want it to look like nebula clouds, not a gradient.
Once that’s dry, use a toothpick or fine brush to dot tiny white stars across the nails randomly.
Add a small white cat silhouette on one accent nail, as if the cat is sitting in the galaxy.
Sponge technique tip: Work fast while the polish is wet for better blending. Apply each color in a different area of the sponge before pressing onto the nail.
Seal everything with a glossy topcoat to deepen the colors and make the stars look like they’re shining.
This design photographs incredibly well. It’s one of those nail looks that almost always goes viral on Pinterest or Instagram when done at home.
Total cost if you’re buying new polish: around $12-$15 for a complete set of colors.
8. Black Cat French Tips
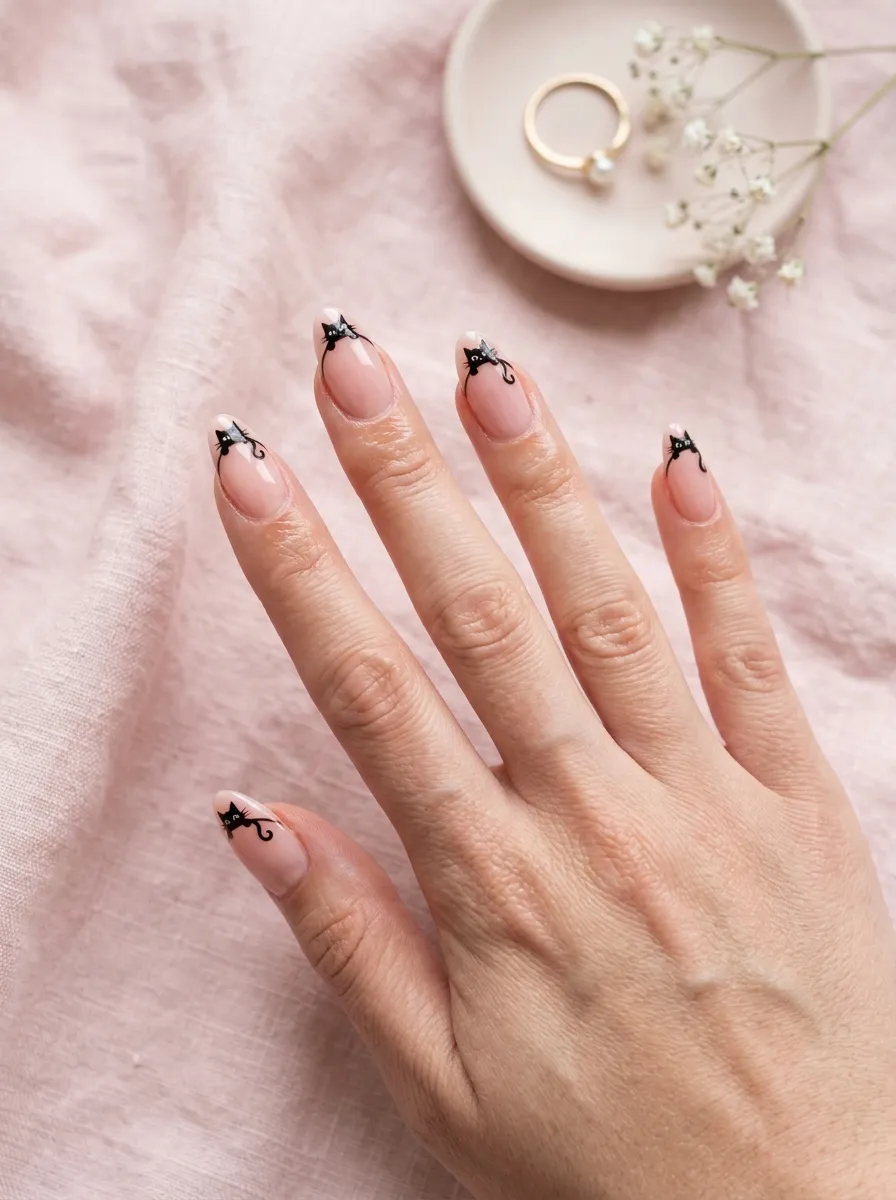
This is a clever twist on the French manicure that cat people will obsess over.
Keep your natural nail or a sheer base as the foundation. Instead of a white tip, use black polish to paint a sitting cat silhouette right at the nail’s free edge.
The cat sits along the smile line — ears and tail extending upward, body tucked at the tip. The result looks like a tiny cat peeking over the edge of your nail.
This requires a steady hand. Use tape to mask off the lower part of your nail while you paint the cat shape if you need clean lines.
Simplification tip: If freehand drawing isn’t your thing, draw the cat body as just a simple curved D-shape with two pointy bumps for ears and a thin curved line as the tail.
Practice the shape a few times on a piece of paper before committing to your nail.
A matte black polish works best here so the detail reads clearly. Top it with a matte or semi-matte top coat to keep the contrast sharp.
This design is genuinely one-of-a-kind and gets compliments every time.
9. Neon Green Eyes on Black Cat Nails
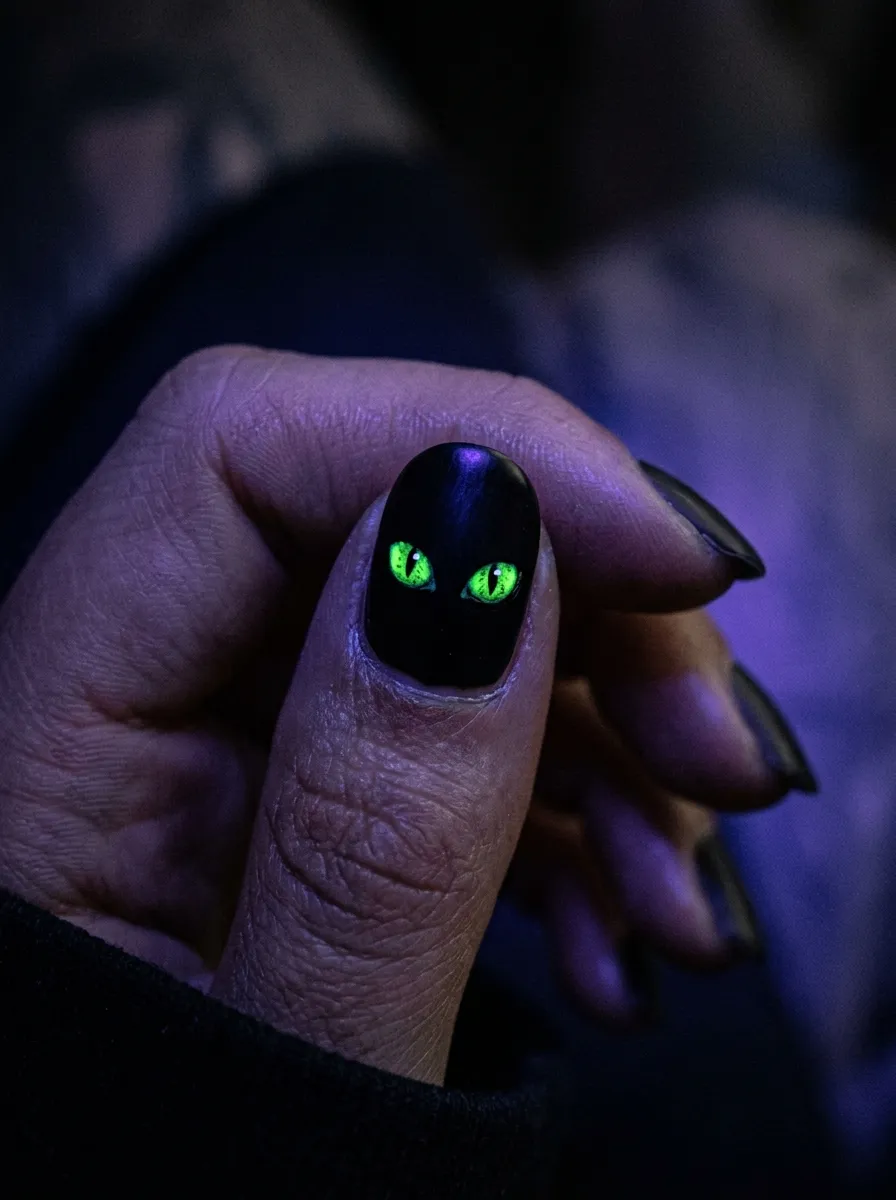
Those glowing green cat eyes are iconic — and you can put them directly on your nails.
Paint a solid black base. On your accent nail, use neon green nail paint or acrylic to add two almond-shaped eyes near the center of the nail. Add a thin vertical black pupil line inside each eye.
The eyes can be as tiny or as large as you want. Tiny eyes look more mysterious. Larger ones have a more cartoon-like, fun energy.
Blacklight hack: Use UV-reactive neon green polish and wear these to a dark party or club. The eyes literally glow. It’s an instant conversation starter.
You can also add a small nose triangle below the eyes in white or pink, and extend a few thin whisker lines with a nail liner.
If drawing two matching almond eyes feels tricky, try this: draw one eye, let it dry, then mirror it on the other side using the first as a reference.
Seal with glossy topcoat to give the eyes a wet, shiny, lifelike finish.
This is one of those designs where the details carry the whole look. Keep everything else simple.
10. Coffin Nails with Embossed Black Cat Texture
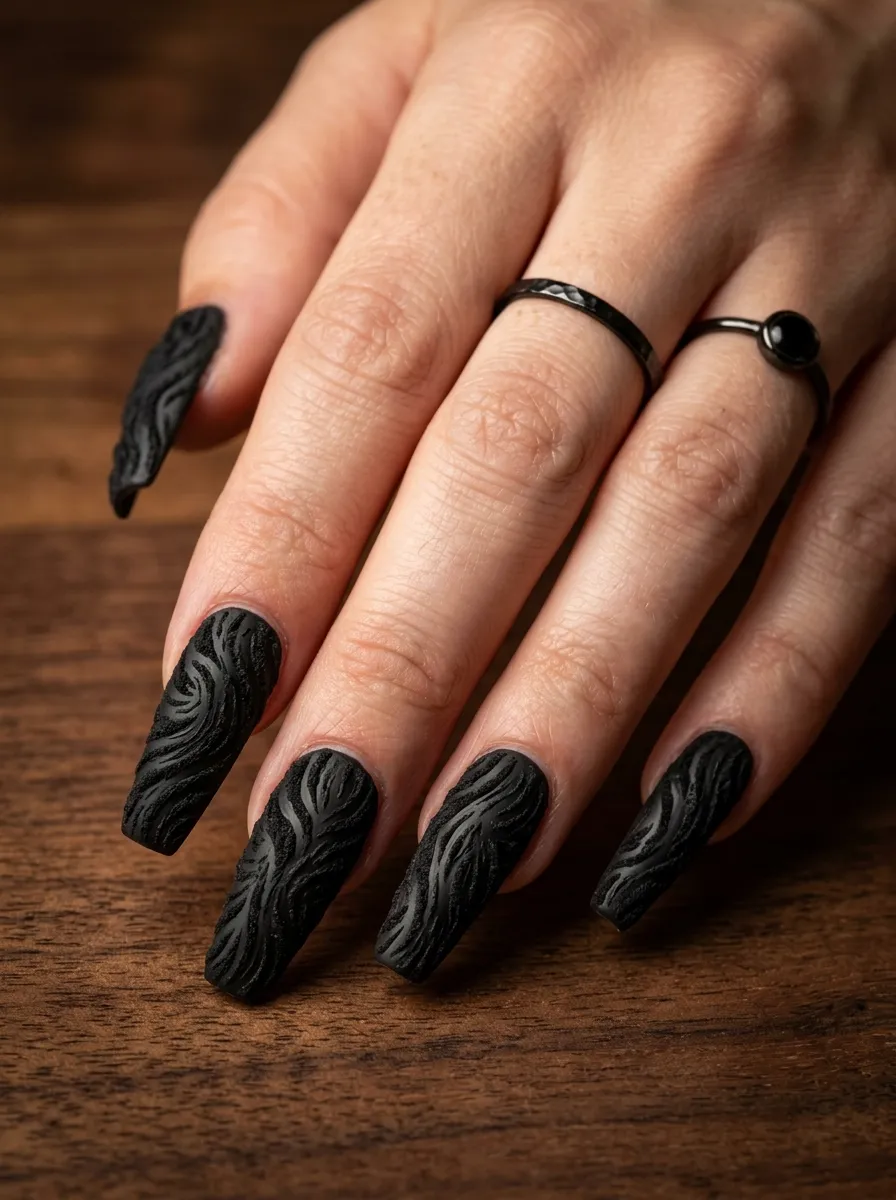
Texture adds a dimension that flat nail art simply can’t replicate.
For this look, apply black textured nail gel or 3D nail art paste over your cured black base. Use a thin brush to stroke vertical and slightly curved lines across each nail to mimic the direction of cat fur.
You can also build raised dots using nail art gel to create a bumpy, tactile surface that looks and feels interesting.
If you want a simpler version, black velvet powder pressed onto tacky topcoat gives a soft, fur-like texture without any sculpting skills.
DIY texture tip: Pat the velvet powder onto tacky top coat using a small brush or your fingertip, then seal with matte top coat.
This look is particularly striking on coffin or square nails because the flat surface gives the texture more space to read clearly.
The design isn’t highly detailed visually, but the tactile quality makes it memorable. People will want to touch your nails — that’s the whole point.
Pair this with simple black clothing and gold jewelry for a coordinated, editorial moment.
11. Starry Night Black Cat Nails
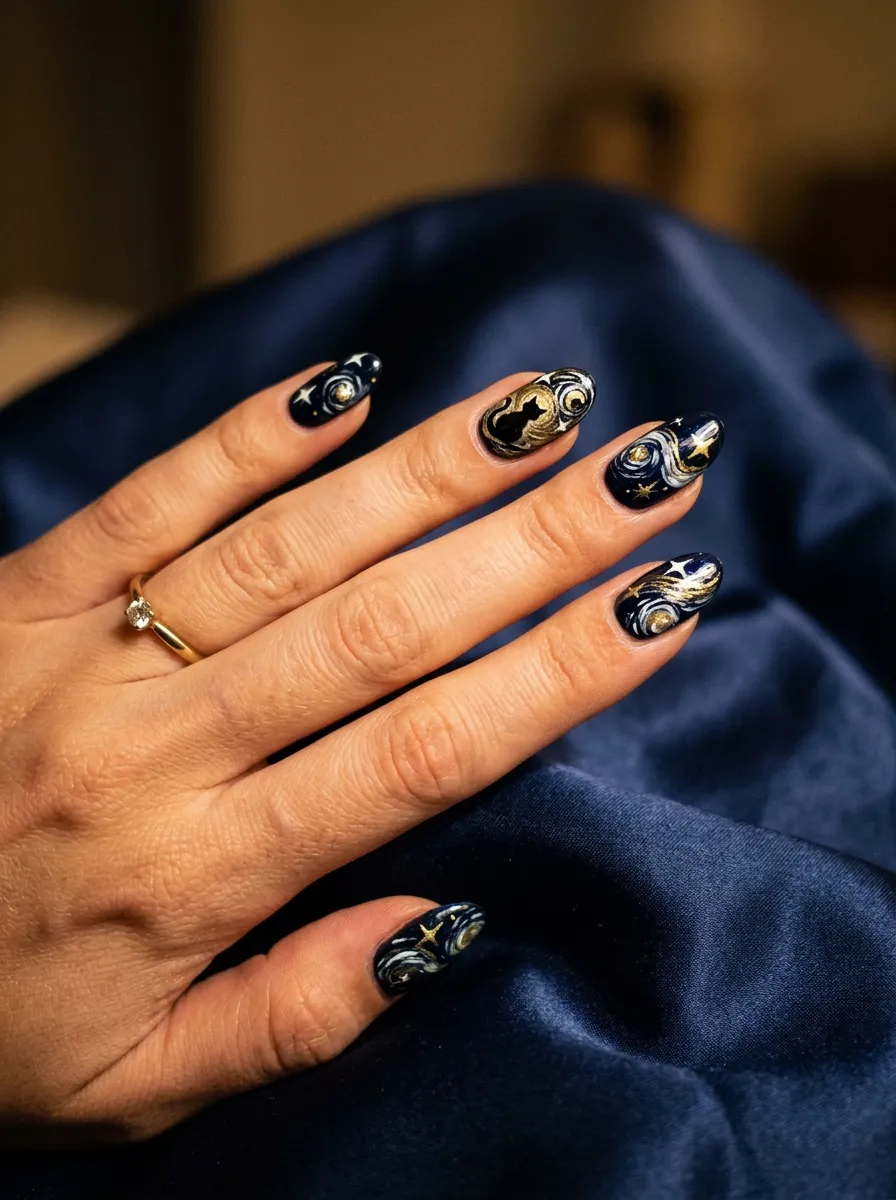
This design takes inspiration from classic art and translates it to your fingertips.
Paint a deep black base. Then use a thin nail brush with white and gold polish to swirl loose, curving brush strokes across each nail — think loose, flowing lines that suggest movement and wind.
Scatter a few small gold or white dots as stars throughout the design.
On the ring fingernail, add a small sitting cat silhouette in solid black against a lighter area of the design so it’s visible.
Artistic tip: Don’t try to copy the painting exactly. Loose, expressive strokes look intentional and beautiful. The goal is mood, not precision.
You can add a single crescent moon in gold on the pinky nail to complete the cosmic story.
This is one of those designs that rewards creativity. Every set comes out slightly different, which makes yours truly unique.
Use a glossy topcoat to deepen the colors and make the swirls look rich and layered.
Total investment: two or three polishes you probably already have, plus one gold nail art liner (around $4 at most beauty supply stores).
12. Black and White Yin-Yang Cat Nails
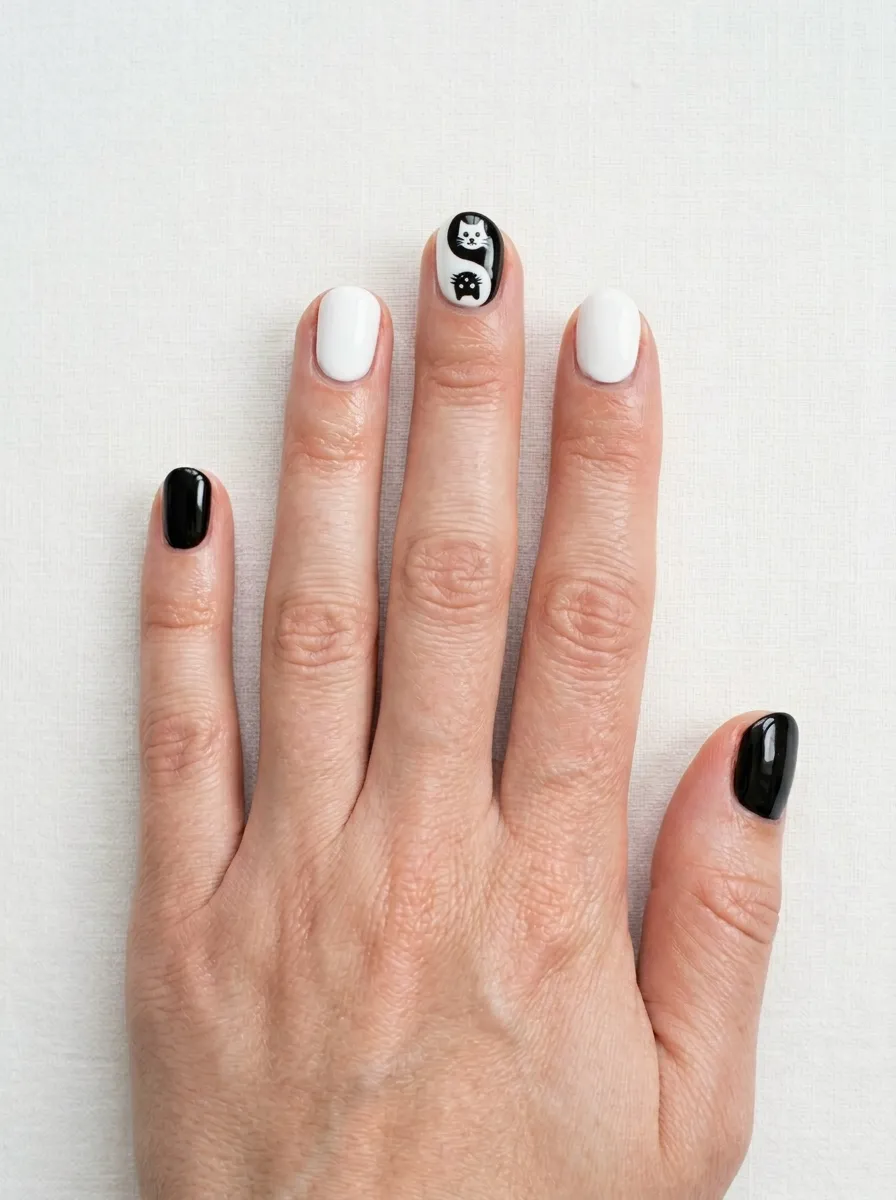
This design plays with balance and contrast — the classic black-and-white pairing looks sharp and graphic.
Paint alternate nails solid black and solid white. On the middle finger, recreate a simplified yin-yang circle. Instead of the traditional dots inside each half, paint a small cat face: one black cat on the white side, one white cat on the black side.
You don’t need to do a perfect circle. Freehand it loosely and use tape or a round sticker as a guide if needed.
Beginner tip: Use a nail stamping plate with a yin-yang design and stamp it in white over black and black over white alternating nails. Add the cat detail by hand.
This design has a clean, graphic quality that works for people who don’t lean heavily into the spooky or mystical aesthetic but still love the cat theme.
Seal with a glossy topcoat to make the black and white really pop against each other.
It works on short and long nails. Short nails actually carry this design especially well because the contrast is visible even on a small surface.
13. Red and Black Cat Femme Fatale Nails
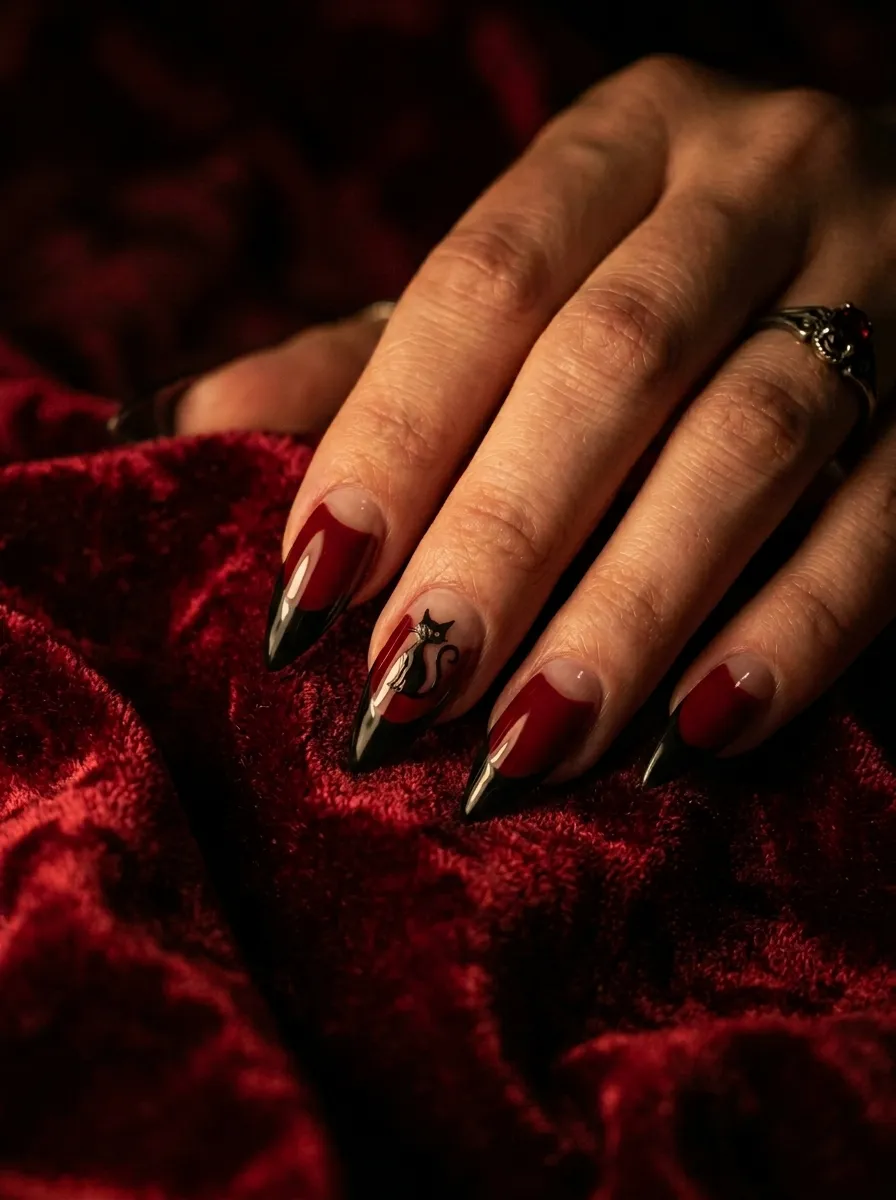
Red and black together read as bold, confident, and slightly dramatic — in the best way.
Start with a deep red base on all nails. Add black tips shaped to look like claws — curved, pointed, slightly elongated at the center. This works especially well on almond or stiletto nail shapes.
On one accent nail, use a thin black nail liner to draw a sleek cat silhouette in the center of the red field.
Color tip: Use a burgundy or oxblood red rather than a bright cherry red for a more sophisticated, gothic result.
You can also reverse the color scheme: black base with deep red cat eyes on two accent nails for a different effect.
This design suits people who want cat nails without the Halloween energy. It’s glamorous and edgy at the same time.
Wear this to a date, a party, or any event where you want your hands to feel like part of your outfit.
Pair with gold or silver jewelry — both work. Gold leans warmer and more theatrical; silver leans cooler and more editorial.
14. Black Cat with a Bow Nails
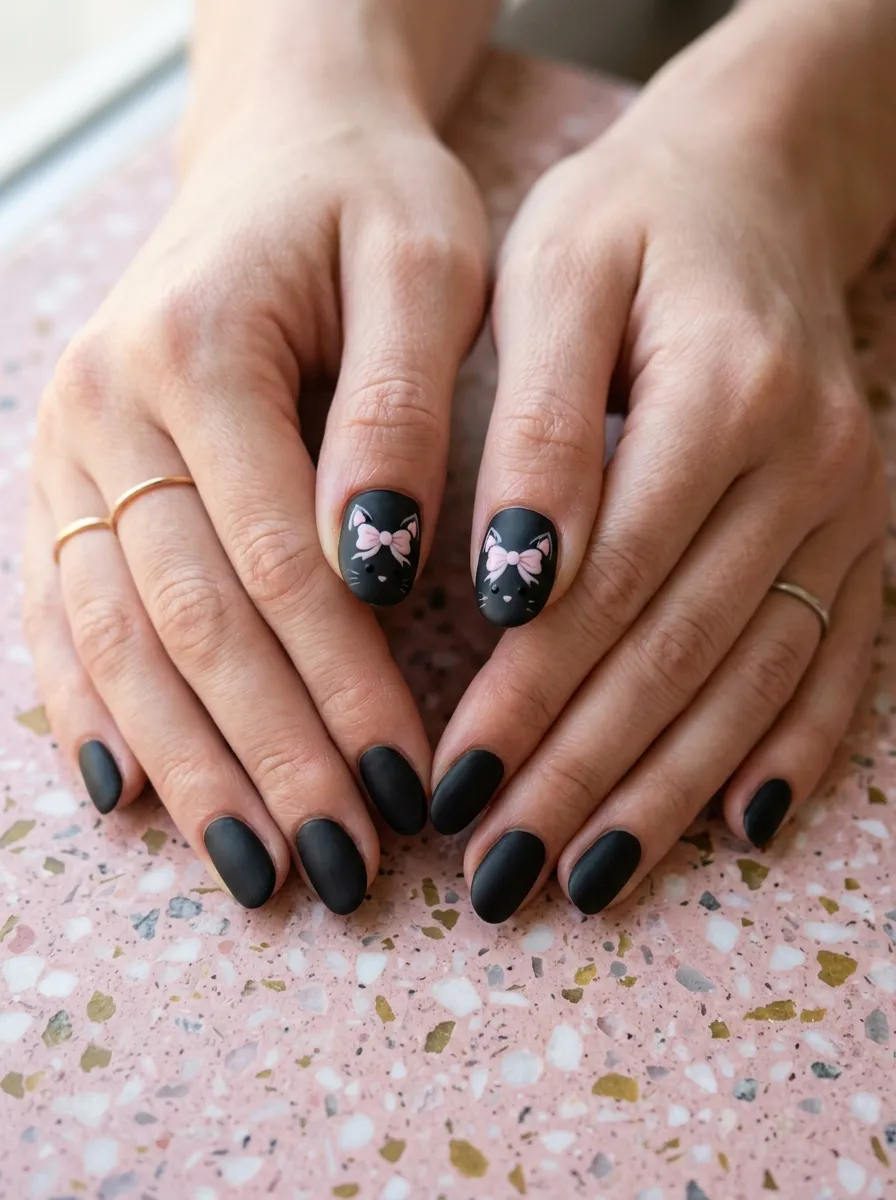
This design is where edgy meets cute and the result is completely irresistible.
Paint your nails matte black. On the accent nails, use pastel pink or red polish to draw a small ribbon bow near the center or top of the nail. Add two small pointed bumps above the bow for cat ears.
It creates the impression of a cat wearing a bow — like Hello Kitty but darker and more personal.
Color variations: Try a red bow for a classic look, lavender for a dreamy mood, or white for maximum contrast against the black.
You can add tiny dots in the bow center using a different color for detail, but it’s honestly not necessary. The simplicity is what makes this design work.
This is a great design for people who usually gravitate toward soft or feminine nail styles but want to try something darker.
It works on short nails especially well — the design is small enough to fit without feeling crowded.
Easy substitution: If drawing a bow freehand feels hard, use a small bow-shaped nail decal and press it onto tacky top coat. Finish with glossy top coat to seal.
15. Black Jelly Cat Nails with Depth Effect
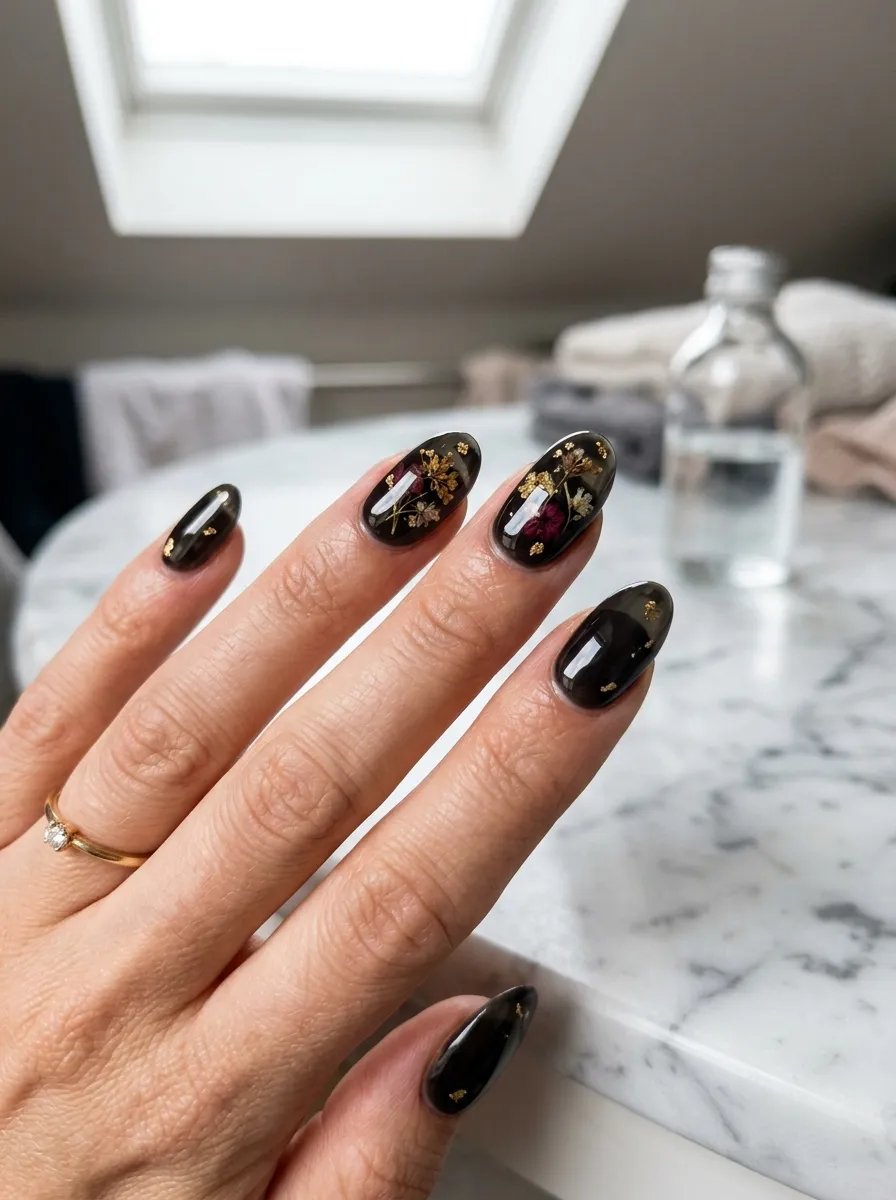
Jelly nails have a see-through, glass-like quality — and in black, they look absolutely otherworldly.
Apply sheer black jelly polish (a semi-transparent formula) in multiple thin layers. Two or three coats build the depth without losing the translucency. Each layer adds darkness but keeps that glassy, dimensional quality.
For extra interest, press a tiny dried flower or gold flake onto the nail between layers before sealing.
Finding jelly polish: Look for terms like “sheer black,” “glass finish,” or “jelly formula” when shopping. Many gel brands carry these. Regular polish options are fewer but exist.
This design doesn’t require any nail art skill. The visual interest comes entirely from the polish formula and the layering technique.
A high-gloss topcoat is non-negotiable here — it amplifies the glass effect and gives the nails an almost wet appearance.
This is a great look for people who want something visually impressive without doing any freehand drawing.
The embedded elements — flowers, flakes, tiny stars — look like they’re floating inside the nail. People genuinely stop and stare.
16. Black Cat Stamped Nails with Full Pattern
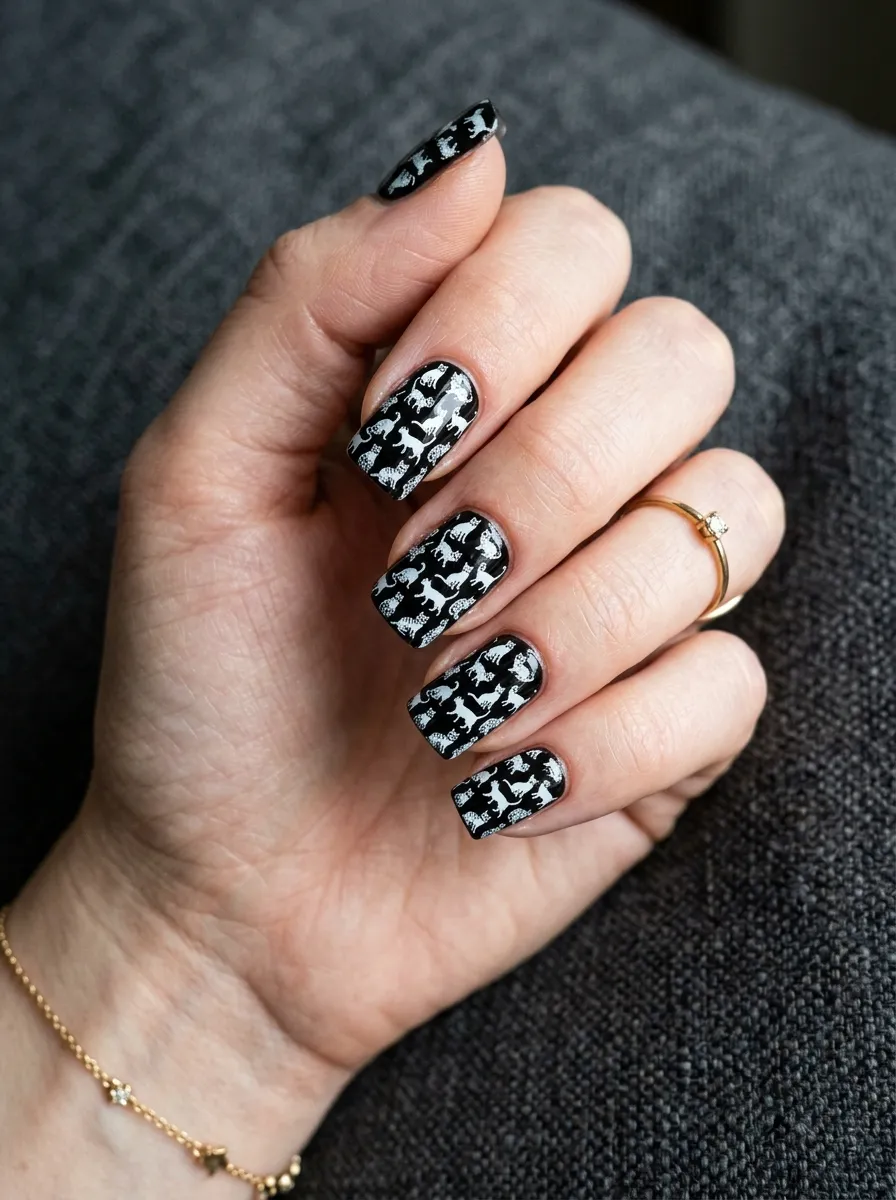
Nail stamping is one of the best DIY techniques for getting crisp, repeatable nail art at home.
Buy a nail stamping kit that includes a cat-themed plate. These kits usually cost $10-$15 and come with a scraper, stamper, and multiple design plates.
Apply white or silver stamping polish (regular polish is too thin) to the design on the plate. Scrape off the excess. Roll your stamper over the plate to pick up the image, then press firmly onto your black-painted nail.
The result is a crisp, printed-looking pattern of tiny cats across every nail.
Common mistake to avoid: Don’t press the stamper — roll it. Rolling picks up the design cleanly without smearing.
You can stamp the same design on every nail for a pattern look, or pick different cat poses from the plate for each finger.
Clean the plate between uses with a lint roller or clear tape to keep the designs sharp.
This technique produces nail art that genuinely looks professional. It’s one of the easiest ways to get impressive nail art at home without artistic skill.
Seal with a quick-dry glossy topcoat and you’re done in under 30 minutes.
17. Tortoiseshell Black Cat Nails
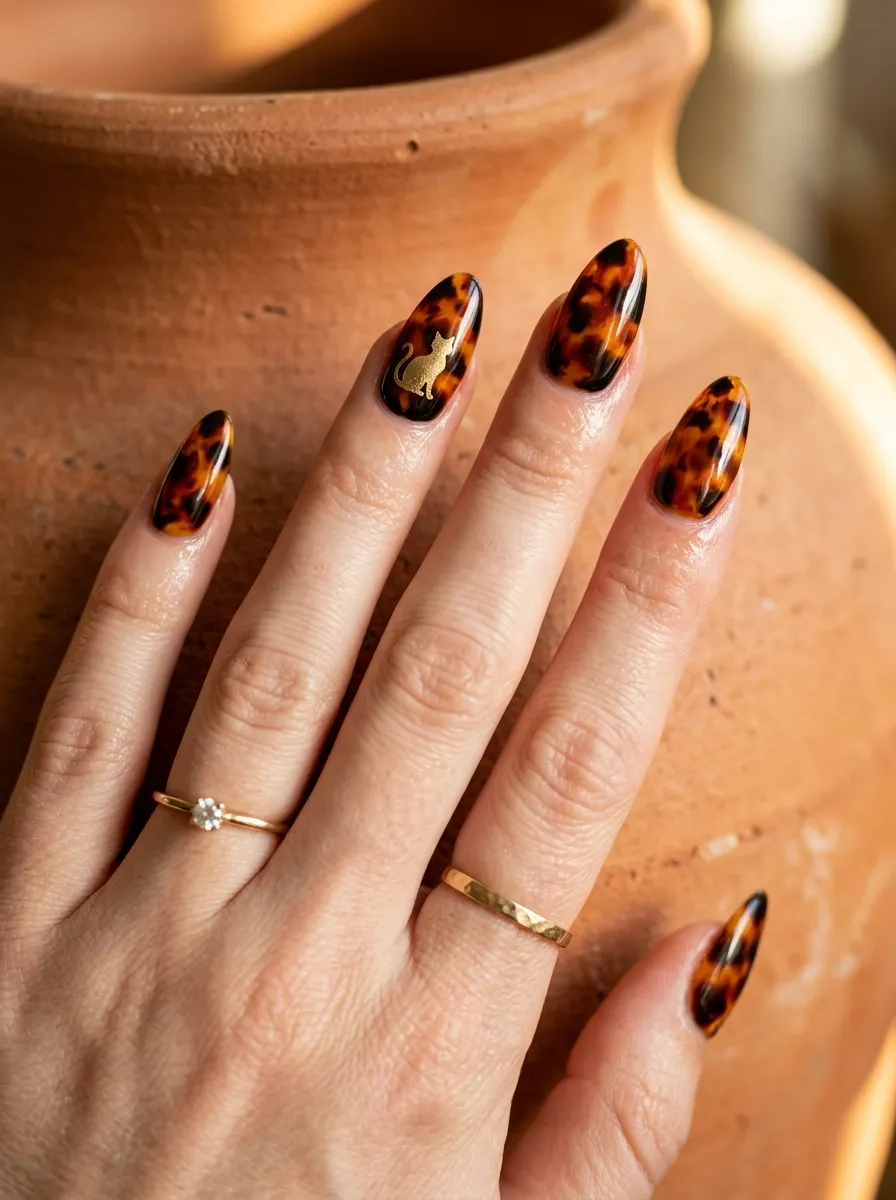
Tortoiseshell is a pattern that exists in nature on actual cat fur, which makes it perfectly on-theme here.
Paint a black base. While it’s still slightly tacky, use a small brush to dab on amber, burnt orange, warm brown, and honey colored polish in overlapping patches. Don’t blend fully — the splotchy, irregular look is what makes tortoiseshell read correctly.
Add thin black veining between the color patches with a nail liner while wet.
On one accent nail, skip the pattern and instead paint a simple cat silhouette in gold over the black base.
Beginner adjustment: If layering multiple colors feels complicated, use one amber polish over black in an irregular pattern and call it a day. It still reads as tortoiseshell.
This design is warm-toned and interesting — it’s one of those looks that photographs beautifully under natural light.
It doesn’t look overtly themed or costume-y, so it works well outside of Halloween.
Use a glossy topcoat to deepen all the amber and brown tones, which creates a rich, jewel-like finish.
18. Gothic Black Cat with Silver Spider Web Accent
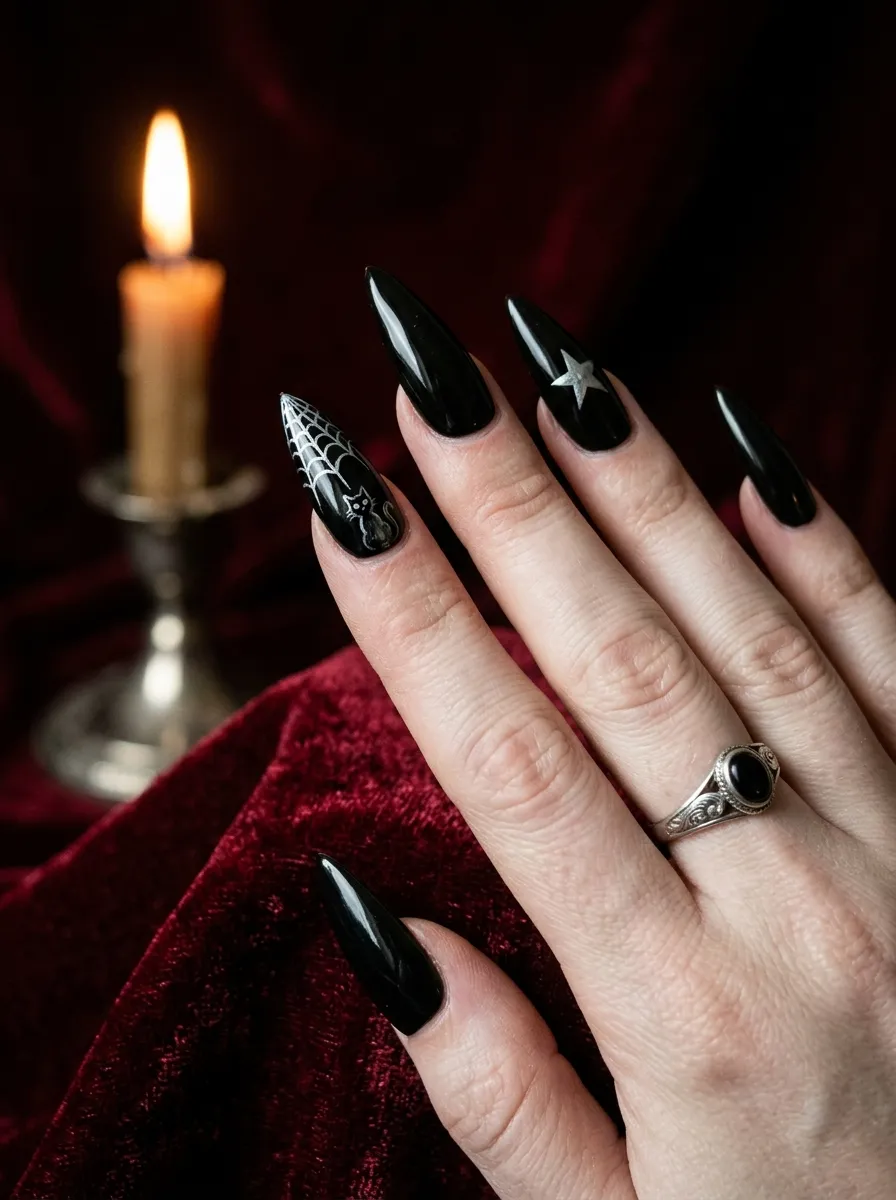
This design is for the people who want their nails to match a maximalist gothic aesthetic.
Start with high-gloss black polish on all nails. On the accent nail, use a thin silver nail art liner to draw a spider web starting from one corner. Pull thin lines outward from a central point, then connect them with curved arcs.
Below or inside the web, draw a tiny black cat silhouette — sitting, looking up. It tells a little visual story.
On another nail, add a single silver star near the tip. Keep the remaining nails plain black so the art nails stand out.
Spider web shortcut: Use a nail art stamping plate with a spider web design and stamp it in silver. Much faster, and perfectly even.
This look works especially well on long stiletto or coffin nails where the pointed shape adds to the gothic feeling.
Pair with dark eyeshadow and silver jewelry for a full coordinated look.
Budget note: A silver nail art liner pen costs around $3-$5 at most beauty supply stores and lasts for many uses.
19. Black Cat Mixed Media Nails (Stickers + Polish)
You don’t need to paint anything freehand to have stunning cat nails. This design is entirely sticker-based.
Paint your nails matte black. Apply the topcoat, let it get 80% dry — still slightly tacky — then press on black cat nail stickers or decals.
Mix different designs: a full cat silhouette on one nail, paw prints on another, crescent moons, stars, tiny cat faces. Create a collage effect across all ten fingers.
Where to find stickers: Search “black cat nail decals” on Amazon or Etsy. You’ll find full sets for $3-$8 that come with dozens of designs.
Once your stickers are placed, seal everything with a glossy top coat to lock them in and smooth the edges so they don’t peel.
Nail stickers typically last 5-7 days without chipping if sealed properly.
This approach is excellent for beginners, kids’ nails, or anyone who wants cat nail art without spending time on drawing.
The layered, mixed-design approach looks intentional and artsy — not lazy at all. Placement and variety are the keys to making it work well.
20. Black Cat Marble Nails

Marble and black make a pairing that’s simultaneously dramatic and sophisticated.
Start with a black or very dark gray base. While it’s wet, use a thin brush or a piece of plastic wrap to press and pull light gray or white streaks across the nail in angular, irregular directions.
Real marble veins aren’t perfectly straight — let yours meander slightly. Pull the streaks with a feathering motion at the edges.
On one accent nail, paint a white cat silhouette over the marble pattern before sealing.
Plastic wrap technique: Crinkle a small piece of plastic wrap, press it lightly into wet white polish on a palette, then dab it onto the nail. The random texture mimics marble naturally.
Use a semi-glossy topcoat rather than ultra-glossy for a more stone-like finish.
This design scales to any nail length and shape. It works especially well on square or oval nails where the marble pattern has enough space to read clearly.
The cat silhouette is the subtle detail that ties the design to the theme without screaming it.
21. Holographic Black Cat Nail Ideas
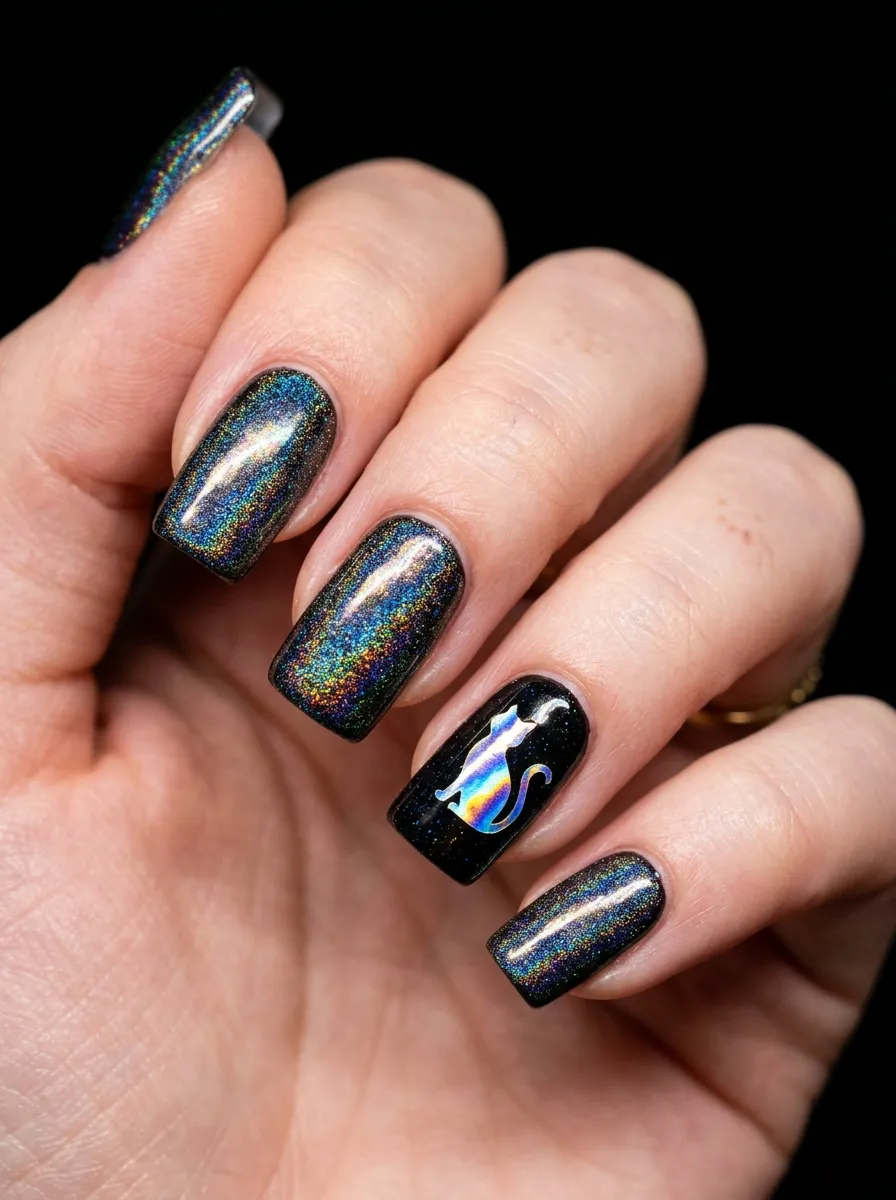
Holographic polish is the most fun finish in nail care — and it looks completely wild against black.
Apply a solid black base. Once cured and dry, apply a holographic topcoat over all nails. In sunlight or direct light, the rainbow dispersion activates and the nails shift through every color of the spectrum.
The black base makes the holographic effect look more intense and dimensional compared to lighter bases.
On your accent nail, press a holo foil cut into a cat shape while the topcoat is still tacky. You can cut the foil with a nail-sized cat stencil and small scissors.
Affordable holographic topcoats: Glisten & Glow HK Girl, or Beauty Bakerie Holographic Top Coat both work well over regular polish.
This is the kind of nail look that people photograph immediately when they see it. The rainbow shimmer is genuinely hypnotic in motion.
Wear these on a sunny day for maximum impact — the holographic effect disappears in low light, which makes wearing them in different environments a surprisingly different experience.
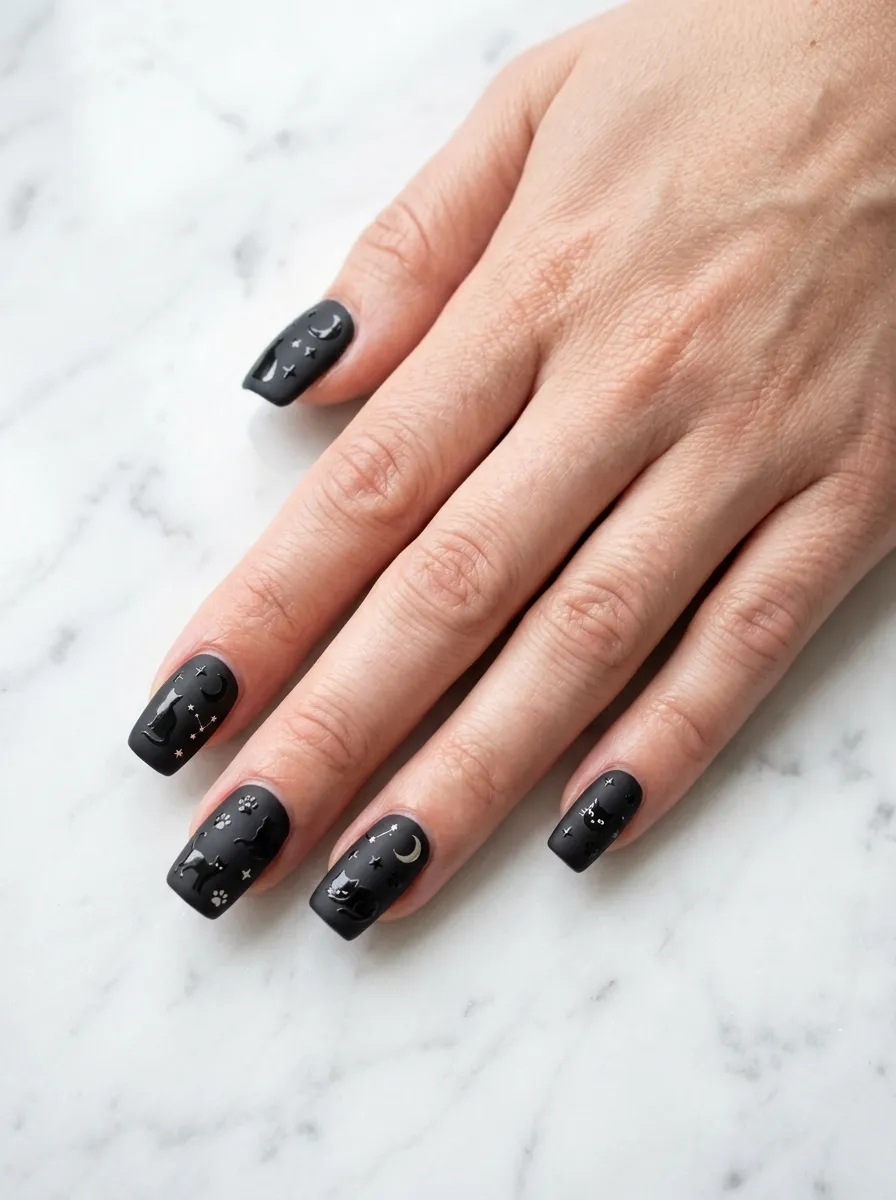
22. Celestial Black Cat Nails with Tarot Card Energy
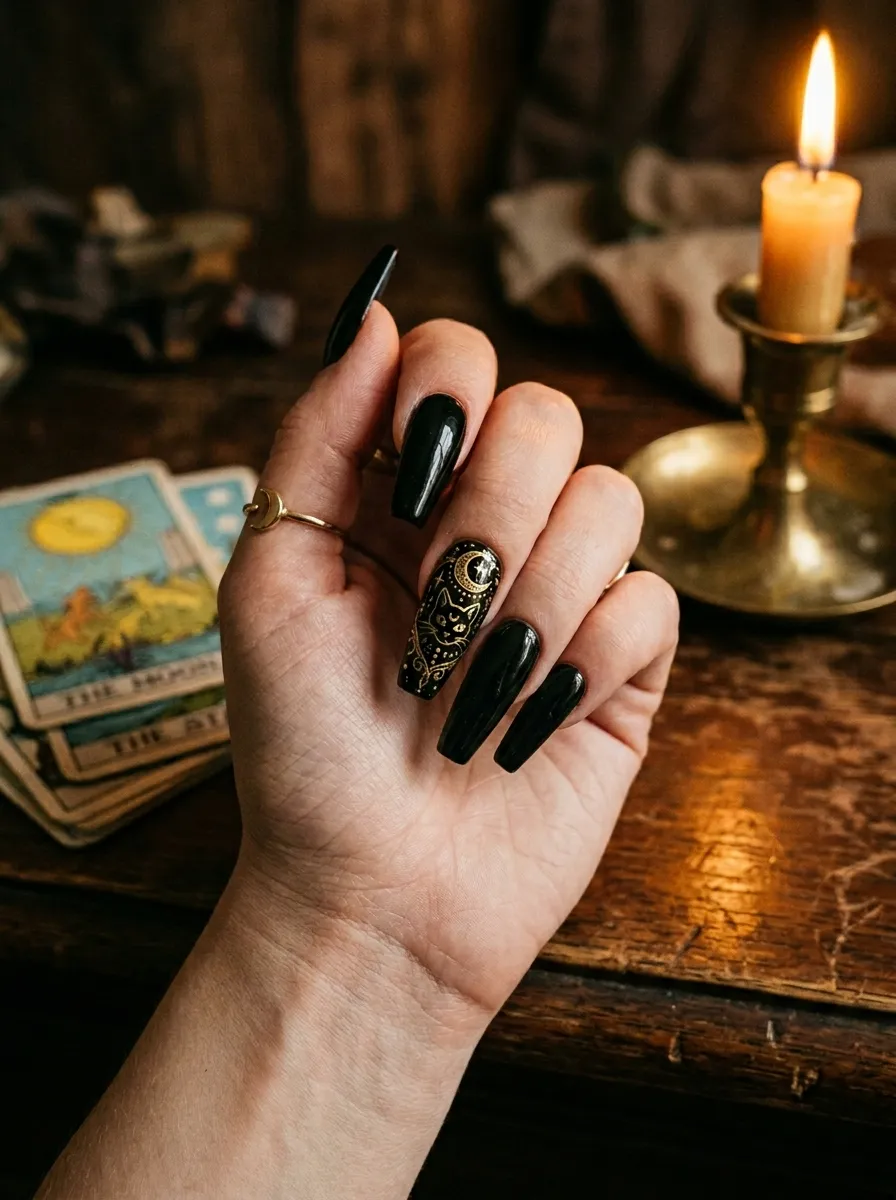
[Image Prompt: Close-up of a hand with long coffin nails painted black, one nail featuring a hand-painted detailed tarot-style illustration of a black cat sitting under a crescent moon surrounded by tiny stars, done in fine gold lines on the black base. Shot on antique wooden surface next to tarot cards slightly out of focus, candlelight, DSLR, warm golden moody tones.]
This design takes clear inspiration from tarot card aesthetics — mysterious, symbolic, and visually rich.
Paint a black base on all nails. On the accent nail, use a gold nail art liner to draw a detailed scene: a sitting cat beneath a crescent moon, surrounded by dots of stars, possibly a sun symbol or astrological glyph nearby.
Work slowly. Let each element dry before adding the next.
Simplification option: If the full scene feels like too much, just draw the cat and moon. Two elements drawn well outperform five elements rushed.
The remaining nails can feature simple gold celestial symbols: a small sun on one, a star on another, a moon phase on the next. This creates a coordinated set where the accent nail is the story and the other nails are supporting details.
Use real gold foil accents pressed onto tacky topcoat for easy metallic details that don’t require painting skill.
This design is meaningful and personal — it can represent beliefs, aesthetics, or just a love for all things cosmic. It’s one of those nail sets that feels like it belongs specifically to you.
Conclusion
Black cat nails are one of the most adaptable nail themes out there. You can go completely minimal with a single cat silhouette on an accent nail, or go all-in with holographic finishes, galaxy designs, and tarot-inspired art. The range covers every skill level — from sticker-based looks that take 15 minutes to intricate freehand designs that become a genuine creative practice.
Most of these looks cost under $15 to recreate at home. A steady hand, a thin brush, and a willingness to try are genuinely all you need.
Pick one design that fits your current skill level and try it this week. Once you see how manageable nail art is with the right approach, you’ll naturally want to try more. Start with the easiest look on the list, build confidence, then work toward the more detailed designs. Your nails are a small canvas — and black cats make for some of the most striking art you can wear.