Halloween nails have come a long way from simple black polish and spider stickers. Scarecrow nail ideas sit in the sweetest spot between spooky and adorable, giving you a look that is festive without being too scary and cute without being too safe. Think patchwork patterns, stitched details, straw tips, burlap textures, autumn color palettes, and hand-painted scarecrow faces that fit on a single nail. Whether you are heading to a Halloween party, a fall festival, or just want something fun for October, scarecrow nails are one of the most creative and wearable seasonal nail trends around. These ideas cover every skill level and budget, from simple stamped designs to detailed hand-painted artwork, so there is something here no matter where you are on your nail art journey. If you’re also exploring Friday the 13th nail ideas, dark horror-inspired themes like blood drips, eerie symbols, and bold black accents can help create dramatic, spooky manicures that feel perfect for the occasion.
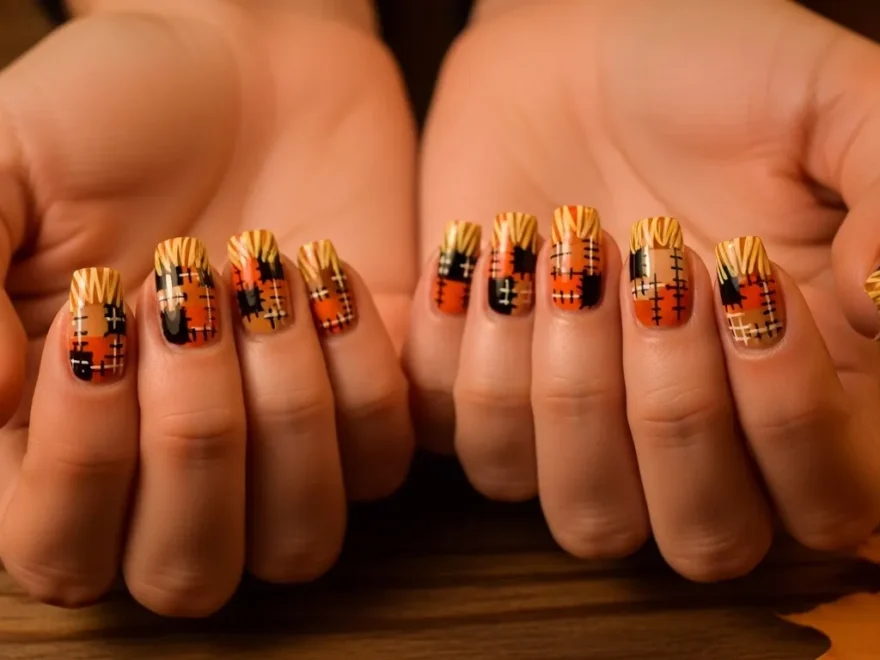
The Classic Patchwork Plaid Scarecrow Nails
Patchwork plaid is the most recognizable element of any scarecrow costume. Translating it onto nails creates an instantly recognizable Halloween look.
Each nail gets its own plaid square pattern. Use a thin nail art brush to draw a grid of lines over a solid base color.
Start with a warm tan or burnt orange base coat. Let it dry completely before adding the plaid lines on top. This gives you a clean surface to work on.
Use a thin striping brush dipped in dark brown or black polish to draw horizontal and vertical lines across each nail. Space them unevenly for a handmade, imperfect look that mimics real patchwork fabric.
Add a second set of lines in a contrasting color like deep red or olive green going in the same direction as the first set but offset slightly. This layering creates the classic plaid pattern.
Finish with a matte top coat. Plaid patterns always read more authentically when they have a fabric-like matte finish rather than a shiny gloss.
A thin nail art brush set costs three to eight dollars at any beauty supply store or online. Combined with a few fall-toned polishes you may already own, this design costs almost nothing extra.
The imperfect lines are part of the charm. Scarecrow patchwork is meant to look hand-stitched and slightly uneven, so do not stress about keeping every line perfectly straight.
Stitched Seam Detail Nails
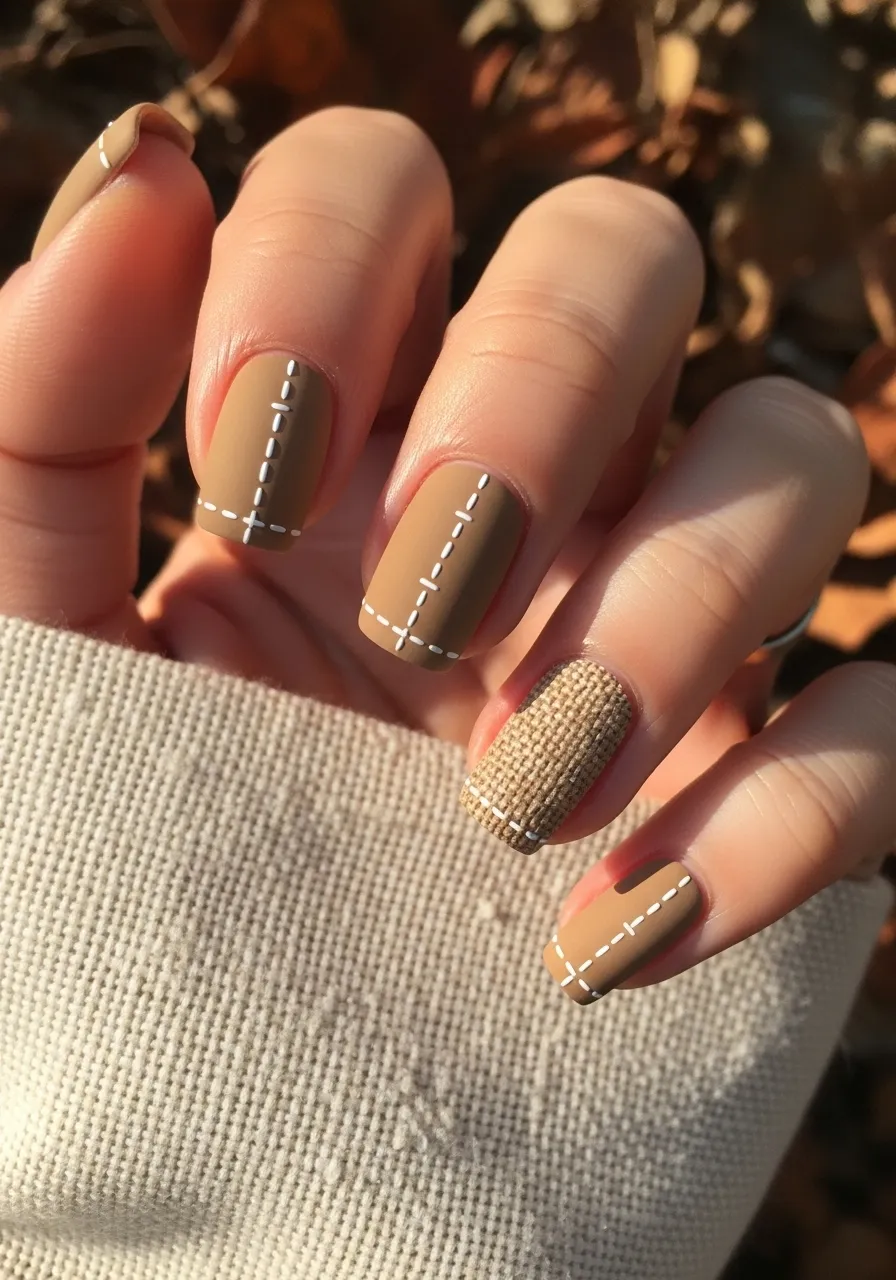
Stitched seam details are one of the most effective scarecrow nail techniques because they look complicated but are surprisingly simple to execute.
The concept is to mimic the look of thread and needle stitching using small dashes of white or cream polish along the edges and across the center of each nail.
Use a dotting tool or the tip of a thin brush to create small, evenly spaced dashes. These represent the stitches holding the patchwork pieces together.
Start by painting your nails in a warm base color. Burlap tan, burnt sienna, or pale mustard all work beautifully as backgrounds for stitch details.
Once the base is dry, dip your thin brush into white or off-white polish and draw a line of small dashes along the outer edge of each nail. Add another line of dashes across the center of the nail horizontally to divide it into two sections.
Finish with a matte top coat to give the whole design a fabric-like quality.
You can combine this technique with the plaid design from the previous idea. Paint half the nail plaid and add stitch lines where the two sections would meet. This layering creates a genuinely detailed and impressive scarecrow effect.
Practice the dash technique on paper before doing it on your nails. Getting the pressure and spacing right takes about two minutes of practice.
Straw Tip French Nails
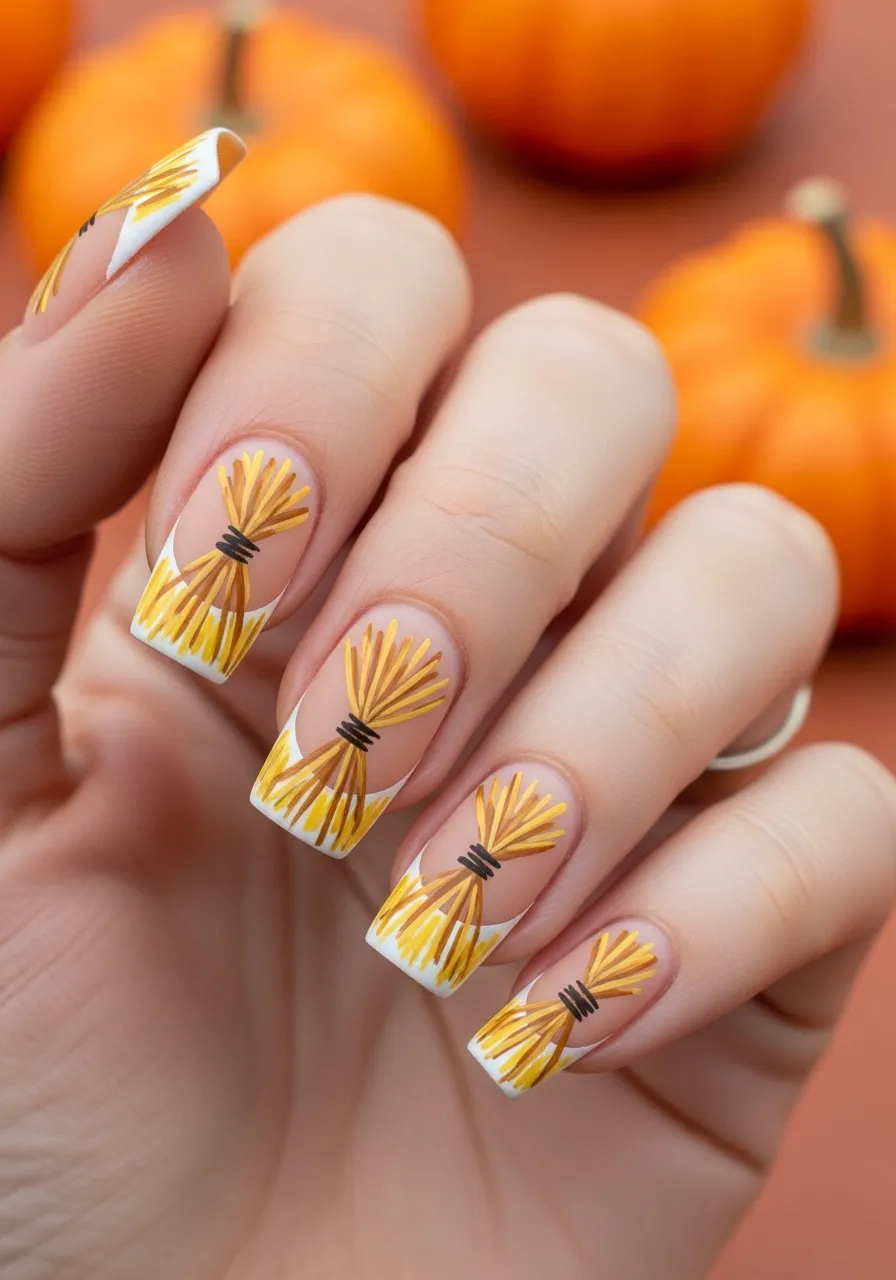
The French manicure gets a scarecrow makeover when you replace the clean white tip with a jagged, straw-inspired golden tip.
The concept mimics straw poking out from the sleeves and hat of a scarecrow. Applied to nails, it creates a unique and instantly recognizable seasonal detail.
Paint your nails with a natural, skin-toned or pale tan base. This mimics the look of fabric underneath the straw.
For the tips, use a thin brush loaded with golden yellow polish. Instead of painting a clean curve, drag irregular upward strokes from the tip line toward the nail. Make some strokes longer and some shorter to create the look of individual straw pieces.
Add a darker amber or brown color in thin strokes over the gold for depth and shadow between the straw pieces. This layering makes the straw look three-dimensional rather than flat.
You can also use a fan brush for this technique. The natural spread of the bristles creates several lines at once and speeds up the process significantly.
A matte top coat locks in the design and completes the dry, hay-like quality of the straw tips.
This nail idea photographs exceptionally well because of the texture and movement in each tip. It is also one of the more beginner-friendly designs on this list because imperfection is the whole point.
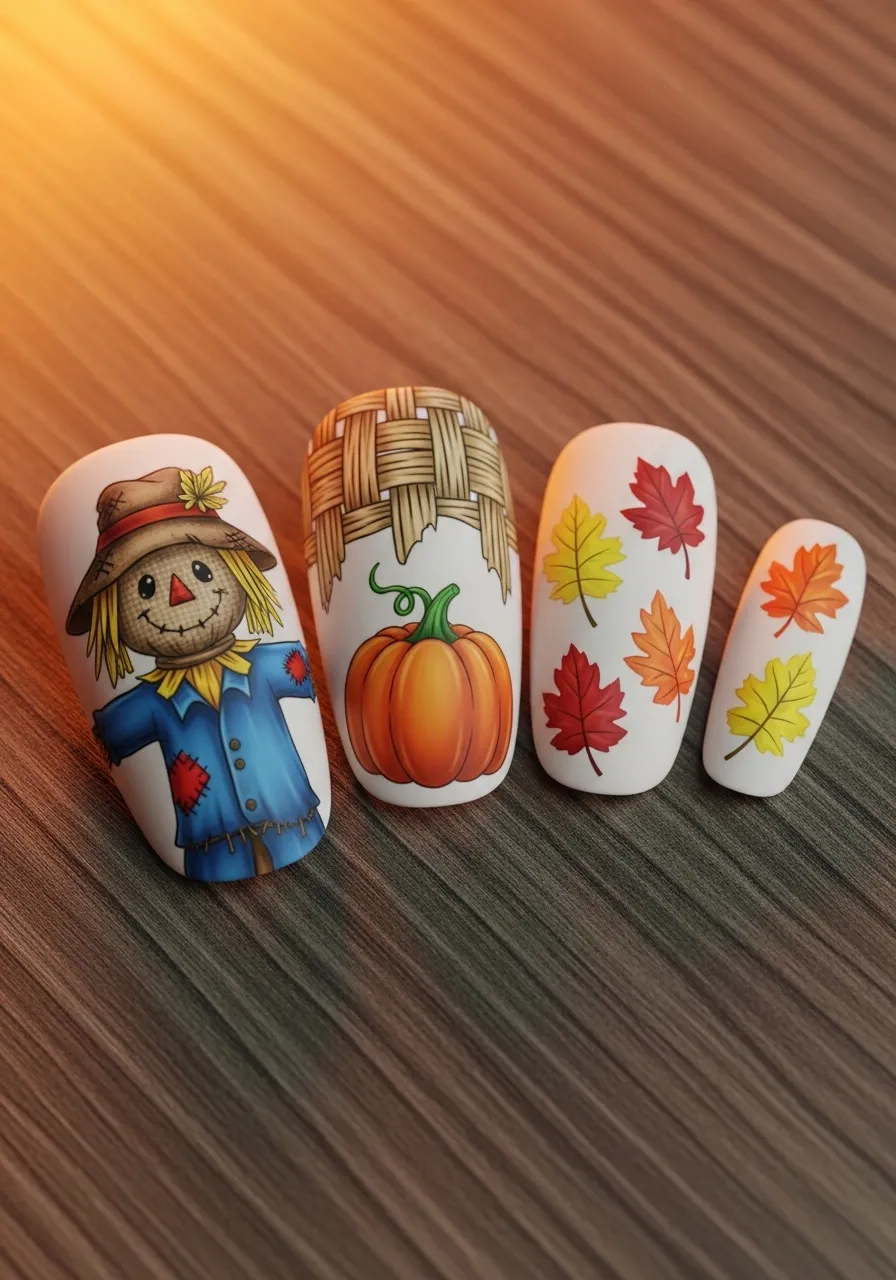
Mini Scarecrow Face Accent Nail
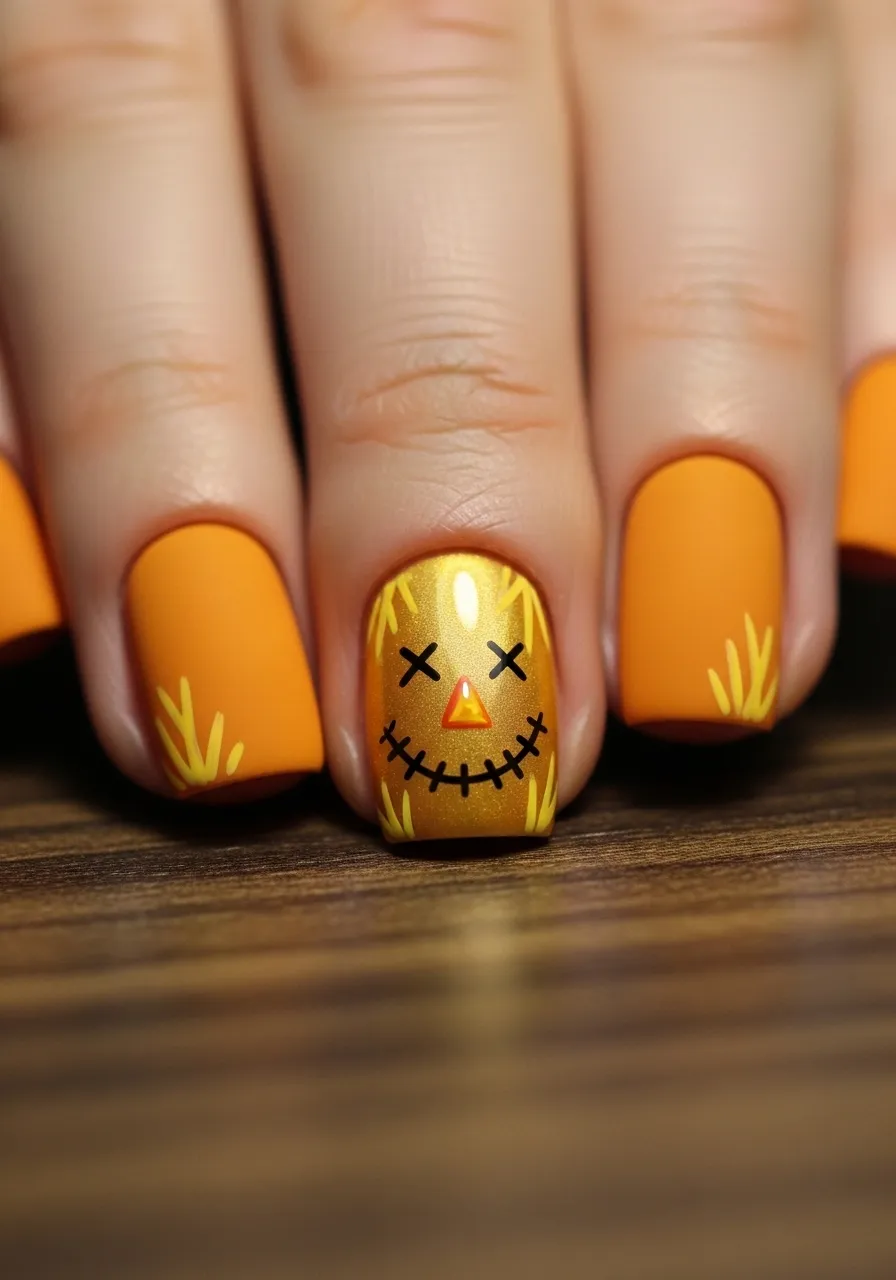
One accent nail featuring a tiny scarecrow face is one of the most charming ways to do this theme without committing every nail to detailed art.
The face goes on one nail, typically the ring finger. The remaining nails carry the supporting colors of orange, tan, or plaid.
Keep the face simple. Two small X shapes for the eyes, a tiny triangle or dot for the nose, and a stitched line of small dashes for the mouth. This is all you need to read as a scarecrow face clearly.
Paint the accent nail in bright yellow or golden tan first. This becomes the scarecrow’s face color. Let it dry completely before adding the facial features.
Use a very fine detail brush or a dotting tool to place each element. Black polish works best for the facial features. Work slowly and use small amounts of polish to keep the details crisp and small.
Add a few short golden strokes along the sides of the nail to represent straw poking out from under a hat.
If freehand drawing feels too difficult, a nail stamp with small face designs works just as well. Halloween nail stamp kits are available for five to fifteen dollars online and contain dozens of spooky design options.
This accent nail approach makes the entire set look coordinated and themed without requiring detailed art on every finger.
Burlap Texture Nails
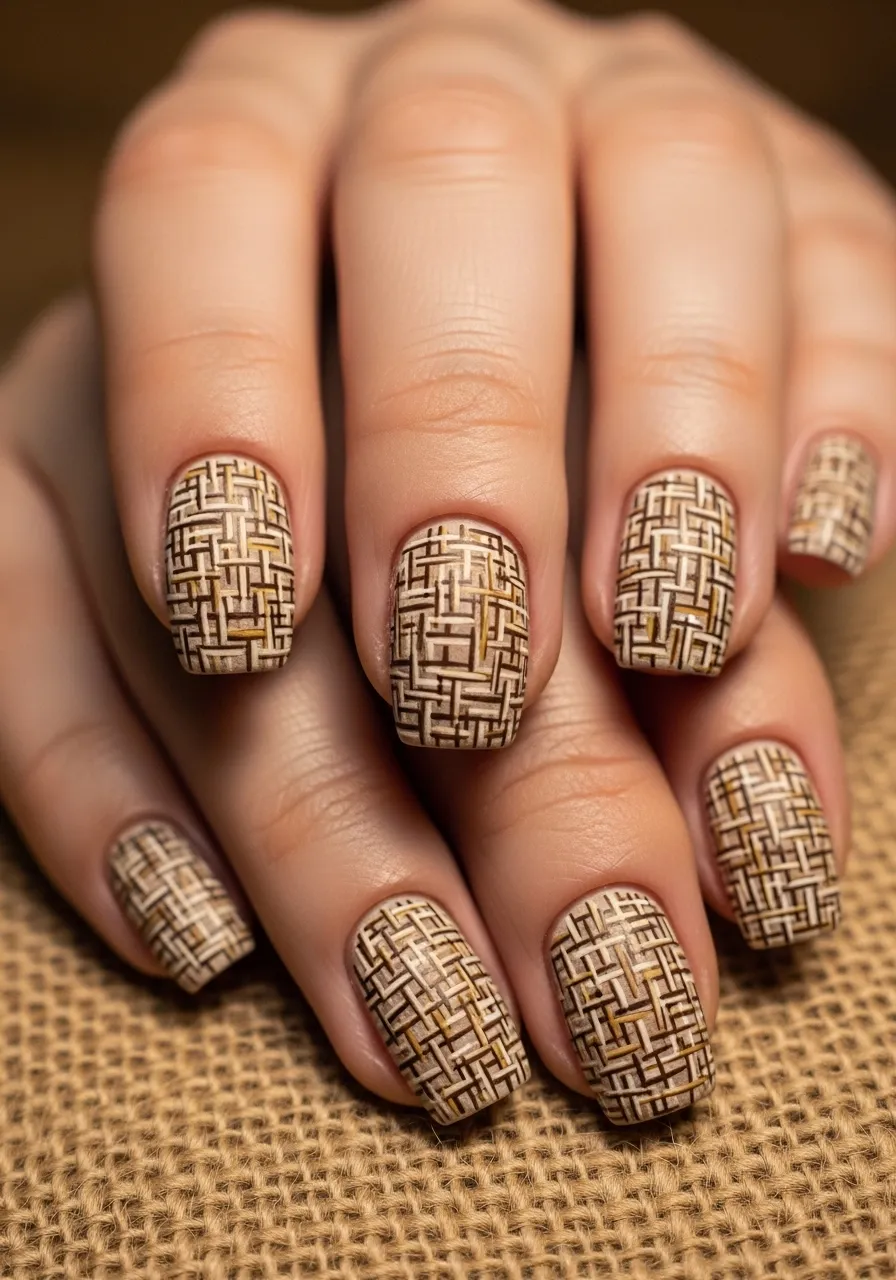
Burlap texture nails are one of the most creative and underexplored scarecrow nail ideas. The woven fabric look is achievable with simple line work and the right matte finish.
Start with a warm beige or pale tan base coat. This represents the base color of burlap fabric.
Once dry, use a thin striping brush to draw a diagonal grid across each nail. Go in one direction first, drawing evenly spaced lines from corner to corner. Then repeat going in the opposite diagonal direction. The crossing lines create the woven grid pattern that mimics burlap weave.
Use a slightly darker tan or light brown for the grid lines. The color difference between the base and the lines should be subtle rather than high contrast. Real burlap is woven from threads of a similar color to the fabric itself.
After the grid lines dry, add a few irregular variations. Some squares of the grid slightly larger, some lines a little thicker. This imperfection mimics the natural unevenness of real woven burlap.
Finish with a matte top coat and the transformation is complete. The matte finish is the detail that makes this design work. Without it, the nails just look like they have lines. With it, they genuinely look like a textile surface.
This design pairs beautifully with the stitched seam nails on other fingers.
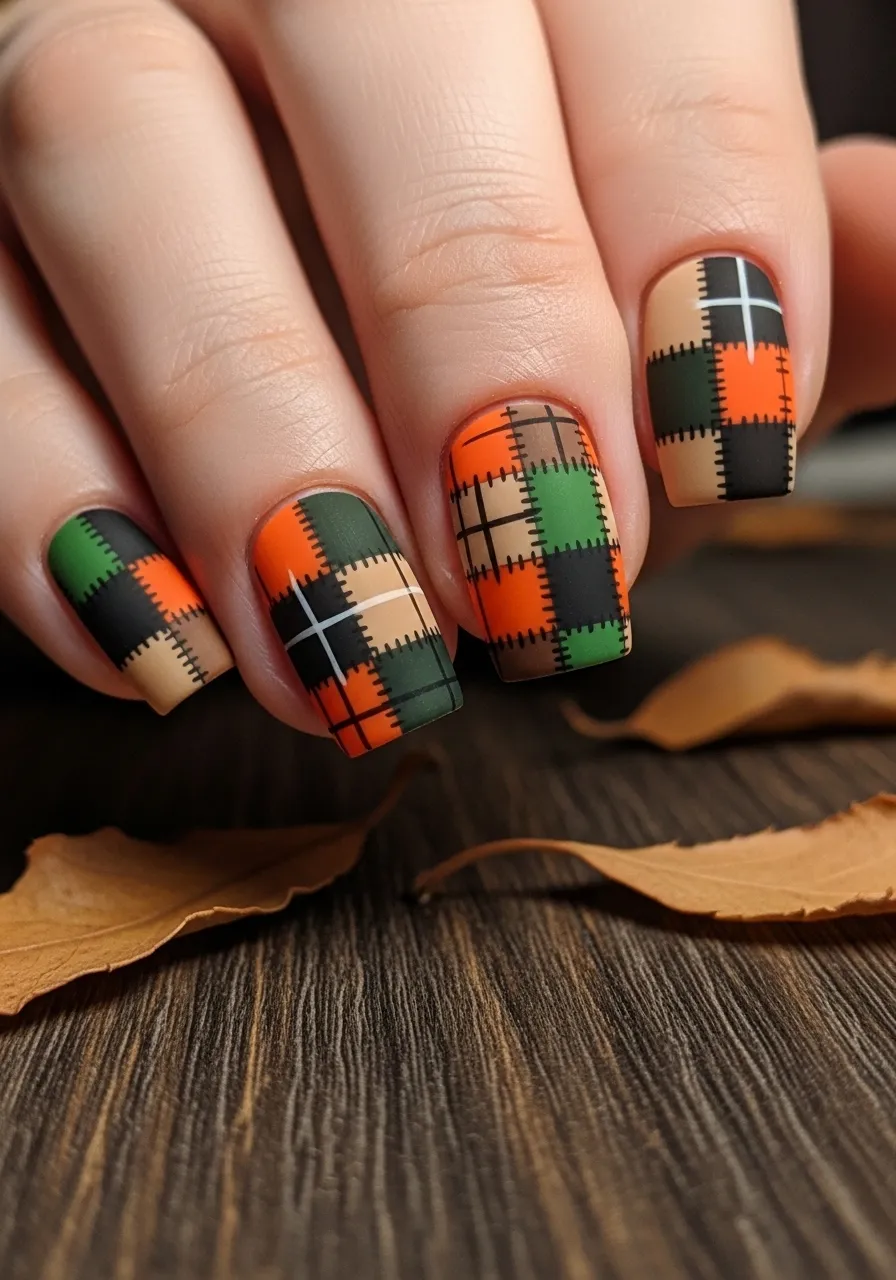
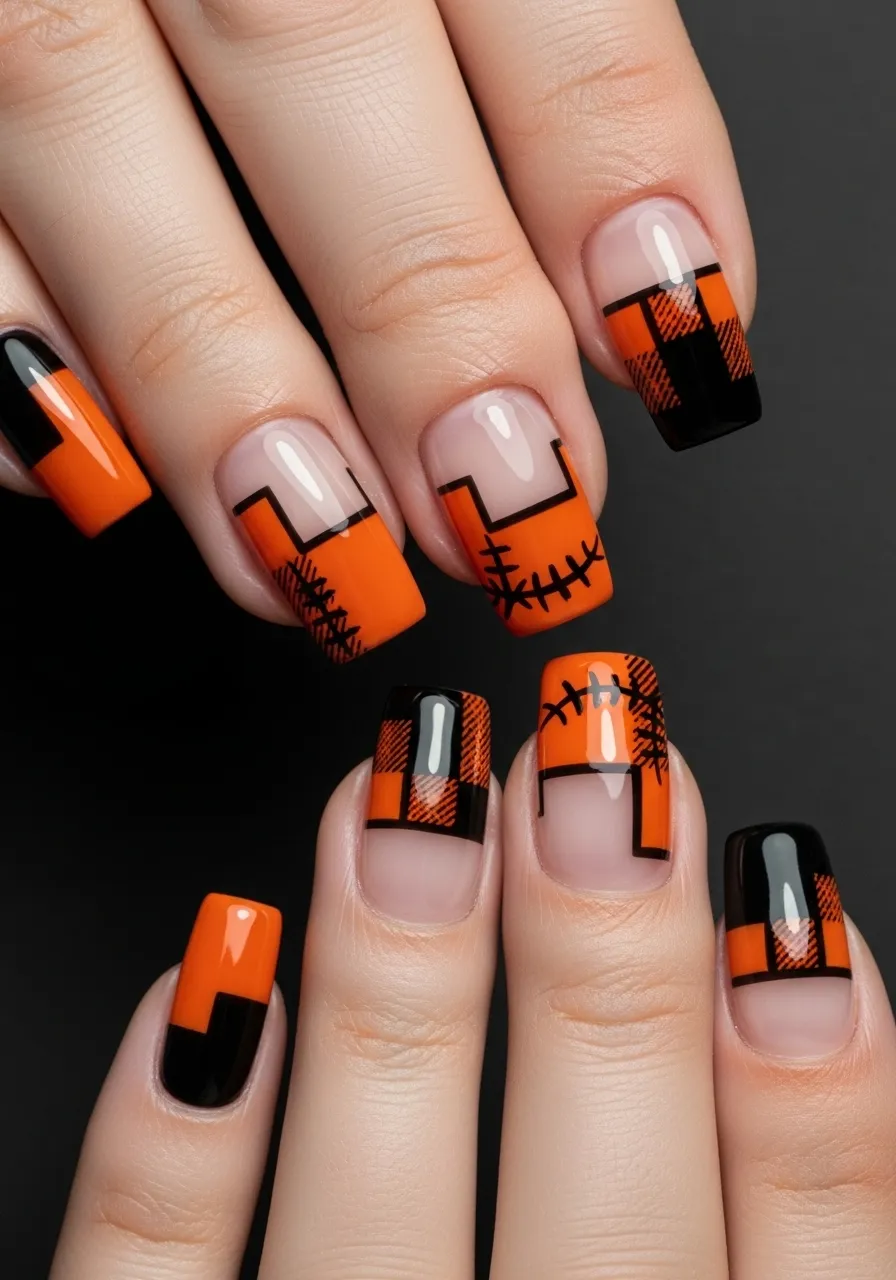
Orange Plaid Coffin Nails With Black Accents
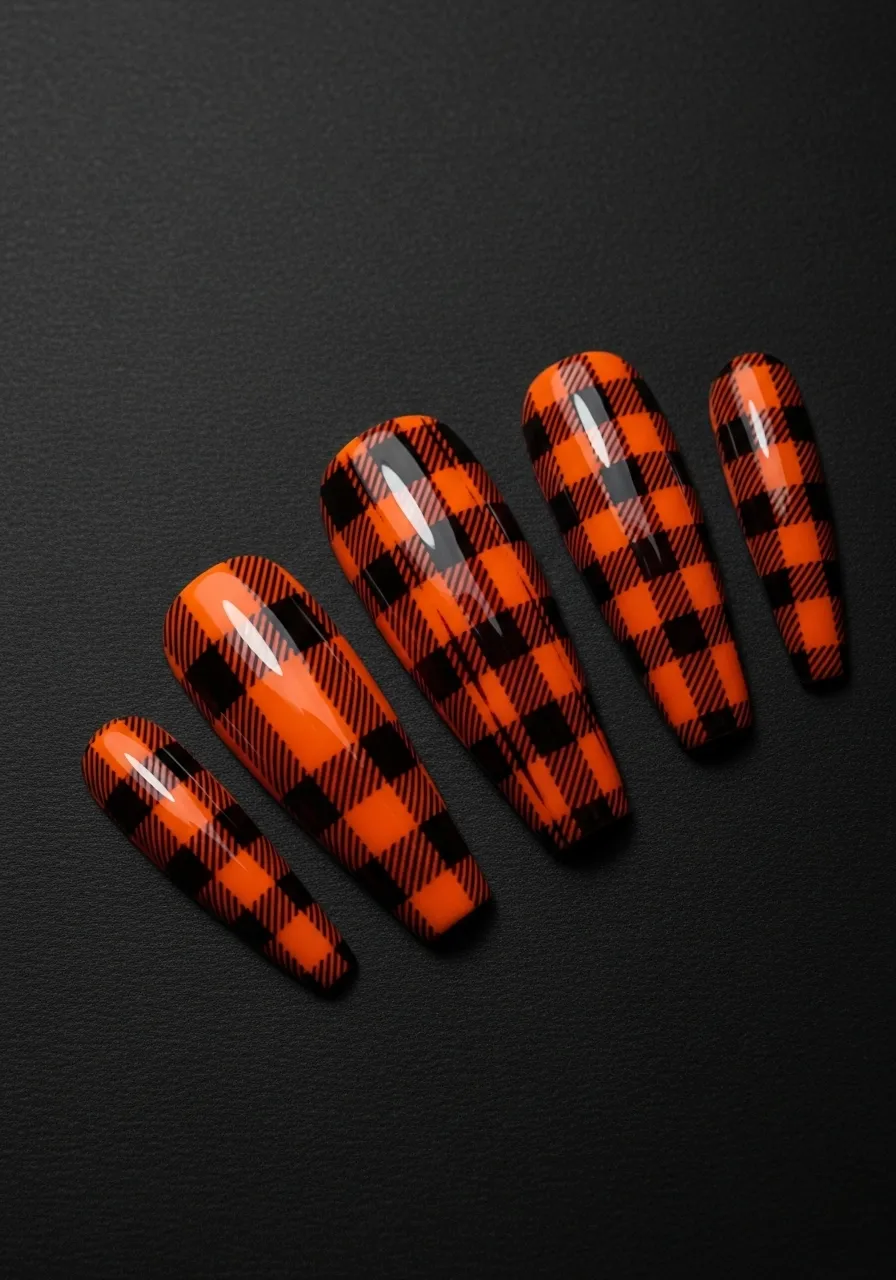
Long coffin nails give scarecrow designs a more dramatic, fashion-forward quality. The elongated shape provides more canvas for detailed plaid work.
Orange and black is the most Halloween-ready color combination. Applied in a plaid format across coffin nails, it hits the sweet spot between festive and stylish.
Use a bright pumpkin orange as your base color. This sets the warm, Halloween tone immediately.
Once dry, use a thin brush dipped in black polish to draw the plaid grid lines. Space them about three to four millimeters apart for a bold, visible pattern on the longer nail surface.
Add a second set of thinner lines in deep burgundy or dark red between the black lines. This creates the layered plaid effect and adds color depth.
Finish with a glossy top coat for a high-shine finish that contrasts beautifully with the bold pattern.
Long nails require a steady hand for the line work. Rest your painting hand on a firm surface and use your non-dominant hand to rotate the nail toward the brush rather than moving the brush around the nail. This technique gives you more control over thin line placement.
Nail art tape is a helpful tool here. Apply strips of tape as guides for your plaid lines, paint over them, and peel away the tape before the polish dries for perfectly crisp edges.
Scarecrow Hat Nail Art
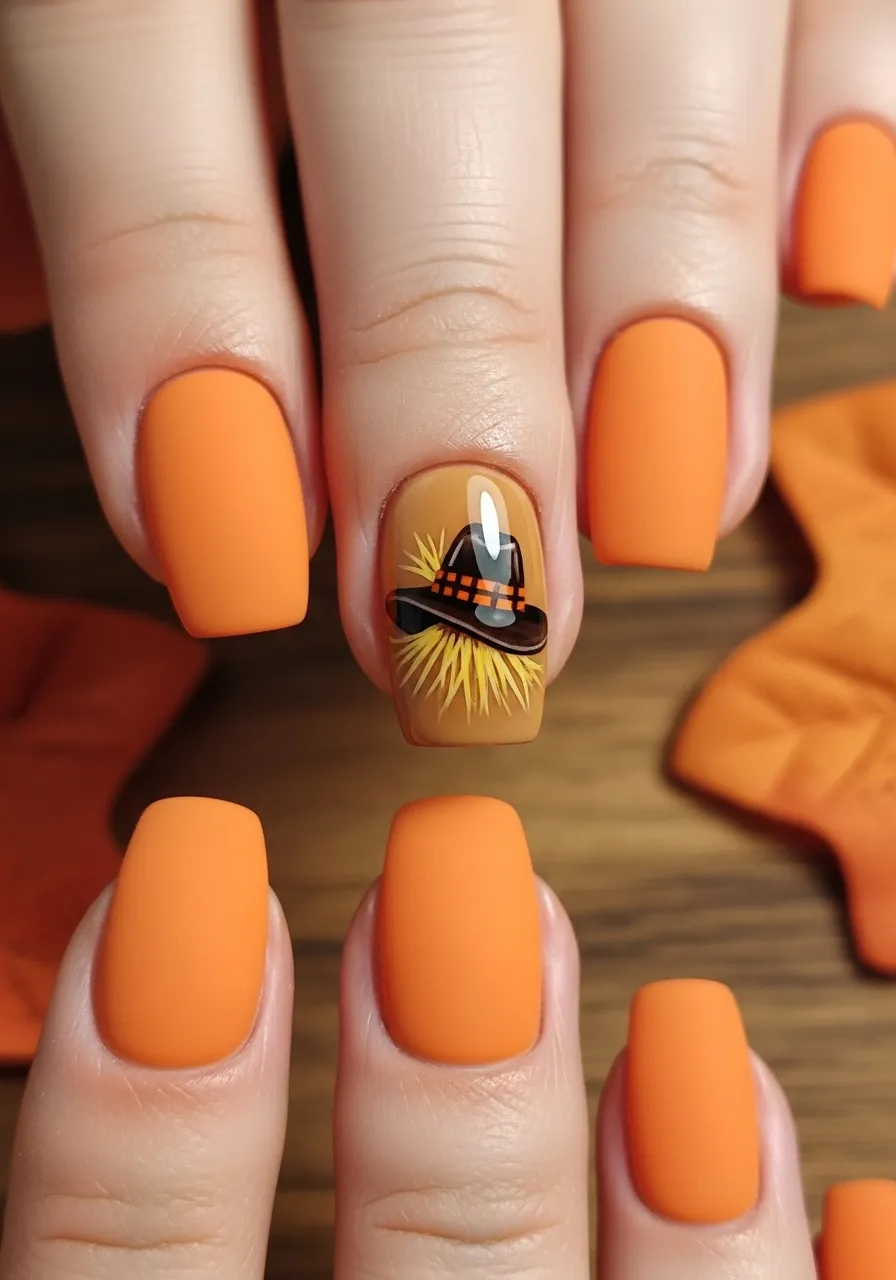
A scarecrow hat painted as a full nail design on one accent nail is one of the most charming details you can add to a Halloween set.
The hat is a recognizable silhouette that reads clearly even at a small scale. A dark brown or black wide-brimmed hat with a small plaid hatband is the classic interpretation.
Start with a tan or yellow base on the accent nail. This represents the face or straw area below the hat.
Use a medium brush loaded with dark brown or black polish to paint the hat shape. The brim should be a wide, flat oval near the middle of the nail. The crown of the hat rises from the brim toward the tip of the nail.
Add a thin band around the base of the crown in orange or plaid pattern. This hatband detail adds the recognizable scarecrow finishing touch.
Paint a few small golden straw strokes below the brim where the brim meets the face area. These straw wisps instantly tell the viewer exactly what the hat belongs to.
Keep the other nails simple in coordinating fall colors so the hat accent nail stands out without competition.
Nail art stencils for hat shapes are available in Halloween sets online if freehand feels too difficult. Place the stencil, paint through it, and peel it off for a clean shape every time.
Autumn Leaf and Straw Combo Nails

Autumn leaves and straw together create a nail set that captures the whole harvest season in miniature. Each element on its own is simple to paint, and they work together beautifully as a set.
Alternate the designs across your nails. Leaf on one finger, straw on the next, plain color in between. This keeps the set from looking too busy while still feeling cohesive.
For the leaves, use a small petal-shaped brush or a fan brush. Dip it in orange or red polish and press it onto the nail at an angle. This creates a natural leaf shape with a single stamp.
Add a thin stem with a detail brush and a few veining lines across the leaf in a darker shade of the same color.
For the straw nails, use the same technique from the straw tip design earlier. Short golden strokes pulled upward in irregular lengths, layered with darker amber for shadow.
The two designs share the same warm autumn palette, so they complement each other naturally without needing to plan the color story too carefully.
A matte top coat over both designs ties the set together and gives every nail the same tactile, harvest-season quality.
This set works beautifully for October nail appointments but also looks great in early November before the fully winter holiday looks take over.
Cute Scarecrow Character Nail Wrap Set
Nail wraps are one of the best tools for achieving detailed scarecrow nail art without any painting skill required. They are pre-printed, adhesive stickers that go on like a second skin over your natural nail or gel base.
Search for scarecrow or Halloween harvest-themed nail wraps on Etsy, Amazon, or dedicated nail art sites. A full set of ten wraps typically costs five to fifteen dollars and takes about ten minutes to apply.
Prep your nails by pushing back the cuticles and lightly buffing the surface. Clean each nail with rubbing alcohol before application. This removes any oils that would prevent the wrap from adhering properly.
Peel the wrap, align it with your cuticle, and press it down from the base toward the tip. Use an orange stick or your fingernail to smooth out any bubbles or wrinkles.
File off the excess wrap at the tip of the nail using a downward filing motion. Seal the entire nail with a clear top coat to extend the wear time significantly.
With a top coat, nail wraps typically last seven to twelve days. Without one, they may start lifting at the edges within a few days.
This option gives you professional-looking scarecrow nail art with no skill required and costs less than a salon visit by a significant margin.
Matte Black and Tan Two-Tone Scarecrow Nails
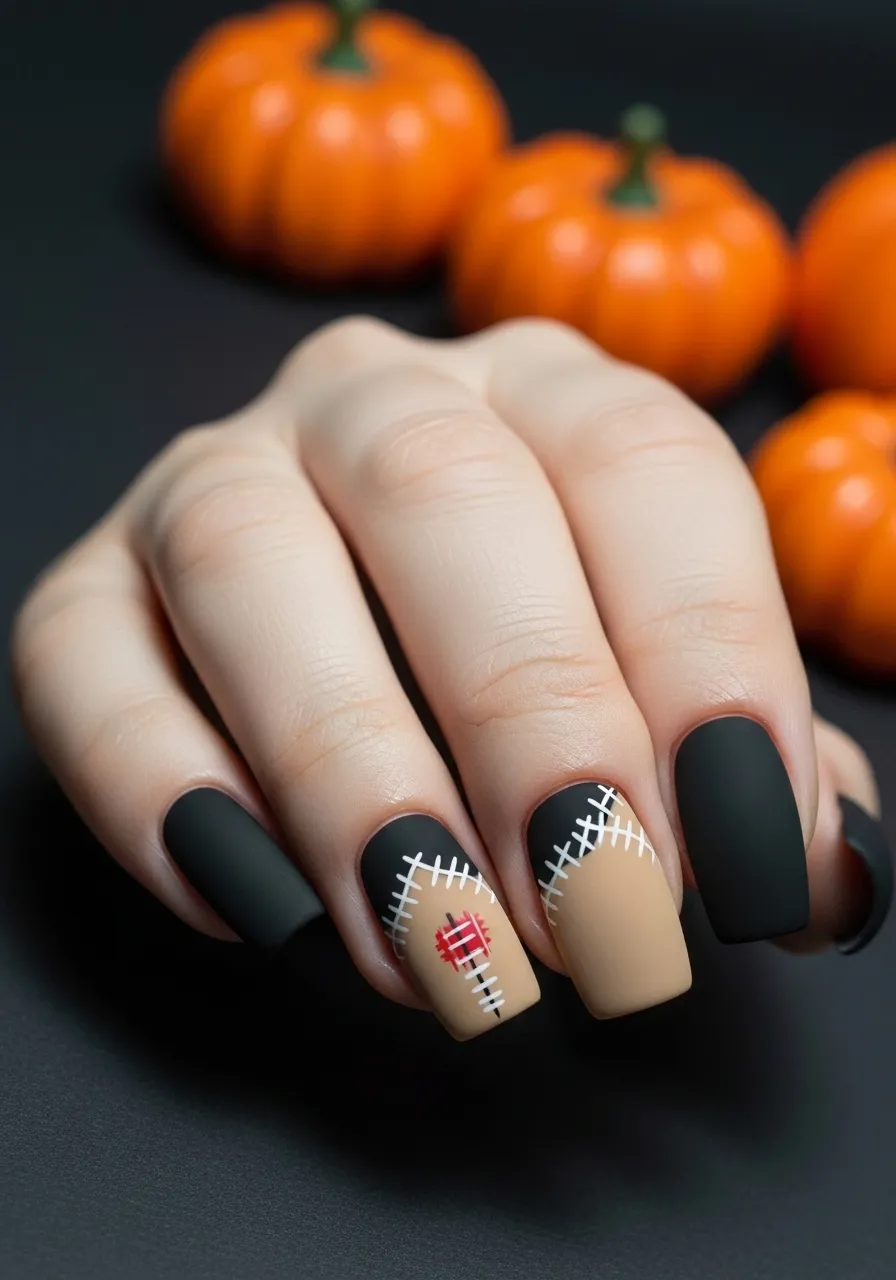
A two-tone design using matte black and warm tan creates a sophisticated, grown-up version of the scarecrow nail trend. This is the option for people who want Halloween nails that still feel fashion-forward.
The design splits each nail diagonally or horizontally into two color zones. Black on the top half or one side, tan or burlap-beige on the other.
Use nail tape or striping tape to get a clean dividing line between the two colors. Apply the tape after the first color dries, paint the second color over it, and peel the tape off immediately before the second color dries.
Once both colors are set, use a fine detail brush to add small white stitch marks along the dividing line. This stitching detail is the scarecrow reference that ties the sophisticated color pairing back to the theme.
A matte top coat over both colors unifies the look and gives it that expensive, editorial quality.
This design works in every nail shape from short square to long almond. The diagonal split is particularly flattering on longer nail shapes because it creates a slimming visual line.
The entire look uses only three products: two nail polishes and a matte top coat, making it one of the most affordable designs on this list.
Pumpkin and Scarecrow Mixed Theme Set
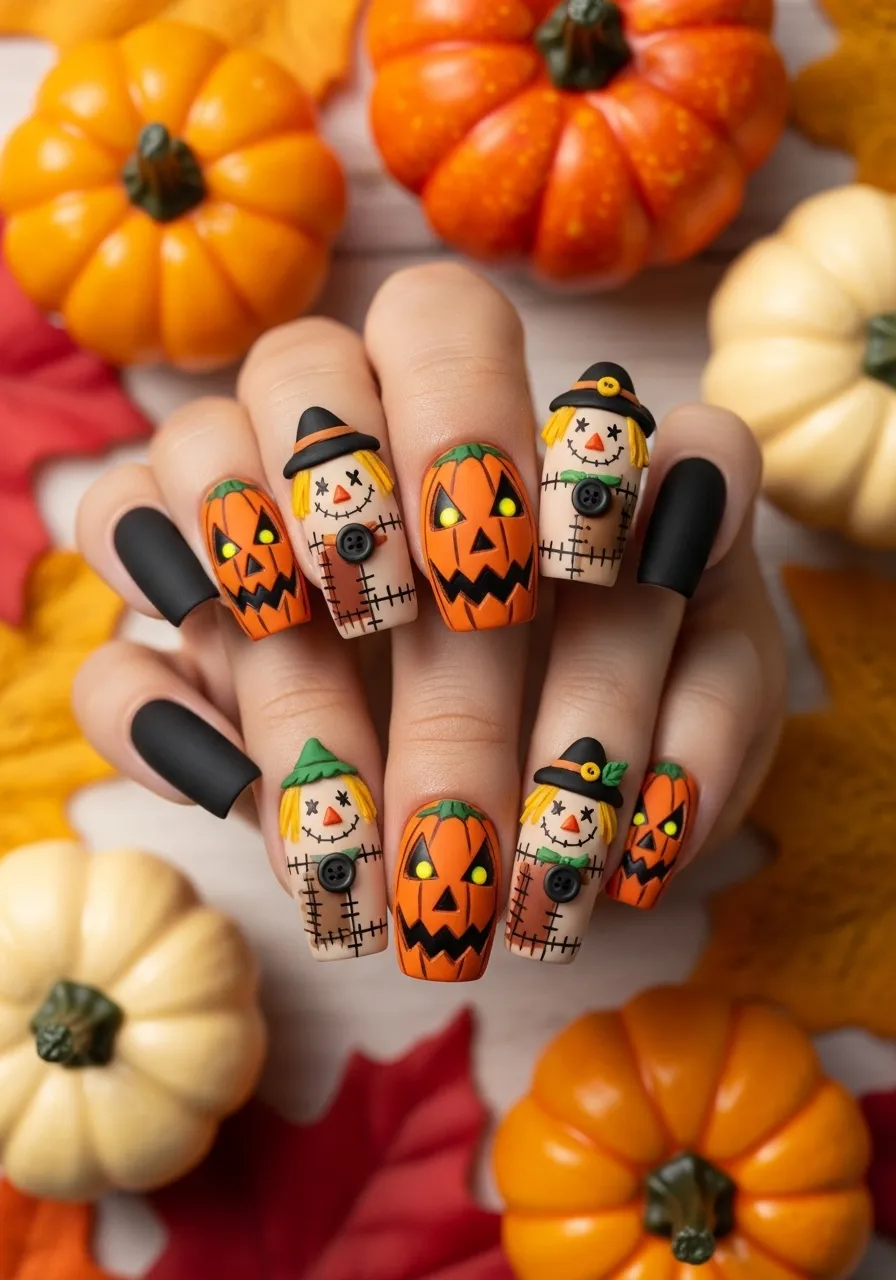
Mixing scarecrow and pumpkin designs across one nail set creates a full harvest Halloween story. Each nail tells a different part of the seasonal tale.
Assign different designs to different fingers. The thumb gets a pumpkin face. The index gets plaid patchwork. The middle gets a plain burnt orange. The ring gets the scarecrow face accent. The pinky gets straw tip detail.
Keep the color palette consistent across all designs. Orange, black, tan, gold, and dark brown work across both the pumpkin and scarecrow elements without clashing.
For the pumpkin nails, paint the base orange and use a thin brush to add curved vertical lines creating the pumpkin segments. Add a small green stem at the cuticle edge and tiny black triangle eyes and a jagged mouth near the tip.
The scarecrow elements can be any of the designs already covered in this article. Pulled together with the pumpkins under one color family, they read as a cohesive set rather than a jumbled mix.
This approach also makes the set easier to execute for beginners. Not every nail requires the same skill level. Simple pumpkin nails are achievable for beginners, while more detailed elements can be simplified without ruining the overall story.
Glitter Gold Straw Accent Nails
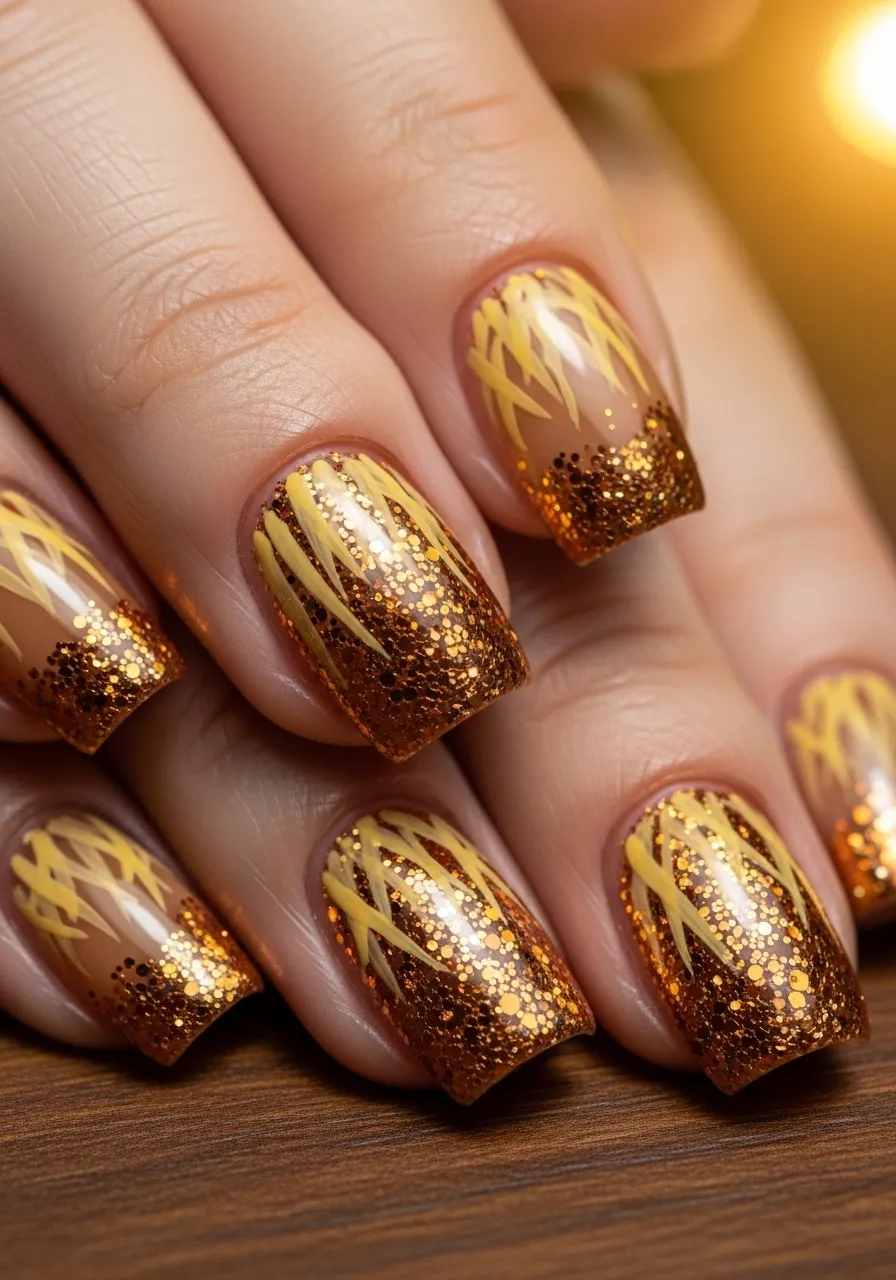
Gold glitter applied in straw-like brush strokes adds a glamorous twist to the scarecrow nail concept. It takes the earthy, rustic theme and makes it feel luxurious.
Use a base of matte tan or pale wheat color on all nails. This neutral background makes the gold glitter pop without competing with it.
Apply the glitter using a dry brush technique. Dip a fan brush lightly into loose gold or copper glitter and sweep it upward over the tip area of each nail in short, irregular strokes.
The irregular application of the glitter mimics the irregular texture of real straw. Some areas will be heavier with glitter and some lighter. This natural variation is exactly what you want.
Seal the glitter with a matte top coat rather than a glossy one. The contrast between matte base and sparkling glitter creates a beautiful depth that a all-glossy finish would flatten.
Loose cosmetic glitter is available for one to three dollars in craft stores. A small container lasts for dozens of nail applications.
For a more subtle version, use a glitter polish in a golden tone rather than loose glitter. Brands like Sally Hansen and Revlon make affordable gold glitter polishes that give a similar effect with much less mess.
This design is especially striking under party lighting. The glitter catches every light source and turns the straw tips into something genuinely dazzling.
Creepy Cute Button Eye Scarecrow Nails
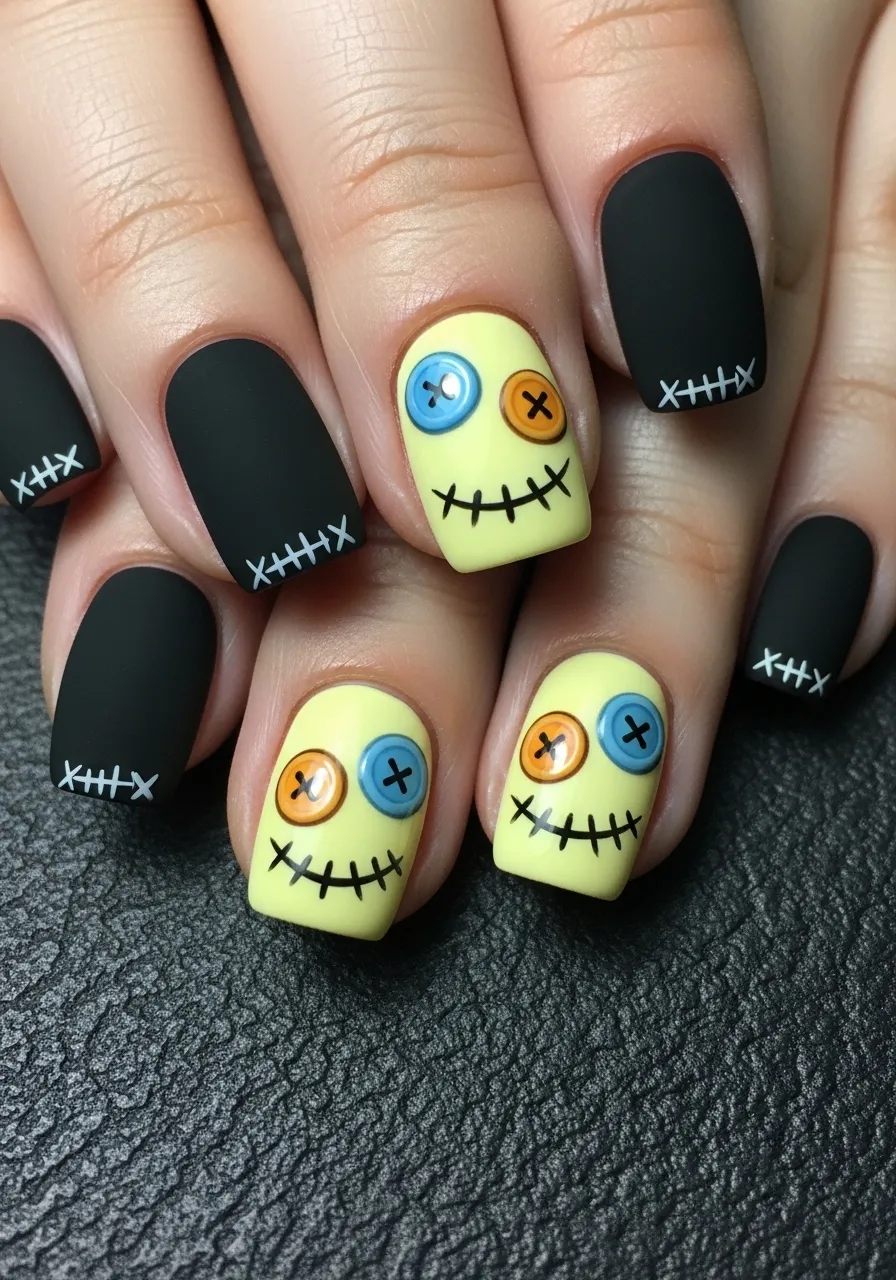
Button eyes are one of the creepiest and most charming details on any scarecrow design. Applied to nails, they create an immediately recognizable and genuinely unsettling-cute effect.
The button eye is a simple shape. Two small circles with an X or plus sign drawn through the center to represent the button holes. Despite being simple, they read clearly as buttons and make the scarecrow face instantly recognizable.
Paint the accent nail in a pale yellow or golden tan base. Use a dotting tool to place two small, equal-sized circles on the nail. These are the buttons.
Fill in the circles with a base color, then use the same dotting tool or a tiny brush to outline each circle and add the X or plus detail in the center.
The mouth below can be a simple curved stitch line made of small dashes. Adding four to six small stitches in a curved arrangement reads clearly as a sewn-shut scarecrow smile.
Surround the accent nail with all-black nails featuring only small white stitch marks along the edges. This minimalist surrounding makes the detailed accent nail the clear focal point.
For extra creep factor, give the button eyes slightly different sizes. One slightly larger than the other adds an asymmetric, unsettling quality that makes the whole design feel more authentically eerie.
Fall Harvest Color Block Scarecrow Nails
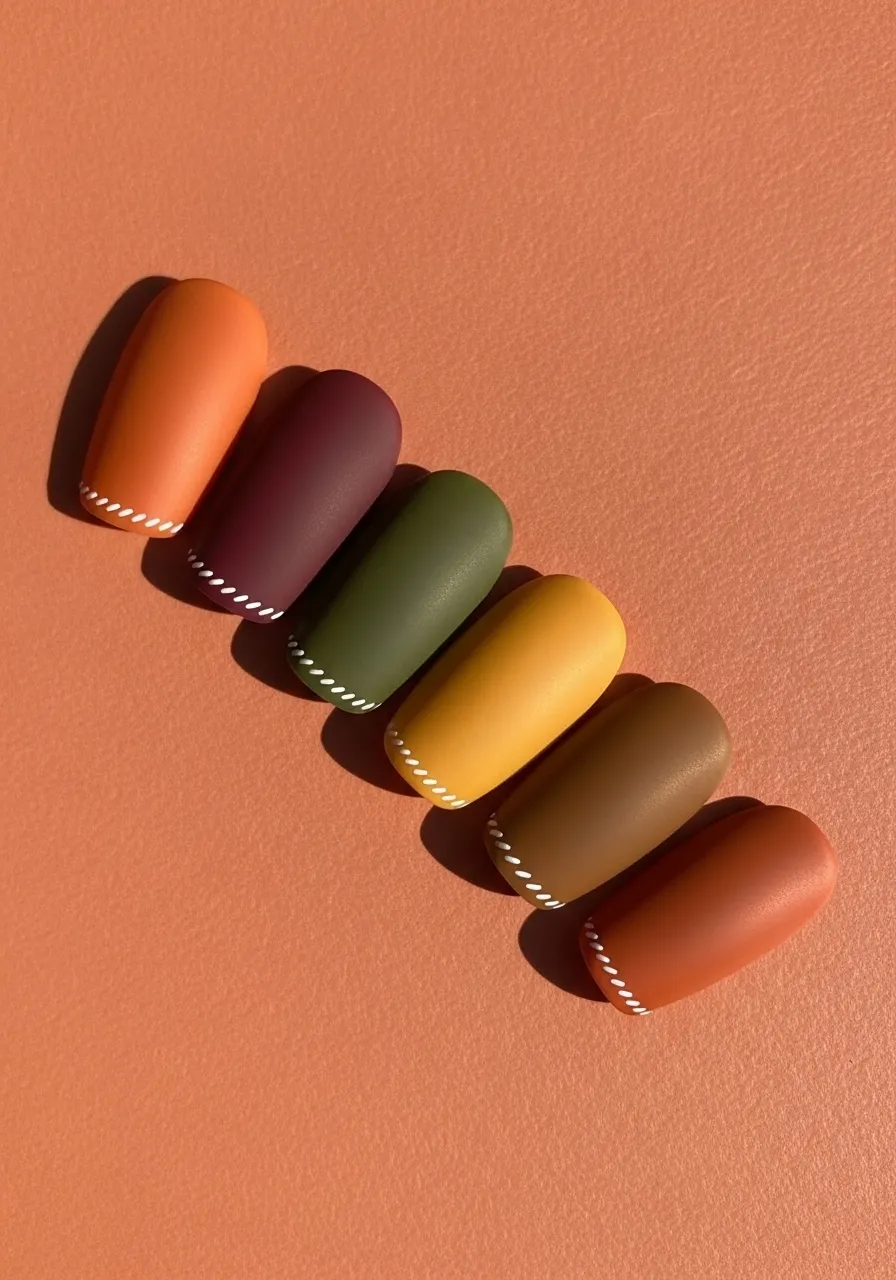
Color blocking with a fall harvest palette is one of the simplest versions of the scarecrow nail theme. Each nail gets one solid fall color and a small stitch detail to tie it into the scarecrow concept.
The palette should cover the full range of autumn tones. Assign one color to each finger: burnt orange, deep burgundy, golden mustard, dark olive, and warm chocolate brown.
Apply each color as a clean, solid base coat with two even layers. No patterns or gradients required.
The detail that makes this a scarecrow set rather than just a fall set is the stitch line. Use white or cream polish and a thin brush to draw a single row of small dashes along the edge of each nail just above the cuticle line.
This one small stitch detail connects every nail to the patchwork, sewn-together scarecrow concept without requiring any advanced nail art skill.
A matte top coat over all the colors creates a unified, fabric-like finish across the whole set.
This design is excellent for beginners because it relies on clean, solid color application rather than detailed brushwork. The small stitch detail is the only freehand element and can be practiced quickly before attempting it on the nails.
The resulting set looks curated and festive while remaining subtle enough for workplaces or school settings where very elaborate Halloween nail art might not be appropriate.
Scarecrow Nail Art With Crow Accent

A crow sitting on a scarecrow is one of the most ironic and charming Halloween images. Adding a tiny crow silhouette to the accent nail gives this manicure a storytelling element that makes it feel extra special.
The crow silhouette is a simple black shape. A rounded body, a small head, a pointed beak, and two small feet. At the scale of a nail, it does not need to be detailed. The silhouette alone communicates the bird clearly.
Paint the accent nail in a bright orange or golden yellow base. Use a fine detail brush loaded with black polish to paint the crow body near the center of the nail.
For extra charm, add a tiny plaid scarf around the crow’s neck using a few short lines in contrasting colors. This detail makes the image feel whimsical and deliberate rather than simply spooky.
Surround the crow accent nail with patchwork plaid nails in warm fall tones. The orange of the accent nail should appear in the surrounding nails as well to tie everything together.
If freehand drawing a crow feels too challenging, a small crow nail stamp achieves the same result with zero artistic skill required. Halloween stamp plates frequently include bird and raven designs.
This is the kind of nail detail that people notice and want to look at closely. It tells a story in miniature.
Ombre Sunset Scarecrow Nails
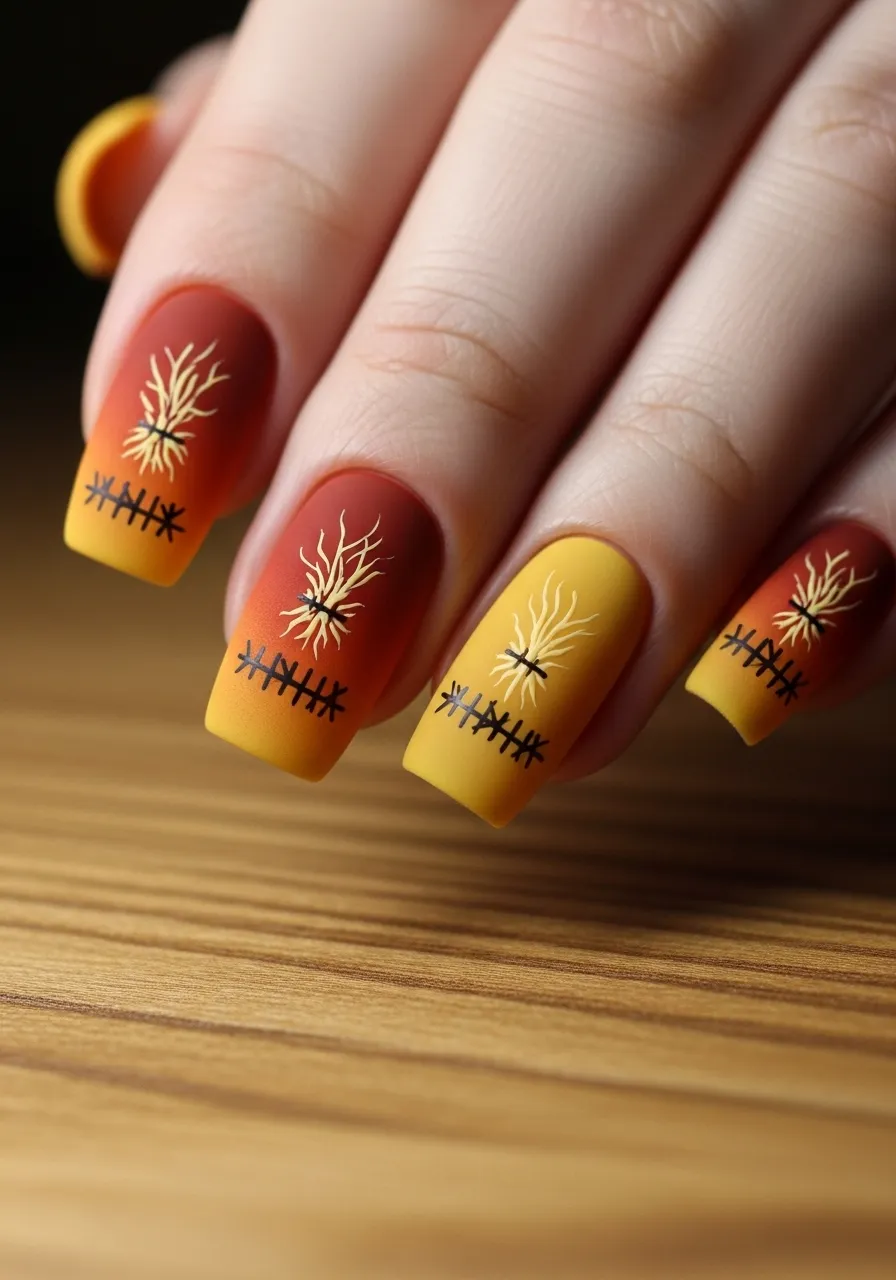
An ombre gradient using harvest sunset colors gives the scarecrow nail theme a softer, more artistic quality. The gradient moves from deep rust or burnt orange at the base to bright golden yellow at the tip.
Ombre nails are achieved with a small sponge. Apply both colors side by side on a makeup sponge and dab the sponge over the nail in gentle, bouncing motions. The colors will mix at the center, creating the gradient effect.
Do several layers of sponge dabbing for a more blended, seamless ombre. Wipe the sponge clean between each layer and reload with fresh color to keep the gradient crisp.
Once the ombre base is dry, add scarecrow details over the top. Thin stitch lines in dark brown or black over the gradient. Small straw wisps at the tip. A tiny stitched face on one accent nail.
The gradient background makes every detail pop beautifully because the warm color transition creates natural depth behind each element.
Clean up the edges around your cuticles with a cotton bud dipped in nail polish remover after the ombre application. Sponge ombre always gets a little messy at the edges.
This design looks complex but the technique is actually beginner-friendly. Practice on a piece of acetate first to see how the two colors mix before applying it to your actual nails.
Scarecrow Hat and Straw on Almond Nails
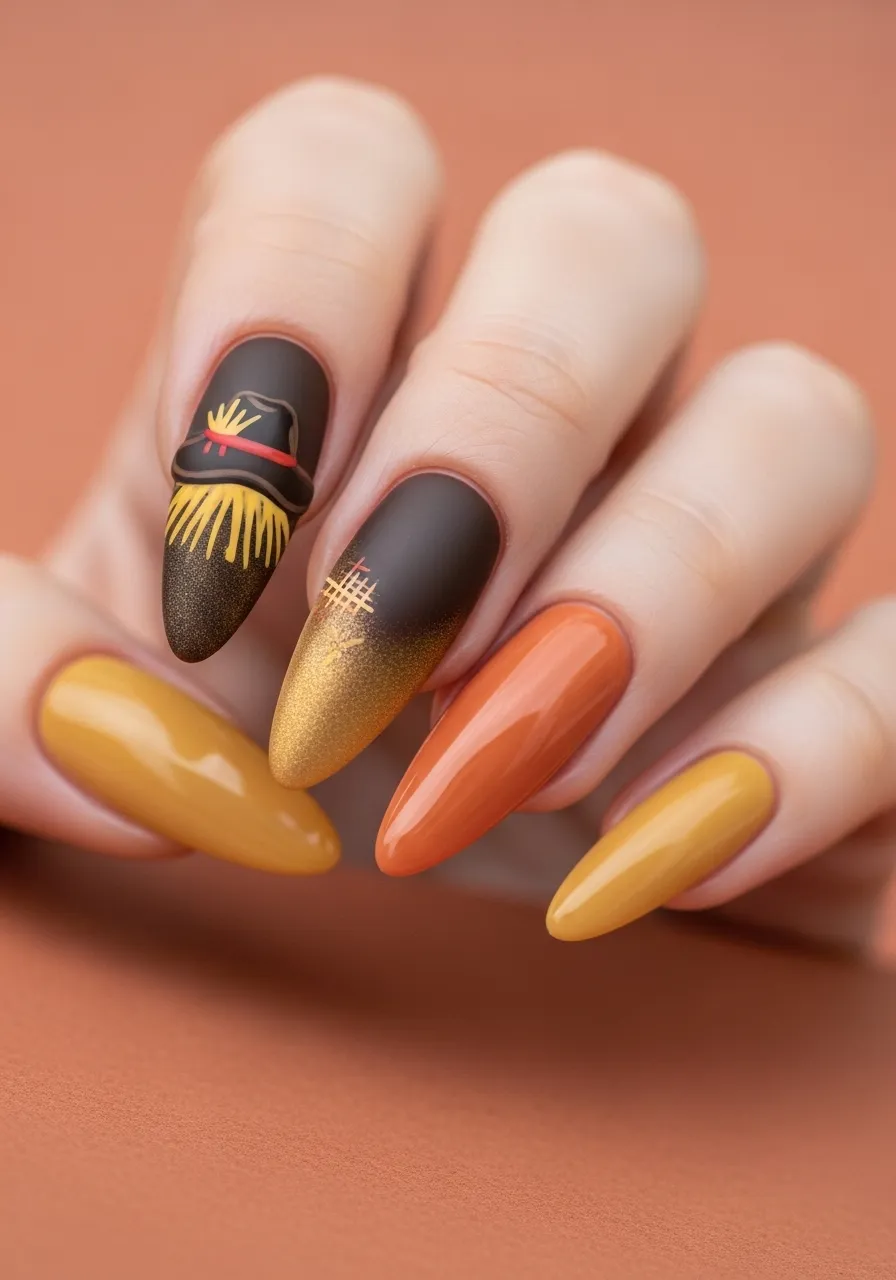
The almond nail shape suits the scarecrow hat design particularly well. The tapered point at the top of the nail mirrors the pointed crown of a scarecrow’s hat, making the shape and the design feel connected.
The hat sits at the top of the nail with the brim roughly in the middle and the crown rising to the tapered tip. The area below the brim becomes the face and straw zone.
Paint the lower portion of the nail in golden yellow and allow it to dry. Then use a medium brush to paint the hat brim as a horizontal oval across the middle of the nail and the crown rising above it in dark brown or black.
Add a thin plaid or striped hatband at the junction of brim and crown using a tiny brush and orange or red polish.
Paint several short golden straw strokes below the brim in the yellow zone. These should be irregular in length and slightly curved to look natural.
The remaining nails in the set can be simple fall colors in rust, mustard, and tan to complement the detailed hat accent nails.
This design works best when the two accent nails, typically the middle fingers, carry the full hat design. The remaining eight nails stay simple so the hats remain the center of attention.
Frankenstein Green and Scarecrow Mixed Halloween Set
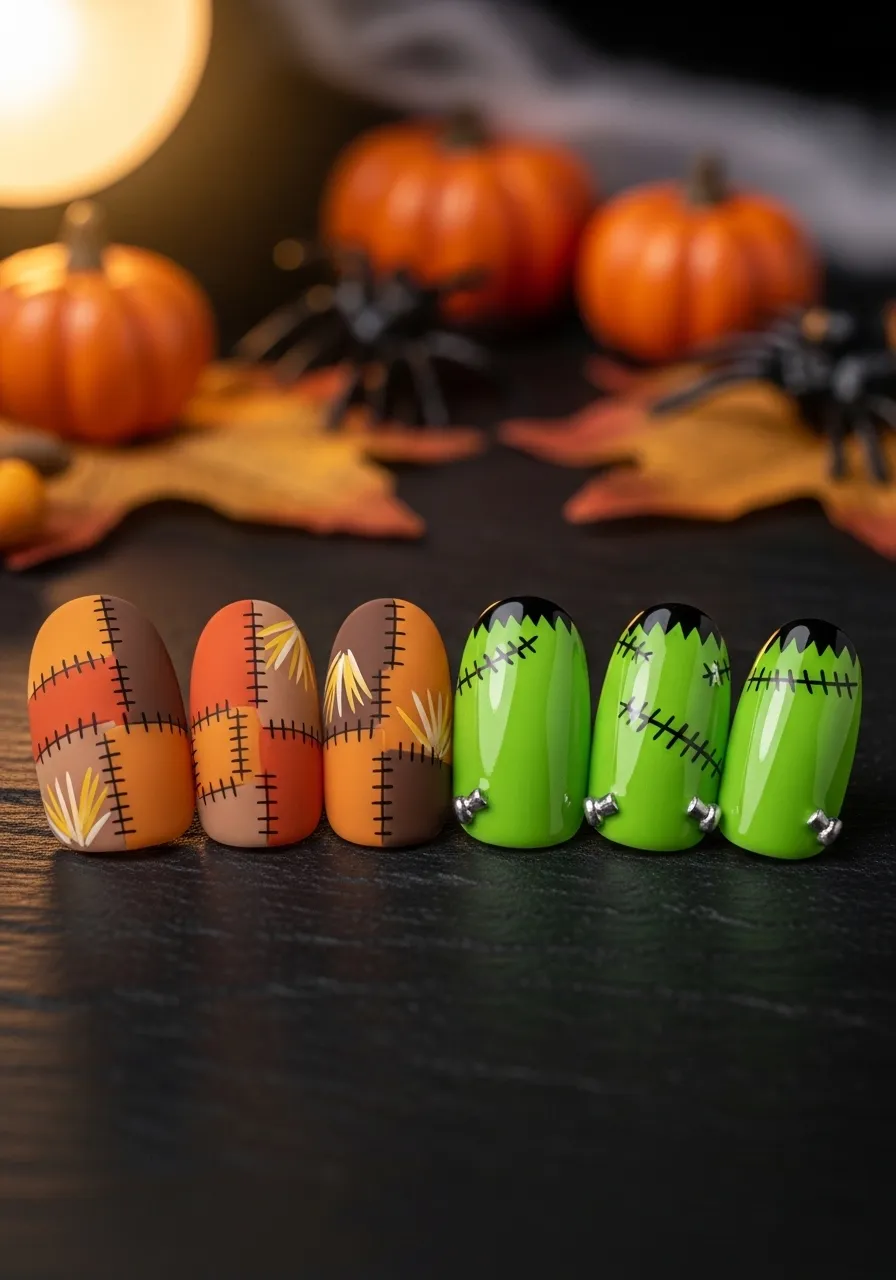
Mixing the scarecrow theme with a Frankenstein color story creates a Halloween nail set that covers two beloved characters in one manicure.
The pairing works because both characters share the stitched, patched-together aesthetic. Scarecrow has fabric stitching. Frankenstein has neck bolts and skin stitches. The visual language overlaps beautifully.
Assign the scarecrow designs to the thumb, middle finger, and pinky. Give the index and ring fingers the Frankenstein treatment in bright lime green with black stitch marks across the surface.
For the Frankenstein nails, paint a bright or muted green base and add three or four horizontal stitch marks across the nail. A small bolt detail near the edge completes the character reference.
The contrasting orange and green palette is naturally Halloween-coded and creates a visually dynamic set that feels cohesive despite using two different character themes.
Both characters are simple enough to paint at a nail scale without needing advanced skills. The stitches are just dashes. The bolts are just small rectangles. The scarecrow elements are already covered in earlier sections.
This is a fun option for someone who loves Halloween broadly and does not want to limit themselves to a single theme across all ten nails.
Subtle Nude Scarecrow Nails for the Workplace

Not every Halloween nail look needs to shout. A subtle, workplace-appropriate scarecrow set uses the same concepts in a much more restrained way.
The base colors stay within the nude, beige, and soft tan range rather than bold orange or black. The scarecrow details appear in muted versions of the same tones.
Stitching in light tan over a slightly darker tan base is barely visible at a glance but reveals itself on closer inspection. This understatement is the whole point.
One accent nail in the middle finger carries a very small, fine-line scarecrow face. The features are drawn with a thin brush in a slightly darker nude rather than bold black. This keeps the design visible without being obvious.
The remaining nails get only a single stitch line detail or a very fine plaid grid in tonal shades. Nothing loud or obviously Halloween.
This set works for professional environments where elaborate nail art is not appropriate but where you still want to mark the season in some small personal way.
It also suits people who prefer a more minimal aesthetic but still want to participate in the Halloween nail art trend without going outside their usual comfort zone.
A matte top coat is especially important here. It gives the whole set a refined, sophisticated finish that matches the understated approach.
Distressed Denim and Scarecrow Patchwork Nails
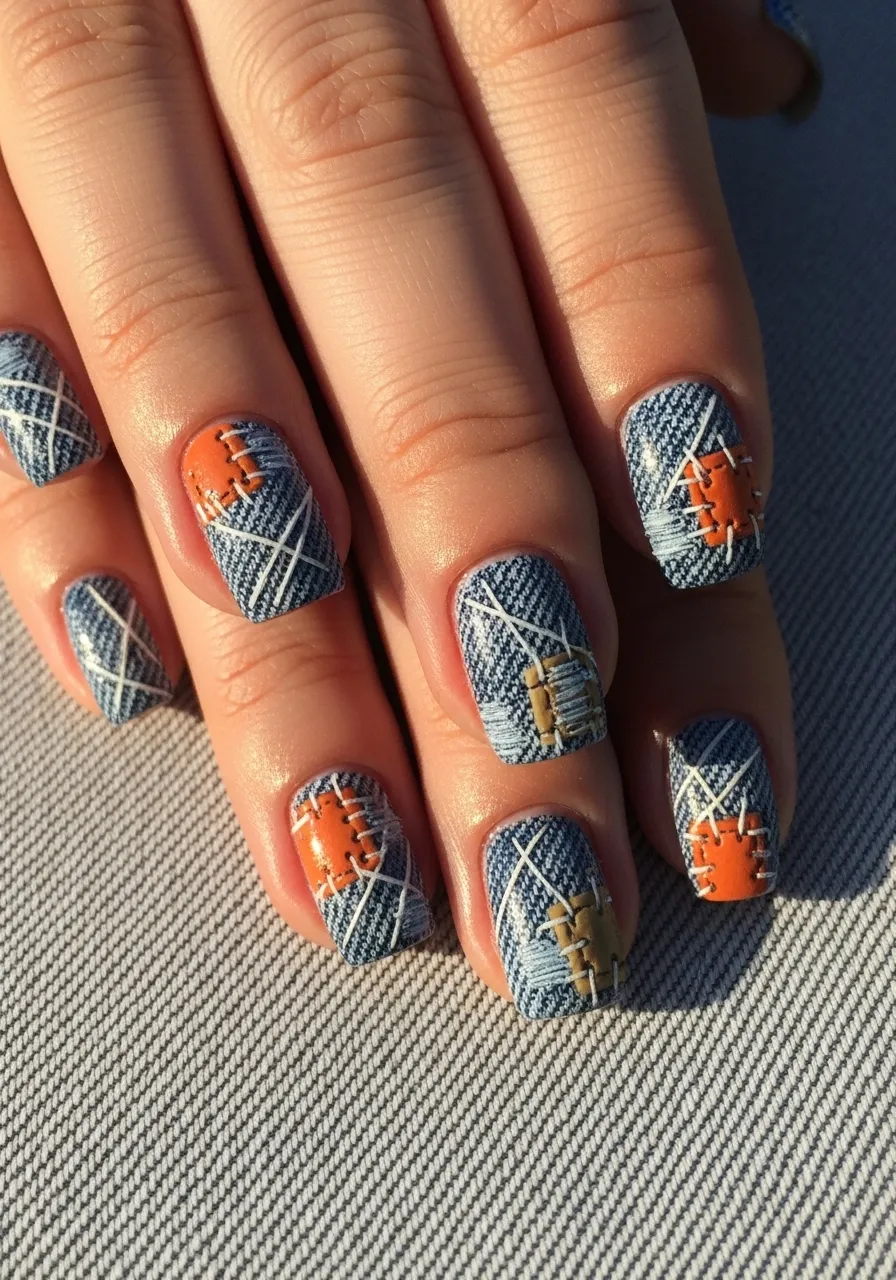
Denim patchwork is a surprising but effective scarecrow nail variation. Many real scarecrow costumes incorporate denim patches alongside plaid and burlap fabrics.
A denim-blue base with thin crosshatch lines in slightly darker navy creates a convincing fabric texture. Add orange and tan patches over the denim on some nails to bring in the classic harvest color palette.
Use a muted, slightly dusty blue rather than bright cobalt. Real denim has a soft, faded quality that bright blue polish cannot replicate. Look for shades described as slate blue, dusty denim, or indigo grey.
Once the blue base is dry, use a fine brush in dark navy to draw the crosshatch weave lines. Space them closely together for a tight denim weave. More space between the lines reads as a looser, more open fabric.
Add small rectangular patches on a few nails in warm tan or orange. Frame each patch with white stitch marks to define the edges clearly.
Finish with a matte top coat. Denim has no sheen at all, so any gloss finish breaks the illusion immediately.
This design gives the scarecrow set a fashion-forward, editorial quality that stands apart from the typical orange and black Halloween manicure while still fully belonging to the harvest season theme.
Glow in the Dark Scarecrow Nails
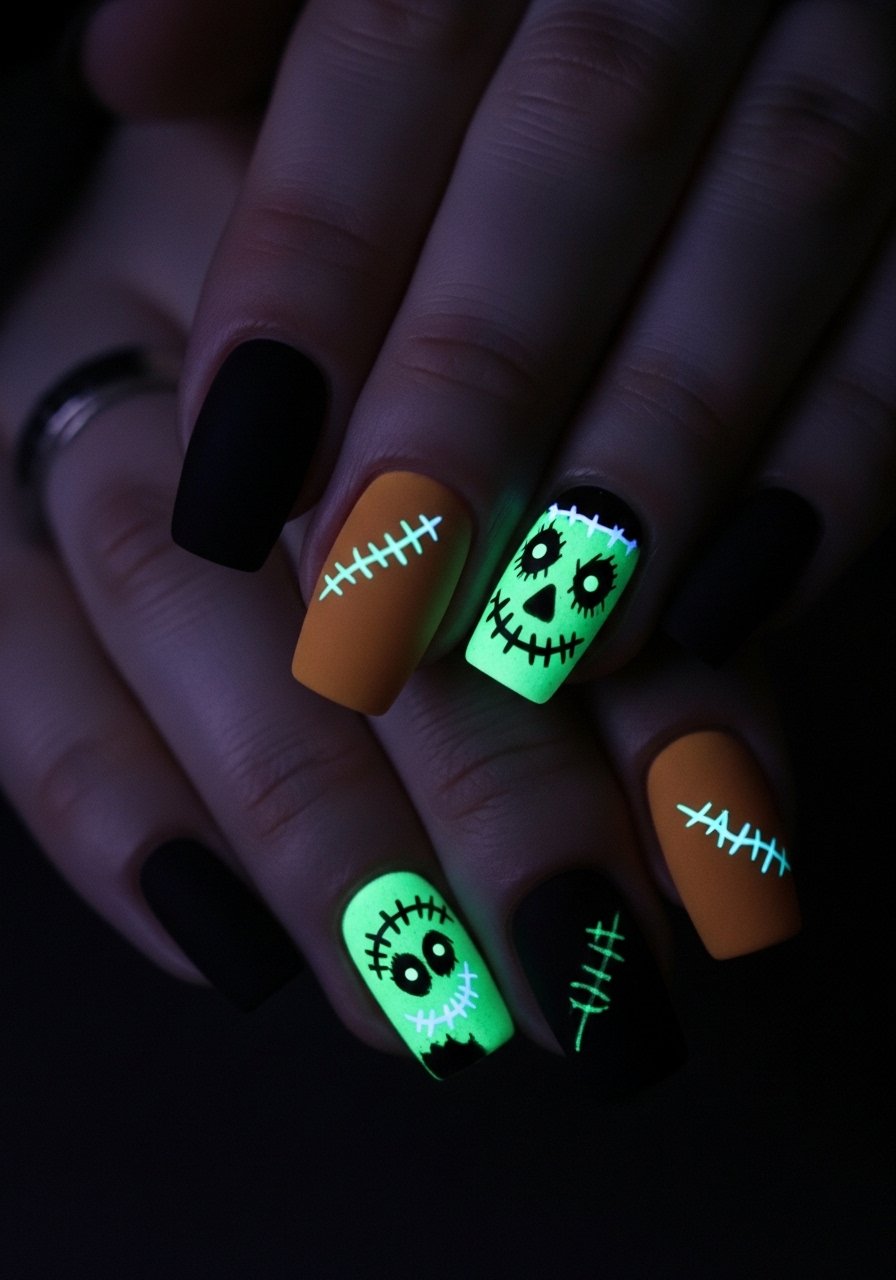
Glow in the dark nail details take the scarecrow theme to a genuinely creepy level. Under normal light, the nails look like a standard fall manicure. Under UV light or in the dark, the hidden details appear.
Apply glow in the dark polish over your regular scarecrow base designs. Use it to paint the stitching lines, the scarecrow face features, or the straw tips. These elements will glow green or white in darkness.
Glow in the dark nail polishes are available at beauty supply stores and online for three to ten dollars per bottle. Brands like China Glaze, OPI, and various indie nail brands offer glow options.
The key is applying the glow polish over a light base so it charges well in regular light. Glow pigments do not activate properly over dark base colors.
Apply two coats of glow polish over your chosen details for maximum brightness. One thin coat often gives a weak glow. Two coats dramatically improves the intensity of the effect in darkness.
Seal with a clear top coat to protect the glow layer without dulling the effect.
This design is exceptional for Halloween parties, haunted houses, or trick-or-treating. The reveal of the glowing details under different lighting creates a genuinely memorable moment.
It is also a wonderful conversation starter because most people do not expect nails to have this kind of hidden element.
Scarecrow Nails With Tiny Sunflower Details
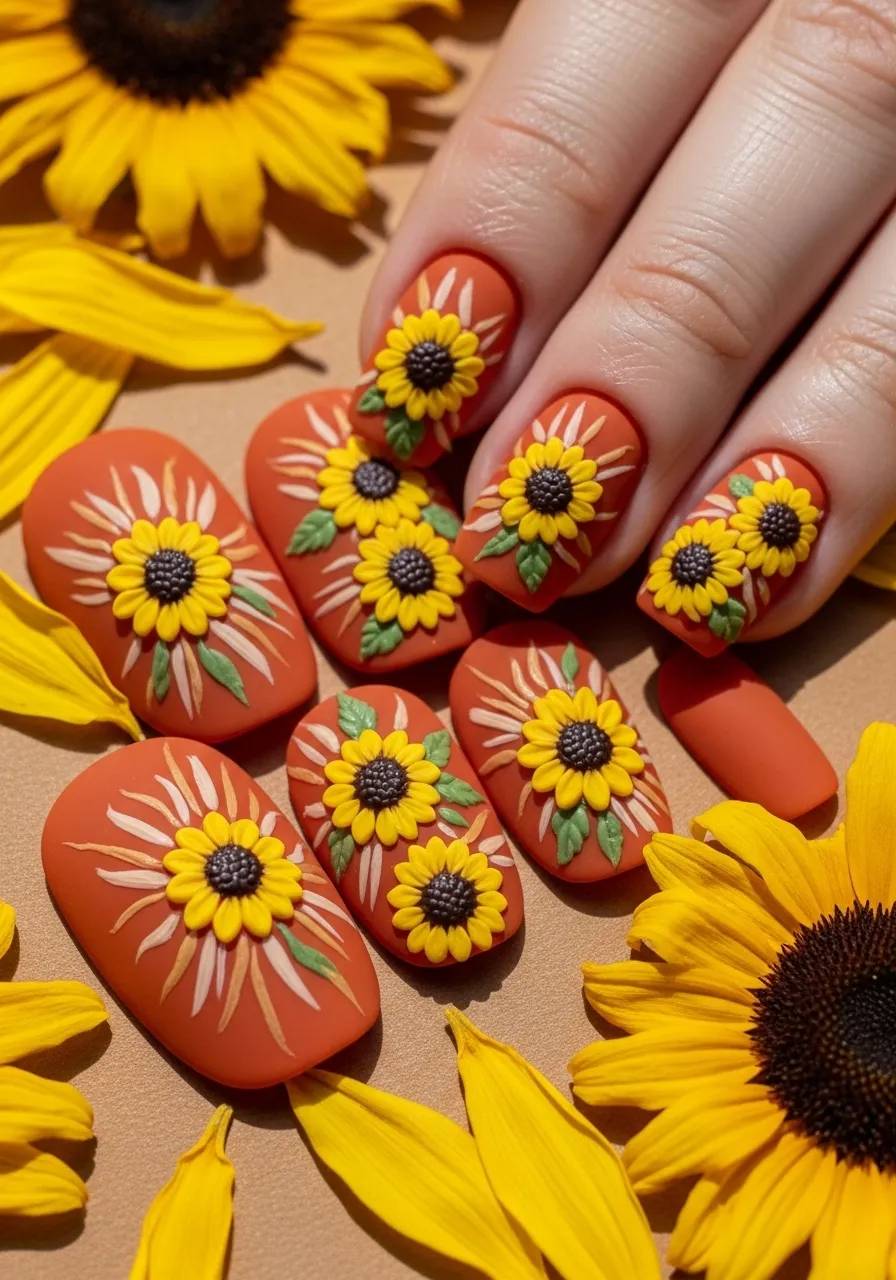
Sunflowers are deeply connected to the harvest and scarecrow visual world. Adding tiny hand-painted sunflowers to the scarecrow nail set brings in a bright, joyful energy that balances the creepier elements.
A tiny sunflower on a nail only needs five to seven petals around a small dark center to read clearly as the flower. At nail scale, simplicity is accuracy.
Use a dotting tool to place a dark brown or deep orange dot near the center of the nail. This becomes the flower center. Use a thin petal brush or the corner of a flat brush to add bright yellow petals radiating outward from the center dot.
Once the petals are dry, add a few dark brown seed dot details on the center using the dotting tool again. This gives the sunflower center the characteristic textured look.
Combine sunflower accent nails with patchwork plaid nails and plain fall tones on the remaining fingers. The sunflower nails bring color and lightness to what might otherwise be a darker, more muted set.
Green leaf details beside the sunflower are a nice touch if you are comfortable with the additional brushwork. A simple curved stroke on each side of the flower represents the leaves without requiring detailed botanical accuracy.
This variation of the scarecrow nail theme is the most cheerful and least spooky option on this list, making it ideal for people who love the harvest theme but prefer to skip the creepy elements entirely.
Negative Space Scarecrow Nails
Negative space nail design uses the natural nail as part of the visual. Areas of bare nail become intentional design elements rather than unpainted gaps.
Applied to scarecrow nails, negative space creates a modern, editorial look that feels very different from traditional full-coverage nail art.
Leave a thin strip or geometric shape bare at the center of each nail. Paint the surrounding areas in burnt orange or matte black with scarecrow stitch marks along the edges of the negative space.
The bare nail strip becomes the visual division between two painted zones. Add stitch marks along the edge of the bare area to frame it and connect it to the scarecrow patchwork concept.
Another option is leaving the full center bare in a diamond or oval shape while painting the tip and the cuticle area in contrasting fall colors.
Apply a clean base coat over the entire nail before starting. This protects the natural nail and gives the bare areas a clean, polished look even though they remain uncovered by color.
Nail tape is extremely helpful for negative space designs. It creates the clean, hard edges between painted and unpainted zones that give the design its graphic quality.
This style suits people who want something that feels current and artistic rather than traditionally cute or spooky. It is the nail designer’s approach to Halloween rather than the costume party approach.
Scarecrow Nails With Hay Bale Background
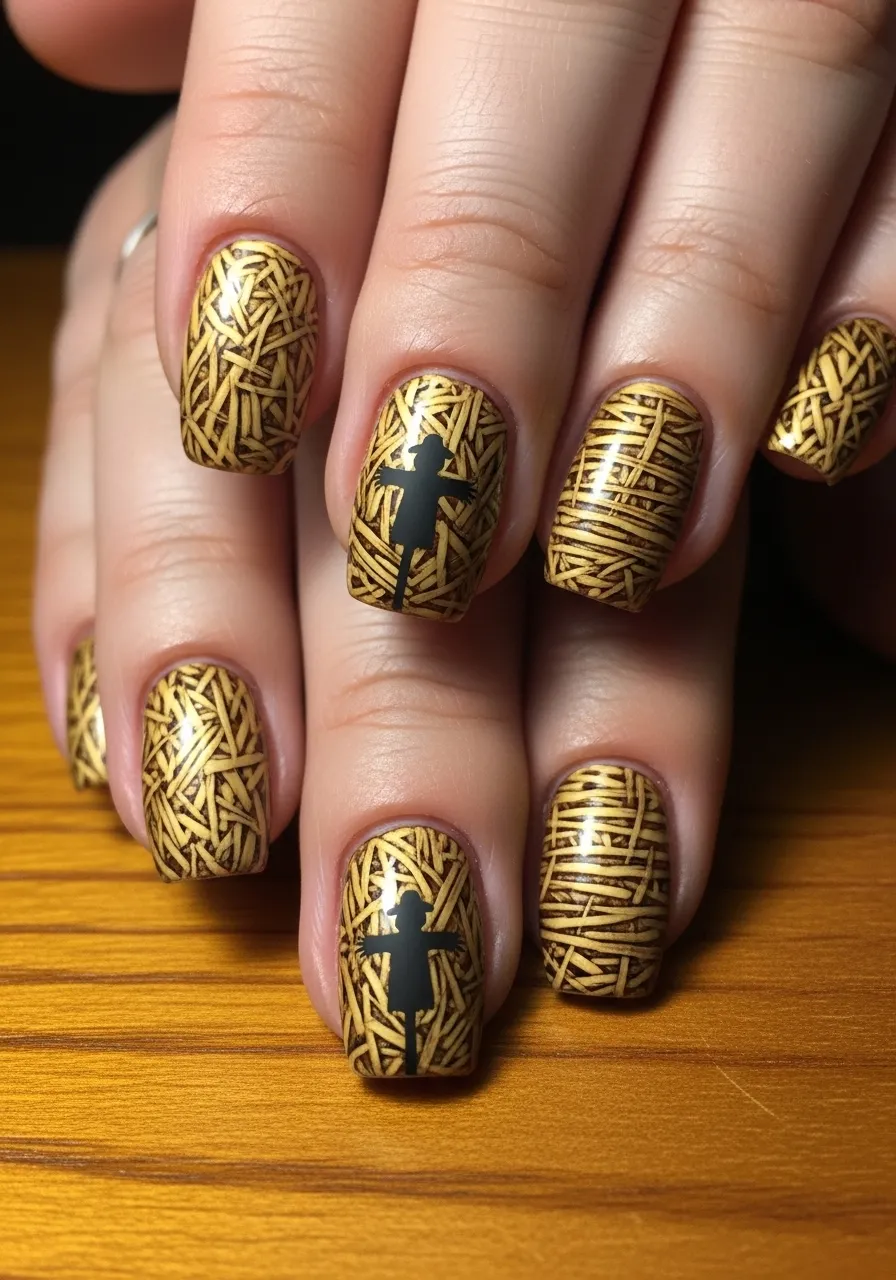
A hay bale background texture takes the scarecrow nail concept one step further by suggesting the full scene rather than just the character details.
The hay bale texture is created by painting tight, horizontal golden strokes across the entire nail surface. These strokes should vary slightly in tone using two or three shades of gold, amber, and dark tan.
Load a thin brush with your darkest gold shade and draw horizontal lines from edge to edge. Fill the nail almost completely. Then add lighter golden lines on top, also horizontal. Finally, a very few near-white highlights add depth.
The result is a surface that genuinely reads as compressed hay or straw bale material.
On one or two accent nails, add a tiny simplified scarecrow silhouette standing in front of the hay background. The silhouette only needs to be recognizable. A body shape, hat, and outstretched arms is sufficient at nail scale.
This design is more advanced than many others on this list because it requires multiple layers of texture work. But the result is genuinely impressive and unlike anything commonly seen in Halloween nail art.
Start with this design on the accent nails first. If you are happy with the result, continue the hay texture to the remaining nails. If not, the surrounding nails can simply be plain fall colors without any loss of cohesion.
Scarecrow Nails Are the Perfect Halloween Manicure
Scarecrow nails deliver something that most Halloween nail designs cannot. They sit at the exact intersection of spooky and sweet, giving you a seasonally festive look without being aggressive or over-the-top. Every idea on this list is achievable at home with basic tools, affordable products, and a little patience. Start with the simplest designs, like color block stitch nails or nail wraps, if you are new to nail art. Work your way toward the more detailed options like the tiny scarecrow face or the hay bale background as your confidence grows. The materials are inexpensive, the learning curve is gentle, and the results are genuinely impressive. Pick one or two of these ideas that speak to your personal style and give them a try before Halloween arrives. Your nails are a small canvas with a lot of potential, and the scarecrow theme gives you the perfect autumn opportunity to make the most of them.