If you love horror and you love nails, Chucky nail ideas are the perfect mashup. These designs pull straight from the Child’s Play universe and turn your fingertips into tiny horror scenes. Whether you want something subtle with just a pop of color or a full-on scary doll face on each nail, there is something here for every skill level. The best part? Most of these looks are totally doable at home with drugstore supplies. Get ready to creep everyone out. If you’re also exploring Bat nail ideas, dark silhouettes, gothic accents, and subtle wing-inspired designs can help create a spooky yet stylish manicure that works perfectly for Halloween or year-round edgy looks.
1. Classic Chucky Face on a Nude Base
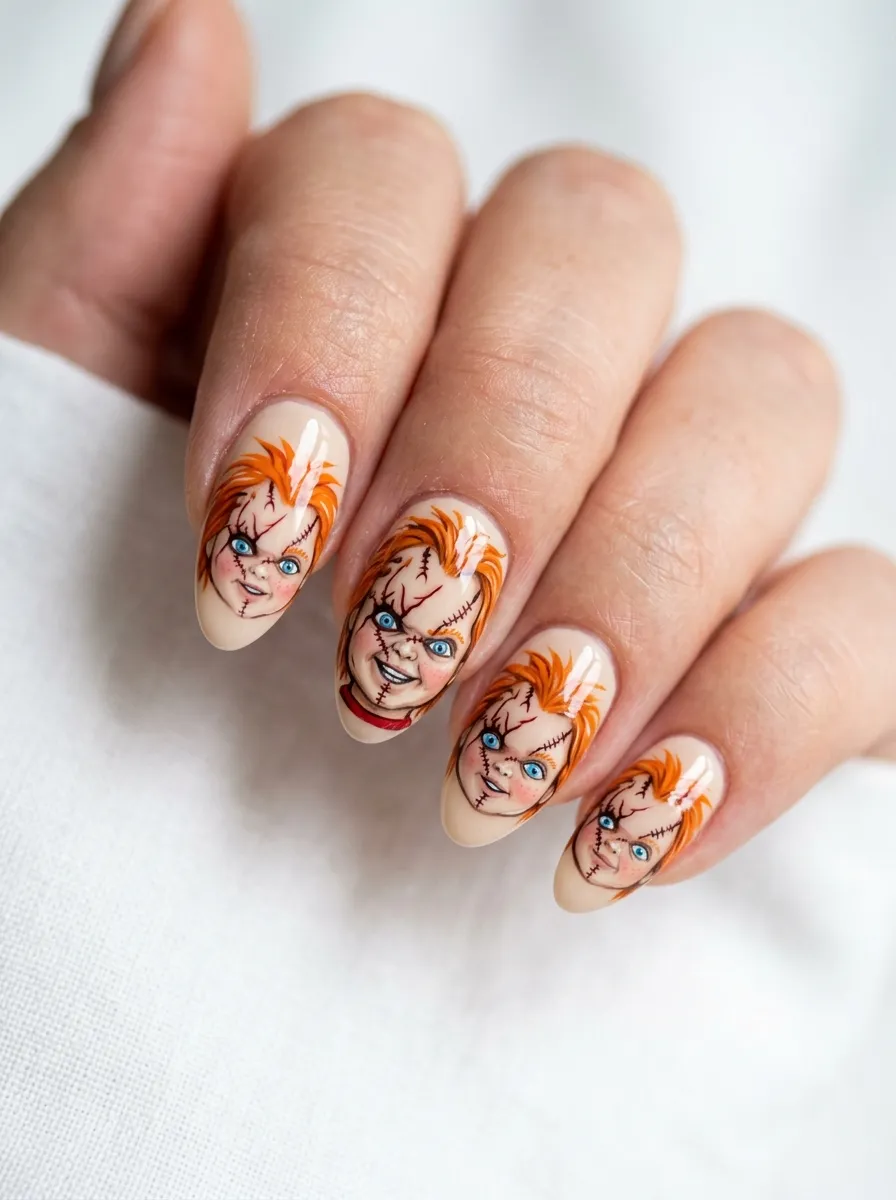
This is the one that started it all. A pale nude or ivory base coat gives you the perfect blank canvas to paint that iconic Chucky face right in the center of your nail.
You do not need to be a nail artist to pull this off. Start with your base coat. Then use a thin nail art brush or a dotting tool to build the face step by step.
Start with a circle of light skin tone paint. Add two blue oval eyes. Dot in black pupils. Add a little red mouth shape. Then finish with a few tiny stitched lines using a striping brush.
Orange hair is the key. Even if your face looks a little rough around the edges, those orange squiggles at the top sell the whole look.
Grab a set of nail art brushes from the dollar section at most beauty supply stores. Acrylic paints work great on top of gel base coats too.
Seal everything with a glossy top coat so the design stays put for days. This look gets major double-takes every single time.
2. Striped Overalls Accent Nail
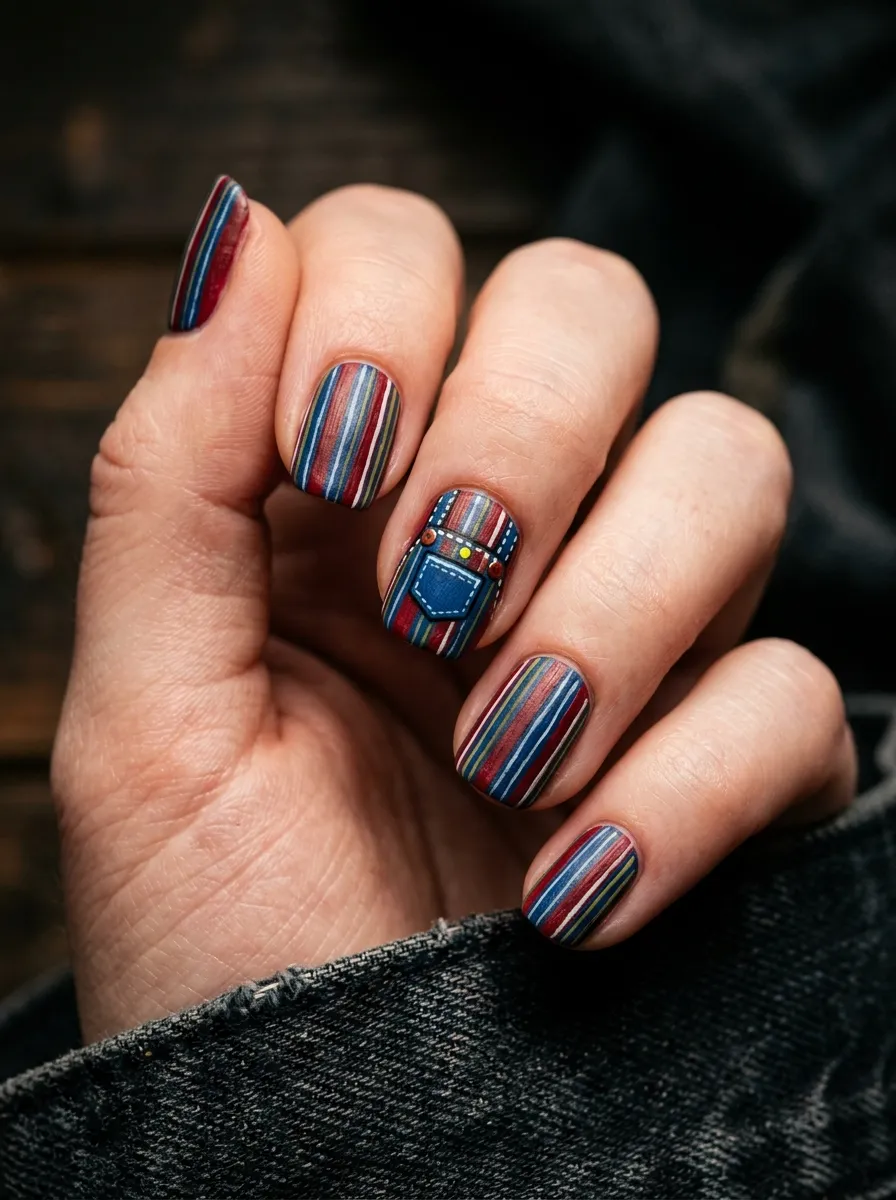
Chucky’s overalls are just as recognizable as his face. This design skips the face entirely and focuses on recreating that bold red and blue striped pattern across your nails.
It reads as Chucky immediately. Even without a single painted eye or scar.
Use a nail striping brush or tape to create clean vertical lines. Alternate between deep red and navy blue to get the classic overalls look. Leave one nail as a solid navy to represent the bib.
You can even add a tiny yellow square on that solid nail with a toothpick to mimic the denim pocket stitching.
This is a great option for people who do not want to attempt painting a face. The stripes alone tell the whole story.
Budget tip: A set of striping brushes costs around two dollars online. Use regular nail polish for this since layering polish stripes is actually easier than using acrylic paint on a tiny surface.
Finish with a matte top coat for a fabric-like effect that makes the stripes look almost like real denim. Simple, creepy, and immediately recognizable at any Halloween party.
3. Bloody Knife Accent Nail
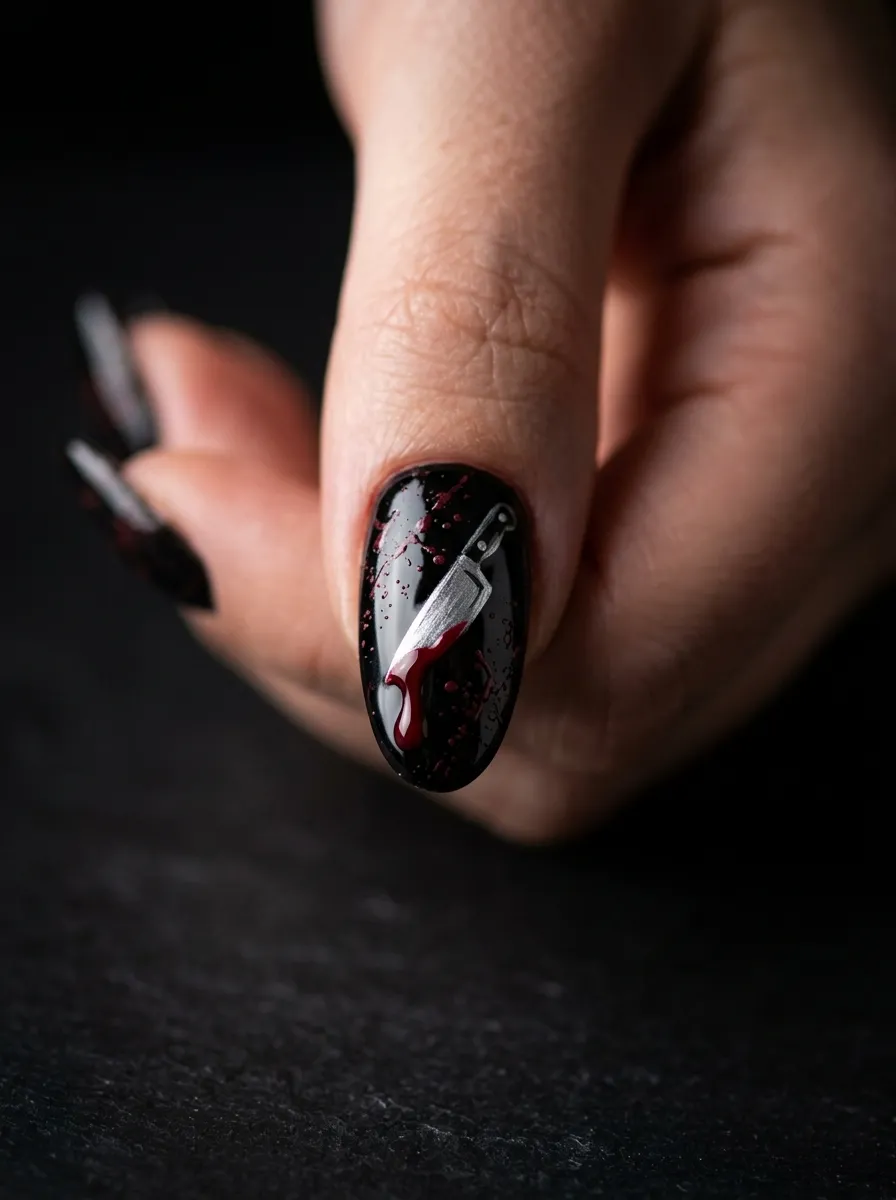
Every Chucky look needs a weapon. A bloody knife accent nail is the easiest way to take your set from spooky to full horror.
Pick one or two nails as accent nails. Use a black base coat on those nails. Then paint a simple silver or chrome-colored knife shape using a thin art brush.
Add drips of red gel or red nail polish coming off the blade. Let them curve slightly downward to look like they are actually dripping.
A toothpick works perfectly for adding fine blood splatter dots around the knife. Dip the tip in red polish and flick or tap it gently across the nail.
Gel top coat makes the blood look wet and glossy. That tiny detail takes the whole design from flat to genuinely unsettling.
This accent pairs perfectly with plain red nails or the striped overalls design on the rest of your fingers. You do not need a full hand of detailed art. Just one sharp nail can carry the whole vibe.
Dollar store metallic nail polish works fine for the knife. The shine reads as metal even without an expensive chrome powder. Keep it simple and let the red do the dramatic work.
4. Stitched Scar Detail Nails
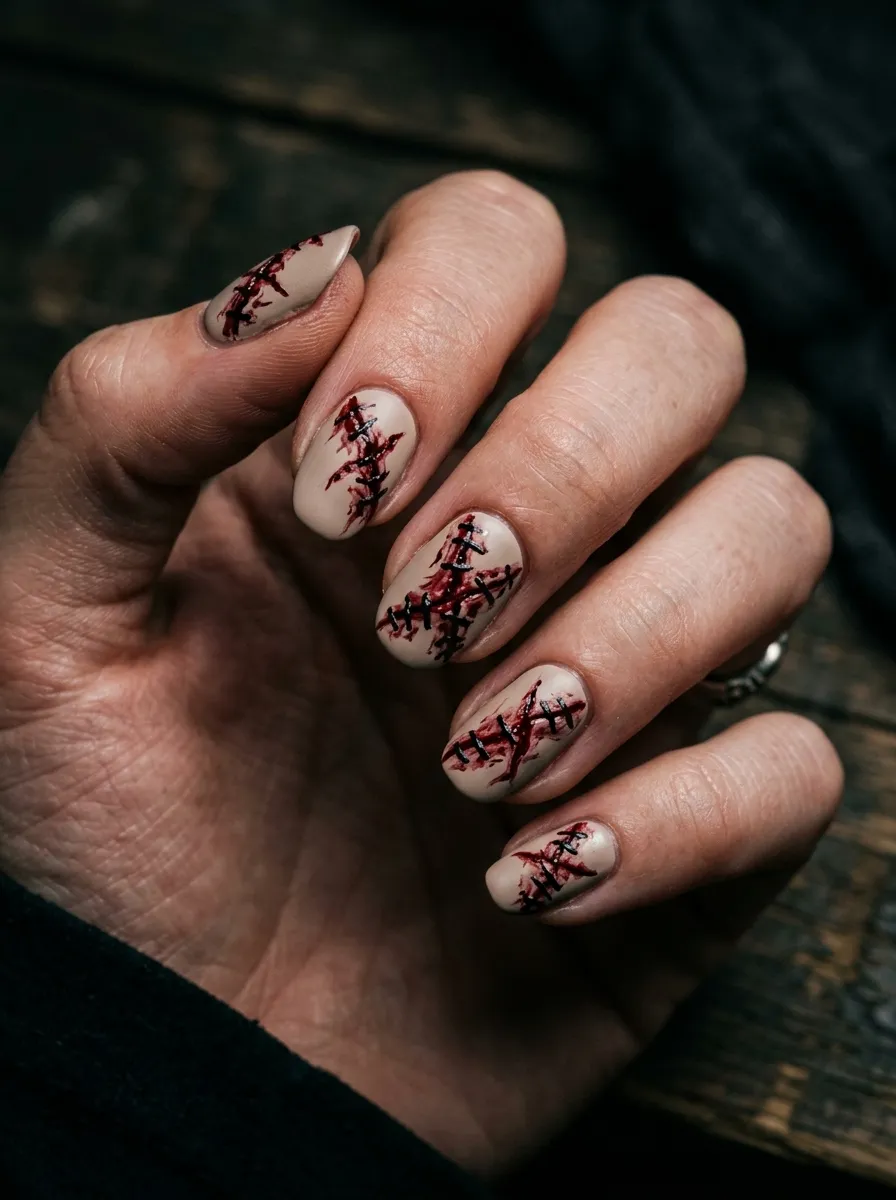
The stitches on Chucky’s face are one of the most iconic details in horror. Recreating them on your nails is surprisingly simple and genuinely creepy.
Start with a pale skin-tone or off-white base coat. Once it is dry, use a thin black striping brush to paint a jagged horizontal line across the nail.
Then cross it with tiny vertical tick marks to create the stitch pattern. These do not need to be perfect. In fact, the messier and more uneven they look, the more realistic the effect.
Add a tiny bit of dark red or brown underneath each stitch line. This creates the illusion of a wound beneath the thread.
The imperfection is what makes it work. Real stitches are never perfect. Let your brush wobble a little.
This design works on any nail length and any shape. It looks especially disturbing on a longer coffin shape because the scar line has more room to stretch across the nail.
A black acrylic paint and a thin art brush from a craft store is all you need. Seal with a matte top coat so the stitches look like they are sitting on skin rather than plastic.
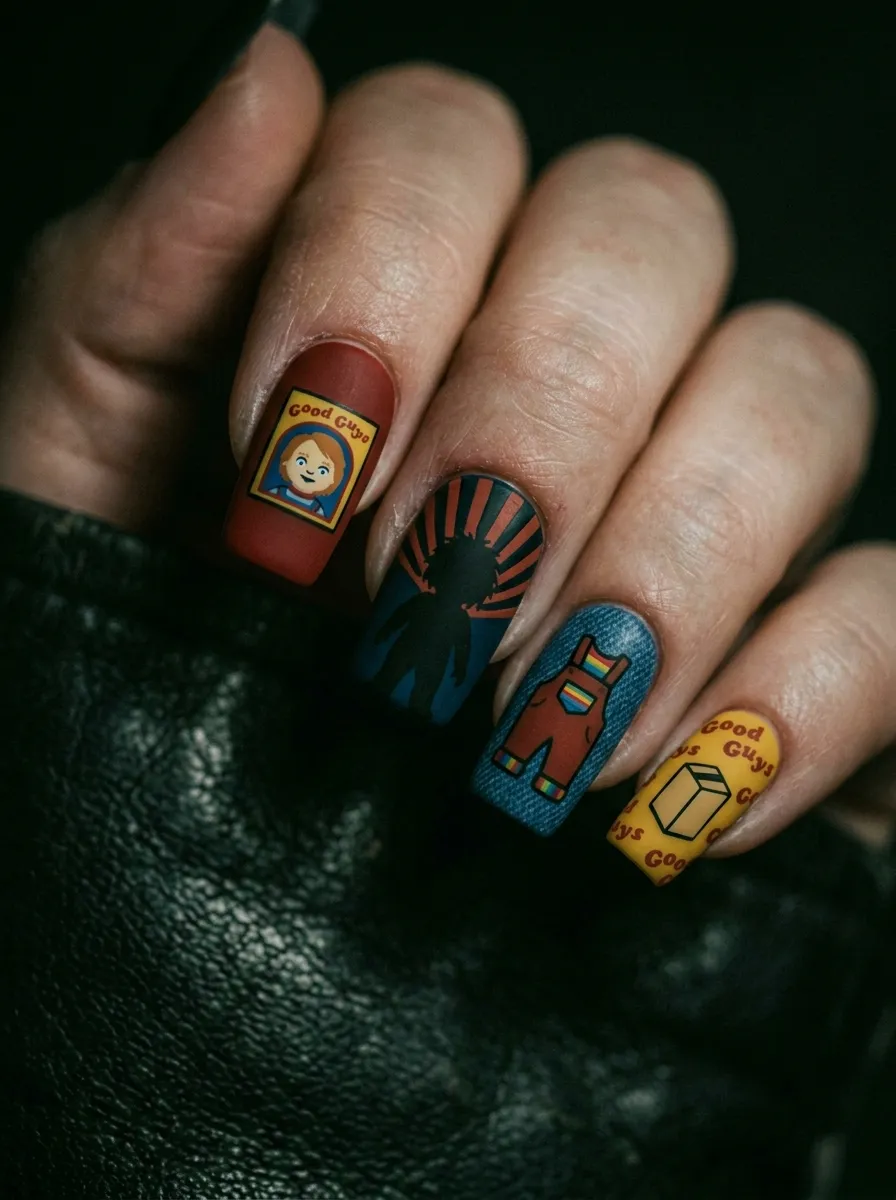
5. Good Guy Box Art Nails
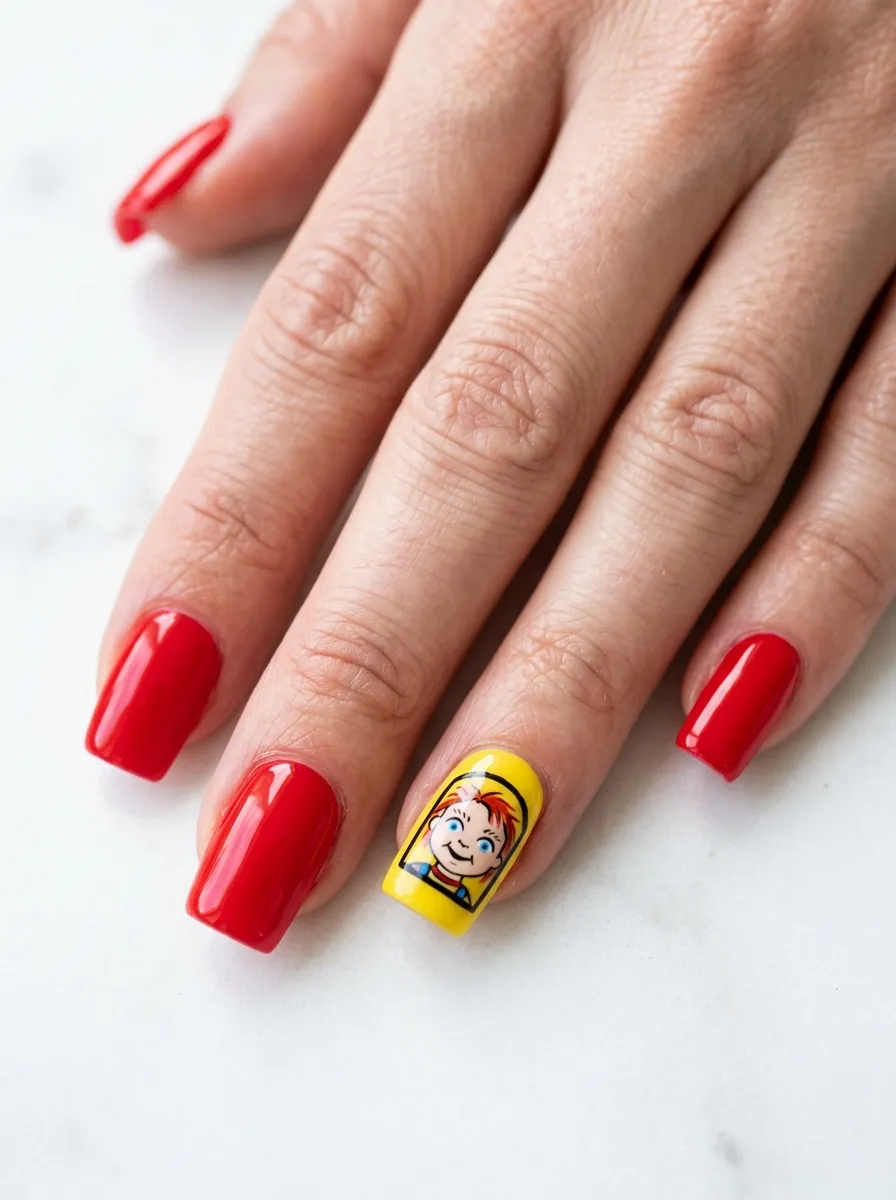
The original Good Guy doll box is bright, cheerful, and totally unsettling when you know what is inside it. Turning that box art into a nail design is a fun and unexpected way to do Chucky-themed nails.
Use a bright red or yellow base coat on most of your nails. Then on one accent nail, paint a simple rectangle to represent the toy box.
Inside the box, use a thin brush to paint a tiny simplified Chucky face or doll shape. You are not going for museum-level realism here. Just enough detail to read as the Good Guy doll in its packaging.
Add a thin white or yellow border around the box shape to mimic the packaging edges.
The contrast between the bright cheerful colors and the creepy subject is what makes this design hit hard. People will look twice before they realize what they are actually seeing.
This works really well for Halloween events where you want to tell a visual story through your nails. Pair it with orange or yellow on the other nails to keep the palette cohesive.
Acrylic craft paint layered over a gel base coat gives you the most control for this detailed work. A toothpick can help add the smallest details.
6. Red and White Striped French Tips with Chucky Twist
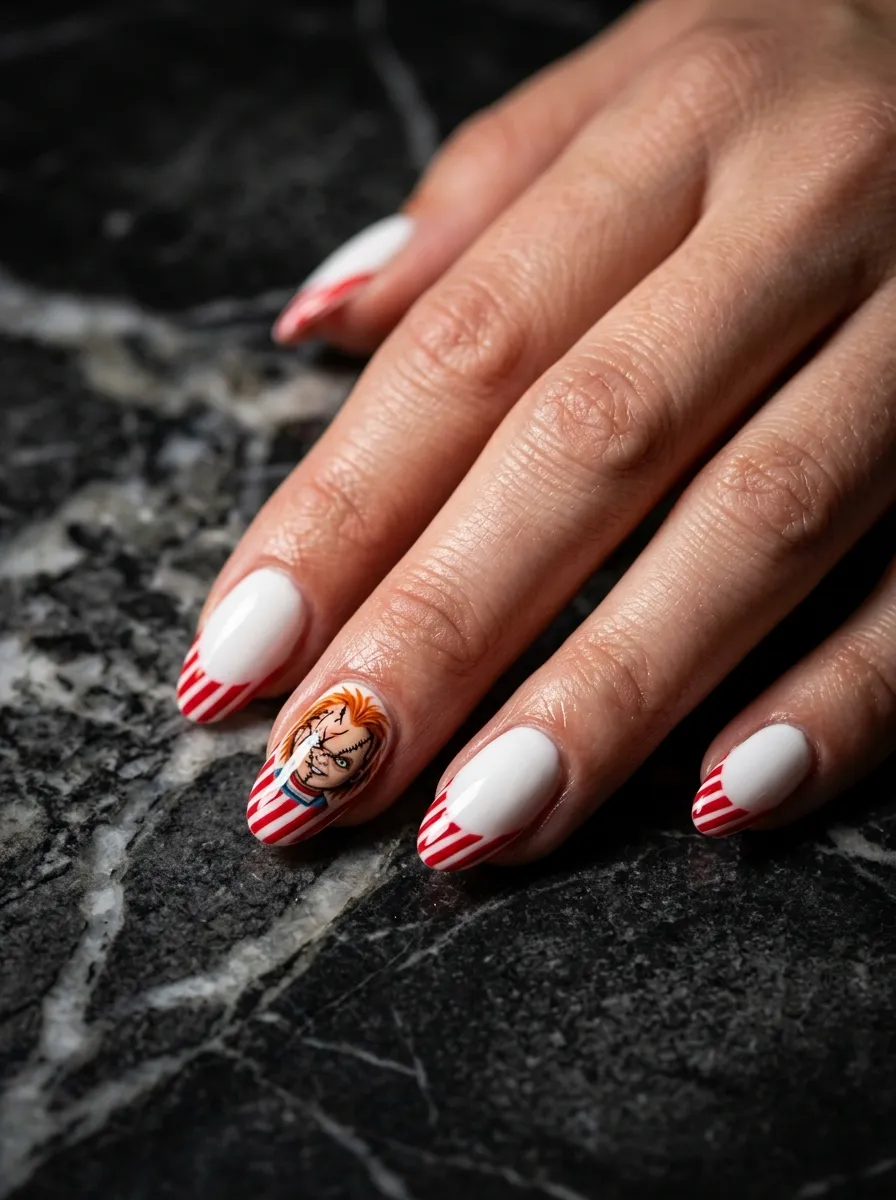
French tips get a horror upgrade here. Instead of the classic white tip, alternate between red and white diagonal stripes at the nail tip to reference Chucky’s striped shirt peeking out from under the overalls.
Use nail tape or a striping brush to keep the lines sharp. The stripes should angle slightly to feel more dynamic and less like candy cane.
On one accent nail, skip the striped tip and paint a small Chucky face near the cuticle area instead. This creates a focal point without overwhelming the whole set.
The contrast between a clean French-style base and the horror details gives this design a stylish edge that works outside of Halloween too.
This is the set for someone who loves horror but still needs nails that look professional at work. From a distance it just reads as striped French tips. Up close? Pure nightmare fuel.
Use red nail polish for the stripes and a white gel base for the cleanest result. Finish with a glossy top coat to keep everything polished.
The whole set can be done in under an hour once you have your base coats dry. Practice the stripes on a piece of plastic wrap before committing to the nail.
7. Voodoo Doll Pin Nails
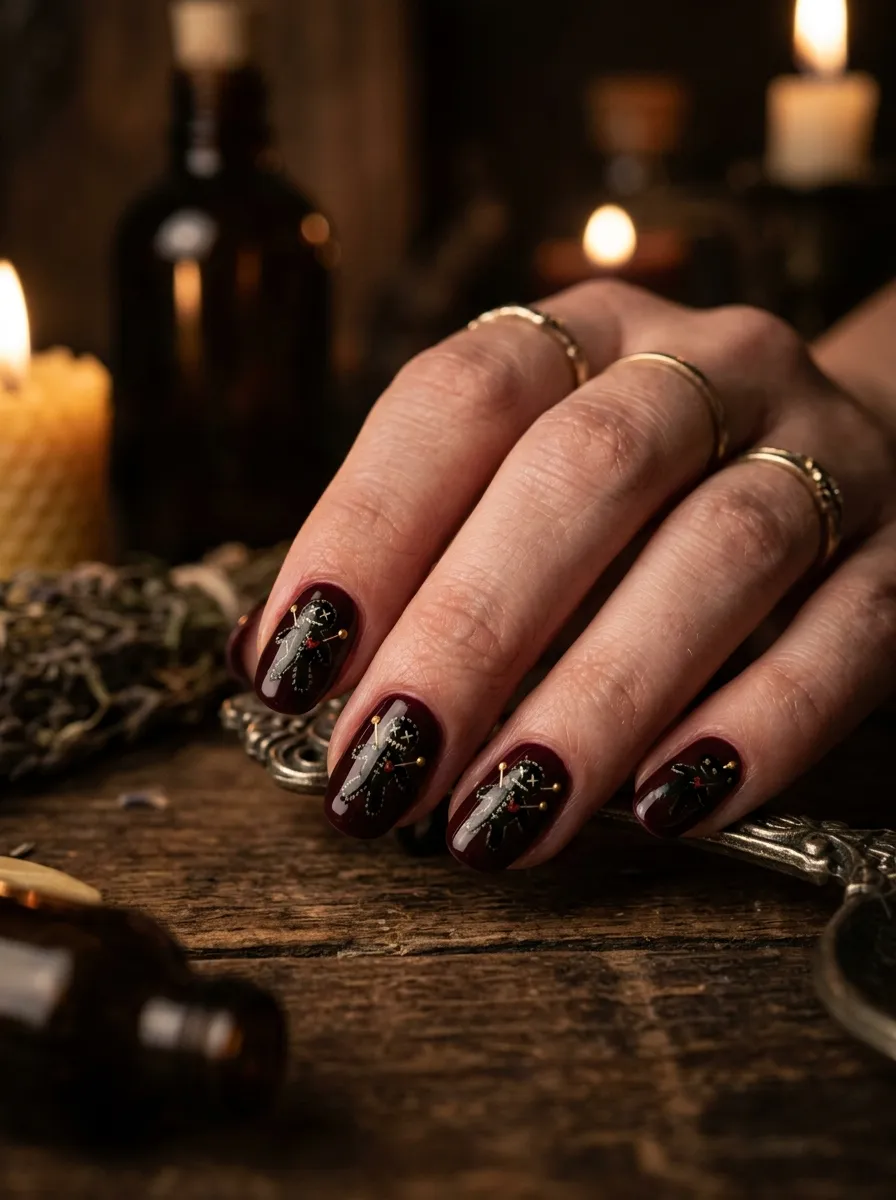
Chucky’s whole origin story involves voodoo. So these nails go back to the source. A dark burgundy or deep plum base coat sets the tone immediately.
Paint a simple voodoo doll silhouette on each nail using a thin nail brush and white or off-white nail paint. The shape is just a stick figure with a rounded head. You do not need it to be detailed.
Add tiny gold dots across the doll shapes to represent the pins. A dotting tool or a toothpick dipped in gold nail art powder creates a metallic pin effect.
A few red drip lines around the pins make it look like the doll is actually bleeding.
Keeping the color palette dark and moody is what makes this design feel genuinely eerie rather than just cute Halloween art.
This is one of the easier designs in this list because you are working with silhouettes rather than detailed faces. Anyone can paint a basic stick figure outline.
Nail art dotting tools cost less than three dollars online and make the gold pin dots perfectly round every single time. Seal with a glossy top coat to make those gold dots pop.
8. Chucky Eye Close-Up Nails
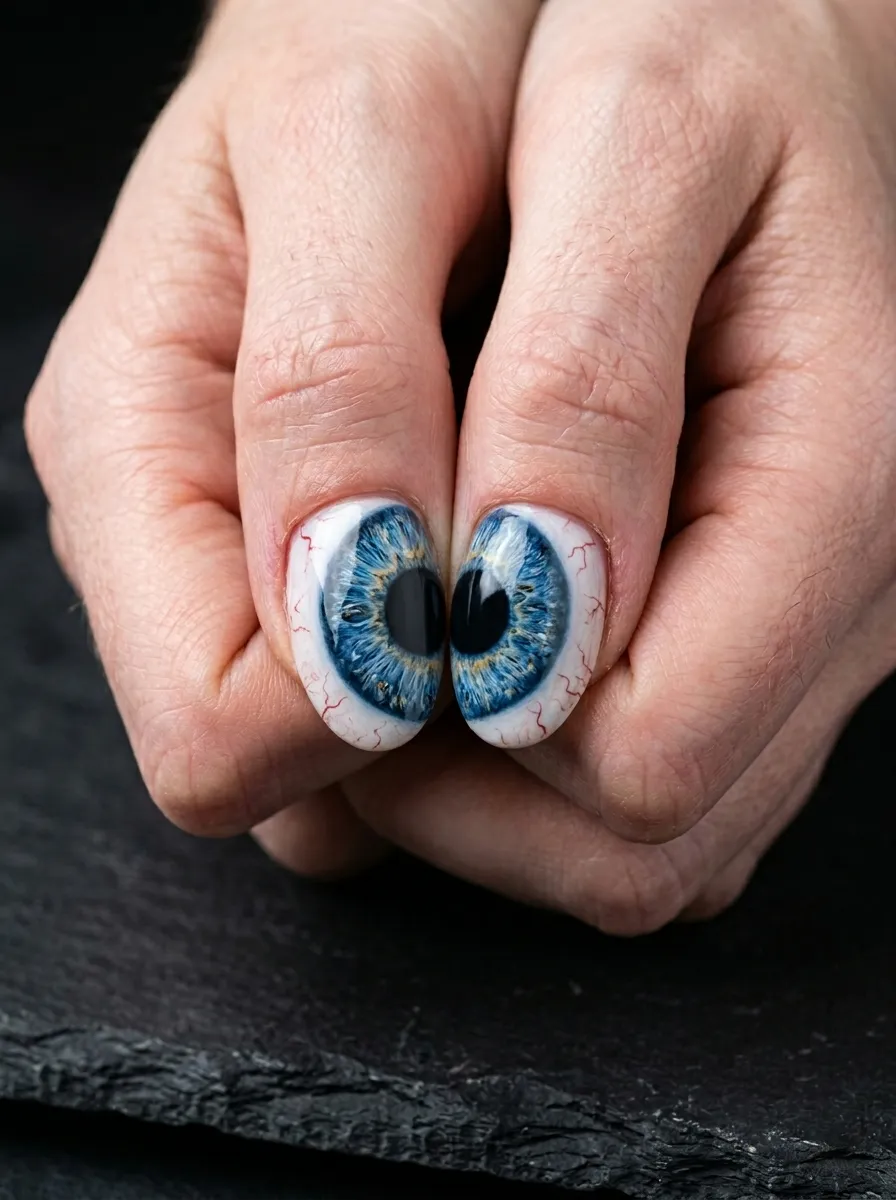
There is something deeply unsettling about a pair of eyes staring up at you from a fingernail. This design zooms in on Chucky’s wide blue eyes and fills the entire nail surface with just one eye per nail.
Use a pale skin-tone base. Then paint a large white oval taking up most of the nail. Fill in the iris with bright blue. Add a black circle for the pupil and tiny white highlight dot.
Around the white of the eye, add very thin red lines radiating from the inner corner to mimic bloodshot veins. These can be drawn with the thinnest nail art brush you have.
The bigger and more wide-open the eye looks, the more unsettling the effect.
You can do alternating eyes across your fingers so when you put your hands together it looks like Chucky is staring at whoever is watching.
This design is actually more approachable than it looks because you are painting basic shapes. A white oval, a blue circle, a black circle, a white dot. That is the whole formula.
Seal with a glossy top coat to give the eyes a wet, alive-looking finish. That shine takes it from painted to genuinely creepy.
9. Tiffany and Chucky Couples Nails
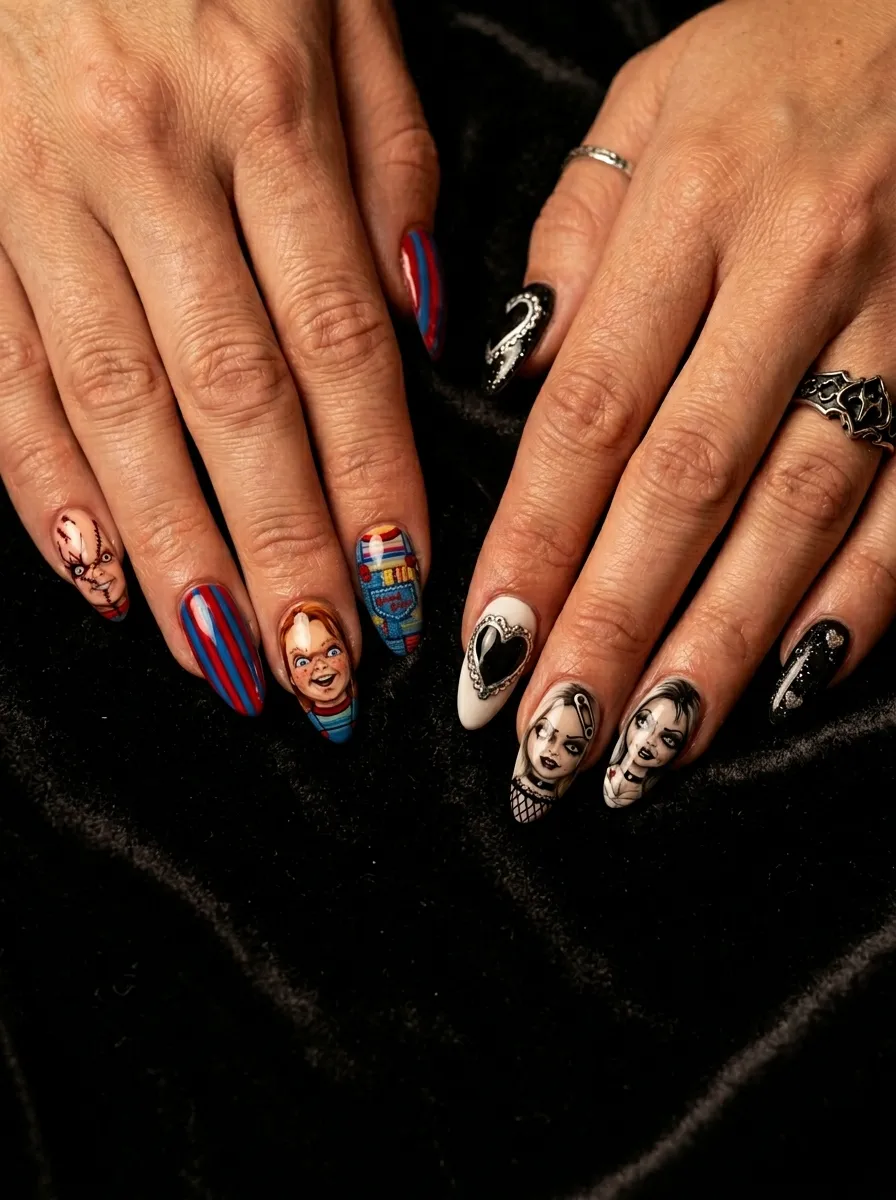
If you want to do a joint Halloween couples costume through your nails, this is the idea. Split the set between Chucky’s red-blue striped details and Tiffany’s goth bride aesthetic.
On one hand, do Chucky elements. Think orange hair tips, striped accent nails, and stitched scar details on the middle finger.
On the other hand, do Tiffany. A black base coat with a white bridal veil edge on the tip. A tiny heart on the accent nail. Dark red lip shapes. A strand of pearls painted along one nail.
The two hands tell a complete horror love story without saying a word.
This is a great option for Halloween parties where you want your nails to be a conversation starter. People will immediately recognize both characters when they see both hands together.
Budget-friendly approach: pick up a black, white, red, and orange nail polish set. Everything else can be done with a toothpick and steady hands.
This also works great as a solo set if you just love both characters. No partner required to pull off the Tiffany and Chucky nail combination.
10. Chucky Orange Hair Tips
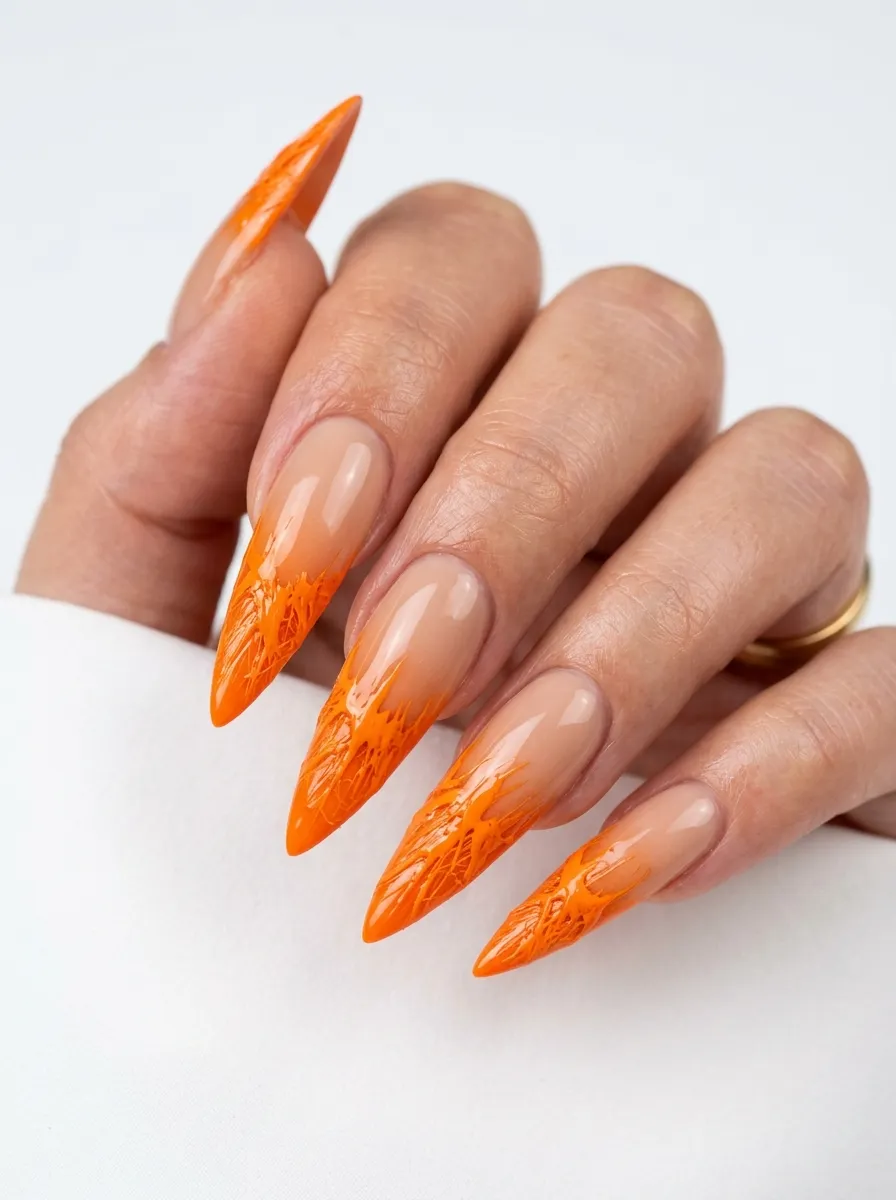
Orange is the most Chucky color there is. This design skips all the face painting and just leans into that wild orange hair through an ombre or French tip effect.
Start with a pale nude or skin-tone base. At the tip of the nail, apply a fiery orange or burnt orange polish. You can keep the edge straight for a clean French tip look or feather it slightly upward to mimic wild hair strands.
Use a thin brush to add a few darker orange lines pointing upward from the tip. This gives the illusion of actual doll hair texture.
The messier and more jagged the hair lines look, the better this design reads as Chucky.
This is a great beginner-friendly Chucky nail because there is no face to paint. Just color placement and a few simple strokes.
Pair this with a single stitched scar accent nail or a bloody knife on one finger to tie the whole set to Chucky without needing to paint his entire face.
Orange nail polish is easy to find in Halloween collections at any drugstore. Look for a shade that leans slightly red-orange rather than yellow-orange to match Chucky’s exact hair color.
11. Glitter Blood Splatter Nails
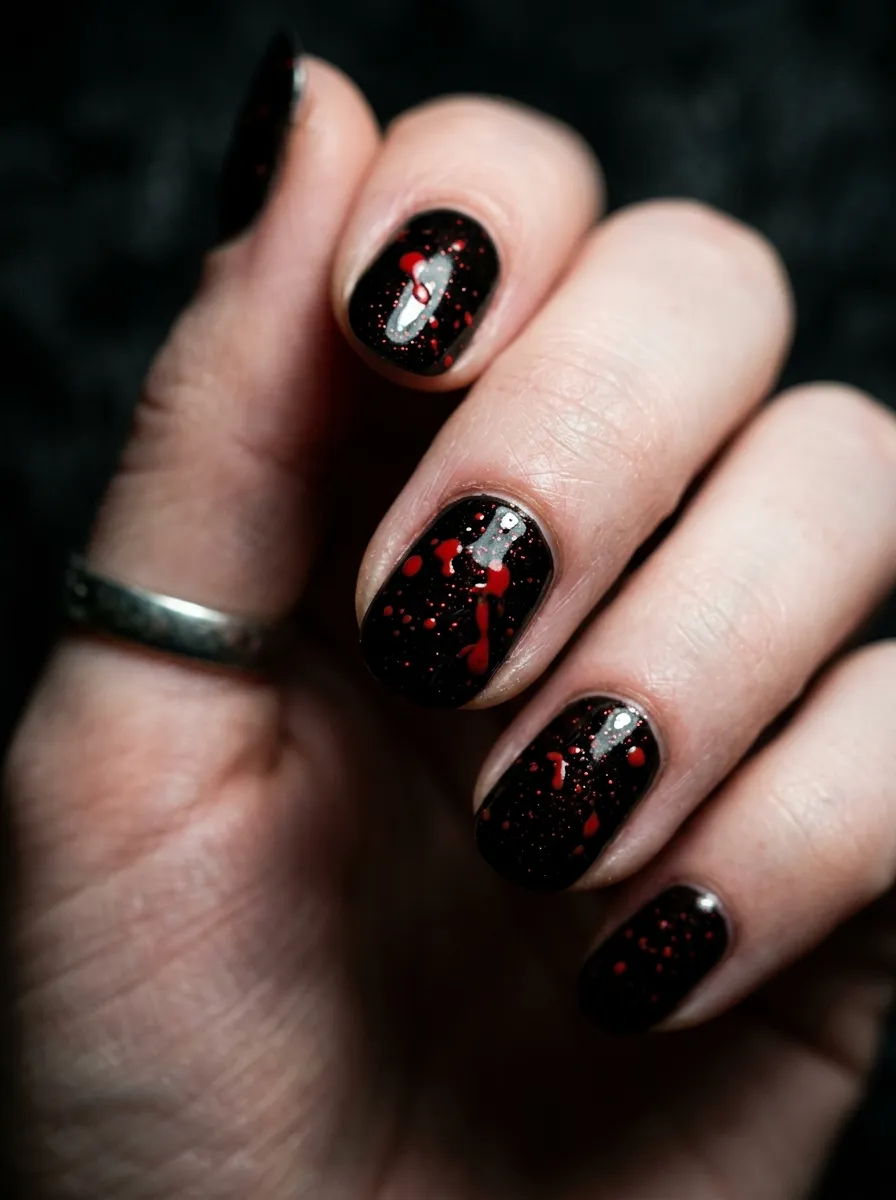
This one has a glam horror quality that works perfectly if you want scary nails that still catch the light. Start with a glossy black base coat on all nails.
Once dry, load a thin brush with red polish. Hold it a few inches from your nail and flick the bristles with your finger to splatter tiny red droplets across the surface.
While the red splatter is still wet, press a tiny amount of red holographic glitter into a few of the droplets. This makes certain spots look like they are catching light in an almost wet, blood-like way.
The combination of matte black, glossy red, and glitter creates a texture that looks genuinely disturbing under different lighting conditions.
Finish with a high-shine gel top coat to lock the glitter in and give the whole nail a blood-soaked wet look.
This design works on any nail length and shape. The longer the nail, the more room you have for dramatic splatter effects.
A small container of red glitter from a craft store costs under one dollar. The splatter technique is also very forgiving since imperfect placement only makes it look more realistic.
12. Chucky in His Box Coffin Nails
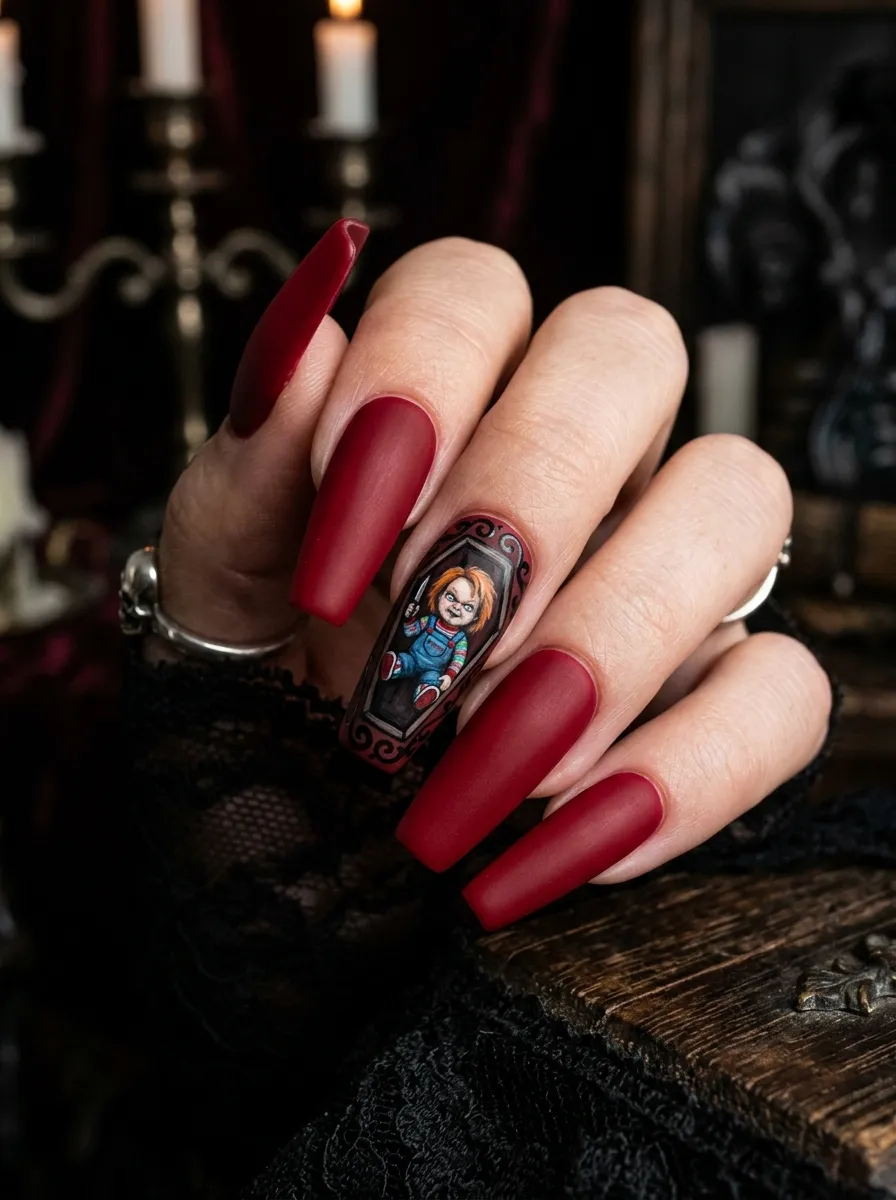
Coffin-shaped nails already have a horror quality to them. Pairing that shape with a Chucky inside an actual coffin design takes things to another level.
Paint all nails in deep matte red. On your ring finger, use a black base coat and paint a coffin or rectangular box outline in white or grey.
Inside the box, paint a tiny simplified Chucky figure. You only need the orange hair, two blue dot eyes, and the striped shirt to make it read clearly as Chucky.
The coffin nail shape itself mimics the coffin box you are painting. The whole nail becomes one unified concept.
Keep the Chucky figure small and centered in the box. Add tiny hinges on the sides of the box outline to make it look like an actual toy package.
This takes patience but is very achievable with a size 0 or size 00 nail art brush. These brushes cost about three dollars online and make tiny detail work so much cleaner.
A matte top coat on the red nails and a glossy top coat on the accent nail creates a contrast that draws the eye directly to the coffin detail. Simple technique with a big payoff.
13. Ombre Red to Black with Chucky Stamp
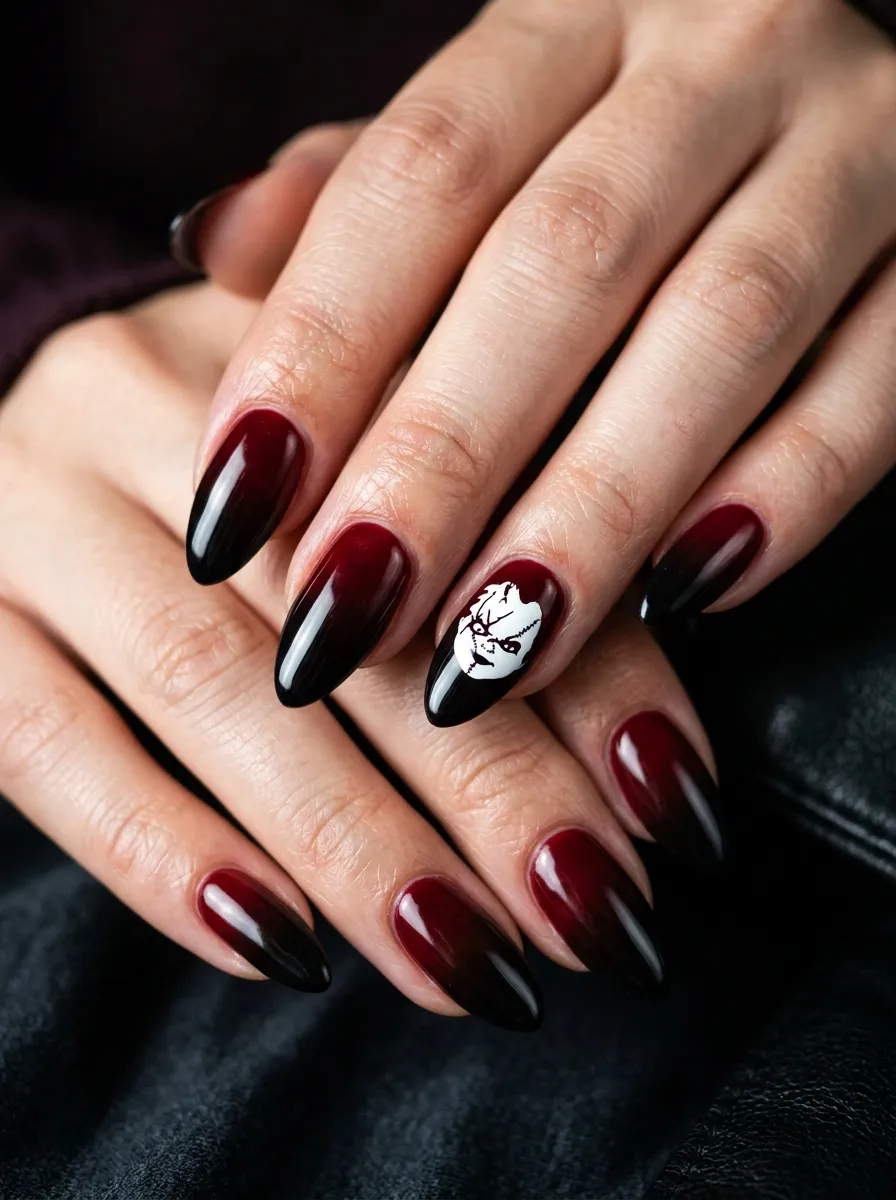
An ombre from deep blood red to solid black creates a moody base that screams horror before you even add a single Chucky detail. This gradient alone is already a statement.
Use a makeup sponge to dab red polish from the cuticle area upward. Then dab black from the tip downward. Blend where the two meet by dabbing back and forth gently.
Repeat this a few times with thin coats until the gradient looks smooth. Clean up the skin around your nails with a small brush dipped in acetone.
On one accent nail, use a nail stamping plate with a Chucky or doll face design. Apply your stamp color, press it to the nail, and lift.
Nail stamping plates with horror designs are available online for under five dollars and give you a clean printed image without any freehand painting required.
This is perfect for anyone who loves the Chucky aesthetic but is not confident in their freehand art skills. The stamping does the detailed work for you.
Seal the whole set with a glossy top coat. The shiny finish over that dark ombre looks incredibly dramatic and the stamped Chucky face pops beautifully against the gradient.
14. Chucky Doll Freckle Nails
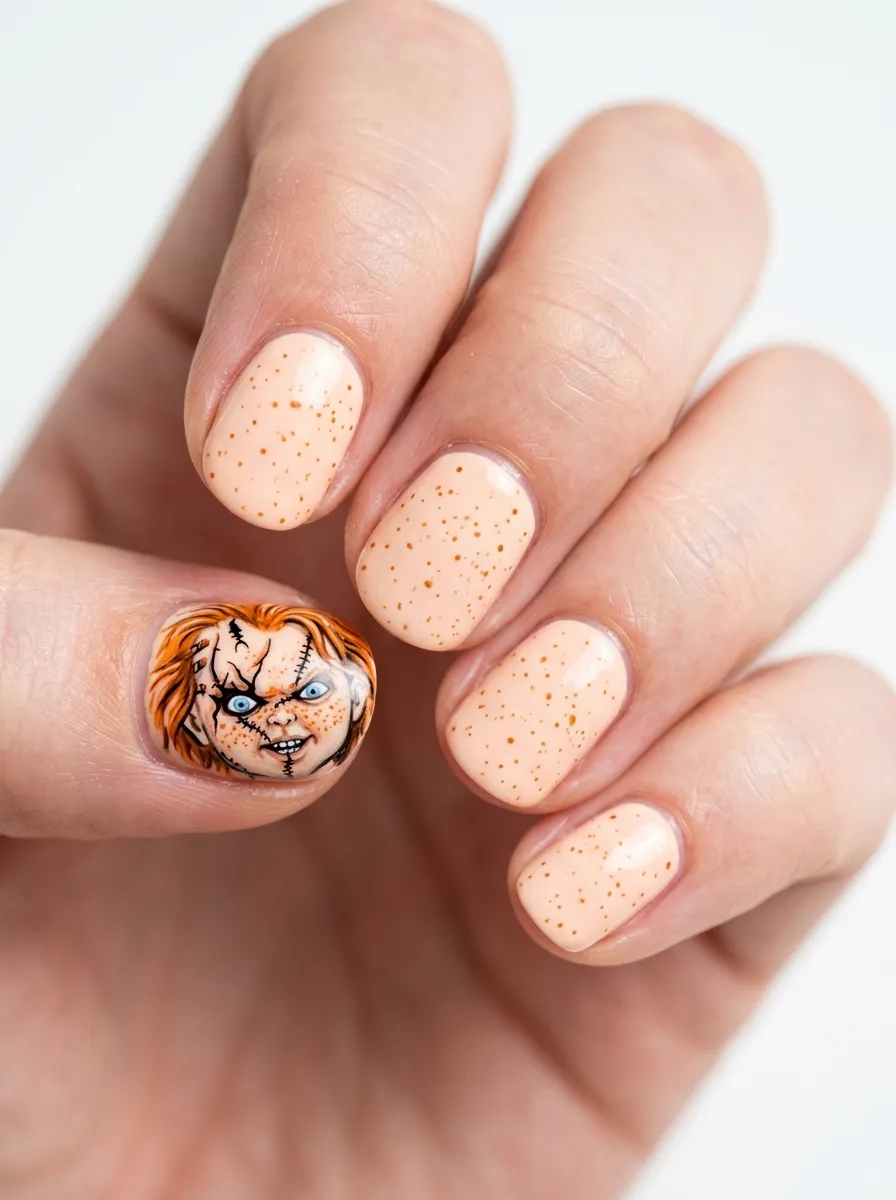
Chucky’s freckles are a detail that most people overlook. But once you see them, you cannot unsee them. These nails celebrate that specific detail in a subtle and creepy way.
Start with a pale peachy skin-tone base on all nails. Then use a dotting tool or toothpick to scatter tiny orange-brown dots across each nail in a random freckle pattern.
On your middle finger, paint a small Chucky face and make the freckles extra dense and prominent on the cheeks.
This design has an unsettling quality because it looks almost like a real child’s freckled skin stretched across your nail.
The color palette is very soft and skin-like which makes it feel more realistic than dramatically colored horror nails. That realism is where the creepiness comes from.
This is a great choice for subtle Chucky nails that fit into daily wear. Most people will not immediately identify it as horror nail art. But those who do will be impressed.
Use a light brown or terracotta shade for the freckles. A toothpick gives you more control than a dotting tool for placing individual dots exactly where you want them.
15. 3D Chucky Hair Texture Nails
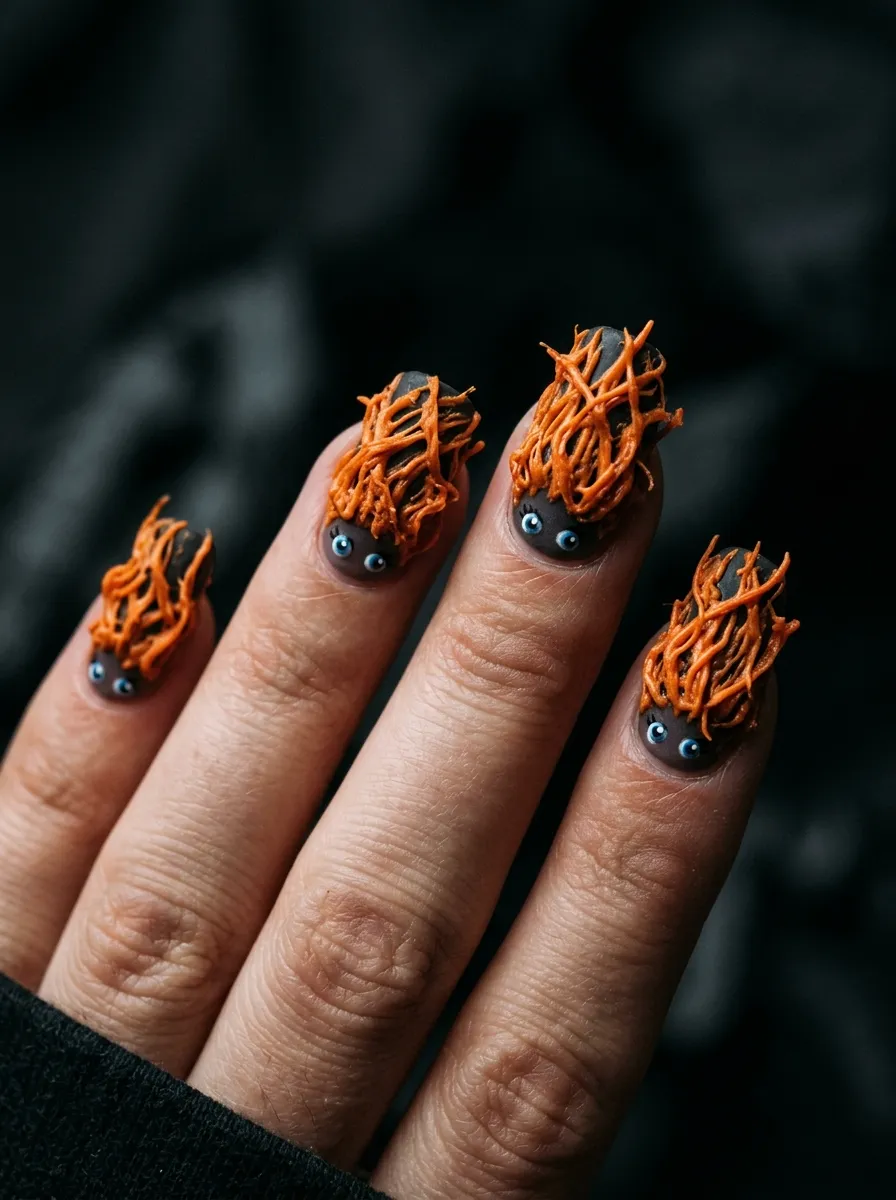
This design plays with texture to create a genuinely disturbing effect. Instead of painting orange hair, you build it using nail gel or acrylic so it actually stands up from the nail surface.
Apply a nude base coat. Then use a nail gel or builder gel to create raised lines starting from the tip of the nail downward. These raised ridges mimic wild strands of doll hair.
Color the raised strands with orange gel or polish. The texture catches light differently at different angles which makes it look like actual hair.
At the base of the hair near the cuticle, paint two tiny blue eyes peeking up from underneath the hair. Just two blue ovals and two black dots.
From a distance it looks like an orange textured nail. Up close, Chucky is staring back at you from under the hair. That reveal is what makes it so effective.
Builder gel and nail gel for texture effects are available at beauty supply stores for around ten dollars for a bottle that will last you many applications.
This design works best on longer nails where the hair strands have room to drape and look convincing. Short nails can still work but the effect is less dramatic.
16. Negative Space Chucky Silhouette Nails
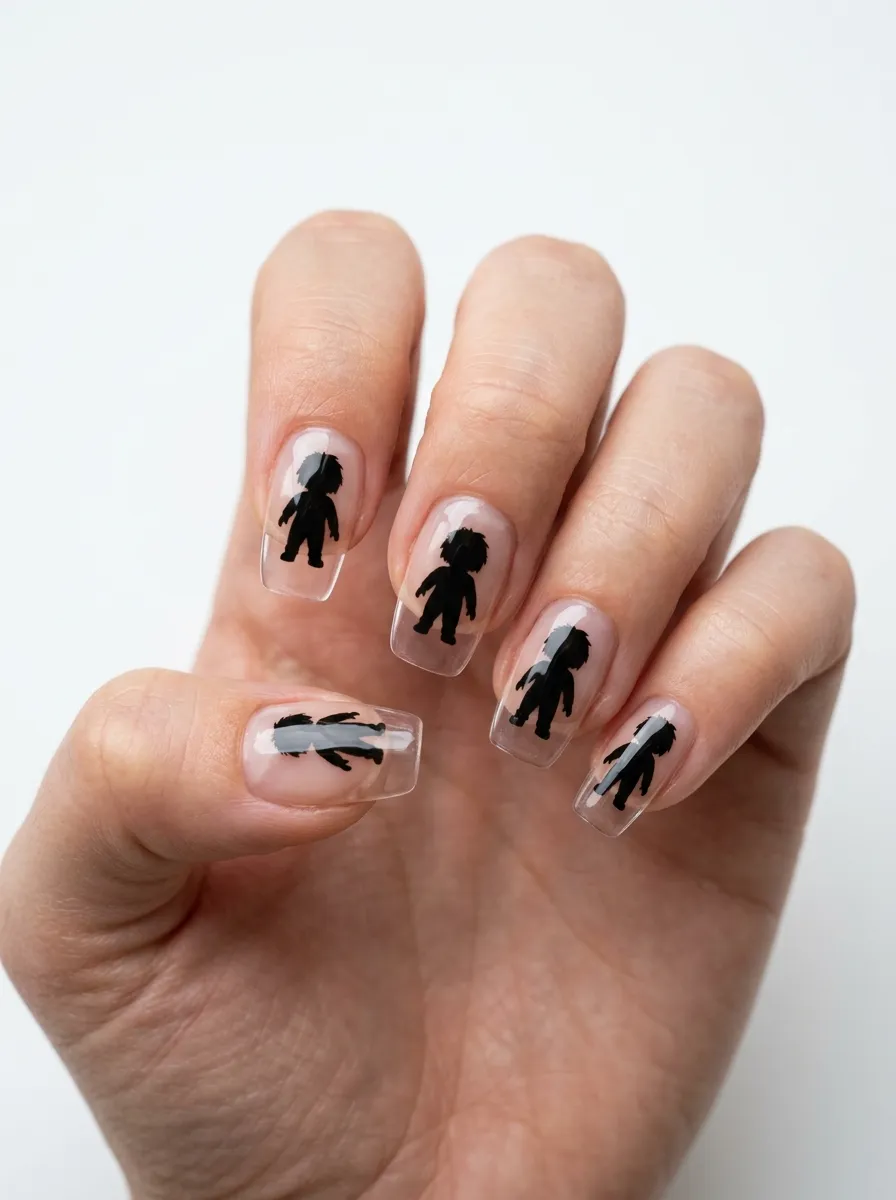
Negative space nail art is already a popular technique and it works brilliantly for horror themes. The clear areas of the nail become part of the design itself.
Start with a clear or very sheer base coat. Do not use a white or opaque base. You want the natural nail to show through.
Then use a thin brush and black nail paint to draw the outline of Chucky’s silhouette in the center of each nail. Just the iconic shape of the doll with the orange hair puff on top and the boxy body.
Leave the space around the silhouette clear so the natural nail acts as a lighter background.
The contrast between the clear nail and the solid black silhouette creates a clean graphic look that feels both modern and creepy.
This is one of the more graphic-design-forward options in this list. It pulls from horror without feeling costume-like, which makes it wearable in more settings.
Fill the silhouette in cleanly with black and let it dry fully before topping with a high-shine gel coat. The gloss over the clear area makes the whole nail look like glass with a horror illustration floating inside it.
17. Child’s Play Checkerboard Nails
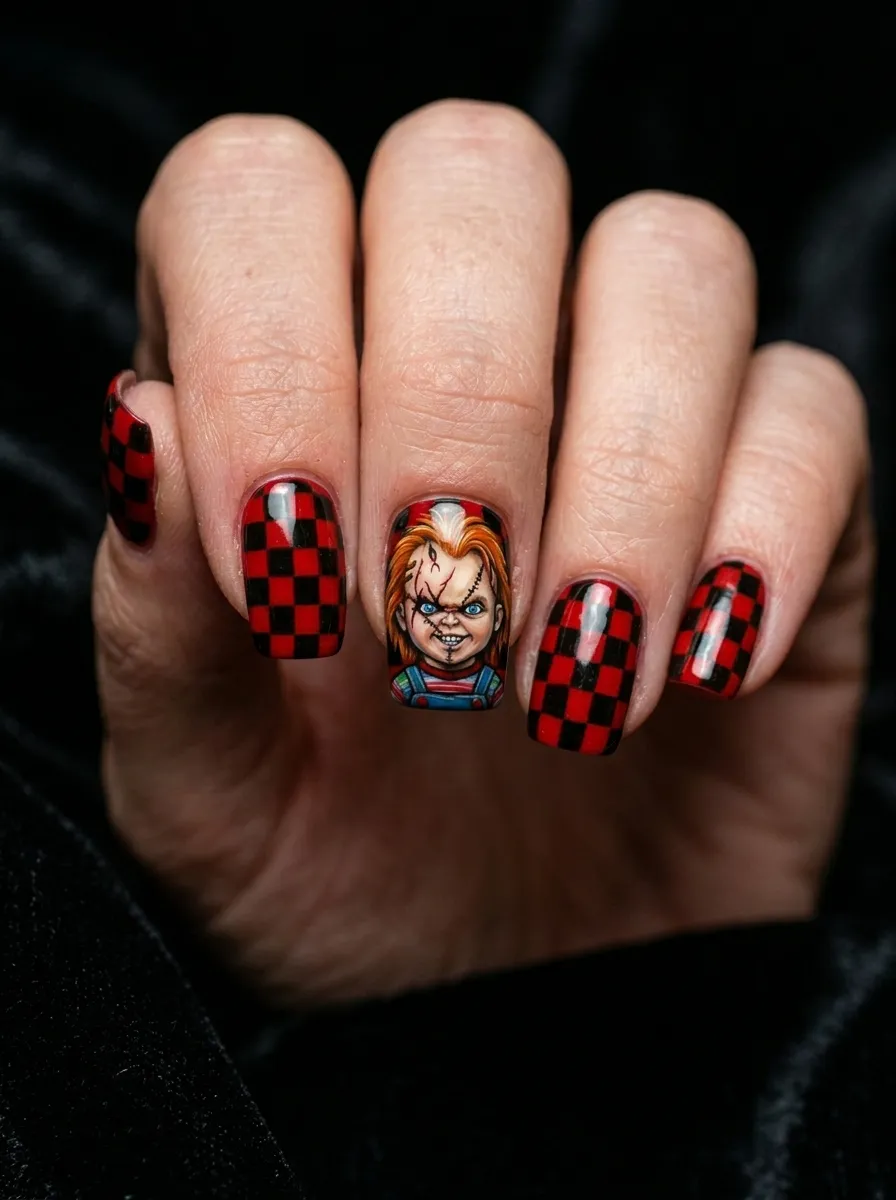
Checkerboard nails are already trending hard and the red and black version reads very naturally as horror. Add a single Chucky detail and the whole set becomes a Child’s Play tribute.
Use nail tape to section off the nail into equal squares. Paint alternating squares in red and black. Carefully remove the tape while the paint is still slightly wet for the cleanest edge.
On your accent nail, do the same checkerboard pattern as a base. Then paint a tiny Chucky face on top using a thin nail art brush. The checkerboard shows through around the face which gives it a graphic poster quality.
The checkerboard base makes even a rough Chucky face look intentional because the bold pattern draws the eye.
Red and black is one of the easiest two-color combinations to work with because the contrast is so stark that minor imperfections are hard to notice.
This design works on short square nails just as well as long coffin shapes. The pattern does not need a lot of length to read clearly.
Nail tape is available at any beauty supply store for about one dollar. It peels cleanly and saves you so much cleanup time compared to freehand painting checkerboard grids.
18. Wanna Play Nails (Text Accent Design)
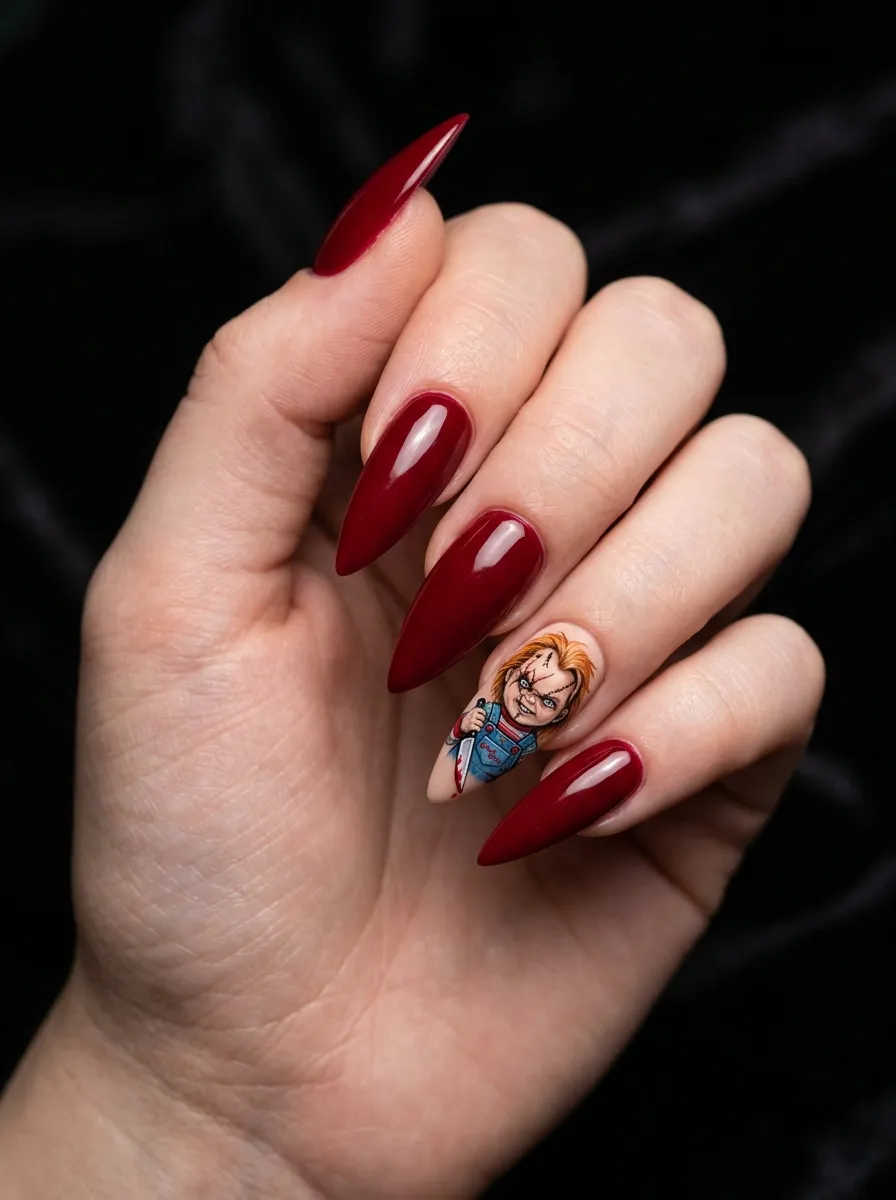
This design is all about storytelling through a single accent nail. Keep nine fingers simple with a deep red or black base. On one nail, paint a tiny Chucky holding his knife.
The figure does not need to be complex. Rough orange hair on top, two small blue dot eyes, a striped body shape, and a tiny silver line for the knife in one hand.
The surrounding red nails make the pale skin-tone of the Chucky figure pop dramatically.
The horror works best when there is contrast. Light against dark. Chucky’s pale face against a sea of deep red.
This approach is great for people who want Chucky nails but do not want every single nail covered in details. One strong accent nail can carry a whole set.
Practice the tiny figure a few times on paper first. You are not going for photorealism. You just need enough recognizable details that people do the double-take when they see it.
A size 00 nail art brush is a worthwhile investment for designs like this. Combined with acrylic paint, which gives you more working time than regular polish, you can build up the figure slowly with full control.
19. Horror Film Poster Nails
Take inspiration from the original Child’s Play movie poster art for this one. The composition uses a dark background with a bright focal point, which translates beautifully to nail art.
Choose one nail as your focal point nail. Use a black or very dark navy base on that nail. Paint a small Chucky silhouette in the center using orange and pale skin-tone paint.
Radiating outward from the figure, paint thin red lines like a starburst to mimic that classic horror poster look.
On the remaining nails, use the same dark base but leave them clean or add subtle red dot spatter.
The movie poster approach gives your nails a graphic art quality that looks intentional and stylized rather than like a costume accessory.
This is also one of the more time-efficient ways to do Chucky nails because most of the nails stay simple and only one nail gets the detailed treatment.
Dark base coats with red accent lines are easy to execute with a regular thin brush. The starburst effect does not need to be perfectly even. Imperfect radiating lines look more hand-drawn and authentic.
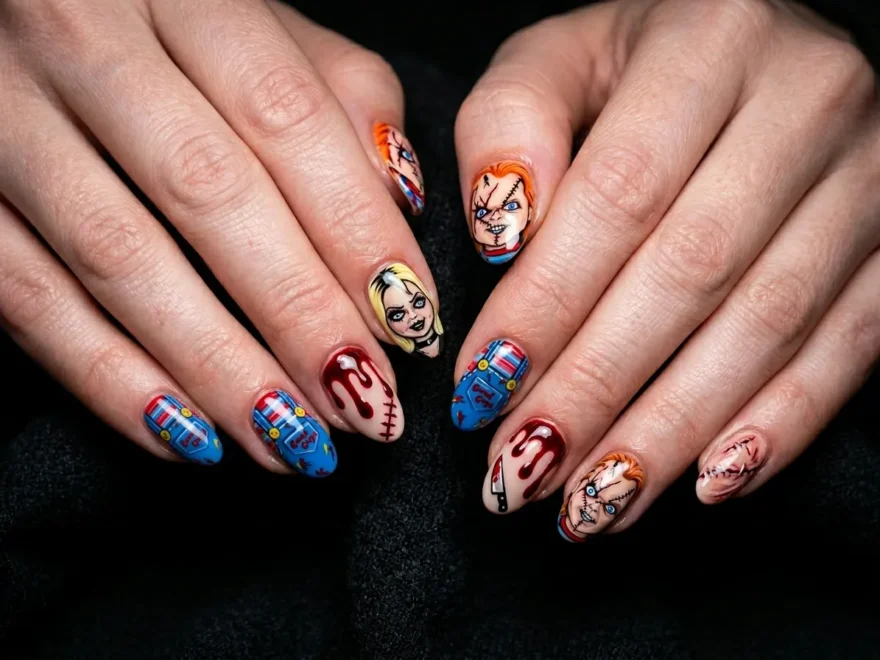
20. Full Chucky Scene Nails (Each Nail Tells Part of the Story)
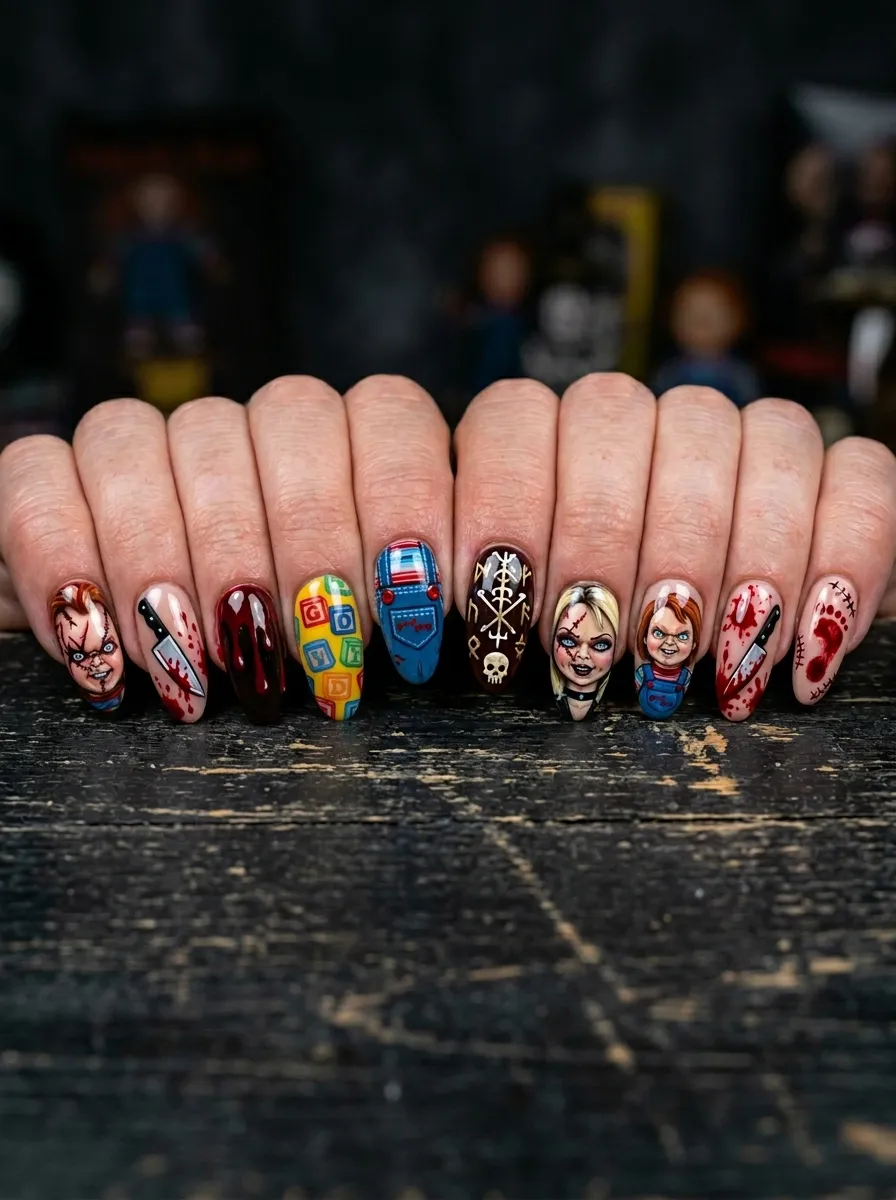
This is the full commitment set. Each nail gets its own Chucky-themed scene element so that when you look at all ten fingers together, they tell the whole Child’s Play story.
Thumb: Chucky face on a pale base. Index finger: Bloody knife on black. Middle finger: Stitched scar on skin tone. Ring finger: Striped overalls pattern. Pinky: Good Guy box outline.
Repeat a similar spread on the other hand with variations. Use the voodoo doll silhouette, the orange hair ombre, a coffin shape, blood splatter, and a plain deep red.
The power of this set is that no two nails are the same. Every finger is its own tiny horror story.
This requires the most time and planning but also produces the most impressive result. Lay out your plan on paper before you start painting so you know exactly which design goes where.
Use a clear top coat between each section if you are layering multiple colors on a single nail to avoid muddying the shades.
Budget for about two hours of work on this set if you are doing it yourself at home. Put on the Child’s Play movie while you paint for the full experience. The effort pays off completely.
Your Next Horror Manicure Is Ready
Chucky nail art is one of those niches where creativity has almost no ceiling. Whether you picked one idea from this list or started mentally planning a full ten-finger scene, the point is the same. You do not need an expensive salon or professional tools to get a genuinely impressive horror manicure at home.
Start with one or two designs that match your skill level. Get comfortable with the basic shapes and color placement. Then work your way up to the more detailed looks as your confidence grows. The stitched scar, the orange hair tips, and the bloody knife accent are all great starting points that deliver big impact with minimal technique.
Horror nail art is meant to be fun, bold, and a little unsettling. Do not worry about perfection. Some of the best Chucky nails out there have a rough, handmade quality that actually makes them look more authentic. So grab your brushes, pick your favorite idea from this list, and make Chucky proud.