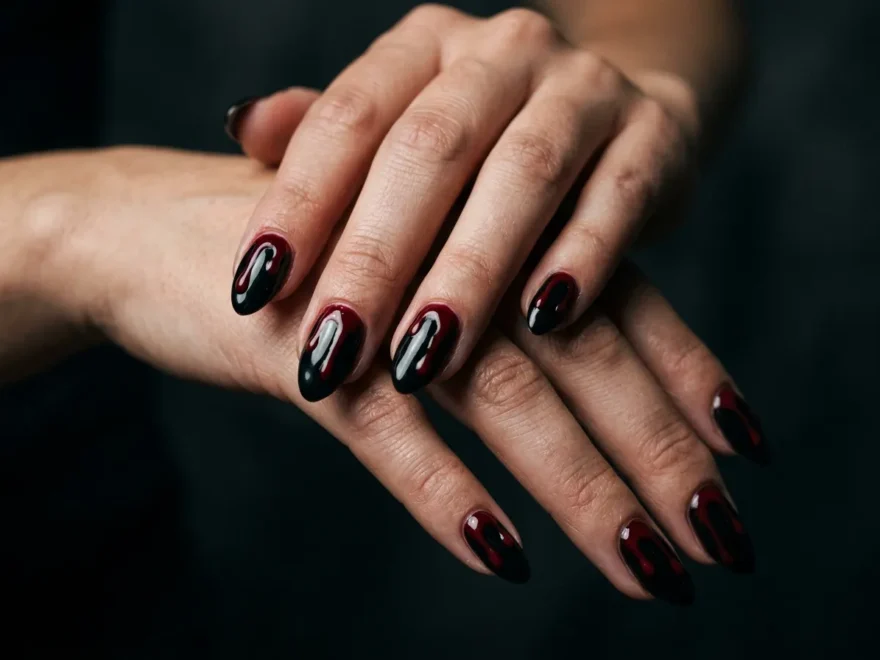
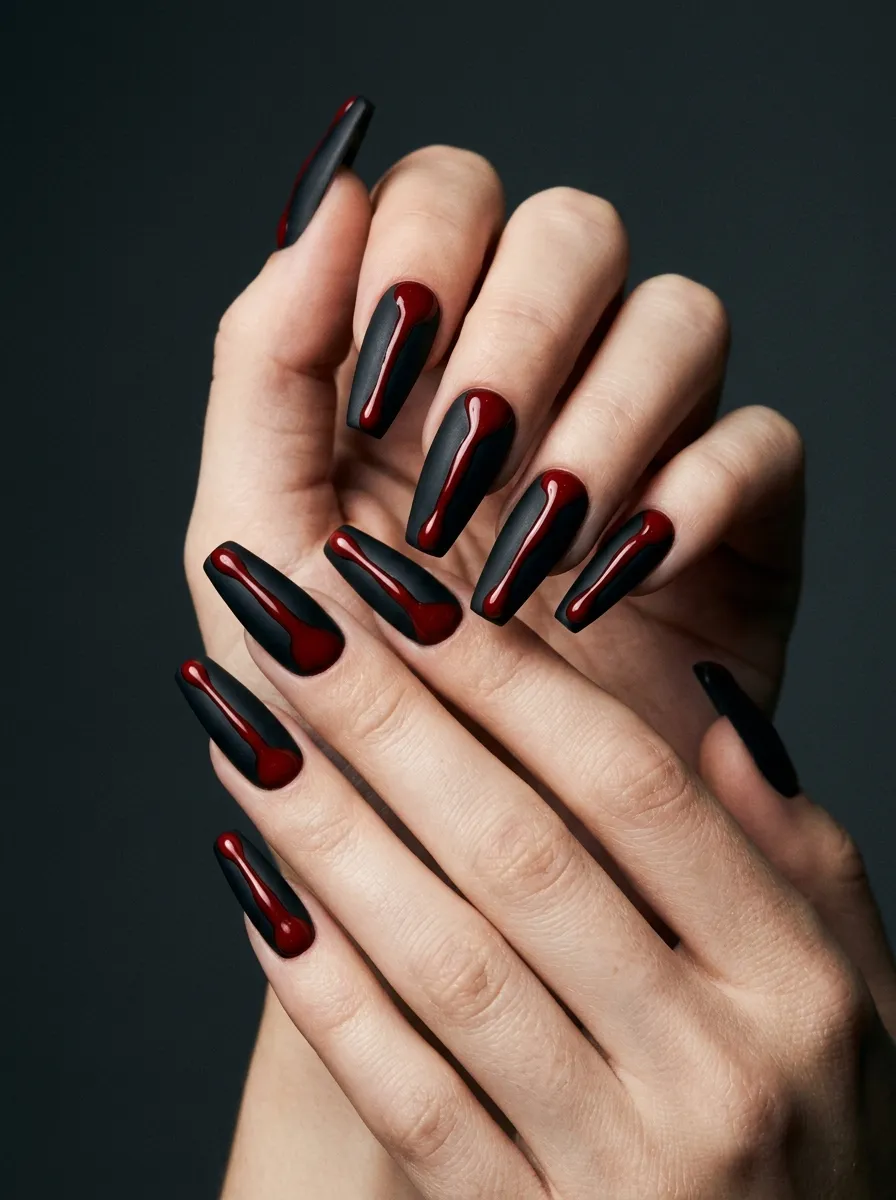
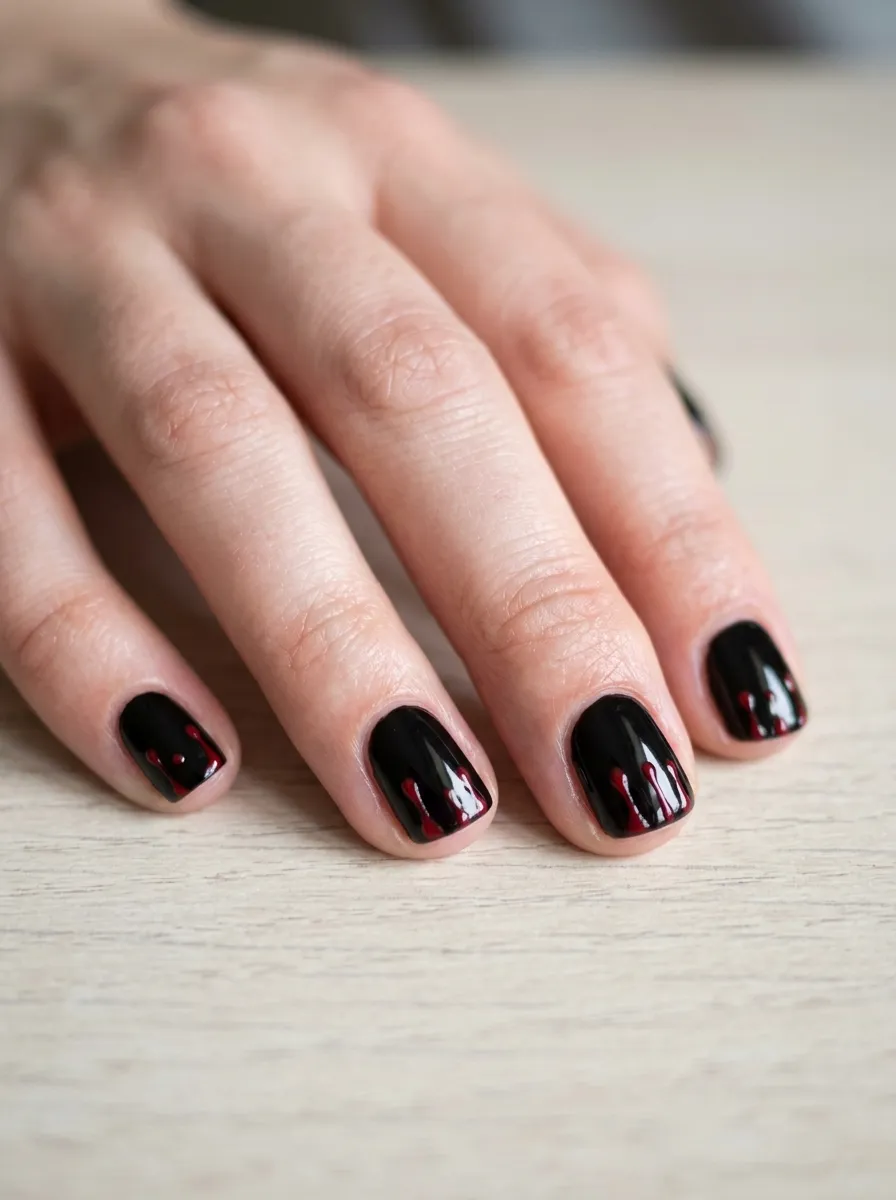
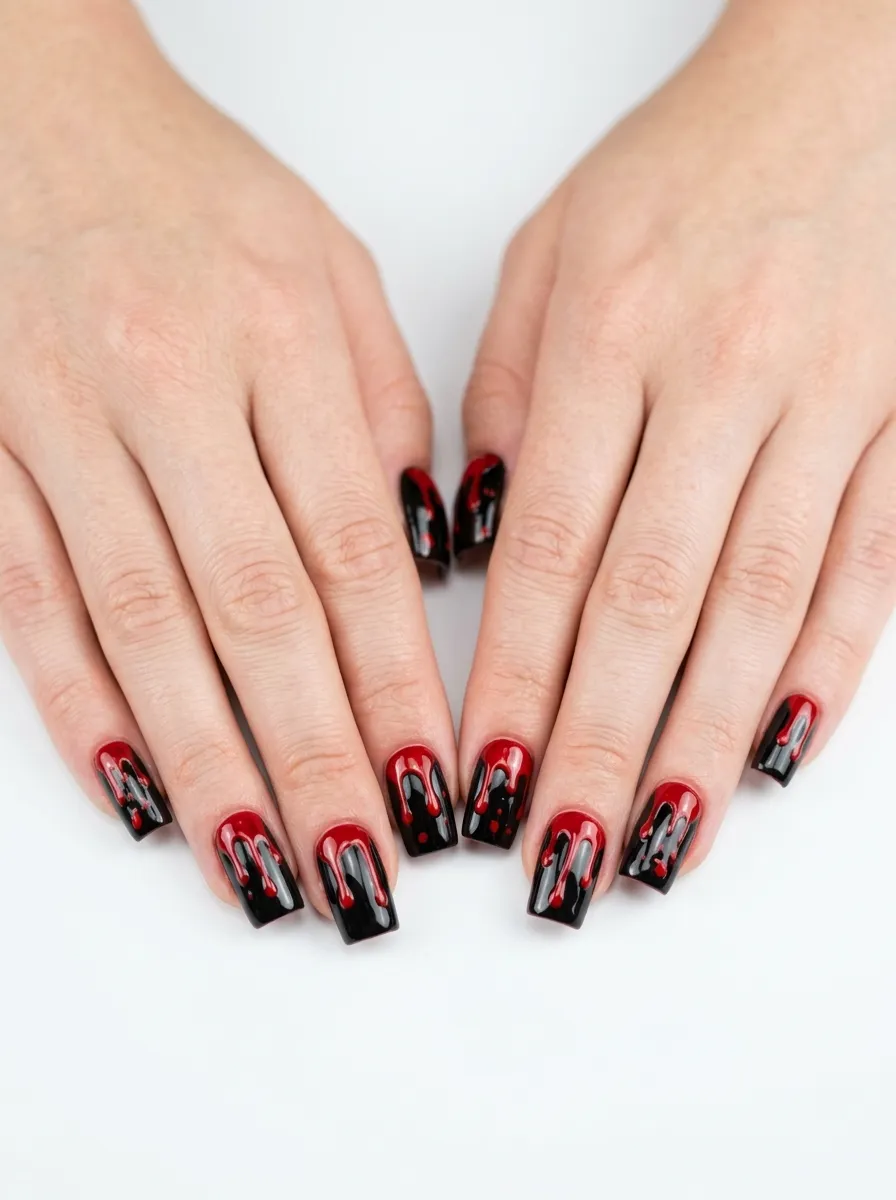
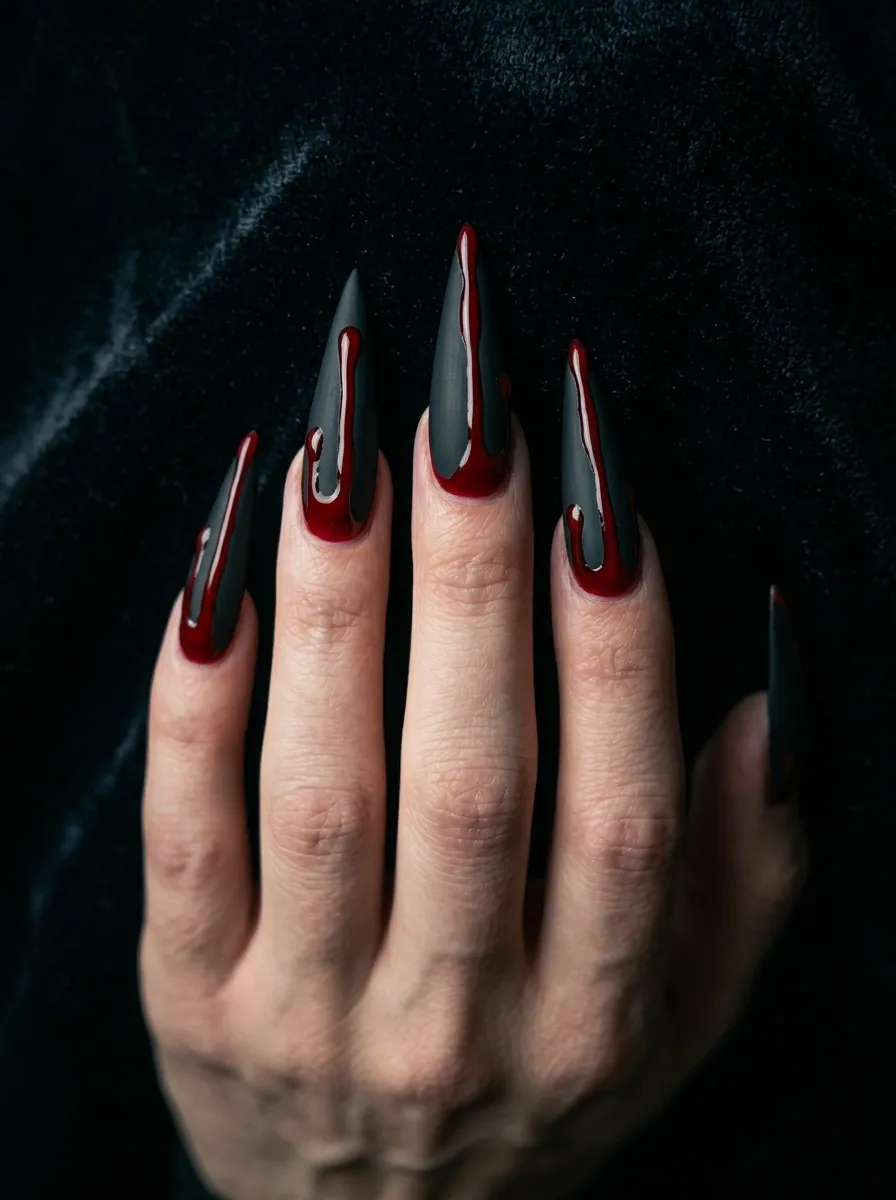
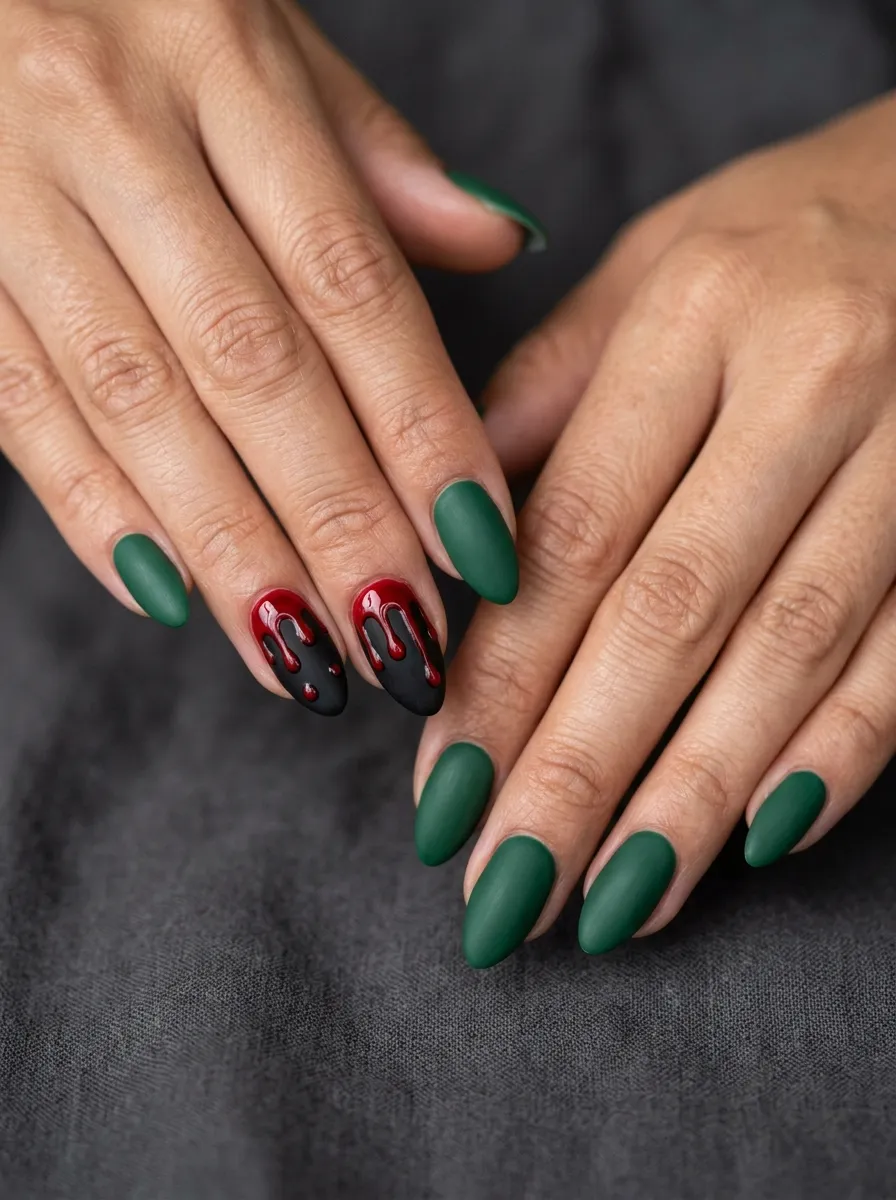
1. Classic Black Base With Red Drips
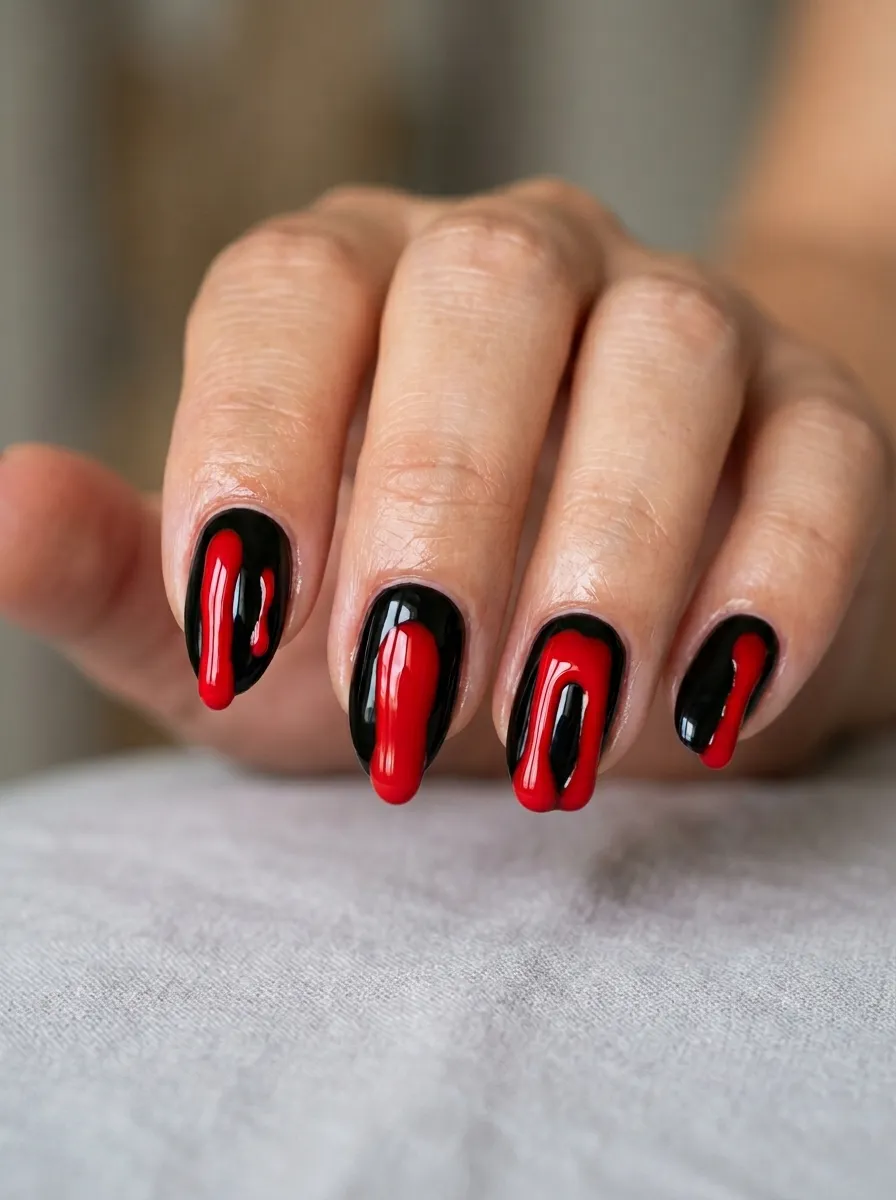
This is the look that started the whole blood drip nail movement.
Black polish goes on first as your base. Once it dries, you grab a thin nail art brush or a toothpick dipped in red gel or acrylic paint. You drag it downward from the tip in short, uneven strokes. The key is making the drips look random. Some should be long and thin. Others should be short and blobby at the end. That unevenness is what makes it look real.
You do not need expensive tools for this. A thin striper brush from any craft store works perfectly. Red nail polish with a fine brush applicator also does the job. Just thin it out slightly with a drop of nail polish remover if it feels too thick to drag smoothly.
Finish with a glossy top coat to make the drips pop. The shine adds that wet blood illusion that takes the whole look to another level. This style works on square, coffin, and stiletto shapes equally well. It is the go to starting point for anyone new to blood drip nails.
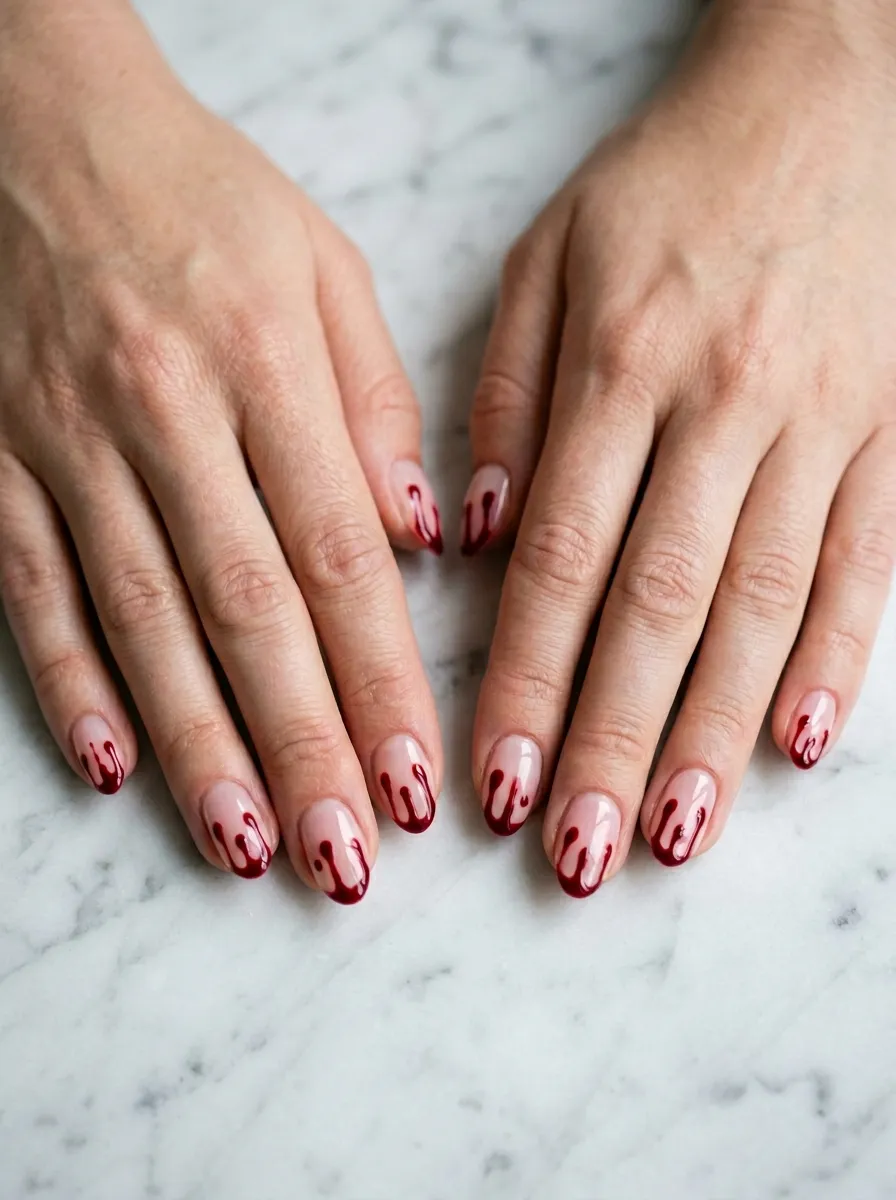
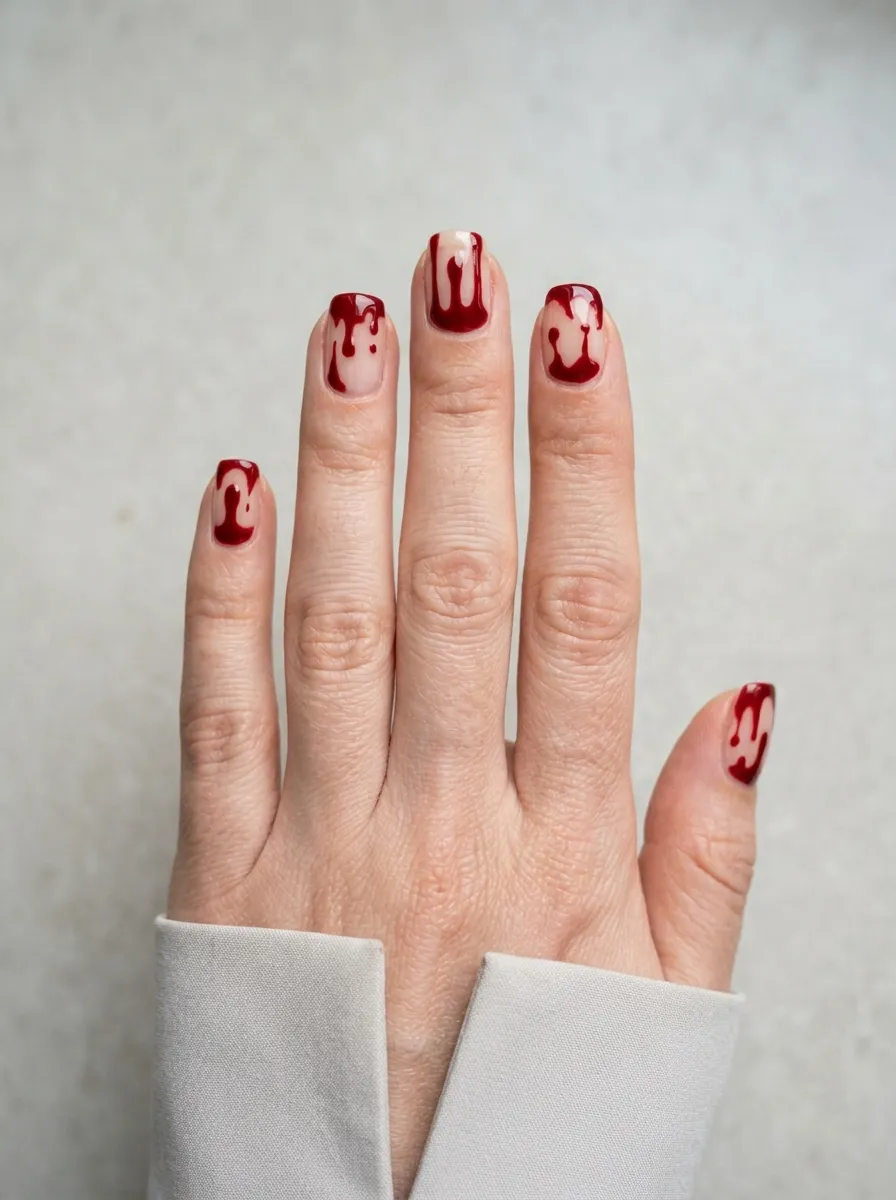
2. Nude Base With Dripping Blood Tips
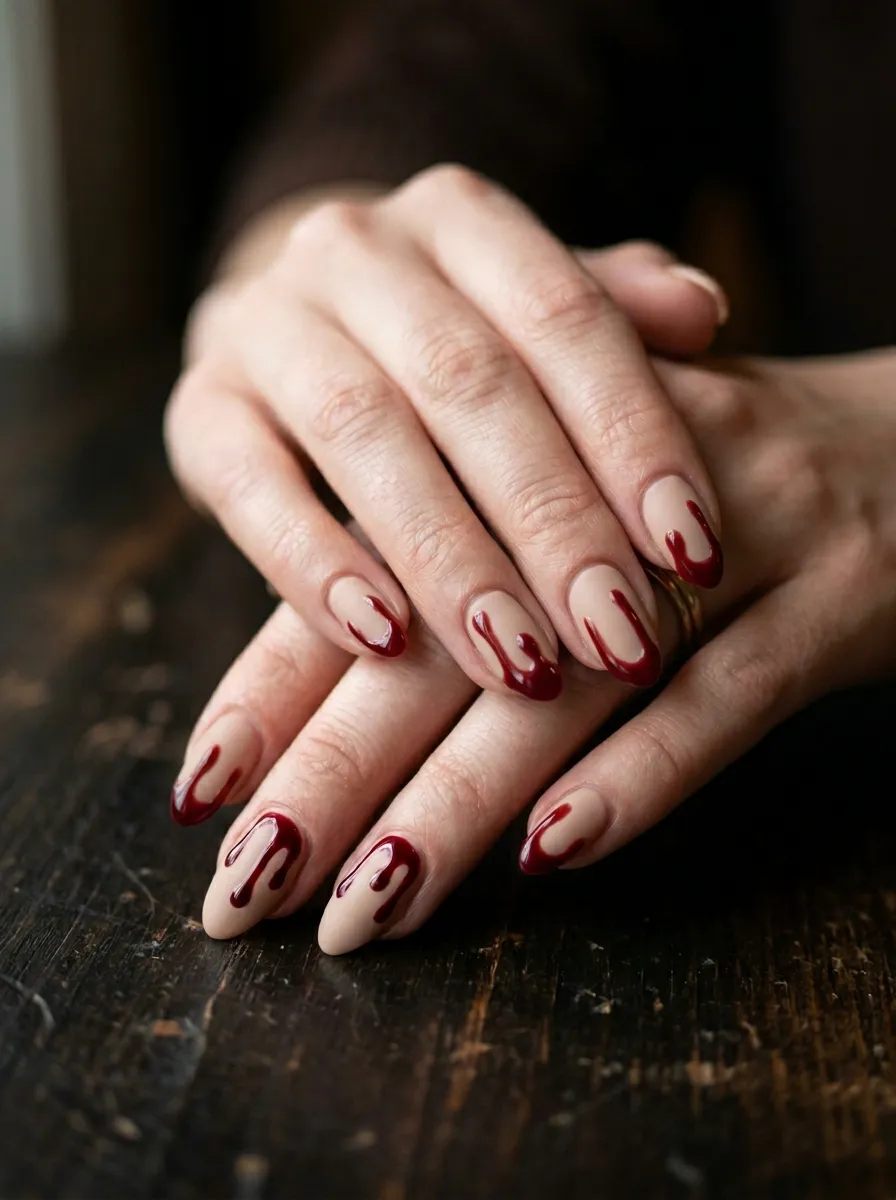
This combination surprises people because it looks so wearable.
The nude base keeps things understated. Then the blood drips come in and completely flip the energy. It is the kind of nail look that reads as elegant from a distance but savage up close. People notice it the moment you move your hands.
Start with a beige or peachy nude base that matches your skin tone or goes slightly lighter. Apply two clean coats and let it fully cure. Then take a dark red or burgundy polish and create your drip effect from the tip downward. Go for thinner drips here since the contrast already does the heavy lifting.
This look also works great for professional settings where a full black and red set might feel like too much. The nude base gives it an almost wearable quality. You still get the drama without going full horror mode. It is a great option for people who want to test the trend without committing to something too intense. Budget wise, this entire look costs very little. Any drugstore nude polish paired with a red striper pen from a beauty supply store gets you exactly where you want to be.
3. French Tip Blood Drip Nails
This is the most unexpected twist on a classic.
The traditional French tip gets a gothic makeover. Instead of the clean white half moon at the tip, you replace it with a red blood drip line. The drips flow down from where the tip would normally end, trailing onto the natural nail bed below. It looks twisted in the best way possible.
Keep your base sheer or light pink just like a regular French manicure. Then paint your tips red instead of white. While the red tip is still slightly wet, drag a thin liner brush downward in a few spots to create the drip effect. Let some areas stay clean and sharp while others have long trailing lines. The mix of clean and dripping creates a really polished horror aesthetic.
This look photographs incredibly well. The classic French structure gives it a refined quality while the blood drips add pure edge. It is one of those nail sets that confuses people in the best way. They expect something traditional and they get something totally unexpected. This is a great option for weddings, parties, or any event where you want your nails to be a conversation starter. Simple and cheap to DIY at home with a red striper brush.
4. Coffin Nails With Chunky Blood Drips
Long coffin nails were practically built for blood drip art.
The extended length gives the drips more room to run. You can create long dramatic trails that cover half the nail or keep them short and stubby near the tip. Both approaches look completely different and both look incredible on the coffin shape.
For chunky drips, load up your brush with more product than usual. Press it down near the tip and slowly drag downward. Pause for a second at the end of each drag to let a little pooling happen. That small bead of polish at the end of the drip looks exactly like a droplet about to fall. It adds so much realism to the design.
Matte black base polish is a great choice here because the red really pops against a flat finish. Apply your matte top coat first, then do the drip work in glossy red. The contrast between the matte base and the shiny drips creates a layered visual effect that looks like it cost a fortune. This is one of the easier designs to DIY at home because coffin nails from press on kits are widely available and affordable. You can get a full set ready to customize for just a few dollars.
5. Glitter Base With Blood Drip Overlay
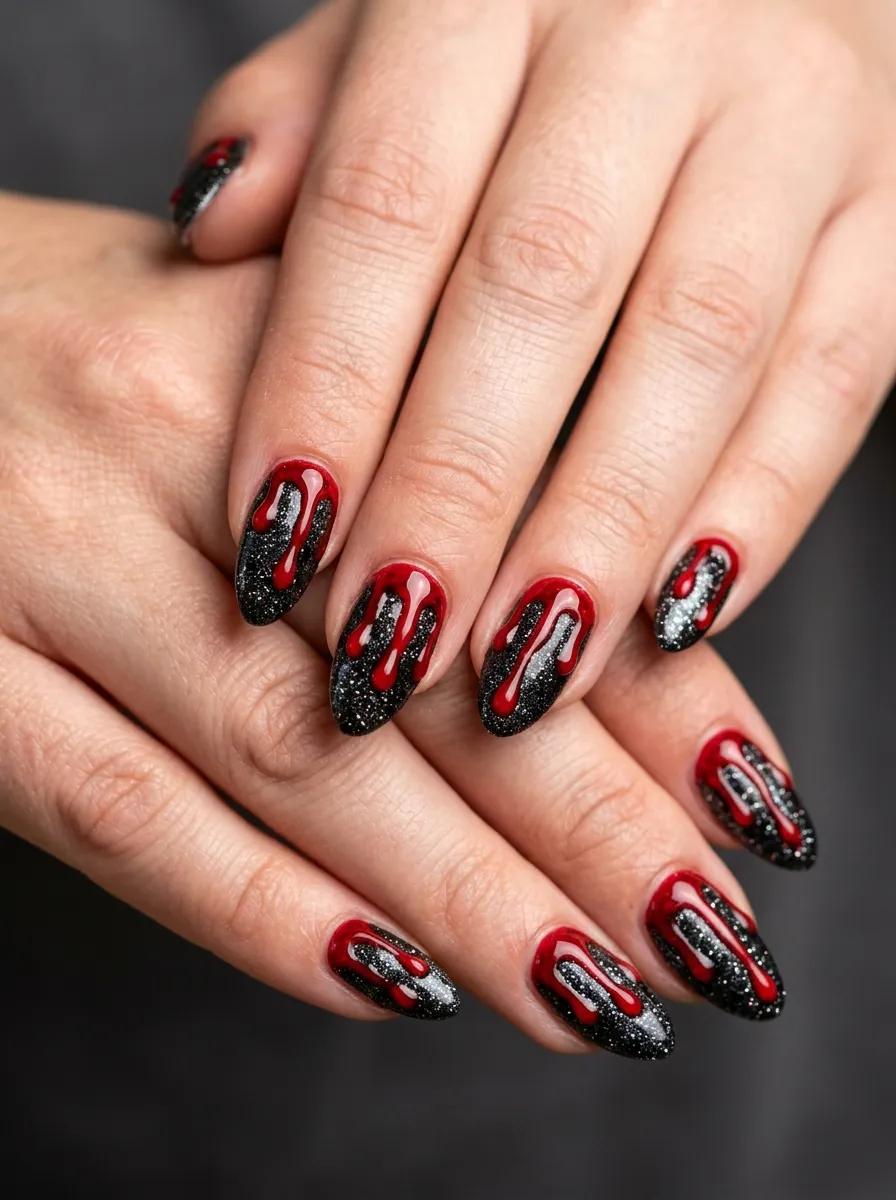
Glitter and gore make an unexpectedly gorgeous pairing.
A chunky black glitter base adds texture and dimension underneath the blood drip design. The glitter sparkles through the red polish in a way that makes the drips look almost three dimensional. It is a more maximalist take on the trend and it absolutely works.
Use a black glitter gel or polish as your base. Let it cure fully. Then apply your blood drip design on top using a contrasting bright red. The red sits on top of the glitter, and because the surface beneath is textured, the drips have a slightly raised quality that catches the light from different angles.
This look works especially well under party lighting. The combination of sparkle and horror is genuinely striking. It also photographs really well because the glitter creates natural visual interest even in areas where the drips are not present. Budget wise, craft glitter polishes from drugstores work just as well as expensive gel versions for this look. You are layering enough product on top that the difference is not really visible to anyone looking at your nails. Add a thick glossy top coat over everything to seal it and add depth.
6. Ombre Blood Drip Nails
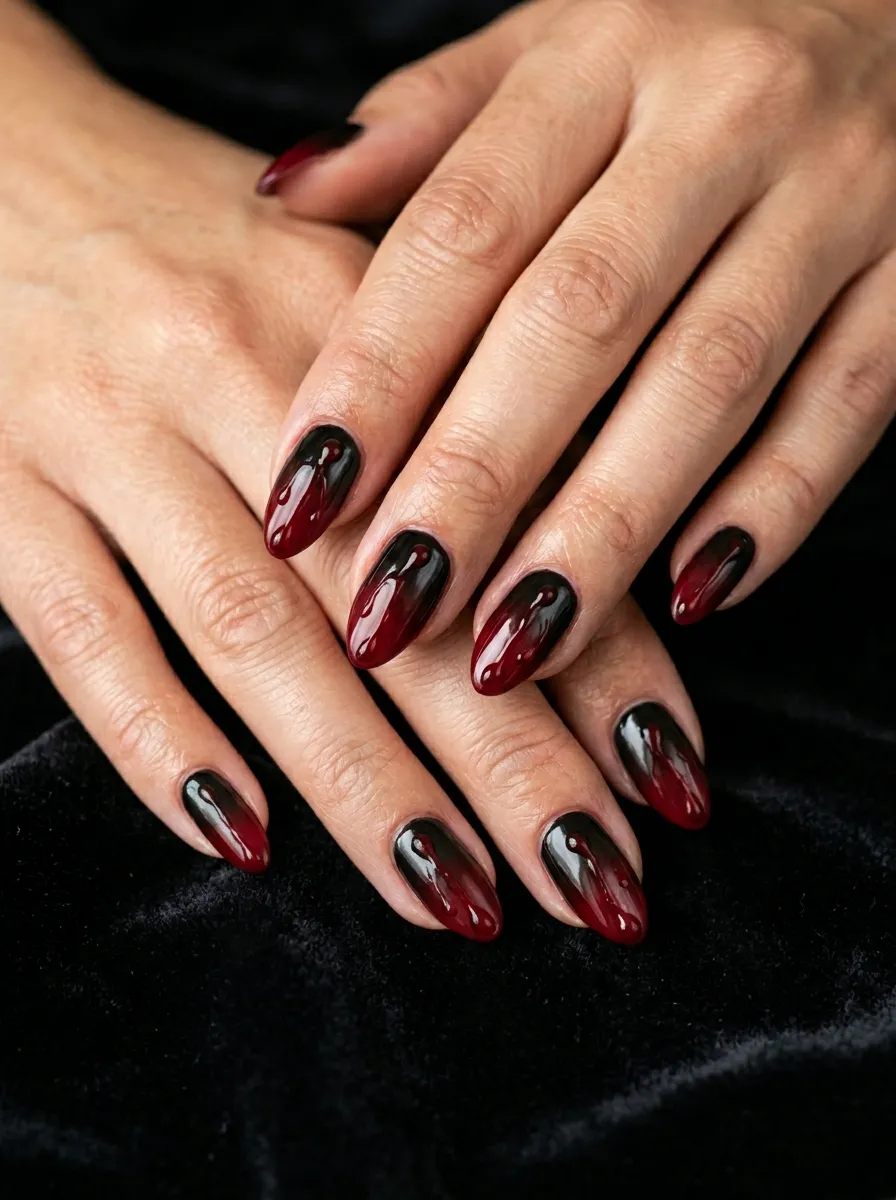
Ombre and blood drips together create a look that feels like a painting.
The gradient goes from dark at the base to red at the tips. Then the drips extend naturally from the red portion downward as if the color is literally bleeding off the nail. The transition between the two colors makes the whole design feel intentional and artistic rather than just spooky.
To create the ombre effect at home, take a small makeup sponge and dab black polish on one end and red on the other. Press it onto the nail with a slight overlap in the middle. Dab several times until the gradient looks smooth. Clean up the edges with a small brush dipped in acetone. Then apply your drips on top of the red section.
This is slightly more advanced than a single color base but still very doable at home. The sponge technique has been around for years and there are tons of simple video guides available to help. Once you get the gradient down, the drip portion is actually the easy part. The final result looks incredibly high end and like something you would see in a professional nail salon photo. A full set of sponges from a drugstore costs almost nothing, making this a very affordable option.
7. White Base Blood Drip Nails
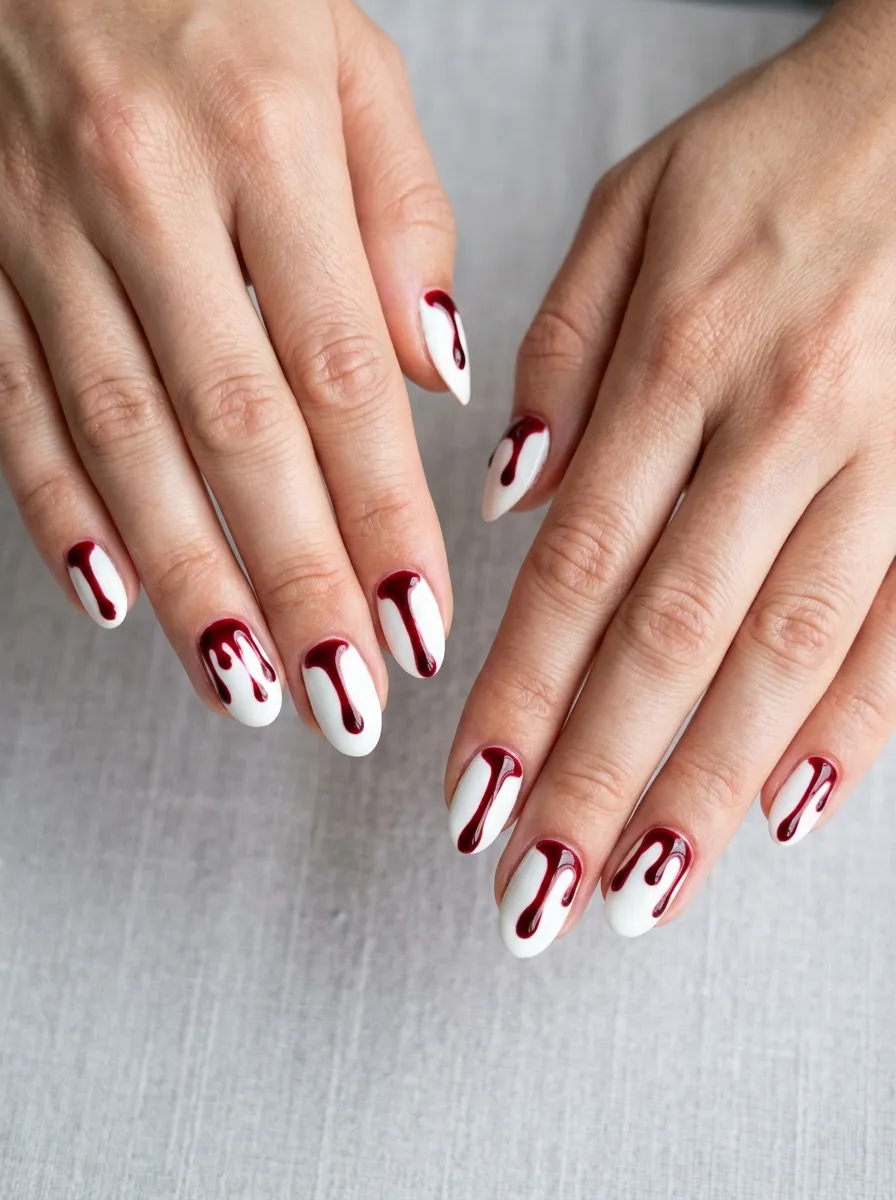
White base polish creates the highest contrast blood drip look possible.
When red drips run down a white nail, nothing gets lost. Every detail is visible and the effect looks incredibly graphic. It almost looks like an illustration rather than a real nail set, which is part of what makes it so cool.
Keep your white base very clean and opaque. Any streaking or yellowing will distract from the drips. Apply three thin coats if needed to get a solid bright white. Then use a deep crimson or dark red for your drips. Avoid orange reds here since they can look more festive than savage on a white base. Go for wines, burgundies, or classic true reds.
The drips can be thin and delicate on white or thick and dramatic depending on the vibe you want. Thin drips on white look almost like fine art. Thick chunky drips look like something straight out of a Halloween display. Both approaches are valid and both look amazing. This is also a great base if you want to add any extra embellishments like tiny gem accents or a small moon or star near the cuticle. The white gives everything room to breathe visually.
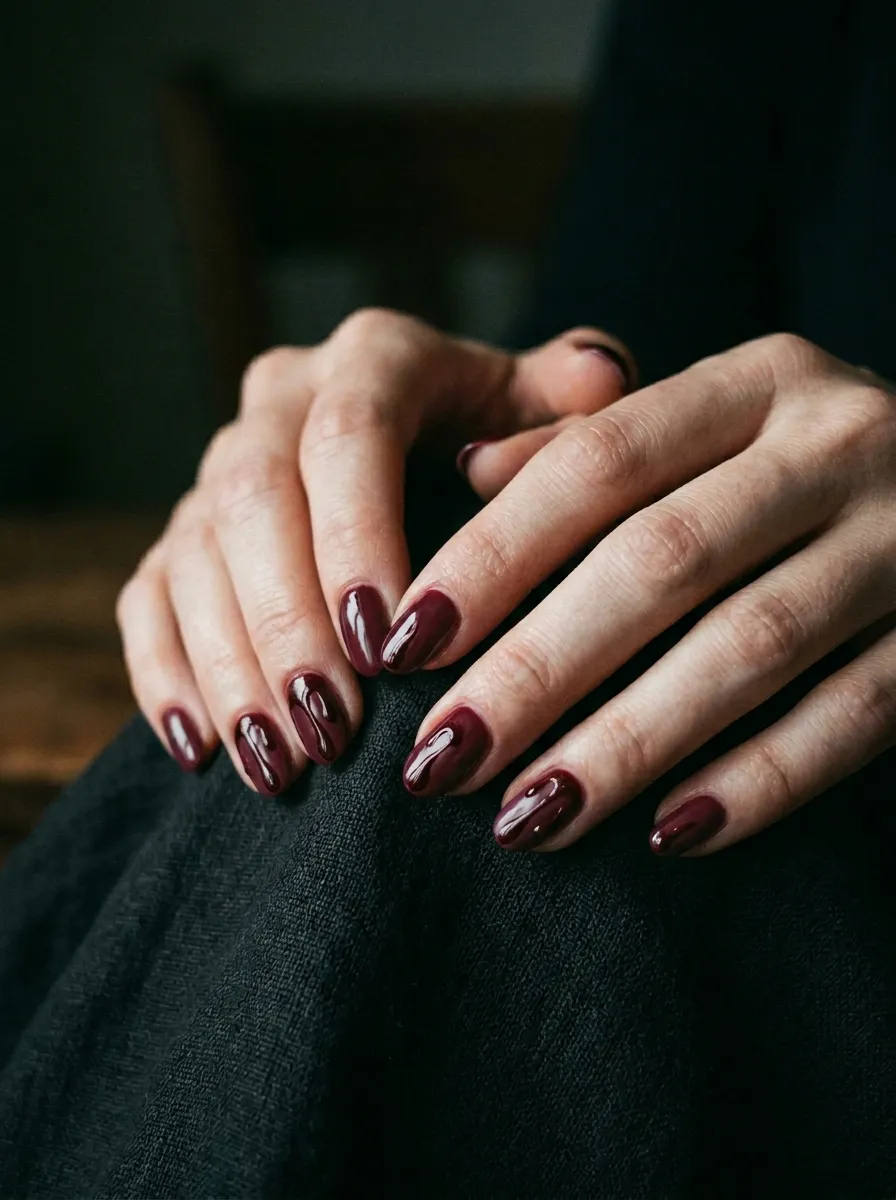
8. Deep Burgundy Blood Drip Nails
Not all blood drip nails have to scream bright red.
Burgundy creates a more sophisticated, tonal take on the trend. The base and the drips are in the same color family, which creates a moody layered effect. It reads as dark and intense without being as overtly dramatic as black and red combinations. This is a great choice for people who want the concept but in a quieter way.
Choose a deep burgundy or oxblood base polish. Then mix your drip color by adding a tiny bit of black polish to your red to darken it slightly. Apply this darker tone as your drips so they stand out against the base without being jarring. The result looks like dried, darker blood over a fresher base, which sounds intense but actually looks incredibly stylish.
This kind of tonal nail look photographs beautifully in natural light. The depth of the colors shows up really well in photos and the whole set has a cohesive quality that looks very put together. It works for fall and winter seasons especially well. Burgundy and oxblood tones pair naturally with cozy seasonal outfits, making this a blood drip look you can genuinely wear throughout an entire season without feeling out of place.
9. Short Nails Blood Drip Design
Blood drip nails are not just for long sets.
Short nails can absolutely pull off this look. You just need to scale the design down. Instead of long trailing drips, you go for shorter, tighter ones that sit closer to the tip. The effect is still completely recognizable and still looks savage on a short nail length.
The trick with short nails is using a very thin brush or a nail art pen with a fine tip. Thinner lines look more proportionate on a smaller nail surface. Avoid making drips that cover more than a third of the nail length or the design starts to look cluttered. A few clean, thin drips are all you need.
Short nails also tend to grow out faster, so choosing a simple design that you can touch up easily makes practical sense. The blood drip style is easy to reapply since it sits mostly near the tip. As your nails grow slightly, the drips simply look like they have moved further down the nail, which honestly still works with the aesthetic. This is also a great entry point for anyone new to nail art. Short nails are easier to work on and less intimidating for beginners practicing their brush control.
10. Press On Blood Drip Nails
Press on nails make the blood drip look completely accessible to everyone.
You do not need any skill to wear them. You do not need a nail tech appointment. You just pick a set you love, prep your natural nails, apply some nail glue or the adhesive tabs included in the pack, and you are done in under fifteen minutes.
Blood drip press on nail designs are everywhere right now. You can find them on online marketplaces for just a few dollars. Many small nail artists sell hand painted custom sets at reasonable prices too. If you want a specific color combination or nail shape, those custom sellers are a great option.
When applying press ons, clean your nails with rubbing alcohol first. Push back your cuticles gently. Size each press on before gluing. Press firmly for thirty seconds after applying. Avoid soaking your hands in water for the first hour. Following these simple steps means your press ons will last anywhere from five days to two full weeks depending on your daily activities.
Press ons are also a commitment free way to test the blood drip trend before booking a full salon appointment. If you love it, you can take the look to a professional. If you want to switch it up after a week, removal is simple and your natural nails stay undamaged.
11. Neon Blood Drip Nails
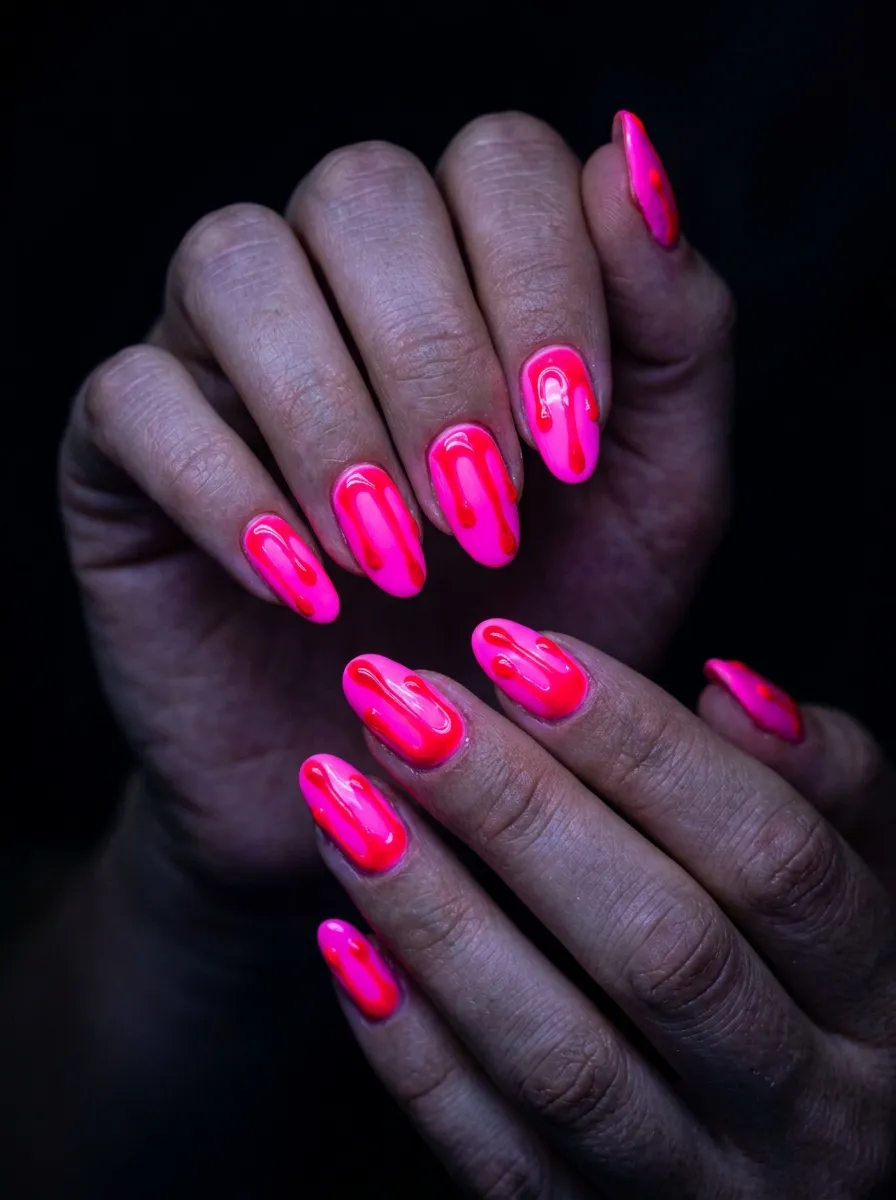
Neon blood drips turn the horror aesthetic completely on its head.
Instead of the expected dark, moody palette, you go full bright and electric. Hot pink drips on a white base. Electric red on neon yellow. Bright coral drips on a pastel background. The concept stays the same but the energy becomes playful and bold rather than dark and scary.
Neon nail polishes are readily available and very affordable. Look for polishes labeled as UV reactive or neon for the most intense color payoff. These polishes often need a white base underneath to really show up properly. Apply your white base coat first, then build up the neon color in two to three coats, then add your neon drips on top using a contrasting shade from the same bright family.
This version of the trend works really well for summer, festivals, rave events, and anyone who loves maximalist color. The blood drip shape gives structure and edge to what could otherwise just be a colorful manicure. The horror reference is still there for those who know, but the overall effect reads more fun than frightening. Under blacklight at a club or festival, neon blood drip nails absolutely go off. They photograph incredibly on social media too since the bold colors translate well on screen.
12. Stiletto Nails With Long Drips
Stiletto nails and blood drips are the most dramatic combination in this entire list.
The sharp pointed tip of a stiletto nail creates a natural focal point where the drip seems to begin. The extreme length gives the drip lines maximum runway to travel. The result looks like something from a horror film poster and it is completely stunning.
Long drips that travel from the tip almost to the cuticle are the most impactful on stiletto shapes. These extended drips require a steady hand and a thin striper brush. Work slowly and do not rush. If you make a mistake, a thin brush dipped in acetone can clean up a drip line before it dries. Practice the movement on paper or on a nail tip before applying it to your actual nails.
Stiletto press on nail sets in longer lengths are available online and at beauty supply stores. Getting the shape done professionally and then adding the blood drip design yourself at home is also a great money saving approach. Many nail techs will shape and prep a set for a lower price if you tell them you plan to add the design detail yourself. The combination of the aggressive stiletto shape and the long blood drips creates a look that is genuinely unforgettable.
13. Halloween Themed Blood Drip Nails
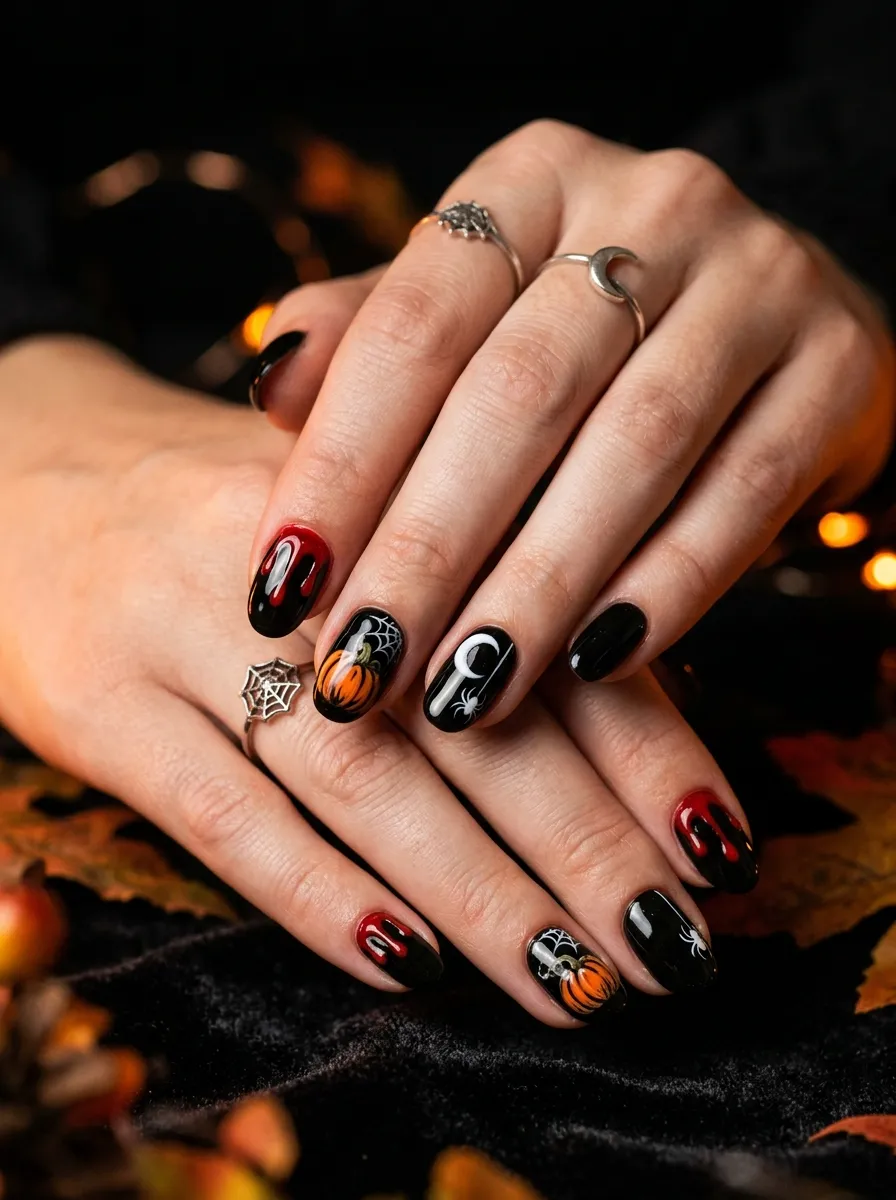
Blood drips paired with Halloween symbols take the whole concept somewhere really special.
Instead of doing all ten nails in straight blood drip style, you mix in a few accent nails with Halloween imagery. A pumpkin on one nail. A spider web on another. A crescent moon on a third. The rest of your nails get the blood drip treatment. The variety makes the whole set feel like a complete Halloween story rather than just a single design.
Nail art stamping plates are one of the easiest ways to add small detailed Halloween images without needing to freehand anything. A stamping kit costs very little and opens up a huge range of design options. Alternatively, small Halloween themed nail stickers and decals are widely available and require zero skill to apply.
Keep the color palette consistent across all the nails for a cohesive look. Black, red, orange, and deep purple all work together in a Halloween context. If you use orange or purple on accent nails, bring in a touch of that color somewhere in the blood drip nails too, maybe with a slightly orange tinted red for the drips. Small details like that tie the whole set together and make it look intentional. This is one of the most photographed nail styles every October for a reason.
14. Silver Chrome Base With Blood Drips
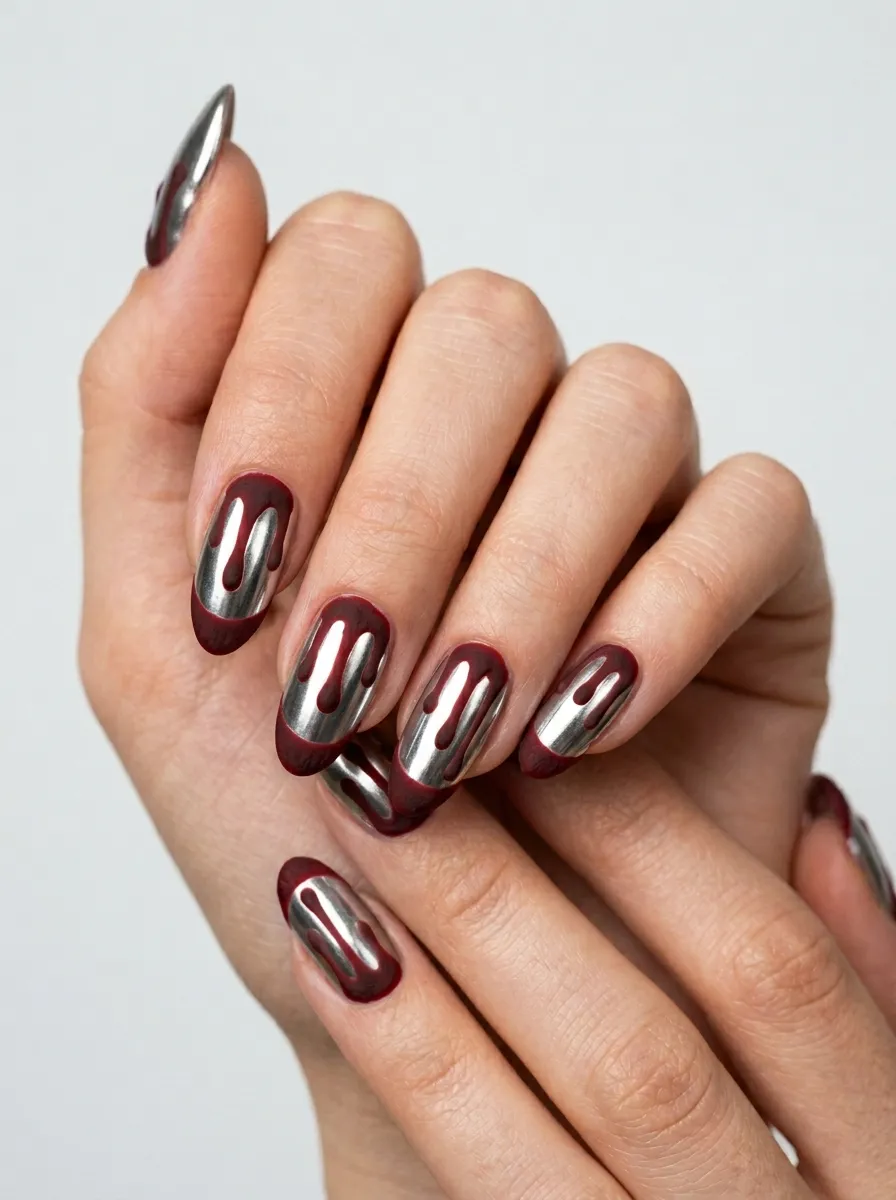
Chrome and blood drips is an unexpectedly beautiful combination.
The reflective silver base creates a futuristic, almost sci fi quality. Then the blood drips break that clean surface with raw organic marks. The contrast between the polished metallic and the chaotic drips creates a tension that makes the design really interesting to look at.
Chrome nails require a gel base and a chrome powder rubbed on after curing, or you can use a chrome effect nail polish which is slightly easier to apply at home. Once your chrome base is done and sealed, apply your red drips on top using a gel liner or nail polish. The drips sit slightly raised on the reflective surface which adds a nice dimensional quality.
This look photographs exceptionally well because the chrome reflects surrounding light in every shot. The red drips show up brilliantly against the silver. If you want to take it even further, try a rose gold or gold chrome base with deep burgundy drips for a warmer, more luxurious version of the same concept. The metallic element elevates the blood drip from pure Halloween to something that feels more like dark fashion. It is the kind of nail look that works year round, not just during spooky season.
15. Glow in the Dark Blood Drip Nails
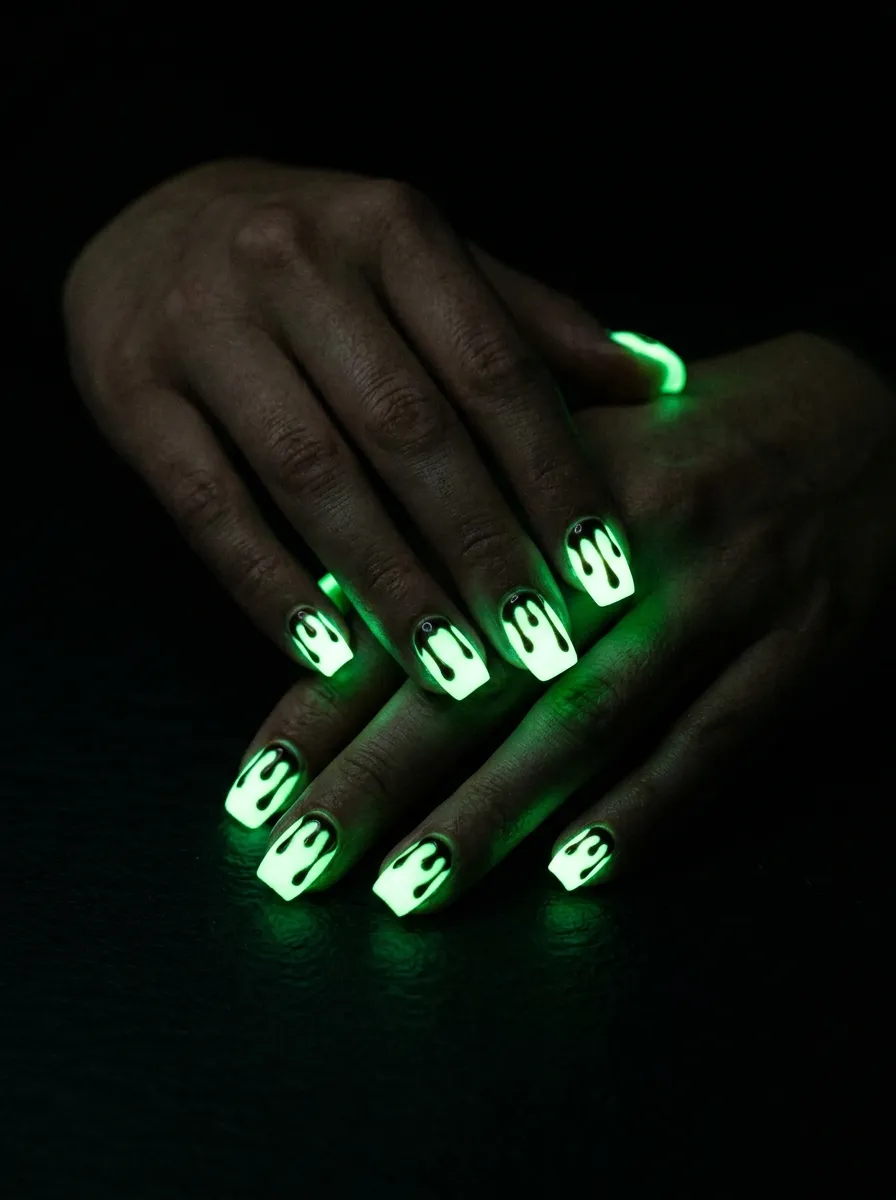
Glow in the dark blood drips are pure nightmare fuel in the best possible way.
During the day, these nails look like a regular dark or neutral set. At night, or in a dark room, the drip lines light up in an eerie green or white glow. It is a two in one nail look that surprises people who see it for the first time in a dim environment.
Glow in the dark nail polishes are affordable and easy to find online and in beauty stores. Use them in place of your regular red drip polish, or layer them underneath a translucent red to get a red color during the day that glows green at night. That layering trick creates a genuinely unsettling effect since the glow shifts the apparent color of the drip in different lighting conditions.
Charge up your glow nails under a lamp or in sunlight before heading into dark spaces. The charge lasts a few hours before needing to be refreshed. This nail look is absolutely perfect for Halloween parties, haunted houses, clubs with dark lighting, and late night events. When someone notices your nails glowing in a dark room, the reaction is priceless every single time. Budget cost for glow nail polish is minimal and the impact is completely disproportionate to what you spend.
16. Accent Nail Blood Drip Design
Not every nail needs a drip.
The accent nail approach is one of the most wearable ways to incorporate the blood drip trend. You pick one or two nails per hand and apply the drip design there. The remaining nails stay solid, clean, and simple. The result looks intentional and put together rather than overwhelming.
This approach also requires less time and skill. You only need to execute the drip technique on two nails per hand instead of all five. Less surface area means fewer potential mistakes and a faster overall process. It is a great starting point for beginners who want to practice the look without committing to a full set.
Choose which nails to feature the drips on based on what you want to draw attention to. The ring finger is a classic accent nail choice. The middle finger makes more of a statement. The index finger works well if you gesture a lot with your hands since it gets the most visual attention during conversation. Keep the rest of your nails in a deep, dark color that works with the blood drip aesthetic. Black, deep red, dark plum, and forest green all pair well. This approach also means your manicure lasts longer since the detailed accent nails are less likely to chip than a full detailed set.
17. Negative Space Blood Drip Nails
Negative space nail art has been popular for years and it works brilliantly with blood drips.
The concept involves leaving parts of your natural nail bare or unpainted. The blood drip lines then travel across both the painted and unpainted sections, creating a design that breaks the visual boundary between nail art and natural nail. The result looks really graphic and artistic.
To pull this off, tape off sections of your nail before painting. Apply tape in straight lines or geometric shapes across the nail. Paint your color in the remaining areas. Remove the tape carefully while the polish is still slightly wet for the cleanest edge. Then apply your drip lines across the whole nail surface, letting them pass over both the painted and bare sections.
The contrast between the clean bare nail and the red drip is especially striking. This design photographs beautifully from overhead angles. It is also a conversation starting look because it takes people a moment to understand what they are seeing. The combination of minimal and extreme creates that satisfying visual tension. If you want to keep things simple, try a half and half approach where the bottom half of the nail is bare and the top half is painted black with drips running across the dividing line.
18. Floral Blood Drip Nails
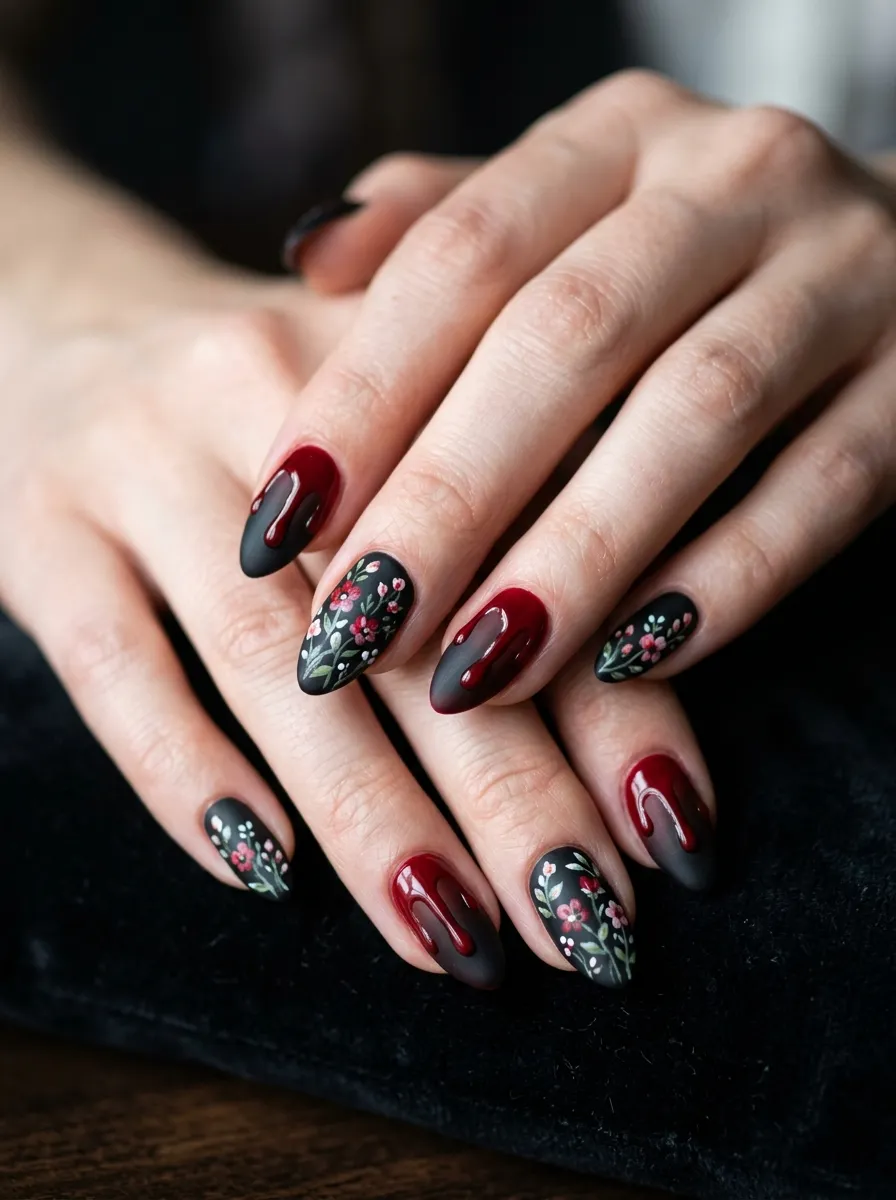
Dark florals and blood drips together create the most gothic romantic nail set imaginable.
Small painted flowers in deep colors like black roses, dark violets, or blood red peonies sit alongside the drip elements. The flowers bring softness and detail while the drips add drama and edge. The combination is striking because the two elements seem like they should not go together but they absolutely do.
You do not need to paint perfect flowers freehand. Nail art stickers with floral designs are inexpensive and widely available. Apply your base color first, then place the sticker flowers wherever you want them, then add your drip lines on top or around the floral elements. Seal everything with a top coat.
If you want to try painting flowers yourself, a small dotting tool makes five petal flowers easy. Put a dot in the center and four or five petals around it. Even rough, imperfect flowers look great in this context because the imperfection adds to the dark, organic quality of the whole design. This is one of those nail sets that looks incredibly detailed and expensive without actually requiring professional skills or a big budget. The contrast between botanical and horror references makes it one of the most unique blood drip variations available.
19. Dripping Blood Moon Nails
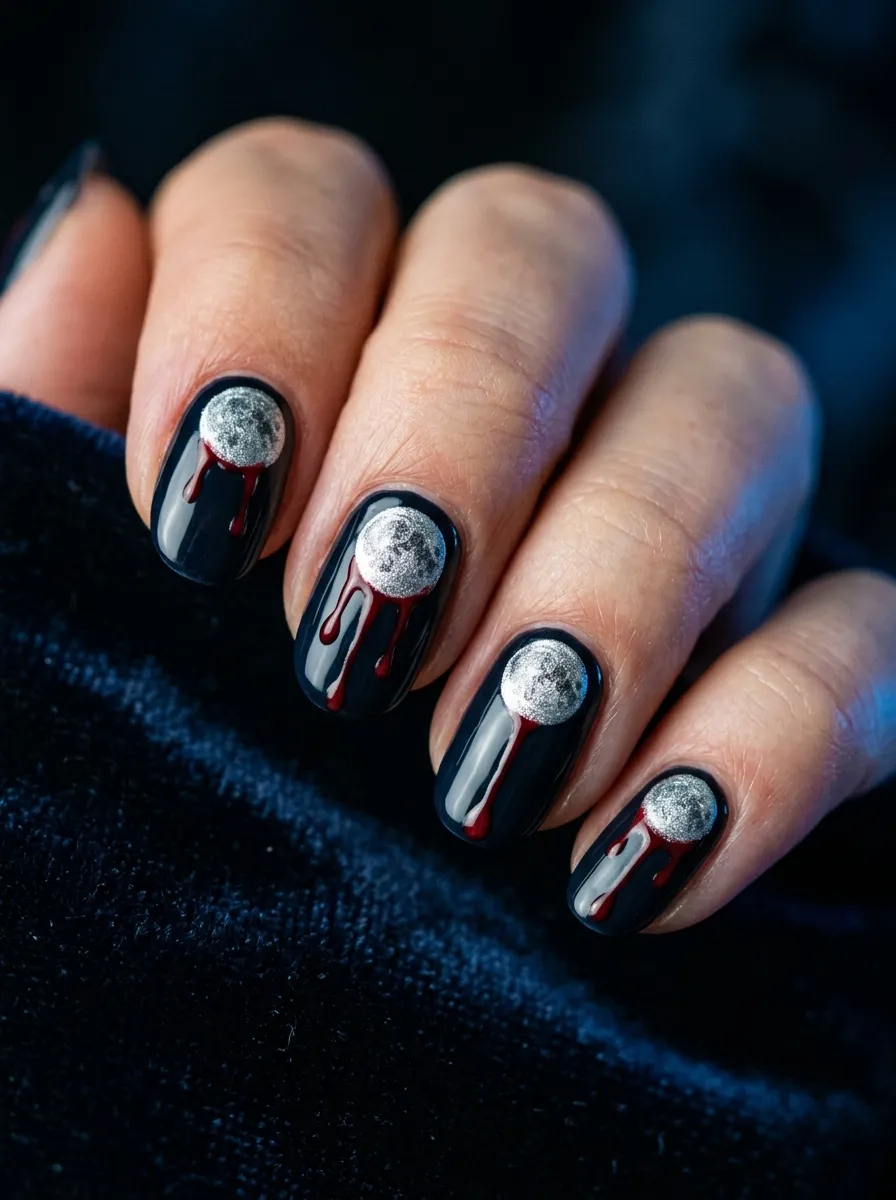
Moon imagery and blood drips share the same dark, ethereal energy.
A painted full moon sits near the tip or center of each nail. Red drips then extend downward from the base of the moon as if the lunar surface is bleeding. The imagery is genuinely striking and has a dark celestial quality that goes beyond typical horror nail art.
Paint your dark base first. Then use a round dotting tool or the back of a brush handle dipped in silver or white polish to stamp a circle near the tip of each nail. While that circle is still slightly tacky, drag a thin brush through the lower edge to add texture that mimics a moon surface. Then apply your red drips coming from just below the moon shape.
This design tells a visual story on the nail. The moon becomes the source of the drips and that narrative element makes people look closer and engage more with the design. It works especially well during full moon phases or on October Halloween sets. Adding tiny star dots in silver around the moon using a fine dotting tool takes just a few extra minutes but adds a lot to the overall look. White or silver nail polish for the moon detail costs very little and the result looks completely professional.
20. Blood Drip Nails With Gold Foil
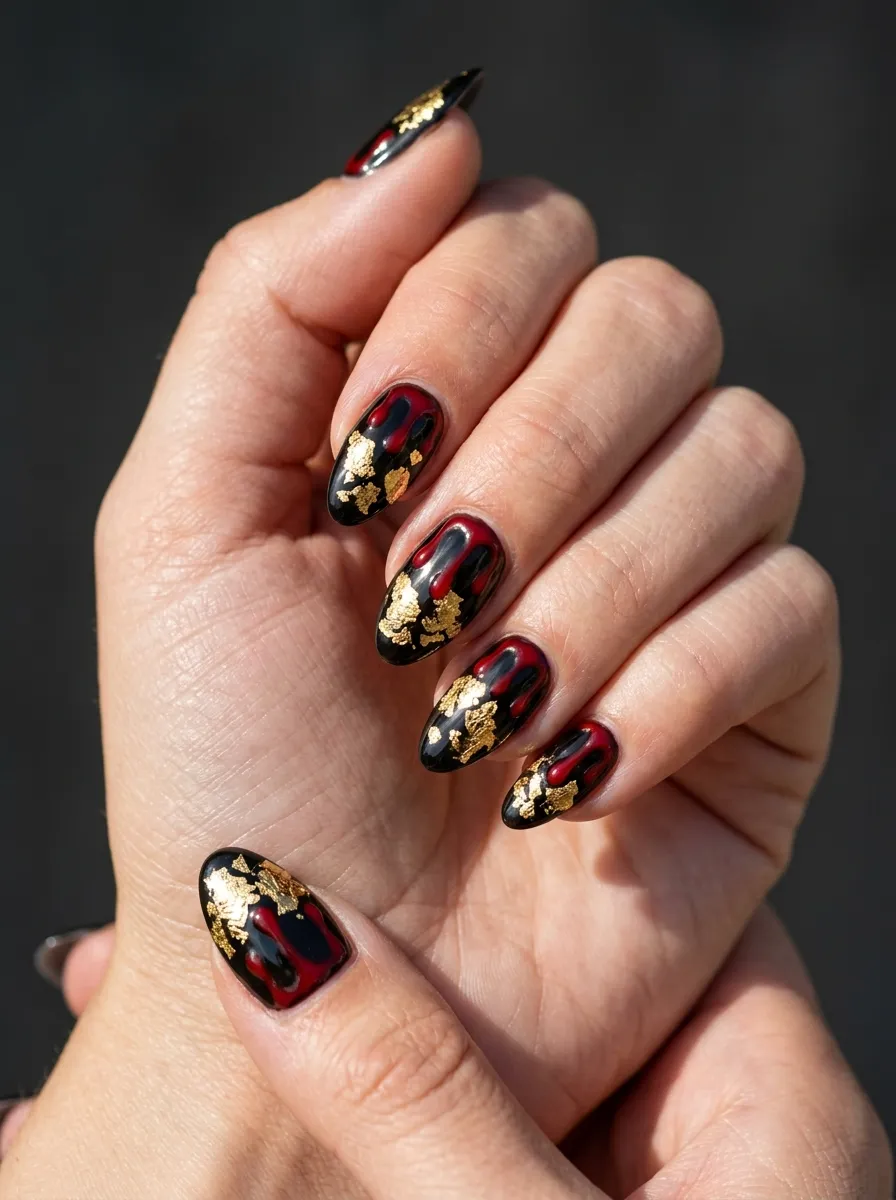
Gold foil and blood drips sounds contradictory but the result is stunning.
The gold adds luxury and texture while the drips bring the raw, edgy element. Together they create a nail design that feels high fashion rather than just spooky. It is the kind of set you would expect to see on a runway or in an editorial photo shoot.
Gold nail foil sheets are inexpensive and available at most beauty supply stores or online. After applying your dark base, press small torn pieces of the foil randomly across the nail surface before it fully cures. The irregular edges of torn foil look better than precisely cut pieces. Seal the foil with a thin layer of top coat, then apply your blood drip design on top.
The drips running over the gold foil pieces create depth because the red sits on different levels of the nail surface. Some drips will pass over raised foil edges which catches light and adds a three dimensional quality. The overall look is maximalist but cohesive because the dark base holds everything together. This is one of the easier high impact designs to create at home because foil application requires no skill. You just press it on and the irregular result actually looks intentional.
21. Pastel Blood Drip Nails
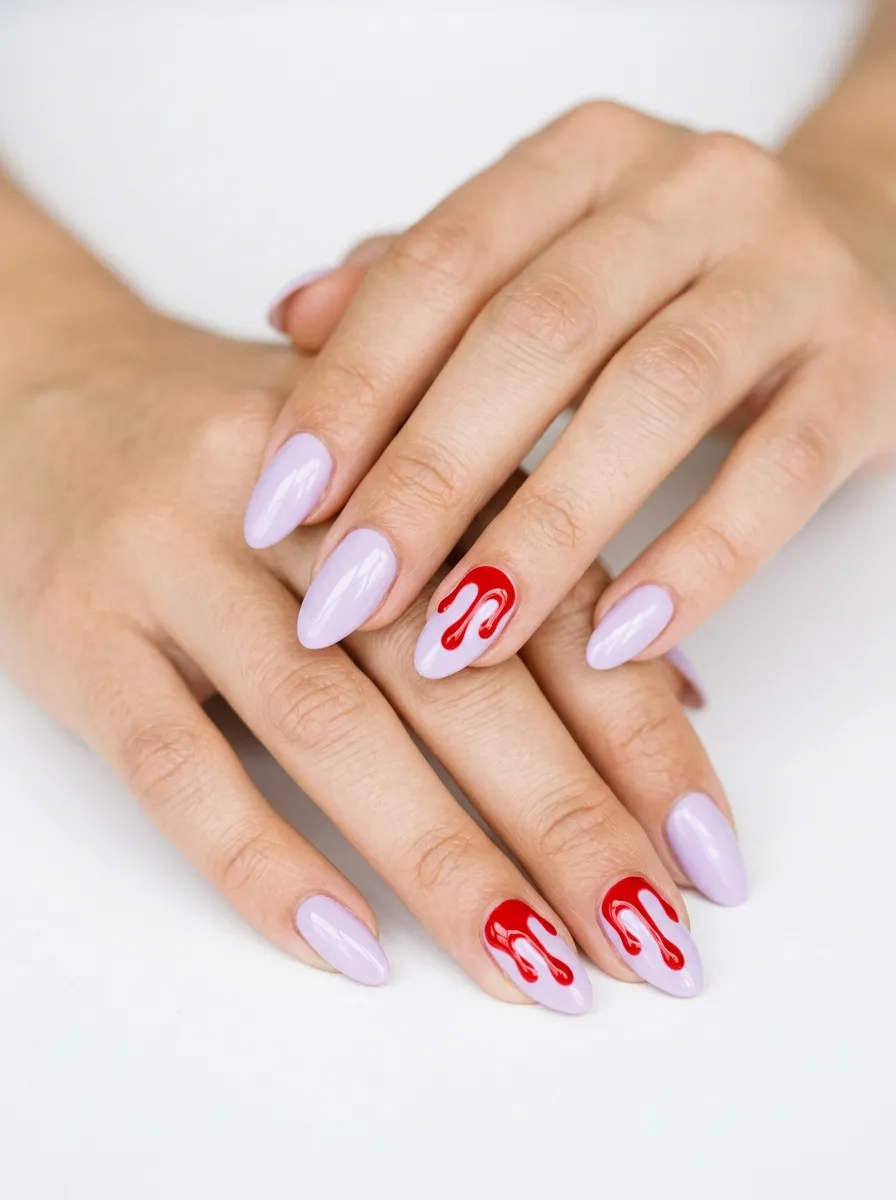
Pastel blood drips are the most unsettling version of this trend and that is exactly why they work.
Sweet pastel bases like baby pink, soft lilac, mint green, or buttery yellow feel innocent and soft. Then the red drips crash that sweetness completely. The contrast between the delicate base color and the aggressive drip design creates a visual dissonance that is genuinely striking.
This concept plays with the idea of dark themes hidden inside innocent packaging. The aesthetic is popular in alternative fashion communities and draws from influences like dark kawaii and horror pop art. It is a very social media friendly look because the contrast reads immediately and creates strong visual interest on screen.
Choose the brightest, most saturated red for your drips when using a pastel base. You want maximum contrast. Avoid darker reds like burgundy or wine here since they can look muddy against soft pastels. A true bright red or even a coral red works best. Keep the drips thin and numerous for extra impact. Five or six thin drips per nail creates more visual chaos than two fat ones, and chaos is the whole point with this particular combination. Pastel polishes from drugstores are very affordable and the red striper pen for the drips is a minimal additional cost.
22. Blood Drip Nail Art With Gemstones
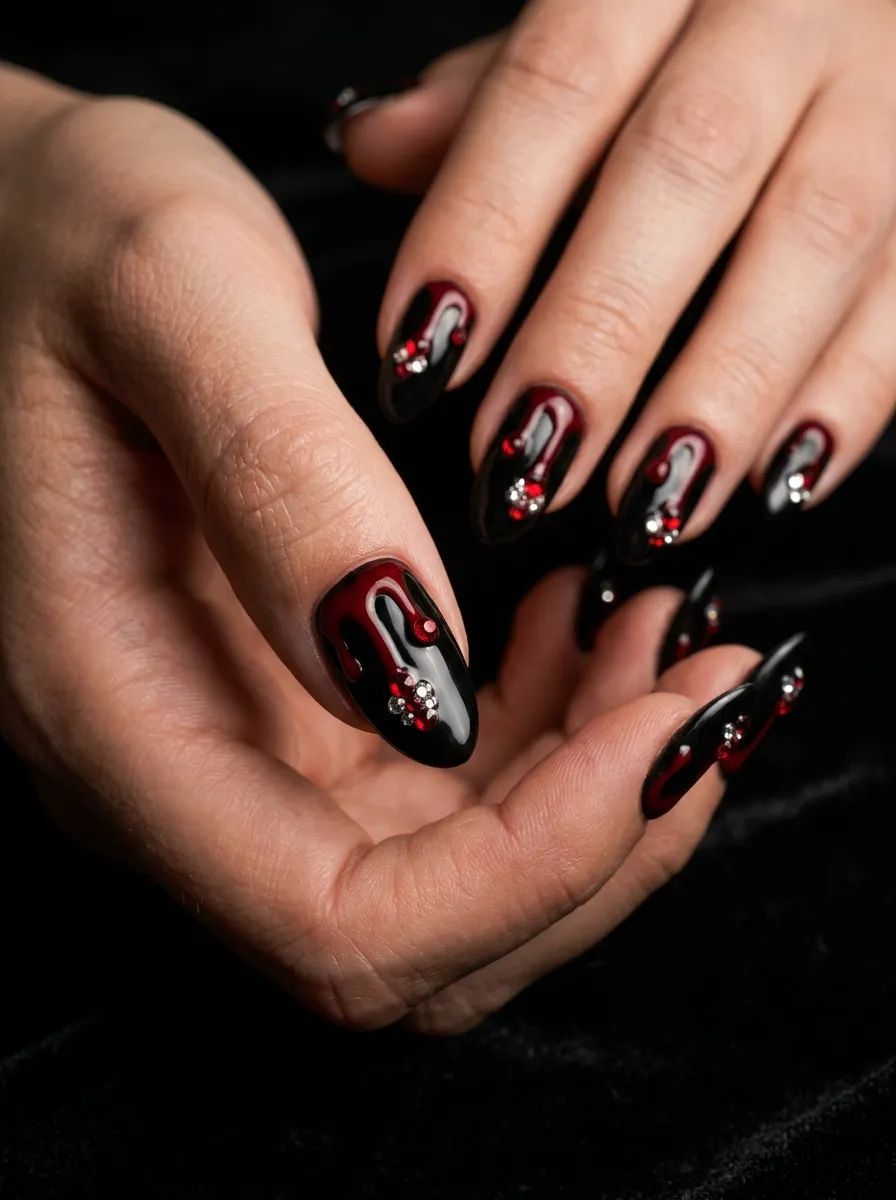
Adding tiny rhinestones at the bottom of each drip line is a game changing detail.
Place a small red or clear gem right at the tip of each drip, exactly where the droplet would form. It mimics the surface tension of an actual liquid droplet and the sparkle adds a theatrical quality to the design. It looks like something a jewelry designer and a horror director created together.
Nail gems are sold in small packets at drugstores, online, and at beauty supply stores for very little money. You apply them with a dotting tool dipped in gel top coat or nail glue. Work while your top coat is slightly tacky so the gems stick without needing extra adhesive.
Position each gem before the drip fully dries. Once placed, cure or air dry, then seal everything with a generous top coat, making sure to cap the edge of each gem to prevent lifting. Gems at the drip tips look especially effective on longer nail shapes where the drips have more length. This is one of those small additions that completely transforms the design. Anyone can add gems to their nails at home with a little patience. The total cost of a packet of small nail gems is minimal and each packet contains enough gems for multiple manicures.
23. Dark Green Base With Blood Drips

Dark green is massively underrated as a blood drip base color.
Deep forest green, hunter green, and dark emerald all create a moody, rich contrast with red drips. The pairing has a dark fairy tale quality. It is unexpected in the same way that burgundy bases are unexpected, but the green reads even more original because most people default to black.
Green also works particularly well during late fall and early winter when deeper jewel tones are popular. A dark green blood drip set bridges the gap between Halloween season and the holiday period, which means you get more wear out of the look without it feeling seasonally limited.
Use a deep, saturated green as your base. Avoid lighter greens or sage tones since they lose the moody quality that makes this combination work. Then apply your red drips in a true red or slightly orange red for the most striking contrast. The warm red against the cool green creates a color tension that makes both shades look more intense than they would on their own. Top coat finish matters a lot with this combination. A glossy finish makes the green look richer and more jewel-like. A matte finish creates a more editorial, fashion-forward result. Both approaches work beautifully, depending on your personal style preference.
24. Spiderweb and Blood Drip Combo
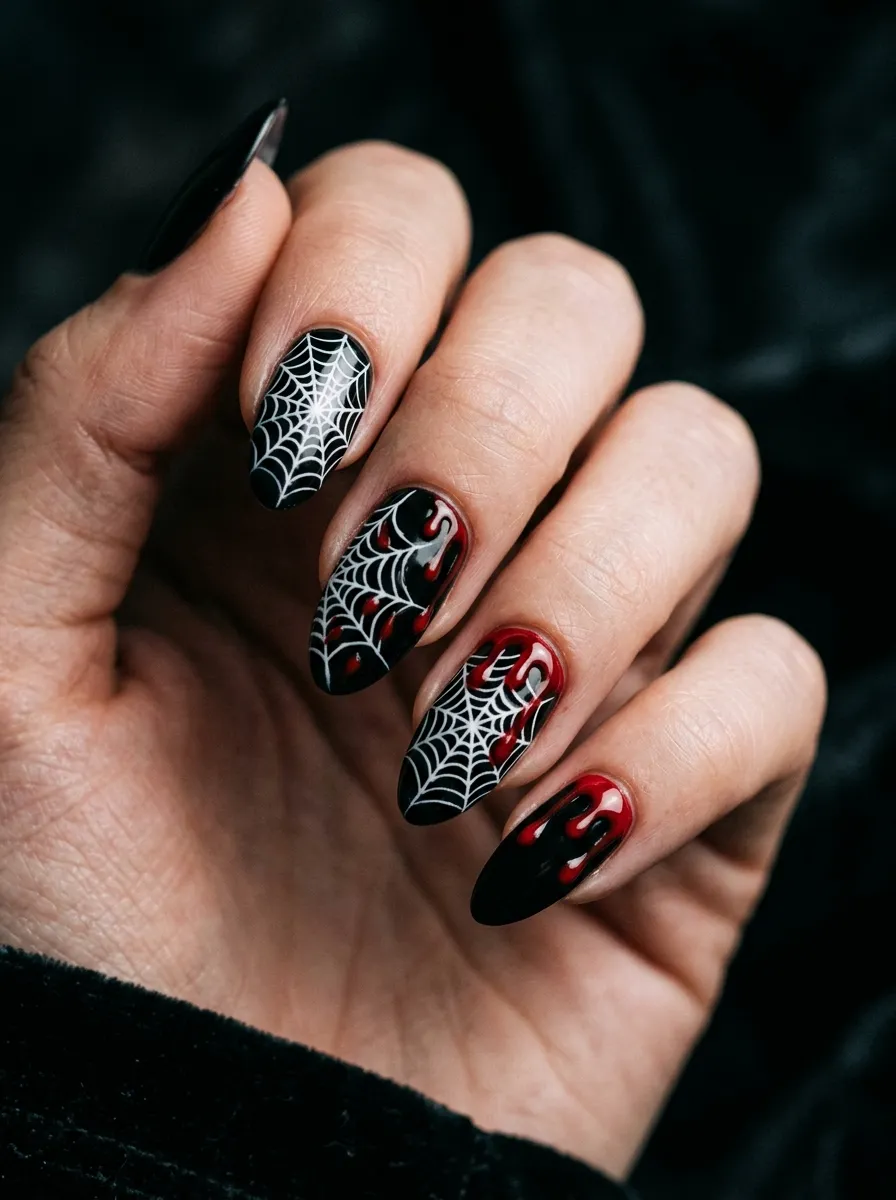
Spiderwebs and blood drips are the two most iconic Halloween nail art elements.
Putting them together on the same set creates a complete horror aesthetic that covers multiple spooky references. You can alternate between the two designs, giving some nails spiderwebs and others blood drips, or combine both elements on each individual nail.
For spiderwebs, a white or silver striper brush works best. Start with a dot in the corner of the nail. Draw straight lines radiating outward from that dot. Then connect those lines with small curved arcs to create the web structure. Practice makes the web look more even. Imperfect webs actually add character, though, so do not stress too much about precision.
Once you have some nails with webs and some with drips, the set reads as a complete Halloween nail story. Adding a tiny spider gem or sticker on one nail brings the design together. This combination is one of the most popular Halloween nail sets for good reason. It is instantly recognizable, extremely easy to recreate at home, and the contrast of the delicate web lines against the bold drip lines creates a varied visual texture that keeps the eye moving across the whole set. All materials needed are minimal cost and widely available everywhere.
25. Color-Blocked Blood Drip Nails
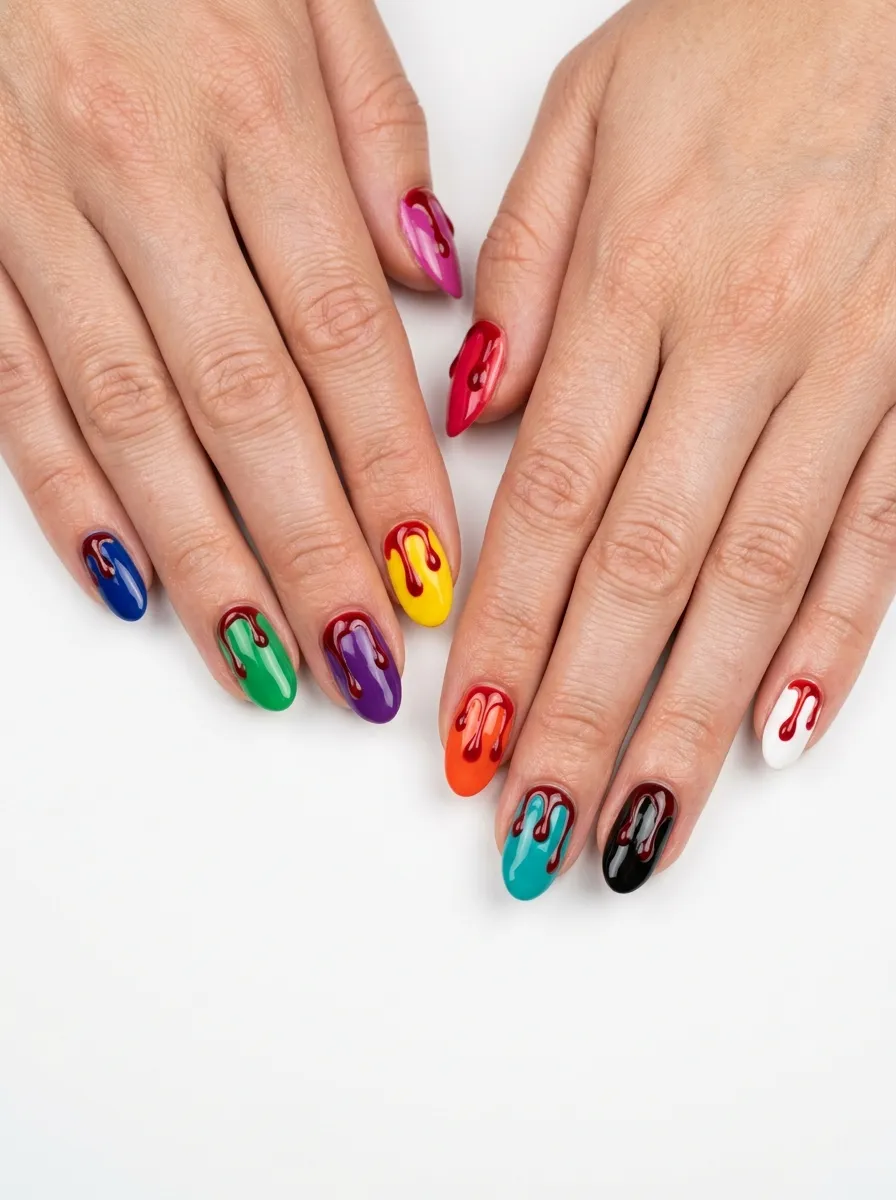
Color blocking brings a modern, fashion-forward energy to blood drip nails.
Instead of keeping all nails the same base color, you go bold with a different color on each nail. Hot pink on one. Cobalt blue on another. Deep purple on the next. Bright orange after that. Black to finish. Then apply blood drips consistently across all ten nails to tie the whole set together.
The drip element acts as the unifying thread across the mismatched base colors. Because every nail has the same style of drips in the same red shade, the set looks cohesive even though the base colors are completely different. It is a clever design trick that works really well.
This look is also a great way to use up small amounts of nail polish you already own. If you have lots of nearly empty bottles of different colors, this is the perfect project for them. No nail in the set needs a lot of product since each one is just a small solid base. The drips on top require minimal additional polish. Total cost could be essentially zero if you are working with polishes you already have. The result looks intentional and creative rather than random because the drip element holds everything together visually.
Blood drip nails are one of the most expressive nail art styles you can wear right now. There are 25 distinct ways to approach this look in this guide, from the simplest classic black and red set to detailed combinations with chrome, glitter, flowers, and gemstones. No matter your skill level, budget, or nail length, there is a version here that works for you. Start with a press-on set or the classic black and red combo if you are new to the trend. Work your way up to the ombre or chrome versions once you feel more confident. Every single look in this list can be achieved at home with affordable tools and basic techniques. The most important thing is to start. Pick the blood drip style that speaks to your personality and go create something savage.