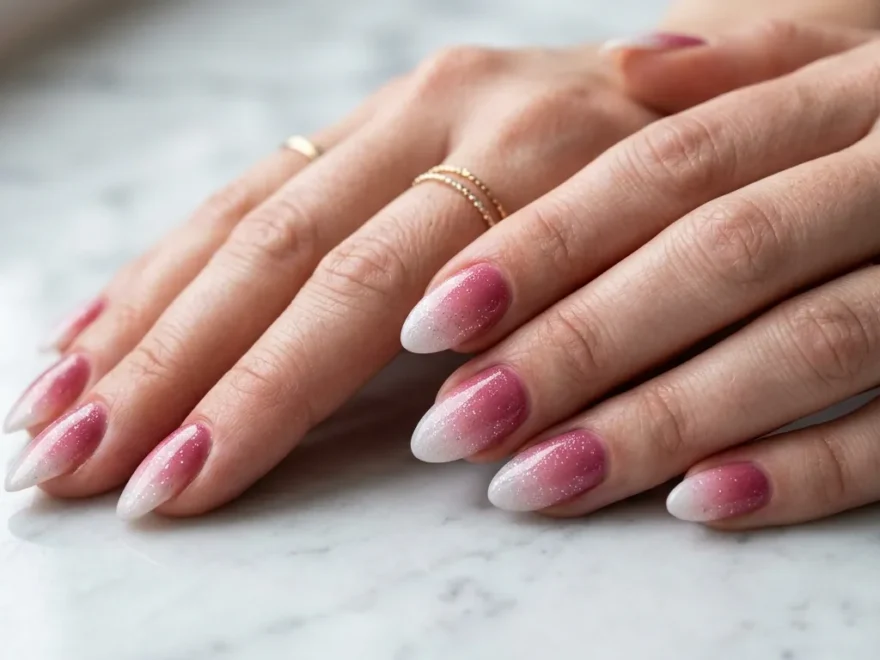
Pink and white ombre nails with glitter are one of the most searched nail looks right now, and for good reason. They work for weddings, date nights, office settings, and lazy Sundays alike. The soft fade from pink to white feels feminine without being over the top. Add glitter and suddenly the whole look comes alive. Whether you do your nails at home or visit a salon, this style is more achievable than it looks. You do not need expensive tools or a professional degree. A few affordable polishes, a makeup sponge, and some loose glitter can get you surprisingly close to salon quality. This list covers 24 fresh takes on the pink and white ombre glitter nail, from subtle everyday styles to full-on glamour looks. Each idea comes with simple tips you can actually use. If you’re also exploring Acrylic Red Ombre Nails Ideas, bold red gradients on acrylic nails offer a striking and sophisticated look that adds depth, elegance, and eye-catching style for both everyday wear and special occasions.
1. Classic Soft Pink to White Ombre with Fine Silver Glitter
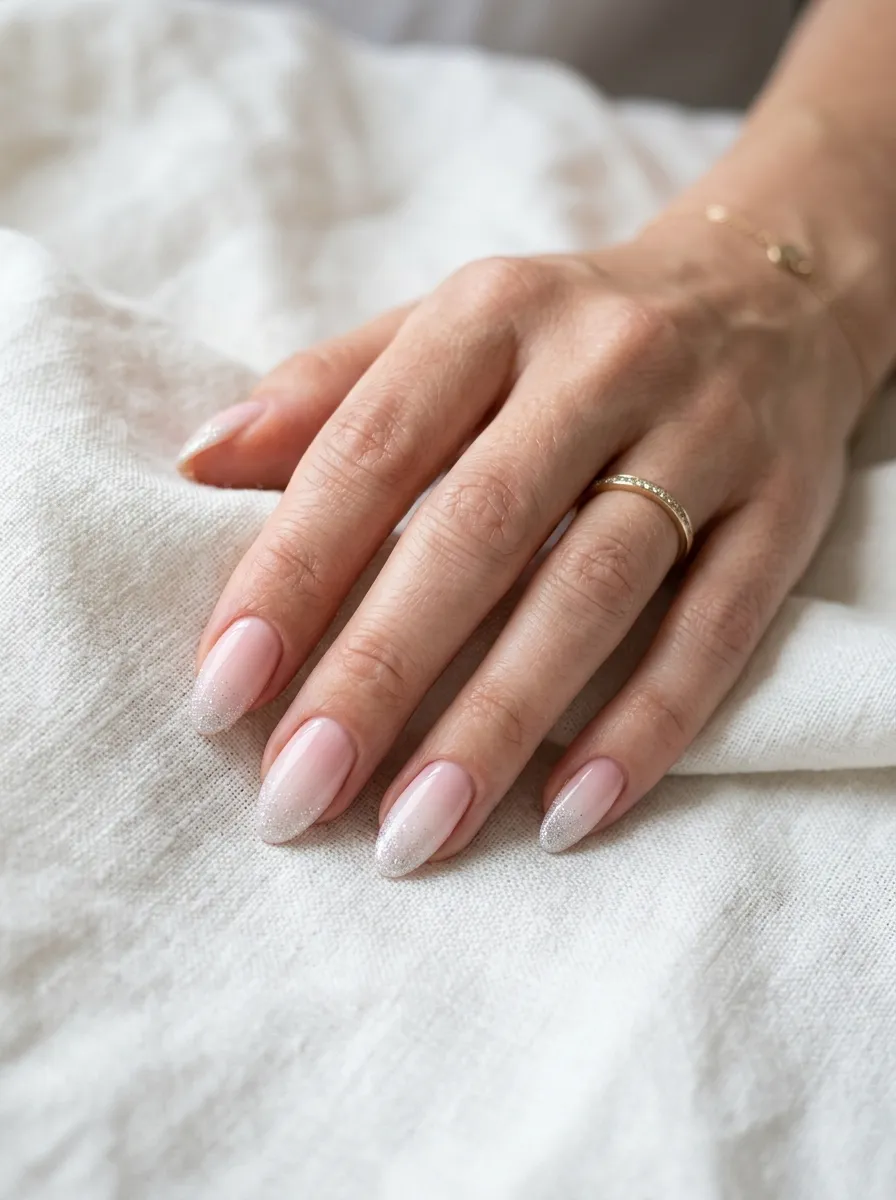
This is the most timeless version of the pink and white ombre glitter nail.
It works for almost every occasion. Think bridal showers, first dates, or just treating yourself on a Tuesday.
Start with a sheer blush pink base. Use a small makeup sponge to dab a slightly deeper pink in the middle zone. Then go almost white near the tip.
While the last layer is still tacky, dust on ultra-fine silver glitter with a small brush.
The key is building up the gradient slowly. Do not rush it. Three thin sponge layers beat one thick messy one every time.
Seal with a glossy topcoat to lock in the glitter and smooth out the sponged texture.
Budget tip: A drugstore sponge applicator and a $3 glitter dust from a craft store work just as well as salon products here.
This look stays fresh for up to 10 days with proper topcoat application. Touch up the tips on day 5 if you start seeing wear. Simple, affordable, and genuinely beautiful.
2. Chunky Glitter Tips on Blush Pink Base
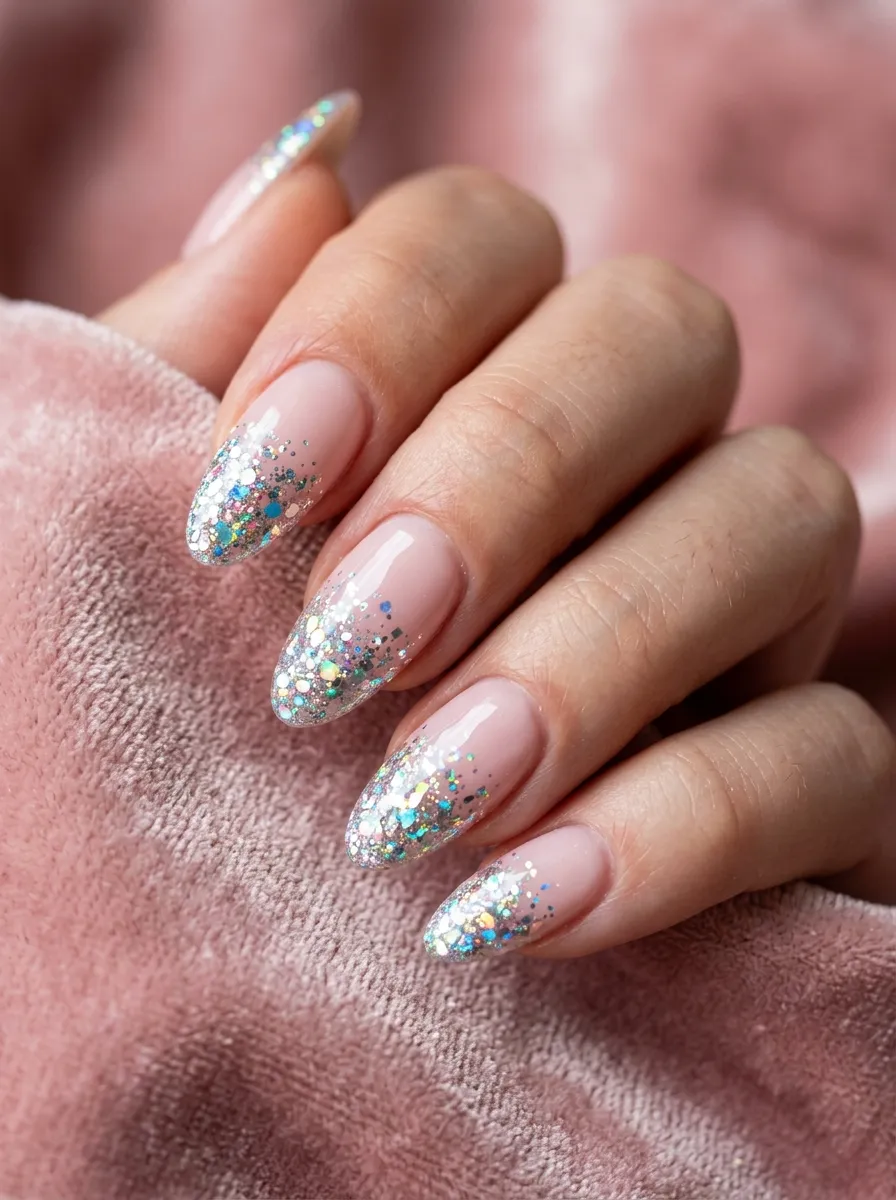
Chunky glitter at the tips gives this style a bolder, more playful personality.
Instead of fine shimmer, you are working with visible glitter pieces. The contrast between the soft blush base and the chunky glitter tips is striking.
Apply your blush pink base first. Let it fully dry.
Then dab chunky glitter polish just onto the top third of each nail. You can also apply loose chunky glitter over a sticky clear coat at the tips for more control.
Holographic chunky glitter works especially well here. It catches light from every angle and shifts color slightly depending on how you move your hand.
Seal with two layers of topcoat. Chunky glitter needs extra sealing to avoid snagging on fabric.
DIY tip: Press the glitter pieces flat with the topcoat brush before it dries. This prevents the top layer from feeling bumpy.
Almond and stiletto shapes really highlight this style. The elongated tip gives the glitter more surface area to shine.
This is a great option for birthday parties, New Year’s Eve, or any time you want your hands to do the talking.
3. Rose Gold Glitter Ombre Fade
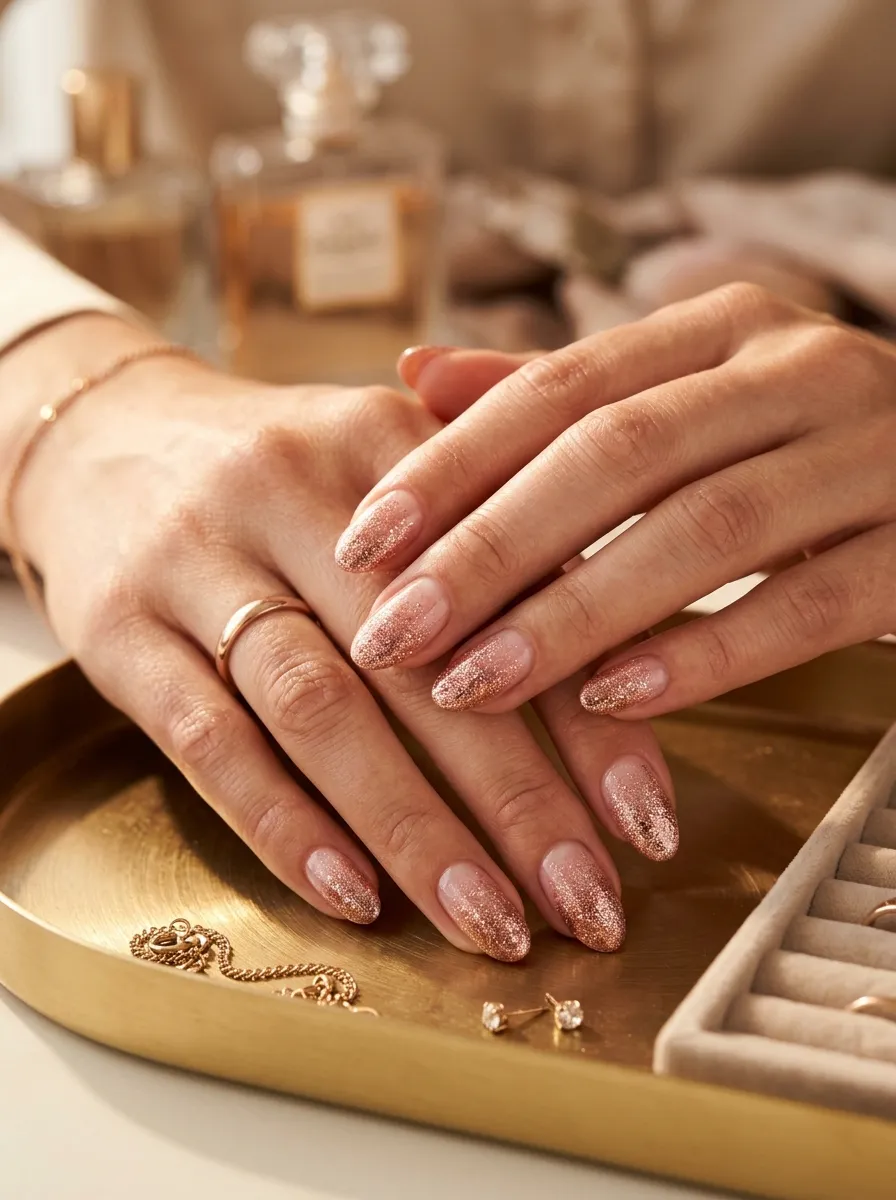
Rose gold glitter adds warmth to the classic pink and white ombre.
Instead of cool silver, you are using a champagne-toned glitter with copper and gold undertones. It feels luxurious without trying too hard.
Start with a soft nude pink base. Sponge on a slightly warmer pink toward the center of the nail. Keep it light.
Apply the rose gold glitter at the tip zone. You can use a glitter polish or press loose rose gold glitter onto a sticky topcoat layer.
The warm tone of the glitter pairs beautifully with medium and deeper skin tones. It also works well for autumn and winter manicures.
Budget tip: KISS and Orly both make affordable rose gold glitter polishes under $6. No need to buy designer brands for this effect.
Use a nude-leaning pink as your base rather than a cool baby pink. The warmth in the base color will help the rose gold glitter look intentional, not random.
Finish with a shiny topcoat. Matte topcoat works too if you want a more editorial feel.
This style is perfect for engagement parties, anniversary dinners, or everyday wear when you want something a little warmer and more grown-up.
4. Glitter Gradient Reverse Ombre
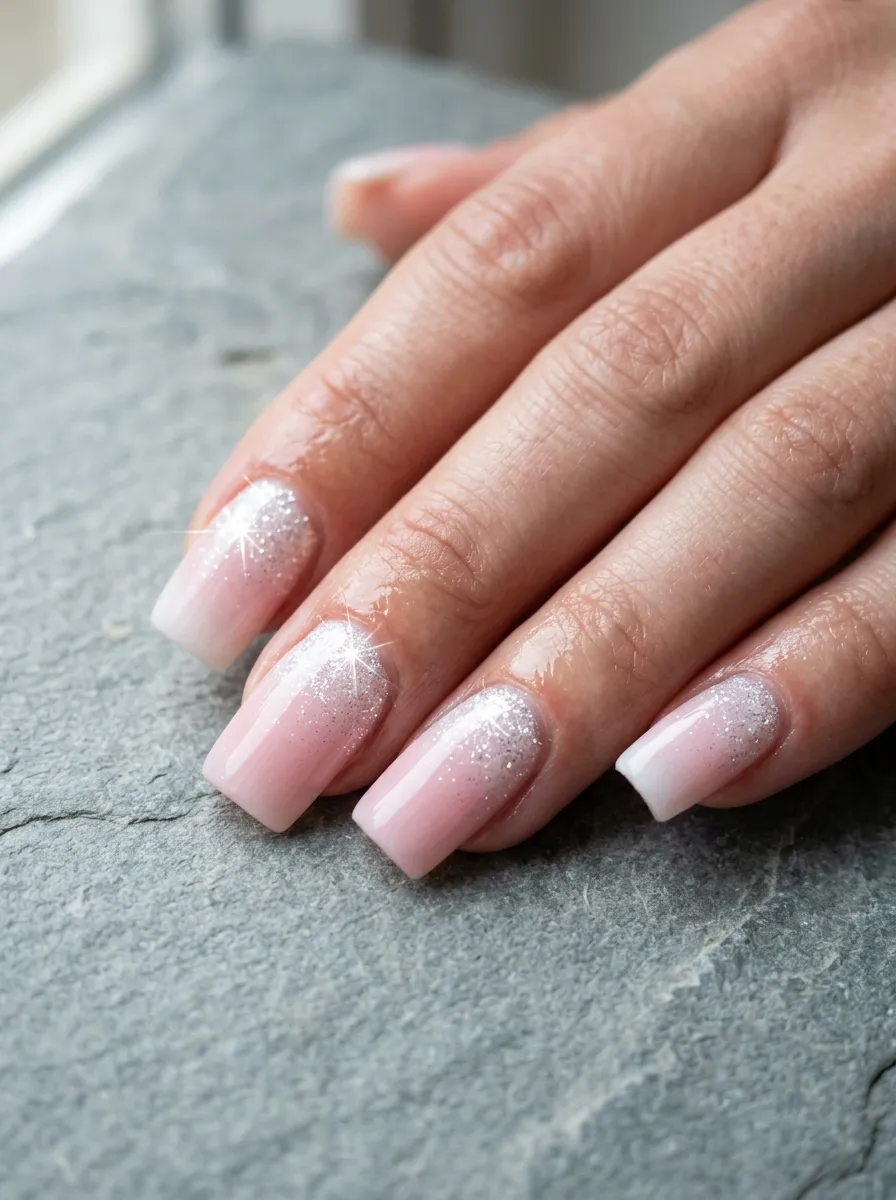
The reverse ombre flips the usual formula.
Instead of glitter at the tip, the sparkle starts near the cuticle and fades into soft pink at the free edge. It is unexpected and eye-catching.
Apply your soft pink shade across the full nail first. Let it dry completely.
Then sponge white near the cuticle area. While it is still wet, dust fine glitter over the white zone. The glitter clings better to the wet polish.
Blend downward with a dry sponge to fade the glitter and white into the pink naturally.
This technique takes a bit of practice. Do not worry if the first attempt is not perfect. You can always clean up the edges with a small brush dipped in nail polish remover.
DIY tip: A flat eyeliner brush is perfect for cleaning up the cuticle line after sponging. Much more precise than a cotton swab.
This reverse gradient looks especially sharp on short, square nails. The clean shape shows off the design without needing length.
Wear this to an art gallery opening, a creative work meeting, or anywhere you want people to notice your nails and ask questions.
5. White Glitter Tips French Ombre
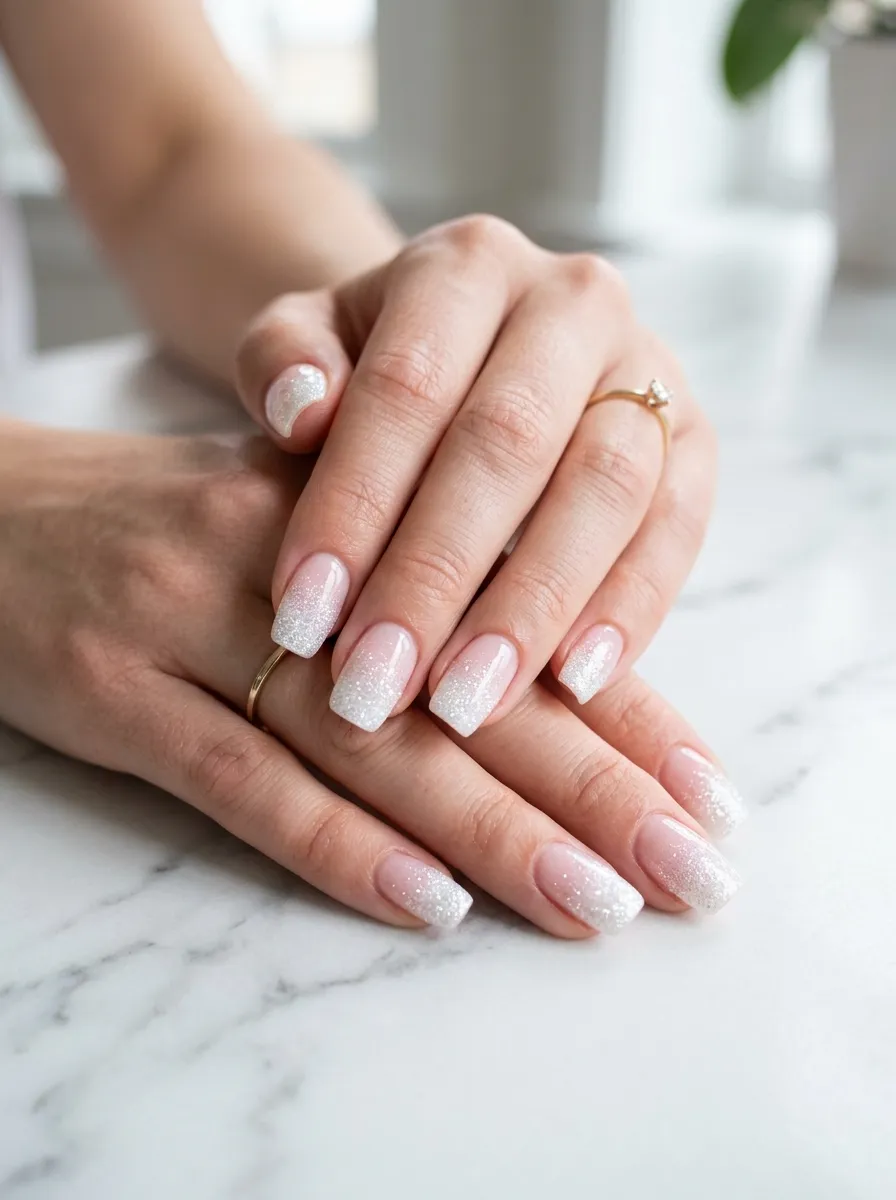
This is the modern answer to the traditional French manicure.
Instead of a crisp white line at the tip, you get a soft fade with white glitter layered on top. It looks polished and updated without being dramatic.
Start with a sheer nude or baby pink base coat. Apply two thin layers and let them dry fully.
Use a sponge to dab white polish at the very tip of each nail. Do not press too hard. You want a soft edge, not a sharp line.
While the white is tacky, press white glitter onto the tip zone with a silicone brush or your fingertip.
Seal with topcoat and repeat on the second day to extend the glitter’s life.
Budget tip: White glitter nail powder from Amazon costs about $4 and lasts for dozens of manicures. A tiny amount goes a very long way.
This look reads as professional enough for office settings but glamorous enough for weekends. It is one of the most adaptable styles on this list.
Oval and round shapes make this feel romantic. Square shapes make it feel modern and sharp. Pick the shape that fits your personality.
6. Hot Pink to White Ombre with Silver Glitter
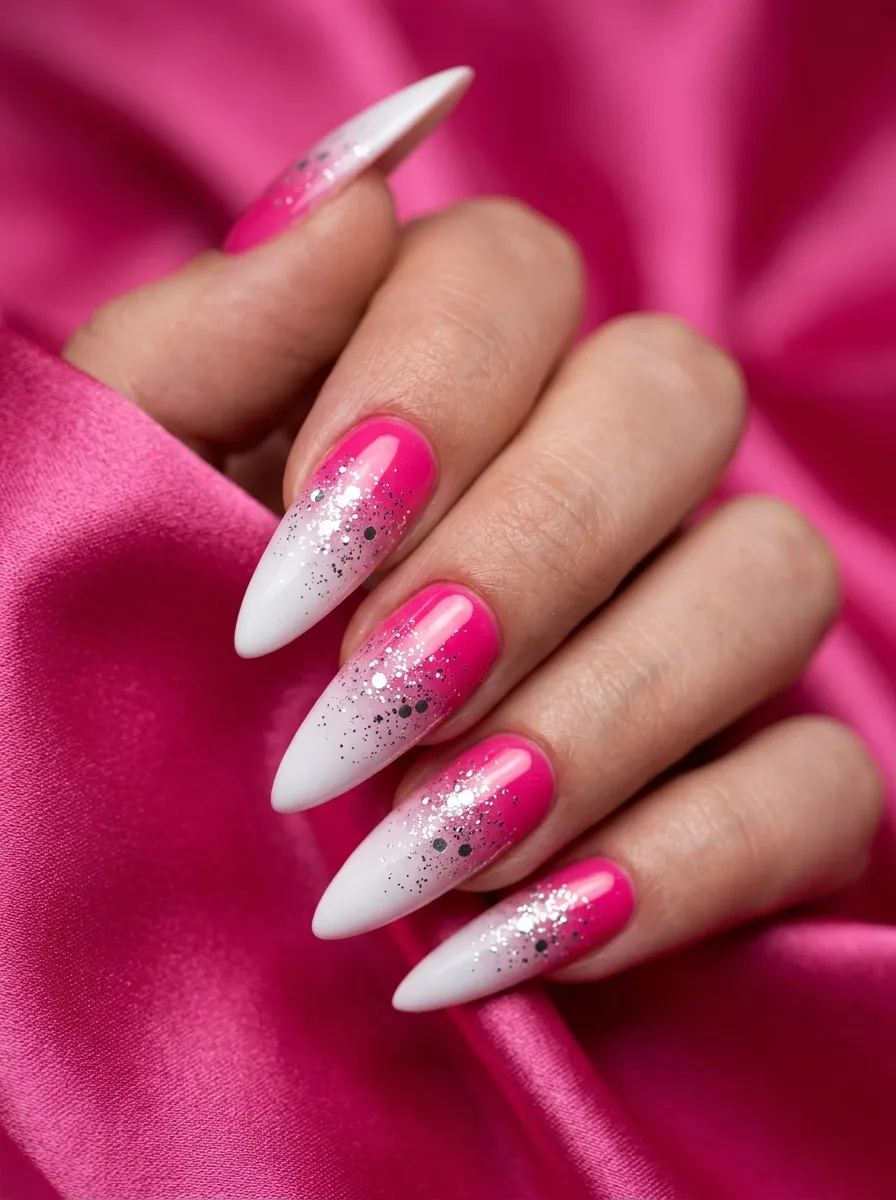
Not every pink and white ombre has to be soft and subtle.
This version starts with a bold, saturated hot pink at the base. The fade into white is more dramatic because of the contrast between the two shades.
Apply hot pink from the base to the middle of the nail. Use a sponge to blend it upward into white at the tip.
Scatter silver glitter across the fade zone. Not just at the tip, but across the whole gradient transition area. This softens the blend and adds texture.
The hot pink version suits people who want their nails to be a statement piece. It is loud in the best way.
DIY tip: If the gradient looks harsh, go over it one more time with a sponge dampened with the lighter pink shade. Blend, blend, blend.
Stiletto and coffin shapes work especially well here. The dramatic nail shape matches the dramatic color.
Wear this to concerts, night events, festivals, or any time you want bold, head-turning nails that people notice from across the room.
7. Opal Glitter Ombre Effect
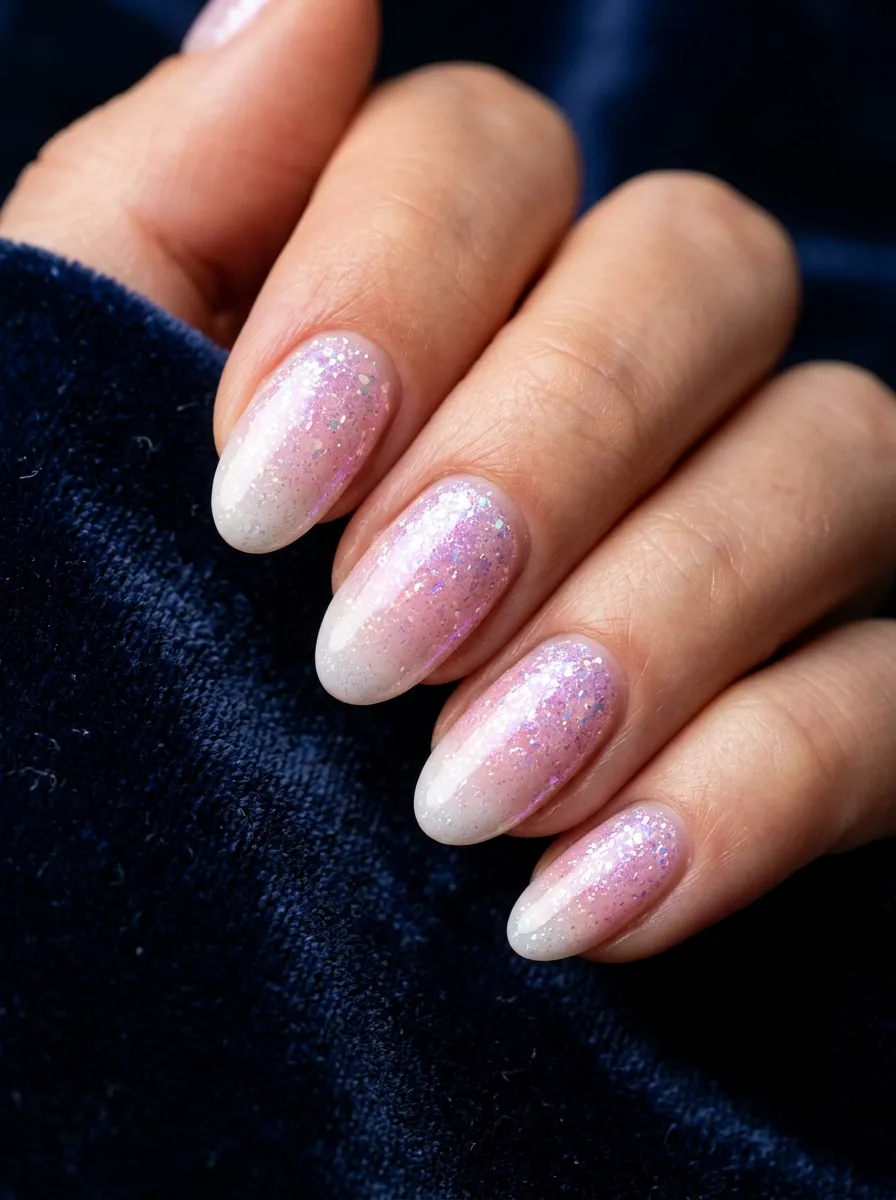
Opal glitter creates a color-shifting, gemstone-like effect on the nail.
It is not just one color. Depending on the light and the angle, it shifts from white to pink to lavender to gold. The result looks genuinely expensive.
Start with a white or very pale pink base to let the opal glitter show its full range of color. Dark bases will mute the shifting effect.
Apply opal glitter dust or opal glitter polish across the whole nail for a full opal look. Or concentrate it at the tips for a more restrained style.
Finish with a glossy topcoat. Gloss amplifies the color-shifting effect. Matte topcoat will dull it.
Budget tip: Born Pretty and Beetles both sell opal glitter powder for under $5. Mix it with a clear nail gel or topcoat to make your own opal glitter polish.
This style photographs beautifully. If you are someone who posts nail content or just loves nails that look different in every photo, opal glitter is made for you.
Oval and almond shapes enhance the gemstone feel. Think of your nails as tiny jewels.
8. Dusty Rose to Ivory Ombre with Micro Glitter
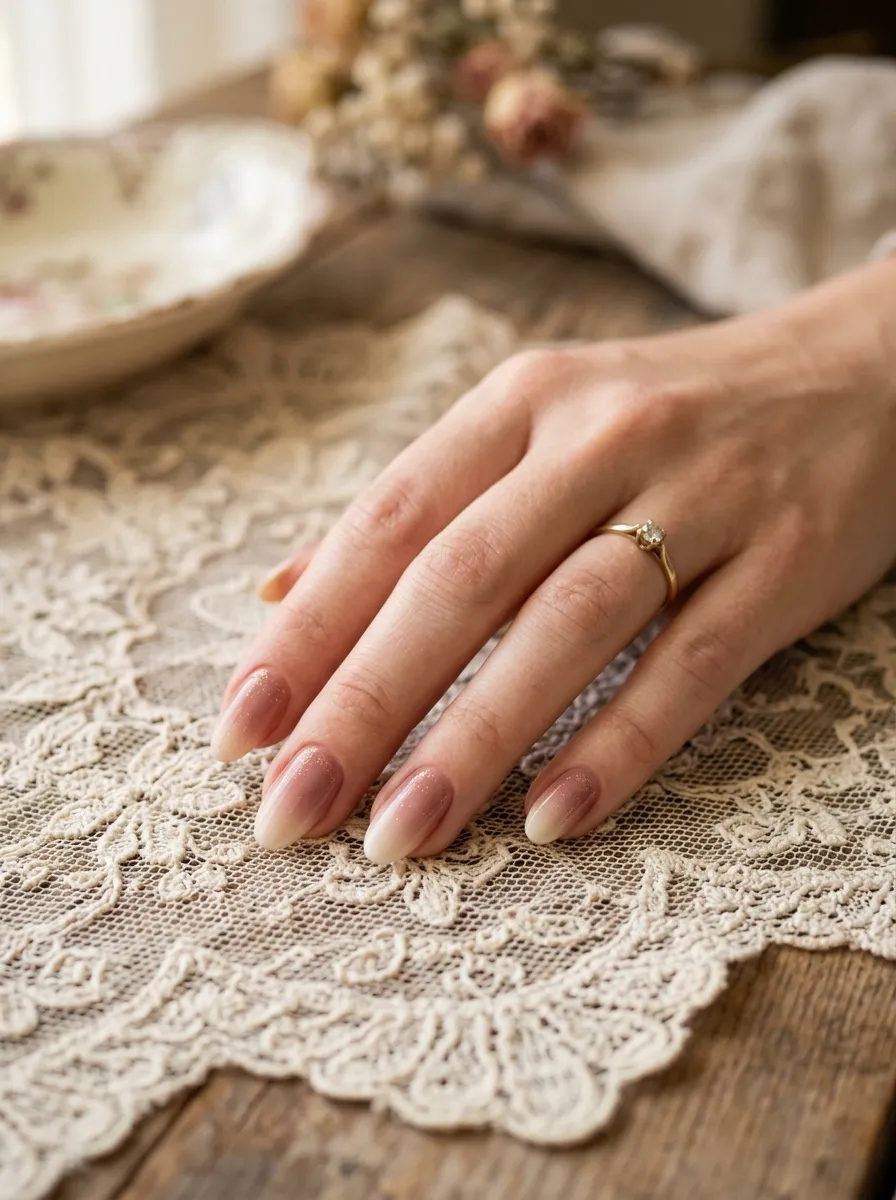
Dusty rose is a more muted, vintage take on pink.
It is not bright or bubbly. It is soft, warm, and a little romantic. Paired with ivory instead of stark white, the ombre feels antique in the best way.
Apply dusty rose from base to mid-nail. Sponge ivory over the top half. The transition should be soft and barely there.
Add ultra-fine gold micro glitter across the nail. Not chunky glitter. Micro glitter that looks more like a shimmer than a sparkle up close.
The combination of dusty rose, ivory, and gold micro glitter creates a look that suits weddings, engagement parties, and vintage-themed events perfectly.
Budget tip: Mix a tiny bit of white polish with your pink polish to create a dusty rose shade if you do not have one. Start with white and add pink gradually.
This style also suits mature nail wearers who want something beautiful but not flashy. The muted palette is sophisticated without feeling boring.
Pair this with gold jewelry and nude lip color for a fully coordinated, editorial-level look that costs almost nothing to achieve.
9. Glitter Ombre Accent Nail
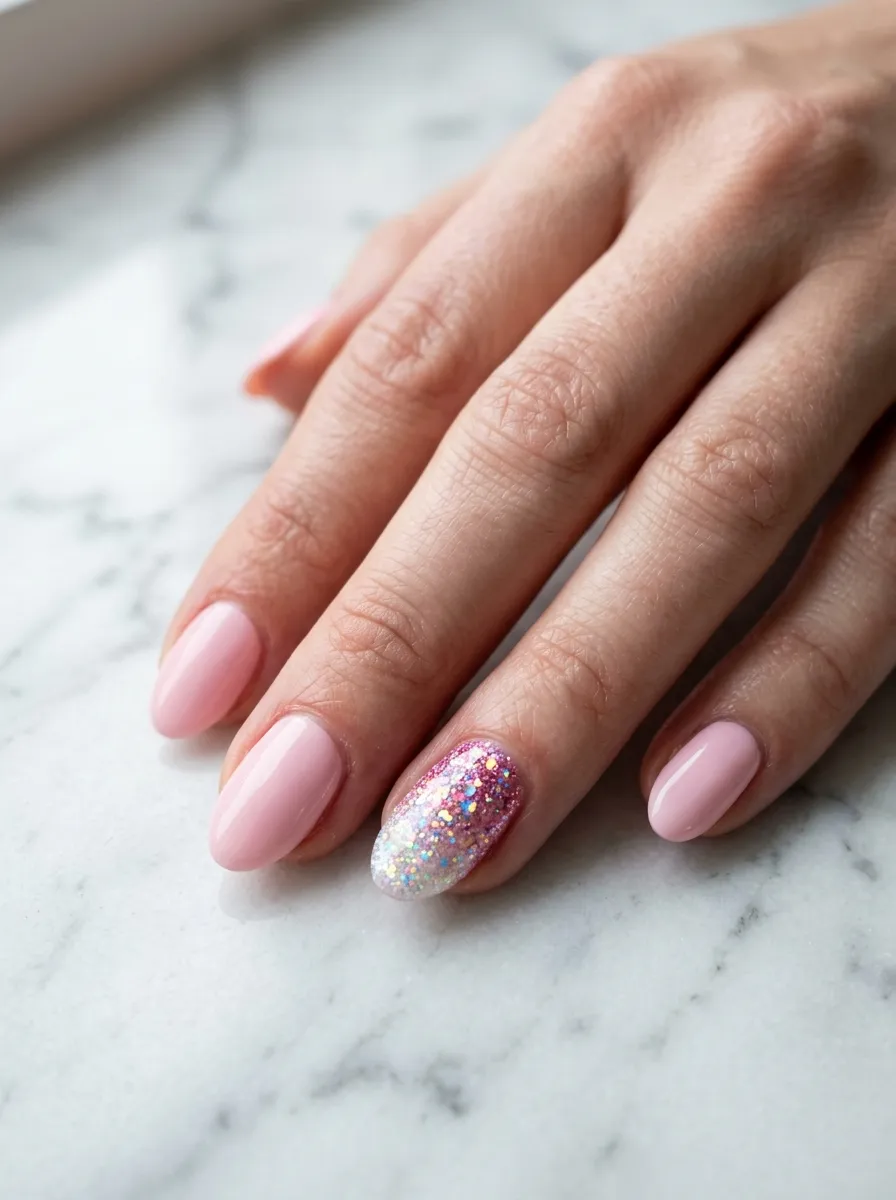
Sometimes one glitter nail is all you need.
The accent nail approach lets you have a bold statement without committing every finger to glitter. It is practical, budget-friendly, and still looks intentional.
Paint all your nails with the same soft pink polish. Keep it simple and clean.
On the ring finger of each hand, do the full pink to white ombre with glitter treatment. Use chunky holographic glitter for maximum impact on the accent nail.
The contrast between the plain pink nails and the one glitter ombre nail is striking. It draws the eye exactly where you want it.
DIY tip: Practice the ombre technique on the accent nail first before committing to all ten fingers. It takes less time and materials to get the method right on just two nails.
This approach also stretches your glitter supply further. You use a fraction of the product compared to doing all ten nails.
The accent nail style also makes chipped polish less obvious. If one plain pink nail chips, it is easy to touch up. The glitter accent nail hides wear better anyway.
10. Pink Ombre with Holographic Glitter Dust
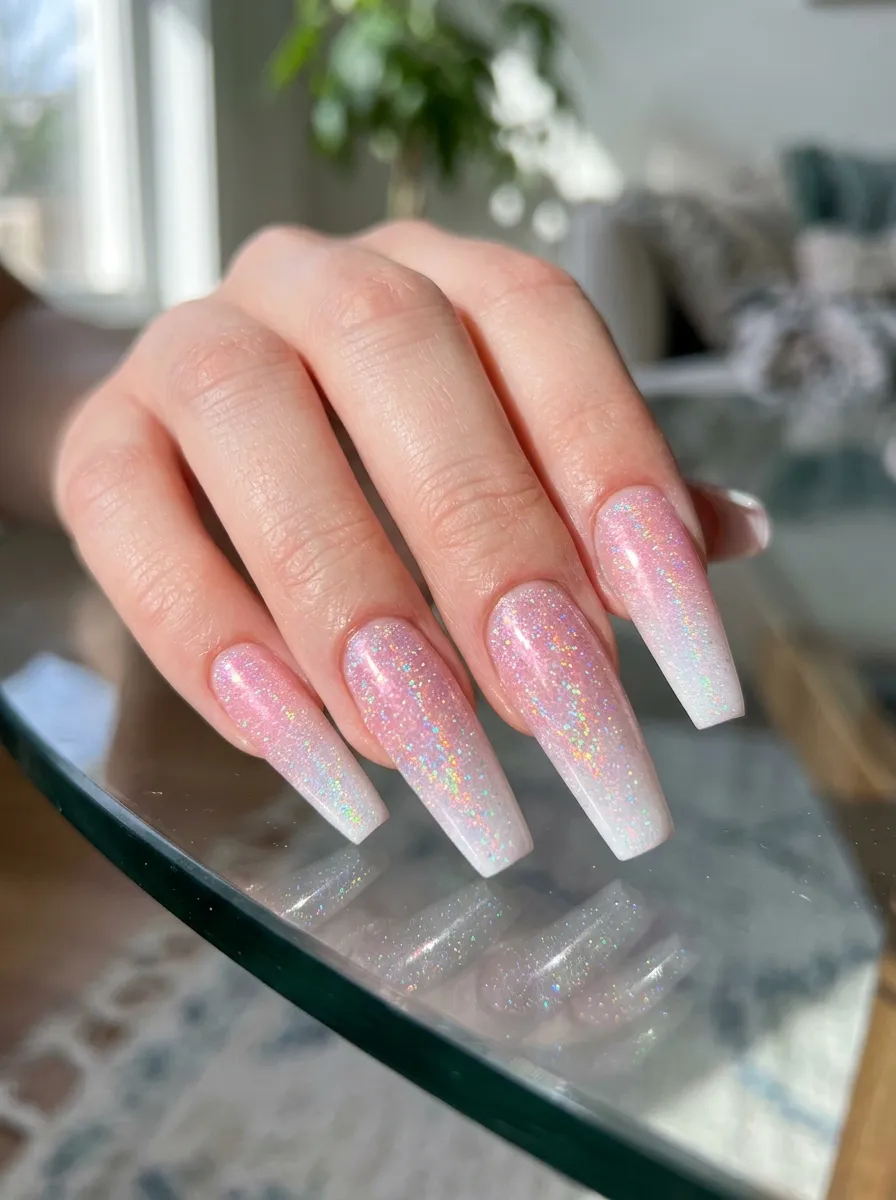
Holographic glitter is different from regular glitter.
It does not just sparkle. It splits light into rainbow colors. Move your hand and your nails flash green, blue, purple, and gold even though the base is pink and white.
Apply your pink to white ombre base first. Let it dry.
Apply a layer of holographic glitter dust on top. You can use holographic glitter polish or apply loose holographic powder with a silicone brush for a more intense effect.
The holographic powder technique gives you more control and a stronger rainbow effect than polish alone.
Budget tip: Holographic nail powder from Amazon runs about $3 to $5 for a set of multiple colors. You only need a tiny pinch per nail.
Apply the powder over a still-tacky layer of gel or topcoat for the best adhesion. Do not apply it over fully dried polish or it will not stick evenly.
Coffin and stiletto shapes make the holographic effect look especially dramatic. Long nails give the rainbow effect more surface area to play across.
This is one of the most photogenic nail styles on this entire list. It photographs differently in every lighting condition.
11. Watercolor Pink and White Ombre with Glitter Wash
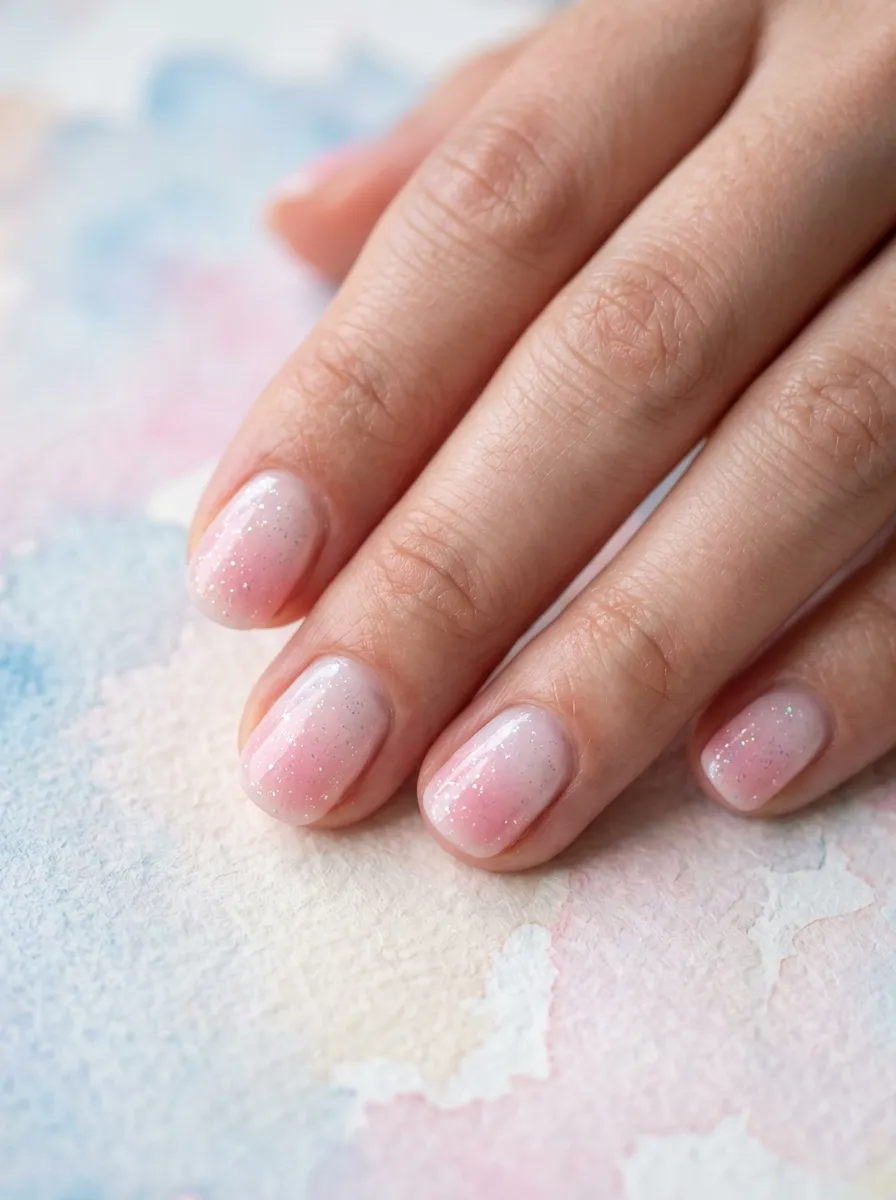
The watercolor ombre is softer and more translucent than a standard ombre.
Instead of opaque pink fading to opaque white, you are working with sheer layers that let the nail show through slightly. It looks light, dreamy, and almost like stained glass.
Use a sheer pink polish as your base. One coat only. You want to see a little of the natural nail.
Dab sheer white at the tips with a sponge. Keep the layers thin and translucent.
Add a fine iridescent glitter wash across the whole nail. Not just at the tips. Iridescent glitter looks amazing over translucent polish because the light bounces off the nail itself underneath.
DIY tip: If you do not have sheer polish, add a drop of clear topcoat to your regular pink and mix them on a palette before applying. This thins the polish and makes it more translucent.
This style suits people with naturally healthy nails. The sheerness means your nail condition is visible, so prep your nails well with a base coat and cuticle care before starting.
Short nails look genuinely beautiful with this look. The watercolor effect works with, not against, the natural nail.
12. Sunset Pink Ombre with Gold Glitter
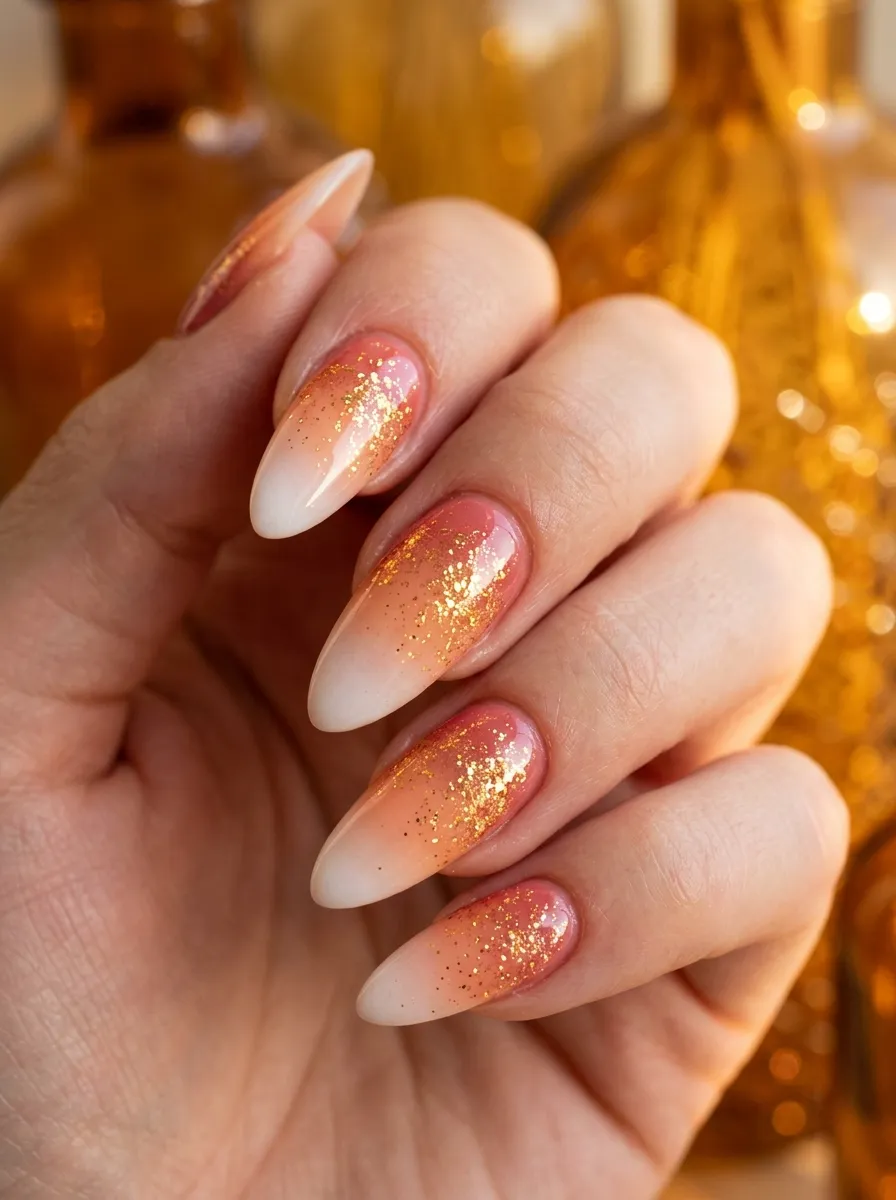
This version pulls in coral and peach tones to create a sunset effect.
The base starts as a warm coral-pink rather than a cool baby pink. It fades through peachy tones into soft white at the tips. Gold glitter sits in the transition zone, like sunlight on the horizon.
Use a warm coral-pink as your darkest shade. Sponge a lighter peachy-pink above it. Then sponge near-white at the very tip.
Apply gold glitter across the middle blending zone. This is where the two colors meet, and the gold glitter makes that transition look intentional and beautiful.
Budget tip: Gold glitter nail polish from Sally Hansen costs about $5 and has enough product for at least 20 manicures. Excellent value for the effect it creates.
This sunset version feels particularly suited to summer and autumn. In summer it feels tropical. In autumn it matches the warm tones of the season.
Almond and oval shapes complement the organic, nature-inspired feel of this gradient. Avoid very square shapes, which feel too structured for this fluid, sunset aesthetic.
Wear this to outdoor events, garden parties, or beach days where the warm natural light will make the gold glitter glow.
13. French Tip Glitter With Pink Ombre Base
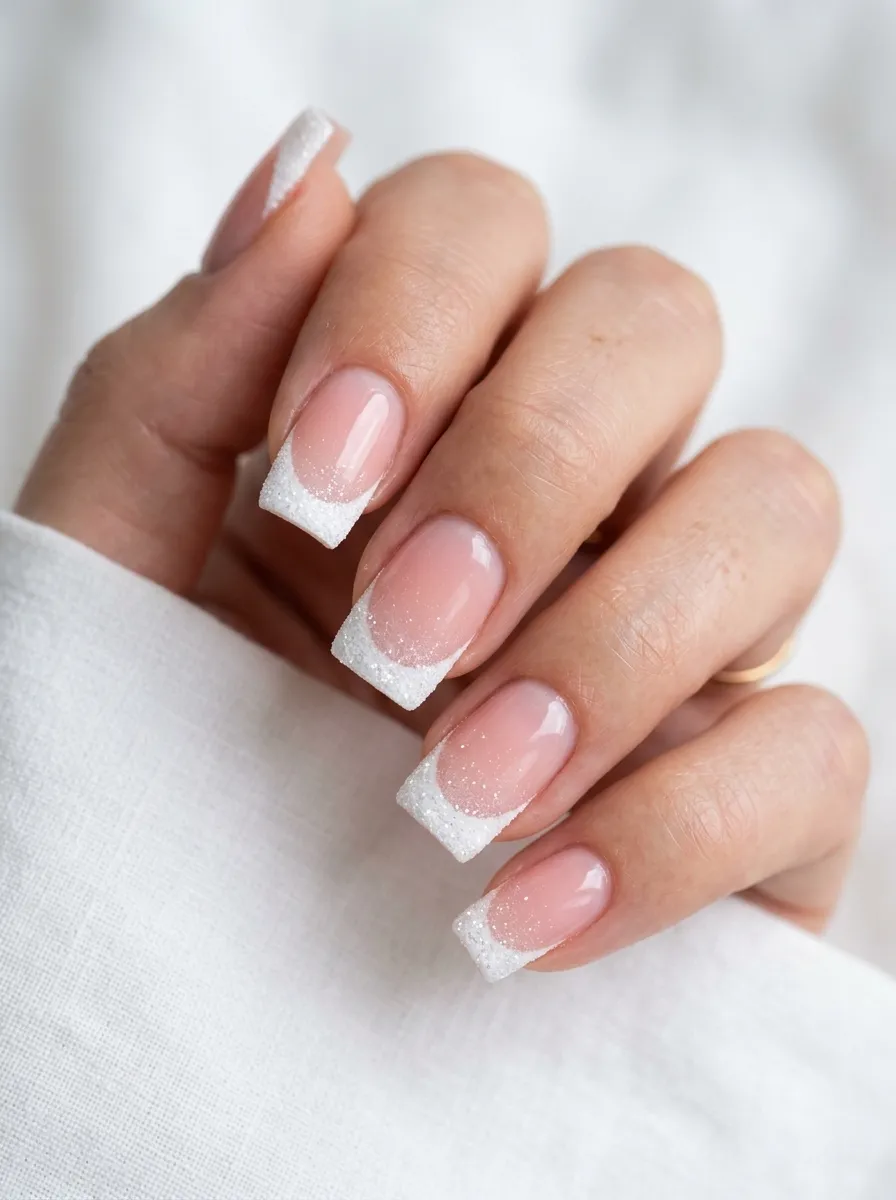
This takes the French manicure structure and makes it more glamorous.
You keep the defined white tip but layer glitter directly onto it. The base remains a soft pink ombre gradient.
Apply your pink ombre base using the sponge method. Let it dry completely.
Use nail tape or a French tip guide to create a clean line at the tip. Apply white glitter polish or press white glitter onto a sticky clear coat layer right at the tip.
Remove the tape carefully while the glitter is still wet to get a clean edge.
DIY tip: Press-on nail guides for French tips cost about $2 at the drugstore. They save enormous amounts of cleanup time and make the line crisp without practice.
The defined glitter French tip reads as polished and grown-up. It suits professional environments more than an all-over glitter look would.
Square and squoval shapes are classic for French manicures and work best here. Round shapes make the French tip look a little retro in a good way.
This is a great low-commitment way to try glitter nails if you are nervous about going too sparkly. The structure of the French tip keeps everything looking clean and intentional.
14. Pastel Pink and White Ombre with Rainbow Glitter
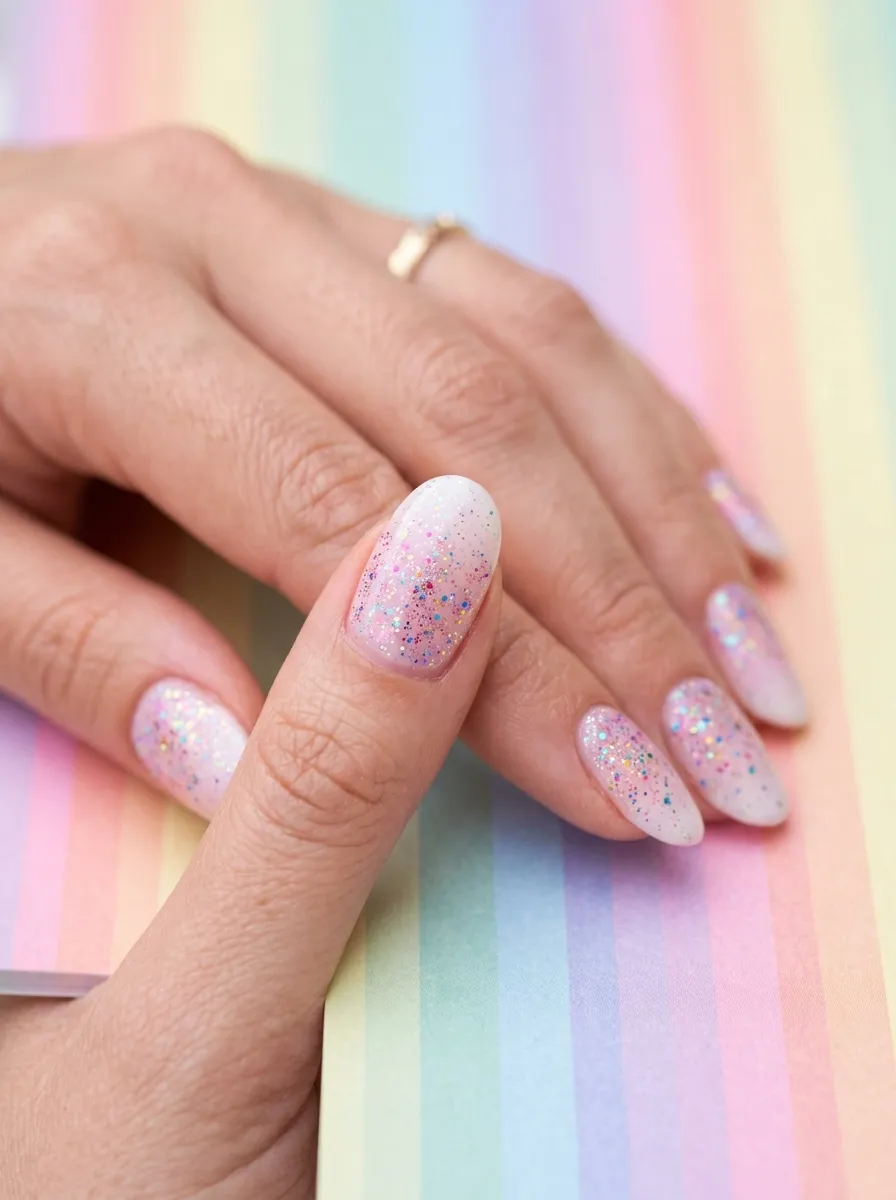
Rainbow glitter on a pastel pink and white ombre looks candy-sweet and cheerful.
The glitter is not one single color here. It is a mix of micro-sized glitter in multiple colors. From far away it looks like shimmer. Up close it reveals tiny flecks of pink, blue, green, gold, and purple.
Apply a very pale pastel pink ombre base. Keep it almost white throughout, just with a faint pink blush at the cuticle end.
Apply rainbow micro-glitter across the full nail. Because the base is so pale, the glitter colors show up clearly.
Budget tip: Mixed color micro-glitter sets from craft stores cost about $5 and include enough variety to experiment with multiple looks. You only need a tiny amount per nail.
This is a perfect style for spring and summer. It suits youthful, playful personalities and looks amazing in outdoor photos.
Short to medium nails work well here because the detail of the rainbow glitter reads clearly even on a small surface.
Wear this for birthday celebrations, children’s parties you are hosting, spring brunches, or just whenever you want your mood to feel lighter.
15. Chrome Pink to White Ombre with Glitter Overlay
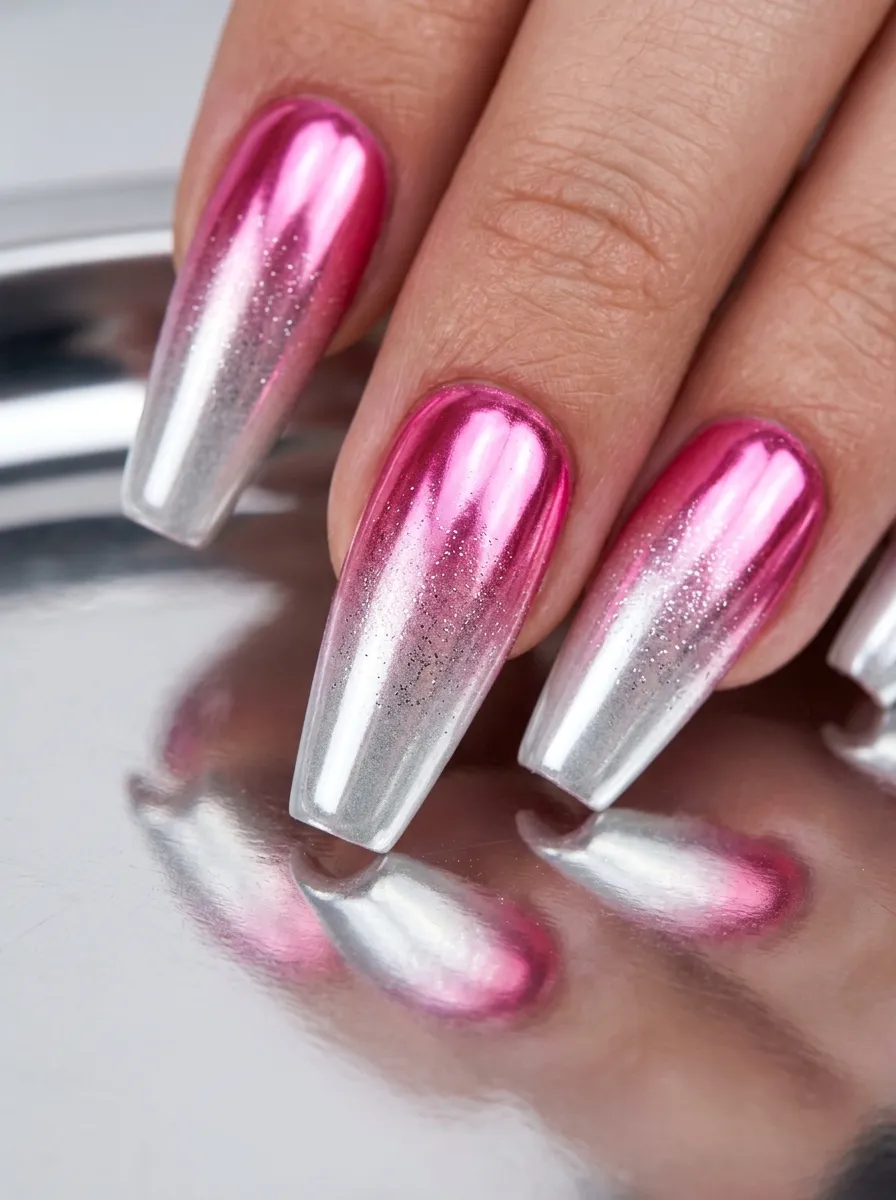
Chrome finishes take ombre nails into a completely different territory.
Instead of a matte or glossy finish, chrome gives your nails a liquid metal mirror quality. It is bold and futuristic but still feminine because the base is pink and white.
Apply your pink to white ombre base using gel polish for best results. Chrome powder bonds better to gel than to regular polish.
Buff chrome powder onto the nail using a silicone finger tool or a felt applicator. Work in small circular motions. The chrome effect builds quickly.
Dust fine silver glitter over the chrome before sealing. The glitter adds texture to what would otherwise be a very smooth, reflective surface.
DIY tip: Chrome powder works best over dark gel colors, but it also works over pale shades. The effect will be slightly different, more pearlescent than mirror-like, which actually suits the pink and white ombre beautifully.
Coffin and stiletto shapes are the most common choice for chrome nails because the wide surface area shows off the mirror effect fully.
Seal with a no-wipe gel topcoat to protect the chrome finish. Regular topcoat will dull the mirror effect significantly.
16. Matte Pink Ombre with Glitter Accent Line
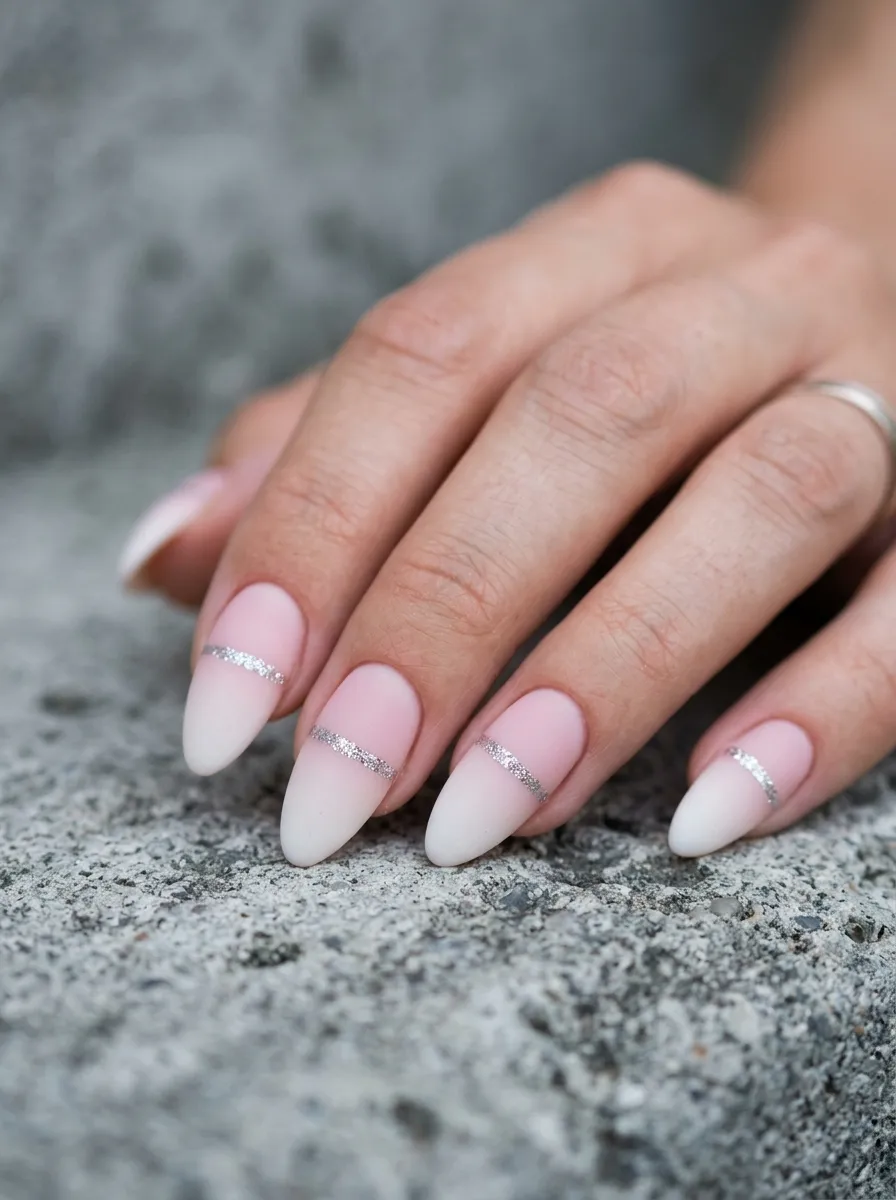
Matte topcoat changes everything about this look.
The same pink and white ombre you know suddenly looks editorial and modern under a matte finish. Then add one thin line of glitter across the middle of each nail and the contrast is stunning.
Apply your pink to white ombre base. Let it dry.
Using a thin nail art brush or a striping brush, paint a thin horizontal line of glitter polish across the widest part of each nail. This sits right in the gradient transition zone.
Apply matte topcoat over everything except the glitter line. Or apply matte topcoat over the whole nail and the glitter will create a textured contrast against the flat matte surface.
Budget tip: Matte topcoats from Essie or Sally Hansen cost about $8 and last for months. One bottle will finish hundreds of manicures.
The glitter line acts like jewelry for your nail. It is a small detail with a big visual impact.
This style suits minimalist aesthetics. It is not maximalist glitter overload. It is one deliberate line of sparkle on a refined matte base.
Great for workplaces with conservative dress codes where you still want something interesting and personal.
17. Baby Pink to White Ombre with Iridescent Glitter
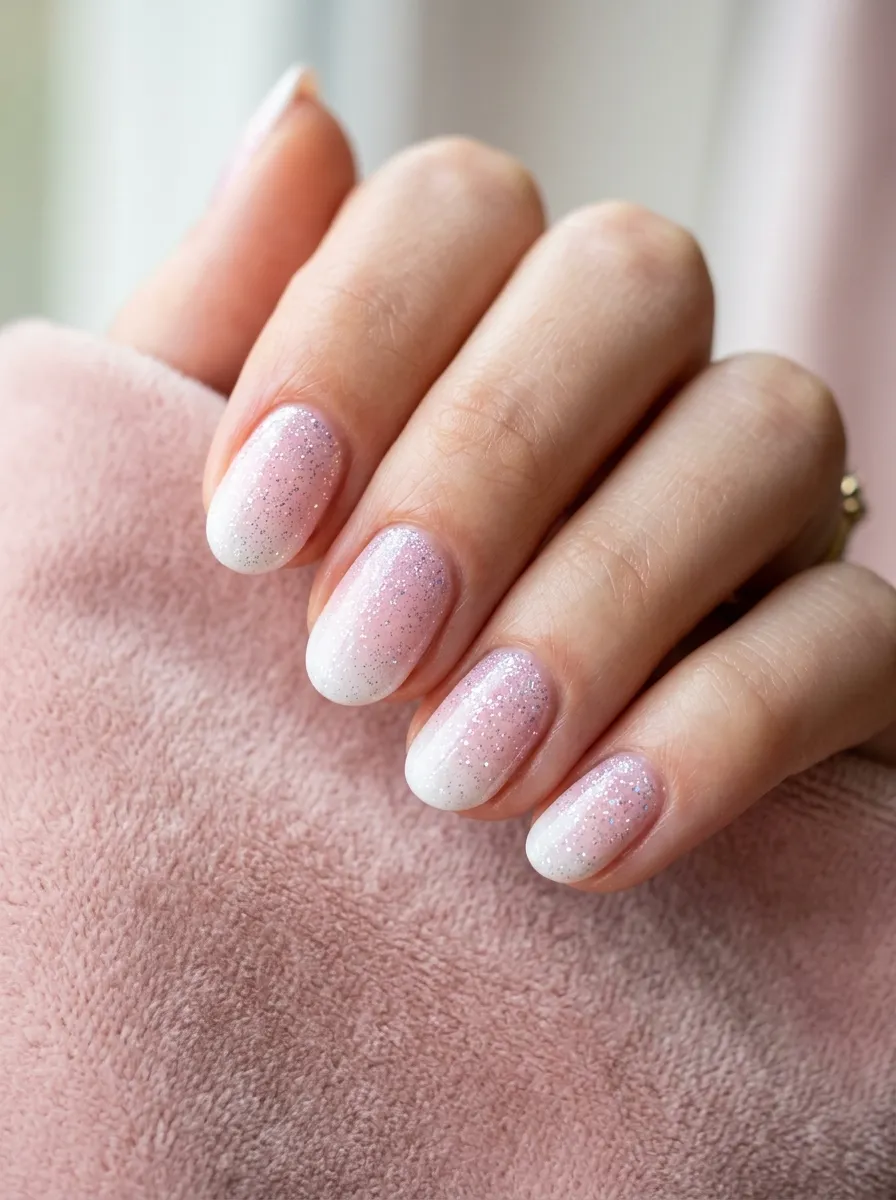
Baby pink is lighter and sweeter than regular pink.
It sits right at the edge of pink and nearly nude. Paired with white and iridescent glitter, it creates the softest, most delicate nail look on this list.
Use the palest pink you can find, something almost skin-toned with just a hint of color. Apply two coats for a full but light coverage.
Sponge white very gently at the tips. Barely there. The transition should almost be invisible.
Apply iridescent glitter across the whole nail. Iridescent glitter shifts color and adds dimension without adding much contrast. It keeps the look airy and light.
Budget tip: Sally Hansen’s Insta-Dri polishes include several baby pink shades under $5. The fast-dry formula is especially helpful when sponging because you can apply the next layer quickly.
This look is perfect for people who want polished nails but prefer understated style. It does not scream for attention. It just quietly looks beautiful.
Short and very short nails look especially good with baby pink. The pale color and light glitter keep everything looking clean rather than crowded.
Ideal for job interviews, formal events, or days when you want to feel put-together without wearing anything dramatic.
18. Glitter Ombre Coffin Nails in Blush and Pearl
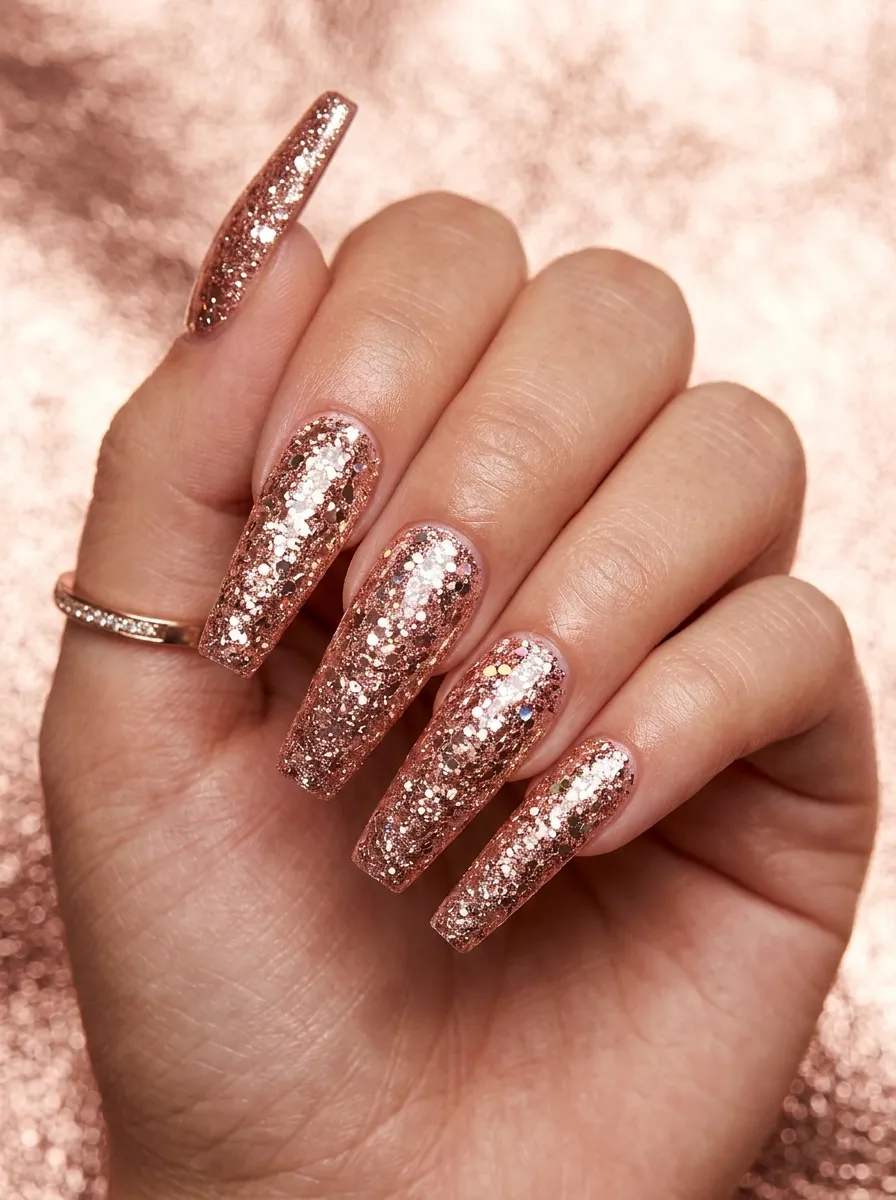
Coffin nails give you the most surface area to work with.
The flat, wide tip of the coffin shape means the glitter ombre has space to breathe and show every layer of the design clearly.
Use blush pink at the base and pearl white at the tip. Pearl white has a slight luster to it that regular white does not. It adds a soft sheen even before the glitter goes on.
Apply mixed glitter across the entire nail rather than just at the tip. Use a combination of chunky and fine glitter for a layered, textured finish.
This full-coverage glitter approach is more high-maintenance but genuinely stunning.
Budget tip: Buy a mixed glitter set rather than individual pots. Sets cost about $8 to $12 and give you multiple sizes and colors to mix. Far more affordable than buying each type separately.
Remove this style with foil wraps and nail polish remover. Soaking is more effective than scraping for heavy glitter polish.
This is a special occasion nail look. Weddings, quinceañeras, formal dances, anniversary celebrations. When you want nails that are part of the outfit.
19. Pink Ombre Nails with Star Glitter
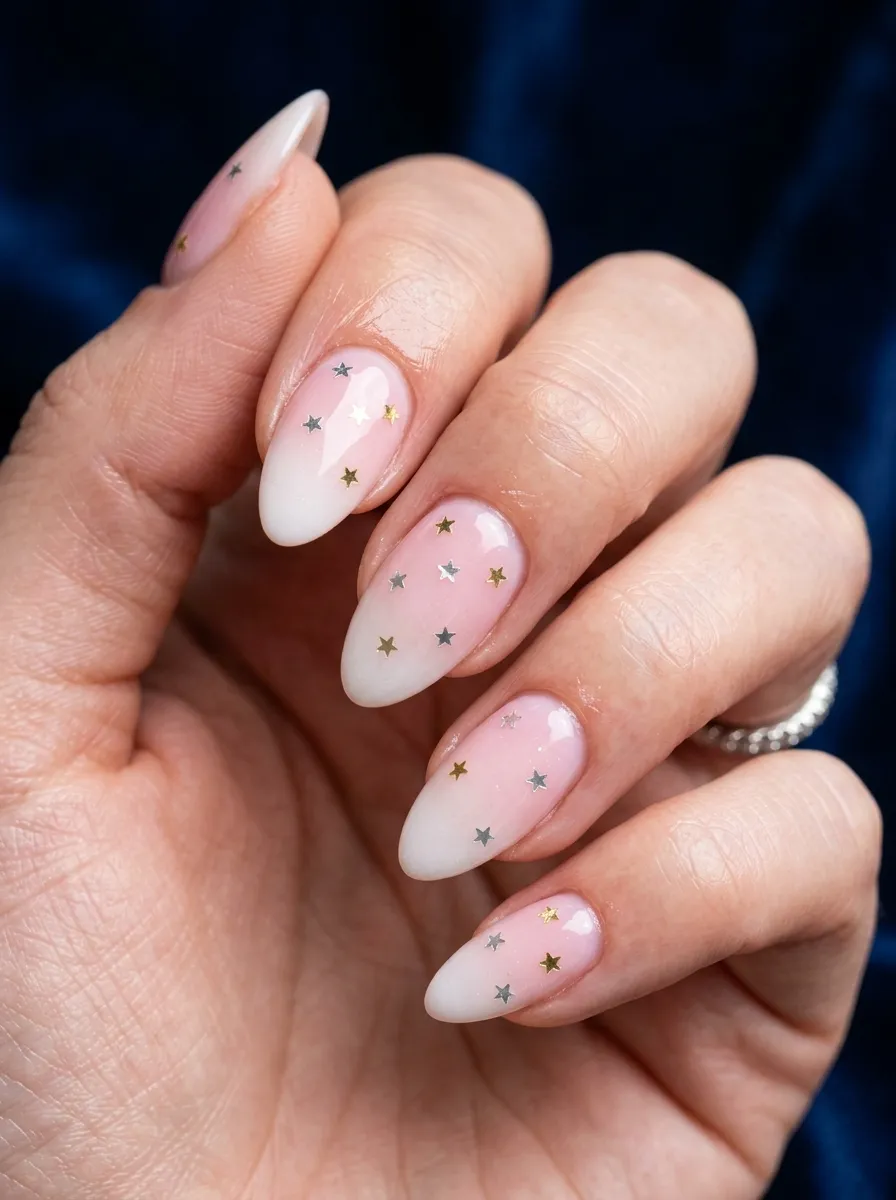
Star-shaped glitter replaces the usual round or hexagonal glitter pieces.
The tiny star shapes add a whimsical, celestial quality to the standard pink and white ombre. It feels more playful and specific than generic sparkle.
Apply your ombre base first. Let it dry.
Apply a sticky clear coat and then use tweezers or a dotting tool to place star-shaped glitter pieces across the nail. You can scatter them randomly or arrange them in a pattern, like a constellation.
Silver and gold star pieces look especially magical against a pale pink and white base.
Budget tip: Star glitter pieces are available in mixed nail art kits from Amazon for about $6 to $10. These kits usually include multiple shapes and sizes, so you get excellent variety for the price.
This style is perfect for holiday nails, especially around Christmas and New Year’s. It also suits star sign lovers and anyone with a celestial or cosmic aesthetic.
The randomness of scattered stars makes each nail slightly different. That variation makes the look feel more handmade and personal than a uniform pattern would.
20. Neon Pink Ombre with White Glitter Tips
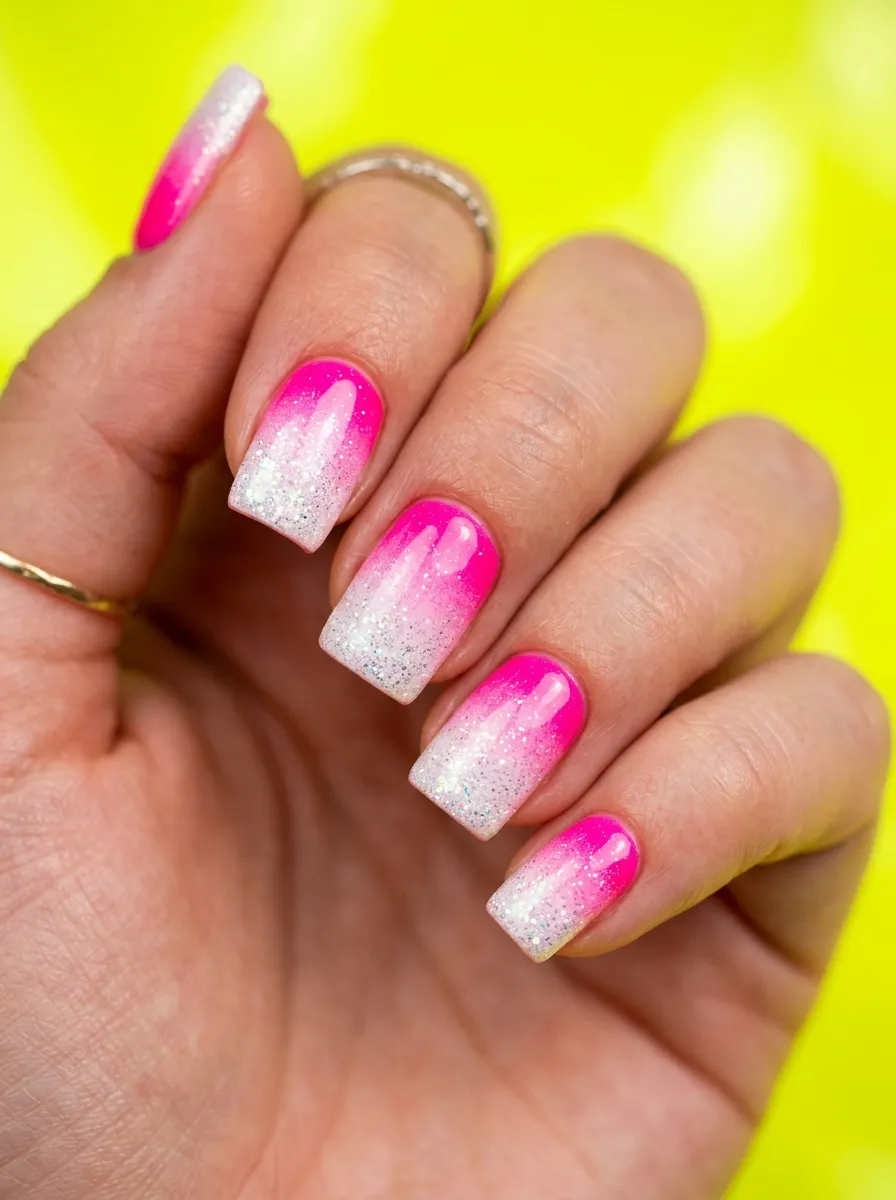
Neon pink takes the usual romantic softness of pink ombre and turns up the volume dramatically.
This is not a subtle look. The neon base is electric and saturated. The white glitter tips create a sharp, graphic contrast at the end of each nail.
Apply neon pink from base to mid-nail. Neon polish can be streaky, so apply three thin coats rather than one thick one.
Sponge white at the very tip. Keep the white zone narrow and concentrated.
While the white is still tacky, press dense white glitter onto the tip. The high density creates a frosted, almost powdery effect against the electric pink.
Budget tip: Neon polishes from OPI and China Glaze are affordable at around $8 to $10. Cult Nails and Orly also make excellent neons for under $10.
Apply a UV-protective topcoat over neon nails. Neon pigments fade faster than regular polish, especially in sunlight. A UV-blocking topcoat extends the life of the color significantly.
Short and medium length nails work best with neon because long nails plus neon can feel overwhelming. Keep the length moderate and let the color do all the work.
21. Ombre Nails with Scattered Glitter Clusters
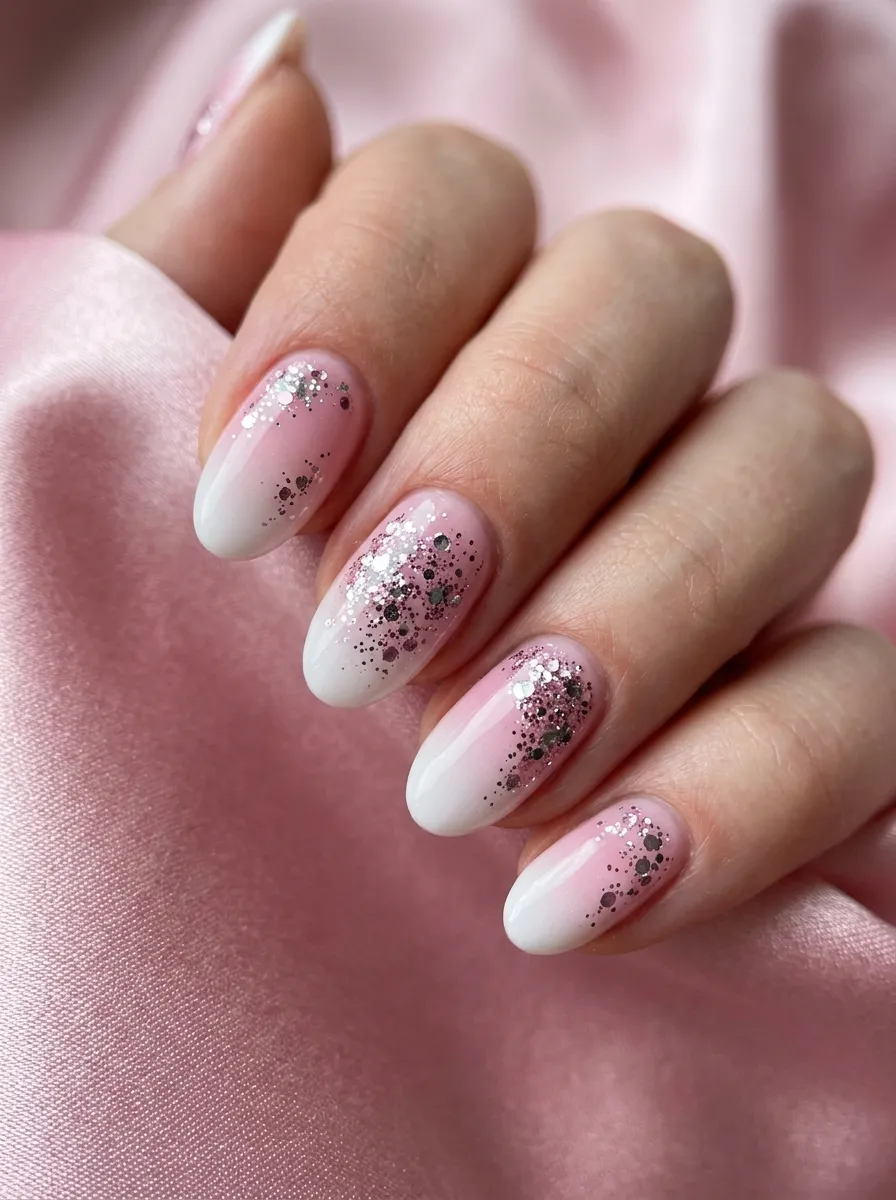
Scattered glitter clusters break the usual uniform glitter rules.
Instead of evenly distributing glitter across the nail, you group it in small organic clusters. Some areas of the nail have dense sparkle. Others have none. It creates an unpredictable, galaxy-like texture.
Apply your pink to white ombre base. Let it dry fully.
Use a dotting tool or the tip of a toothpick to place small drops of clear sticky gel or topcoat in irregular spots across the nail. Then press glitter onto those sticky spots only.
The glitter clusters where the gel is, leaving the rest of the nail clean.
DIY tip: Mix two or three different glitter sizes in your clusters. Large pieces anchoring the cluster with fine glitter filling around them creates depth and makes the clusters look more natural.
This technique suits artistic personalities who find perfectly even glitter a little boring. The irregularity is the whole point.
Oval and round shapes complement the organic, non-geometric nature of the glitter clusters. The rounded nail shape and the organic glitter placement feel cohesive together.
22. Pink Ombre with Glitter Cuticle Detail
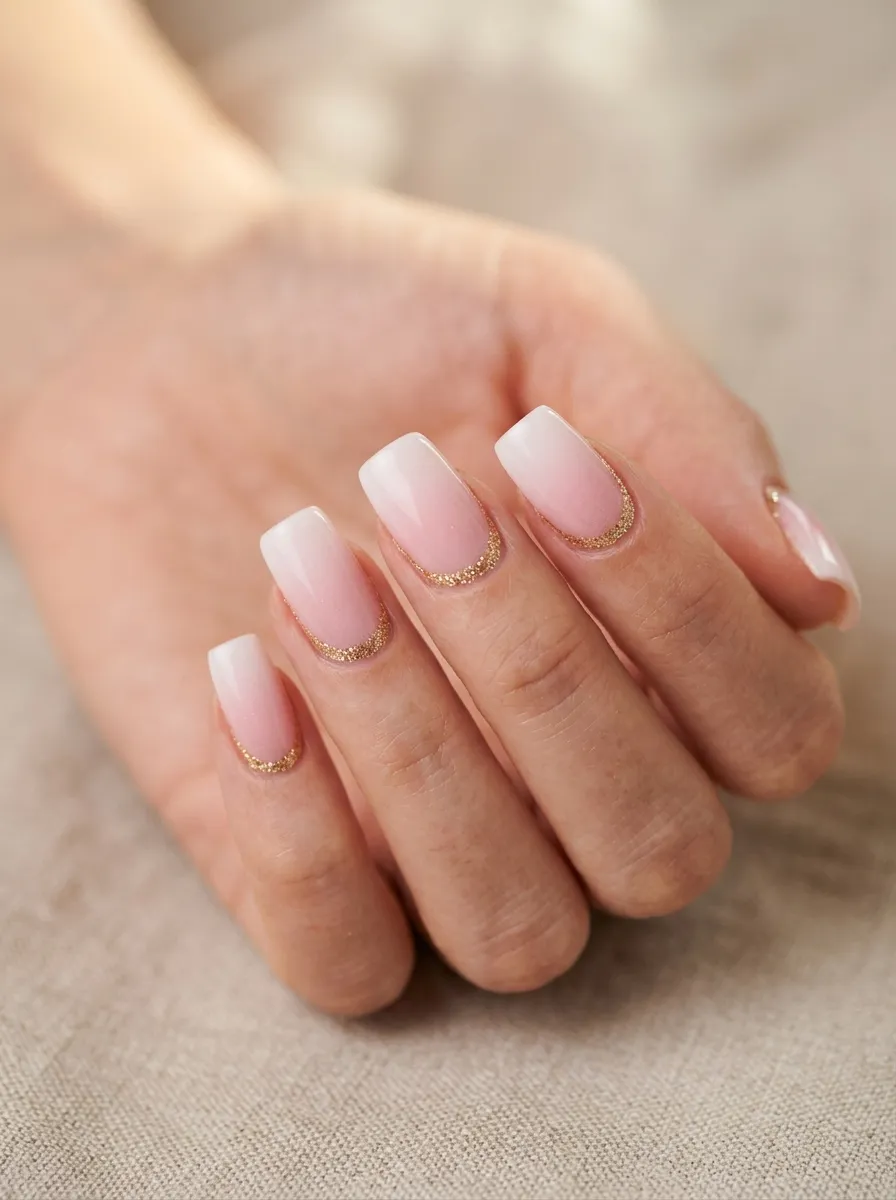
Instead of glitter at the tips, this version concentrates sparkle at the cuticle.
A thin band of fine glitter along the cuticle line frames the nail like a piece of jewelry. It is unusual, refined, and stands out from every other glitter placement option on this list.
Apply your pink to white ombre. Let it dry.
Use a thin nail art brush to paint a thin line of glitter polish right along the cuticle edge. Keep it thin. This is not a thick glitter band. It is a delicate line.
Alternatively, apply a thin strip of nail tape along the cuticle, apply glitter over it, then peel the tape to reveal a crisp glitter edge.
Budget tip: Nail striping brushes from Amazon cost $2 to $4 for a pack of multiple sizes. They give you far more control than a regular nail brush for fine detail work like this.
Gold glitter at the cuticle line looks like a fine gold ring on each nail. Silver glitter looks like platinum. Rose gold looks warm and luxe.
This cuticle detail approach works especially well on short nails. Short nails sometimes feel like they do not have space for big glitter designs. A cuticle glitter line proves otherwise.
23. Three-Tone Pink, Peach, and White Ombre with Glitter
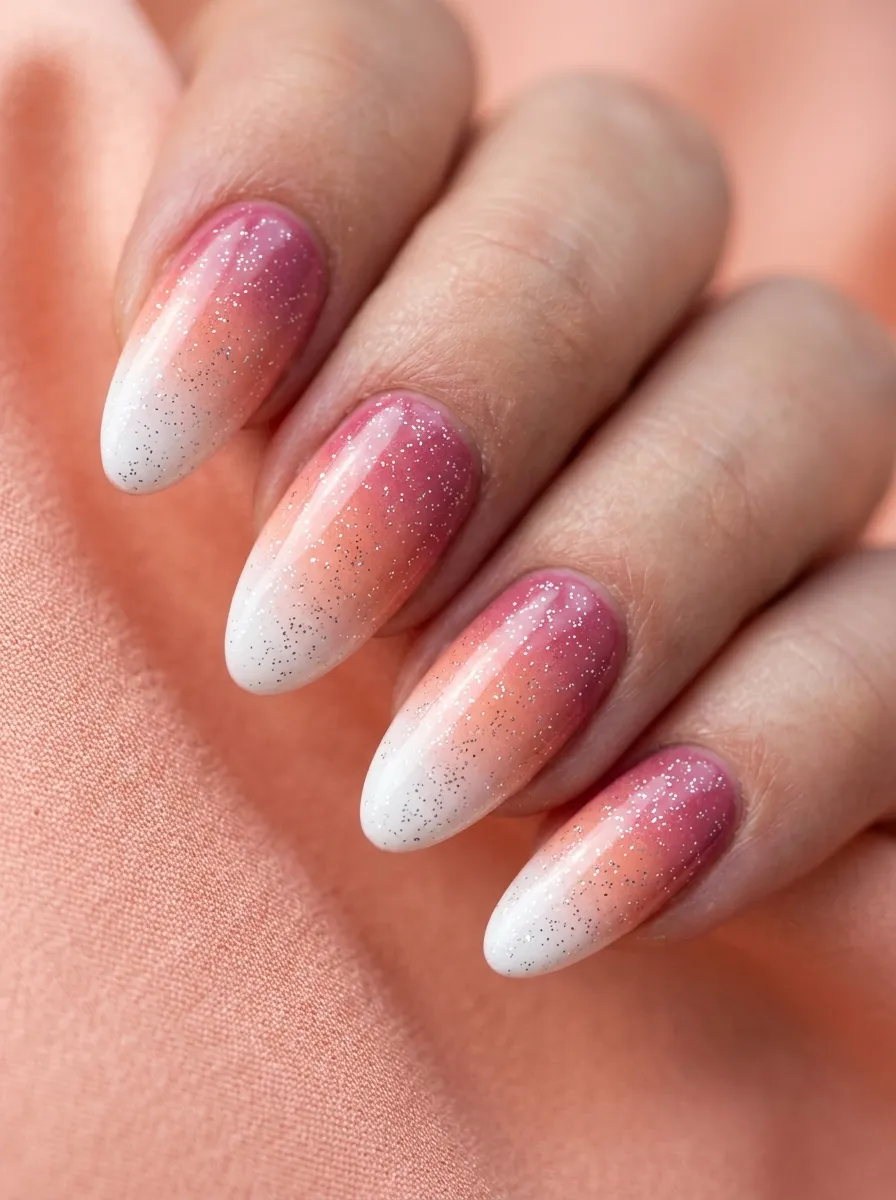
Adding a third color to the ombre makes the gradient richer and more complex.
Instead of just pink and white, you are working with pink, peach, and white. Three tones that flow naturally into each other create a more sophisticated gradient.
Apply deep pink at the base. Sponge peach or coral-pink across the middle zone. Sponge white at the tip. Use the sponge to blend all three transition zones carefully.
Apply fine silver glitter across the whole nail once the ombre is dry. The glitter unifies the three tones and makes the gradient look more cohesive.
DIY tip: If you do not own a peach polish, mix your pink and white polishes together on a palette. The resulting shade is approximately the middle peach-pink tone you need. Mix and apply directly.
Three-tone ombre takes more patience than two-tone. Take your time between each layer. Do one nail at a time rather than all ten simultaneously.
This look photographs beautifully and suits people who want something more refined than a simple two-color ombre without going completely custom or complex.
24. Glossy Pink and White Ombre with Mirror Glitter
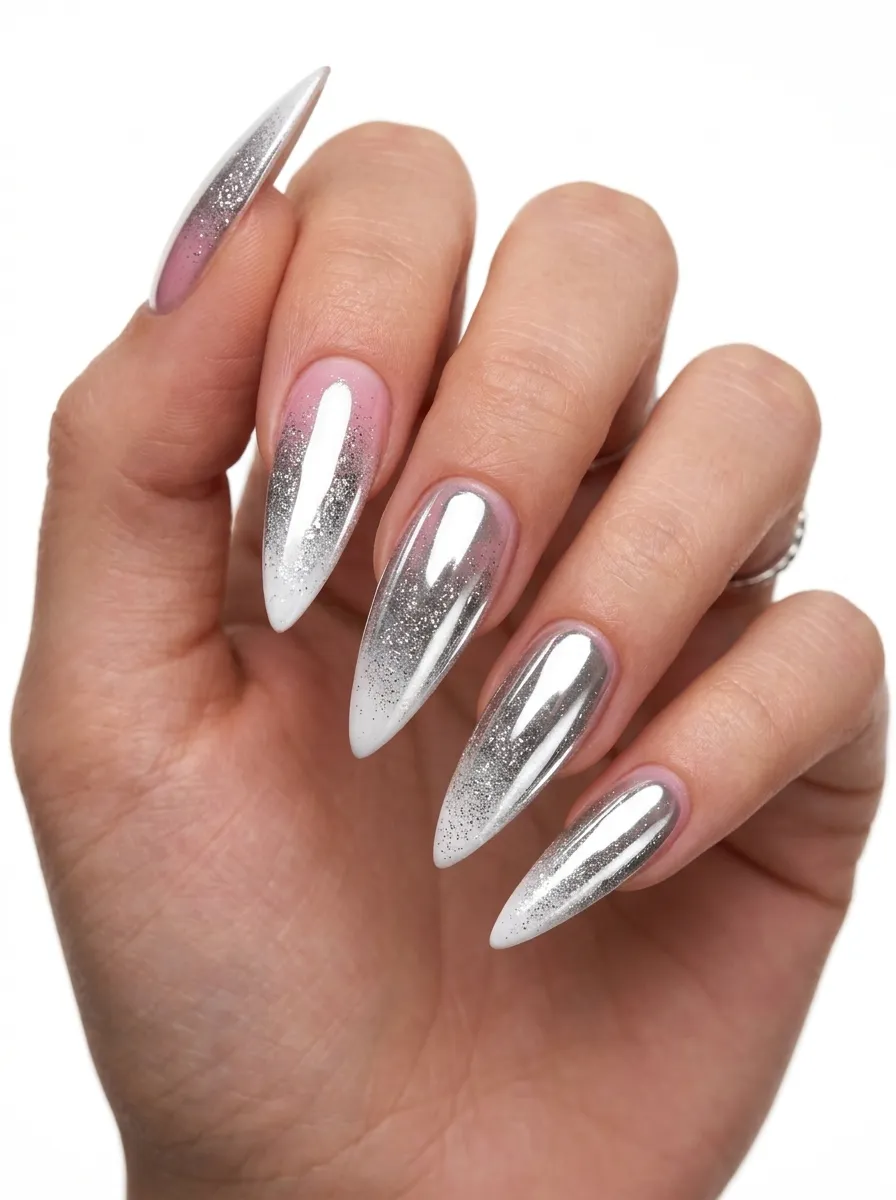
Mirror glitter is the most reflective, most dramatic glitter option available.
It is not sparkle in the traditional sense. It is tiny reflective pieces that create an almost liquid metal effect on the surface of the nail.
Apply your pink to white ombre base and cure or dry it fully. For best results, use gel polish here because mirror glitter bonds better to a gel surface.
Apply mirror glitter powder using a silicone finger applicator. Rub it in small circular motions. The mirror effect develops quickly.
The result is a nail that reflects the world around it like a tiny mirror.
Budget tip: Mirror nail powder kits from Born Pretty Store cost about $8 and include several shades. Silver, gold, rose gold, and blue mirror powders all work beautifully over a pink and white ombre base.
Seal with a gel topcoat rated for mirror or chrome effects. Regular topcoat will dull the mirror finish. Use a no-wipe gel topcoat and cure it under a UV lamp.
Stiletto shapes maximize the mirror effect because the length and pointed tip create an almost blade-like reflection. Long coffin shapes work equally well.
This is the most maximalist option on this list. Save it for special occasions where you want your nails to genuinely stop people in their tracks.
Conclusion
Pink and white ombre nails with glitter are one of those rare styles that manage to be both timeless and genuinely exciting.
There are versions here for every budget, every skill level, and every occasion. From the simplest soft pink to white fade with fine silver glitter to the intense drama of mirror glitter on stiletto nails, the range is enormous.
You do not need a salon visit or expensive products to get beautiful results. A makeup sponge, a few affordable polishes, and a $4 glitter pot can take you very far.
Start with the styles that feel most achievable. Practice the sponge technique on one or two nails before committing to the whole hand. Use tape for clean edges. Seal everything with topcoat.
Most importantly, have fun with it. Nail art is one of the most affordable, low-stakes ways to express your personality and treat yourself to something beautiful. Pick the look that makes you feel something, grab your supplies, and get started today.