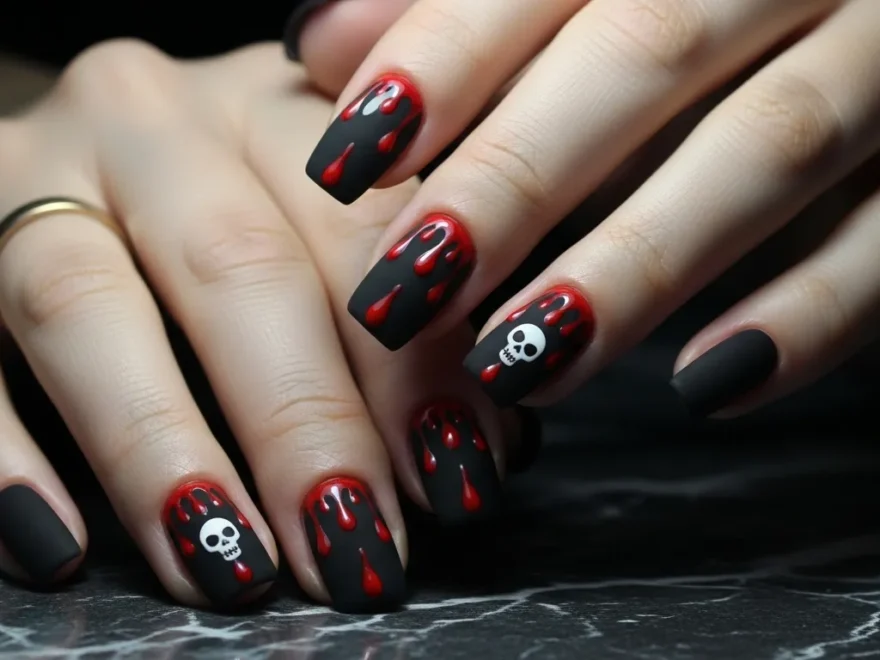
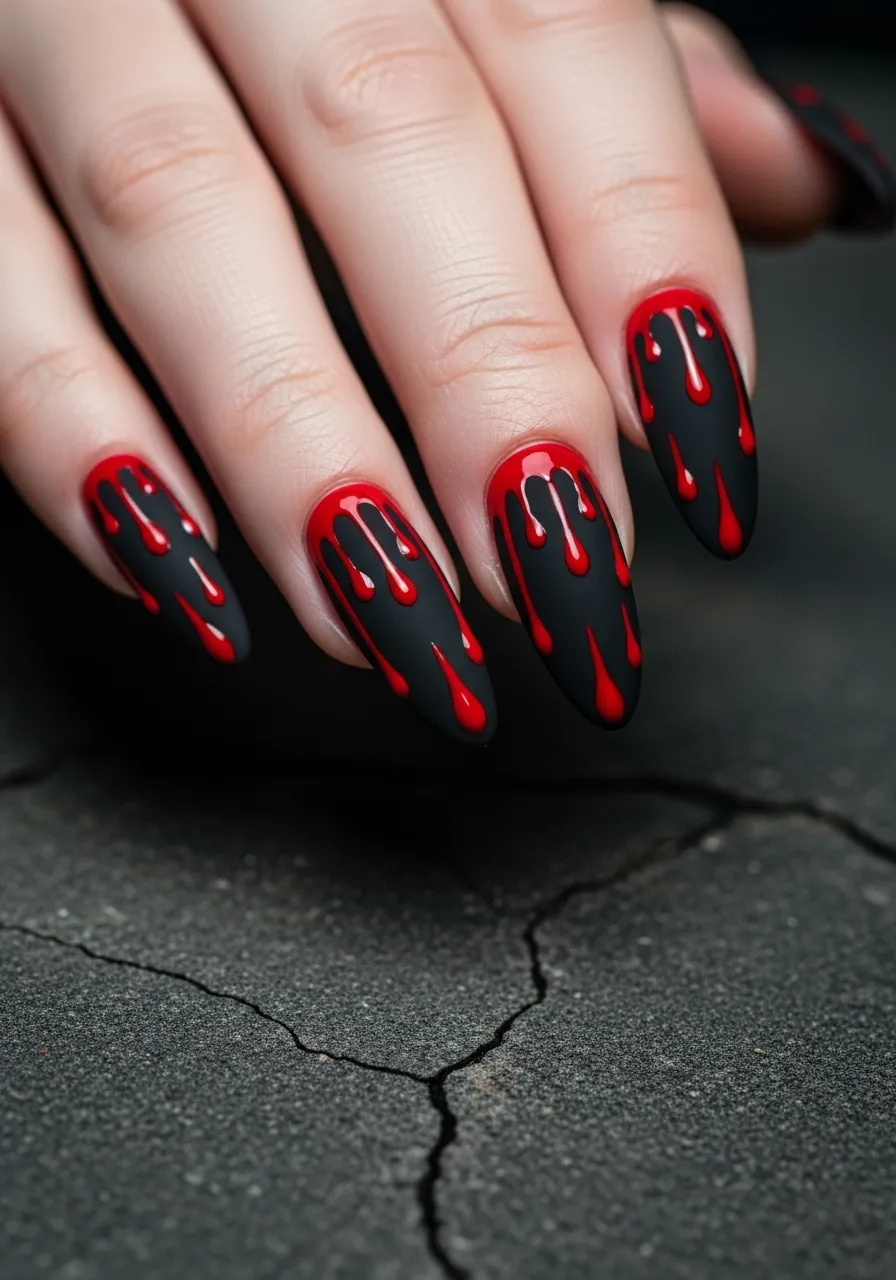
Classic Matte Black with Blood Drip Tips
This is the most iconic Friday the 13th nail look, and it earns that status.
Matte black is the perfect base because it makes the red drips pop dramatically without any competition from a shiny surface.
The blood drip effect is easier to achieve than it looks. All you need is a thin nail art brush and bright red polish.
Start with two coats of matte black polish. Let it dry completely.
Load a thin nail art brush or a clean bobby pin with red polish. Starting at the tip of the nail, drag small uneven lines downward toward the middle of the nail. Vary the length and thickness of each drip.
Add a small round dot at the bottom of each drip to mimic how a drop of blood pools before falling.
Let the red dry fully, then seal everything with a matte topcoat to keep the base texture consistent.
If you want the drips to look glossy against the matte base, apply a small amount of glossy topcoat over the red sections only. This contrast effect makes the drips look wet and fresh.
Budget tip: The Sinful Colors matte black and Wet n Wild red polish each cost around $2 to $3. A set of thin nail art brushes from Amazon runs about $5 for ten pieces. Total cost for this look: under $15.
Jason Voorhees Hockey Mask Nails
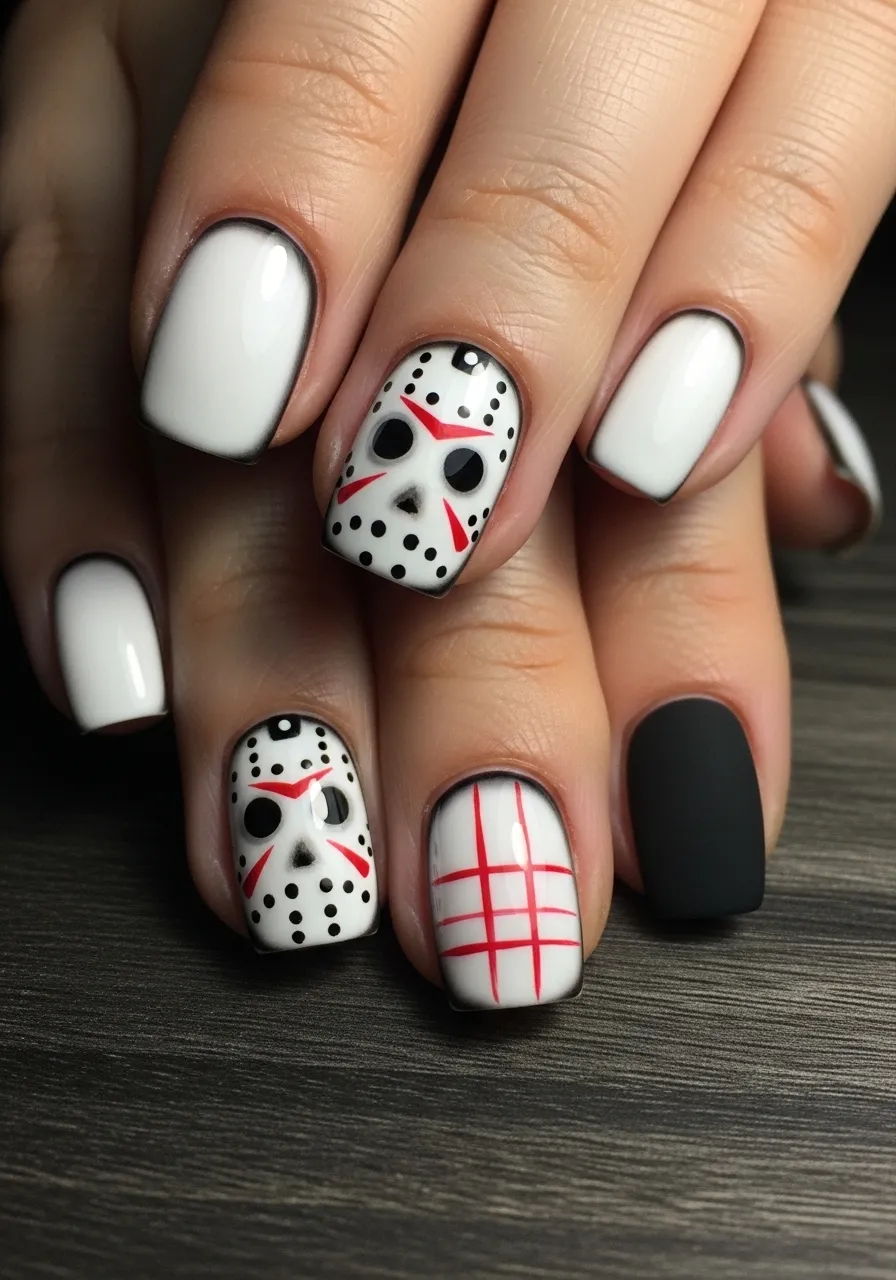
Nothing says Friday the 13th more directly than Jason’s hockey mask painted across your nails.
This design looks complex but breaks down into simple geometric shapes: a white base, red triangles near the eye areas, and a grid of thin lines across the surface.
Nail stamp sets are the easiest shortcut for this design. Search “hockey mask nail stamp” online and you will find stamp plates specifically designed for this look. A stamp kit costs $8 to $15 and takes the freehand work out of it completely.
For a freehand version, paint all nails white or ivory as the base. Let dry fully.
Using a thin detail brush and red polish, paint two triangles near the upper portion of each nail, referencing the actual mask placement. Add smaller red accent marks below.
Then use a dark grey or black polish on a very thin brush to draw thin grid lines across the surface.
An accent nail painted solid matte black with a small red splatter effect ties the set together.
Seal with a glossy topcoat to make the design look sharp and clean.
Budget tip: Born Pretty nail stamp plates cost around $4 to $6 each and include horror-themed designs. Paired with a basic stamp scraper kit, you can recreate this look in under 20 minutes.
Bloody Knife Accent Nail
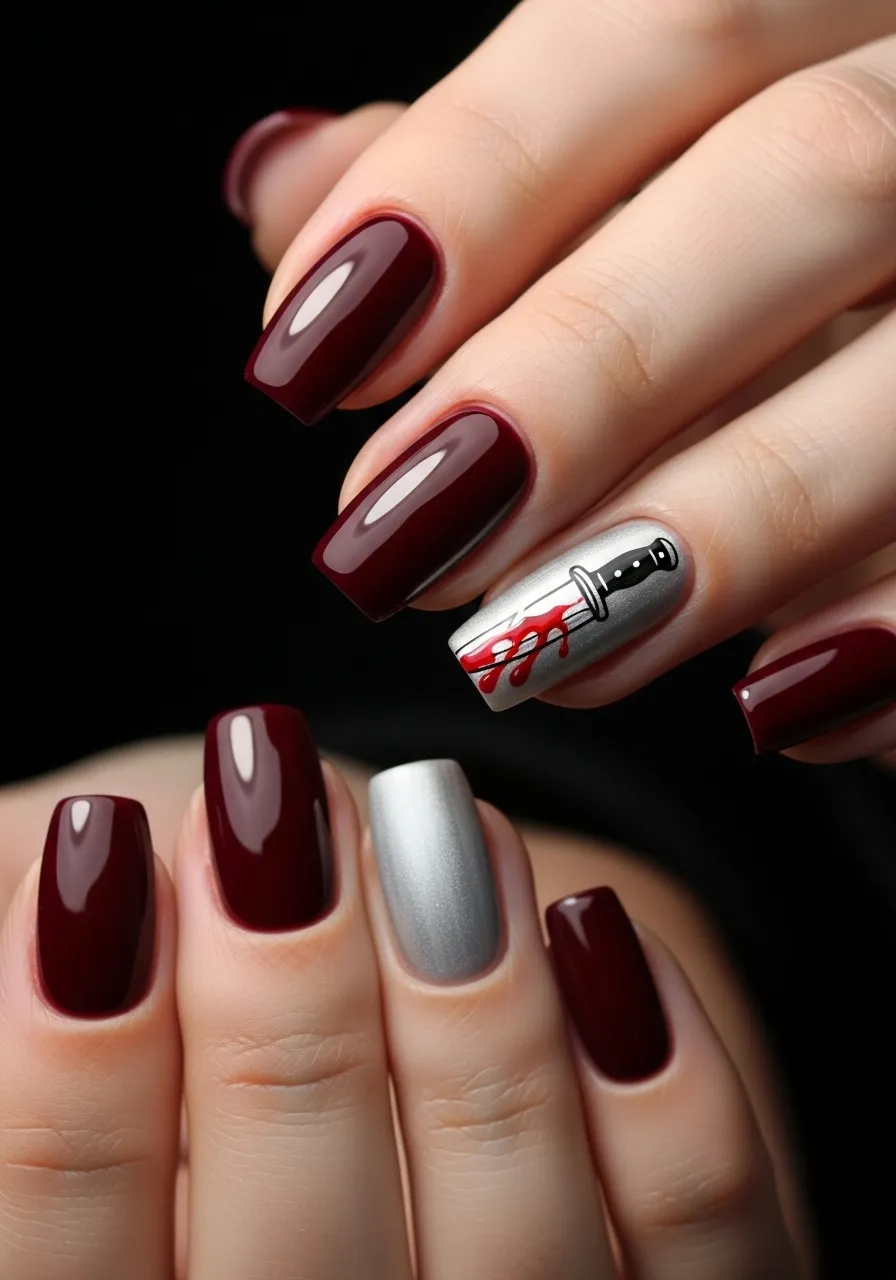
One statement nail can carry an entire manicure when the design is strong enough.
A bloody knife painted on a single accent nail against a dark or deep red base is exactly that kind of statement.
The knife shape is simpler to paint than it appears. It is essentially a thin elongated triangle for the blade and a small rectangular handle at the base.
Paint all nails in a deep burgundy, black cherry, or matte black base. Let dry.
On your accent nail, which is usually the ring finger, use a thin brush and silver or metallic grey polish to paint the blade. Start narrow at the tip and widen slightly toward the middle of the nail.
Paint the handle in a darker grey or black at the base of the blade.
Using a thin brush loaded with red polish, paint two or three thin drips running from the blade downward. Add a small pooling dot at the bottom of each drip.
Seal with glossy topcoat for a finished, polished look.
For extra drama, add a faint shadow effect beside the knife using a dark grey polish diluted slightly with topcoat and applied with a small fan brush.
Budget tip: Sally Hansen Nail Art Pens in silver and red cost around $4 each and give you much better control than a regular brush for detailed designs like this.
Spiderweb French Tips
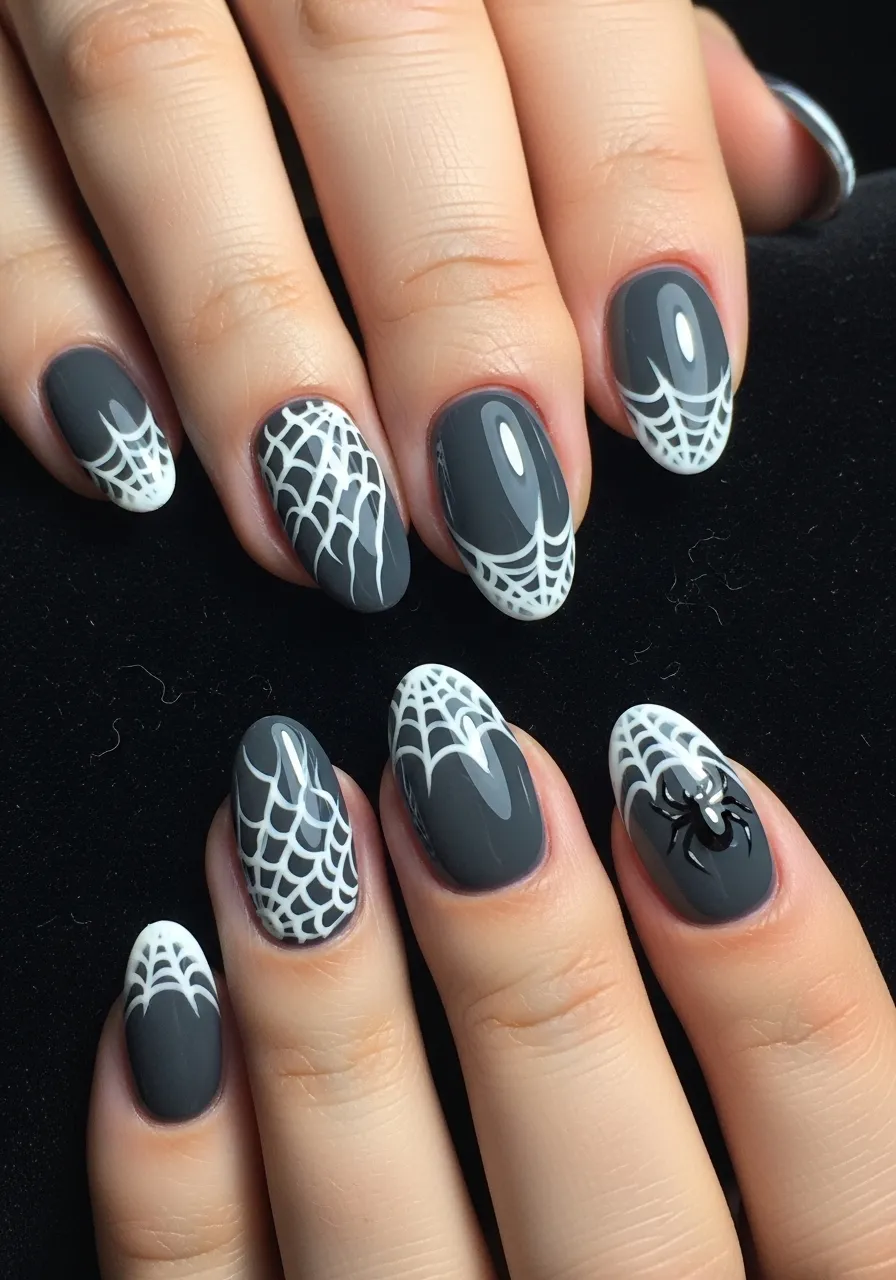
Spiderwebs are one of the most satisfying nail art designs to paint because the technique is repetitive and meditative once you get the hang of it.
A spiderweb French tip replaces the traditional white or nude tip line with a web design that radiates from one corner of the nail toward the center.
Start with a dark grey, black, or deep navy base. Let it dry fully before attempting the web.
Load a very thin nail art brush with white polish. Paint a small curved line from one corner of the nail tip inward toward the center. This is your first anchor line.
Add two or three more curved lines radiating from the same corner at slightly different angles.
Then connect these lines with short curved cross-lines that get progressively smaller as they move outward from the corner. This creates the classic web structure.
Practice on a piece of paper or a plastic bag before attempting it on your nails.
A small black spider painted on one accent nail completes the set. The spider is just two small circles for the body and eight thin legs drawn with a fine brush.
Seal with matte topcoat for an eerie, flat finish.
Budget tip: Nail art brushes from Beetles or Born Pretty cost $5 to $8 for a full set and make spiderweb designs dramatically easier to execute cleanly.
All-Black Coffin Nails with Chrome Detail
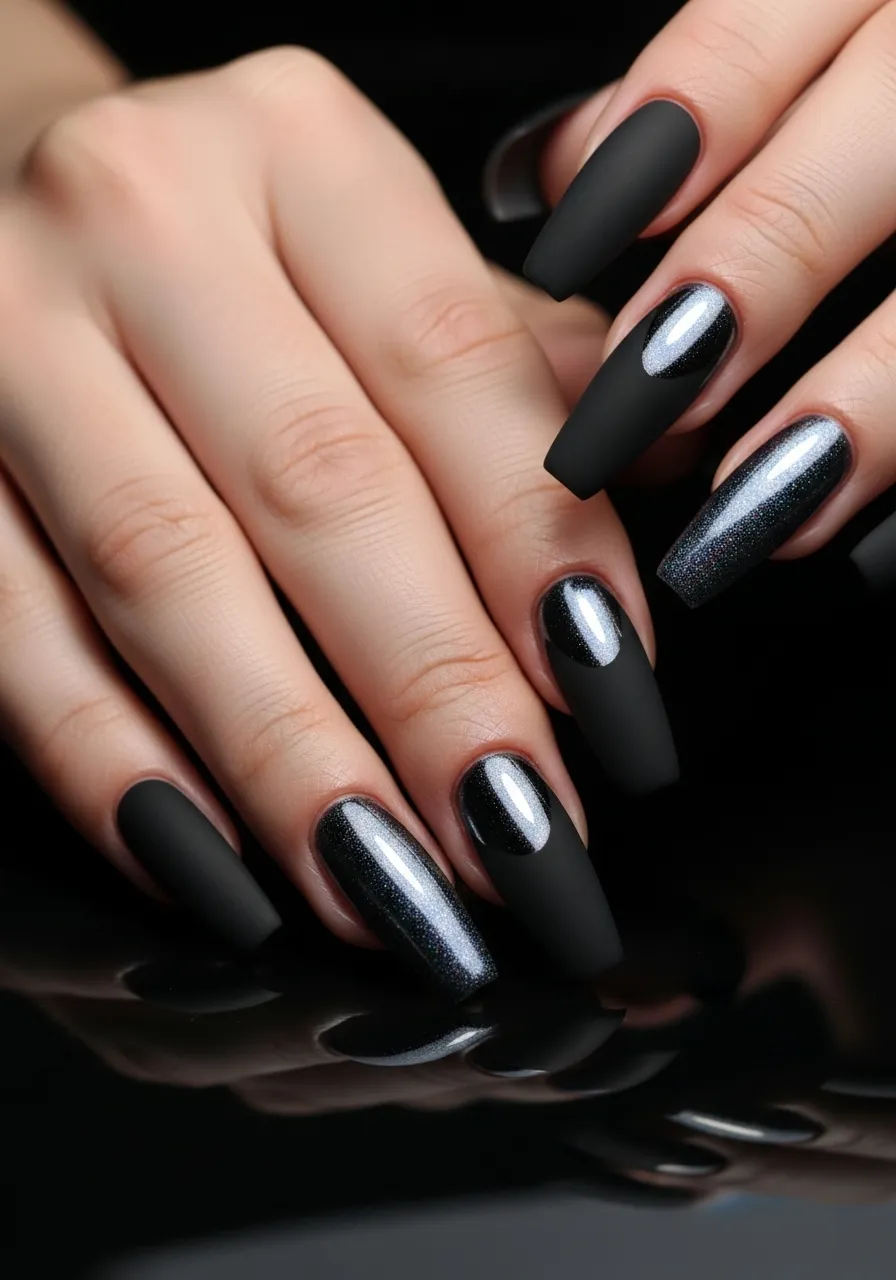
Black coffin nails are a Friday the 13th staple. The coffin shape alone reads dramatic and deliberate before any art is even added.
Adding a chrome or mirror powder detail to a matte black base creates a look that is simultaneously dark and highly polished.
Chrome powder applied to the center of each nail while leaving matte black at the edges creates a shadow effect that makes the nails look three-dimensional.
At a salon, chrome gel nails cost $50 to $80 for a full set. For home application, chrome nail powder kits cost $8 to $15 and include everything needed to apply the effect over regular polish or gel.
To apply at home: paint nails with black gel polish and cure. Apply a no-wipe topcoat and cure without wiping. While slightly tacky, rub chrome powder onto the center of each nail using a silicone applicator or eyeshadow brush. Seal with topcoat and cure.
For regular polish users, holographic or chrome foil sheets pressed onto a sticky base coat give a similar reflective effect without a UV lamp.
Coffin tips are available as press-on nails in full sets for $8 to $15, which makes this entire look achievable without gel or salon work.
Skull French Tips on Nude Base
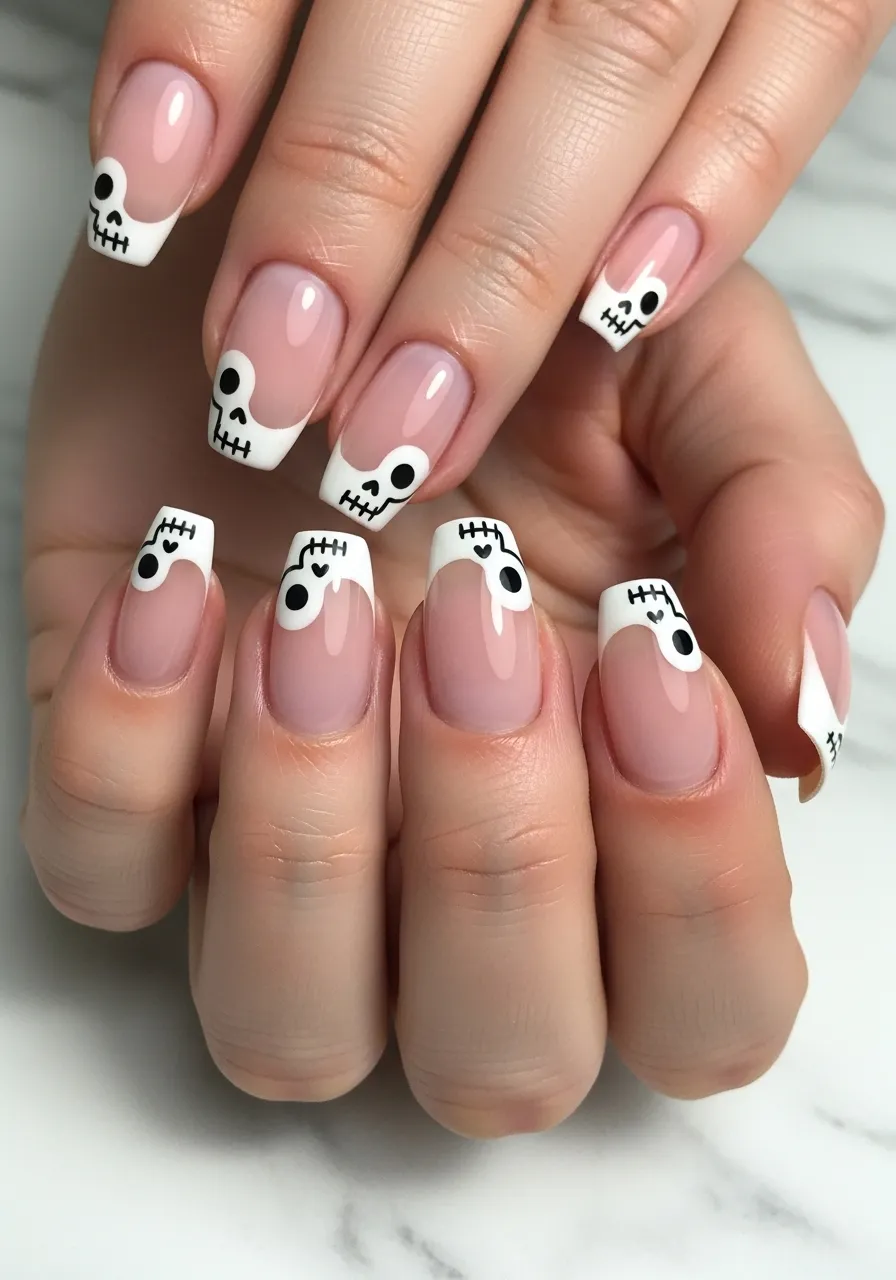
Skull French tips are one of the most wearable Friday the 13th nail designs because the nude base keeps the overall look soft while the skull tips add dark personality.
This is a great option if you want something festive that still looks office-appropriate or polished enough for a formal event.
The skull shape at the tip replaces the traditional white French line and is painted as a simple, rounded shape with minimal detail: two dark oval eyes and a tiny triangular nose.
Paint all nails with a sheer nude or soft pink base. Let dry completely.
Using a small round brush and white polish, paint a small, rounded skull silhouette at the tip of each nail. Keep them consistent in size.
Once dry, use a very thin brush and black polish to add two small oval eyes and a small triangle for the nose on each skull.
For teeth, add tiny rectangular white marks along the lower edge of the skull shape or leave it clean for a more minimal look.
Finish with a matte topcoat for a modern, graphic finish that photographs beautifully.
Budget tip: Essie Nail Art Studio pens in white and black give exceptional control for small, detailed designs like skulls. They cost around $8 each and feel like a felt-tip marker rather than a brush.
Dripping Green Toxic Slime Nails
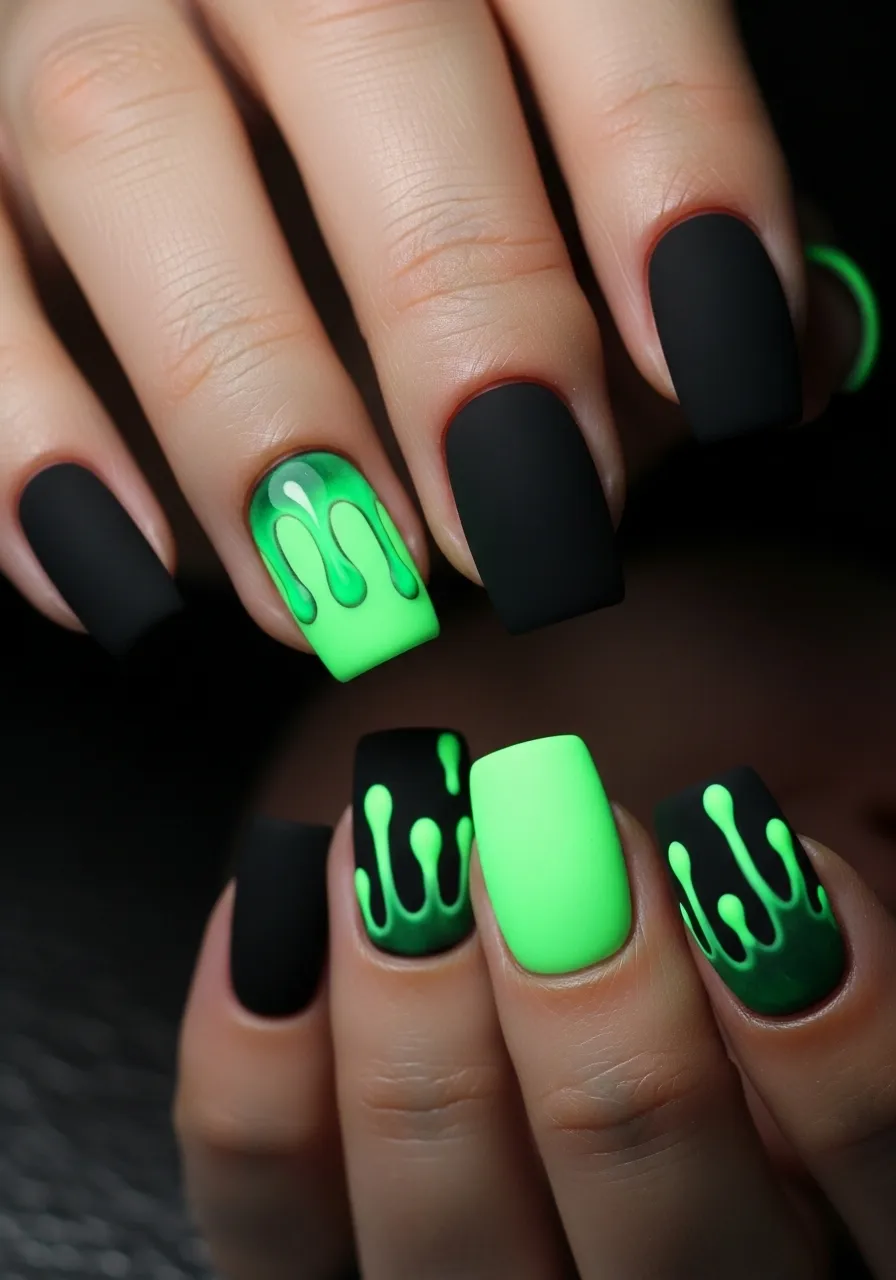
Not all Friday the 13th nail art has to be red and black.
Toxic neon green against matte black is an unexpected color combination that reads horror and sci-fi simultaneously, like something radioactive has spilled across your fingers.
The neon green drip effect is applied the same way as blood drips, but in a bright, almost glow-in-the-dark green polish that creates a completely different mood.
Start with a matte black base on all nails. Let dry fully.
Using a thin brush loaded with neon or UV-reactive green polish, paint drip lines from the tips of the nails downward. Make them irregular and organic-looking.
Add small pooling dots at the bottom of each drip.
One accent nail painted entirely in neon green and sealed with a glossy topcoat adds contrast to the set and makes the drips on the other nails feel intentional rather than accidental.
UV-reactive green polish actually glows under blacklight, which makes this look spectacular at nighttime Friday the 13th events.
Budget tip: Neon and UV-reactive polishes from Beetles or Glow in the Dark nail polish sets on Amazon cost $10 to $15 for a set of multiple colors. Entirely worth it for the blacklight effect alone.
Red and Black Checkerboard Nails
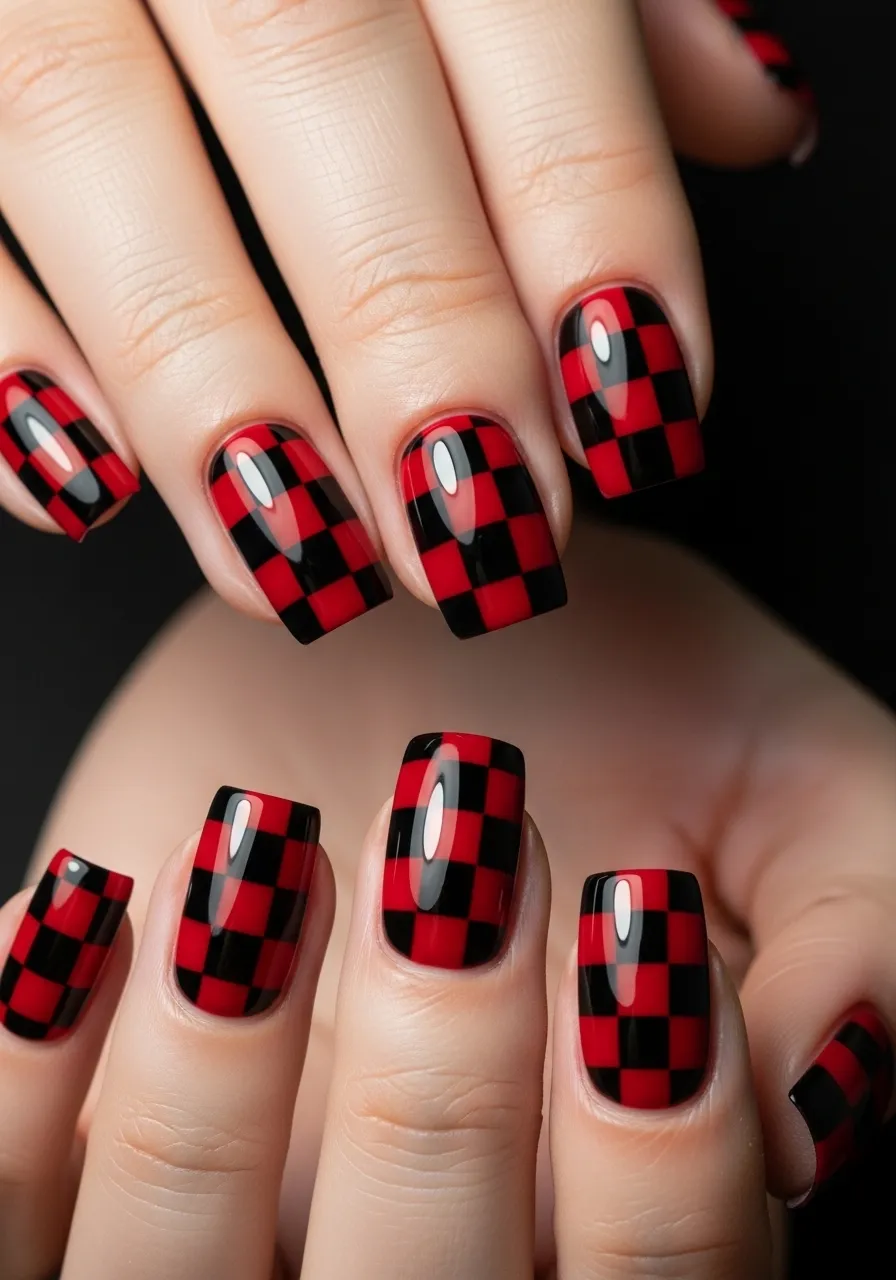
The checkerboard pattern has roots in punk and horror aesthetics and it translates perfectly to Friday the 13th nail art.
Red and black in a checkerboard grid reads bold, graphic, and deliberately edgy without requiring any figurative art skills.
Nail striping tape is the secret to getting clean, even checkerboard squares without freehanding every line.
Paint all nails red as the base. Let dry completely.
Place thin strips of nail tape in a grid pattern across each nail, leaving alternating squares exposed. Press the tape down firmly so polish does not bleed underneath.
Paint over the entire nail with black polish. Let dry for about 60 seconds.
Carefully peel the tape away while the black polish is still slightly tacky for the cleanest edge removal.
Touch up any bleed spots with a small brush dipped in acetone.
Seal with high-gloss topcoat.
Nail striping tape costs $3 to $6 for a roll on Amazon. It is one of the most useful tools for geometric nail art and works for dozens of different designs beyond this one.
A checkerboard press-on set is also available from brands like imPress and Kiss for $8 to $12, making this look achievable in under 15 minutes with no painting required.
Black Cat Silhouette Nails
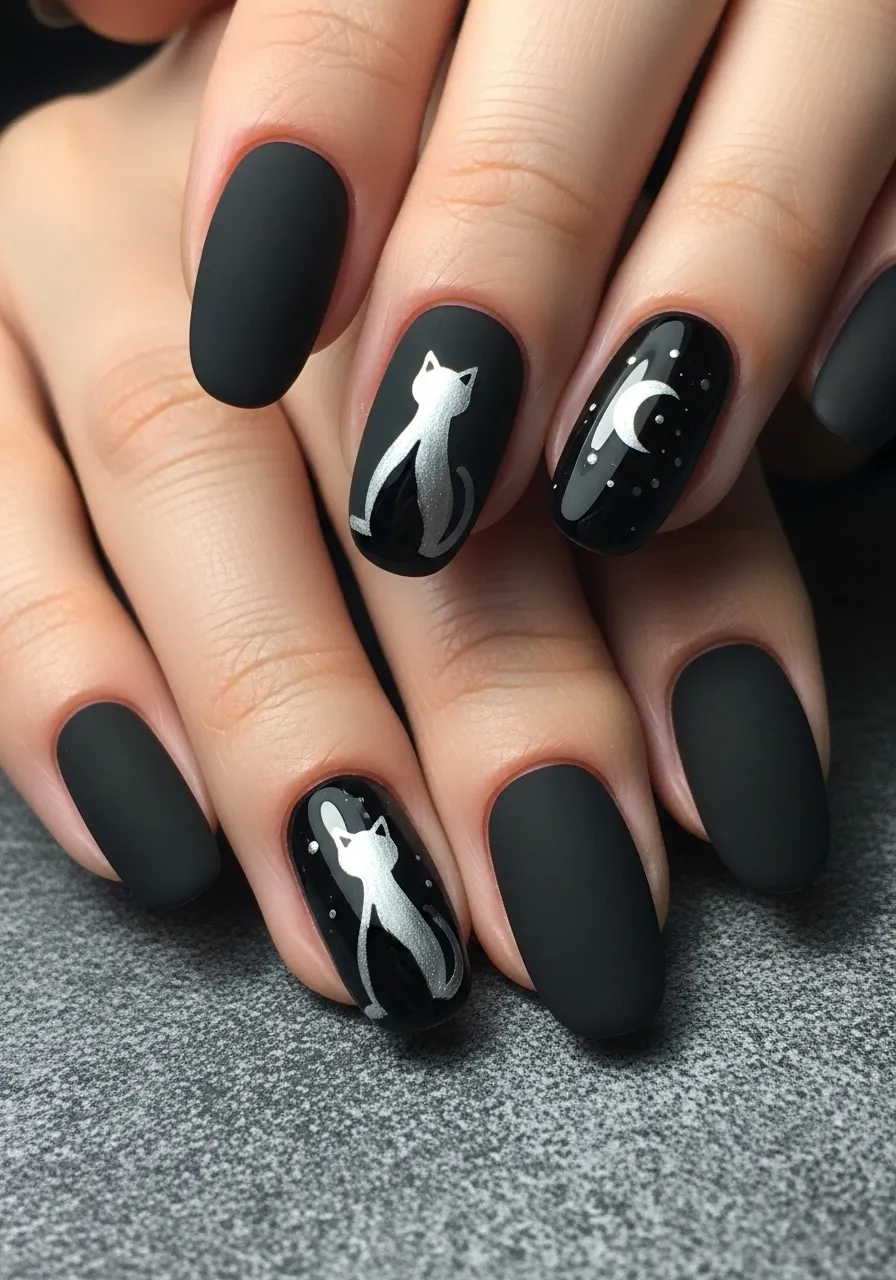
Black cats and Friday the 13th go together as naturally as any horror pairing.
A black cat silhouette painted on a deep jewel-toned or dark base nail is simple, graphic, and genuinely stylish beyond the seasonal context.
The silhouette technique works best when you keep the cat shape simple: a round head, pointed ears, an arched or seated body, and a curved upright tail.
Paint all nails in a deep base color: matte black, dark purple, or midnight navy all work beautifully.
On two accent nails, use a thin brush loaded with white, silver, or gold polish to paint the cat silhouette. Work slowly and build the shape piece by piece rather than trying to paint the whole cat in one stroke.
Add a small crescent moon beside the cat on one nail for an extra superstitious detail.
A full moon painted as a small white circle on a separate accent nail adds to the theme without crowding the cat design.
Seal with matte topcoat for a graphic, intentional finish.
Budget tip: Cat silhouette nail stickers are available on Amazon and Etsy for $3 to $6 per sheet and include multiple sizes and poses. These are a perfect shortcut if freehand painting feels challenging.
Matte Black with Gold 13 Stamping
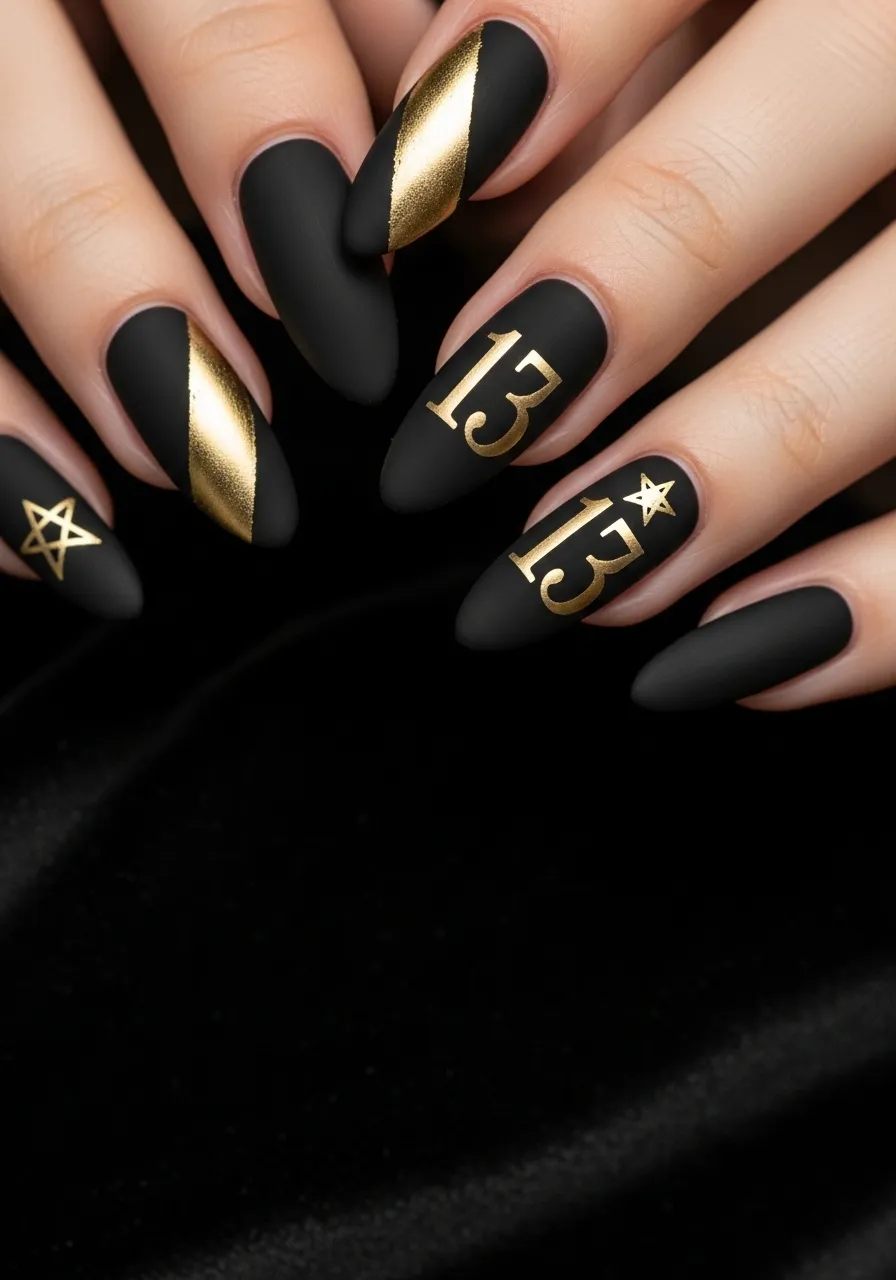
The number 13 is the defining symbol of the day and putting it directly on your nails is an unapologetically direct way to mark the occasion.
Matte black paired with metallic gold gives this design a luxury feel that looks far more expensive than it costs.
Gold stamping polish works best for this design because it transfers cleanly onto nail stamp plates and produces a bright, opaque metallic result on the first application.
Find a nail stamp plate that includes numbers. Plates from Moyou London, Born Pretty, or Bundle Monster all include numeral designs. A plate costs $5 to $10.
Apply gold stamping polish to the number 13 on the plate. Scrape once cleanly with the scraper tool. Roll the stamp over the polish quickly and transfer it directly onto the matte black nail with one confident press.
Practice the stamping motion on paper a few times before attempting on nails.
If stamping feels too fiddly, use a thin brush and gold nail polish to hand-letter the number 13 on each nail. Imperfect hand-lettering actually adds character.
Seal with matte topcoat applied very carefully over stamped designs so the stamping does not smear.
Budget tip: Konad stamping polish in gold costs around $6 and gives the most opaque, clean gold transfers available for DIY nail stamping.
Halloween Horror Movie Character Nails
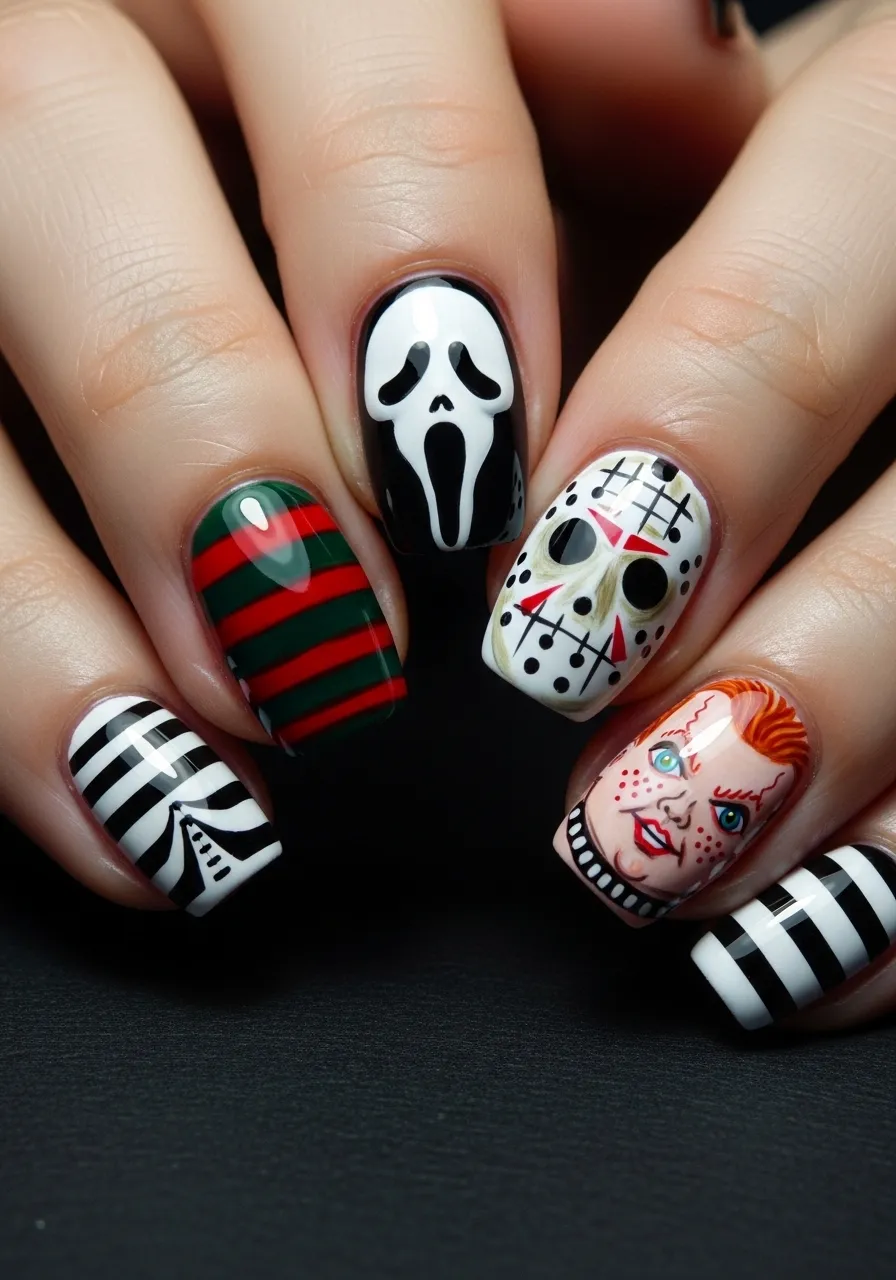
Why dedicate your nails to just one horror character when you can feature an entire horror hall of fame across all five fingers?
This is a mixed-character nail set where each nail represents a different iconic horror figure.
Keep each design simplified to the most recognizable element of each character rather than attempting a detailed portrait on a tiny nail canvas.
Freddy Krueger: red and dark green horizontal stripes across the nail. Simple and instantly recognizable.
Jason Voorhees: white base with red triangles and a grey grid, mimicking the hockey mask.
Ghostface: white oval shape on a black base with two simple dark eye cutouts.
Chucky: pale skin base with painted orange hair, blue eyes, and red overall straps along the edge.
Michael Myers: a simple white oval mask shape with dark rectangular eye holes on a black base.
You do not need to include all five. Choose your favorites and fill the rest with complementary dark base colors.
Reference images searched on Pinterest or Google give you the exact colors and shapes for each character.
Budget tip: A set of nail art acrylic paints costs $8 to $12 for a full color range and gives you far more precise control over small character details than standard nail polish bottles.
Graveyard Scene Across All Nails
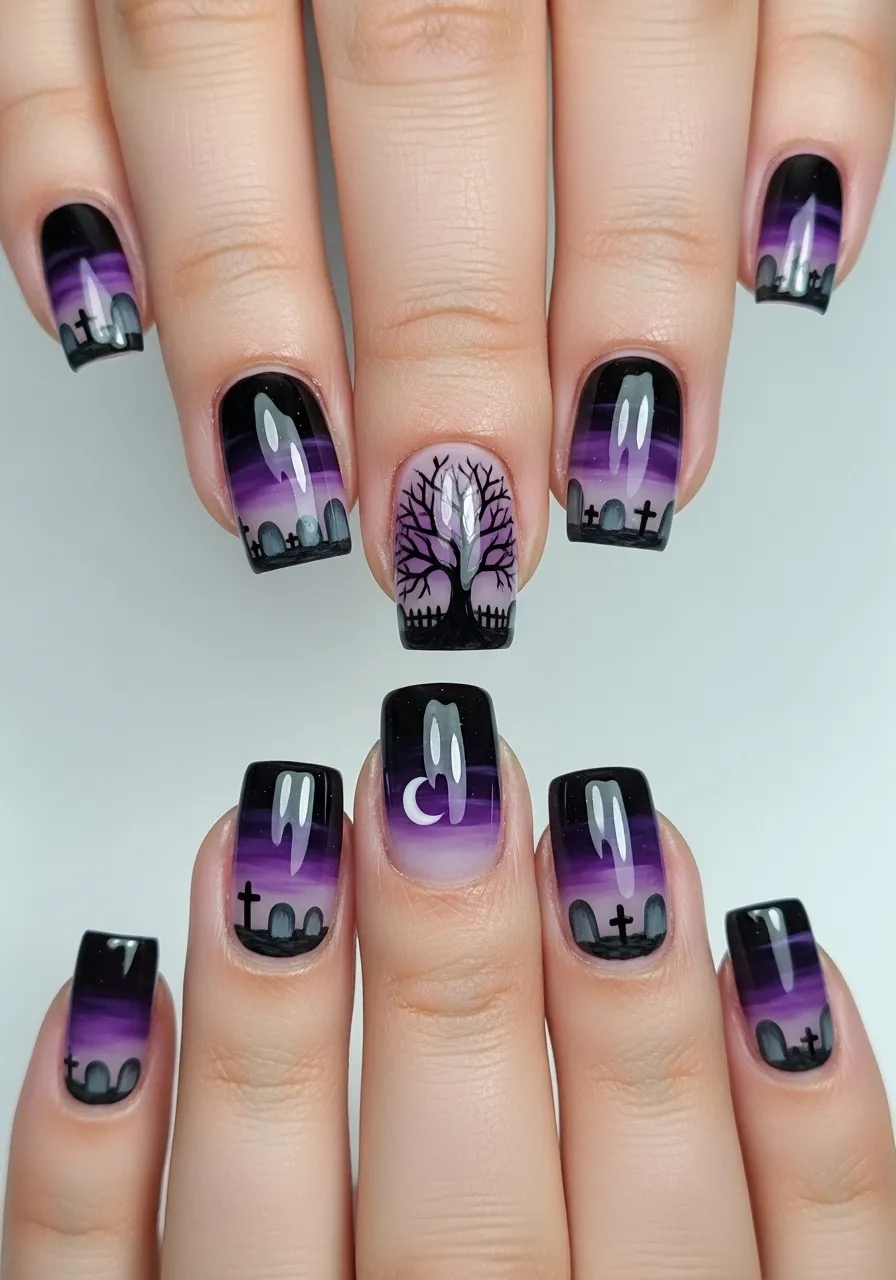
A continuous scene painted across all ten nails is a showstopper that photographs incredibly well.
The graveyard concept works perfectly for Friday the 13th because it combines multiple spooky elements: tombstones, bare trees, a full or crescent moon, and a dark sky.
The key to making a panoramic nail scene work is treating your nails as individual panels of one image, like frames in a comic strip.
Start by painting all nails with a gradient background. Use a deep purple at the top blending into black at the bottom of each nail using a makeup sponge.
Once dry, paint small grey tombstone silhouettes along the bottom of each nail using a thin brush. Vary the sizes and shapes slightly for a more organic feel.
On the center nail, paint a bare leafless tree. Start with a thin trunk at the bottom and add branching lines that spread outward toward the top.
Add a small white crescent or full moon on one nail and tiny white dots scattered across the purple sky on others for stars.
A small ghost or bat silhouette flying across one of the middle nails ties the scene together.
Seal with glossy topcoat and enjoy the way the scene reads as a complete image when your hands are together.
Negative Space Black Coffin Nails
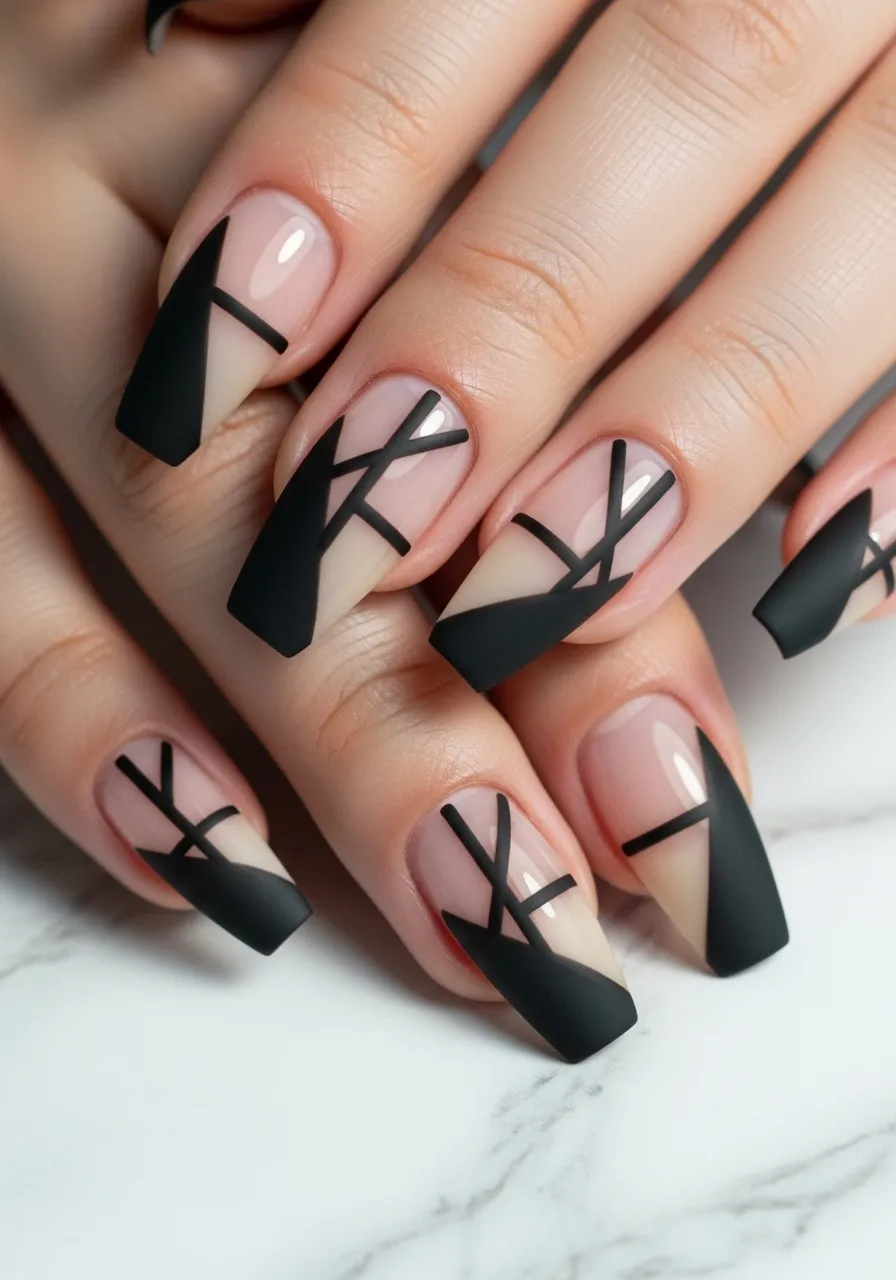
Negative space nail art uses your bare nail as part of the design rather than covering it completely with color.
For Friday the 13th, this technique takes a matte black polish and creates angular, geometric shapes that leave deliberate gaps of bare nail visible.
The effect looks architectural and deliberate rather than unfinished, and it photographs beautifully with strong contrast between the black painted sections and the natural nail.
Apply striping tape in angular or geometric configurations across bare, buffed nails. Press down firmly.
Apply matte black polish over the entire nail, covering both the tape and the exposed nail sections.
While still slightly wet, peel the tape away to reveal the bare nail lines beneath.
The result is a precise geometric negative space design in matte black and natural nail.
For a Friday the 13th twist, add a single tiny red drip or skull detail within one of the negative space sections on the accent nail.
Coffin-shaped nails work especially well for this design because the elongated shape gives more room for geometric patterns to breathe.
Budget tip: Winstonia striping tape for nails costs about $4 for a set of multiple widths. Investing in a few different tape widths gives you dramatically more design options for geometric nail art.
Deep Red Gel Nails with Black Widow Spider
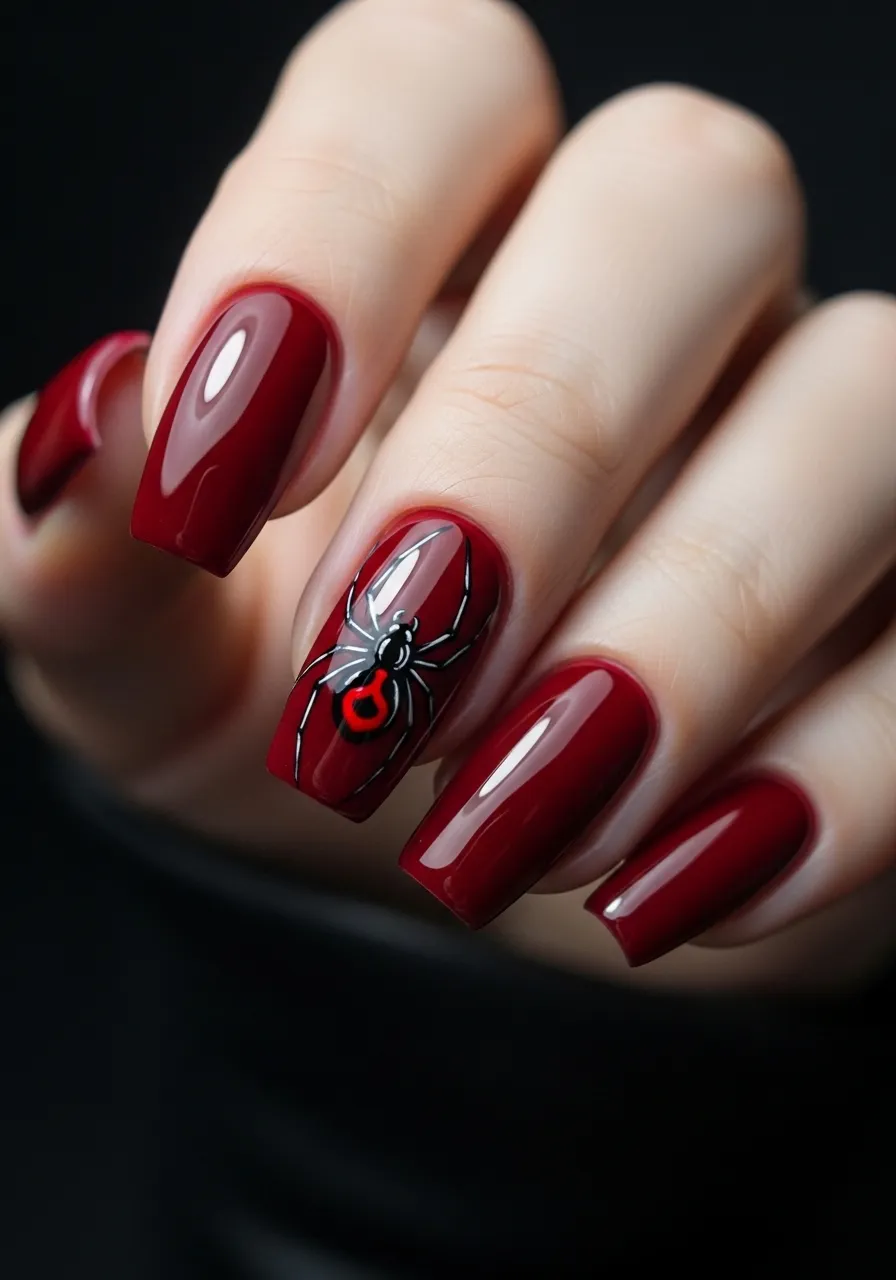
Deep oxblood red is one of the most flattering and dramatic nail colors available and it works especially well for Friday the 13th because it reads dark and rich rather than bright.
Pairing it with a black widow spider on an accent nail adds a specific horror detail that is subtle enough to work in most settings.
The black widow spider is identifiable by one key detail: the red hourglass shape on its abdomen. Including this marking makes the design instantly recognizable.
Paint all nails in deep red gel or regular polish. If using regular polish, two to three thin coats give the best depth of color.
On the accent nail, use a thin brush and black polish to paint the spider body: one larger oval for the abdomen and a smaller circle above it for the head.
Add eight thin leg lines radiating from the head section, slightly bent at a joint point.
Using a very thin brush or a toothpick loaded with red polish, paint a small hourglass shape on the abdomen.
Seal with glossy topcoat.
Budget tip: OPI Big Apple Red and Essie Bordeaux are both affordable drugstore options that give that perfect deep blood red shade for around $8 to $10 per bottle.
Frankenstein Inspired Green Nails
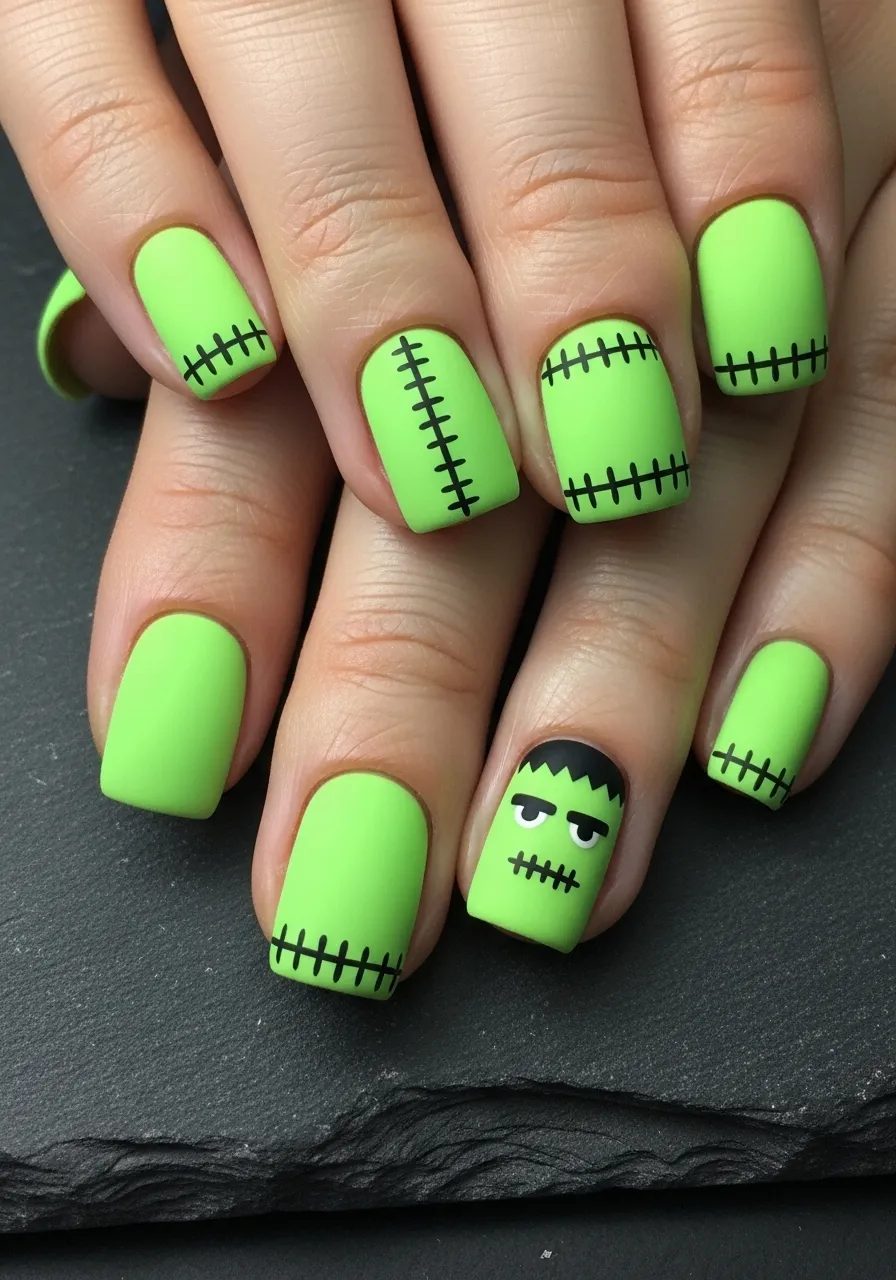
Frankenstein’s monster may not be the first Friday the 13th character that comes to mind, but lime green nails with black stitch details are one of the most visually striking and instantly recognizable horror nail looks.
The stitch design is also one of the easiest details to paint freehand.
A simple cross-stitch or running stitch painted in black across the center of each nail mimics the iconic stitched-together appearance of Frankenstein’s monster without requiring any complex art skills.
Paint all nails in a bright lime green or sickly yellow-green. Let dry.
Using a thin brush and black polish, paint a horizontal line across the middle of each nail. Then add short vertical lines crossing the horizontal at even intervals to create the stitch effect.
On one accent nail, paint a simplified Frankenstein face: a flat-top rectangle at the top of the nail for the head silhouette, two small rectangular dark eyes, and a short stitch mouth.
Add two small bolt shapes on the sides of the accent nail for the neck bolts.
Seal with matte topcoat to keep the look graphic and deliberate.
Budget tip: China Glaze Kiwi Cool-Ada or Sinful Colors Island Coral are affordable lime green options in the $3 to $5 range that give the perfect Frankenstein green shade.
Tarot Card Inspired Nail Art
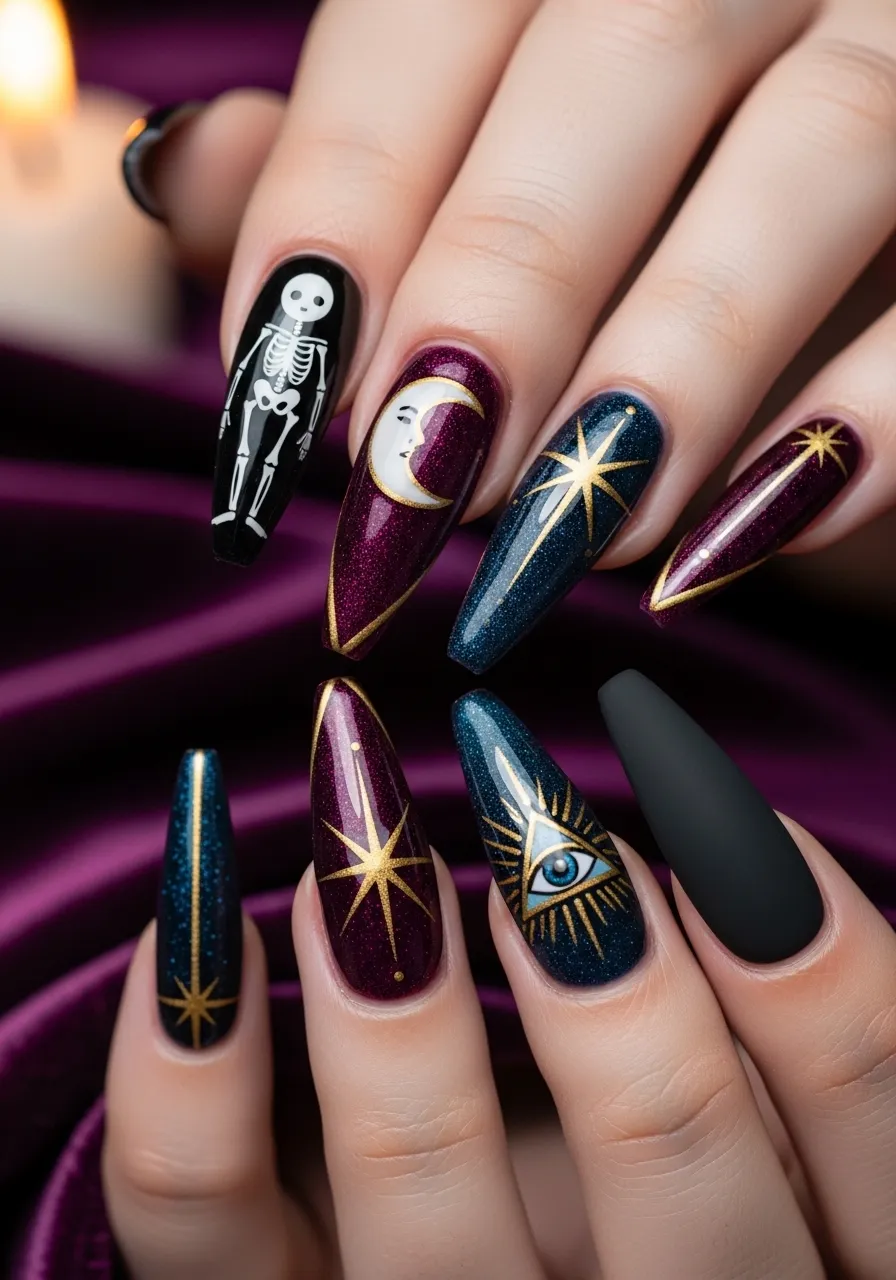
Tarot cards carry a perfectly superstitious energy for Friday the 13th and translating them into nail art creates an intellectually interesting and visually rich set.
The Death card, The Moon, The Tower, The Star, and The Devil are all thematically appropriate for the day.
You do not need to recreate the entire card. Instead, paint the central symbol of each card in a simplified form: the skeleton from the Death card, the moon and towers from The Moon card, the lightning bolt from The Tower.
Use a dark jewel-toned base: deep purple, dark teal, or midnight blue work beautifully for tarot-inspired nails.
Paint each simplified symbol in gold or white on its designated nail using a thin detail brush.
The all-seeing eye, a crescent moon, a simplified skull, a lightning bolt, and a star make a complete five-finger tarot set that looks incredibly cohesive.
Seal with high-gloss topcoat to give the nails a polished, printed card appearance.
Tarot card nail stickers are also available on Etsy for $3 to $8 per sheet for people who prefer the sticker application method over freehand painting.
Budget tip: Golden Rose nail art pens cost around $5 each and give you fine gold line control that is perfect for the detailed linework tarot nail art requires.
Gothic Lace and Skull Nails
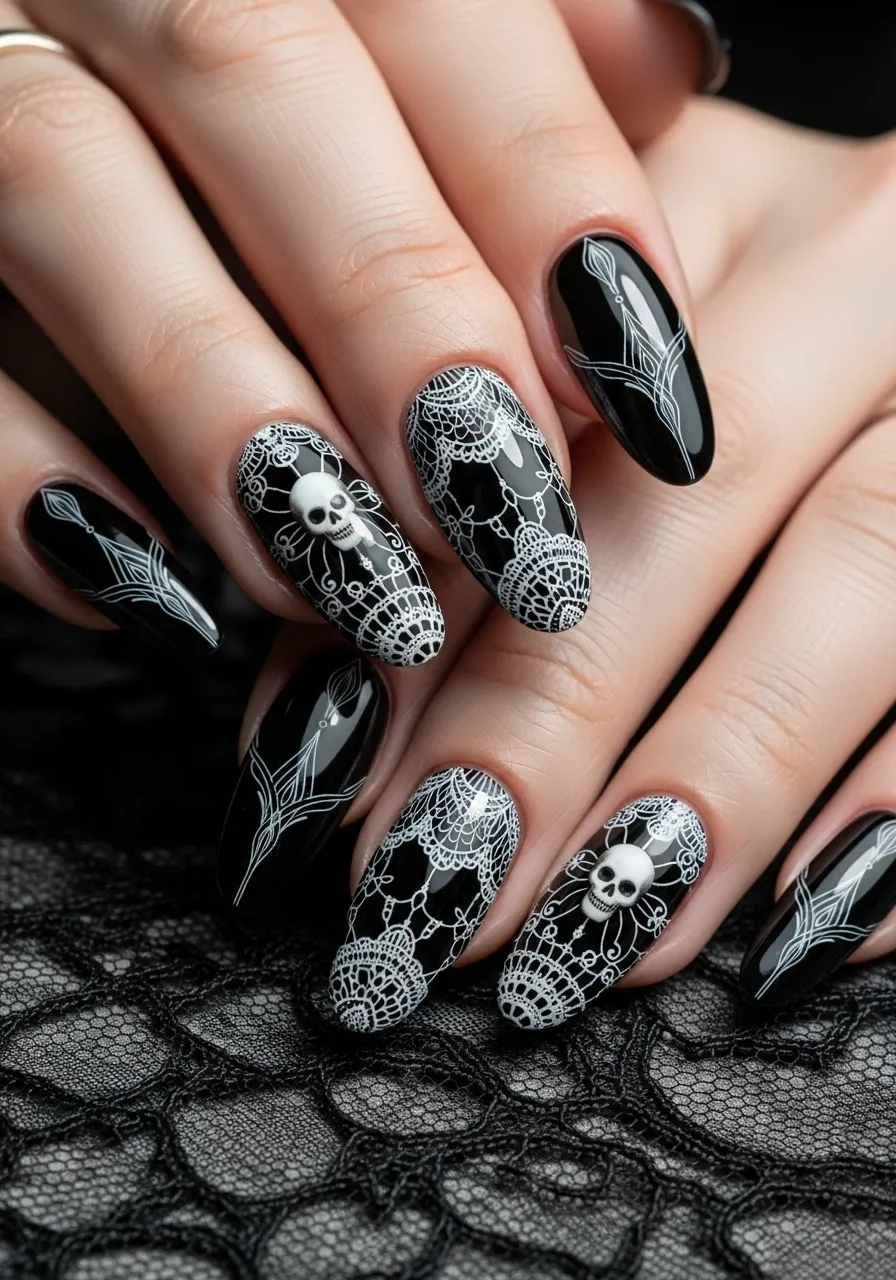
Gothic lace patterns combined with skull details create a nail look that sits somewhere between dark romance and outright horror, which is a perfect combination for Friday the 13th.
This design has a formal, almost Victorian quality that works for events and occasions where you want something dark but structured.
Lace nail stamp plates are the most practical tool for this design. Freehand lace is extremely difficult to execute convincingly on a small nail surface.
Search for “lace nail stamp plate” and you will find options from Born Pretty, Maniology, and Moyou London for $5 to $12 each. These plates include multiple lace patterns in varying densities and styles.
Apply white stamping polish to the lace plate. Scrape clean and roll the stamp over the pattern, then transfer onto a cured black base nail.
On every second or third nail, paint a small skull within the lace pattern using a thin brush after the stamping is complete.
The skull integrates into the lace rather than sitting on top of it, which gives the design a deliberate, cohesive look.
Seal with high-gloss topcoat.
Budget tip: Maniology stamp plates regularly go on sale for $6 to $8 and offer some of the best lace pattern variety of any affordable nail stamp brand.
Bloody Handprint Nails
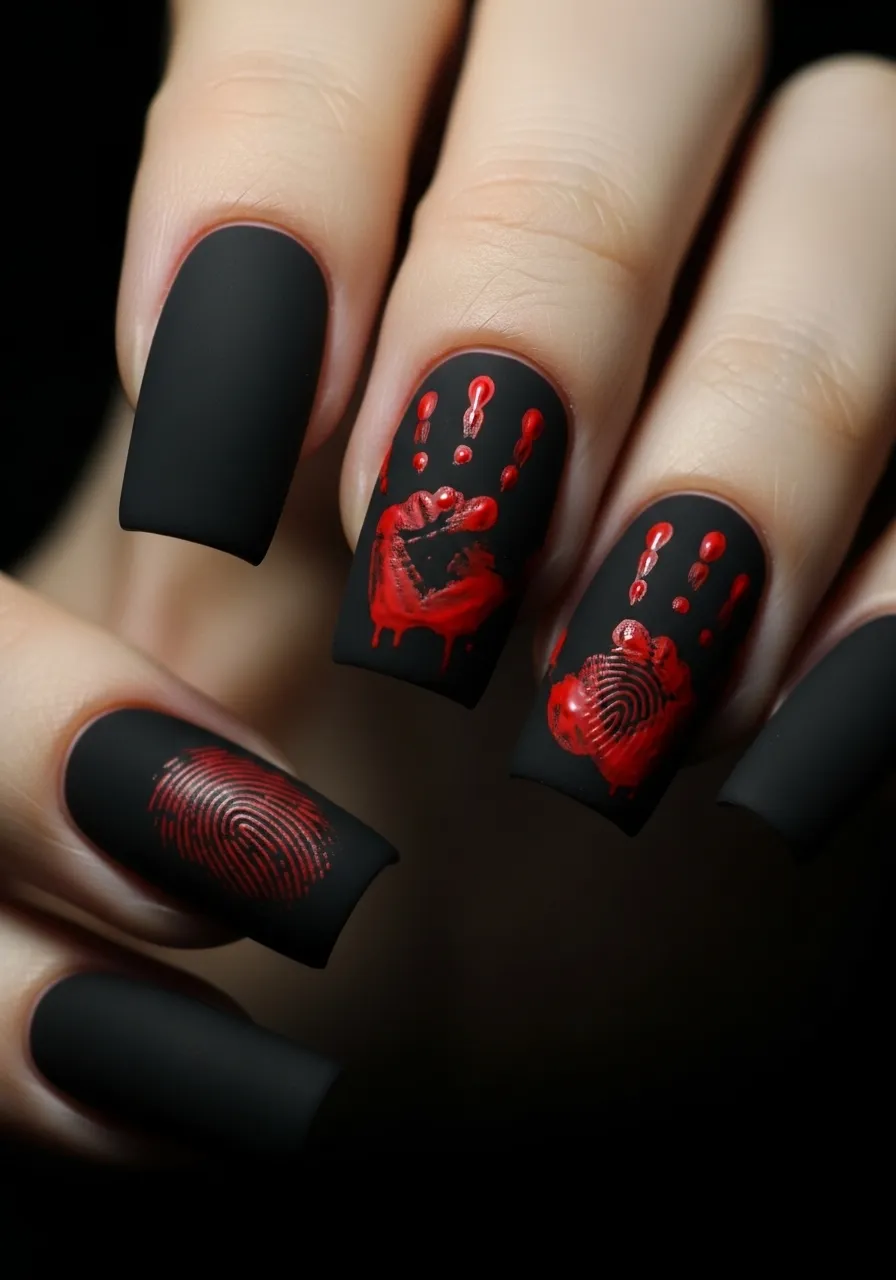
A bloody handprint on a nail is one of the most viscerally effective Friday the 13th designs because it suggests a story without showing any direct horror content.
The smeared, imperfect quality of a handprint is also one of the easiest nail art designs to execute convincingly.
Imperfection is intentional with this design. A too-clean handprint looks decorative. A slightly smeared, irregular one looks genuinely unsettling.
Paint all nails in matte black as the base.
Load a very thin nail art brush with bright red polish and paint a palm shape on the accent nail: an irregular rectangle or oval for the palm, and five thin extending lines for the fingers.
Smear the edges of the red paint slightly using a toothpick or fine brush while it is still wet. Add small oval fingertip dots at the end of each finger line.
A partial handprint, just fingers and no palm, works well on a second accent nail for variety.
Add a few red smear marks on the surrounding nails as though the hand dragged across the fingers for a connected, scene-like effect.
Seal with matte topcoat.
Budget tip: Acrylic paint in red from a craft store costs under $2 per tube and gives better control and slower dry time for smearing effects than regular nail polish.
Dripping Candle Wax Effect Nails

Dripping candle wax nails are an atmospheric Friday the 13th design that is less gory than blood drips but equally moody and intentional.
The image of melting candle wax suggests old gothic rituals, dark ceremonies, and supernatural gatherings, all of which fit the spirit of the day perfectly.
The candle wax drip is created using white or ivory polish on a dark base, applying the same drip technique as blood art but with a completely different color story.
Paint all nails in a deep base: burgundy, dark forest green, midnight blue, or black all work beautifully beneath white wax drips.
Using a thin brush loaded with white or warm ivory polish, paint irregular drip lines from the tips of the nails downward. Make each drip slightly different in length and width.
Add a small pool shape at the bottom of each drip where the wax would collect.
For a textured, three-dimensional effect, apply a second coat of white polish over the dried drips. The raised layer creates a subtle physical texture that catches light beautifully.
Seal with matte topcoat for a gothic, candlelit finish.
Budget tip: Elmer’s dimensional fabric paint in white costs around $3 and can be used instead of nail polish for the drip layer to create a genuinely raised, textured wax effect that holds its shape beautifully.
Evil Eye and Superstition Nails
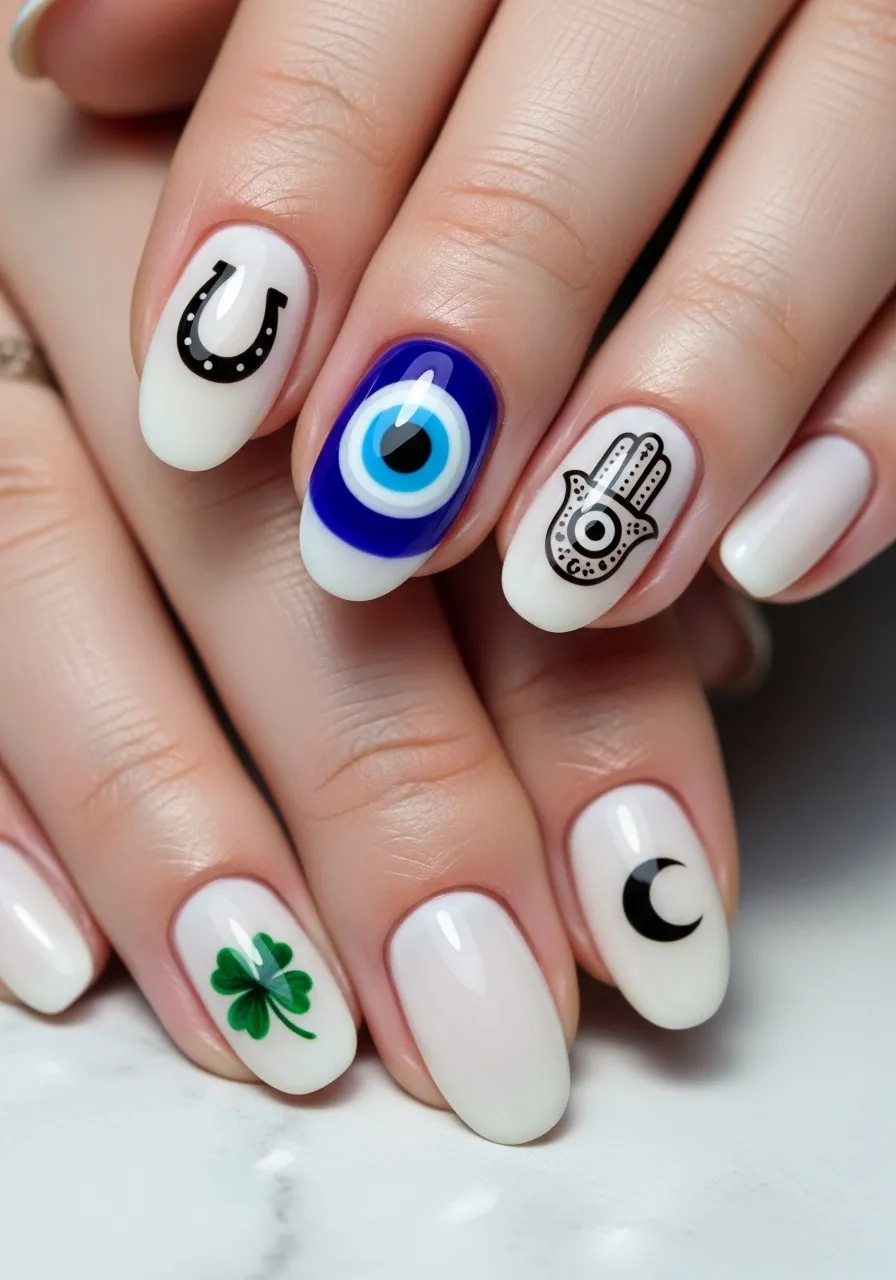
Friday the 13th is built entirely around superstition, so a nail set dedicated to superstitious symbols is a perfectly thematic choice.
The evil eye, horseshoe, four-leaf clover, black cat, and number 13 are all classic superstition symbols that make for a cohesive mixed-motif nail set.
The evil eye is the most visually striking of these symbols and works as the anchor design for the set. It consists of concentric circles in cobalt blue, white, dark navy, and a black center pupil.
Paint the evil eye base in cobalt blue. Add a white circle inside. Add a smaller dark navy circle inside that. Finish with a black dot in the center for the pupil.
Thin white paint applied with a fine brush at the outer edge of the cobalt circle completes the traditional evil eye look.
On remaining nails, paint simple versions of the other superstition symbols: a horseshoe in gold, a four-leaf clover in green, a hamsa hand in white.
Keep the background color neutral, either ivory, pale blue, or soft grey, so the symbols read clearly.
Seal with high-gloss topcoat.
Budget tip: Evil eye nail stickers are available on Amazon for $3 to $5 per sheet in multiple sizes and come pre-designed with perfect concentric circles, saving significant time and effort.
Red and Black Swirl Marble Nails
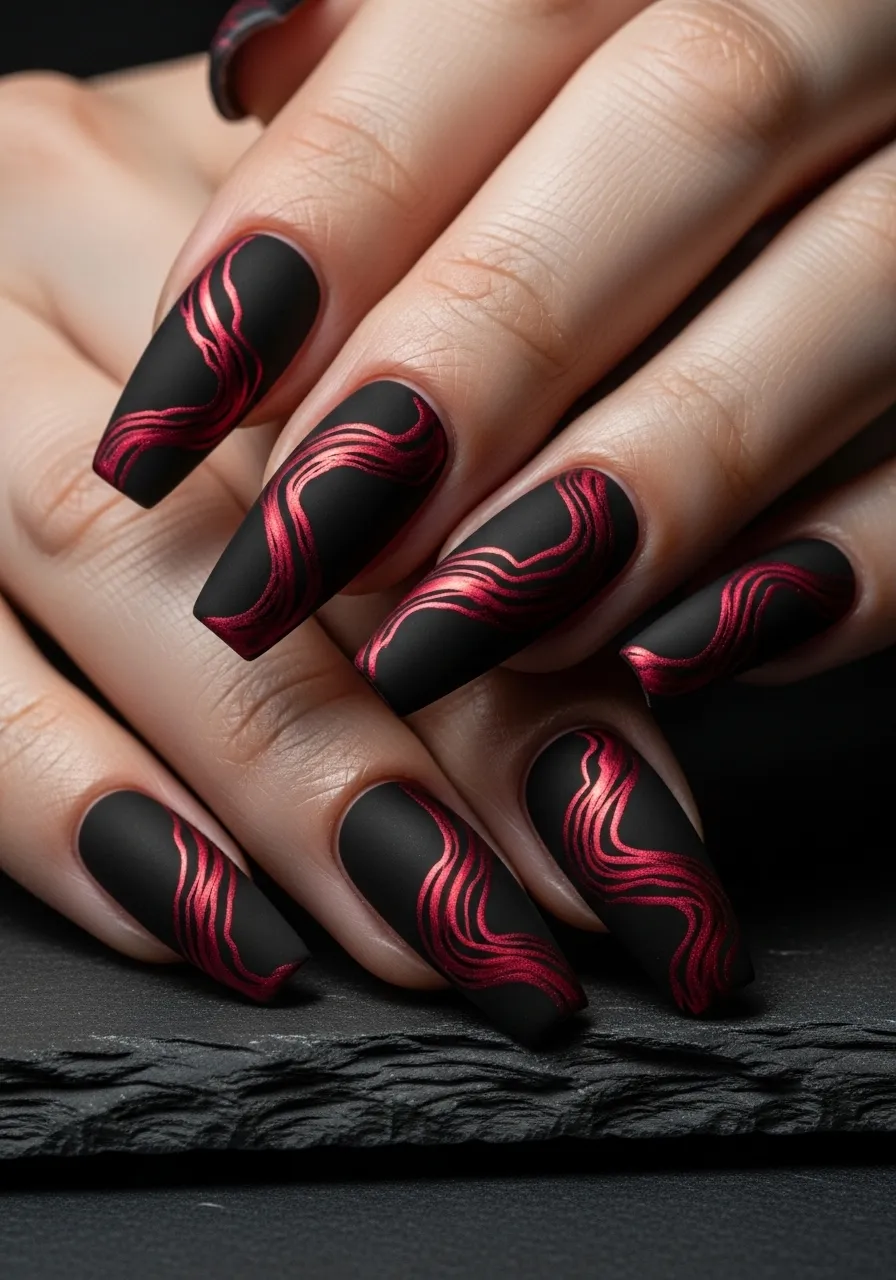
Red and black marble nails look expensive and complex but are actually achievable at home with a simple technique that requires no specialized tools.
The marble effect is created using a thin brush and a veining technique that mimics the natural look of marble stone.
The key is working quickly while the base coat is still slightly tacky, which lets the vein colors drag and blend naturally rather than sitting on top as hard lines.
Paint all nails in matte black. While still slightly tacky but not wet, load a thin brush with deep red polish.
Draw thin, slightly irregular lines across each nail at a diagonal angle. Wiggle the brush very slightly as you draw to create the natural imperfection of marble veins.
Add a few thinner red branches splitting off from the main vein lines for a more complex, realistic marble appearance.
Use a clean brush slightly damp with acetone to soften some of the vein edges by dragging lightly across them.
Seal with glossy topcoat to give the nails the polished, stone-like finish of real marble.
Budget tip: A thin liner brush from a makeup brush set costs around $5 and gives excellent control for marble veining. No specialized nail art tools are required for this design.
Conclusion
Friday the 13th only happens a handful of times each year and your nails are one of the fastest, most affordable ways to fully commit to the day.
Every idea in this list is achievable at home with basic polishes, a few nail art brushes, and the patience to practice once or twice before the real thing. Start simple if you are new to nail art. A matte black base with blood drip tips costs under $10 in supplies and takes under 30 minutes. Work your way toward the more detailed designs as your confidence grows.
The most important thing is that you choose a design that genuinely excites you, gather your supplies in advance, and give yourself enough time to actually enjoy the process. Nail art should be fun, especially when the theme is this good.
Book your Friday the 13th nail session, set up your supplies, put on a horror movie in the background, and get started.