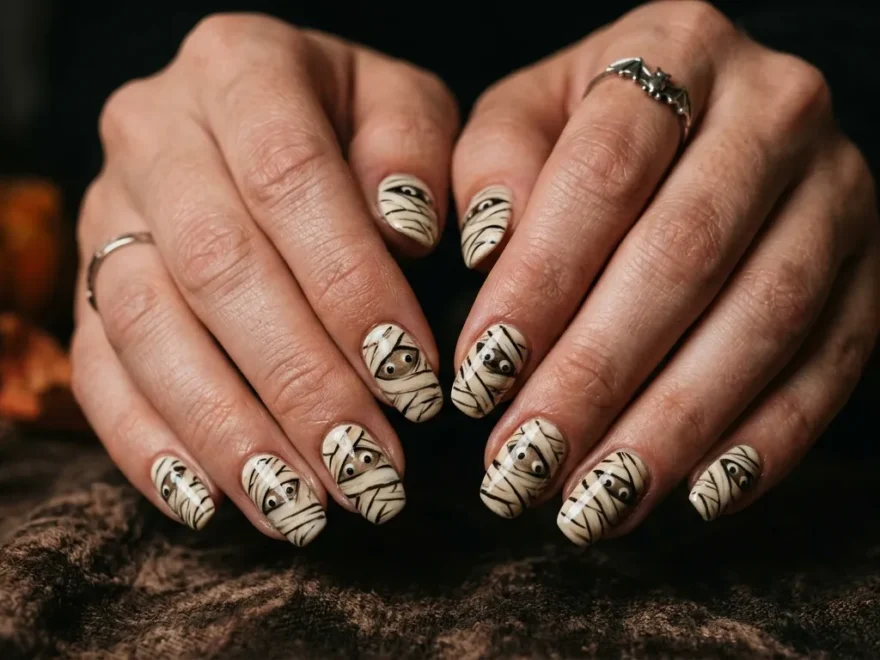
Halloween nail art has come a long way from basic orange and black designs, and mummy nail ideas sit right at the top of the seasonal nail art conversation for good reason. They are spooky without being gory, creative without being complicated, and impressive enough to stop people mid-conversation to ask about your manicure. Mummy nails take the classic wrapped bandage look of everyone’s favorite Halloween monster and translate it into a surprisingly wearable and genuinely fun nail design. Whether you prefer a clean white bandage look, a glittery mummy accent, a dark and moody take, or something that mixes mummy art with other Halloween elements, there is a version here for you. Most of these designs are achievable at home with basic tools and drugstore polishes, and the ones that require a little more skill come with tips on how to simplify them. This guide covers 25 specific mummy nail ideas that range from beginner-friendly to salon-level so you can find exactly the right design for your skill level and style. If you’re also exploring Scarecrow nail ideas, patchwork patterns, stitched details, and warm autumn tones can create a cute yet spooky seasonal look that feels perfect for Halloween without being too intense.
1. Classic White Bandage Mummy Nail Ideas
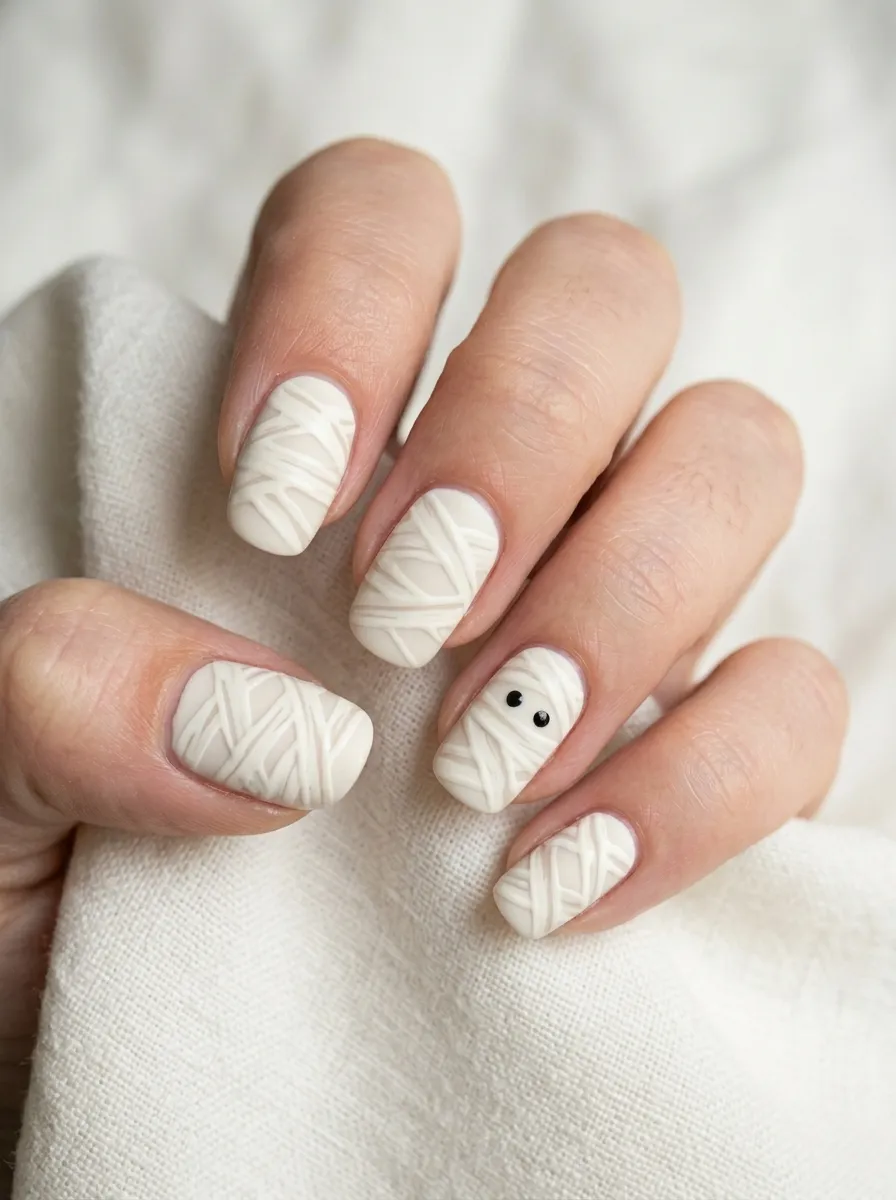
This is the most recognizable mummy nail design and the best place to start.
The look is simple: a cream or off-white base with thin, loosely drawn crossing lines over the top to mimic bandage wrappings.
Start with two coats of a creamy off-white or pale beige polish. This is your bandage base.
Once dry, use a thin nail art brush or a striping brush dipped in a slightly darker white or light grey polish to draw thin lines across the nail.
The lines should cross in different directions, not perfectly parallel. Real bandages wrap at slight angles and overlap each other.
Leave small gaps between the lines. Mummy bandages are not perfectly neat.
On one accent nail, add two tiny black dots close together near the nail tip to suggest eyes peering through the bandages.
A dotting tool makes the eyes easy and perfectly round. A toothpick dipped in black polish works just as well.
Seal everything with a glossy top coat to make the design look polished and extend its wear.
Total cost for this look at home is minimal. White and cream polishes are widely available at drugstores for just a few dollars each.
This design is perfect for beginners because the slightly imperfect lines actually make it look more realistic.
2. Mummy Nails with Glowing Green Eyes
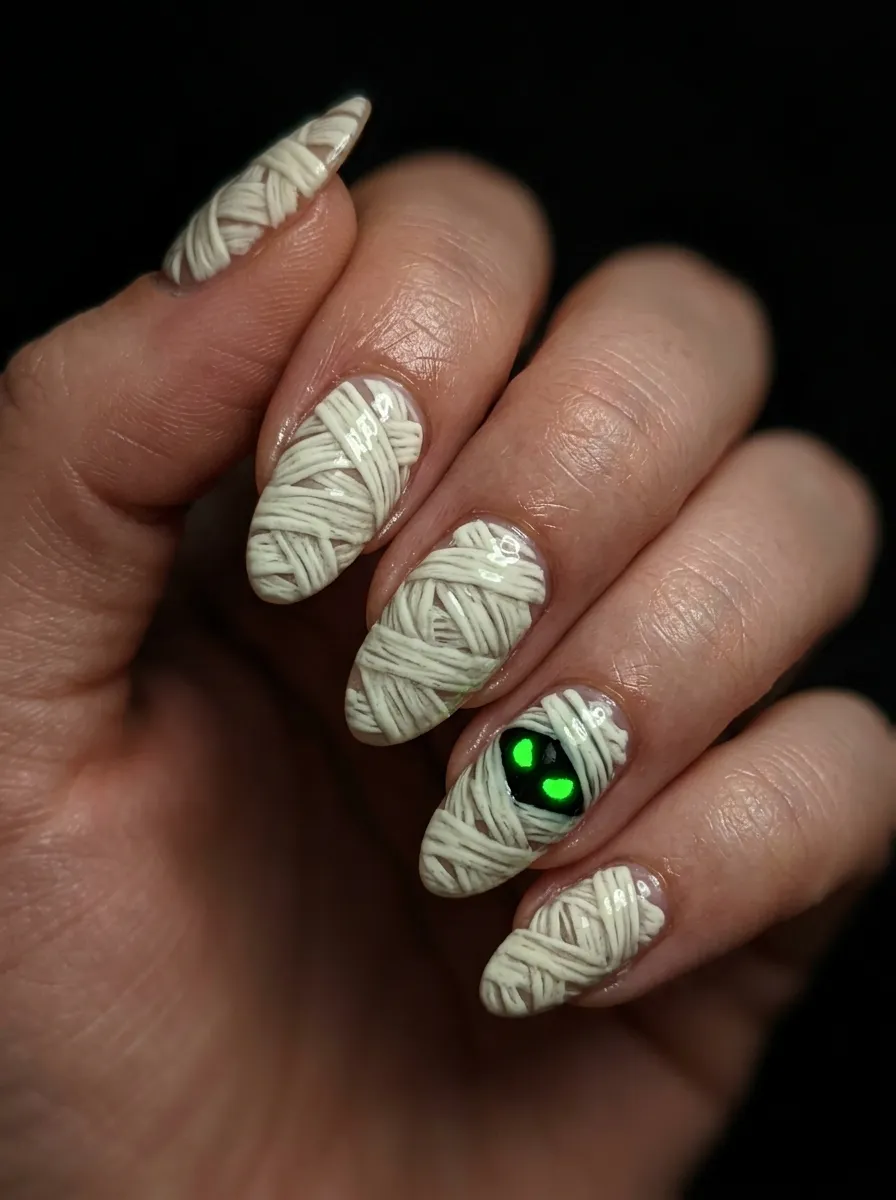
Adding a pair of glowing green eyes to your mummy nails takes the design from simple to genuinely spooky.
The green eyes create a focal point and add a pop of color that makes the otherwise neutral design stand out.
Complete the white bandage base on all nails as described in the classic design above.
Choose one accent nail on each hand for the eyes. The ring finger is a popular choice but any nail works.
Use a dotting tool or toothpick to place two small dots of neon green polish close together on the upper third of the accent nail.
Let the green dry. Then use a very thin brush to outline each dot with a tiny ring of black polish for definition.
Add a tiny white highlight dot to each green eye using the very tip of a toothpick. This makes the eyes look shiny and dimensional.
Neon green polish is the most effective color for this design. It reads as eerie and immediately suggests glowing monster eyes.
For an extra effect, use a UV or glow-in-the-dark green polish. In low light or under black light at Halloween events, the eyes will glow on their own.
Seal with a glossy top coat to protect the details and add shine.
This small color addition completely changes the personality of the design.
3. Matte Mummy Nails for a Subtle Look
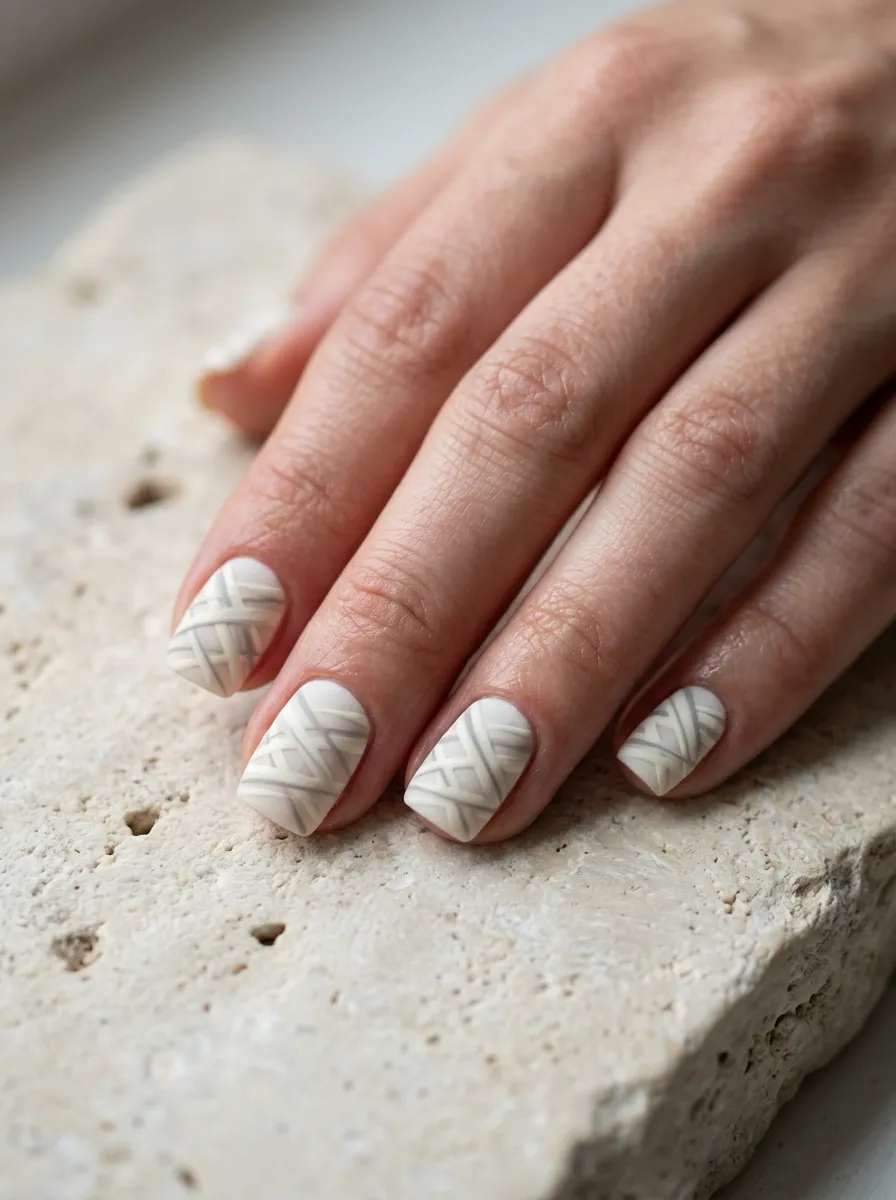
Most mummy nail designs use a glossy top coat, but switching to matte completely changes the feel of the design.
A matte finish makes the bandage lines look more textured and fabric-like. It feels less costume-y and more like a sophisticated Halloween look.
Complete your standard white or cream bandage design on all nails.
Instead of a glossy top coat, apply a matte top coat over the finished design.
The flat finish makes the crossing lines look like actual fabric strips rather than painted lines.
Use light grey or taupe for your bandage lines instead of white on white. On a matte finish, the subtle contrast between cream base and grey lines looks especially realistic.
A matte mummy nail pairs well with neutral or earth-toned outfits where a full glossy Halloween manicure might feel too bold.
This is a great option if you want to wear your Halloween nails to work or in a setting where a very dramatic manicure might not be appropriate.
Matte top coats are widely available at drugstores and nail supply stores for just a few dollars.
One important note: most matte top coats become slightly shiny with daily use as natural oils from skin contact hit the surface. Reapply matte top coat every two to three days to maintain the flat finish.
This version of mummy nails suits both short and medium nail lengths beautifully.
4. Mummy Nails on Black Base with White Bandages
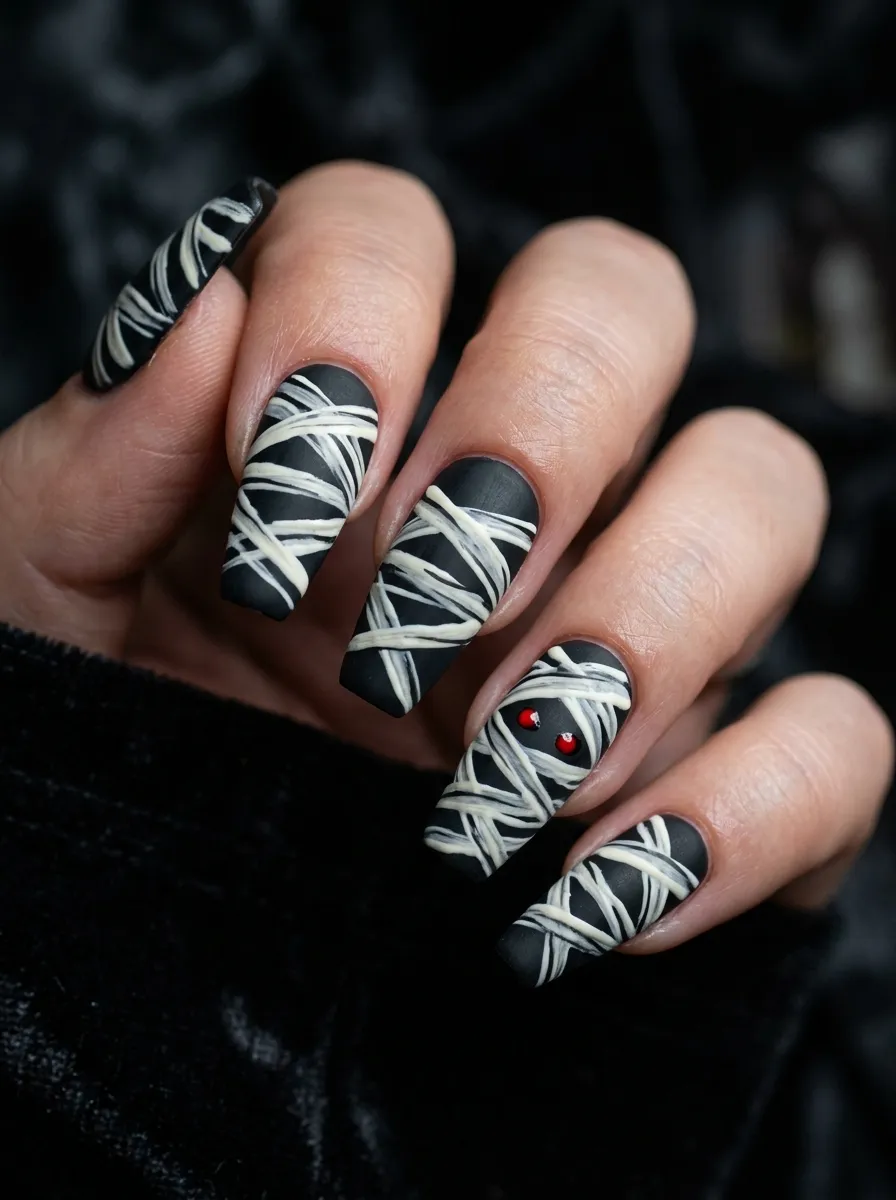
A black base completely reinvents the mummy nail look.
Instead of the traditional pale, ghostly mummy, this version feels dark, gothic, and genuinely Halloween-coded.
Start with two coats of black polish as your base. Both glossy and matte black work for this design.
Once fully dry, use a white or cream striping brush to draw the crossing bandage lines over the black base.
The contrast between stark white lines and the black background is immediately striking.
The lines do not need to be perfect. A slightly shaky or organic line looks more like fabric than a ruler-straight one.
Add two tiny red dot eyes on one accent nail rather than the traditional black eyes. Red reads as sinister against the black background in a way that black dots would not.
You can also use neon orange or yellow eyes for a more Halloween-specific color palette.
Finish with a glossy top coat to make the white lines pop even more against the dark background.
This design suits coffin, almond, and stiletto nail shapes particularly well because the longer, more dramatic shapes complement the dark base color.
It is one of the most visually striking versions of mummy nails and works beautifully as part of a full Halloween costume or look.
Budget tip: A good quality black polish and a white striping brush are all you need, both available at drugstores for just a few dollars total.
5. Mummy Accent Nail on a Neutral Set
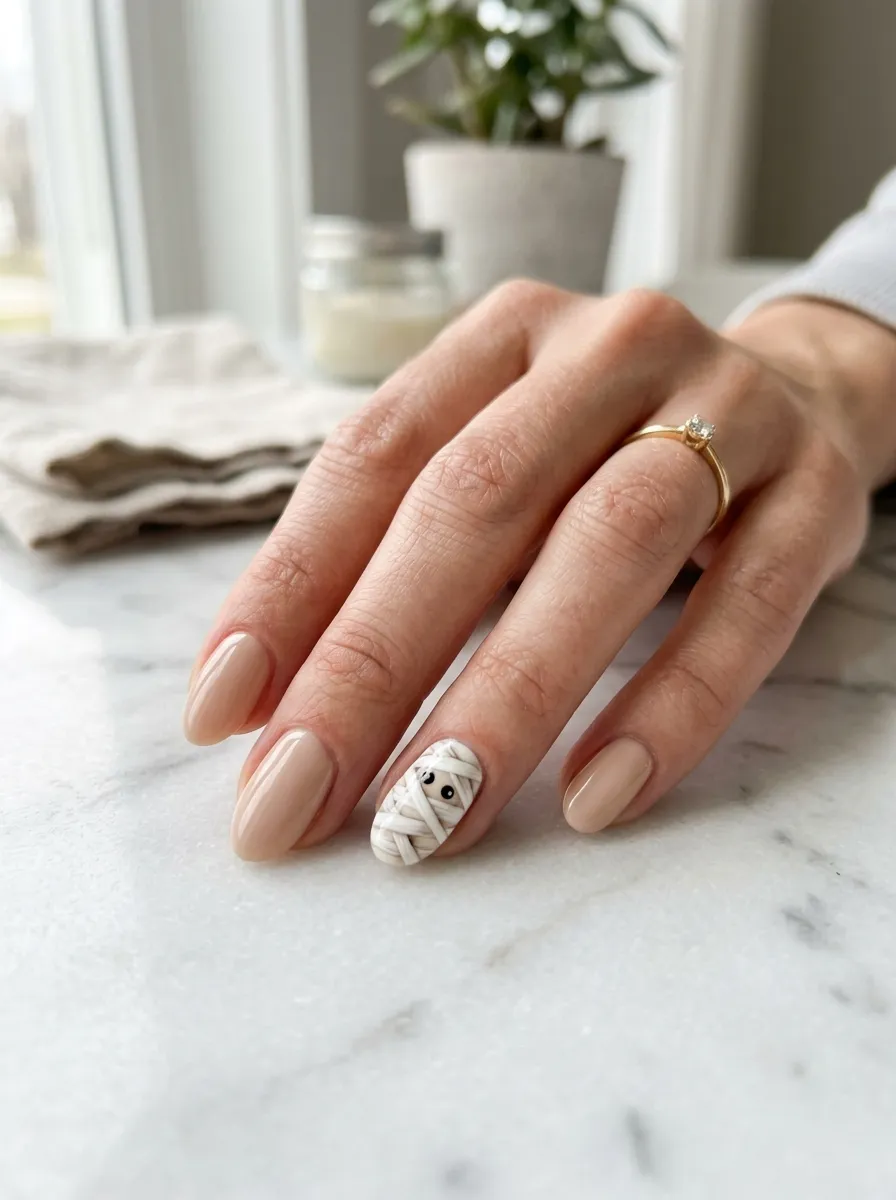
Not everyone wants ten full mummy nails.
A single mummy accent nail on an otherwise neutral manicure is one of the most wearable ways to participate in Halloween nail art without committing to a full themed set.
Paint all nails except the ring finger in a neutral nude, beige, or soft pink shade.
On the ring finger, create your full mummy design with a cream base, crossing bandage lines, and tiny black dot eyes.
The contrast between the minimal neutral nails and the detailed accent nail makes the mummy design look even more intentional and artistic.
This approach works well for professional environments where a full Halloween set might be too much.
You can also do two accent nails instead of one, placing the mummy design on the ring finger and one thumb for a balanced, symmetrical look.
The neutral nails around the accent nail act as a visual rest for the eye, which makes the detailed mummy art on the accent nail appear more prominent by comparison.
Use a glossy top coat on all nails including the accent to unify the look.
This design philosophy works for any of the mummy variations in this guide. Take whichever specific mummy design appeals to you most and apply it as an accent within a neutral or minimal set.
It is a genuinely elegant approach to Halloween nail art.
6. Glitter Mummy Nails for a Glamorous Halloween Look
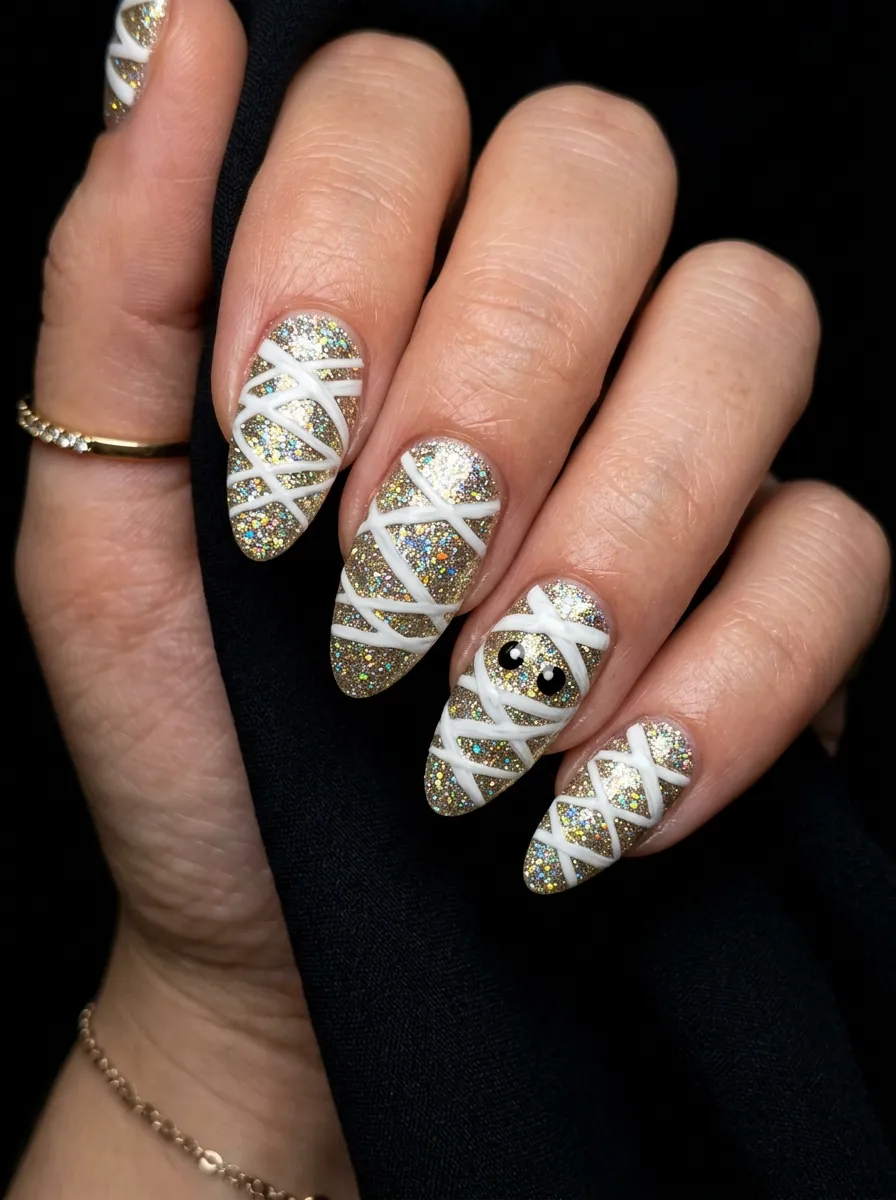
Mummy nails and glitter are not an obvious combination, but the result is surprisingly beautiful.
The glitter adds a festive, glamorous quality that makes the mummy design wearable for Halloween parties rather than just Halloween day.
Start with two coats of a gold, silver, or holographic glitter polish as your base.
Once dry, paint your white bandage crossing lines over the glitter. The lines will be slightly less opaque over the glitter than they would be over a plain base, which actually looks great because the sparkle shows through the lines.
Add your tiny black dot eyes on one accent nail as a focal point.
The combination of the spooky mummy motif and the glittery, glamorous base creates a fun contrast that feels dressed-up rather than simply costumey.
For a more controlled glitter application, use a chunky glitter polish on just the accent nail and a plain white or cream base on the remaining nails.
This gives you glitter where it matters most, on the main mummy nail, without going full glitter on every finger.
Gold glitter suits warm skin tones beautifully. Silver and holographic glitter suit cooler skin tones. Both look equally festive.
Seal everything with a glossy top coat for maximum sparkle and to lock in the design.
This is the party version of mummy nails and one of the most photographable options in this entire guide.
7. Coffin Mummy Nails with Detailed Wrapping
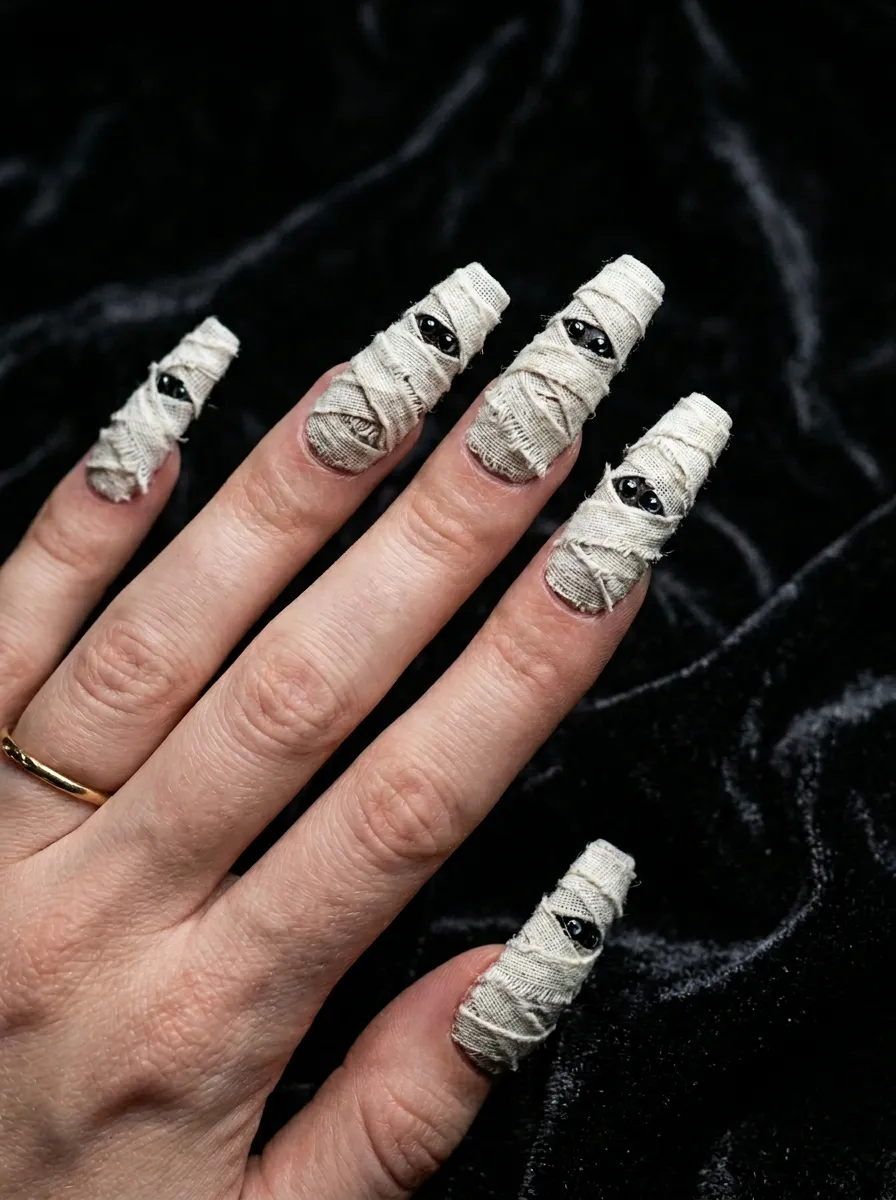
Long coffin nails give you an extended canvas that allows for much more detailed bandage wrapping than shorter nail shapes.
The length and flat tip of the coffin shape is perfect for mummy art because the bandage lines can travel the full length of the nail and overlap at the tip, creating a convincingly wrapped effect.
Start with a pale cream or linen-toned base on long coffin nails.
Using a thin striping brush, draw bandage lines that travel across the nail at varying angles. Some lines should go almost horizontally, some diagonally.
At the tip of the nail, overlap the lines more densely to suggest the bandage is wound more tightly at the end.
Vary the thickness of the lines slightly. Using a thin line next to a slightly thicker one adds realism and prevents the design from looking too uniform.
Add tiny black eyes peeking through a gap between two bandage lines near the upper portion of one accent nail.
For extra detail, add a tiny drip of dark red or brown polish at one edge of a nail to suggest aging or weathered bandages.
Seal the complete design with a matte top coat for a more ancient, fabric-like look, or a glossy coat for a clean, polished finish.
This detailed version of mummy nails looks genuinely impressive and is worth the extra time it takes to complete.
8. Mummy Nails with Gold Foil Bandages
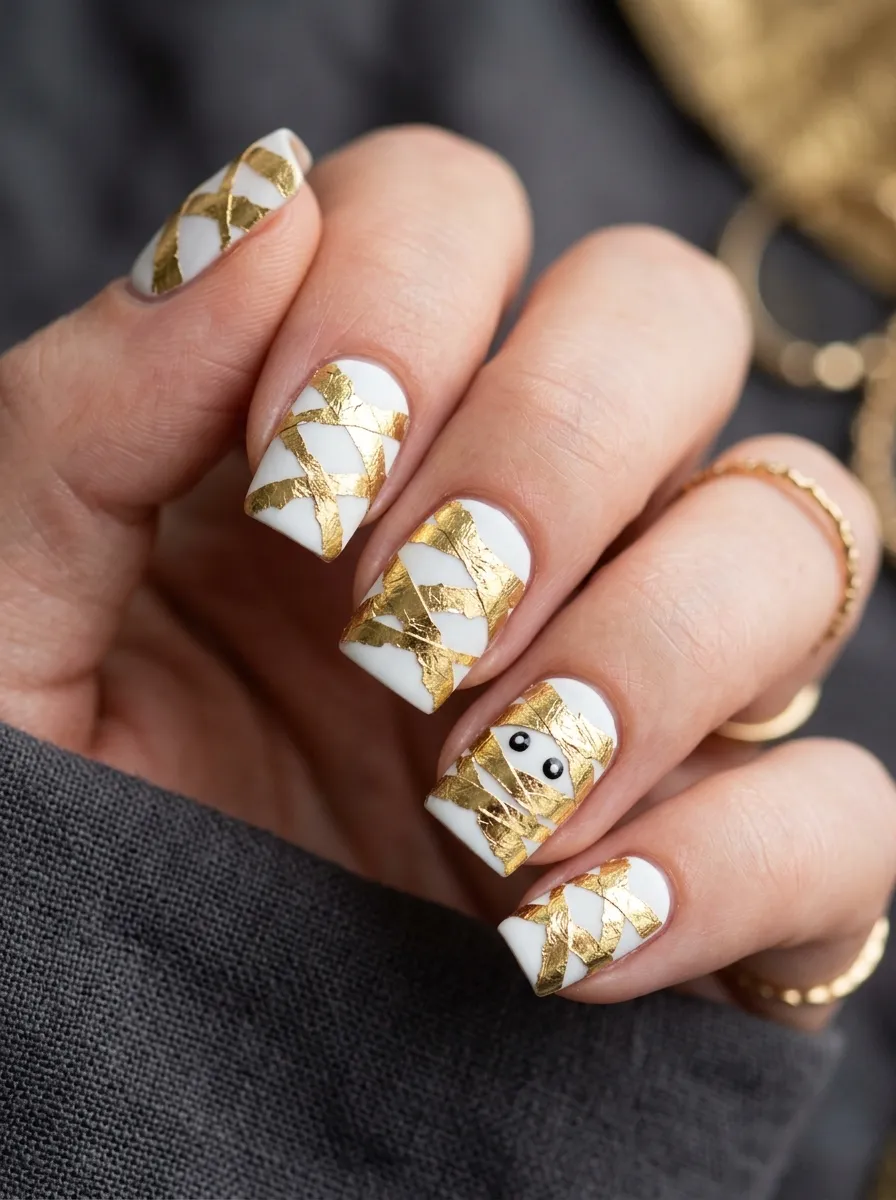
Using actual nail foil instead of painted lines creates a mummy design with genuine metallic texture that catches light in a way that painted lines simply cannot.
Nail foil comes in thin sheets that you tear or cut into strips and apply to tacky nail adhesive.
Apply your white or cream base first and let it cure or dry fully.
Apply a thin layer of nail foil adhesive in narrow strips across the nail in a crossing pattern. Let the adhesive become tacky, about 60 seconds.
Press thin strips of gold nail foil onto the adhesive strips. Press firmly, then peel back the backing sheet quickly.
The foil transfers only where the adhesive was applied, creating metallic bandage strips across the white base.
The torn edges of the foil create a naturally frayed, organic look that suits the mummy aesthetic perfectly. You do not need clean edges.
Add your tiny black dot eyes on an accent nail using a toothpick.
Seal with a glossy top coat to smooth the foil strips and lock everything in place.
Nail foil sheets are available at beauty supply stores and online for very little cost and a single sheet provides enough foil for multiple full manicures.
This design looks like a salon-quality manicure but is very achievable at home once you get the hang of foil application.
9. Pastel Mummy Nails for a Softer Halloween Look
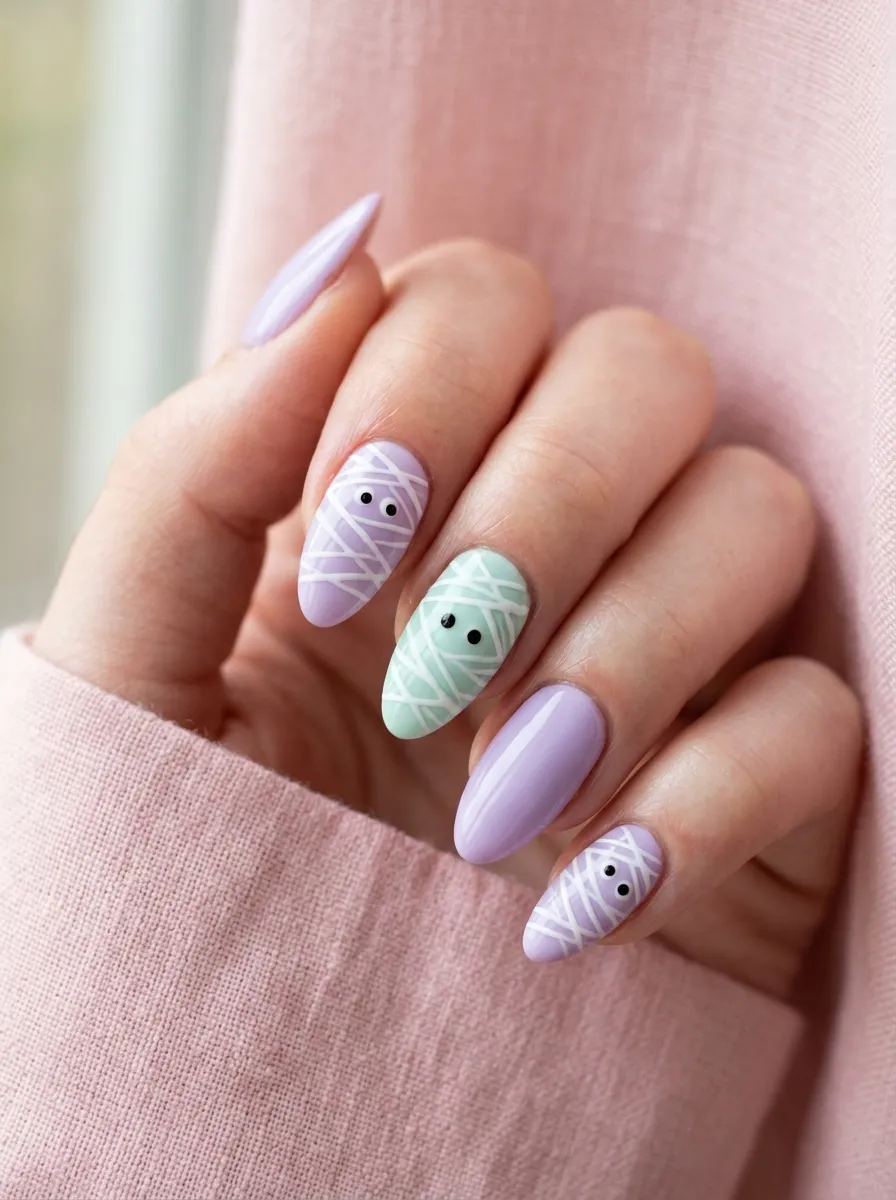
Not every Halloween nail design has to be dark and moody.
Pastel mummy nails are a softer, more feminine take on the trend that suits those who love cute Halloween aesthetics rather than gothic ones.
Choose two or three pastel shades as your base colors. Lavender, mint, dusty pink, and baby blue all work beautifully.
Paint different nails in different pastel shades for a colorful, mix-and-match base.
Over each pastel base, draw your white bandage crossing lines using a thin striping brush.
The white lines show up clearly against all pastel shades without needing to adjust the line color.
Add tiny black dot eyes to one or two accent nails. On pastel nails, consider adding a tiny heart or star pupil inside the eye dots for a cute twist.
The pastel mummy nails aesthetic is sometimes described as spooky-cute or pastel goth and has a strong following in the Halloween nail community.
Finish with a glossy top coat to make the pastel shades look vibrant and candy-like.
This design is especially popular with those who want to wear Halloween nails to daytime events, children’s parties, or casual settings where full gothic designs might feel out of place.
It is cheerful, seasonal, and very easy to execute at home with basic supplies.
10. French Tip Mummy Nails
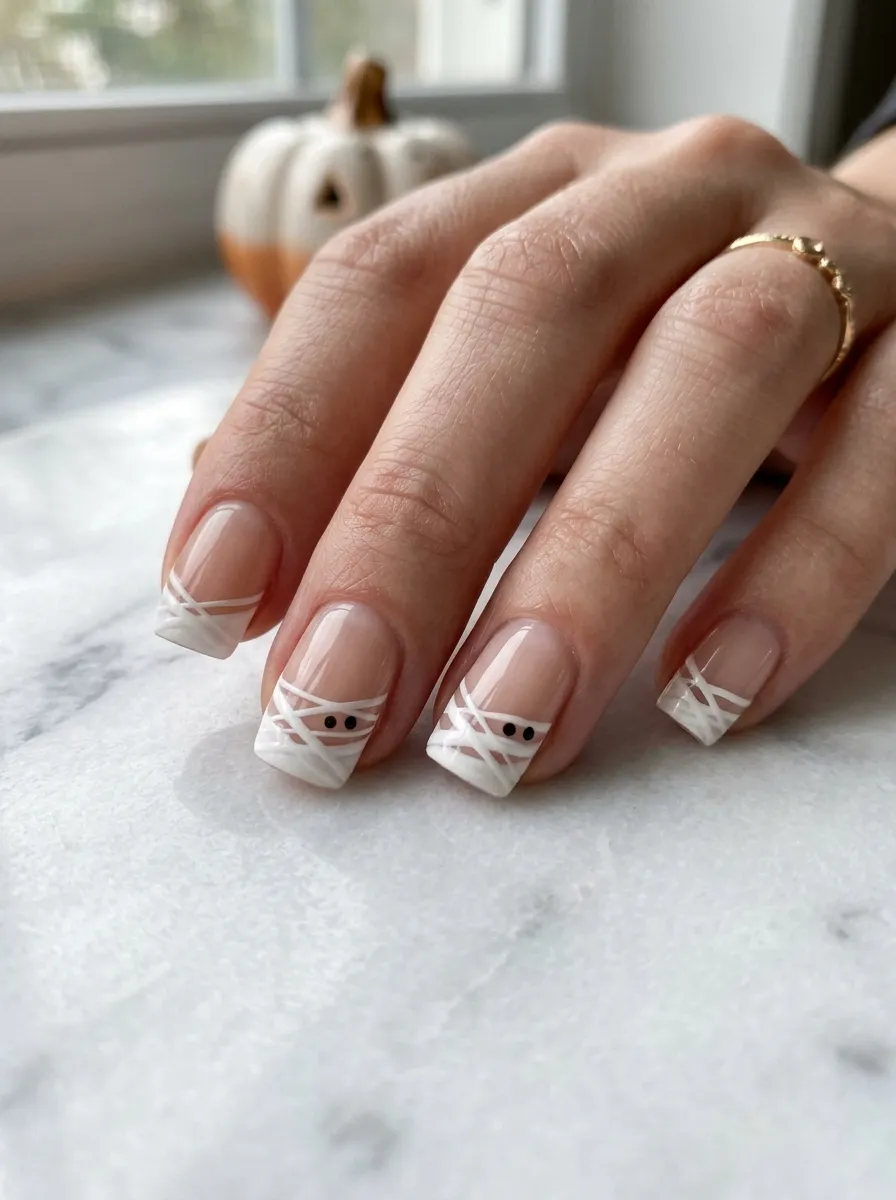
Giving the classic French manicure a mummy makeover is one of the cleverest seasonal nail ideas available.
The structure of the French tip, a nude base with a white tip, already has the right color palette for mummy art.
Start with a sheer nude or natural pink base on all nails.
Apply a white tip as you would for a standard French manicure. You can use French tip guides or a steady hand with a thin brush.
Once the white tip is dry, extend thin bandage crossing lines from the white tip area down onto the nude nail bed.
These lines should appear to travel from the tip downward, as though the bandage is unraveling from the end of the nail.
Add tiny black dot eyes right at the edge where the white tip meets the nude base on one or two accent nails.
This placement makes it look like the mummy is peeking out from the tip of the nail, which is both clever and genuinely cute.
The overall design reads as a French manicure at a glance but reveals the mummy detail on closer inspection.
This makes it one of the most workplace-appropriate Halloween nail designs in this guide.
Use a glossy top coat to unify the tip and base for a clean, polished result.
11. Mummy Nails with Bloody Accents
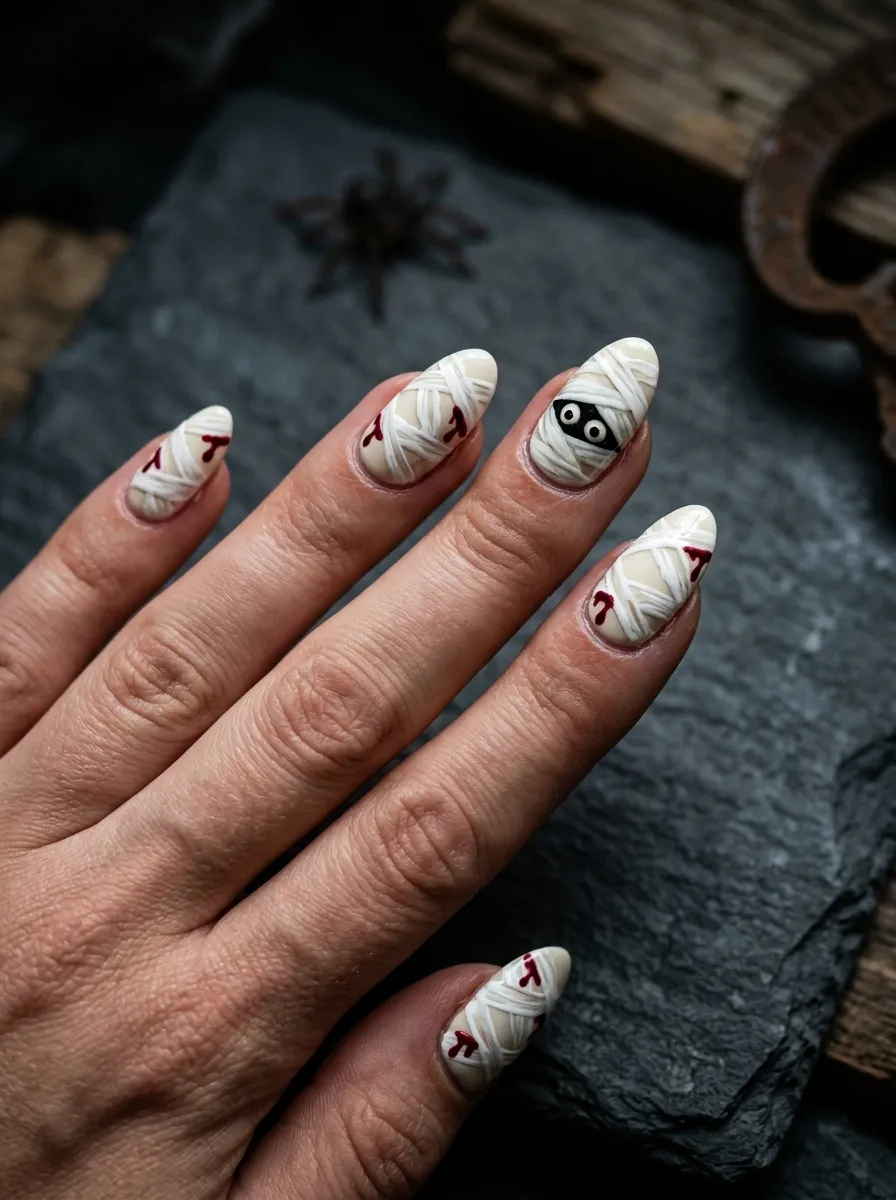
For those who want their mummy nails to lean more toward horror than cute, adding small red bloody accents does the job perfectly.
The blood detail suggests an ancient, damaged mummy rather than a cartoon one and adds genuine spooky credibility to the design.
Complete your standard white bandage mummy nails on all fingers first.
Once the bandage design is dry, use a thin detail brush or toothpick dipped in dark red polish to add small drips at the edge of one or two nails.
Real blood drips are not perfectly round. Let the toothpick create organic, slightly irregular drip shapes that trail downward from the bandage lines.
Add a small pool of red at the very tip of the nail where multiple drips would collect.
Use a deep, almost burgundy red rather than a bright cherry red. Darker red reads as more realistic and less cartoon-like.
Apply the blood detail only to one or two nails rather than all ten. Restraint makes the detail more impactful.
Let the red dry completely before applying a glossy top coat, which makes the red detail look wet and fresh in a genuinely unsettling way.
This design is for Halloween parties, haunted house nights, and any occasion where you want maximum spooky impact from your manicure.
12. Mummy Nails with Rhinestone Eyes
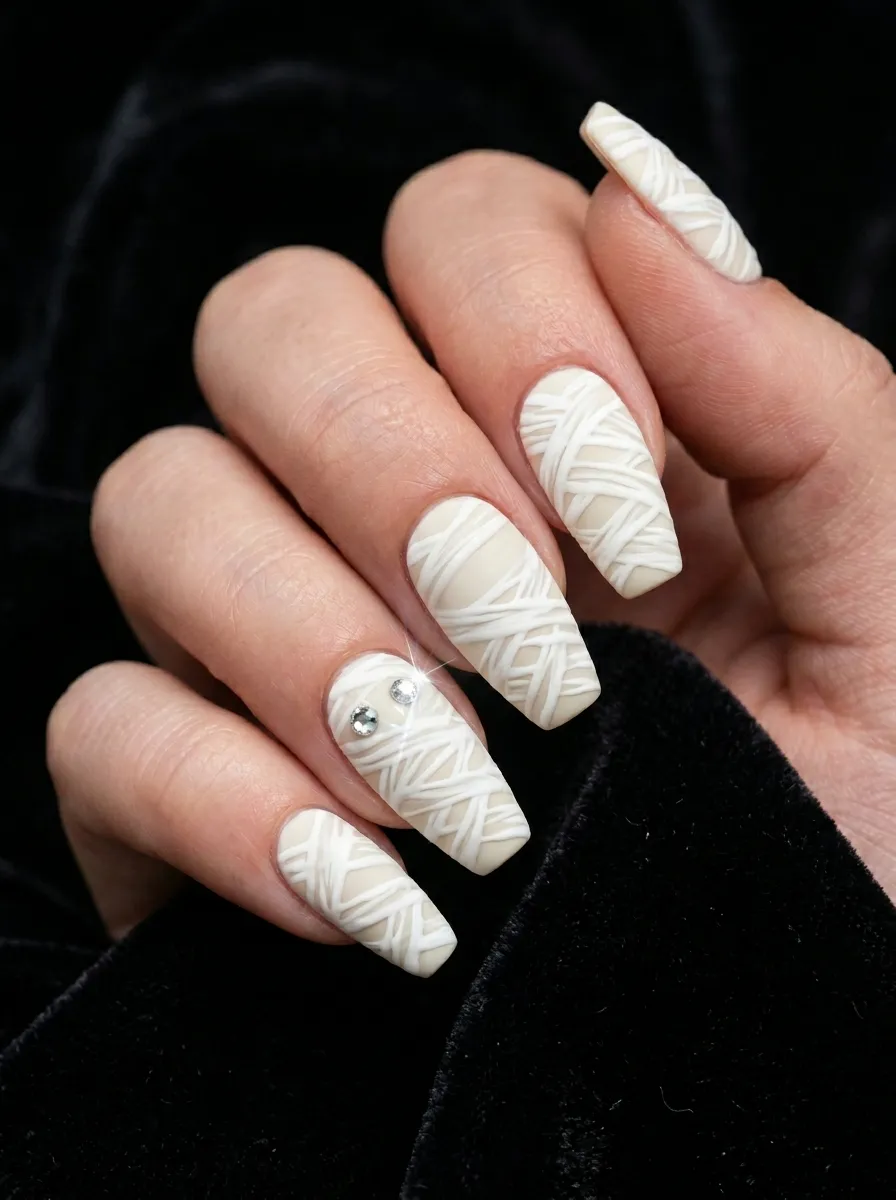
Replacing the painted dot eyes with tiny rhinestones adds a three-dimensional, sparkling detail that makes the mummy design look genuinely luxurious.
The rhinestone eyes catch light and create a focal point that draws immediate attention to the accent nail.
Complete your full bandage mummy design on all nails.
On your chosen accent nail, apply two tiny flat-back rhinestones close together using nail glue or a small dot of gel polish used as adhesive.
Silver rhinestones work beautifully against a white bandage base. For a more sinister look, use black rhinestones or red crystal rhinestones for the eyes.
Apply the rhinestones with a rhinestone picker tool or the sticky end of a toothpick dampened with a little water. Both methods pick up and place small rhinestones precisely.
Press each rhinestone firmly into the nail surface with a toothpick tip to secure it.
Seal around the rhinestones (not over them) with a glossy top coat. Applying top coat directly over rhinestones can cloud their sparkle.
Rhinestones in small sizes are available in bulk at craft stores and beauty supply shops for minimal cost. A single packet of 100 rhinestones provides enough for many manicures.
This simple substitution of rhinestones for painted dots elevates the entire look and makes it feel finished and professional.
13. Mummy Nails with Orange Halloween Accents
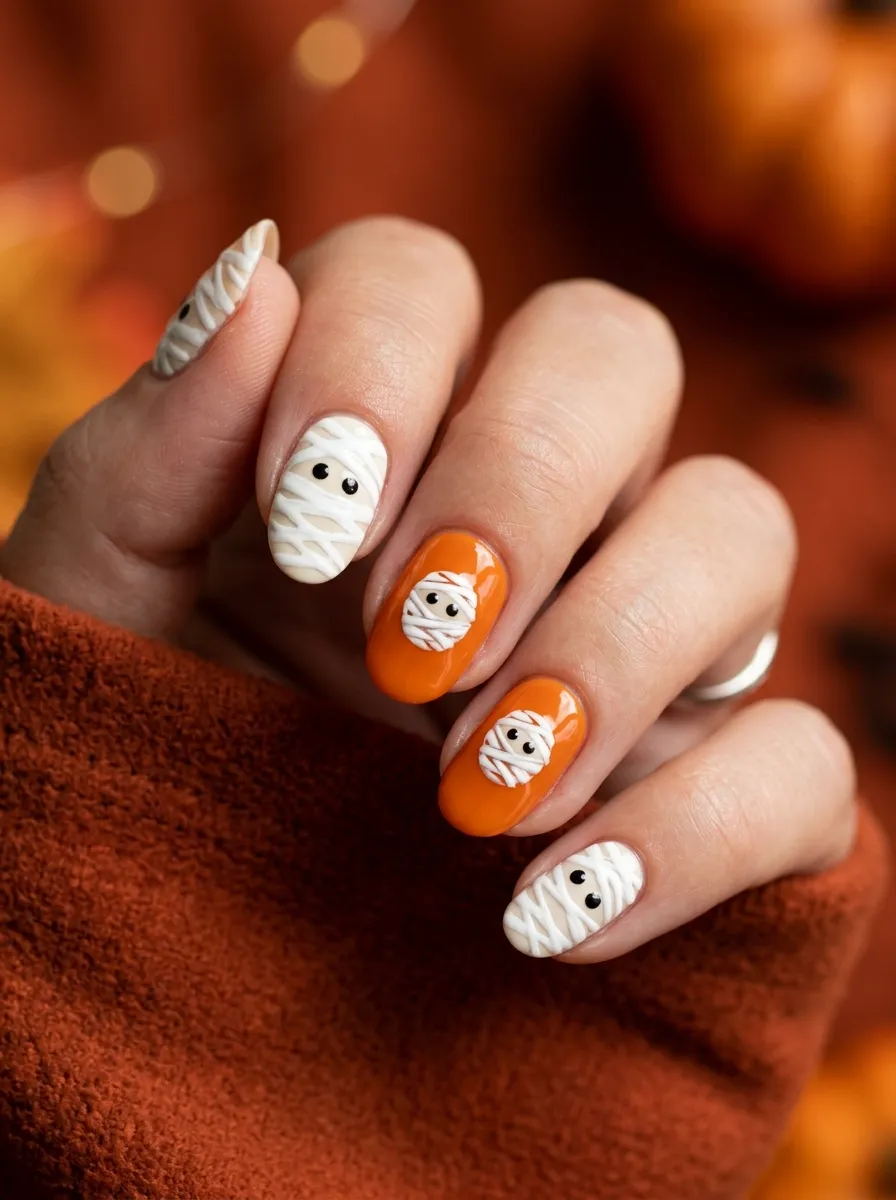
Mixing classic Halloween orange with the mummy nail design creates an immediately festive, seasonal manicure.
This combination screams Halloween in the best possible way without going into dark or gory territory.
Paint most nails with the standard white bandage mummy design on a cream base.
Choose one or two accent nails, typically the ring fingers, and paint them in pumpkin orange polish.
On the orange accent nails, draw a small simplified mummy face using a thin white nail art brush. Two oval eyes, a small line for the nose, and a few crossing lines across the lower portion of the nail to suggest bandages wrapped around a face.
Alternatively, keep the orange accent nails plain with just a tiny mummy face sticker or decal pressed onto the orange base.
Halloween-themed nail stickers including mummy faces are very easy to find at seasonal shops and online for minimal cost.
The orange and white color combination is one of the most instantly recognizable Halloween palettes.
Finish with a glossy top coat on all nails to unify the orange and white nails visually.
This design works beautifully on shorter nail lengths where the orange accent nail provides a pop of color that compensates for the smaller surface area available for the bandage detail.
14. Negative Space Mummy Nails
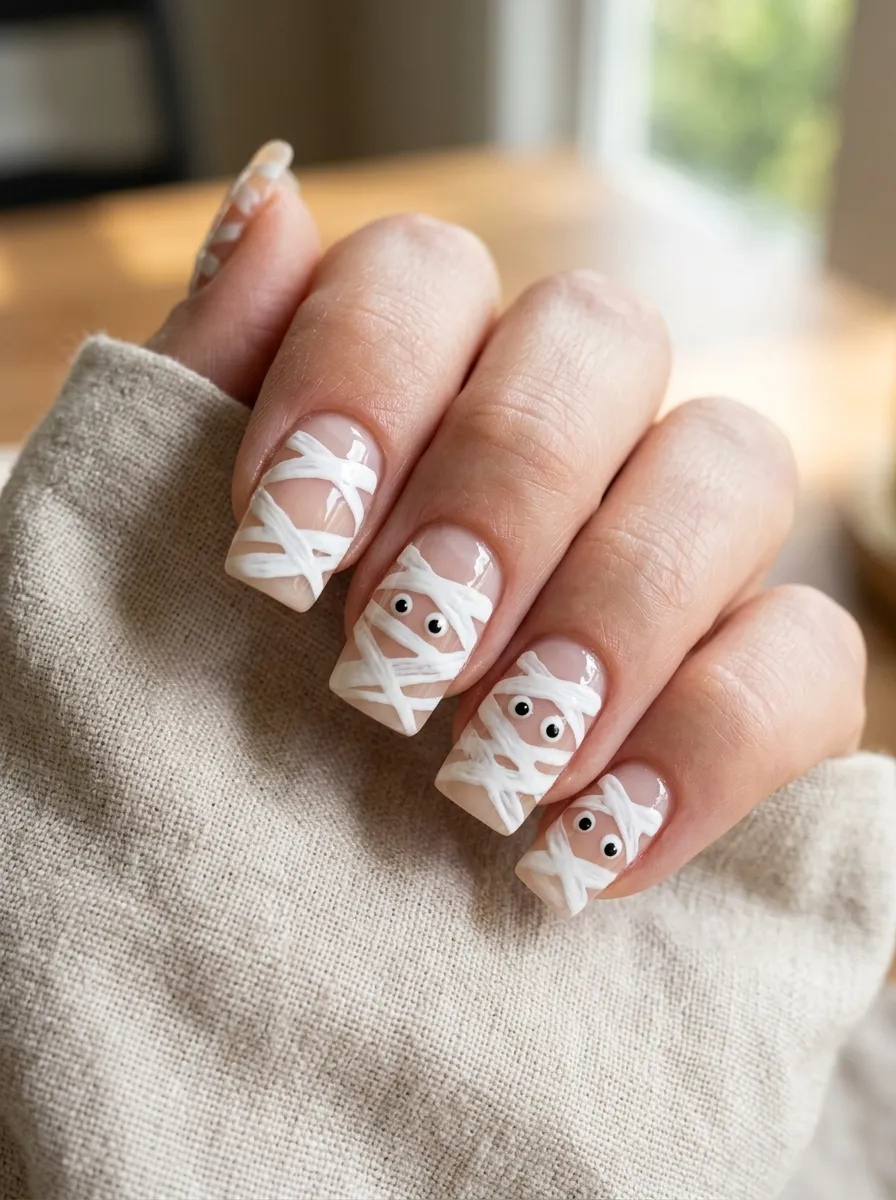 Negative space nail art uses the natural nail surface as part of the design rather than covering it entirely with polish.
In a mummy nail context, this means leaving large areas of the natural nail bare while painting only the bandage strips across certain sections.
Apply a very thin layer of clear base coat to protect the nails.
Using a thin striping brush and white polish, paint three to four crossing bandage lines across the nail. Leave significant gaps of bare nail visible between and around the lines.
The natural nail showing through the gaps represents the skin beneath the bandages, which makes this design conceptually clever and visually interesting.
Add your tiny black dot eyes near the nail tip where a few bandage lines converge.
This design works best on natural nails in good condition because the bare nail becomes a design element. Staining, ridges, or uneven nail surface will be visible.
Apply a matte top coat over just the painted white strips to create texture contrast between the shiny natural nail and the flat bandage lines.
Alternatively, apply a sheer pink or beige top coat over the entire nail to slightly tint the natural nail area while keeping the negative space look.
This is one of the most modern and architectural versions of mummy nail art in this guide.
15. Mummy Nails with Purple Gothic Accents
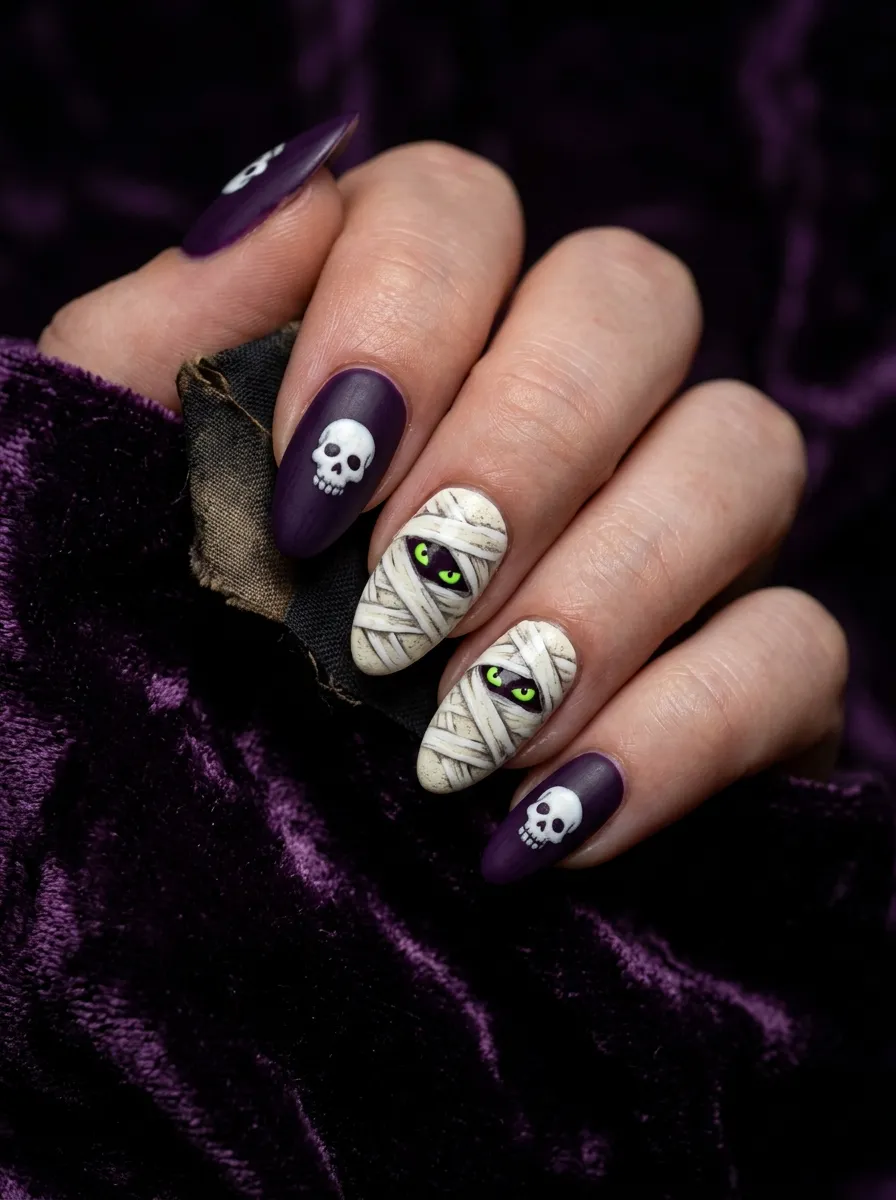 Purple is the other great Halloween color alongside orange and black.
A deep purple accent within a mummy nail set creates a gothic atmosphere that is distinctly Halloween without being predictable.
Paint three nails on each hand with the standard white bandage mummy design on a cream base.
Paint the remaining two nails in deep purple or violet polish.
On the purple nails, add a small white detail. A tiny skull shape, a simple crescent moon, or a small web design all suit the gothic theme.
On the cream bandage nails, use neon green or yellow dot eyes for the mummy. The combination of green eyes and purple accents creates a rich, witchy color palette.
Deep purple and cream together have a historically Gothic aesthetic that suits the mummy theme well.
For extra depth, add a small amount of dark purple or black shading at the edges of the purple accent nails using a makeup sponge and a dark polish. This creates a subtle gradient that adds dimension.
Seal all nails with a glossy top coat to make the purple look deep and rich and to bring out the cream and white details on the bandage nails.
This design is perfect for those who love Halloween aesthetics and want something more sophisticated than a standard mummy manicure.
16. Mummy Nails Using Nail Tape for Precise Lines
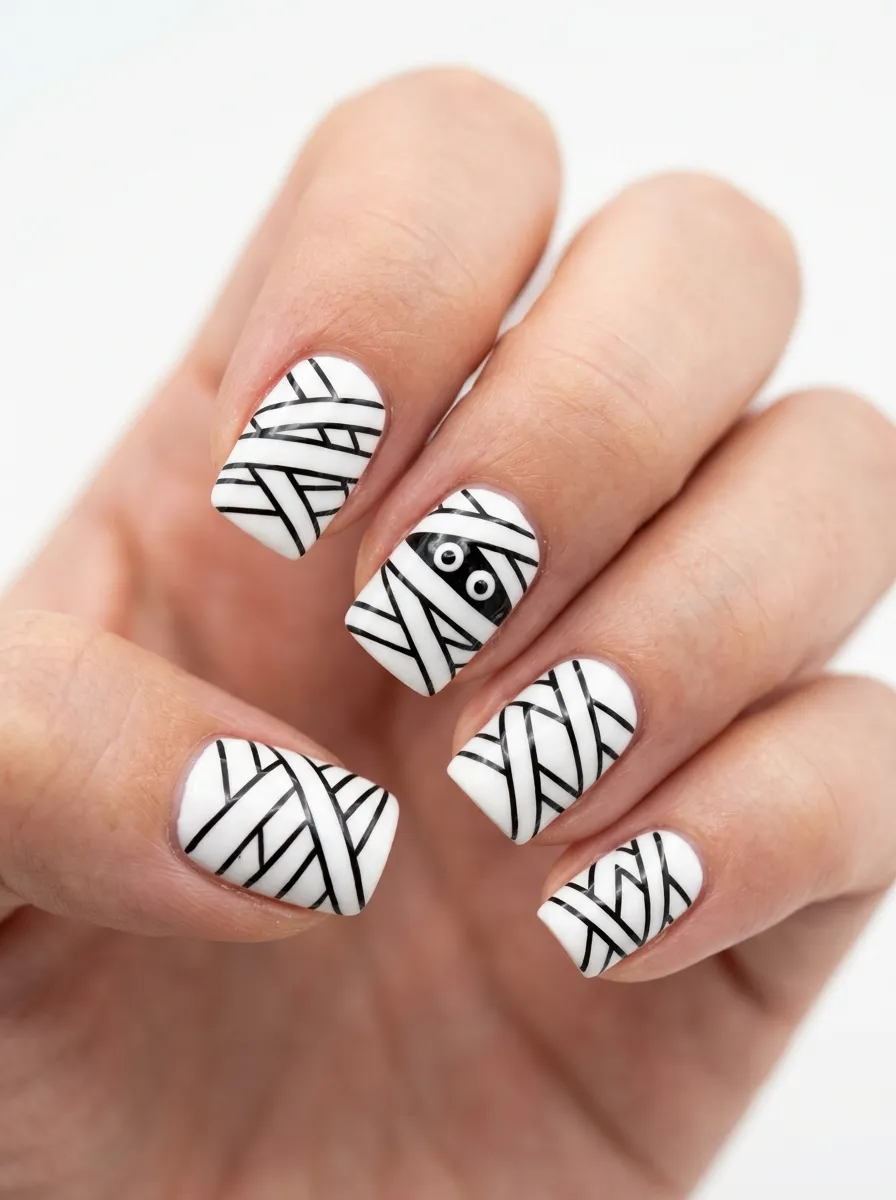 If freehand painting feels difficult, nail tape offers a way to create clean, consistent bandage lines without requiring a steady hand.
Nail tape is a thin adhesive tape available at beauty supply stores in various widths. It is specifically designed for nail art and peels off cleanly without pulling polish.
Paint your cream or white base and let it dry fully. It must be completely dry before tape application.
Press thin strips of nail tape across the nail in crossing directions. Leave small gaps between strips.
Apply a layer of slightly darker white or light beige polish over the entire nail including over the tape.
Let this coat dry for 30 to 60 seconds but not completely. Then peel the tape strips off while the polish is still slightly tacky.
The areas under the tape will remain your original base color. The areas between the tape will be the slightly darker color, creating a banded effect.
This technique creates bandage lines with a clean, consistent edge that is very difficult to achieve freehand.
Add your black dot eyes with a toothpick over the finished bandage design.
Nail tape rolls are very affordable and a single roll is enough for dozens of manicures.
This method is ideal for nail art beginners who want clean results or for anyone doing mummy nails for the first time.
17. Mummy Nails with Spider Web Detail
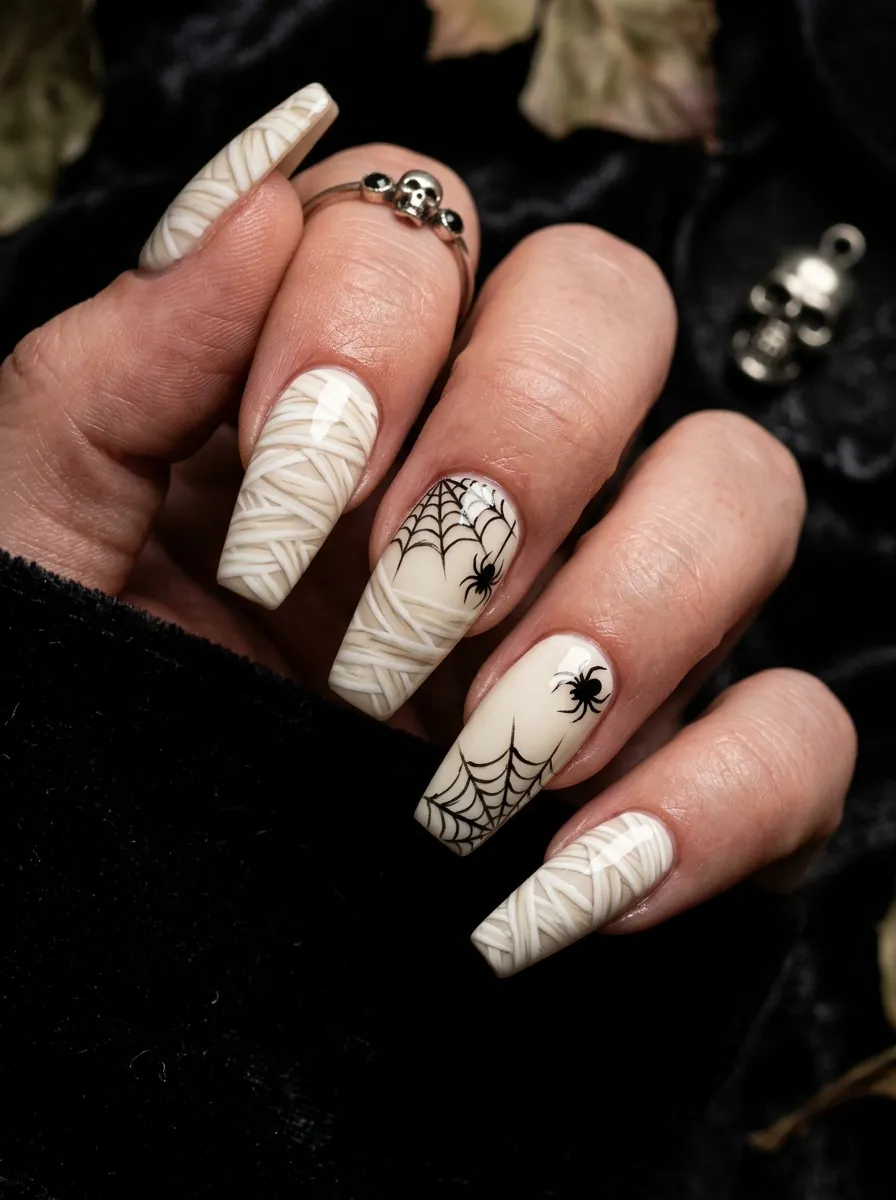 Combining mummy bandage art with a spider web detail brings two classic Halloween nail motifs together in one design.
The spider web adds a dark, slightly gothic element that complements the dusty, ancient quality of mummy nail art.
Complete your standard white bandage mummy design on all nails.
On one or two accent nails, use a very thin detail brush or a fan brush and black polish to add a spider web in one corner of the nail.
To paint a simple spider web, draw a small dot in the corner. From that dot, draw several thin straight lines radiating outward like the spokes of a wheel.
Then connect the spokes with curved connecting lines working from the center dot outward in progressively larger arcs.
Add a tiny black spider somewhere on the web or hanging off one of the spokes. A small oval body with four lines on each side for legs is all you need.
The contrast between the cream and white mummy bandages and the sharp black spider web creates a strong visual interest.
Use a matte top coat on the web accent nail and a glossy coat on the bandage nails for a subtle finish difference that adds depth.
This combined design takes a little more time but the result is one of the most detailed and impressive Halloween nail looks in this guide.
18. Mummy Nails on Short Natural Nails
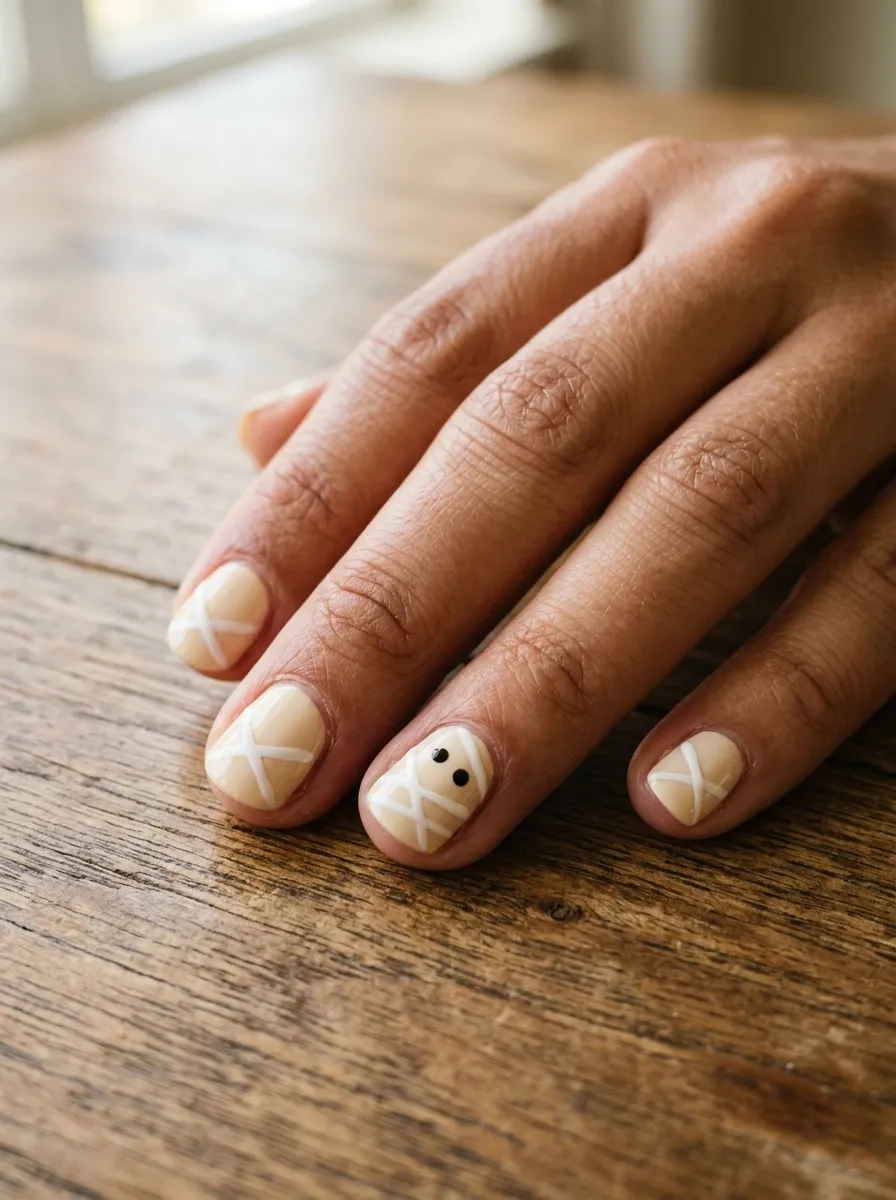 Short nails are just as capable of carrying a mummy design as long ones.
The key with short nails is simplification. You have a smaller surface area, so a few well-placed lines and a pair of eyes is more effective than trying to crowd on too much detail.
Paint a cream or off-white base on short nails.
Draw just two or three crossing lines across the nail. On a short nail, two lines in an X formation with one additional line is enough to suggest bandage wrapping without overcrowding the surface.
Add two tiny black dot eyes on one accent nail, as close together as possible given the limited space.
The miniature scale of the mummy eyes on short nails is actually quite charming.
Use a very thin striping brush rather than a standard nail art brush. The thinner the brush, the easier it is to work on a small surface without the lines looking too heavy.
Finish with a matte top coat to add texture interest to the simple design.
Short mummy nails are not a compromise. They are a genuinely cute and wearable version of the trend that requires less product, less time, and less skill than longer nail versions.
They also tend to wear better because short nails are less prone to chipping and breaking.
19. Mummy Nails with Stamping Plates
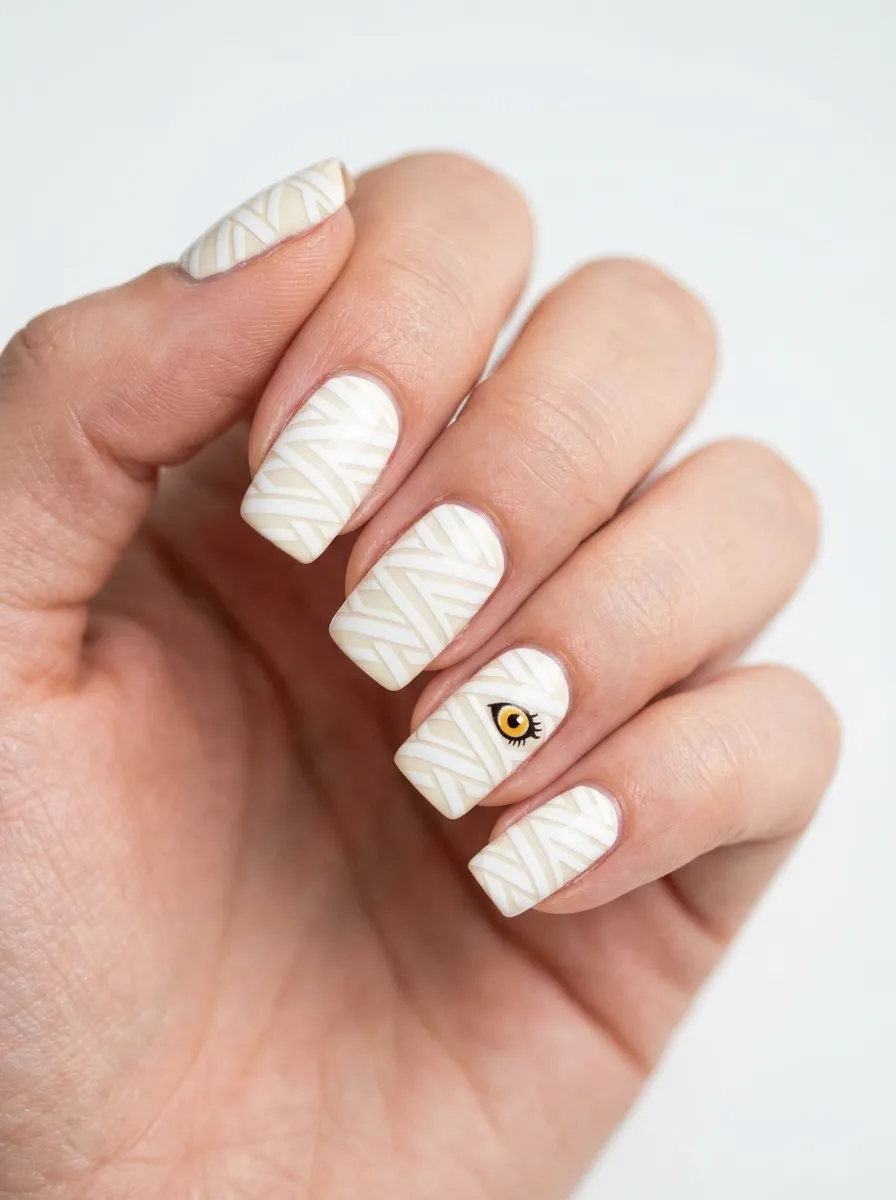 Nail stamping is a technique that uses an engraved metal plate and a special stamping tool to transfer detailed patterns onto nails with a single press.
Halloween-themed stamping plates including bandage wrapping and mummy face patterns are widely available at beauty supply stores and online.
Apply your cream or white base and let it dry fully.
Apply white or off-white stamping polish over the relevant design on the stamping plate.
Scrape off the excess polish with a stamping scraper in one quick motion.
Press your stamping tool over the design and roll it onto the plate to pick up the pattern.
Then roll the stamping tool firmly over your nail in one motion to transfer the design.
The result is a perfectly even, detailed bandage pattern applied in seconds.
This technique is particularly useful for people who struggle with freehand painting because it delivers consistent, salon-quality results on every nail.
Stamping polish is different from regular polish because it is more opaque and thicker, designed to transfer cleanly. Do not substitute regular polish as it will not stamp correctly.
Look for Halloween-specific nail stamping plate sets that include mummy, ghost, bat, and spider designs for a range of seasonal options beyond just mummy art.
Stamping plates are affordable and a single plate contains enough designs for multiple different nail looks.
20. Mummy Nails with Tiny Pumpkin Accents
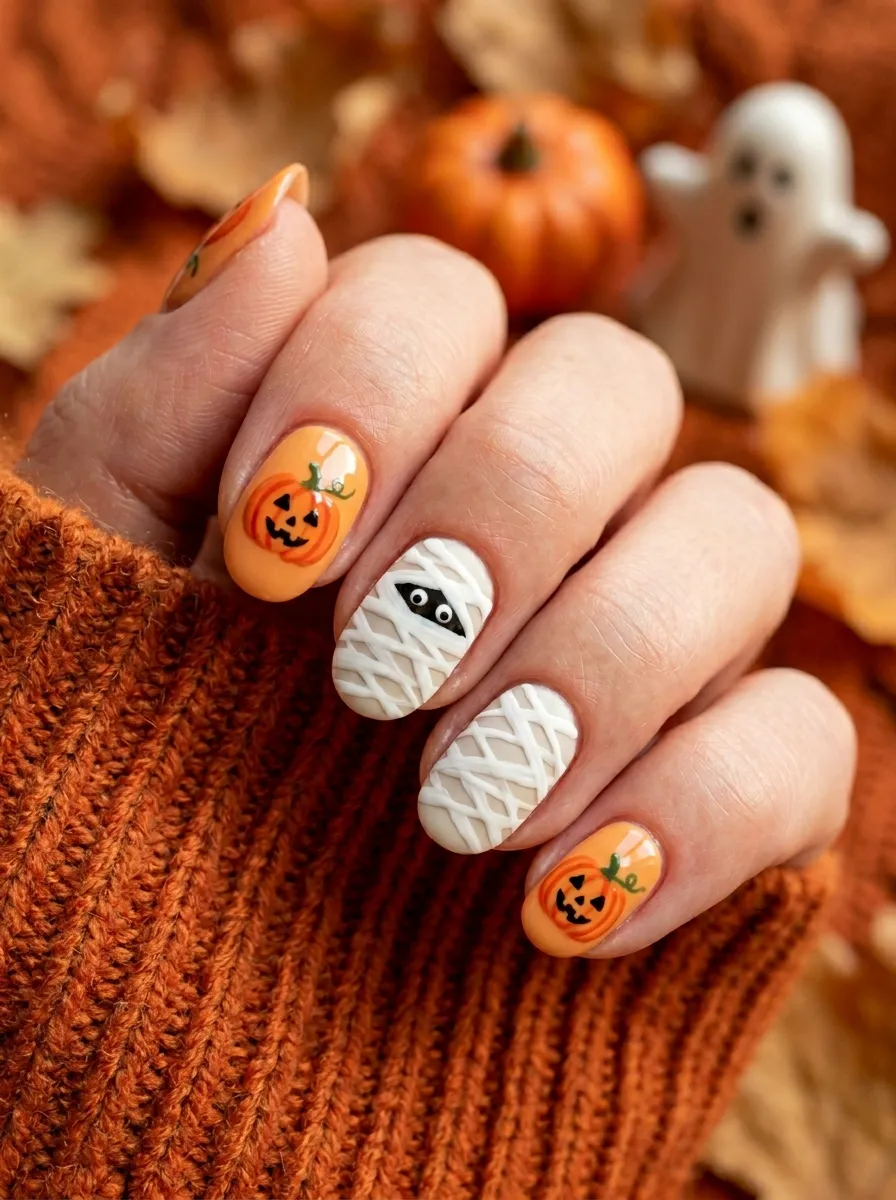 Adding tiny pumpkin details to a mummy nail set creates one of the most festive and seasonal nail combinations possible.
The orange pumpkin and white bandage mummy combination covers both classic Halloween color families in one manicure.
Complete your bandage mummy design on three nails per hand.
On the remaining two nails per hand, paint an orange base with two coats of pumpkin orange polish.
Once dry, use a thin black brush or toothpick to draw a simple jack-o-lantern face. Two triangle eyes, a triangle nose, and a jagged mouth is all it takes.
Add a small green rectangular stem at the top of the nail with a tiny green curl for a pumpkin vine.
The pumpkin design does not need to be elaborate to be effective. Simple cartoon-style pumpkins are charming and much easier to paint than realistic ones.
Seal all nails with a glossy top coat to make the orange nails look vibrant and the cream bandage nails look clean.
This combination is one of the most popular Halloween nail sets on social media because it photographs so well and suits a wide range of ages and personal styles.
It is also entirely achievable at home for any skill level because both the pumpkin and the mummy designs rely on simple shapes.
21. Mummy Nails with Ombre Base
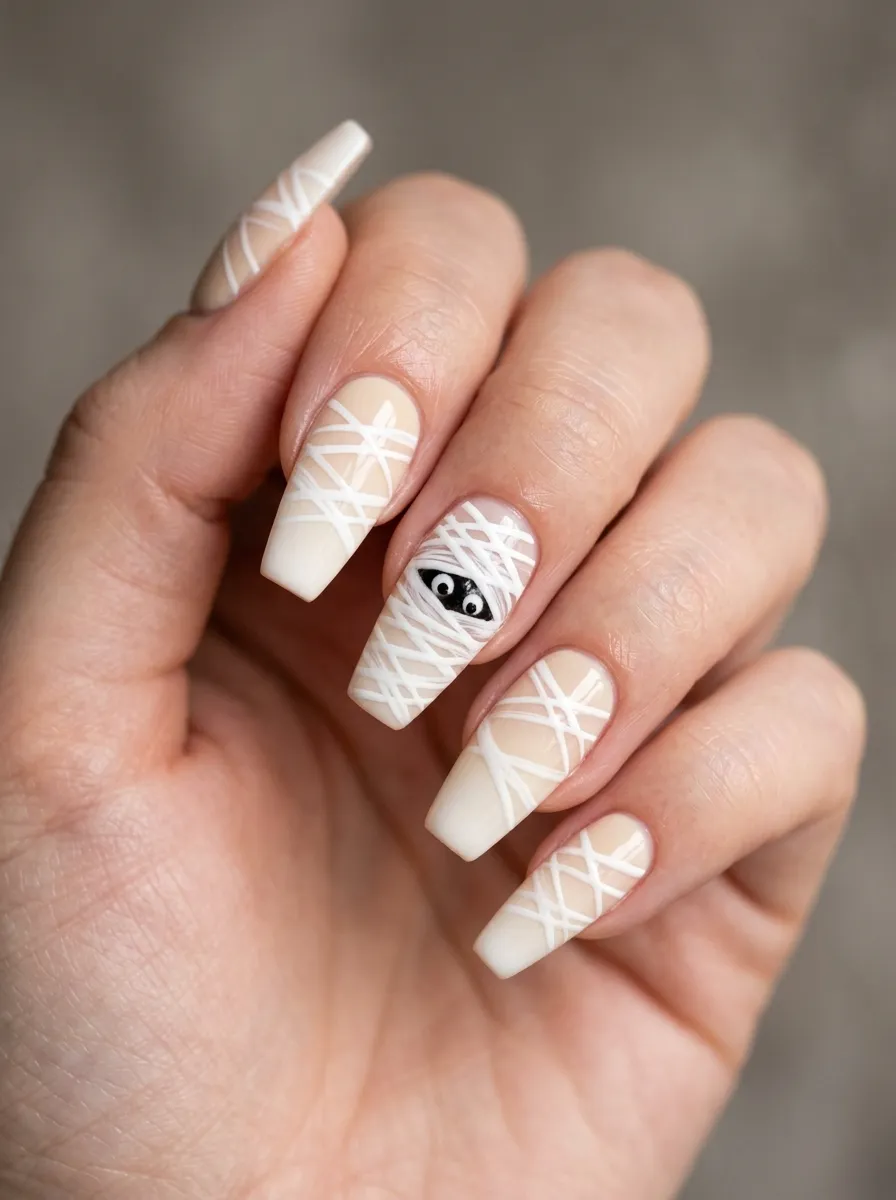 An ombre base beneath the mummy bandage lines adds dimension and depth that makes the overall design look more complex and polished.
A cream to white gradient is the most natural-looking base for mummy nails because it resembles the uneven tone of aged bandage fabric.
To create the ombre base, apply cream polish to the lower half of the nail and white polish to the upper half. While both are still wet, blend the join with a makeup sponge by dabbing gently at the meeting point.
Let the ombre base dry fully, then apply your white bandage crossing lines over the gradient.
The crossing lines over a slightly varied background look more textured and dimensional than lines over a flat single-color base.
The natural variation in the ombre actually makes the bandage lines look like they are sitting in different layers at different depths, which adds to the realistic wrapped effect.
Add your tiny black eyes on one accent nail.
Seal with a matte top coat for a fabric-like finish that suits the ombre background.
This technique does require slightly more time than a flat base but the tools you need are nothing beyond what you likely already own.
An inexpensive makeup sponge is the only additional tool needed to create a smooth gradient for this design.
22. Mummy Nails with Galaxy Background
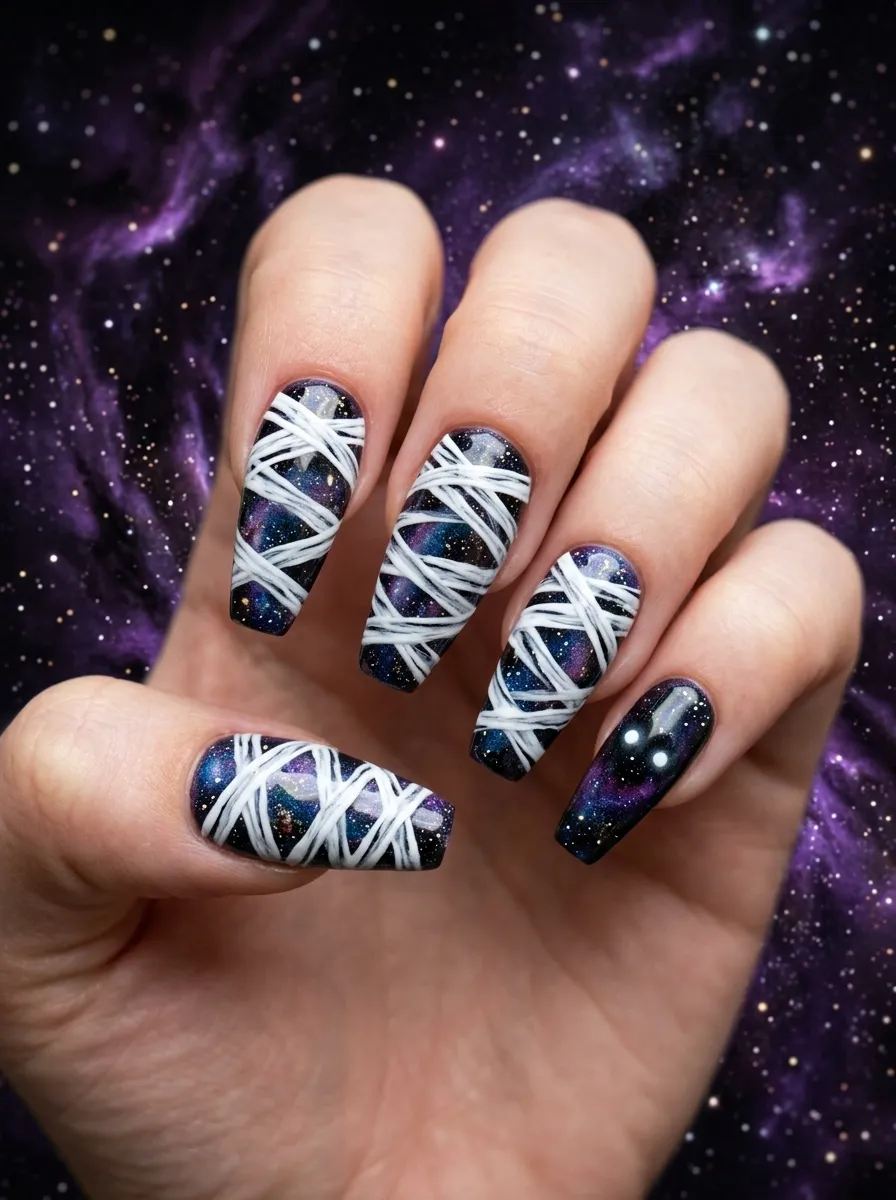 Placing mummy nail art over a galaxy background creates a surreal, other-worldly design that is unlike any conventional Halloween nail look.
The idea is that this mummy belongs to outer space rather than an ancient tomb.
To create the galaxy base, apply a black or very dark navy base first.
While the base is still wet, use a small makeup sponge to dab on sections of deep purple, dark teal, and dark blue polish in random cloud-like areas.
Add tiny white dots using a toothpick across the dark sections to suggest stars.
Let the galaxy base dry completely.
Then apply your white bandage crossing lines over the galaxy. The white lines will contrast sharply against the dark background.
The bandage lines over a galaxy base look like they are floating in space, which is genuinely striking.
Add white dot eyes on an accent nail. Against the dark galaxy background, plain white eyes have a glowing quality that suits the cosmic concept.
Seal with a high-gloss top coat to give the galaxy depths a deep, shiny quality that looks like actual space imagery.
Finish the galaxy base with a touch of iridescent nail powder pressed over the dried surface before applying the bandage lines for a holographic star effect.
23. Mummy Nails with Ghost Accent Nails
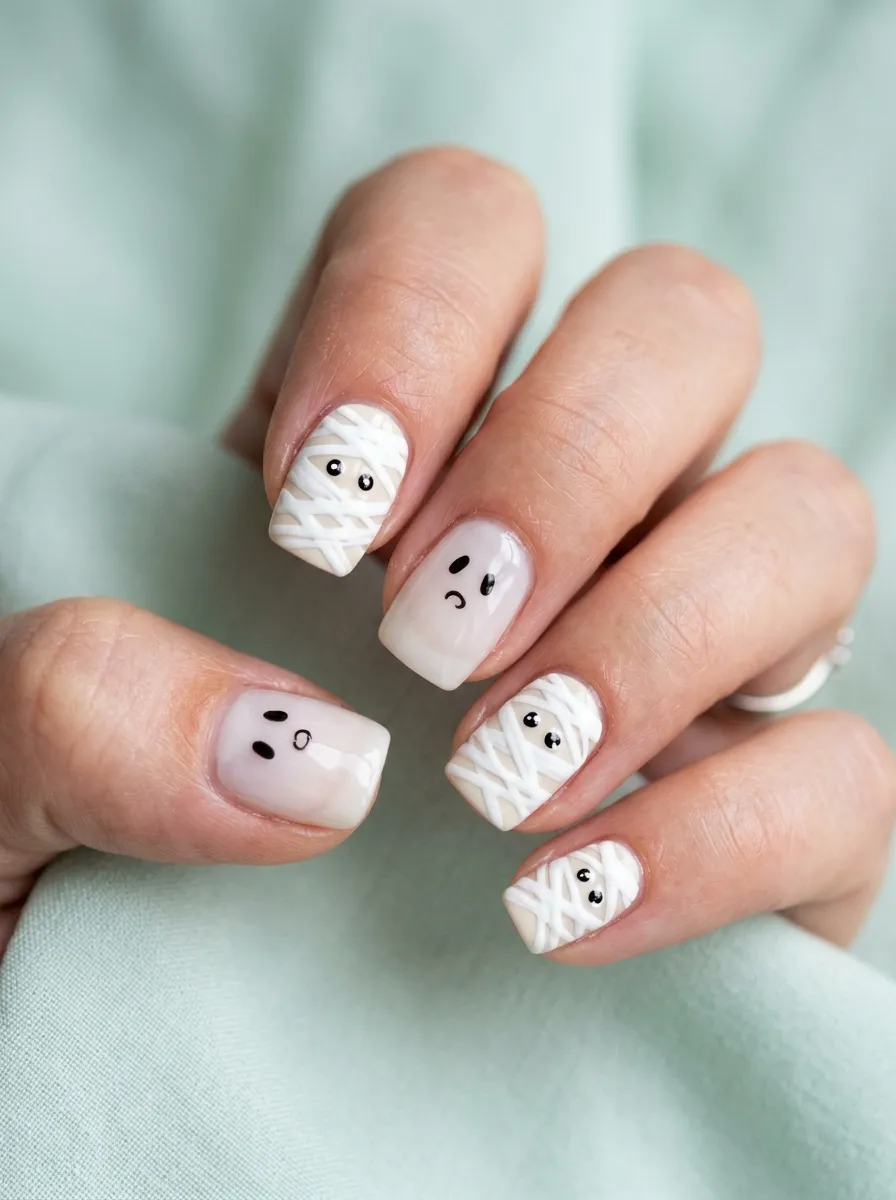
Mummy nails and ghost nails are natural companions in the Halloween nail universe.
Both use a white and cream color palette and both belong to the same family of friendly, classic Halloween imagery.
Complete your standard bandage mummy design on three nails per hand.
On the remaining two accent nails, paint a sheer white or milky white base.
Once dry, use a thin black brush or toothpick to draw a simple ghost face. A simple oval shape for the body, two small oval black eyes, and a small open oval mouth is all you need.
Leave the base of the ghost shape open or add two small curved lines at the bottom like a sheet trailing off the finger.
The ghost accent nails and the mummy nails look like they belong to the same set because of the shared white palette.
A small detail that ties the two designs together beautifully is adding a tiny ghost face to the mummy’s bandage design on one nail, as though the ghost is peeking through the bandages.
Seal all nails with a glossy top coat.
This combination is one of the most beloved Halloween nail sets among beginners because both designs are simple to execute and the result always looks cheerful, seasonal, and complete.
24. Mummy Nails with Black Widow Spider Accent
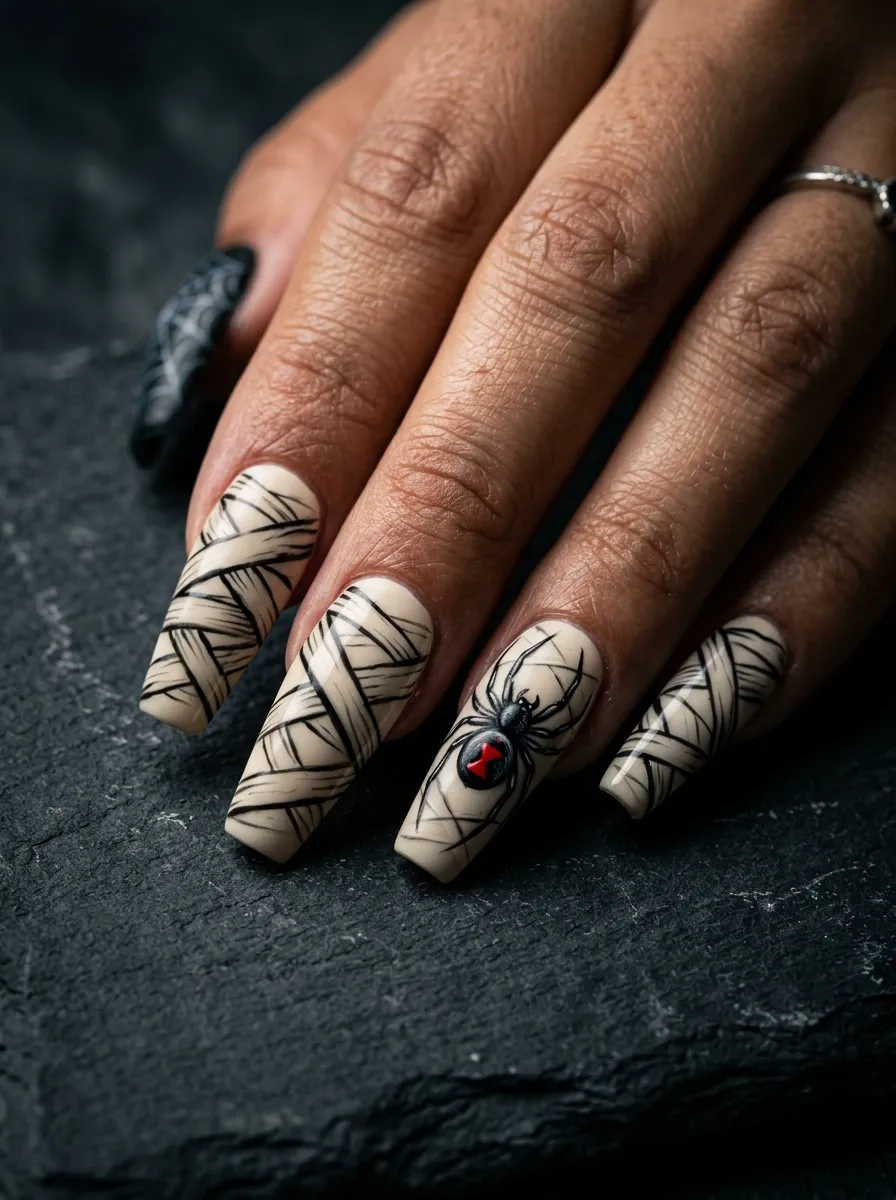
A black widow spider accent takes mummy nails into more dramatic, dark territory.
The detail of the black widow, specifically its signature red hourglass marking on a black body, is a tiny but instantly recognizable detail that makes the accent nail look genuinely impressive.
Complete your white bandage mummy design on all nails except one accent nail per hand.
On the accent nail, apply black polish as the base.
Once dry, use a thin detail brush to paint a black spider body in the center of the nail. An oval for the abdomen and a smaller oval above it for the thorax.
Add eight thin legs extending outward from the thorax, four on each side with slight bends at the joints.
Using a red polish and a very thin brush or toothpick, add the distinctive hourglass shape on the spider’s abdomen. Two small triangles pointing toward each other with a thin line connecting them.
This single red detail is what makes the spider recognizable as a black widow rather than a generic spider.
Seal the accent nail with a glossy top coat and the mummy nails with a matte top coat for a finish contrast that makes both designs stand out.
This is one of the most technically detailed designs in this guide but the impact is absolutely worth the effort.
25. Mummy Nails with Skeleton Hand Design
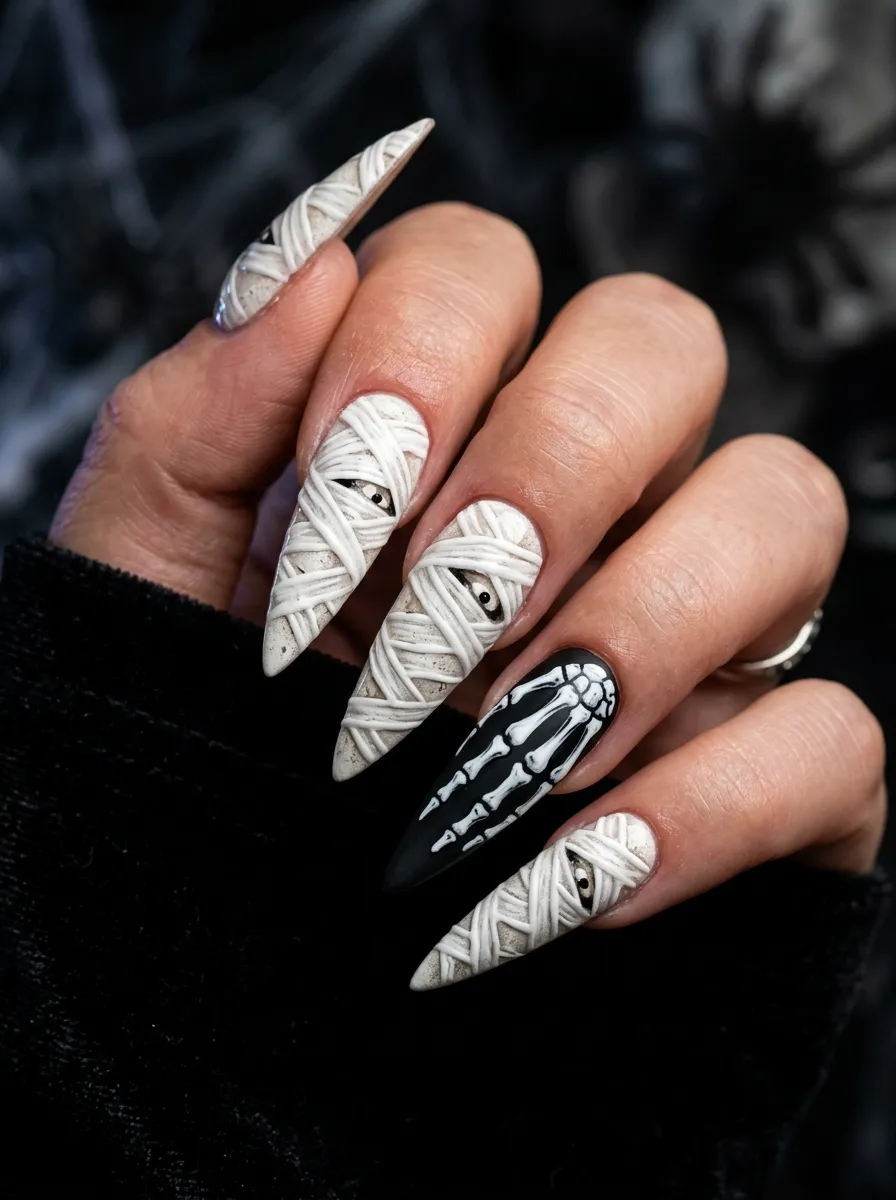
A skeleton hand-painted across an accent nail alongside your mummy bandage designs creates a strong, graphic Halloween manicure.
The skeleton design on the accent nail looks like a skeletal hand grasping at the nail tip from beneath.
Complete your standard mummy bandage design on most nails.
On one accent nail, paint a black base.
Using a thin white brush, paint a simple skeletal hand on the black surface. Start with the wrist bones at the cuticle end and paint upward toward the tip.
Add four to five elongated finger bones extending toward the tip, each one made of two oval segments with a small joint line between them.
Add small dot knuckles at the joints for detail.
The skeleton hand does not need anatomical accuracy to look effective. A simplified, stylized version works perfectly in this context.
The contrast between the cream mummy bandage nails and the black and white skeleton accent nail creates a compelling visual balance.
For long stiletto nails, the skeleton fingers can be painted to align with the actual shape of the nail, making the pointed nail tip look like a skeletal fingertip.
Seal with a high-gloss top coat on the skeleton nail and a matte coat on the mummy nails for a finish contrast.
Mummy nails prove that Halloween nail art does not have to be complicated, expensive, or limited to one specific look. Across these 25 ideas, you have designs that work on every nail length, every skill level, and every budget. You can recreate most of these looks with a cream base, a thin striping brush, a toothpick for eyes, and a top coat, all of which cost just a few dollars at any drugstore. The messy, imperfect quality of bandage lines means that even beginners produce results that look intentional and cool. Start with the classic white bandage design to get comfortable with the technique, then add your own twist with a dark base, a glitter accent, rhinestone eyes, or a spider web detail in subsequent sessions. Halloween only comes once a year but a great seasonal manicure is one of the easiest and most enjoyable ways to fully commit to the spirit of the season. Pick your favorite design from this list, gather your supplies, and give yourself an hour to create something genuinely wicked.