1. Pale Blue Base With White Lace Tips
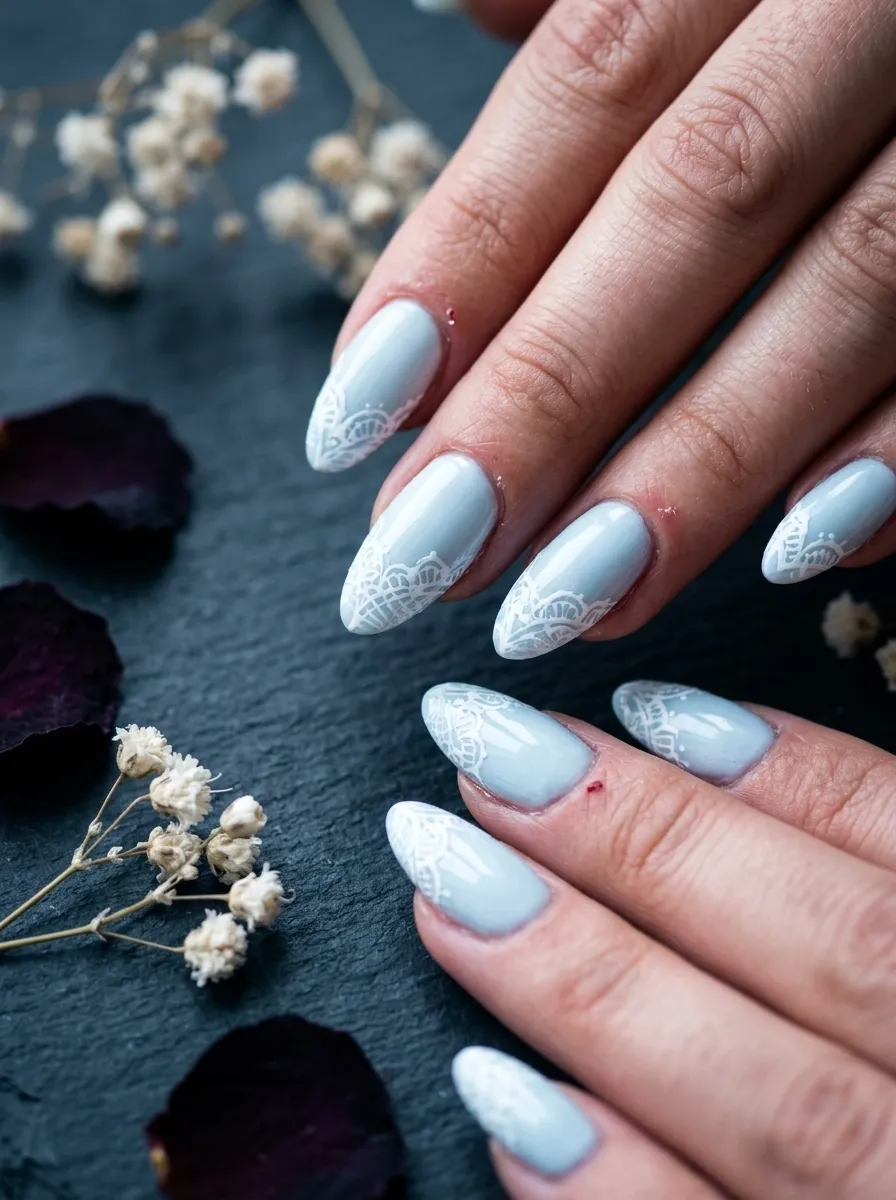
This is the most classic Corpse Bride nail look you can do. Start with a soft, dusty blue base. Think pale sky meets ash, not bright or neon. Let it dry fully before adding anything on top.
Once the base is dry, use a thin nail art brush or a striping brush dipped in white polish. Draw small curved lines near the tip of each nail to mimic lace edging. You do not need to be perfect. Lace is naturally irregular, so slight wobbles actually help.
Add tiny dots between the curved lines for extra detail. You can also use a dotting tool dipped in white to create a simple floral pattern within the lace border.
This look costs almost nothing if you already have blue and white polish. A nail art brush set from a beauty supply or dollar store works perfectly. Finish with a glossy top coat to seal everything. A matte top coat also looks amazing on this design and gives it a more eerie, ghostly feel. The whole look takes about 20 minutes after your base dries.
2. Coffin Nails in Dusty Lavender and Gray
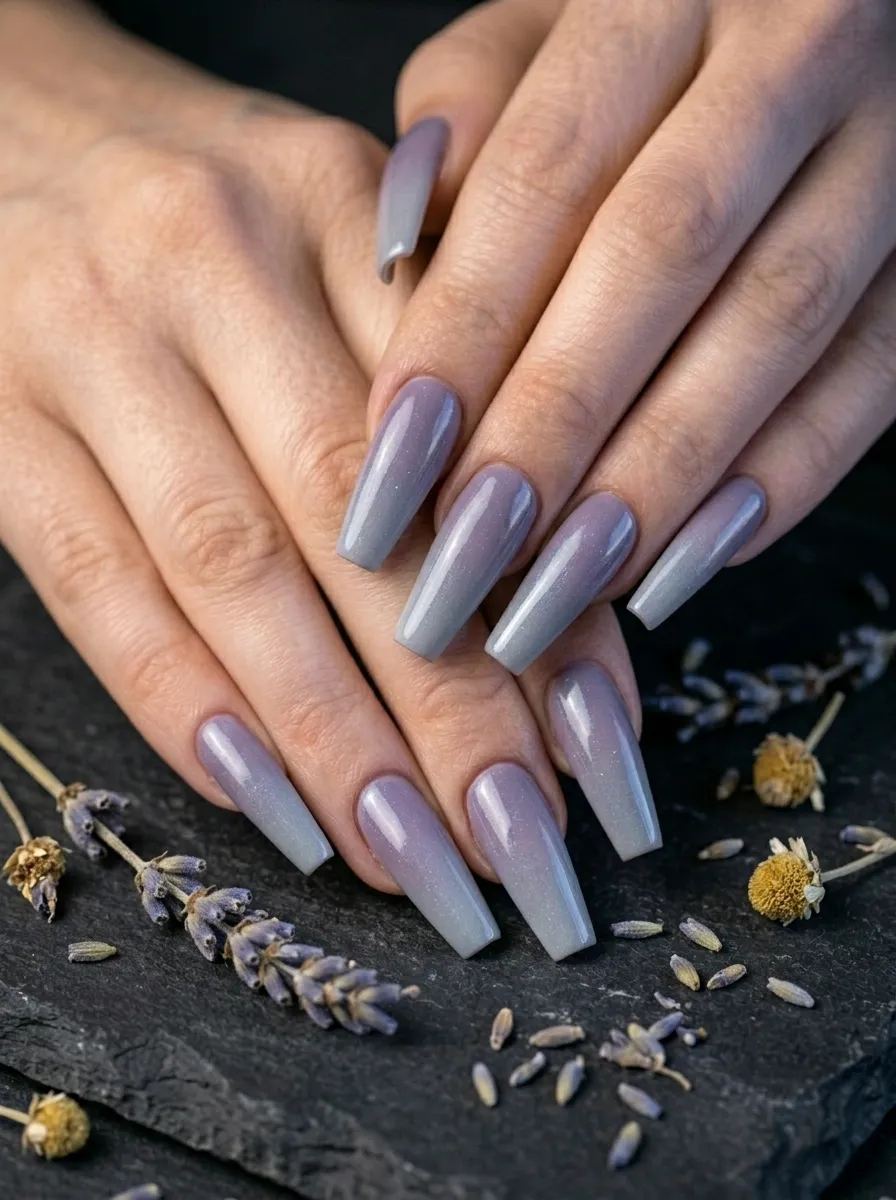
Coffin nails have that instantly dramatic look that fits the Corpse Bride world perfectly. The shape alone tells a story before you even add art.
For this design, choose a dusty lavender as your base. Not bright purple. Go for something that looks like it has been left out in the cold. A gray-lavender or smoky lilac works best.
Apply two coats for full coverage. While it is still slightly tacky, you can use a sponge to press a deeper gray at the base and tip for a soft, muddy gradient effect.
This is a budget-friendly technique. Cut a small piece of makeup sponge, dab it in darker polish, and press lightly. The texture of the sponge creates a soft gradient without special tools.
You can leave these plain for a minimalist gothic look, or add a single white butterfly stamp using a nail stamping plate. Stamping kits cost around $5 to $10 at beauty stores or online. Finish with a matte top coat. The dusty finish makes the whole look feel vintage and whimsical at the same time.
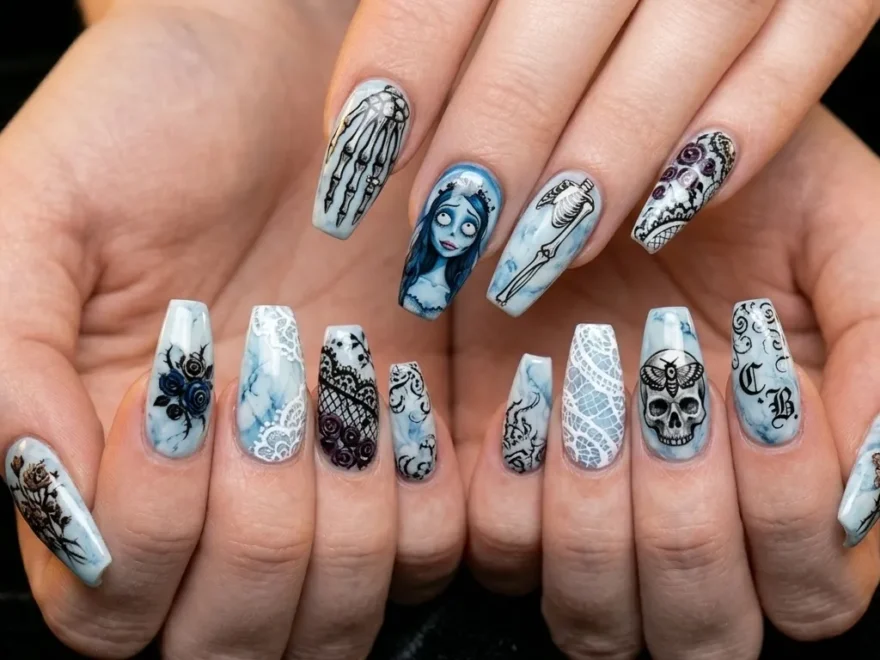
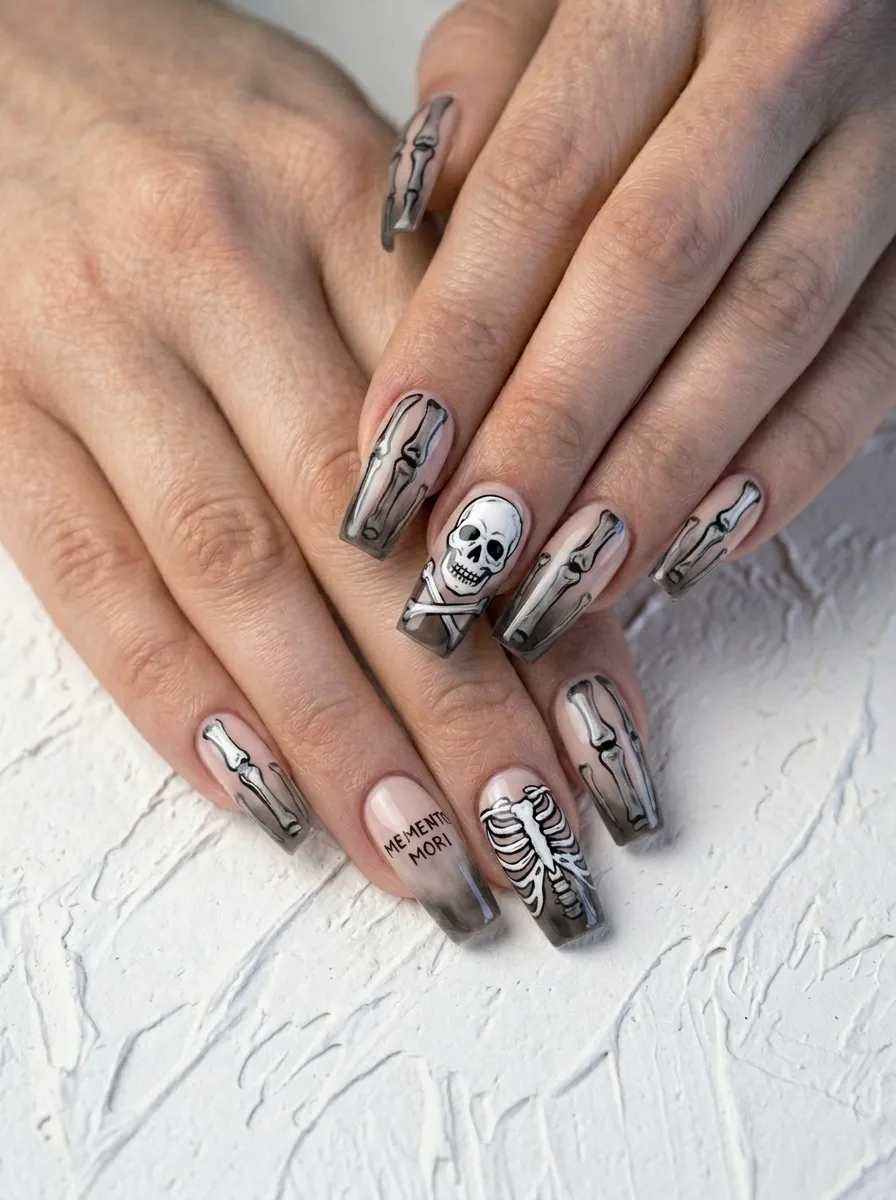
3. Skeleton Hand Accent Nail
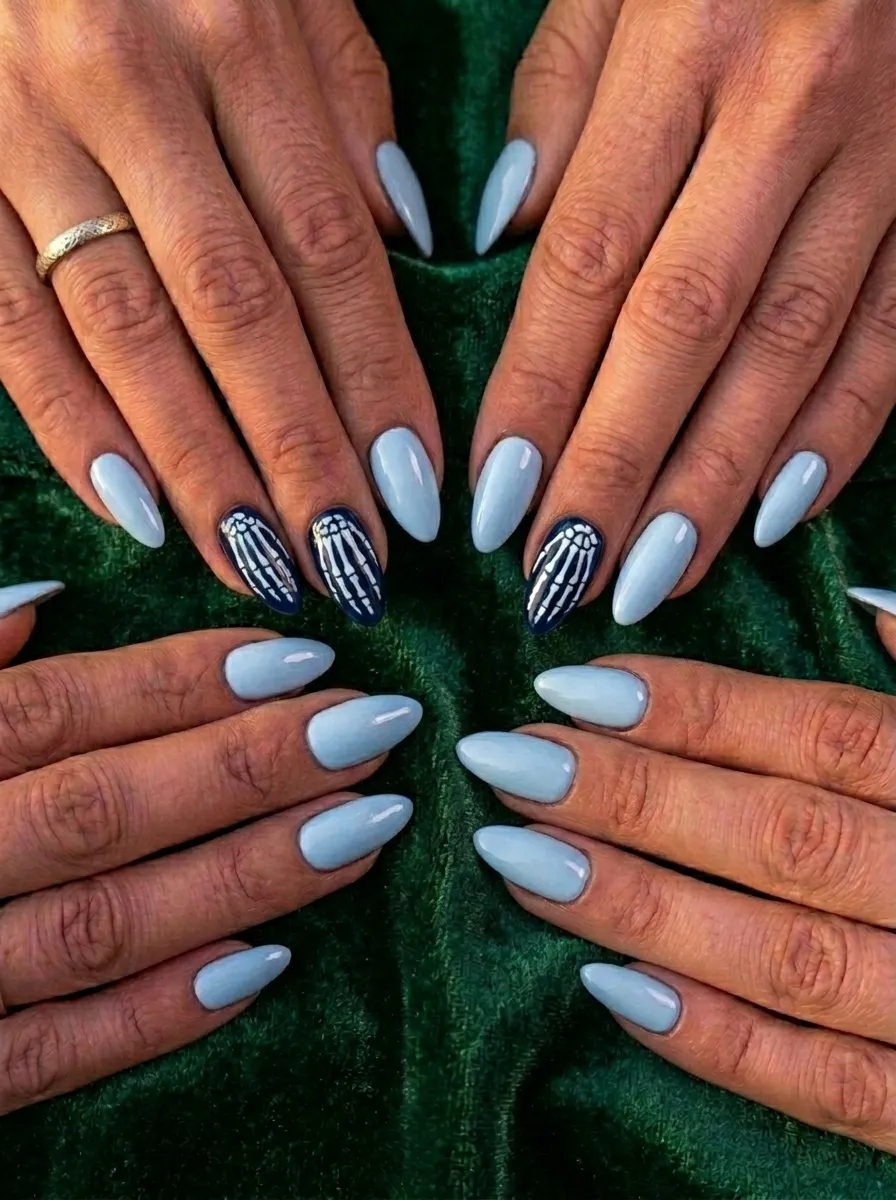
One accent nail can do all the heavy lifting. You do not need detailed art on every single finger.
Pick one nail, usually the ring finger, for your skeleton hand detail. Keep all other nails in a flat pale blue or white. This makes the accent nail pop without overwhelming the whole look.
For the skeleton hand, use a fine striping brush and white nail polish. Paint thin vertical lines for the bones of each finger. Add small oval shapes at the knuckle joints. A tiny curved shape at the base represents the wrist bone.
This sounds complex, but you are really just drawing simple shapes. The thinner your brush, the more convincing it looks.
If freehand feels too scary, skeleton nail stickers are sold in most beauty supply stores for under $3. Press one onto the nail, seal with top coat, and you are done.
The contrast between the detailed accent nail and the clean solid nails around it is what makes this idea feel so polished. It is simple to do and genuinely impressive to look at.
4. Icy White Nails With Blue Butterfly Foil
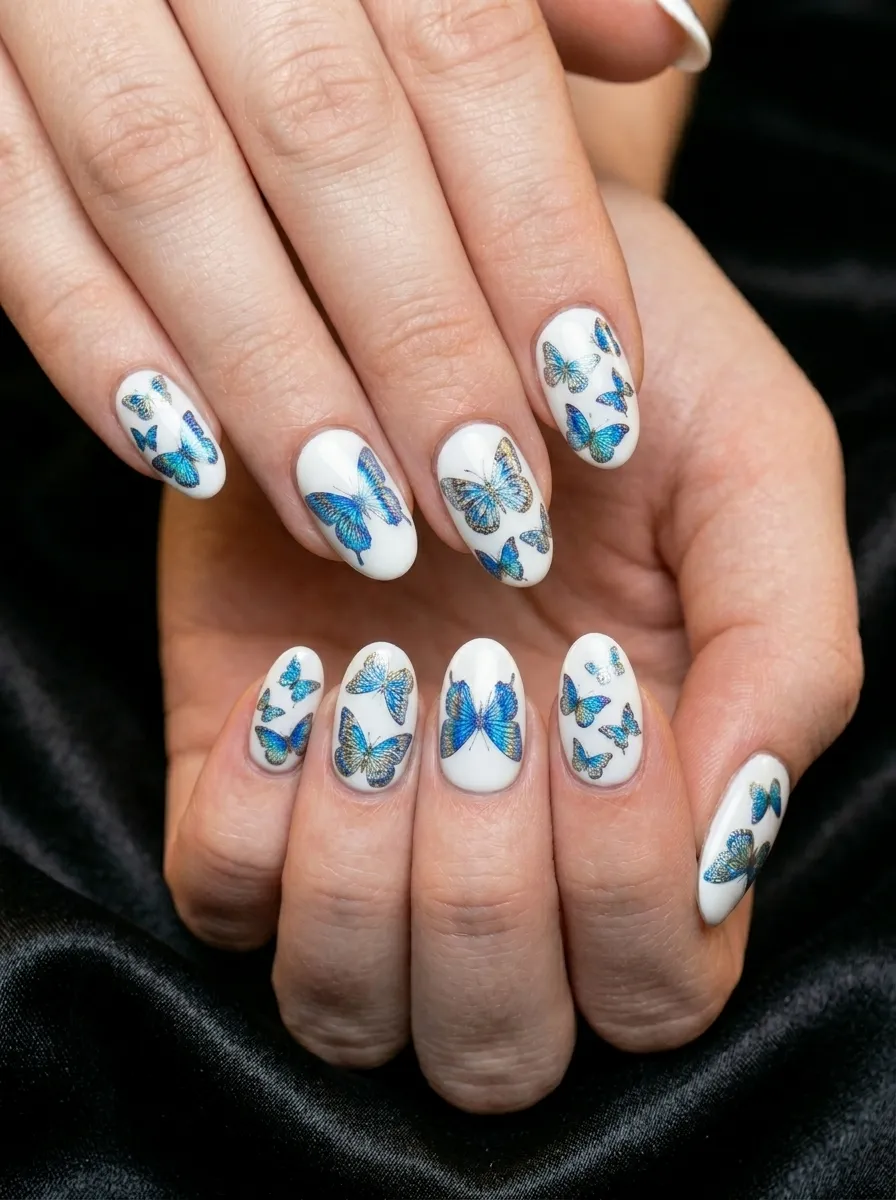
Butterflies are everywhere in Corpse Bride. Emily has one resting on her finger in iconic scenes. This design brings that magical detail to life.
Start with a pure white or off-white base. Two thin coats will give you a clean, even surface to work with.
While the polish is slightly tacky or after applying a special nail foil glue, press small butterfly-shaped foil pieces onto each nail. Blue iridescent foil works perfectly here. It catches the light in an almost supernatural way.
You can find nail foils in multipacks online for just a few dollars. They come in sheets you press and peel. No special tools needed.
Press the foil firmly, peel back slowly, and the metallic design transfers to your nail. Seal with a non-wipe gel top coat or a regular glossy top coat.
This look photographs beautifully. The iridescent foil shifts color depending on the light, going from icy blue to silver to almost white. It looks expensive and dreamy without costing much at all.
5. Midnight Blue Nails With Silver Crescent Moons
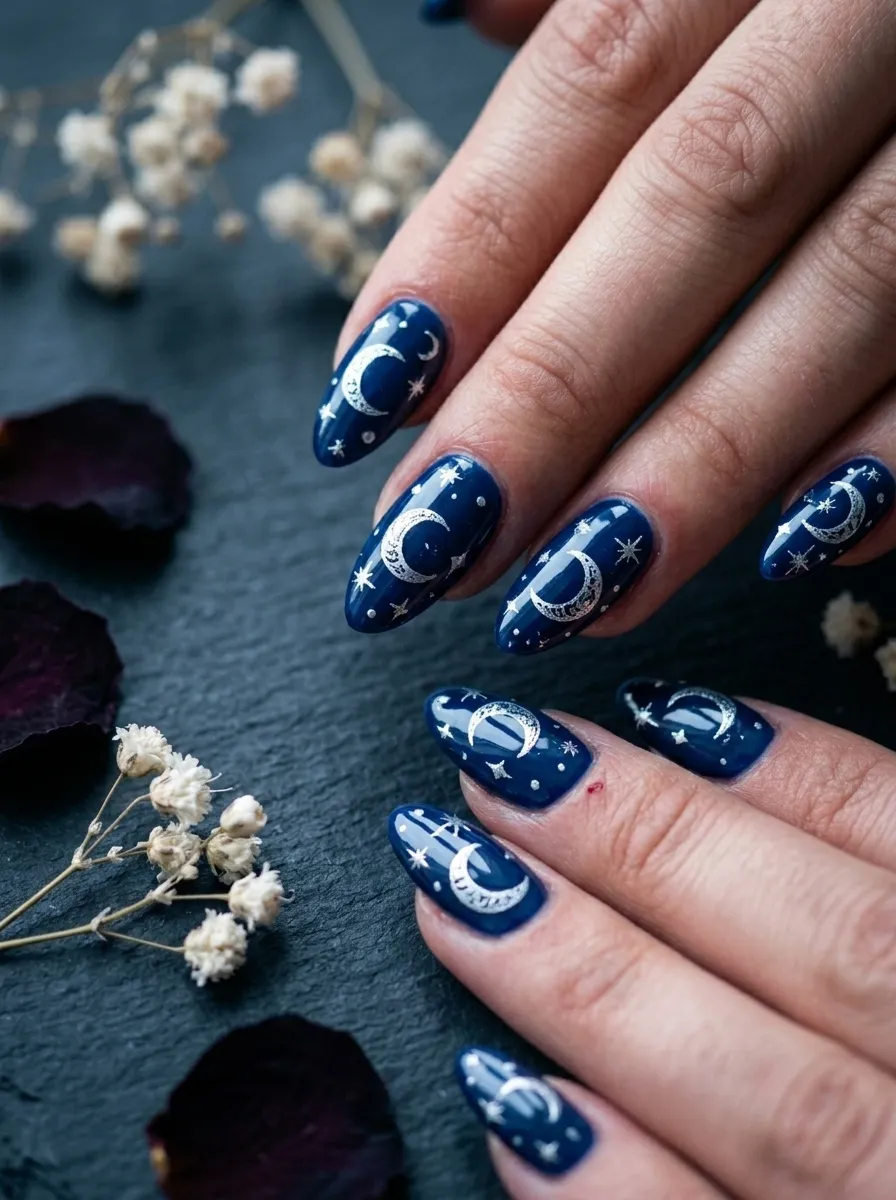
Dark blue nails with moon and star details feel pulled straight from the gothic sky in a Tim Burton world.
Choose a deep, true midnight blue. Not navy, not teal. Look for shades with names like “midnight,” “abyss,” or “after dark.” Apply two coats for full depth.
Once dry, use a small dotting tool or a toothpick dipped in silver nail polish to add crescent moon shapes. A crescent is just a curved C shape with a gentle second curve inside. Practice on paper first if needed.
Add tiny dots around each moon for stars. You can also use a silver stamping plate with a moon design if freehand feels challenging. Stamping plates with celestial designs are very affordable and reusable.
Silver on deep blue creates a beautiful contrast that feels gothic but also romantic. It suits both Halloween and everyday wear. Finish with a glossy top coat to make the silver really shine, or a matte top coat to keep things mysterious.
6. Cracked Porcelain Effect Nails
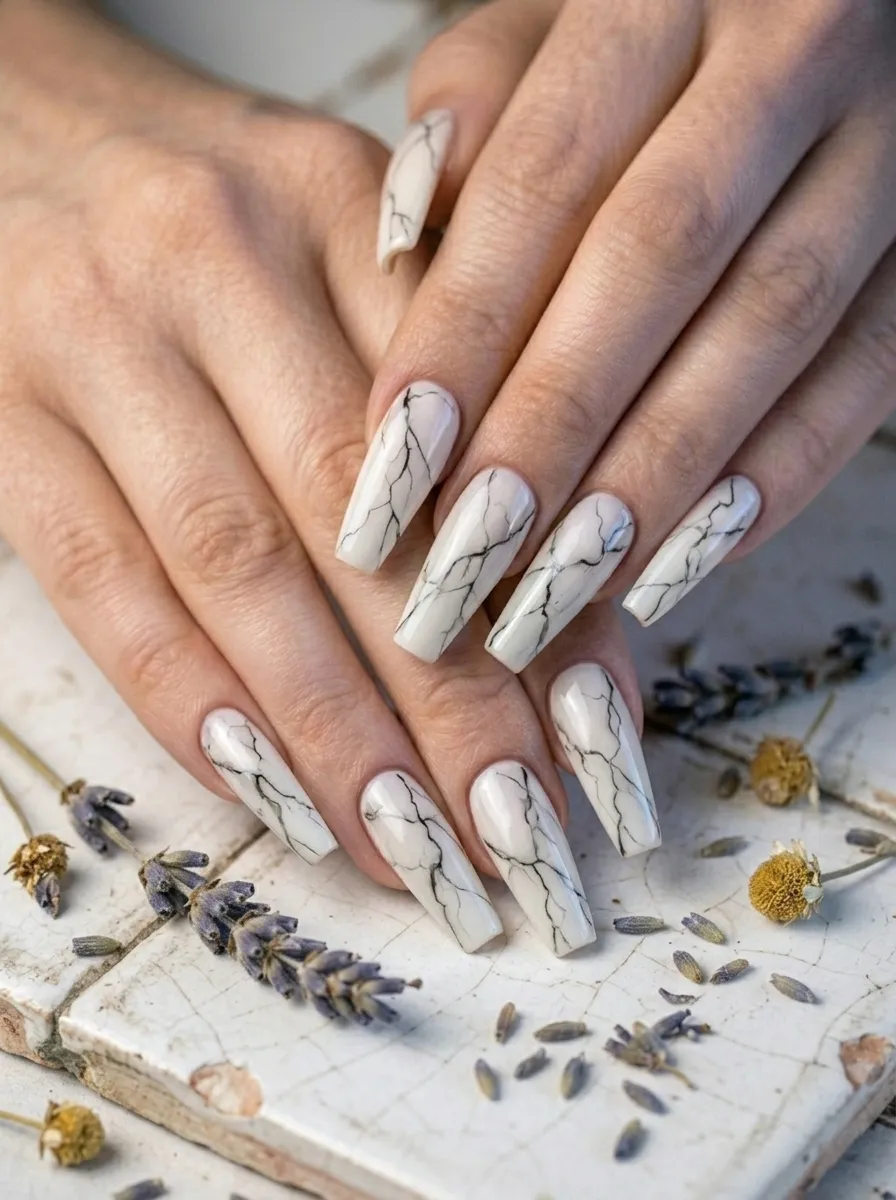
Emily in Corpse Bride looks like a beautiful broken doll, and this nail design captures that exact feeling.
Start with an ivory or pale cream base. This mimics aged porcelain. Apply two coats and let it dry completely.
Using a thin striping brush and gray or black polish, paint irregular cracked lines across each nail. Start with one main line that goes diagonally. Then branch off smaller, thinner lines from it, like actual cracks in china.
The key is making the cracks irregular. Real cracks do not follow straight paths. Let your hand move naturally without trying to control it too much.
For a more dramatic version, fill the crack lines with dark navy or deep black. Add a drop of blue-tinted polish near the crack centers to suggest depth.
This is a conversation-starter design. People will ask how you did it. And the answer is honestly just a striping brush and some patience. Seal with a glossy top coat to make it look like shiny ceramic.
7. Blue Ombre Nails Fading Into Black
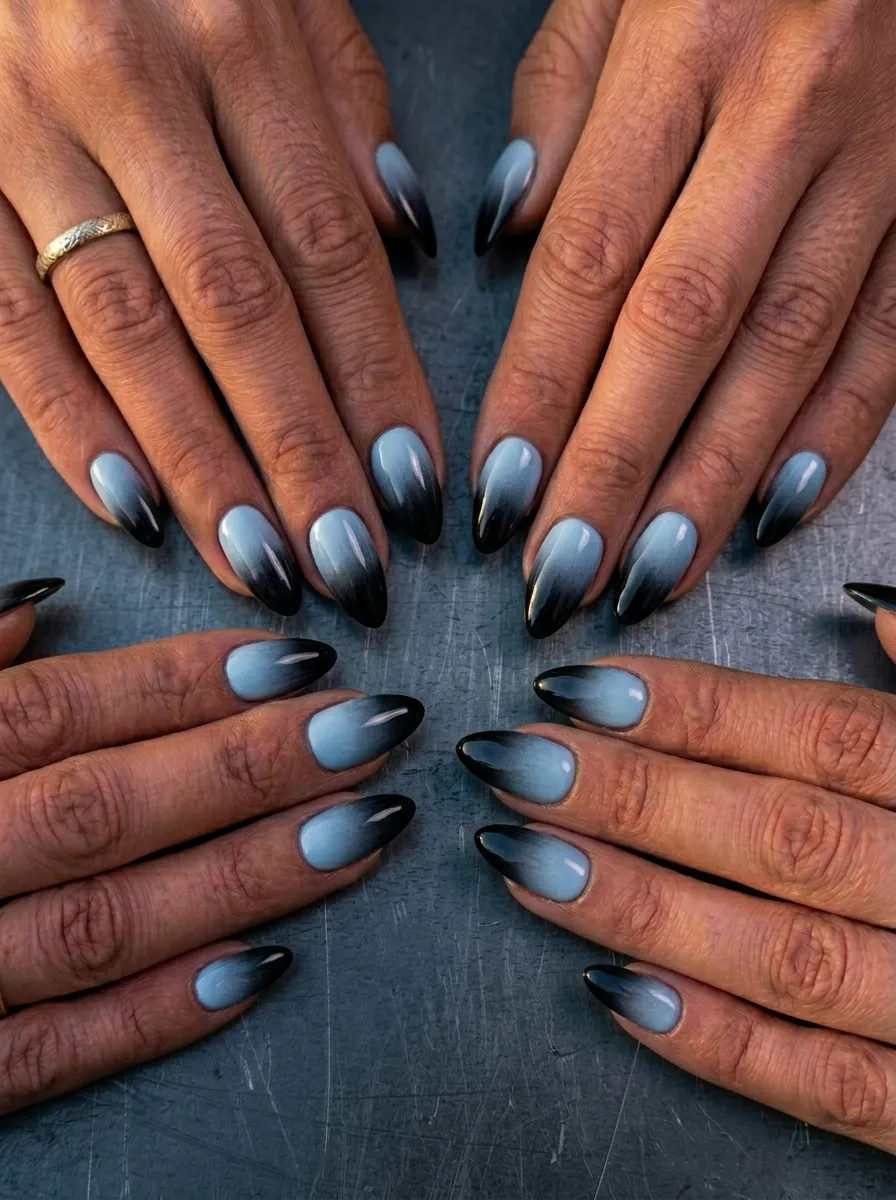
Ombre nail art looks stunning and is easier to do than it seems. This blue-to-black gradient captures the cold, shadowy world of the Corpse Bride perfectly.
You need two polishes: a pale icy blue and a pure black. You also need a small makeup sponge, which you can cut from any cheap cosmetic wedge.
Paint the full nail pale blue first. Let it dry. Then paint both colors side by side on the sponge, with a slight overlap in the middle. Dab the sponge onto the nail, pressing from tip to mid-nail. Reapply polish to the sponge and repeat until the gradient looks smooth.
Clean up the skin around the nail with a cotton swab dipped in acetone.
This technique rewards repetition. The more you dab, the smoother the blend. It is a beginner-friendly method that looks professionally done.
Seal with a glossy top coat. This ombre looks especially good on longer nails where the full color transition has room to breathe.
8. White Lace Full-Nail Design
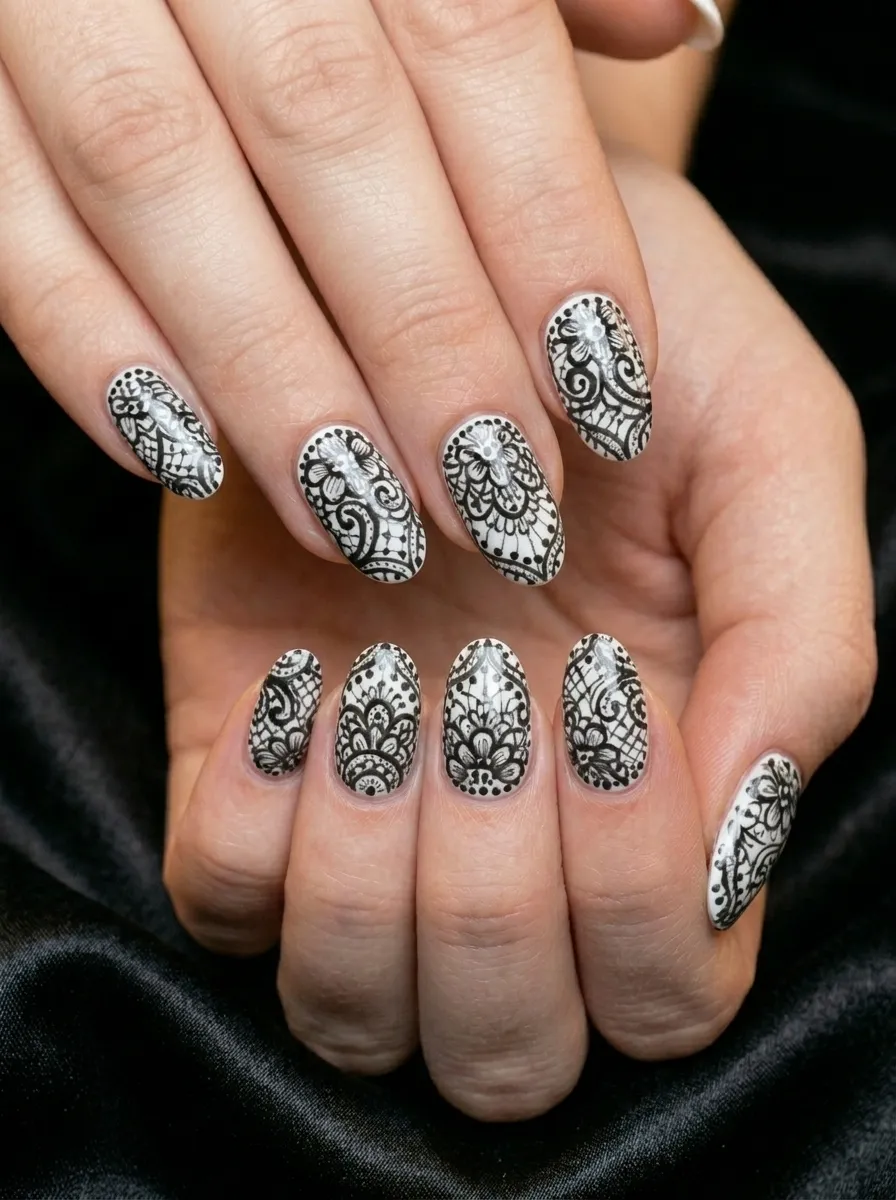
Full lace nail art sounds difficult, but when you break it down into simple repeated patterns, it becomes very manageable.
Start with a solid white base. Let it dry for at least five minutes.
Use a thin nail art brush dipped in pale gray or light silver to draw the lace. Start with small curves along the sides of the nail. Add tiny circular flower shapes in the center. Connect them with thin curved lines.
Lace patterns repeat, so once you draw one section, mirror it on the other side. The repetition makes the design look intentional even if your lines are not perfectly even.
For an easier version, use white lace nail stickers. They come in sheets and can be pressed directly onto a nude or pale blue base for an instant Corpse Bride look.
Real brides wear lace. So does Emily. The difference is she wears it with decomposing elegance. These nails capture that same romantic but haunting energy. Finish with a matte top coat to make the lace look like real fabric.
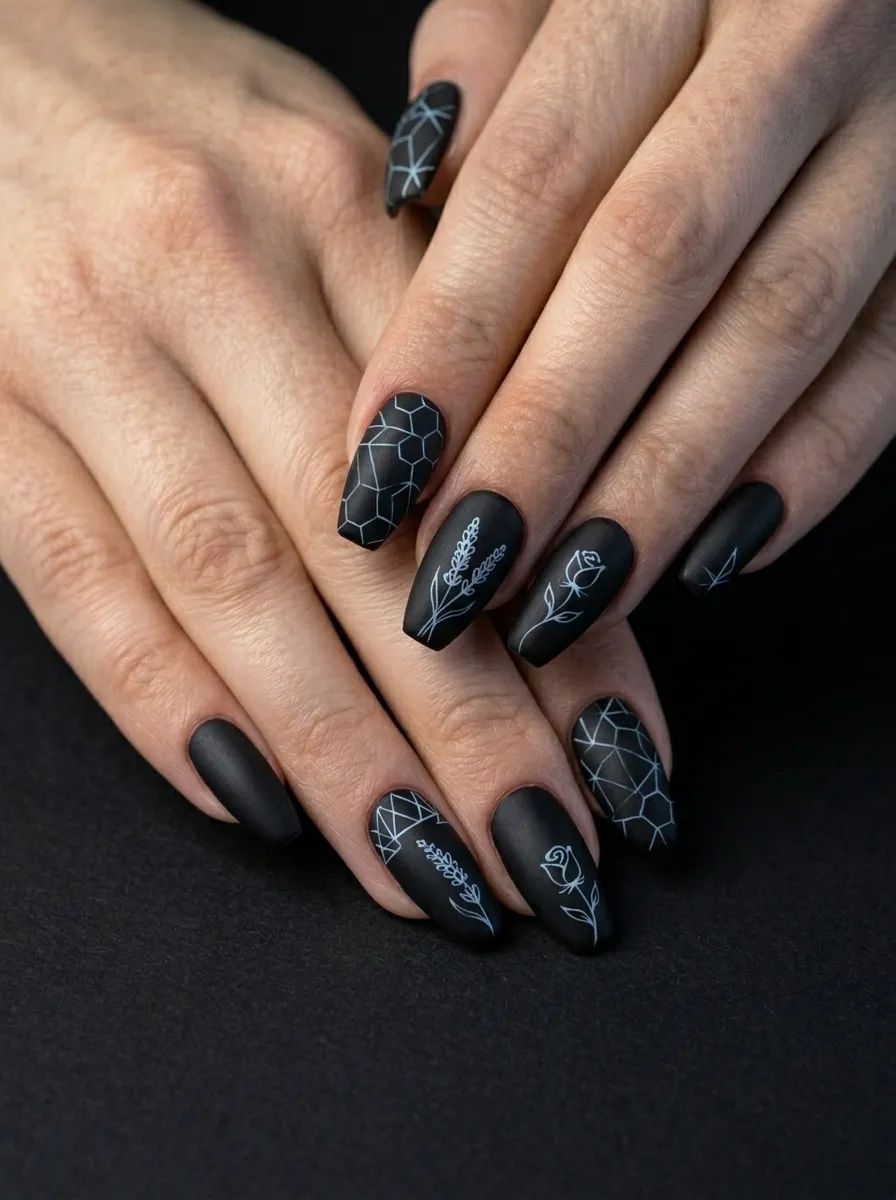
9. Tiny Blue Rose Details on Nude Base
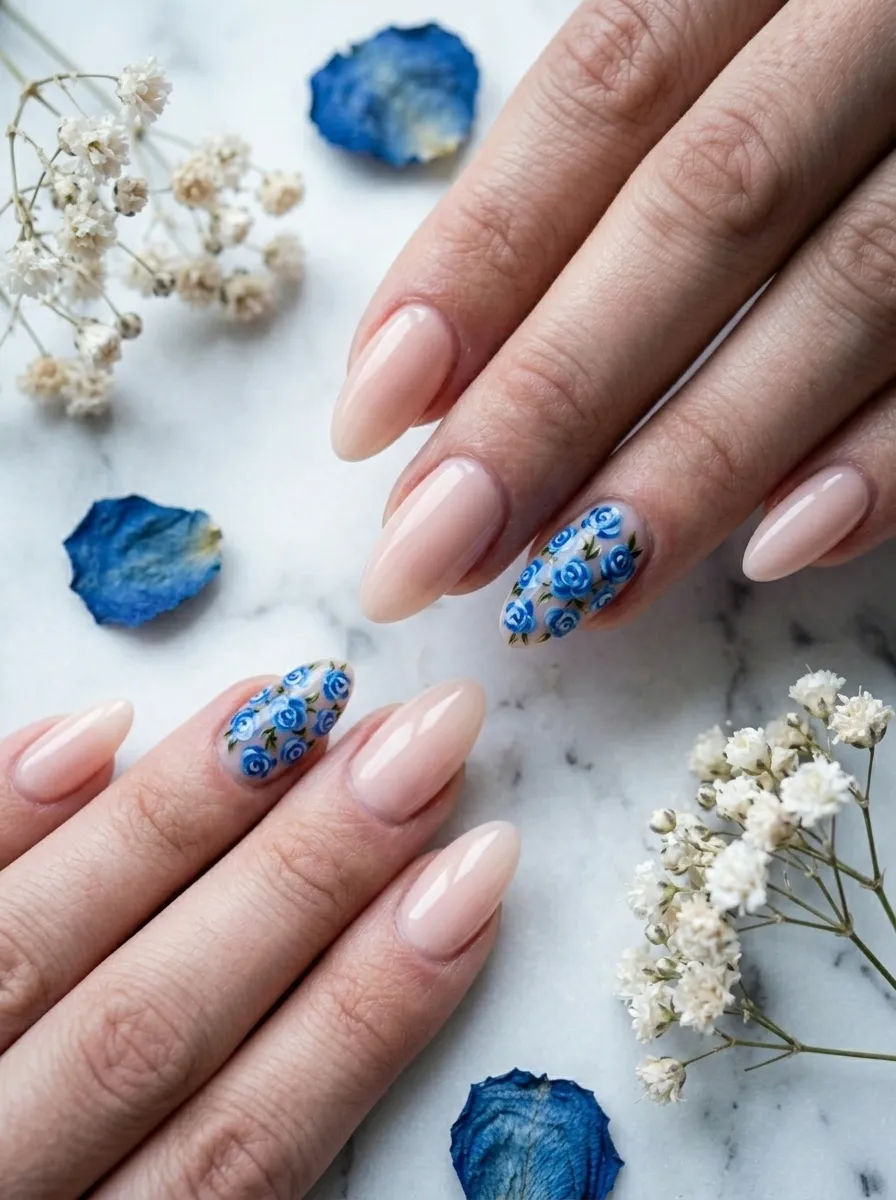
Blue roses are Emily’s signature. She holds them, she is surrounded by them. This design gives a subtle nod to her story without going fully gothic.
Keep most nails plain in a pale nude or ivory shade. Choose two or three nails for the rose detail. This restraint makes the design feel refined rather than busy.
To paint a simple rose, start with a tiny spiral in the center using a fine brush and dusty blue polish. Add curved petal shapes around it, working outward. The more imperfect the petals, the more organic and pretty the rose looks.
If roses feel too challenging, use a nail art stamping plate with a floral design. Most floral stamping plates are inexpensive and give you consistent results every time.
Blue roses feel romantic and slightly sad, which is exactly the emotional tone of the Corpse Bride story. This design works beautifully for weddings, Halloween events, or any time you want something pretty with a bit of edge. Seal with a high-gloss top coat.
10. Ghost White Nails With Smoky Gray Tips

This is a Corpse Bride take on the classic French manicure. Instead of clean white tips, you get a smoky, faded gray that feels ghostly.
Start with a bright white base for full opacity. Two coats work well. Let each coat dry fully before the next.
Using a thin brush or a French tip guide sticker, apply a gray tip. The gray should look ashy, not dark. Think morning fog rather than storm clouds.
To soften the tip line, use a clean brush very lightly dampened with acetone and drag it gently over the edge. This feathers the gray slightly, making it look like it is dissolving.
The ghostly French tip works beautifully on coffin or squoval nail shapes. It is professional enough for any event and spooky enough for Halloween. Add a matte top coat for a truly supernatural finish that catches no light at all.
11. Dark Floral Nail Art With Black Base
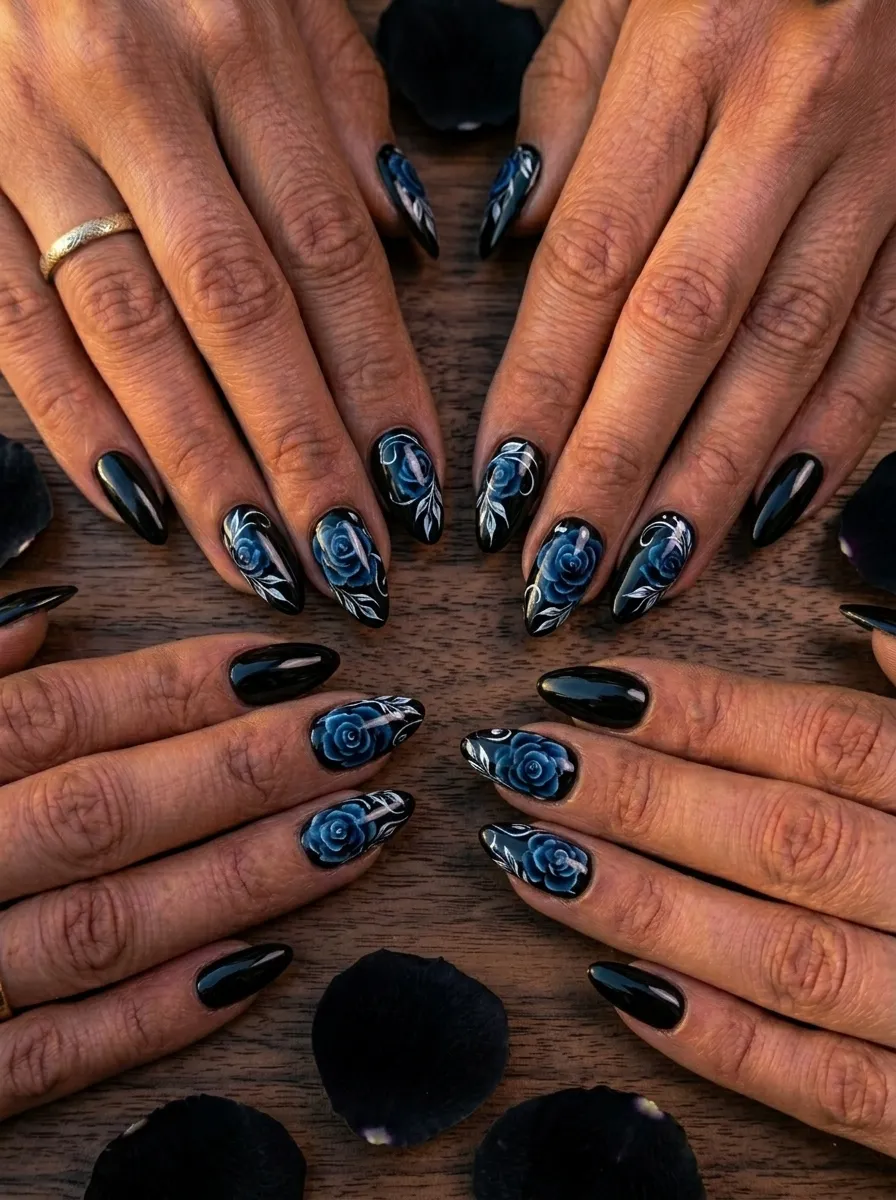
Black nails with floral details are a gothic staple, but adding blue and white flowers gives this look a Corpse Bride edge rather than a generic dark nail vibe.
Apply two coats of black nail polish as your base. Make sure there are no streaks. A flat black works better than a shimmer for this design since you want the flowers to be the focus.
Use a thin brush to paint rose shapes in white. You can then go back with a dusty blue and shade the inner petals. This two-tone technique makes the flowers look dimensional even on a small nail.
Add thin leaf shapes in dark teal or dusty sage to complete the floral arrangement. They do not need to be perfect. Natural-looking imperfection makes hand-painted art charming.
You do not need art school training for this. A steady hand and thin brush are all you really need. If you practice the petal shape on paper a few times first, you will be surprised how quickly your hands learn it. Seal with a glossy top coat to make the florals pop.
12. Holographic Glitter Nails in Ice Blue
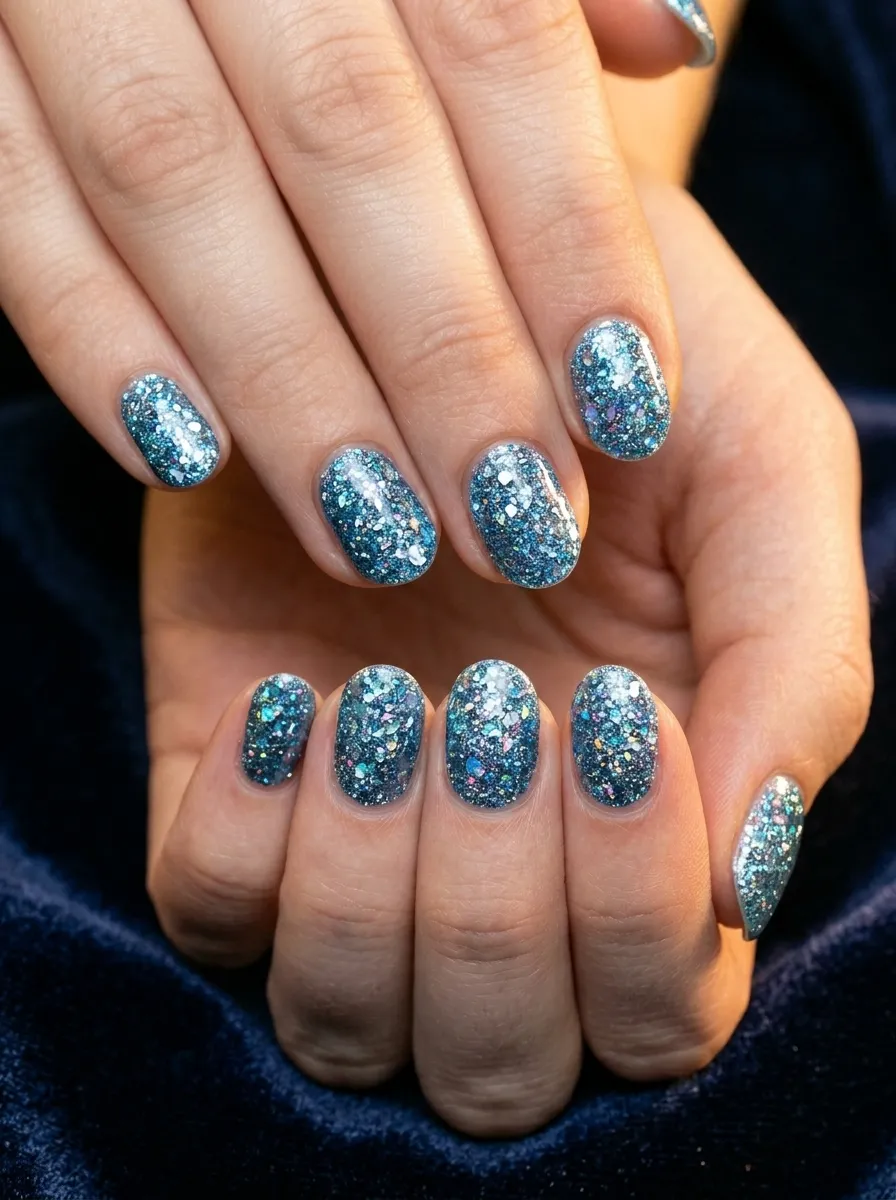
Emily’s gown shimmers in certain lights. This glitter nail idea brings that magical, unearthly shimmer to your fingertips.
Choose a holographic glitter polish in an icy blue or silver-blue shade. These polishes already have everything in them, so you just apply and go.
Apply a coat of pale blue nail polish first as a base to deepen the color. Then layer two to three coats of the glitter polish on top. Each coat adds more density to the sparkle.
Finish with a thick layer of glossy top coat to smooth the surface and seal in all the glitter so it does not chip or catch on fabric.
Holographic polishes are affordable and widely available at drug stores, beauty supply shops, and online. They cost $3 to $8 for a full bottle that will last dozens of manicures.
This is the easiest design on the list. There is no art involved. You just paint and watch the magic happen. It looks incredible in photos and under any kind of light.
13. Blue and White Swirl Nails
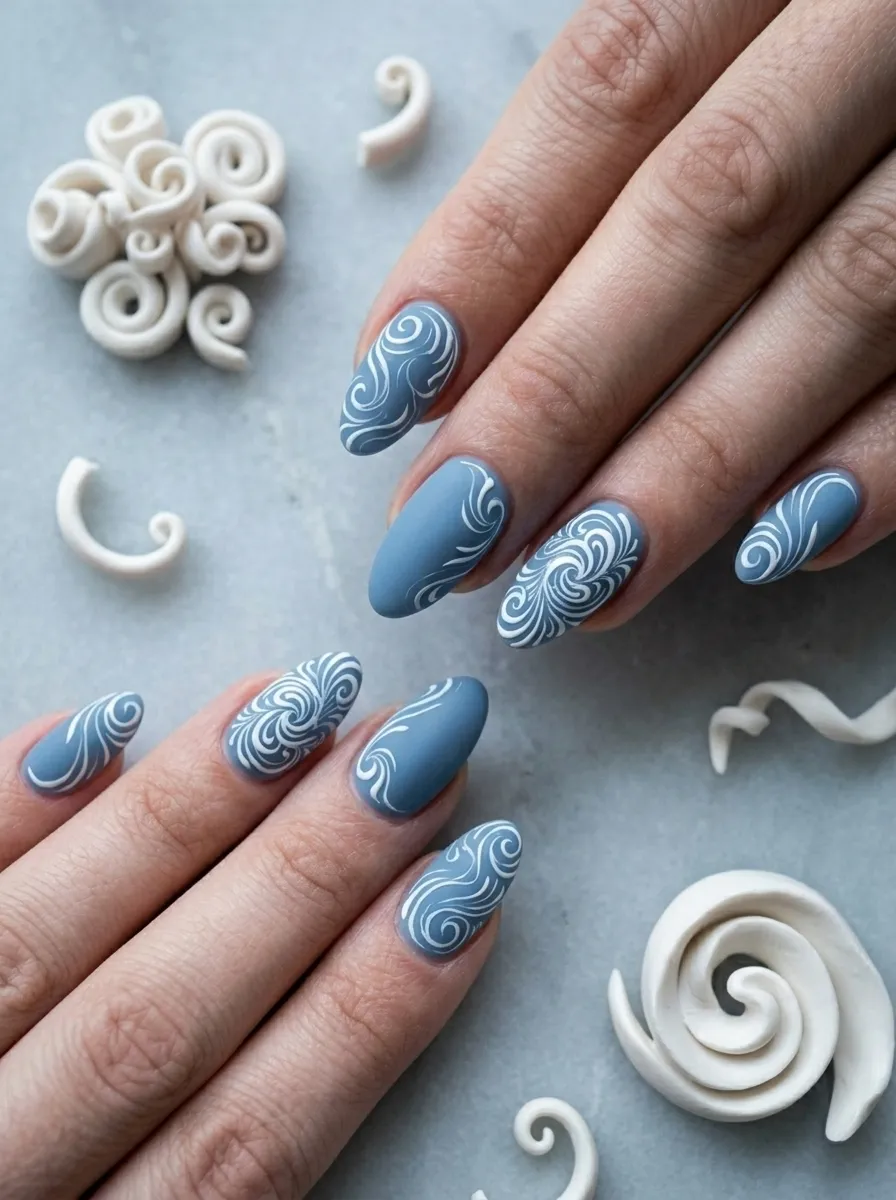
Swirl nails are one of the biggest nail art trends, and in blue and white they look like something straight out of an animated gothic fairy tale.
Start with a pale blue base and let it dry completely. This is important because the swirls need a dry surface to drag properly.
Apply dots or curved strokes of white polish across the nail using a thin brush. Before the white dries, use a fine dotting tool or a wooden toothpick to drag through the white, pulling it into swirl shapes.
Work quickly on one nail at a time because the swirls only form while the white polish is still wet. Once it dries, the dragging technique no longer works.
This design rewards spontaneity. The less you plan each swirl, the more organic and beautiful the result. Some nails will look different from others and that is completely fine. It gives the whole set a whimsical, handmade quality that is very much on-brand for the Corpse Bride world.
14. Negative Space Skeleton Nails
Negative space nail art uses your natural nail color as part of the design. For a skeleton look, this creates a really eerie, beautiful effect.
Apply a sheer nude polish as your base. Just one coat so the nail itself shows through slightly.
Using black nail polish and a fine brush, paint the outline of bone shapes across the nail. Leave the inside of the shapes unpainted. The natural nail peeking through acts as the bone color.
Add a few thin lines inside each shape to suggest the structure of actual bones.
This is a surprisingly wearable gothic look. The natural nail color keeps it from looking too intense. It reads as nail art from a distance but reveals the skeleton detail up close. That surprise element is part of what makes it so cool. Seal with a matte top coat to keep the nude areas looking clean.
15. Dusty Blue Nails With Gold Foil Accents
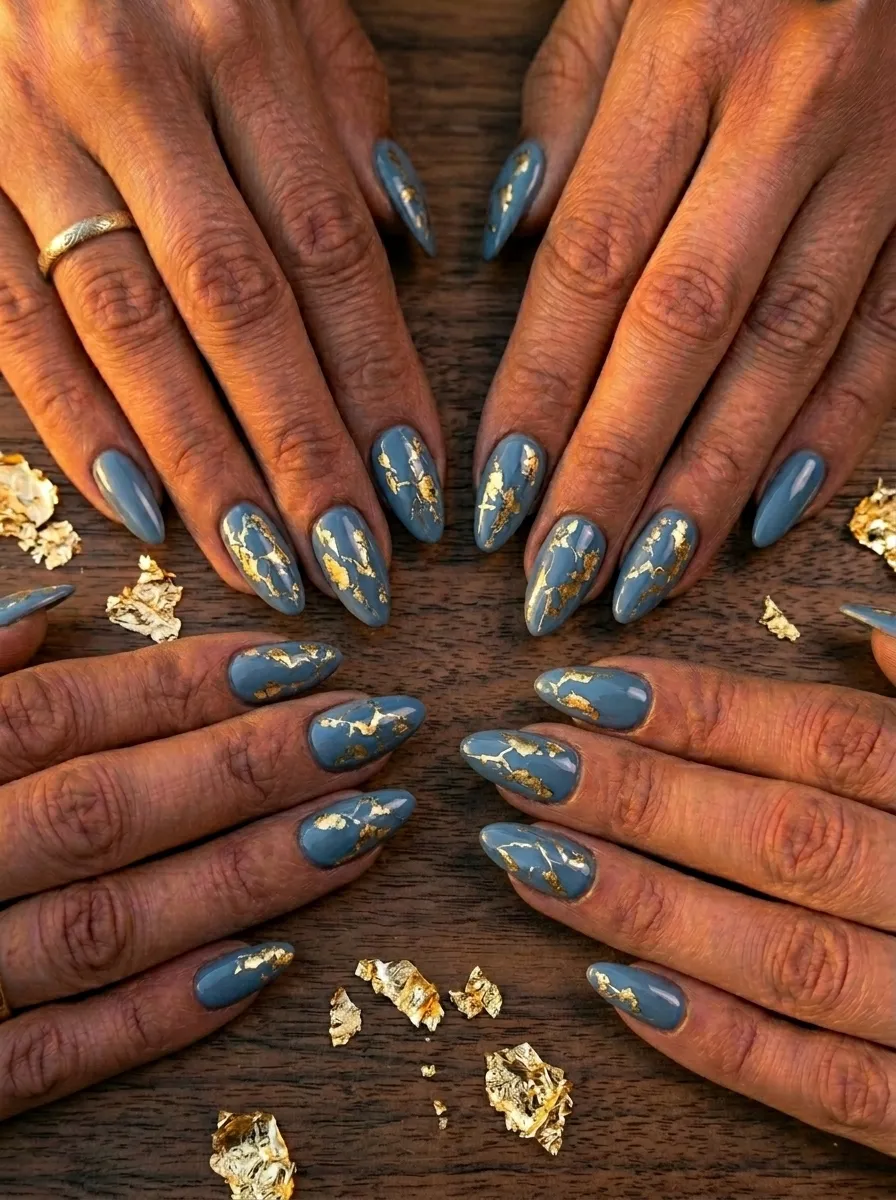
Gold might not seem like a Corpse Bride color, but vintage tarnished gold against pale blue reads like something from an old cemetery monument. It is beautiful and a little mournful.
Apply a dusty, muted blue base. Two coats for full coverage.
While the polish is slightly tacky, press small irregular pieces of gold foil onto the nail. You want the pieces to look random and broken, not neat or uniform.
Apply nail foil glue if your polish is already dry. Brush a thin layer of glue, let it go tacky, then press the foil pieces.
The broken, irregular gold fragments look like cracked gilding on an old portrait or worn gold leaf on a grave marker. It is unexpected and genuinely striking.
Gold nail foil comes in packages of multiple sheets for just a few dollars. You will have more than enough for several manicures. Seal with a non-wipe gel top coat or a regular top coat to lock the foil in place.
16. Sheer Blue Nails With Dried Flower Encapsulation
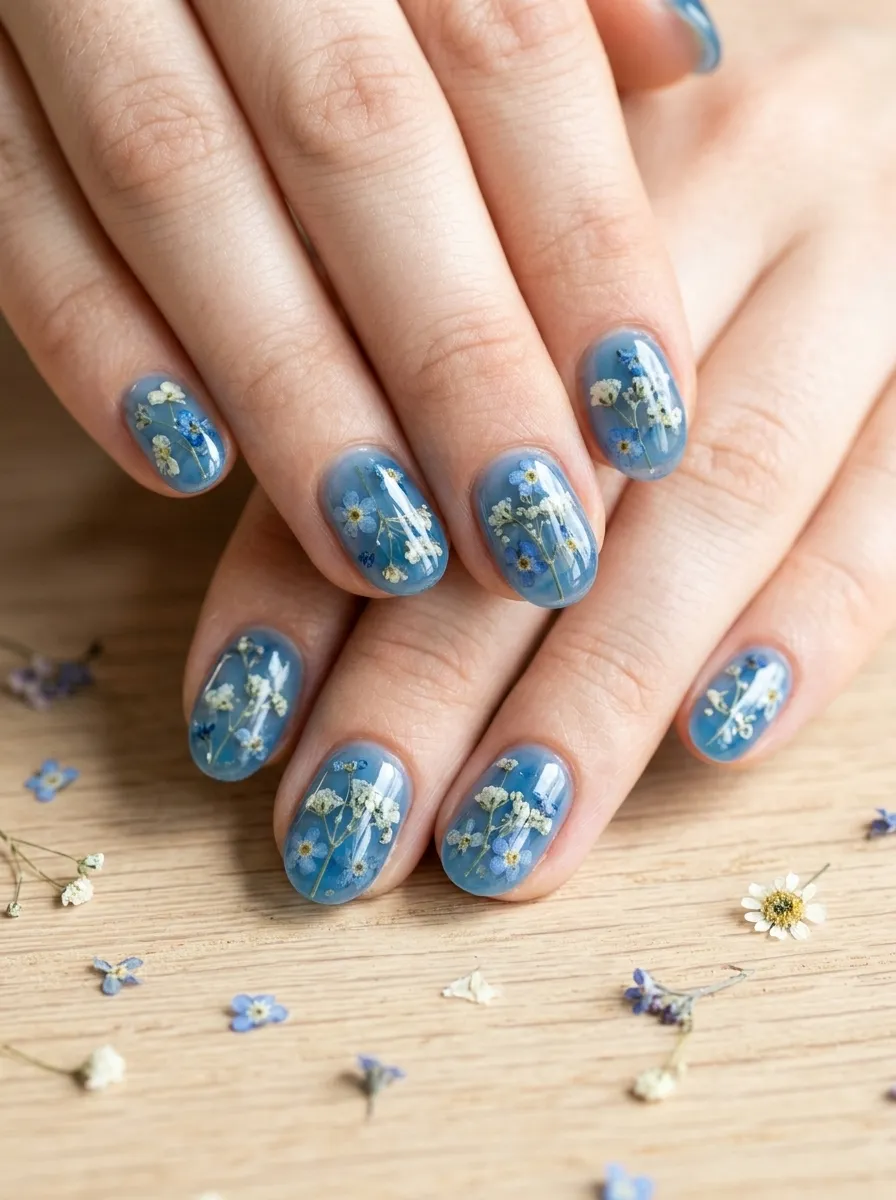
This nail technique genuinely looks like a piece of wearable art. Tiny dried flowers are sealed inside the nail polish layers, creating a preserved botanical look.
You need very small dried flowers, which you can buy from craft stores or dry small flowers at home between book pages. White baby’s breath and tiny blue forget-me-nots work perfectly.
Apply a sheer blue base. While still tacky, place small flower pieces on the nail using tweezers. Press gently. Then apply two to three more coats of clear or sheer polish on top to encapsulate the flowers.
Finish with a thick glossy top coat to smooth everything and create a glass-like surface.
This is one of the most romantic nail ideas on this list. It looks intricate but once you have your dried flowers ready, it takes the same amount of time as a regular manicure. The flowers stay preserved inside the polish for the full life of the manicure.
17. Two-Tone Cobalt and Black Geometric Nails
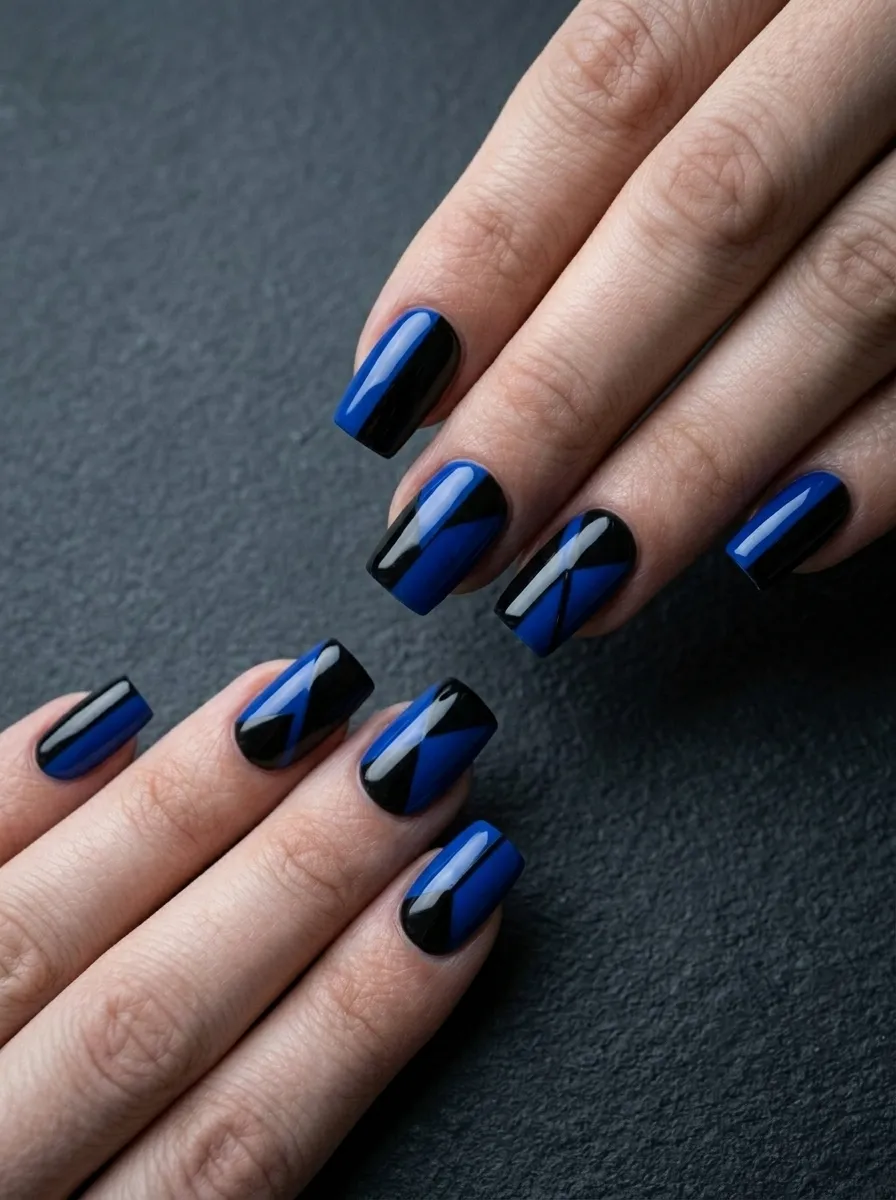
Geometric nail art is graphic and modern, but in cobalt blue and black it becomes something more sinister and Corpse Bride-adjacent.
Apply black polish to the entire nail as your base. Let it dry completely.
Using nail tape or striping tape, press diagonal lines across each nail in whatever pattern you like. Press the tape down firmly so no polish bleeds underneath.
Apply cobalt blue over the exposed section. Wait about 60 seconds, then peel the tape away while the polish is still slightly wet. This gives you the cleanest lines.
Nail tape costs almost nothing. A roll lasts many manicures and makes professional-looking geometric designs accessible to anyone regardless of skill level.
Each nail can have a slightly different geometric angle for a pattern-mixed look, or you can keep them uniform for something more architectural. Both versions look strong and intentional.
18. Ghostly Lilac With Floating Hearts

This design takes the romance out of Corpse Bride and gives it a central place on your nails. It is delicate and pretty but with that signature pale ghostly quality.
Apply a ghostly lilac base. This is a very pale purple, almost a whitened lavender rather than a saturated purple. Two coats give good coverage.
Using a fine nail art brush and white polish, paint small heart outlines on each nail. Do not fill them in. The hollow hearts look more ethereal than solid ones.
Scatter the hearts at random angles rather than in a pattern. Some big, some tiny. The randomness makes the design feel like floating, drifting hearts.
This works beautifully for Valentine’s Day, Halloween, or any gothic-romantic occasion. The combination of lilac and white hollow hearts is both sweet and slightly haunting. Seal with a matte top coat to enhance the ghostly quality of the palette.
19. Silver Chrome Nails With Black Detailing
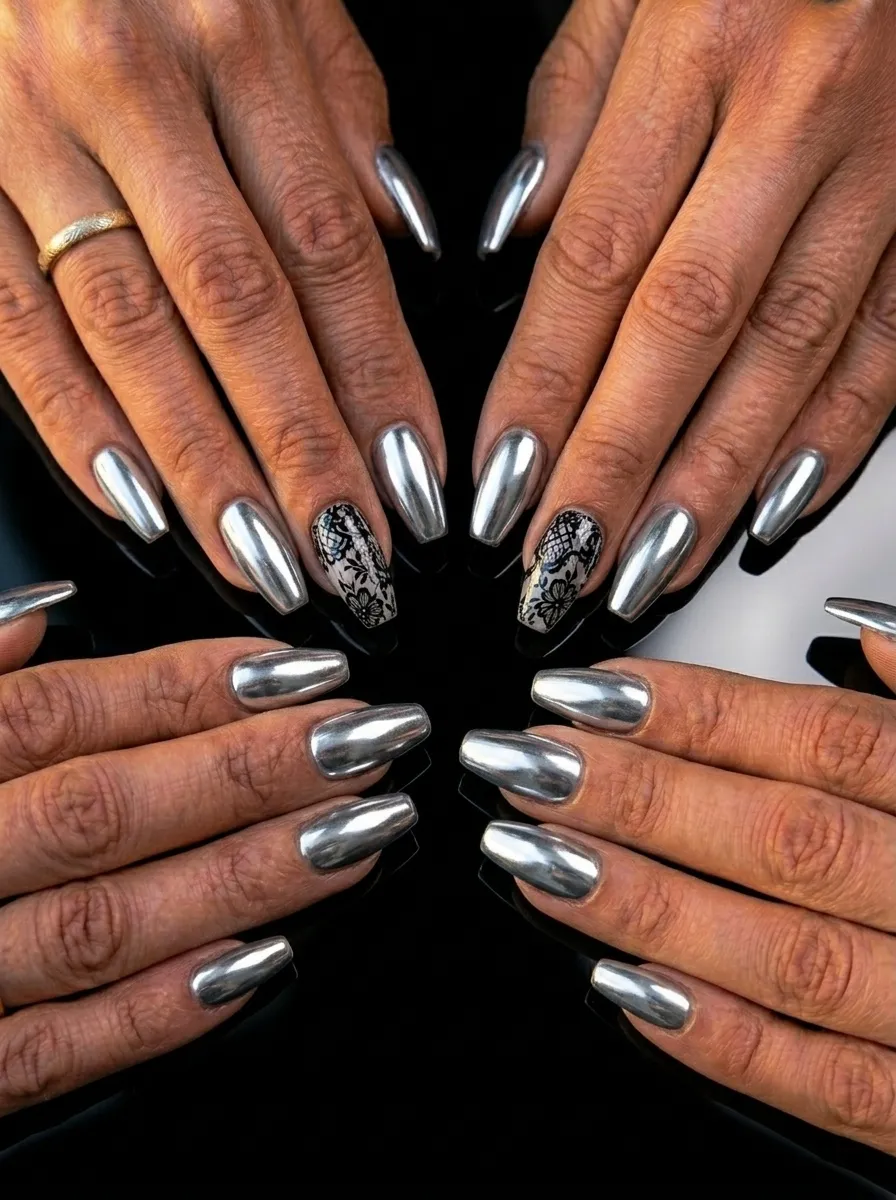
Chrome nails look like liquid metal and have an otherworldly quality that fits perfectly into the Corpse Bride aesthetic.
You can achieve a chrome effect with a chrome powder applied over a cured gel base, or you can buy chrome nail polish in a bottle that provides a similar mirror effect on natural nails.
Apply the chrome as your base and seal it lightly. Then use a very fine brush and black nail polish to paint thin lace or floral details on two or three accent nails. The black art on top of the silver chrome looks like dark embroidery on a metal surface.
Chrome polishes have become much more affordable. You can find good versions for $5 to $12 at beauty stores. The powder version requires a UV gel lamp but gives a more intense mirror finish.
This is a striking, high-contrast look. The plain chrome nails and the detailed accent nails balance each other well. It feels high-end without the salon price tag.
20. Spider Web Nails on Pale Blue
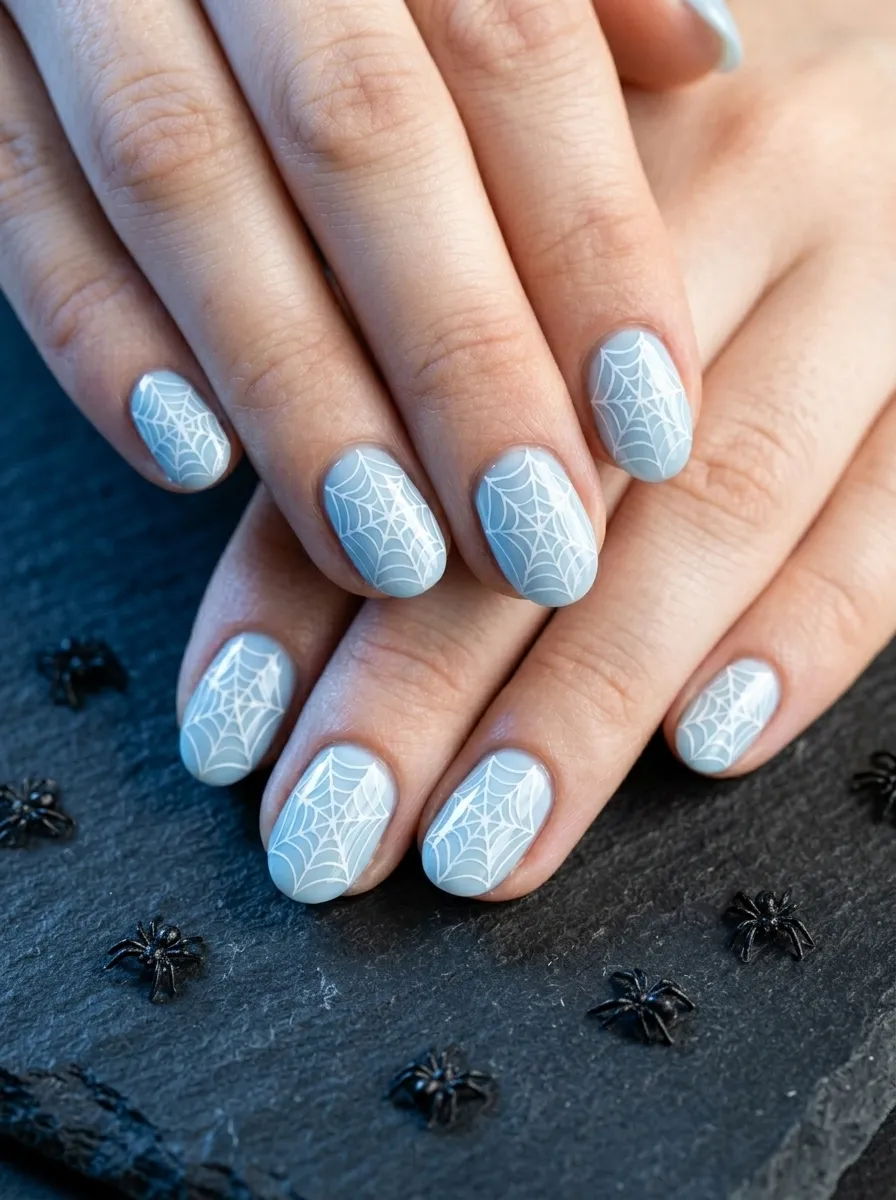
Spider webs are a gothic classic, but on pale icy blue they look delicate and beautiful rather than just spooky.
Apply a pale blue base, two coats for opacity. Let it dry fully.
To draw a spider web, start with a small dot near one corner of the nail. Draw thin lines radiating out from that center dot, like spokes on a wheel. Then draw curved lines connecting the spokes at regular intervals, getting larger as they move outward from the center.
Use a very thin brush or a thin striping brush for the cleanest lines. White works beautifully against blue. So does pale silver.
This design is actually one of the easiest freehand nail art options. A spider web is just radiating lines and connecting curves. Once you understand the structure, you can draw it quickly. Each nail takes about two minutes after your base dries. Seal with glossy top coat.
21. Dark Teal Nails With Pearl Finish
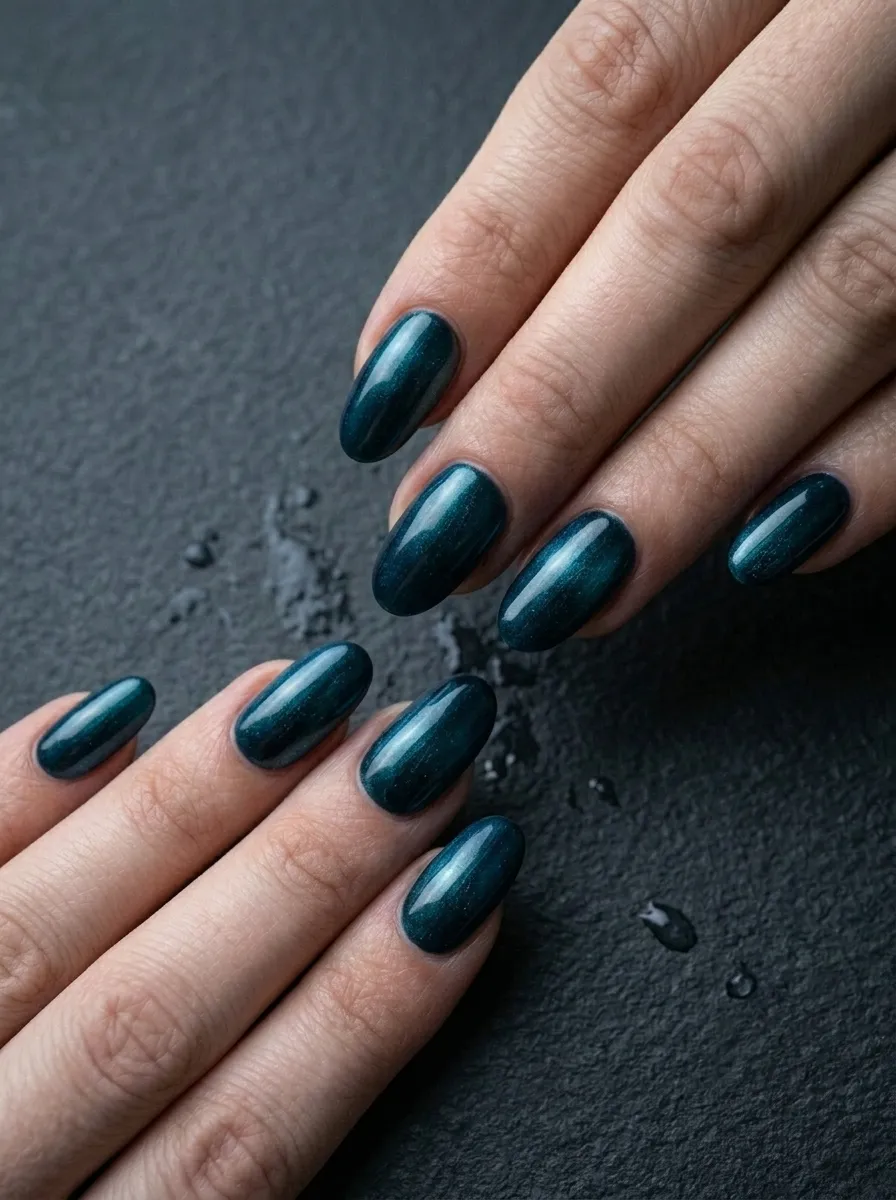
Dark teal is an underused color in Corpse Bride nail art, but it captures that deep underwater, subterranean world perfectly. Add a pearl finish and it looks almost alive.
Choose a dark teal nail polish with a built-in pearl or shimmer finish. These polishes have a subtle glow that shifts in light. They look flat from a distance and magical up close.
Apply two to three coats for full depth. The pearl finish often looks more striking with more layers.
No additional art is needed. The polish does the work on its own. But you can add a single white butterfly sticker to one accent nail if you want to connect it back to the Corpse Bride imagery.
Pearl finish polishes are available at most drugstores and beauty supply stores for well under $10. They photograph beautifully and the shimmer makes simple painted nails look like professional salon work.
22. Matte Black Nails With Blue Outlined Details
Matte black is the most gothic base you can choose. Adding blue outlines rather than white creates a cooler, more Corpse Bride-specific version of a classic look.
Apply two coats of black nail polish. Seal with a matte top coat before adding any details.
Using a thin striping brush and pale blue polish, trace outlines directly onto the matte surface. You can outline geometric shapes, simple rose silhouettes, or thin delicate curves that suggest lace without fully forming it.
The pale blue on matte black looks like glowing moonlight. The contrast is dramatic but the color choice keeps it from going full Halloween-costume and into wearable everyday territory.
Matte top coat is inexpensive and completely changes the look of any nail polish. A matte top coat costs around $3 to $8 and can be used over any color. Once you try matte nails, it is hard to go back.
23. Gradient Blue to Lilac With Silver Dust
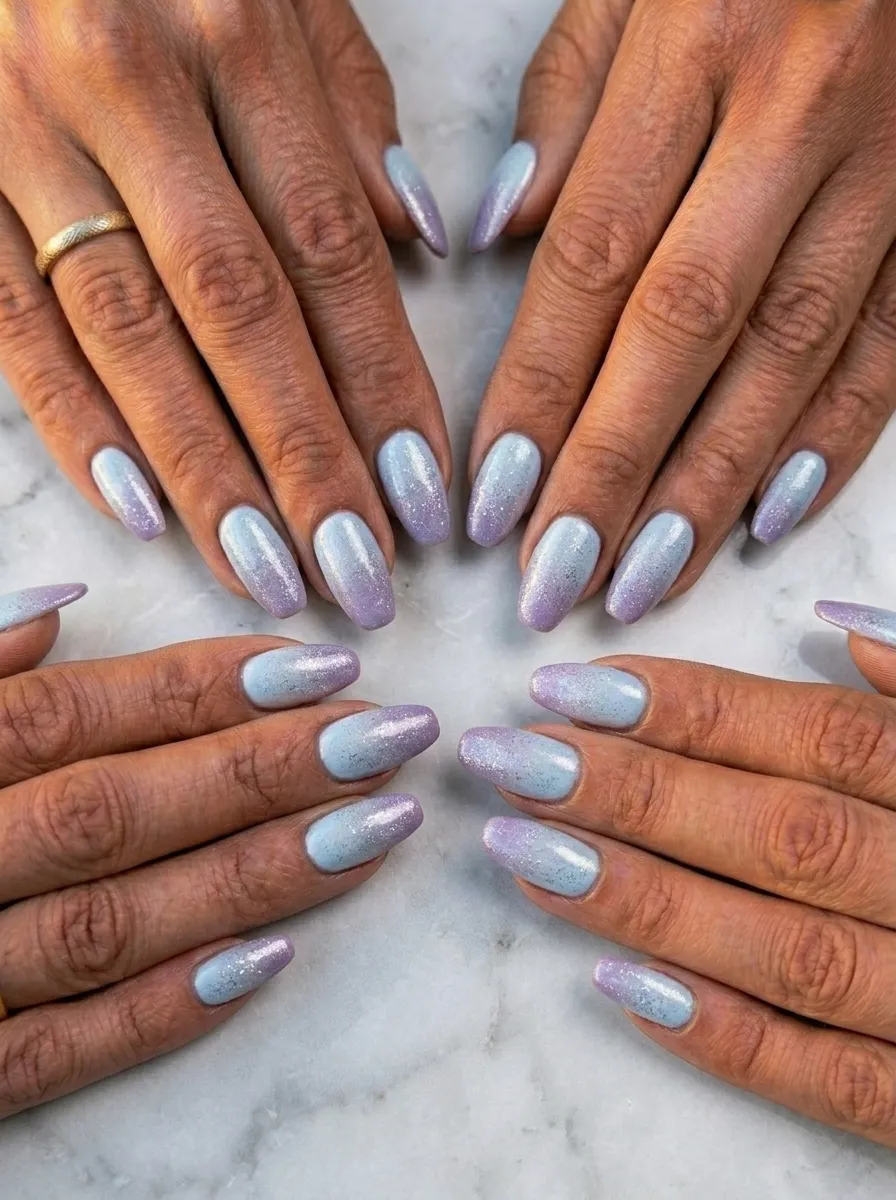
This final design is the softest and most romantic of the entire list. It feels like watching sunrise in a ghost world.
Apply pale blue at the base of the nail. Using a sponge technique, blend a dusty lilac toward the tip. The two colors should meet and melt together in the middle rather than creating a hard line.
While the gradient is still slightly tacky, tap fine silver nail dust or glitter powder over the entire nail using a small shadow brush. The dust settles into the surface and creates a hazy, luminous shimmer.
Seal with a glossy top coat to lock everything in place and deepen the colors.
The combination of blue, lilac, and silver feels genuinely otherworldly. It is the kind of nail look that people notice from across the room. And the three materials together, polish, sponge technique, and powder, cost under $15 total. You can recreate this look multiple times once you have everything.
Conclusion
Corpse Bride nail art gives you so much room to play. You can go as dramatic or as subtle as you want. Whether you choose the simple ghost white French tip, the full lace design, or the romantic dried flower encapsulation, every one of these ideas connects back to Emily’s world of cold beauty and dark romance. The best thing about these designs is that most of them are genuinely affordable and doable at home. You do not need to be a professional to get beautiful results. Start with whichever idea feels most manageable and build from there. A thin brush, a few key polish shades in pale blue, white, and deep black, and a good top coat are honestly all you need to get started. Pick your favorite look, gather your tools, and let your nails tell a little gothic love story.