1. Classic Red and Gold Glitter Nails
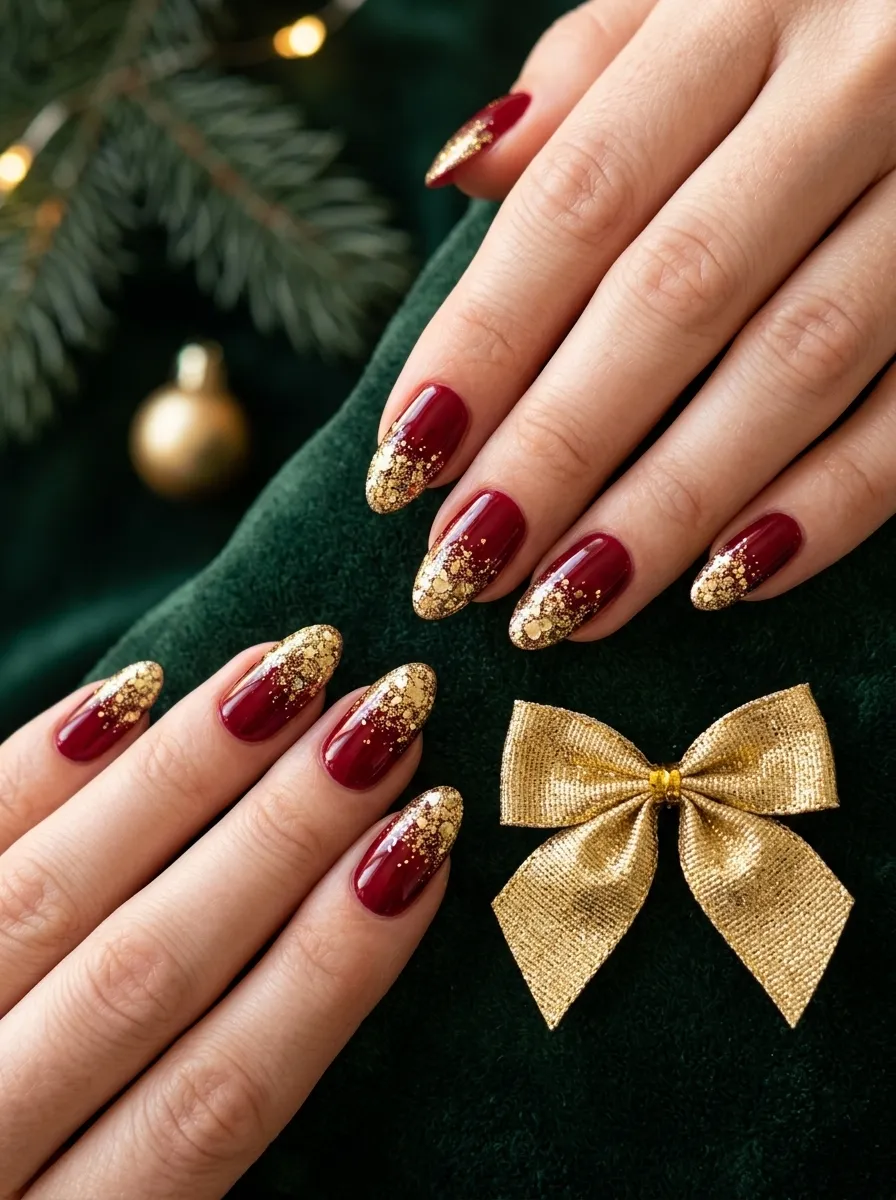
Red nails are the most iconic Christmas look of all time, and they never go out of style. This version takes the classic red and gives it a festive upgrade with gold glitter. You can paint your nails a solid deep red and then add a coat of gold chunky glitter polish over the tips. This creates a look that feels both polished and playful at the same time.
You do not need to visit a salon for this. Pick up a bottle of dark red polish and a glitter topcoat from any drugstore. Brands like Sally Hansen and Sinful Colors both have beautiful options under five dollars each.
For a more dramatic finish, apply two coats of the glitter all over the nail instead of just the tips. This turns the look into a full glam moment perfect for Christmas parties.
If you want a longer-lasting result, seal everything with a thick topcoat. It will lock in the glitter and prevent chipping for up to a week. This is one of those looks that photographs beautifully and works on any nail length.
2. Candy Cane Swirl Nails
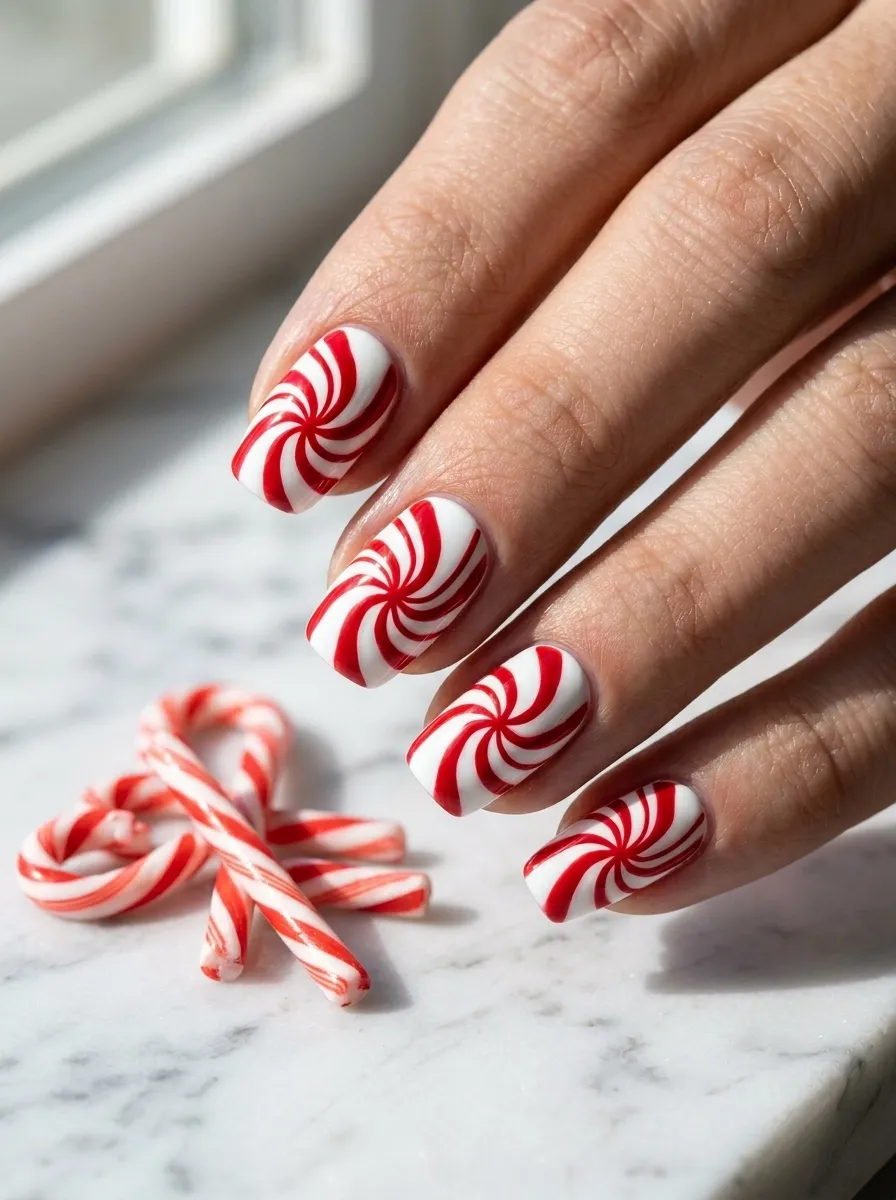
Candy cane nails are one of the most fun and recognizable Christmas designs out there. The look uses red and white swirling stripes that mimic the real candy, and it works especially well on shorter nails where the design can be seen clearly.
Start with a clean white base coat and let it dry completely. Then use a thin nail art brush or a striping brush dipped in red polish to draw curved diagonal lines across the nail. You do not need perfect lines. The slight imperfection actually adds charm to the design.
You can buy a nail art striping brush set online for around three to five dollars. These brushes make the lines much easier to control than a regular brush.
If striping feels too tricky, try a nail stamp kit instead. Many holiday stamp sets include candy cane patterns that transfer onto the nail in seconds. These kits are beginner-friendly and reusable every season.
Finish with a glossy topcoat to make the design pop. For extra fun, try doing only two or three candy cane accent nails and keeping the rest white or red.
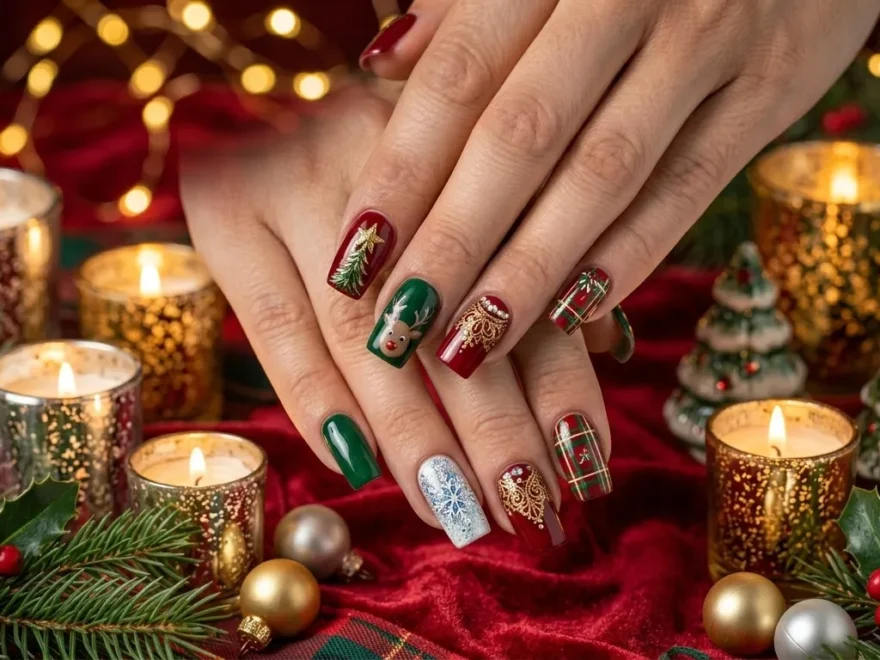
3. Snowflake Accent Nails
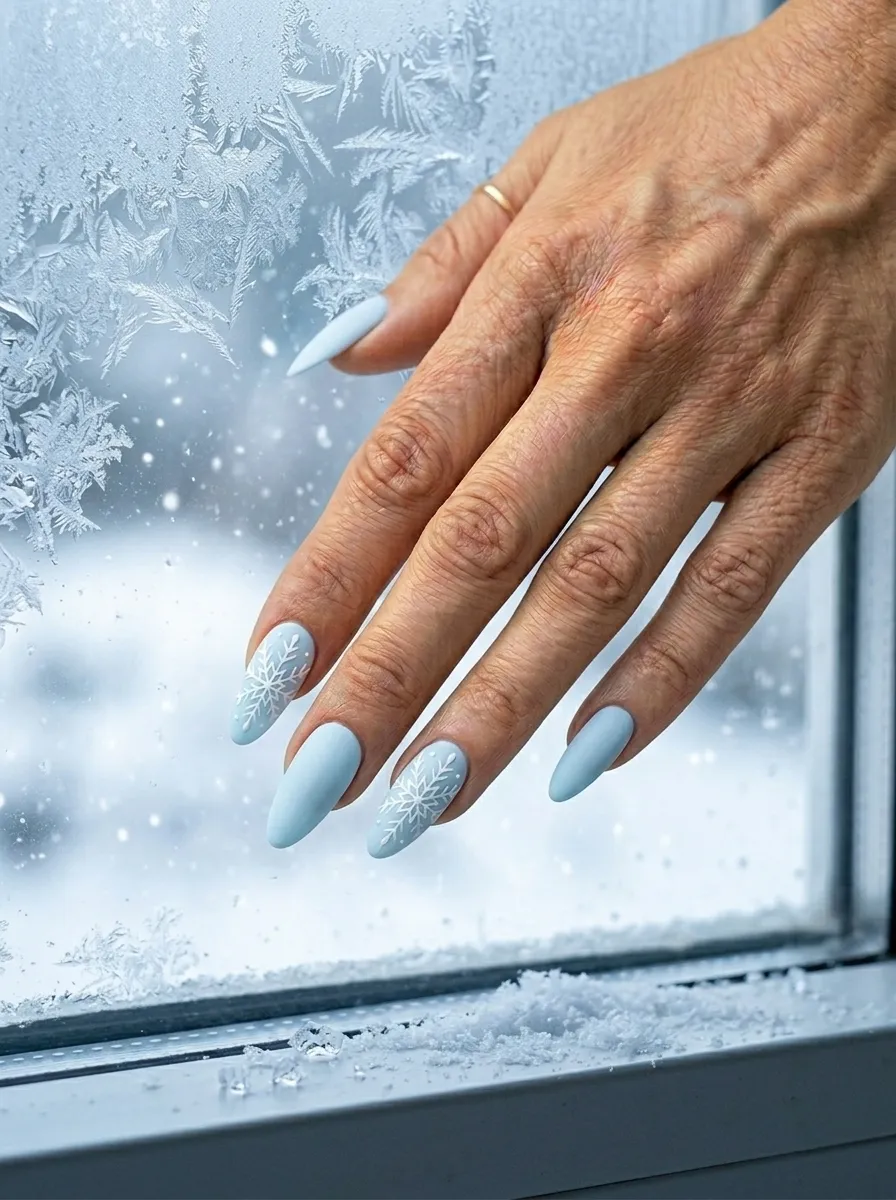
Snowflake nails are elegant, wearable, and work beautifully with almost any color base. The key is using snowflakes as an accent rather than putting them on every single nail. Pick one or two nails on each hand to feature the snowflake design, and keep the remaining nails in a coordinating solid color.
An icy blue or soft white base works perfectly under white snowflakes. But snowflakes also look stunning on navy, burgundy, or even black backgrounds.
If you are doing this at home, a thin nail dotting tool and striping brush are all you need. Draw a simple six-pointed asterisk shape and add small lines at the tips of each point. That basic shape is all it takes to create a recognizable snowflake.
You can also find nail stickers and decals shaped like snowflakes at craft stores and beauty supply shops. A sheet of nail stickers costs around two to three dollars and gives you dozens of snowflakes to work with.
This look photographs beautifully and feels winter-ready without being too loud. It is a great option if you want something festive that still looks clean and understated.
4. Midnight Blue Christmas Nails
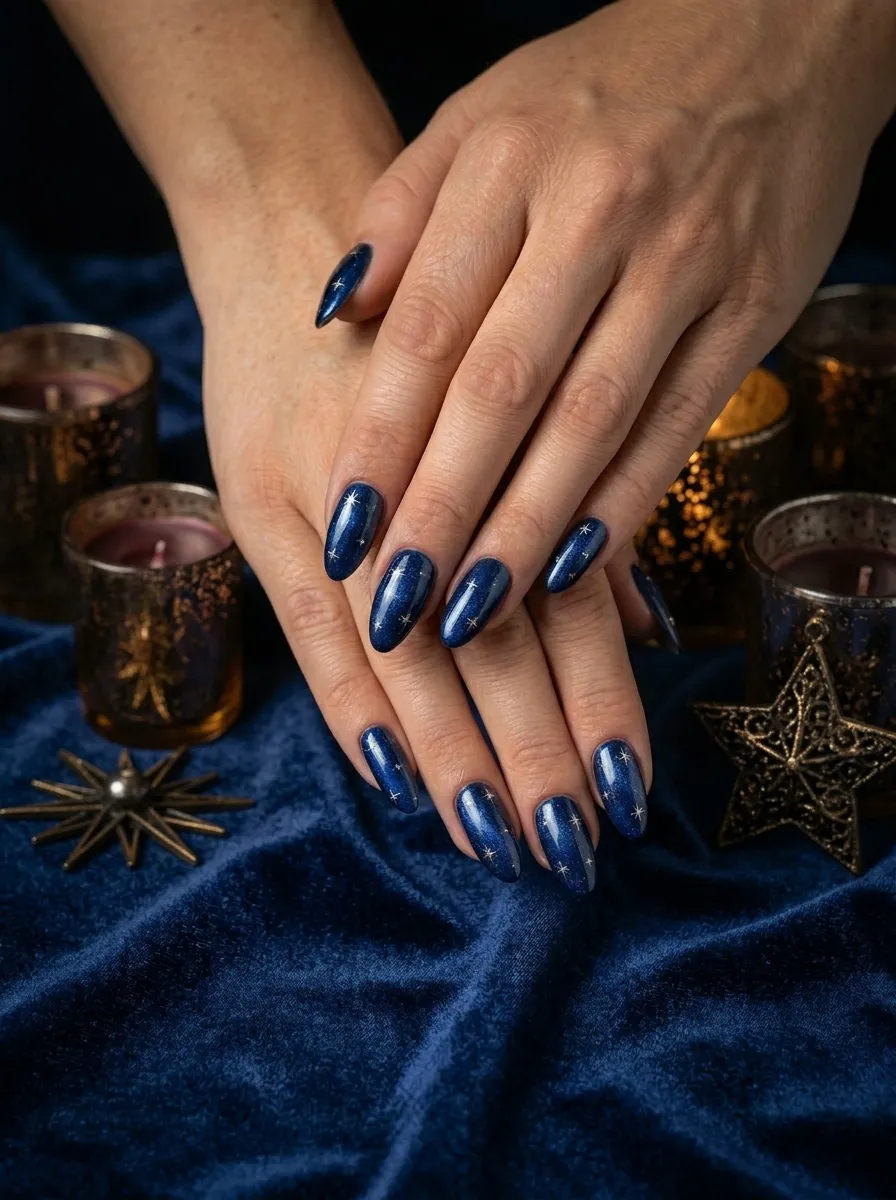
Not everyone wants to go red and green for Christmas. Midnight blue nails offer a cool, moody alternative that still feels completely seasonal. The deep blue shade reads as wintery and sophisticated, making it perfect for grown-up holiday gatherings and evening events.
Look for a dark navy or midnight blue polish with a slight shimmer or metallic finish. The light-catching quality adds dimension and keeps the look from feeling flat. Brands like OPI and Zoya have gorgeous deep blue shades that apply smoothly.
You can keep this look simple with just the polish alone. Or add silver star nail stickers on top for a night sky effect. Press-on star stickers are easy to apply and available online for very little money.
This design works especially well on medium to long nails where the depth of color really shows up. On shorter nails, use a polish with more shimmer to add interest.
Pair midnight blue nails with silver jewelry and you have a holiday look that feels coordinated and intentional. This shade also photographs stunningly in low light, making it ideal for Christmas parties with dim, ambient lighting.
5. Reindeer Nail Art
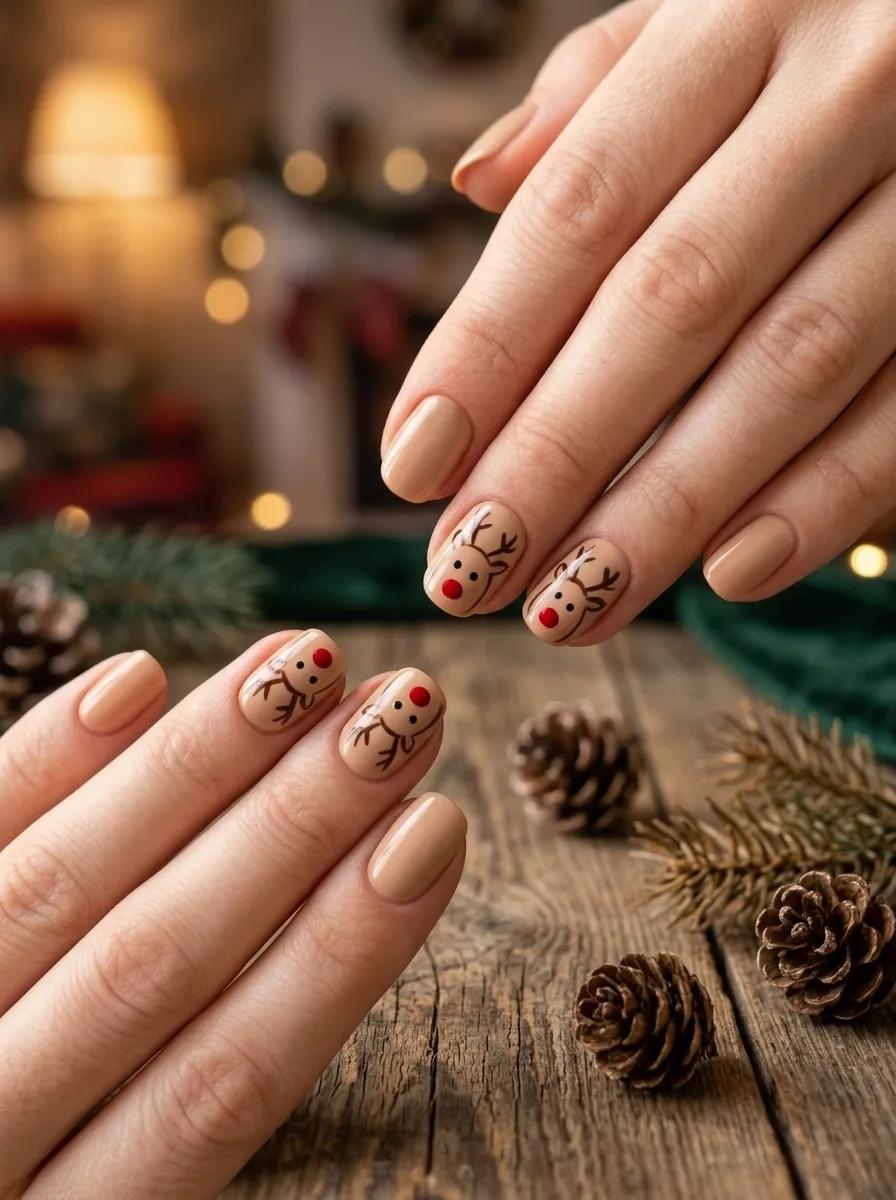
Reindeer nail art is one of the cutest Christmas designs and it is much easier to create than it looks. The design centers on a simple illustrated reindeer face using just a few basic shapes.
Start with a warm beige or tan base coat. Using a brown nail art brush or a toothpick, draw two oval ear shapes at the top of the nail. Add two small dots for eyes and a red dot in the center for Rudolph’s iconic nose. Fill in with black for the pupils and you have a reindeer face.
This design is best done as an accent nail. Keep the rest of your nails in a solid warm tone like camel, cream, or soft brown so the reindeer stands out without competing with everything else.
If drawing feels intimidating, use nail sticker sets that include reindeer faces. Many Christmas nail sticker sheets include Rudolph designs for easy application.
Kids absolutely love this look, but it works for adults too when done in a refined, clean way. Use a fine detail brush for sharper lines and keep your proportions small and neat. This is one of those nail designs that always gets comments.
6. Christmas Tree Nails
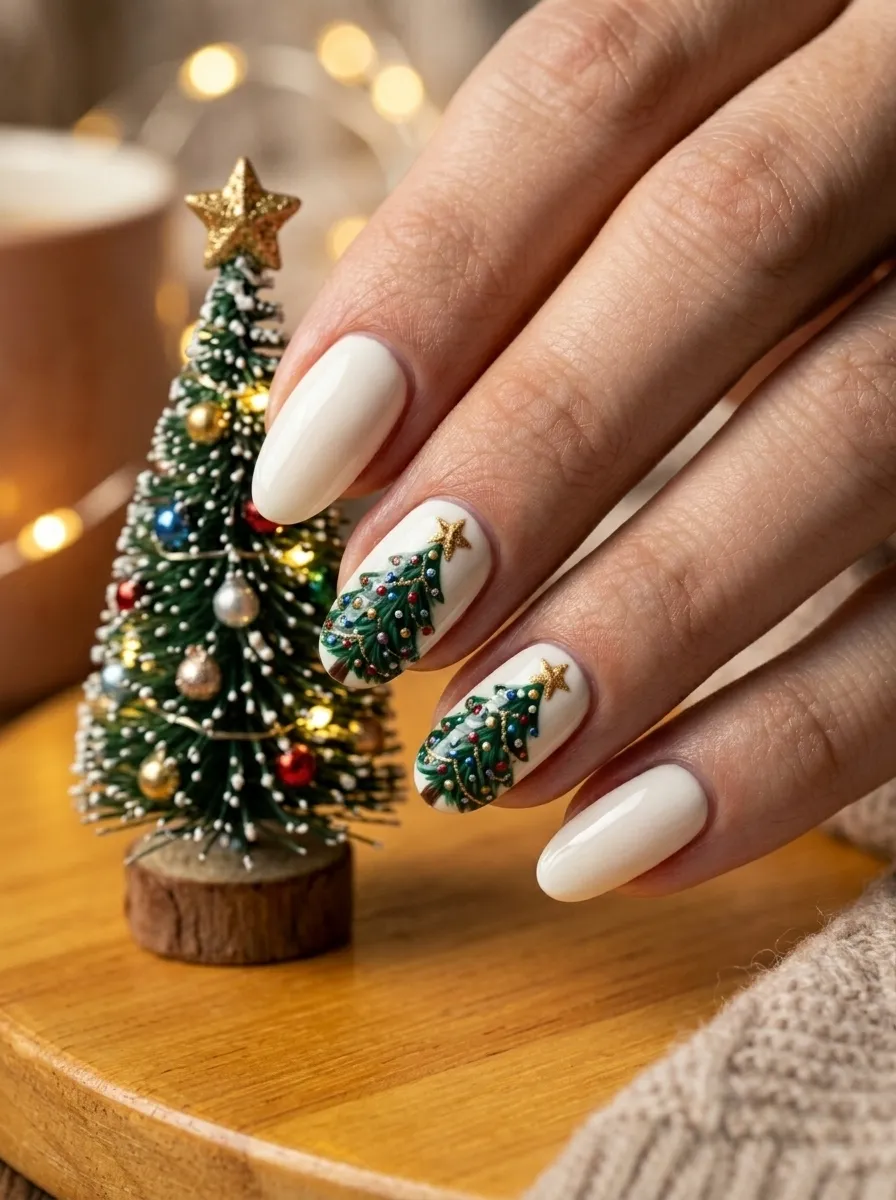
A tiny Christmas tree on your nails is a true holiday statement. The tree design works best on the ring finger as an accent, with the remaining nails kept in a simple complementary shade.
To create the tree, use a bright or deep green polish and a thin brush. Draw a triangle shape starting narrow at the top and widening toward the bottom. Add horizontal zigzag lines across the triangle to create the layered branch effect.
Once the green is dry, add tiny colored dots along the branches using a nail dotting tool. These represent ornaments and bring the whole design to life. A small gold or yellow dot at the very top becomes the star.
The entire design takes about ten minutes per nail once you get comfortable with it. Practice on paper first to get the shape right.
Nail art brushes from Amazon or local beauty stores are very affordable and give you much more control than trying to use the original polish brush. A five-piece brush set is usually under eight dollars and lasts for many uses.
If you want a simpler version, use a Christmas tree nail stamp for instant results with zero freehand drawing required.
7. Santa Hat Nails
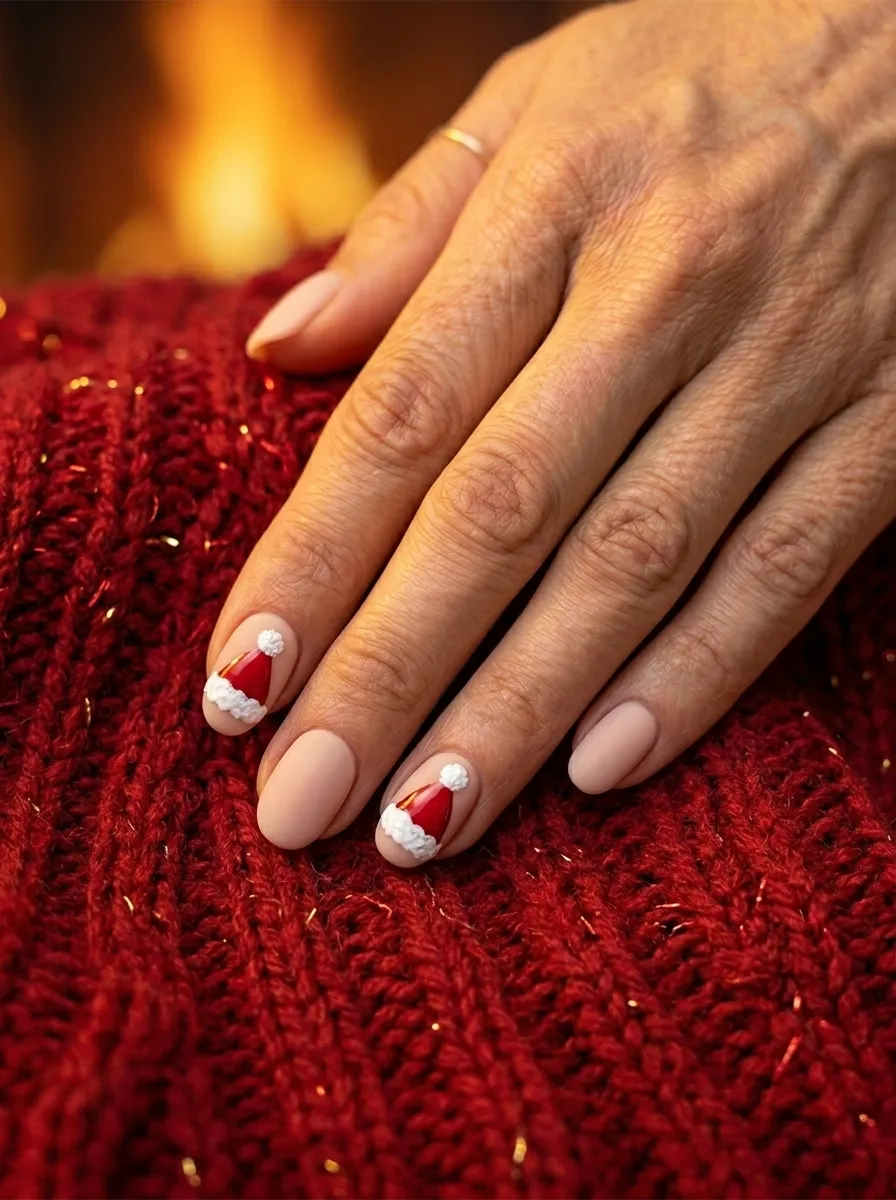
Santa hat nails are adorable, simple to execute, and bring instant Christmas cheer to your hands. This design uses a red and white color combination to mimic the classic Santa hat and looks especially charming on shorter nails.
Start with a nude or blush base on all nails. On your accent nails, paint a red triangle pointing to one side of the nail. This is the main body of the hat. Use a flat nail brush for clean edges.
Once the red dries, use a thin white brush or a small amount of white polish to paint a thick horizontal band across the base of the triangle. This is the white brim of the hat. Add a small white dot at the pointed tip for the pom-pom.
The whole design uses only three colors: red, white, and your chosen base. That means most people already have everything they need at home.
For extra detail, use a small dotting tool to add tiny white dots around the white brim section. This gives the look a fluffy, three-dimensional feel.
This design is one of the most beginner-friendly Christmas nail ideas on this entire list. Even if you have shaky hands, the hat shape is forgiving and still looks intentional.
8. Frosted White Winter Nails
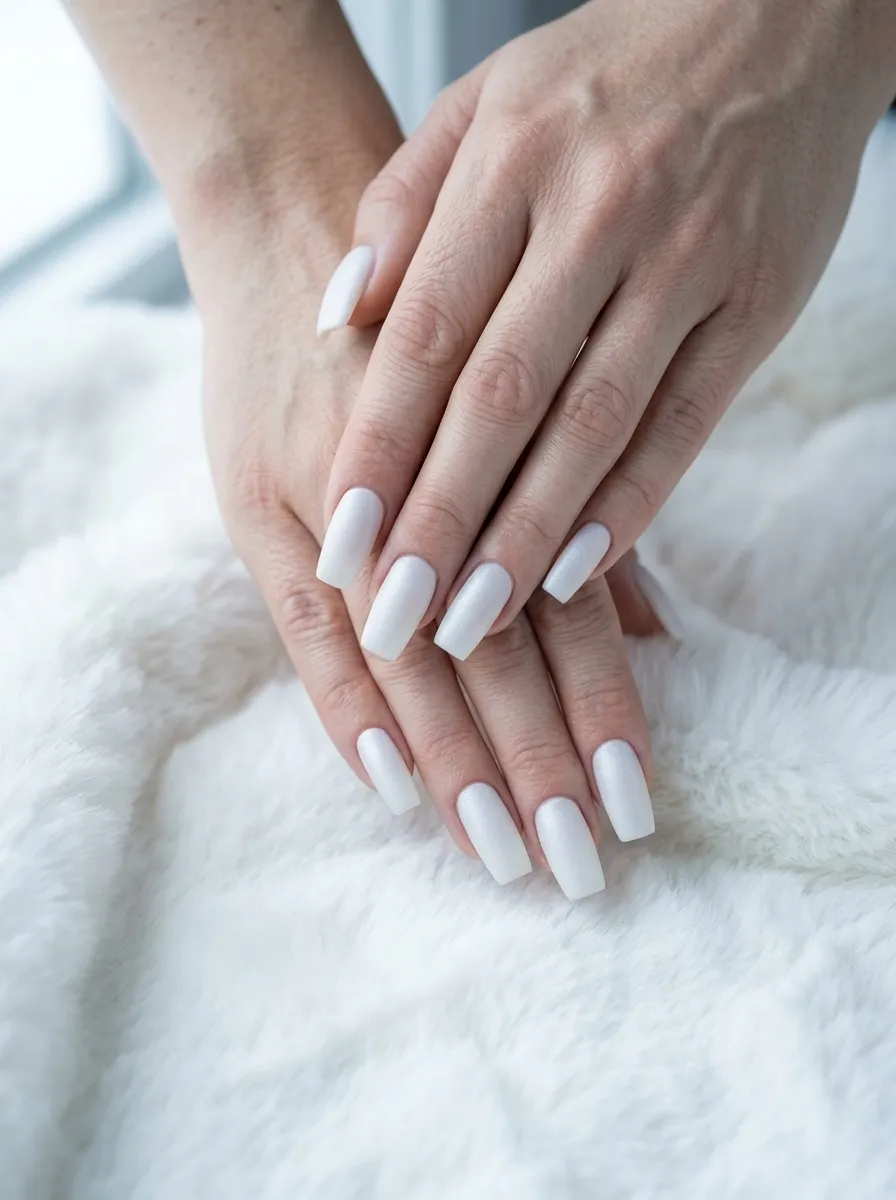
Frosted white nails are the definition of understated holiday elegance. This look does not scream Christmas, but it feels deeply seasonal and works perfectly for both casual and formal occasions throughout December.
Choose a white polish with a matte or satin finish. Regular glossy white can look clinical, but a frosted or milky white has a soft, dreamy quality that feels much more luxurious. Brands like Essie and ORLY make beautiful milky white shades that achieve this look.
Apply two coats for full opacity and finish with a matte topcoat instead of a glossy one. The matte finish is what gives this look its frosted, wintry quality.
For a subtle twist, apply a thin coat of white iridescent shimmer over the matte base. The shimmer catches the light in a very soft, understated way that adds dimension without being too sparkly.
This look works on every nail shape and length. It is also a great base if you want to add minimal nail art like a small snowflake sticker on one accent nail.
Frosted white nails pair beautifully with cozy winter outfits, holiday sweaters, and silver or pearl jewelry. They are clean, modern, and feel genuinely polished.
9. Green and Gold Plaid Nails
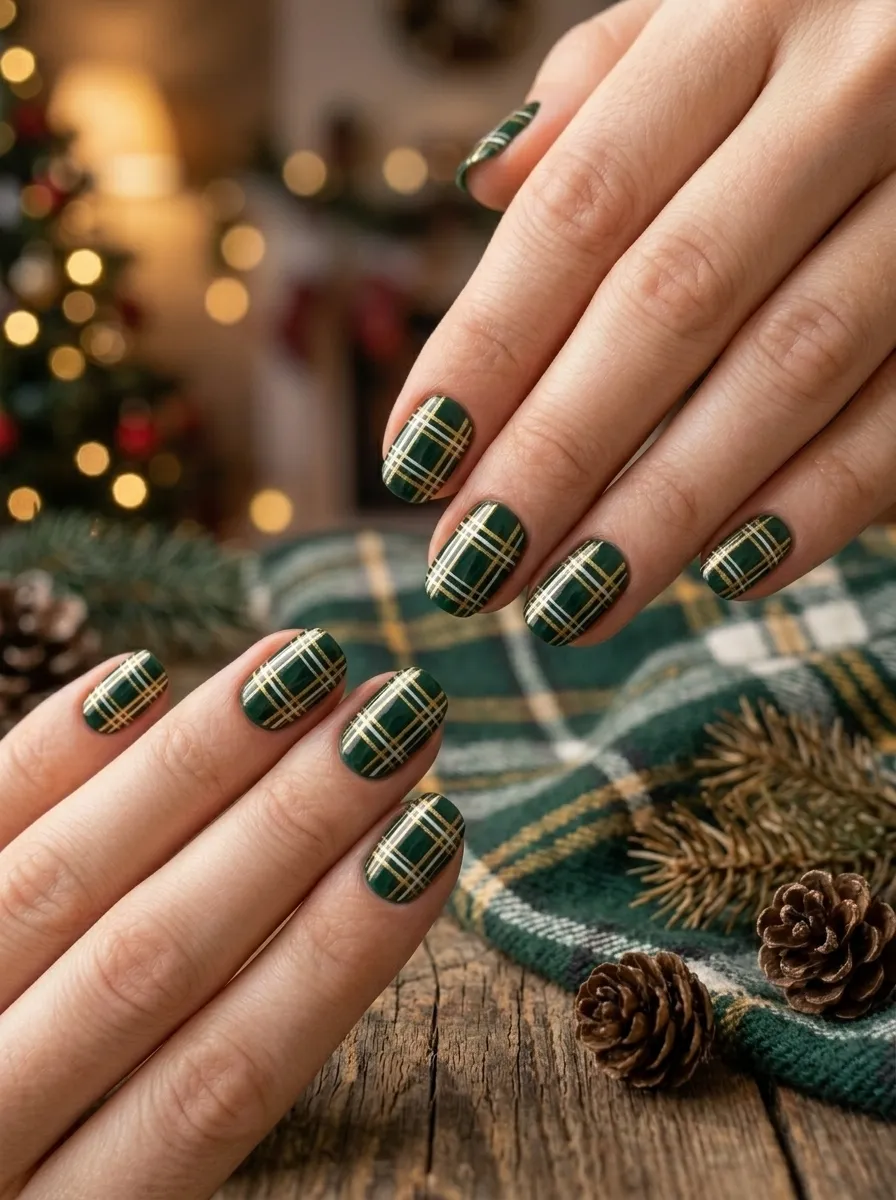
Plaid nails are a seriously underrated Christmas design. The pattern feels festive, preppy, and slightly unexpected compared to the usual Christmas nail options. Green and gold is the perfect color combination to make plaid feel holiday-appropriate without looking too much like a tablecloth.
Start with a forest green base and let it dry fully. Then use a thin striping brush and gold polish to draw horizontal and vertical lines across the nail. Space them evenly, with two gold lines close together as a pair, then a gap, then another pair.
Once the gold lines are dry, use a thin white or light gold brush to draw single lines in between the gold pairs. This layering is what creates the authentic plaid effect.
This design takes patience but does not require advanced skill. Go slowly and focus on keeping your lines parallel.
You can also buy plaid nail wraps online that do all the work for you. These peel-and-stick wraps are available in Christmas plaids and apply in minutes with no drying time.
Green and gold plaid nails look especially nice with gold jewelry and holiday-colored outfits. They work on any nail length and are guaranteed to be a conversation starter at holiday events.
10. Hot Cocoa Brown Nails
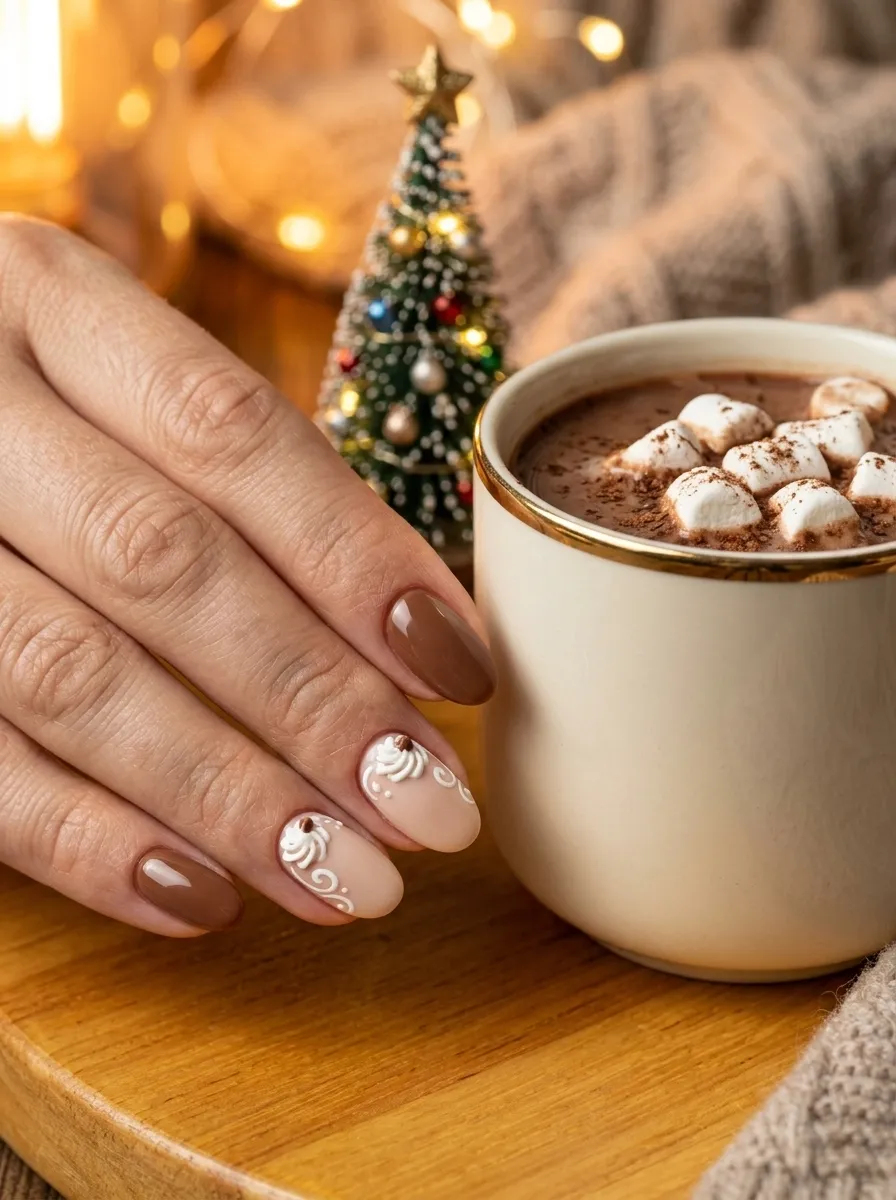
Hot cocoa nails might not be the first thing you think of for Christmas, but this warm brown palette is incredibly seasonal and wearable. These nails feel cozy and grounded, perfect for a December that is more about comfort than glitter.
Choose a milk chocolate or warm caramel brown for the main color. Avoid shades that lean too orange or too gray. You want a true brown that reads as rich and warm. Essie’s Ballet Slippers adjacent shades and OPI’s chocolate tones work beautifully here.
You can keep all nails in the same warm brown for a clean, minimalist look. Or try a milk chocolate on four nails with one creamy nude accent nail featuring a small white swirl design on top.
The swirl design on the accent nail is easy to do with a thin brush. Just mimic the look of whipped cream being swirled on top of a drink.
For a budget option, E.L.F. and Wet n Wild both carry excellent brown polishes for under three dollars.
This palette pairs wonderfully with camel coats, cream sweaters, and warm-toned accessories. It is a holiday nail look that is completely wearable into January without looking out of season.
11. Silver Holographic Christmas Nails
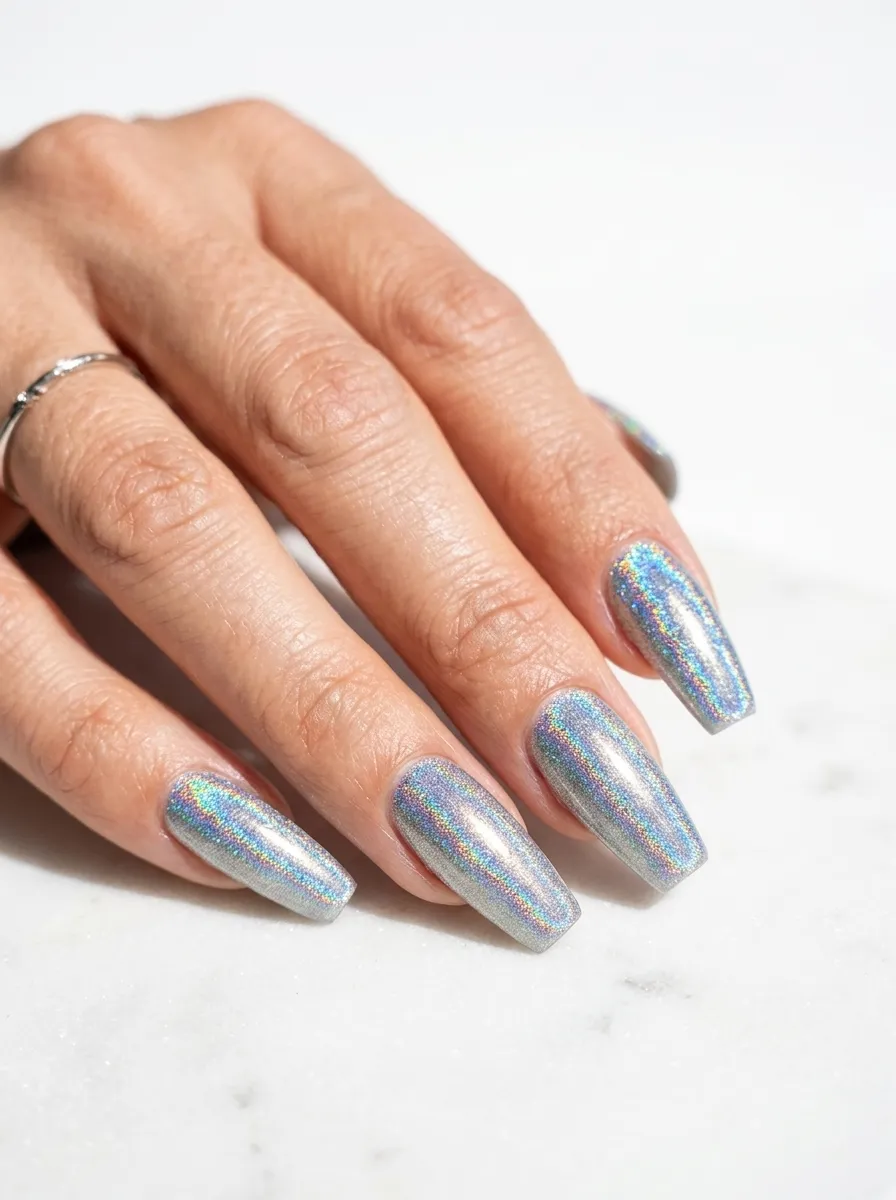
Holographic silver nails are a showstopper Christmas look that works equally well for the holiday season and New Year celebrations. The polish shifts between silver, pink, purple, and blue depending on the angle of the light, creating a mesmerizing effect.
Look for polishes labeled “holographic” or “holo” from brands like Holo Taco, Cirque Colors, or more budget-friendly options from ILNP. The key ingredient is the holographic powder or glitter particles in the formula that create the rainbow shift effect.
Apply over a black or dark base for the most intense holographic effect. Over a clear base, the effect is more subtle and wearable. Both approaches look stunning in their own way.
If you want extra drama, try a gel-style holographic polish that cures under a UV lamp. These tend to last longer and look even more brilliant.
This look requires no nail art skill at all. Just paint and the polish does all the work for you.
For the most affordable approach, buy loose holographic nail powder from Amazon for around five dollars. Apply it over a sticky base coat using a silicone applicator and it gives the same mirror-like holographic finish at a fraction of the cost.
12. Ombre Red to Gold Nails
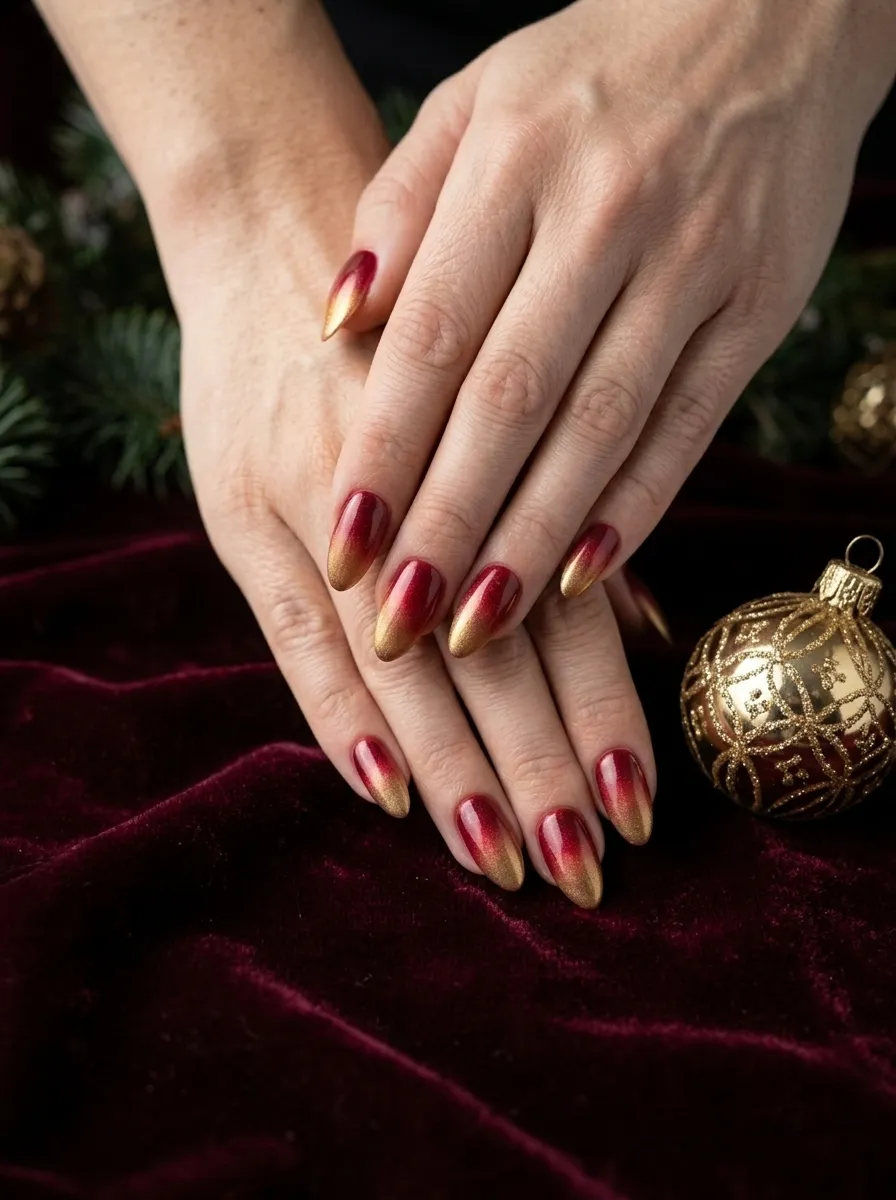
Red fading into gold is one of the most glamorous Christmas nail color combinations available. The ombre effect feels high-end and editorial while still being something you can absolutely achieve at home.
To create an ombre effect, you need a small makeup sponge. Paint your red shade on one half of the sponge and your gold shade on the other half, slightly overlapping in the middle. Then dab the sponge onto the nail in a pressing motion. Repeat several times, adding more polish to the sponge as needed.
The sponge technique takes a little practice but is the most beginner-accessible way to get a blended gradient at home.
Clean up the skin around your nails with a small brush dipped in nail polish remover before adding the topcoat. This keeps the finished result looking clean and professional.
For a more seamless result, use gel polish in both colors and blend the junction with a thin brush before curing under the lamp.
This look photographs beautifully in warm lighting and pairs perfectly with gold or ruby jewelry. It is one of those nail designs that looks like it cost a lot of money even when you spent less than ten dollars on supplies total.
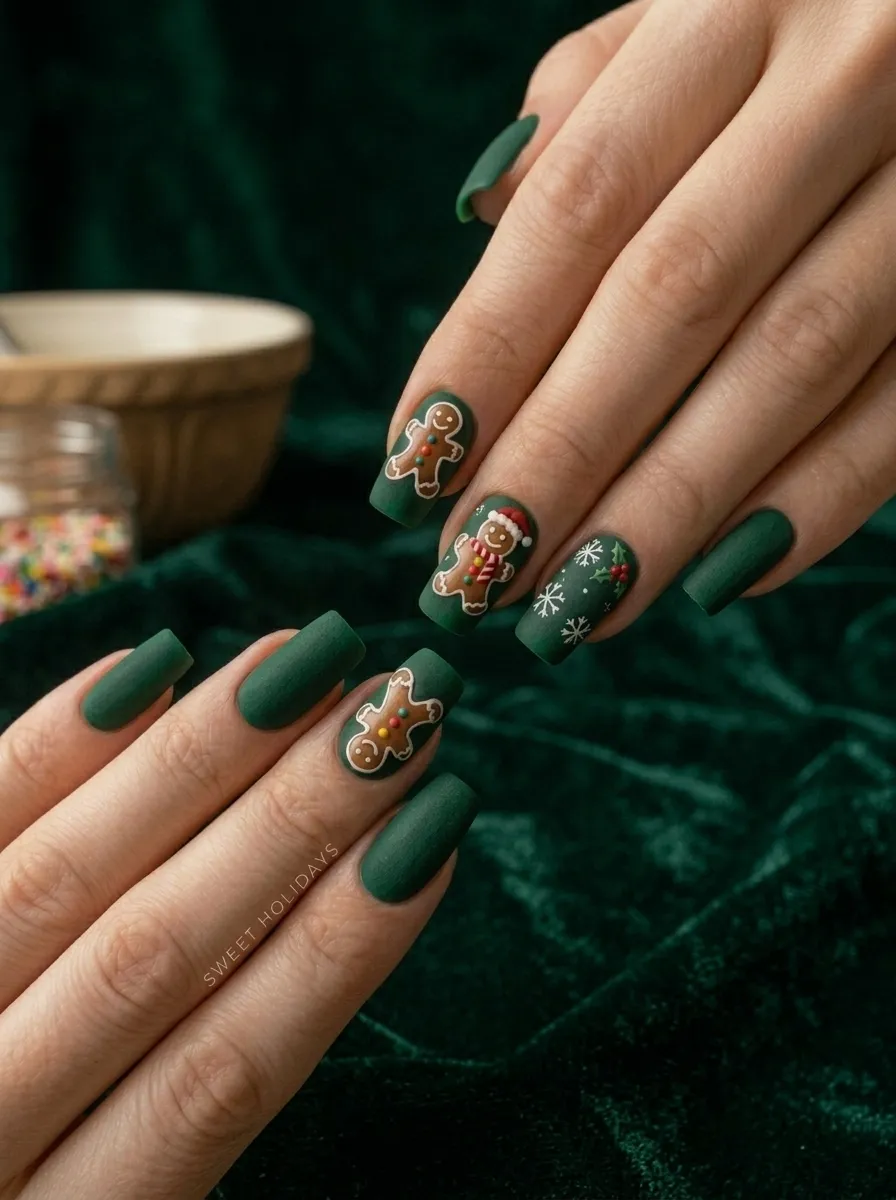
13. Gingerbread Man Nails
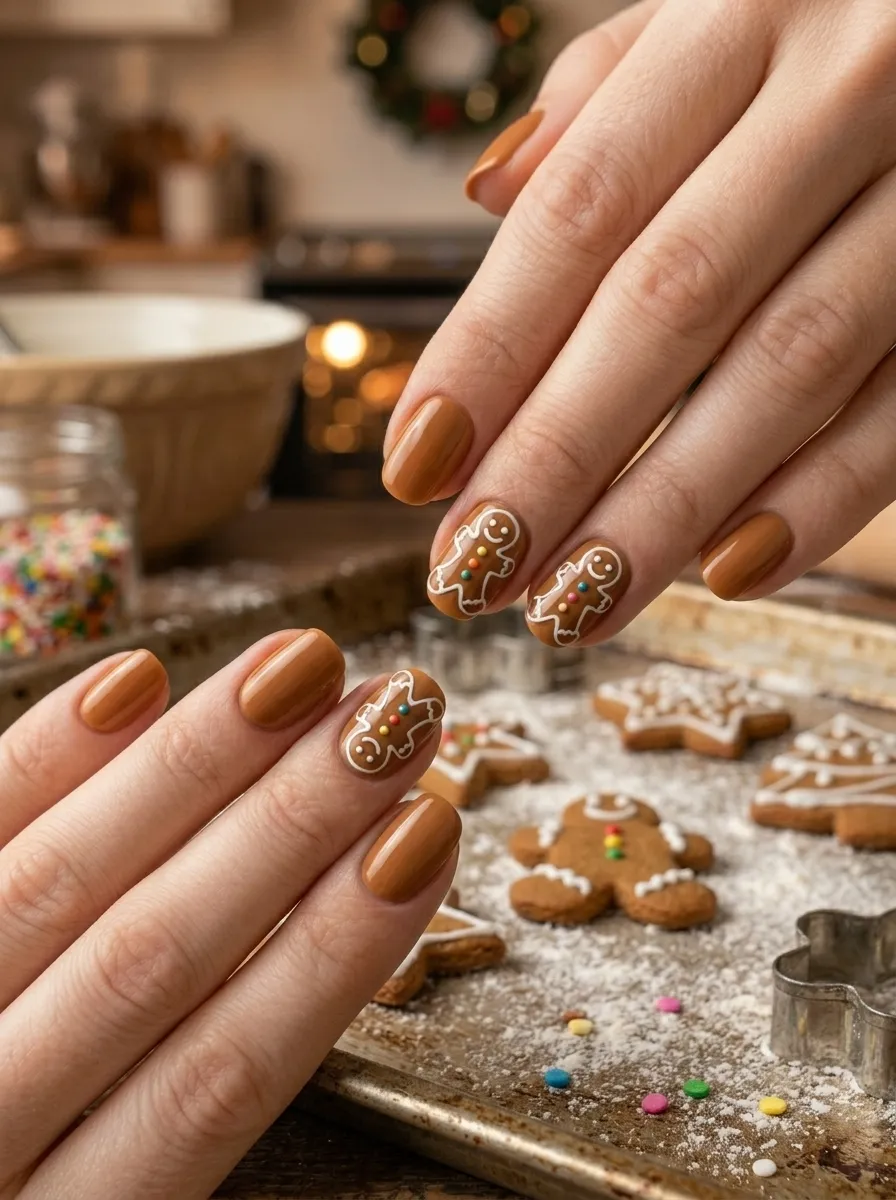
Gingerbread man nails are sweet, playful, and full of holiday personality. The design works perfectly as an accent nail paired with warm brown or cream solid nails on the remaining fingers.
Start with a medium warm caramel brown on your accent nails. Once dry, use a thin nail art brush dipped in white polish to draw the outline of a gingerbread man. Keep the shape simple: a round head, small body, two leg shapes, and two arm shapes extending from the sides. You do not need to be a skilled artist. The chunky, rustic look of a gingerbread man actually benefits from slight imperfections.
Add tiny white dots down the center of the body for buttons. Draw a simple smile and two dot eyes on the face. You can also add a tiny red bow at the neck using red polish for extra charm.
If freehand drawing feels like too much, gingerbread man nail stickers are widely available in holiday nail art kits. These stick directly onto the nail without any drawing required.
Pair this accent nail with a warm caramel or cream polish on the rest of your nails. The combination feels cohesive and festive without being too loud.
14. Ugly Christmas Sweater Nails
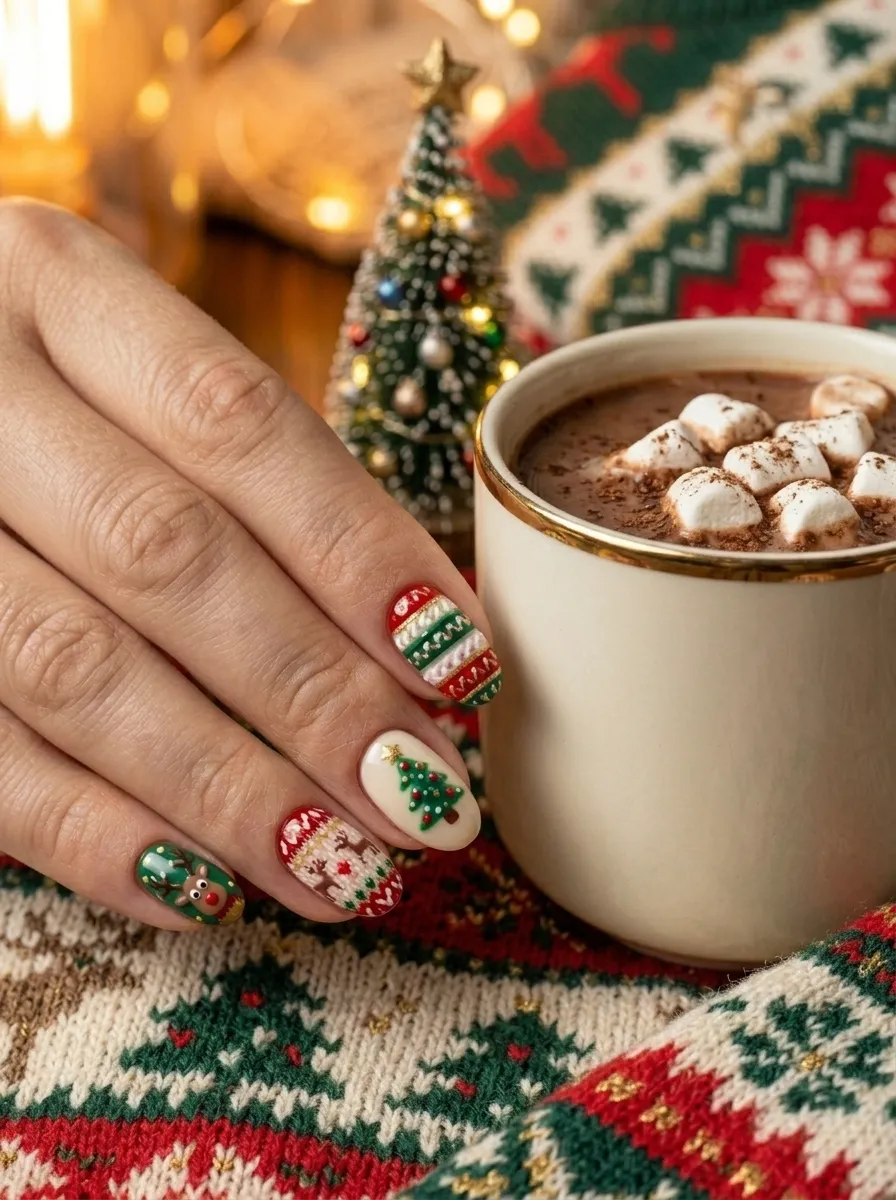
Ugly Christmas sweater nails are the most fun option on this list because they celebrate imperfection and give you permission to mix every Christmas design you love onto one hand. The concept is simple: each nail gets a different Christmas-themed design and nothing has to match.
One nail can have a snowflake, another a reindeer, another stripes, another a tiny tree, and the last one a simple red or green solid. The mismatch is intentional and that is what makes it charming.
This is an excellent option for people who get bored easily or cannot commit to just one Christmas look. It is also a great way to use up leftover Christmas nail stickers from multiple different packs.
Use a mix of red, green, white, gold, and silver polishes. The color variety ties all the different designs together and makes the hand look cohesive even with multiple patterns.
Keep the overall background colors coordinated if you want a slightly more polished version. For example, use all nails on a white base with different colored designs on top.
This is one of those looks that people immediately comment on at parties. It is fun, personality-driven, and genuinely festive in the most joyful way possible.
15. Mistletoe Nails
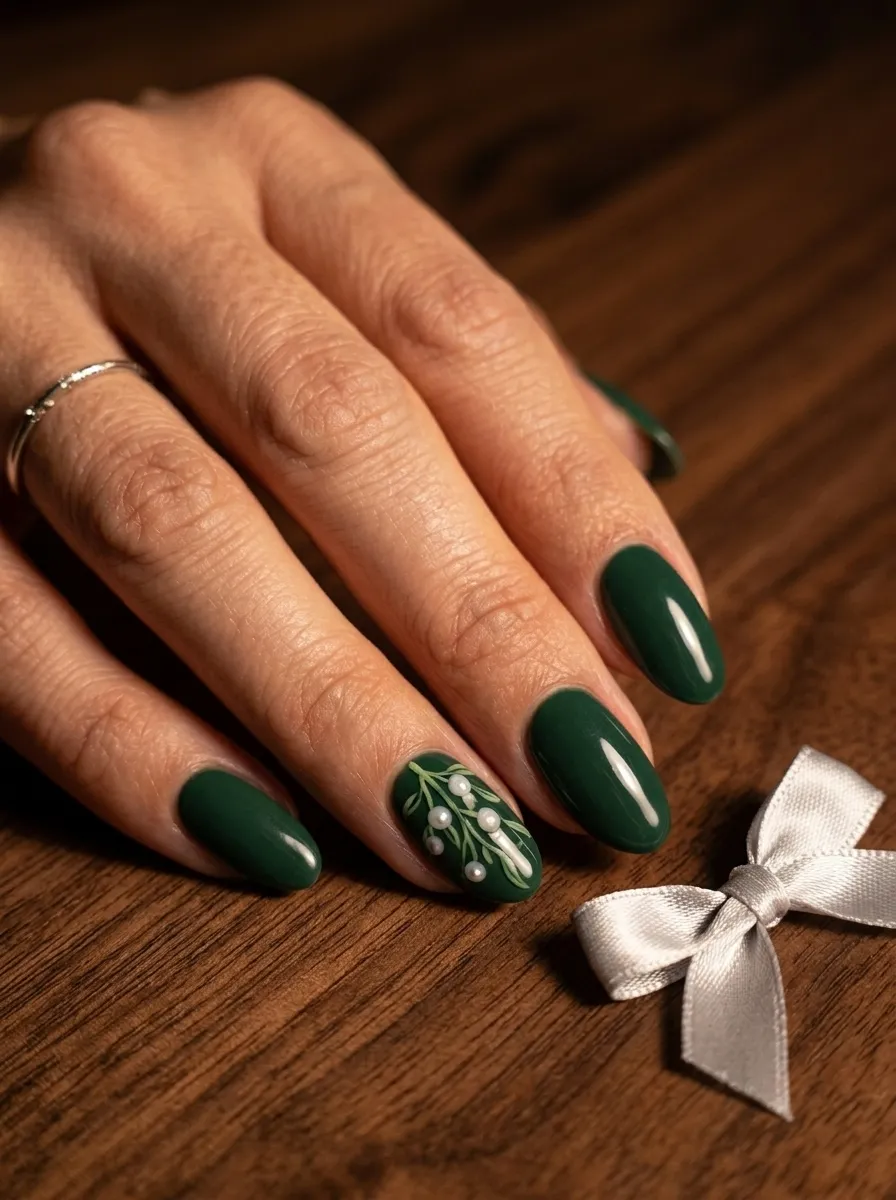
Mistletoe nails are romantic, refined, and slightly unexpected as a Christmas nail choice. The design features the classic mistletoe sprig with its round berries and green leaves, and it looks best as an accent nail on a deep green or burgundy base.
To paint mistletoe, start with your deep green or dark base on all nails. On one accent nail, use a thin brush with a slightly lighter green to sketch two or three small oval leaf shapes branching from a central stem. Keep the leaves simple and organic-looking.
Once the leaves are dry, use a dotting tool dipped in white or pearl polish to add small round berries clustered near the center. Two or three dots are enough. You can also add a tiny red bow at the base of the stem using a thin brush and red polish.
The mistletoe design looks incredibly chic and has a hand-painted watercolor quality that feels artisanal.
If freehand is not your strength, search for mistletoe nail decals online. These press-on decals replicate the design perfectly and are available for just a few dollars per sheet.
This is a nail look that reads as thoughtful and personal rather than mass-produced. It suits anyone who prefers a more grown-up and artistic Christmas aesthetic.
16. Snowman Accent Nails
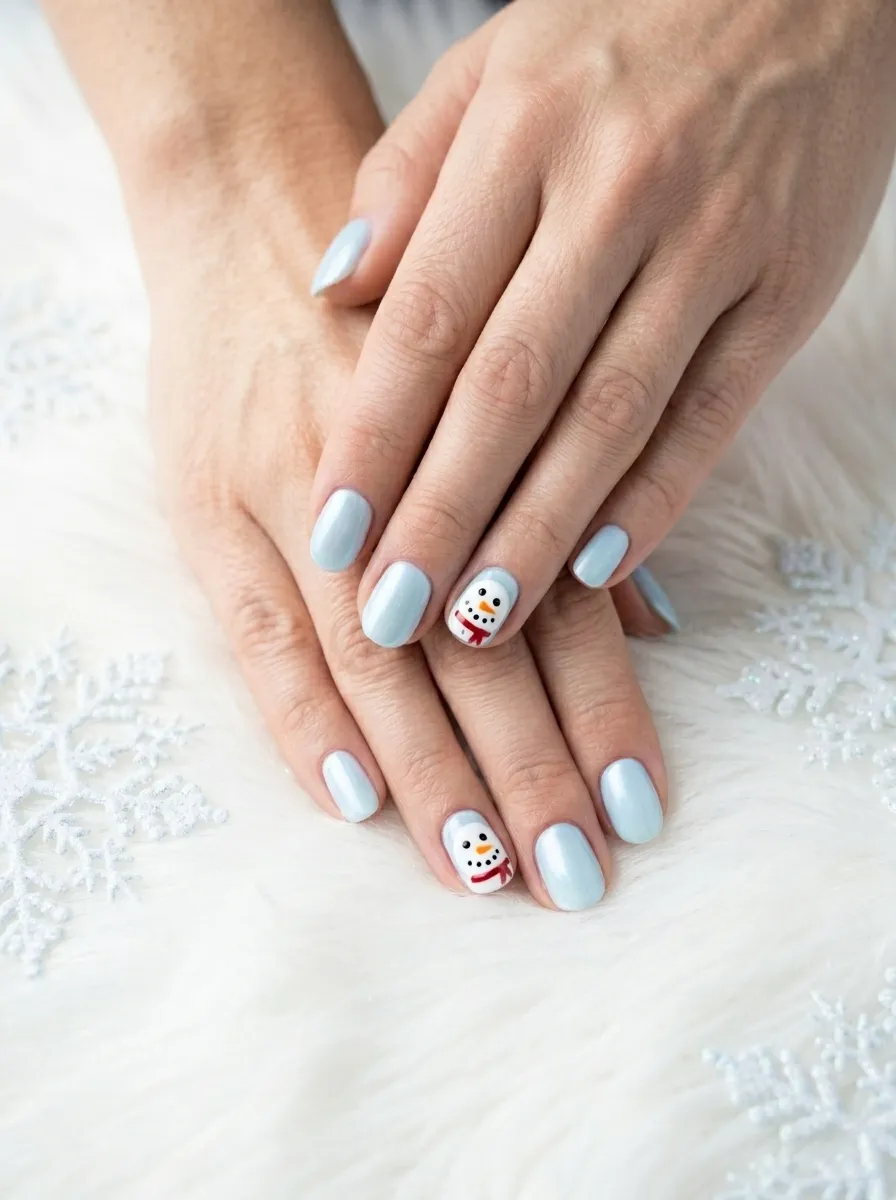
Snowman nails bring a lighthearted and joyful energy to your Christmas manicure. The design is quick to do, works on short nails, and uses polishes most people already own.
Start with a pale icy blue or soft white base on all nails. On your accent nails, paint two white circles stacked on top of each other to form the snowman body and head. Use a thin brush for clean edges.
Once dry, use black polish on a dotting tool to add two small button eyes and three body buttons down the center. Use an orange dotting tool or thin brush to add a tiny carrot nose.
For the finishing touch, add a thin stripe of red or plaid-looking stripes near the neck of the snowman to suggest a scarf. A small black top hat shape at the top of the head adds extra personality.
The whole design is made up of basic shapes, which makes it accessible for beginners. Imperfect circles and slightly wobbly lines actually add to the charm.
Snowman nails look especially cute on children and for family-friendly holiday events. Pair them with a solid pale blue or white on the remaining nails for a clean, cohesive finish.
17. Dark Green Velvet Nails
Dark green velvet nails are for anyone who wants a Christmas look that is more editorial than playful. This style leans into luxury and sophistication, using the deep color and matte finish to create something that looks genuinely high-end.
The key to this look is the matte topcoat. A glossy finish on dark green looks beautiful but a matte finish is what gives the polish that velvet-like quality that makes this design so special.
Start with two coats of a deep forest or emerald green polish. Let it dry completely before applying your matte topcoat. Any nail brand sells matte topcoats for around four to six dollars.
For an extra tactile feel, some nail brands sell actual velvet powder that you press onto tacky polish to create a genuine velvety texture. This is an optional step but it creates an extraordinary effect.
This look pairs beautifully with gold jewelry, especially chunky rings and bangles that contrast against the deep green.
It is also one of the most low-maintenance Christmas looks because there is no intricate nail art involved. Just clean color and a beautiful finish. Touch up any chips with the same polish and you are done. Simple, stunning, and completely seasonal.
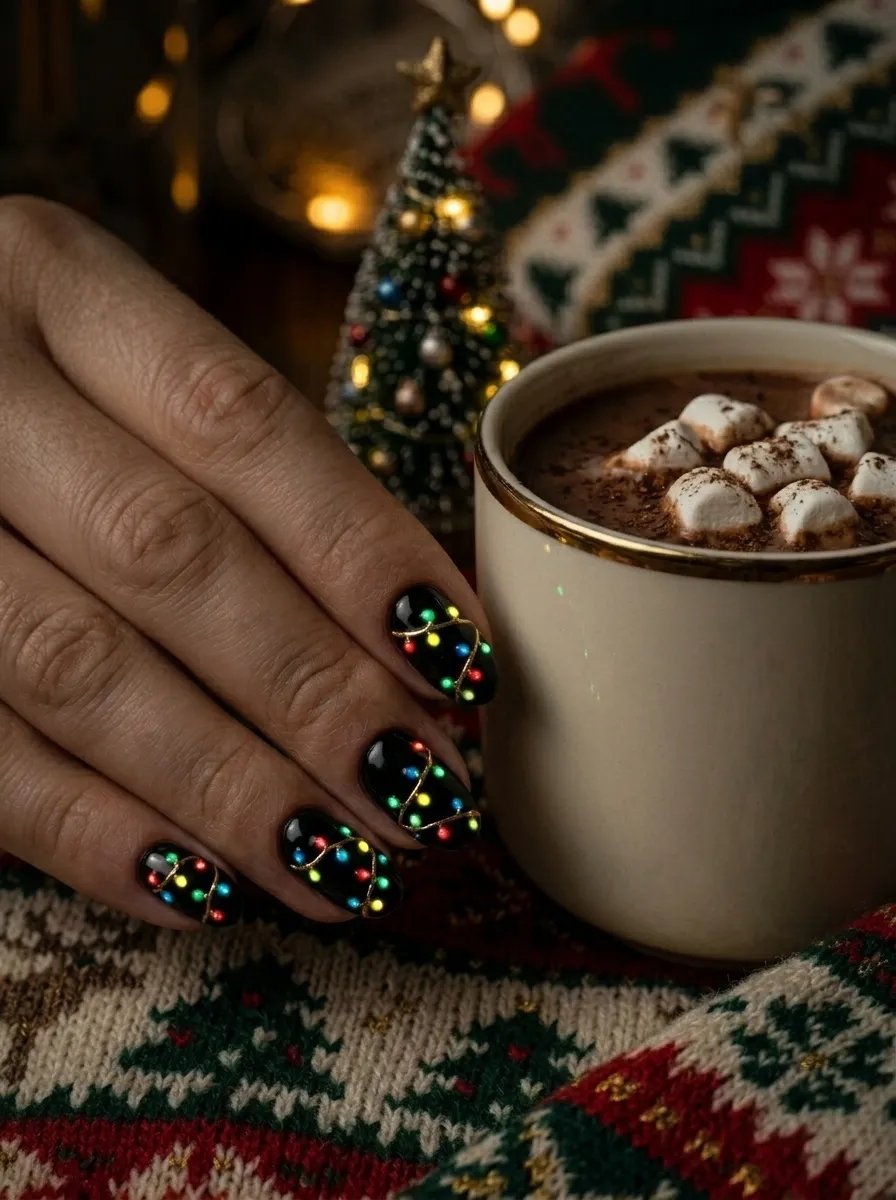
18. Christmas Lights Nails

Christmas lights nails are one of the most visually striking designs on this list. The concept is simple: a dark or black base with a thin string painted across the nail and tiny colored circles representing the light bulbs hanging from it.
Start with a black or very deep navy base. Once dry, use a thin striping brush dipped in white or gold polish to draw a gently wavy line across the nail from one side to the other. This represents the wire of the lights.
Then use a dotting tool to add small teardrop or oval shapes hanging from the line at irregular intervals. Use red, yellow, blue, green, and orange polish to color each bulb differently.
The contrast between the dark background and the bright bulb colors creates a look that is genuinely eye-catching and magical.
This design is surprisingly manageable for beginners because the bulbs do not need to be perfect. Slightly uneven dots actually look more realistic and charming.
The black background makes every color pop intensely, so even cheap dollar-store polishes photograph vividly against it.
Christmas lights nails are perfect for evening holiday events and dark lighting environments where they will genuinely look like little glowing lights on your hands.
19. Poinsettia Nails
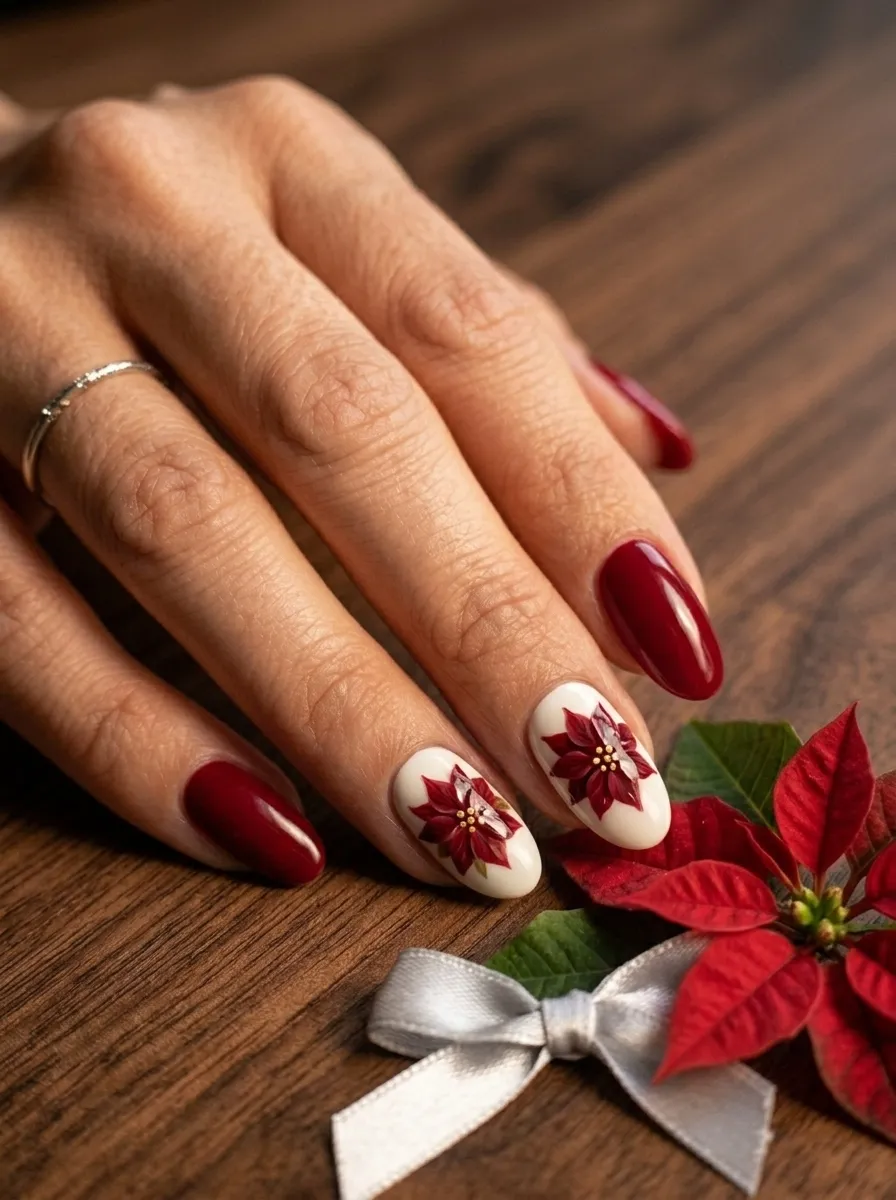
Poinsettia nails are a sophisticated floral alternative to the usual geometric or character-based Christmas designs. The poinsettia is one of the most iconic Christmas flowers, and bringing it onto your nails feels elegant and artistic.
Start with a cream or white base on your accent nails. Use a red polish and a flat nail art brush to paint elongated petal shapes radiating out from the center of the nail. Poinsettia petals are pointed and slightly curved, so try to capture that shape even loosely.
Once the red petals are dry, add several tiny yellow or gold dots clustered in the very center using a dotting tool. These represent the small center stamens of the flower.
Keep the remaining nails in a deep solid red or cream to tie the design together.
The design has a hand-painted botanical illustration quality that feels grown-up and artistic. Even imperfectly drawn petals still read as flowers, so do not worry too much about precision.
This look works especially well for people who love floral nail art but want something more seasonal than roses. It is also completely office-appropriate while still being festive and visually interesting.
20. Ice Crystal Nails

Ice crystal nails take inspiration from the way real ice and frost catch the light. The look is almost clear with a shifting, iridescent quality that goes from white to silver to pale blue depending on the angle.
Achieve this look using a chrome nail powder or an aurora iridescent powder applied over a clear or pale base. These powders are available on Amazon for around five to ten dollars and give a professional-looking result at home.
Apply a clear or very pale icy pink base coat. While the last coat is still slightly tacky, use a silicone applicator or your fingertip wrapped in a cloth to buff the chrome powder onto the nail surface. The powder will adhere and create an instant mirror-like finish.
Seal with a no-wipe topcoat designed specifically for chrome or iridescent powders. A regular topcoat will dull the chrome effect.
This design works best on longer nails where there is more surface area for the iridescent shift to be visible. But even on shorter nails it creates a beautiful frosty effect.
Ice crystal nails are unique because they look completely different in every light. Under indoor warmth they appear silver. In sunlight they shift to blue and pink. That dynamic quality makes them endlessly interesting to look at.
21. Red Plaid Tartan Nails
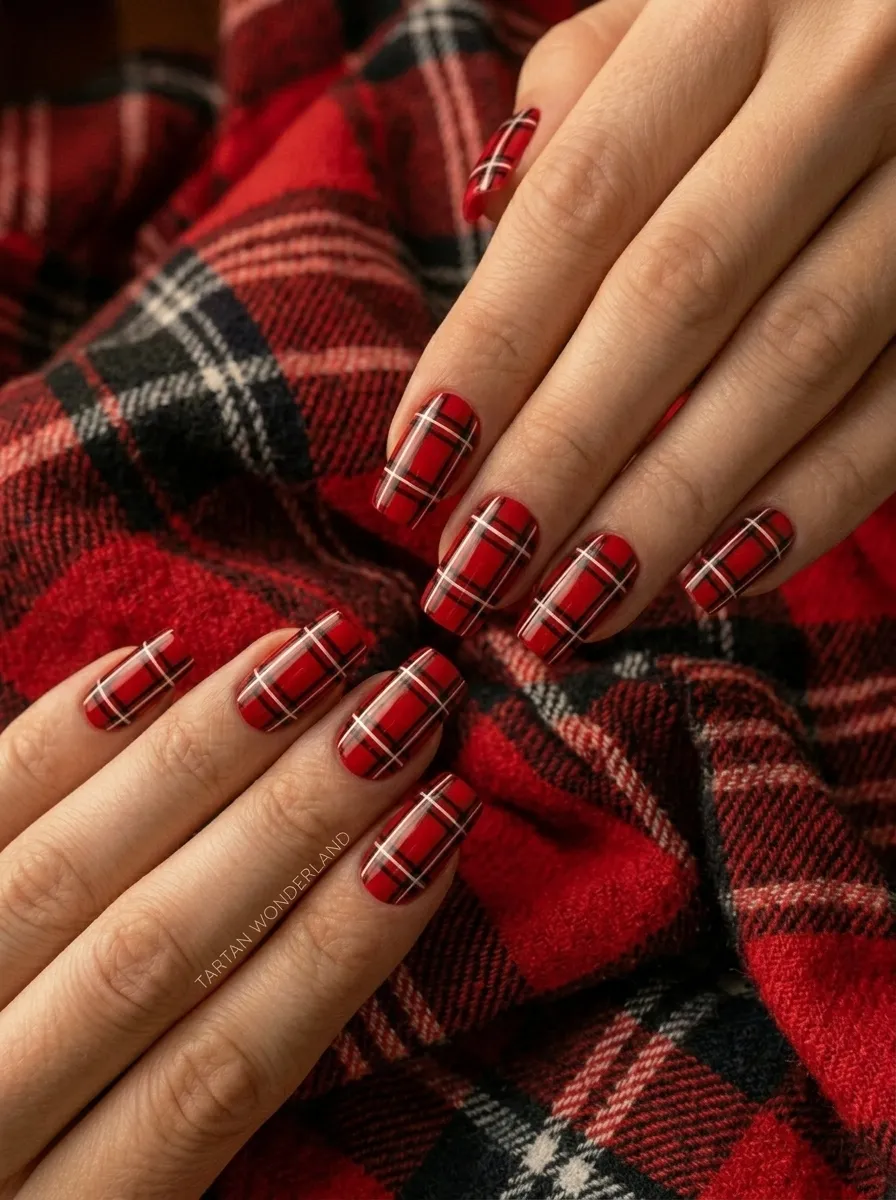
Red tartan nails are bold, graphic, and deeply Christmas-coded. The red and black plaid pattern draws on the classic holiday flannel aesthetic and looks striking on almost any nail shape.
Start with a solid red base and allow it to dry completely. Using a thin striping brush dipped in black polish, draw evenly spaced vertical lines across the nail. Then draw horizontal lines of the same width and spacing to create the grid.
Once the black grid dries, use a thin brush with white or gold polish to draw single lines slightly offset from each black line. These secondary lines are what give plaid its layered, woven appearance.
This design does take precision and patience. Work slowly and keep your brush lines as consistent as possible in width and spacing.
Alternatively, tartan nail wraps are available online and in beauty stores. These wraps come pre-printed with the plaid pattern and simply adhere over the nail for a completely effortless result.
Red tartan nails pair wonderfully with cozy holiday outfits and feel appropriately festive from early December straight through to New Year’s Day. They work on any nail length and look especially sharp on square or squoval shapes where the geometric pattern can be seen fully.
22. Gold Foil Star Nails
Gold foil star nails are the perfect finish to this list because they are glamorous, simple to apply, and make a huge visual impact with very little effort. The design uses real gold foil flakes pressed onto the nail surface, combined with tiny gold star stickers for a celestial holiday effect.
Start with a deep base color in burgundy, navy, or black. Let it dry to a slightly tacky stage, then use tweezers or a gel pick-up brush to place small torn pieces of gold foil directly onto the nail surface. Press gently to adhere.
Once the foil is placed, use a clear topcoat to seal it down. Press-on gold star stickers can go on top of or alongside the foil for extra sparkle.
Gold foil sheets are available online in craft stores and nail supply shops for around three to five dollars per pack. One pack contains enough foil for dozens of manicures.
This look feels genuinely expensive and editorial but requires no real nail art skill. The randomness of torn foil pieces is part of the beauty.
Gold foil stars work on every nail length and shape. They photograph beautifully and catch every light source in the room. This is the kind of manicure that makes people stop and ask where you got your nails done, even when you did it yourself at home for under ten dollars.
Wrap Up Your Holiday Manicure with Confidence
Christmas nails do not need to cost a lot or require professional tools to look stunning. As this list shows, there are so many directions you can take a seasonal manicure, from playful gingerbread characters to moody velvet finishes to sparkling holographic statements. The most important thing is choosing a look that genuinely excites you and matches the occasions you have coming up this holiday season. Start with one or two ideas that feel achievable and build your skills from there. Stock up on a basic nail art brush set, a few key polish colors, some nail stickers, and a good topcoat. With those simple tools, almost every idea on this list is within reach at home. Your hands are going to look magical this Christmas, and you are going to love every compliment that comes with it.