Freddy Krueger is one of the most iconic horror characters ever put on screen. His look is instantly recognizable. The red and dark brown striped sweater, the worn fedora, the scarred and melted face, and, of course, those terrifying razor claws have made him a permanent fixture in horror culture for decades. Freddy Krueger nail art takes all of that dark energy and puts it right at your fingertips. Whether you are getting ready for Halloween, heading to a horror-themed party, or simply love edgy nail designs year-round, these ideas were made for you. The best part is that most of these looks can be done at home with drugstore polish and a basic nail art brush. You do not need a salon. You do not need expensive equipment. Just some patience, a steady hand, and a genuine love for all things spooky. Here are 13 Freddy Krueger nail ideas that will give your manicure some serious horror personality. If you’re also exploring Day of the Dead nail ideas, vibrant floral patterns, colorful skull art, and symbolic designs can help you create a bold, artistic manicure that honors tradition while still looking stylish and eye-catching.
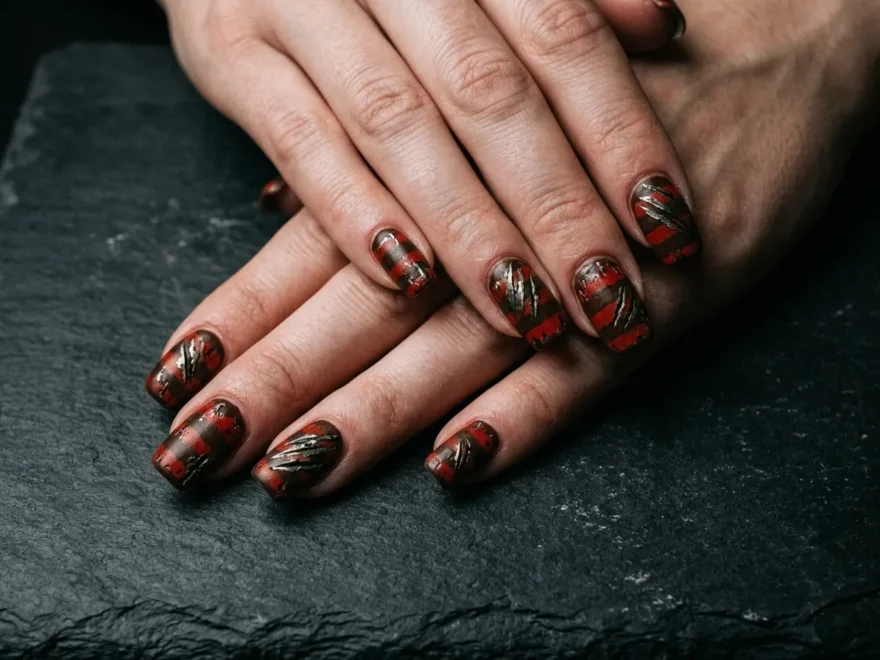
1. Classic Red and Brown Striped Nails
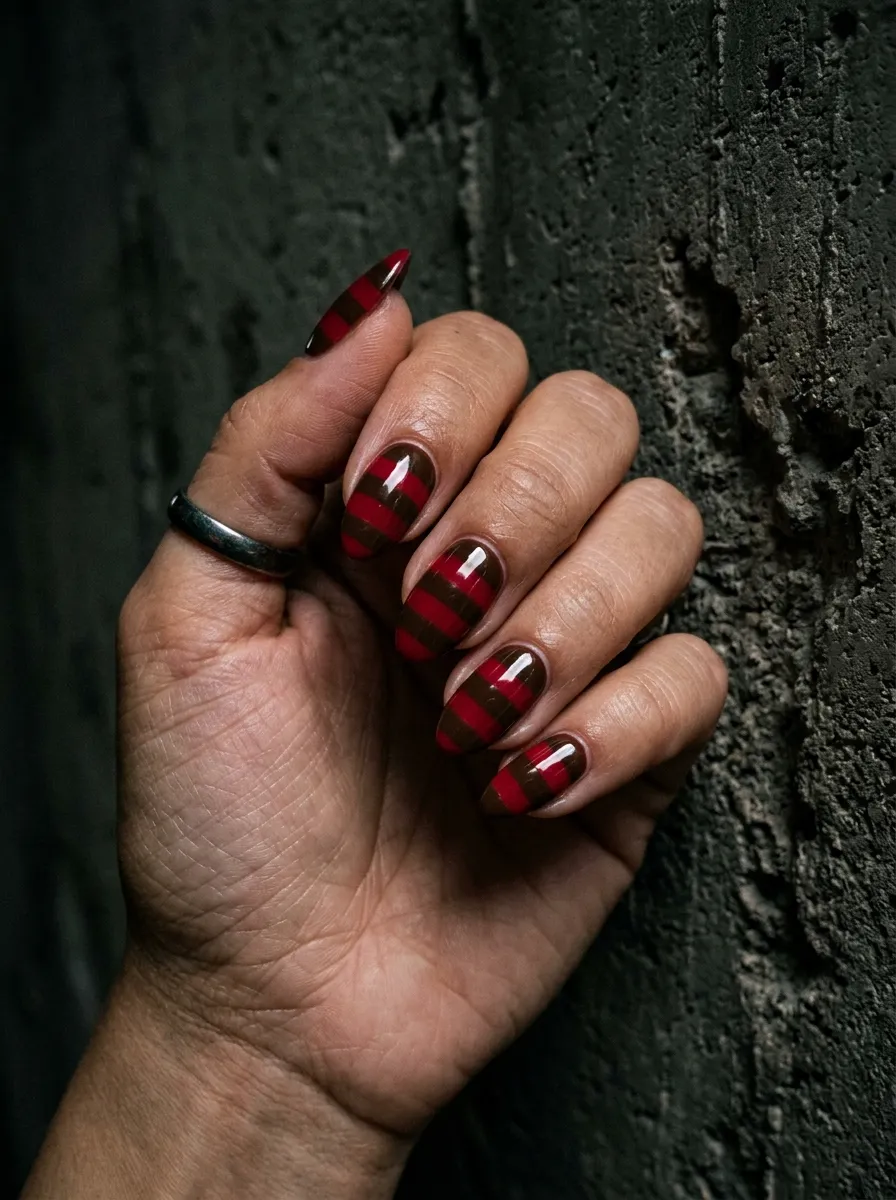
This is the most recognizable Freddy Krueger nail look out there. It pulls directly from his signature sweater and is the first design most people think of when they hear Freddy nails. The design uses just two colors: a deep brick red and a dark chocolate brown. You paint horizontal stripes across each nail, alternating between the two shades. The stripes do not have to be perfectly even. Slightly uneven lines actually give the look a raw, handmade horror feel that works in your favor.
To get started, paint your nails with a dark brown base coat and let it dry completely. Then use a thin nail art brush or a striping brush to paint thin red horizontal lines across the nail. Space them about two millimeters apart. Once dry, seal the whole thing with a glossy topcoat. This design works on any nail length. Short nails look great with three or four stripes. Longer nails can carry five or six.
You can find dark brown and deep red polishes at the dollar store or any drugstore for under two dollars each. A striping brush from Amazon costs about three dollars. This is one of the most affordable Freddy looks you can recreate at home. It is ideal for beginners who want maximum impact with the least amount of effort.
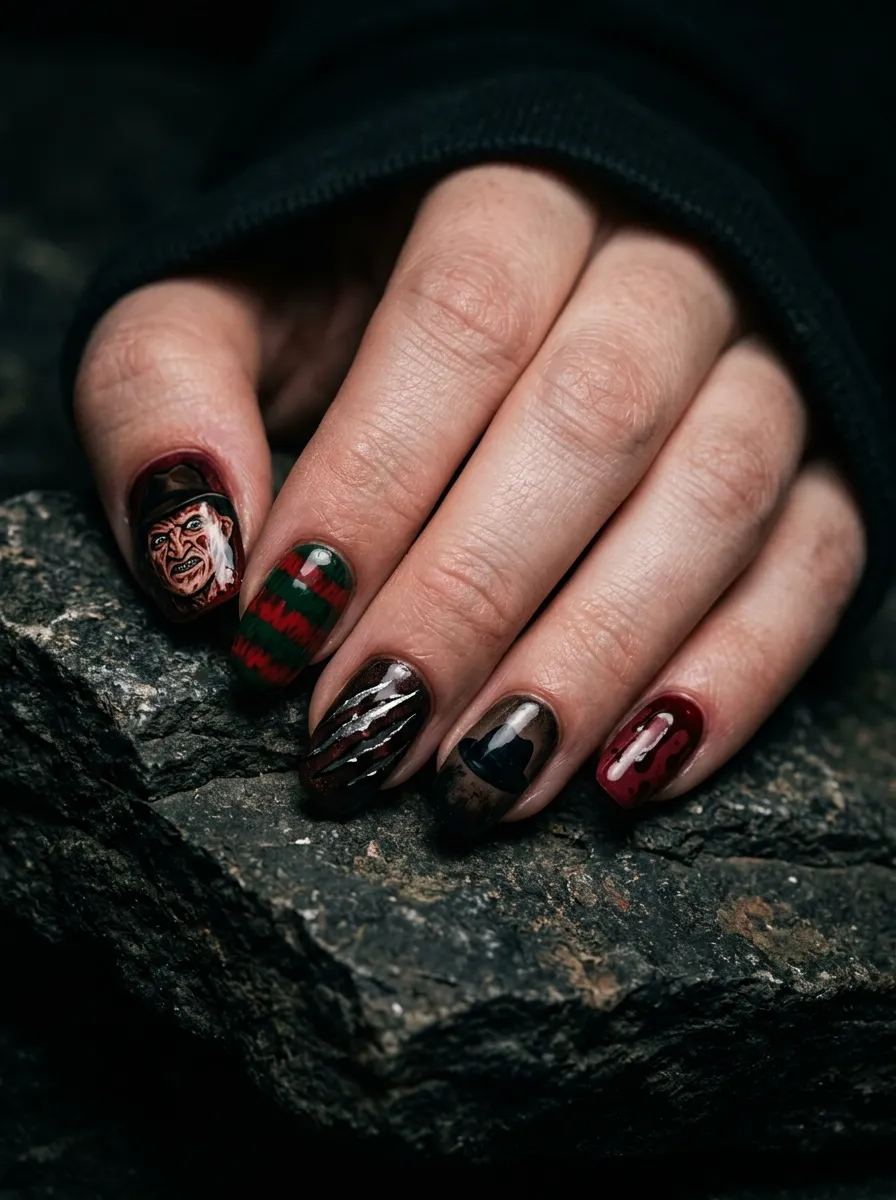
2. Rusty Razor Claw Nails
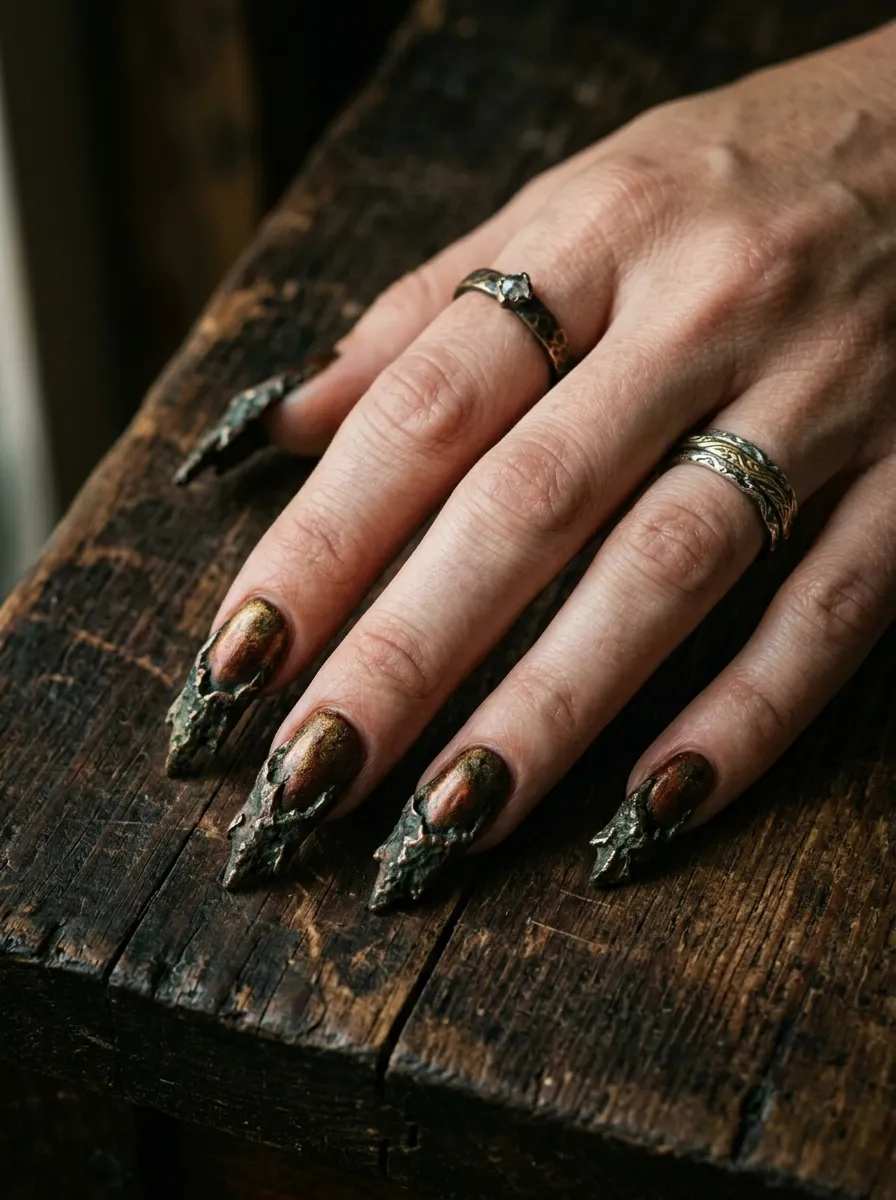
Freddy’s glove is the scariest part of his whole look. Those long, rusted razor claws are pure nightmare material. You can recreate that energy on your nails using a combination of metallic rust, dark bronze, and aged gold polish. This look works best on longer nails. Stiletto or coffin shapes give the most claw like effect and make the design read clearly from across the room.
Start with a base of dark burnt orange or rust. While the base is slightly tacky, sponge on some dark bronze near the tips. Use a dry brush technique to drag tarnished gold downward from the cuticle area. This creates a streaky, worn metal texture that looks genuinely aged. Finish the tips with a thin line of dark gray or black to mimic the sharpened claw edges.
You can find chrome and metallic polishes at beauty supply stores for around three to five dollars. The dry brush technique is easy to learn with a bit of practice. Watch one short YouTube tutorial and you will get the hang of it in under an hour. This design looks complex but is very forgiving because imperfections only add to the rusty, aged aesthetic. No two nails need to look exactly the same.
3. Burnt Skin Texture Nails
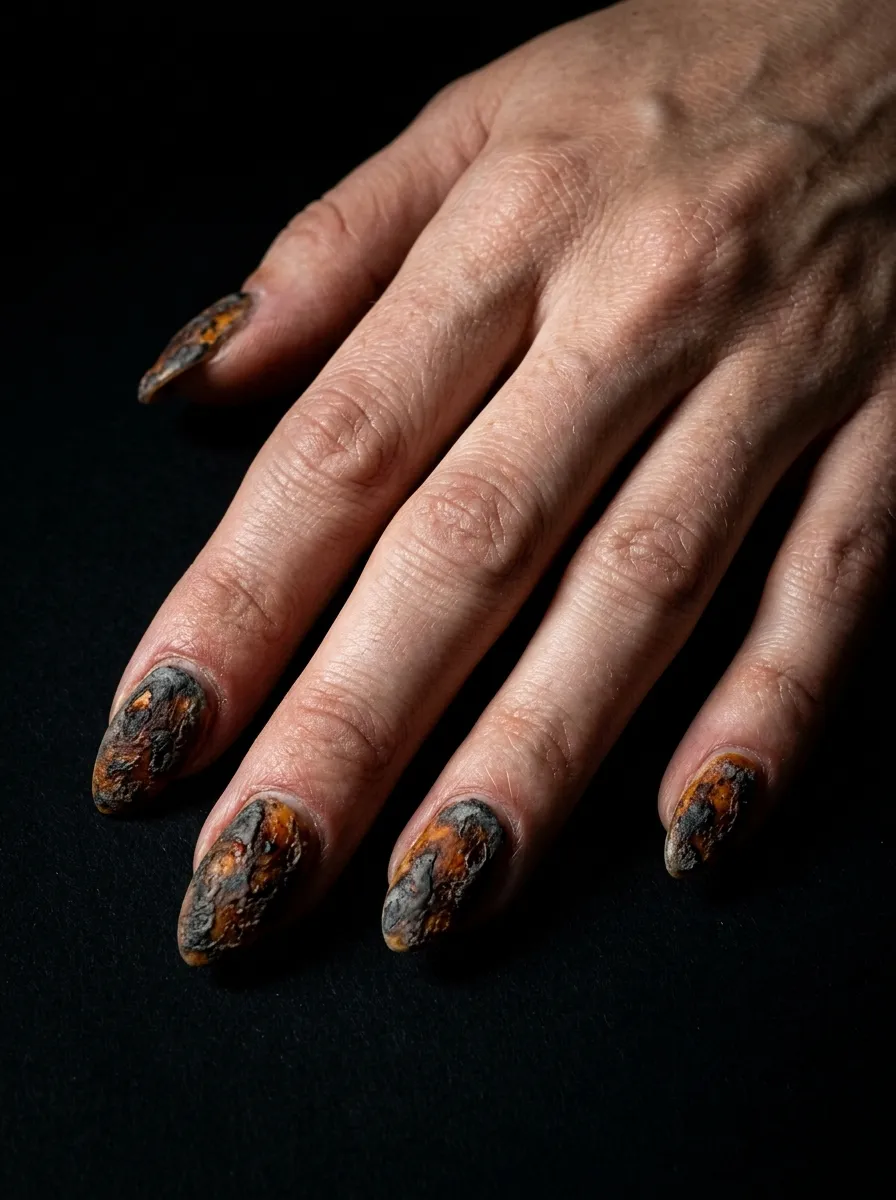
Freddy Krueger’s scarred face is one of the most unsettling images in horror cinema. His burnt, melted skin is something that sticks with you long after the movie ends. You can translate that disturbing texture into nail art using a simple sponging and stippling technique. The color palette you need is dark amber, burnt sienna, charcoal gray, and pale beige.
Start with a light tan base coat. While slightly wet, dab on irregular patches of dark brown and amber using a small makeup sponge. Then stipple in some gray and black using a torn piece of sponge. The goal is controlled chaos. You want the colors to sit in uneven, blotchy patches that look organic and deeply unsettling. No two nails should look alike.
Once dry, add some fine black lines using a thin detail brush to hint at scarring and cracked skin texture. A matte topcoat finishes this look perfectly. It removes the plasticky shine and makes the nails look raw and real. All the polishes you need for this look are easy to find. Earth tones and grays are available in any drugstore nail section for under three dollars each. This is a medium difficulty design but the result is genuinely hard to look at in the best possible way.
4. Blood Drip Horror Nails

Nothing says horror like blood drips. This design is dark, dramatic, and impossible to ignore. You start with a glossy black base on all nails. Once completely dry, use a deep crimson red polish to paint dripping shapes from the nail tips down toward the center of each nail. A thin nail art brush makes the drips look sharp and deliberate.
The trick is to paint a thick, uneven line across the tip and then pull thin lines downward at irregular lengths. Some drips should be long. Some short. Some wide at the top and thin at the bottom. Vary them so each nail tells its own story. Let the drips dry and then go over everything with a glossy topcoat. The gloss makes the red look wet and raw, which takes the horror factor up considerably.
You can buy black and red polishes at any beauty supply shop for under three dollars each. If you want a more dimensional effect, try using a nail art gel drip product from Amazon. These come in small bottles and let you create raised, textured drips for around five dollars. This design works on any nail length and any nail shape. It is bold, simple, and genuinely terrifying. Great for Halloween night or a horror movie marathon at home.
5. Freddy Hat Accent Nail
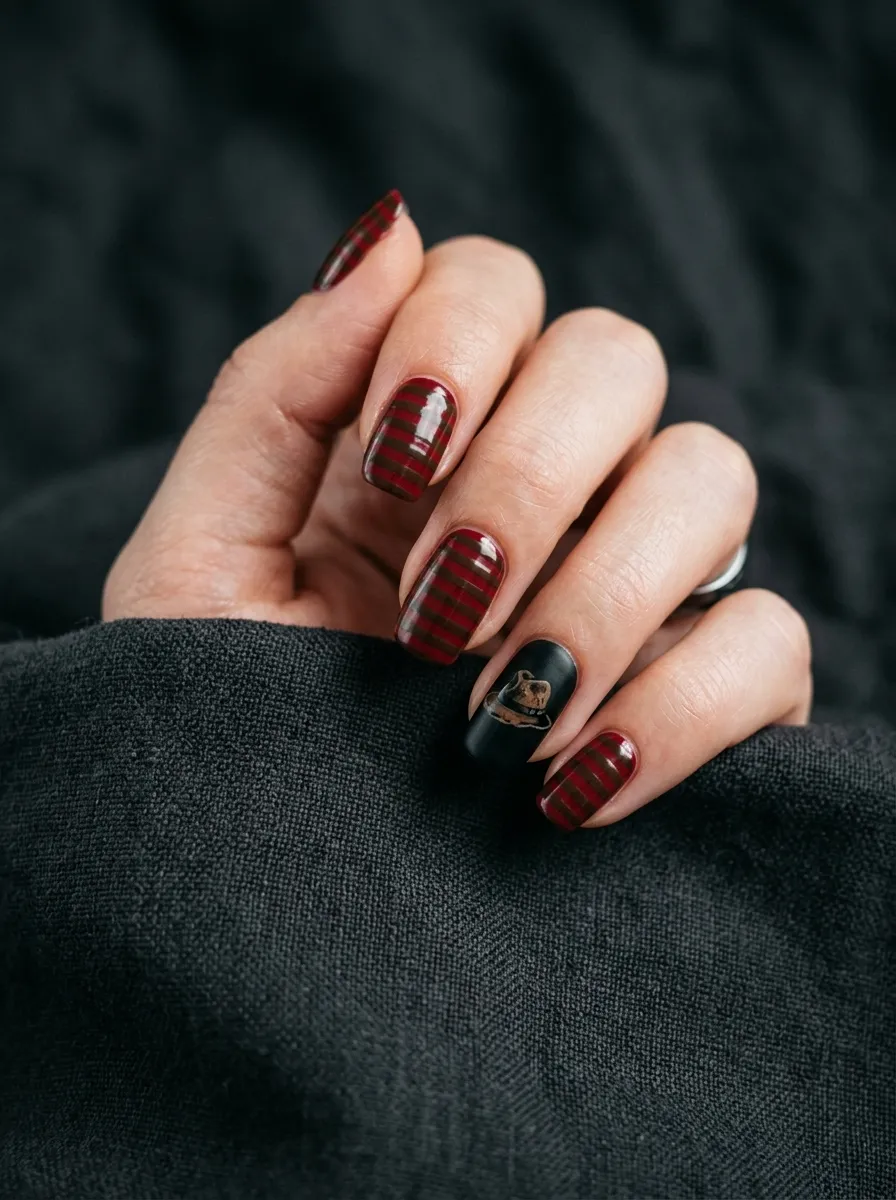
Accent nails are a great way to tell a visual story without painting all ten fingers the same way. For this Freddy look, you keep most nails in the classic red and brown stripe pattern and dedicate one nail, usually the ring finger, to a tiny fedora hat illustration. It creates a focal point that anchors the whole design.
Freddy’s hat is a worn, dark brown fedora with a beaten brim. On your accent nail, start with a black base. Then use a small detail brush to paint the hat shape in dark brown. Add a thin darker line for the brim and a tiny dot of lighter brown to hint at the hat band. It does not need to be photorealistic. Even a rough silhouette instantly reads as Freddy’s hat when placed against the stripe pattern on the other nails.
If freehand painting feels too challenging, try using a nail stamp. Stamping plates with horror and hat designs are available on Amazon for around six to eight dollars. The stamps do all the work for you and give you a clean, sharp result without any artistic skill required. The hat accent breaks up the stripe pattern beautifully and gives the full look a storytelling element. It takes the design from simple Halloween nails to a genuine character tribute.
6. Nightmare Ombre Nails
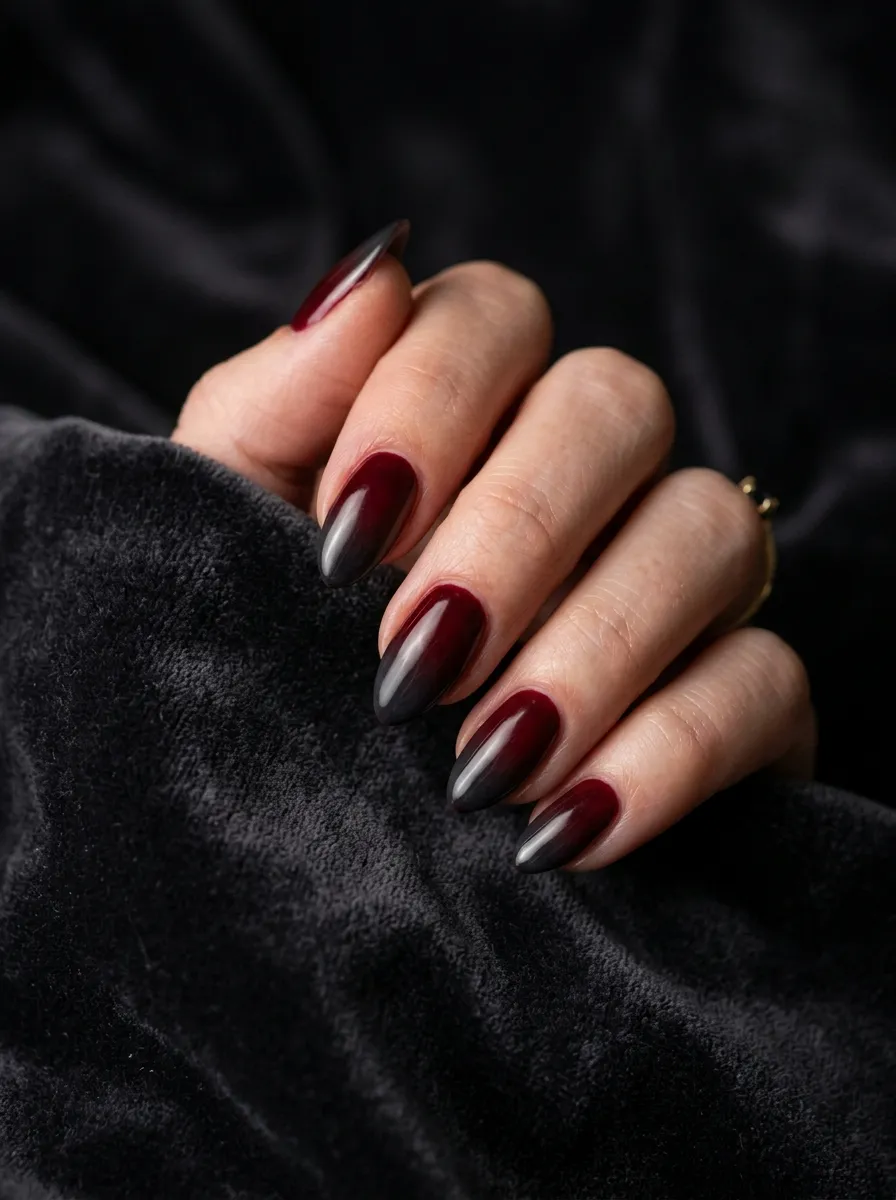
Ombre nails are a popular technique for a good reason. The gradient effect is visually stunning and far easier to do than it looks. For a Freddy Krueger version, you work with his signature color palette of deep red, burnt orange, and near black to create a sinister, smoky look.
Paint your nails with a dark red base coat and let it dry completely. Then take a small makeup sponge and dab a small amount of dark charcoal or black onto the tip area. Press and rock the sponge gently to build up the color. The shift from red to near black gives the nails a dramatic, atmospheric quality that feels genuinely unsettling. You can add a third color in the middle, a dark rust or burnt orange, to give the gradient more depth and dimension.
Once the colors are blended to your liking, clean up the skin around your nails with a small brush dipped in acetone. Seal with a glossy topcoat. This look pairs well with one solid black nail on each hand for extra drama. Red and black polish are the most commonly available colors in any store and cost almost nothing. This ombre style looks salon quality even when done at home by beginners. It is moody, dark, and very much on brand for a Freddy Krueger themed manicure.
7. Claw Glove Silhouette Nails
Freddy’s glove is the symbol of everything he represents. Painting a tiny glove silhouette on each nail is a clever, graphic way to pay tribute to the character without going full horror gore. The design is minimal, striking, and genuinely cool.
Paint all nails matte black first and let them dry completely. Then use a thin detail brush and bright orange or rust red polish to draw the outline of a gloved hand near the base of each nail. The silhouette does not need to be intricate. Just the basic shape of a hand with four long pointed blades extending from the fingers reads immediately as Freddy’s glove. Keep the lines thin and sharp. The matte black background makes any colored detail pop dramatically.
If freehand silhouettes feel too difficult, print a small reference image and keep it beside you while you paint. You can also use a nail art stencil for the shape. Halloween stencil sets are sold at craft stores for around four dollars. This design looks like something lifted from a professional nail artist’s social media page. The contrast between the matte black base and the bright orange silhouette is striking and unexpected. This is one of the better Freddy nail ideas for people who prefer subtle horror over full on gore.
8. Freddy Face Mini Art Nails
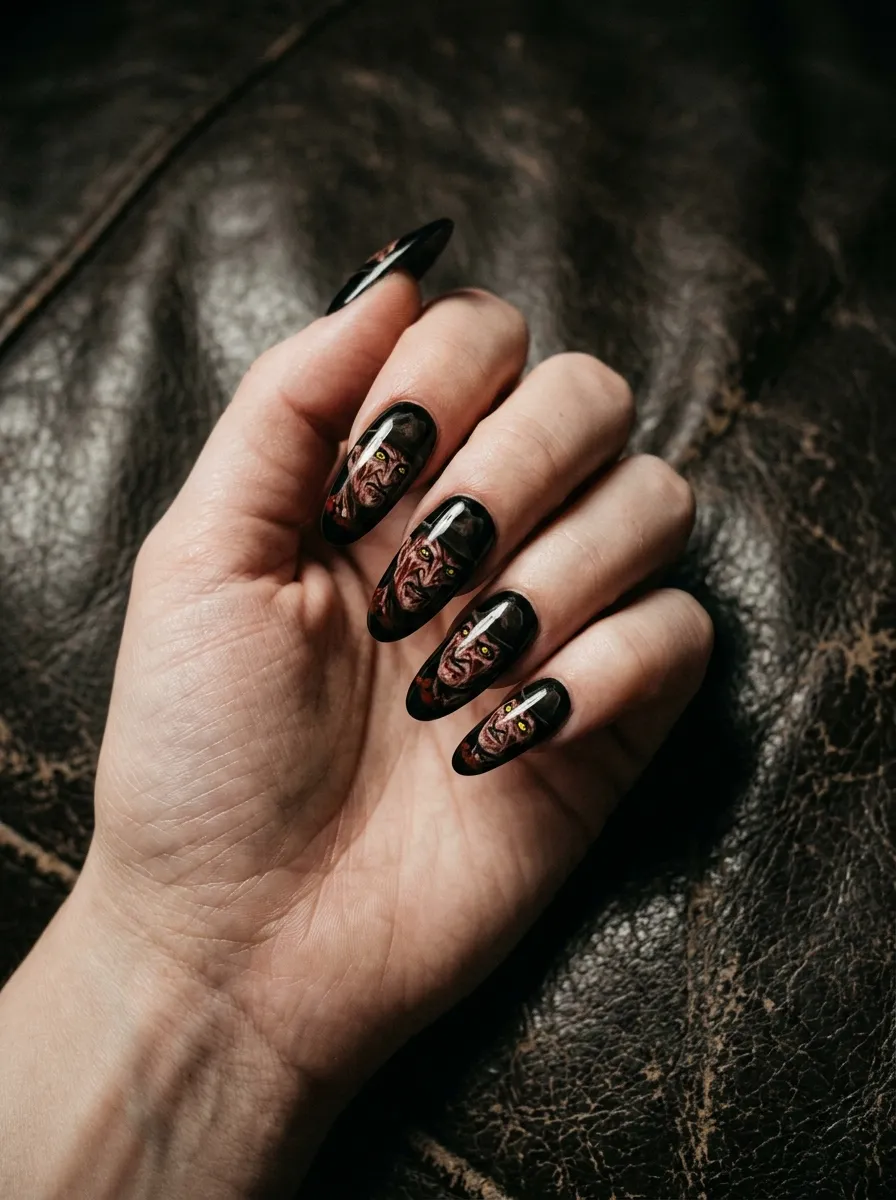
Painting Freddy’s face on your nails is the ultimate tribute for serious horror fans. This is a more advanced design but the result is genuinely remarkable. Start with a black base on all nails and let it dry fully. Use a small detail brush to sketch the rough outline of a face, keeping it simple with an oval or slightly rectangular shape.
Fill the face shape in with pale tan or light beige. Then use dark brown and burnt orange in rough, irregular patches to build up the scarred skin texture. Add two small oval shapes for the eyes and fill them with bright yellow. Use a tiny black dot for each pupil. Outline the face lightly in dark brown and add the hint of a hat brim across the top using dark brown or black. The face does not need to be perfectly realistic. A slightly stylized, sketchy version of Freddy reads clearly and has its own artistic charm.
If you want this look without the freehand work, search Etsy for Freddy Krueger nail decals. Many sellers create custom horror character nail stickers for around five to eight dollars per sheet. You simply stick them onto your base coat and seal with a topcoat. This saves hours of effort and delivers a result that looks polished and intentional. A great option for fans who want the full face look without the pressure of painting it themselves.
9. Distressed Rust and Copper Nails
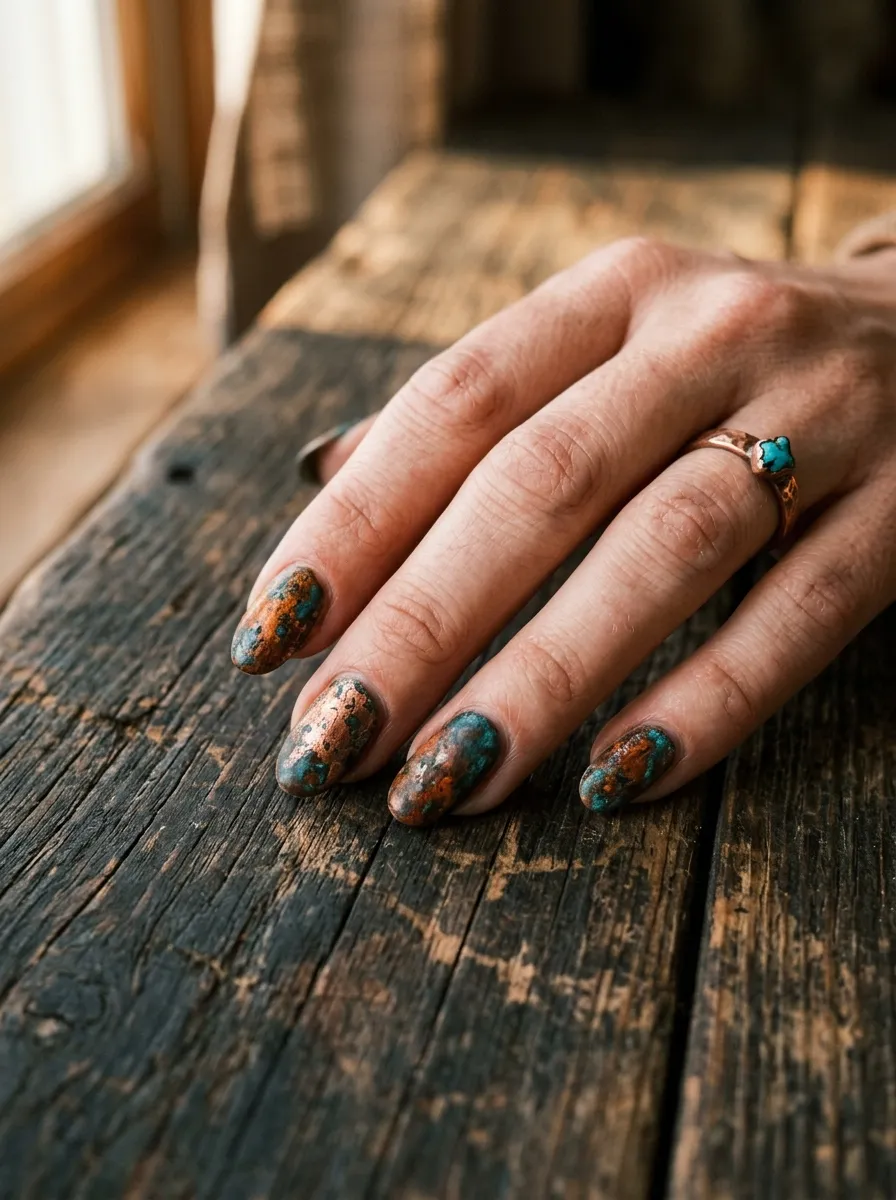
Freddy’s glove is old, rusted, and corroded from years of nightmare world use. You can capture that aged metal look with a distressed rust and copper nail design. This is an abstract look inspired by his weapon rather than his face or clothing, which makes it a bit more wearable outside of Halloween.
Start with a base of deep burnt orange. While it is still slightly tacky, use a crumpled piece of aluminum foil to dab on dark rust brown in random patches across the nail. Then lightly sponge on some dark metallic copper. For extra realism, add tiny dabs of dark teal or dark green in the shadow areas to mimic corrosion and patina. The result looks like a piece of genuinely old, rusted metal.
Seal it with a matte topcoat to remove the shine and make it look worn and real. Metallic and rust colored polishes are easy to find in any beauty store for a few dollars each. The aluminum foil dabbing technique is a free DIY trick that creates organic texture without any special tools. This design is abstract enough to wear outside of Halloween season as well. People who do not know Freddy will admire the aged metallic look. Horror fans will recognize exactly where you got the inspiration.
10. Claw Scratch Effect Nails
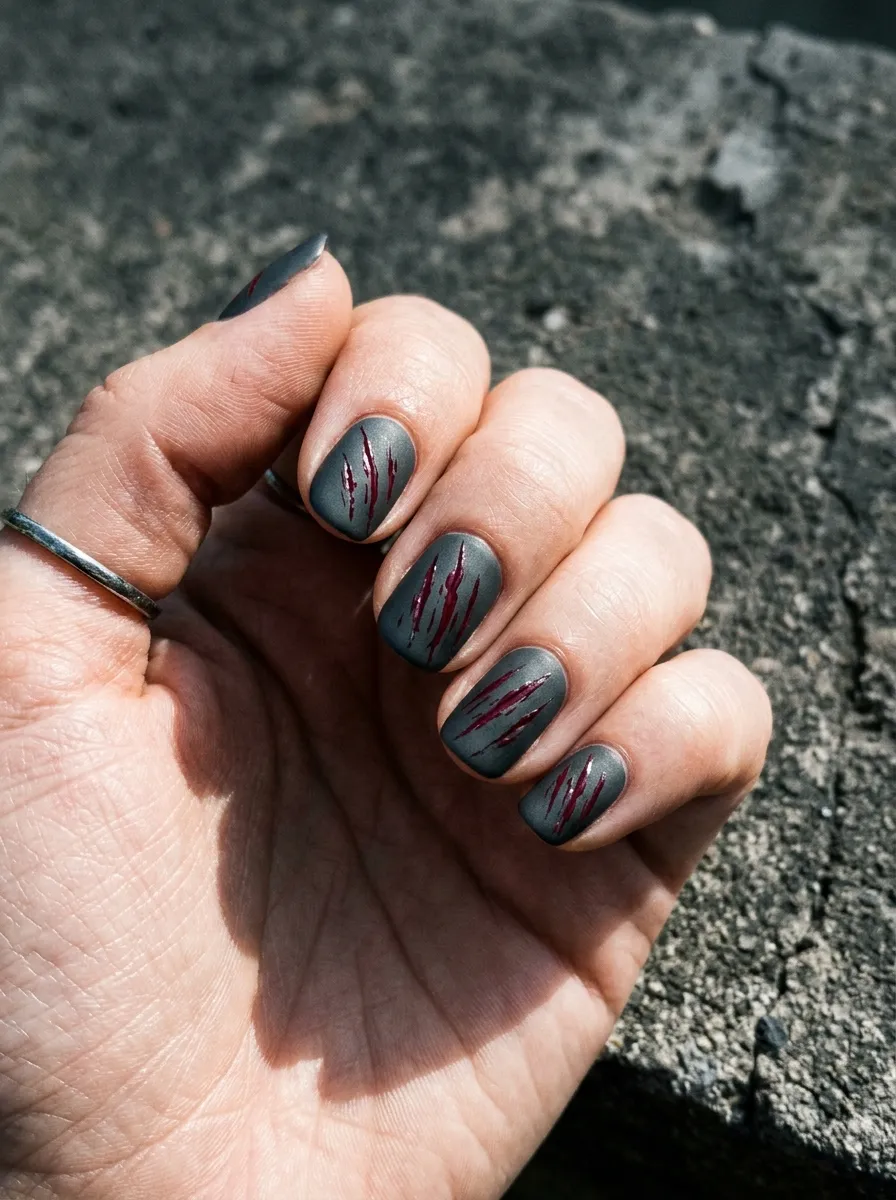
Freddy’s claws leave long, deep gouges in everything they touch. That violent detail translates directly onto nails in a way that is simple but very effective. Paint all nails a dark gray or charcoal base coat and let them dry fully. Then use a thin striping brush and deep red polish to paint three or four irregular diagonal lines across each nail.
The lines should be slightly uneven and jagged, not perfectly straight. Some can have small breaks in them. Some can be thicker at one end and taper off to a fine point. These small variations make the scratches look real and violent rather than neat and decorative. Once the red lines are fully dry, use a tiny brush to add a very thin dark brown or black shadow line alongside each red scratch. This gives each mark a slight dimensional quality, as if the nail surface was actually torn open.
Finish with a glossy topcoat. The gloss makes the red lines look raw and vivid. This whole design uses just three polishes: gray, red, and dark brown or black. All three cost under ten dollars combined from any drugstore. The scratch effect works equally well on short and long nails. It is quick to execute once you have practiced the freehand lines a couple of times on paper or a practice nail.
11. Gothic Black with Red Stripe Nails
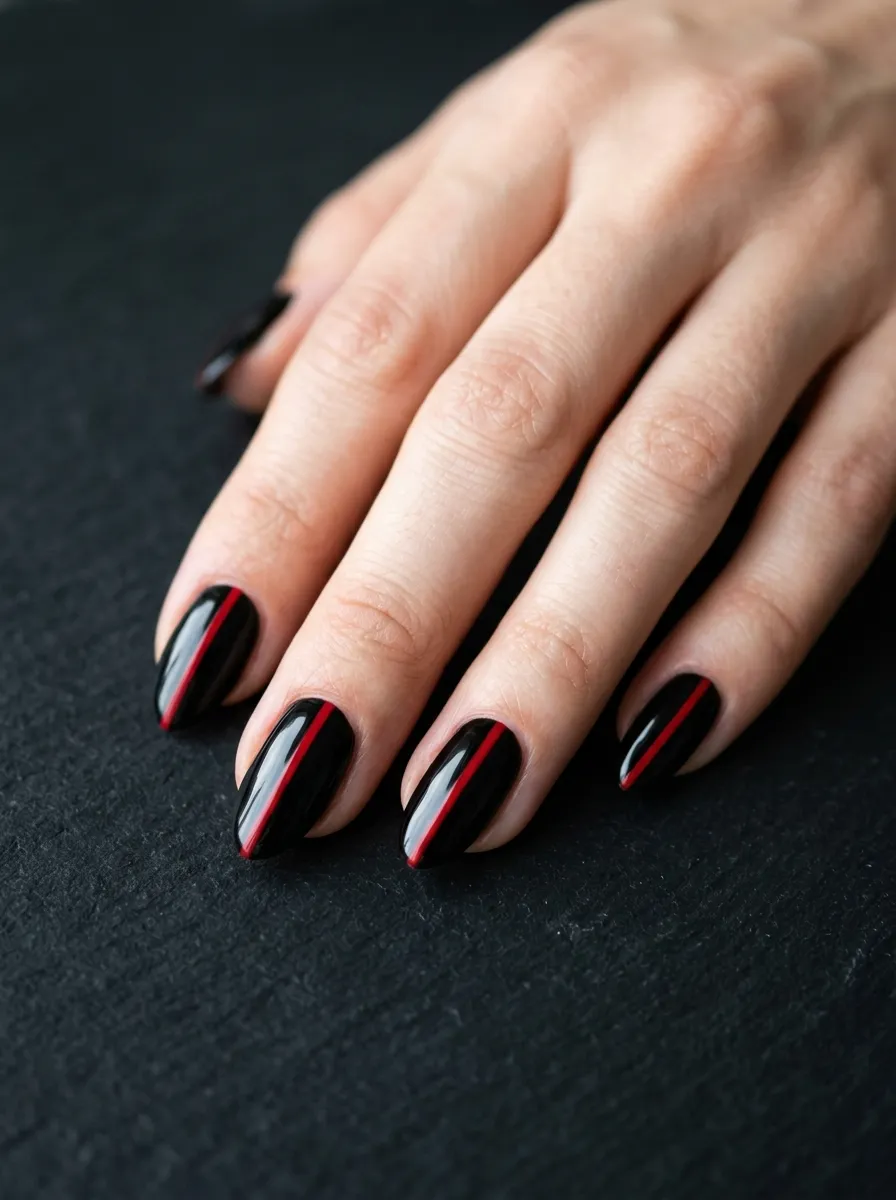
Sometimes the most powerful designs are the most simple ones. This minimal look takes the Freddy Krueger color palette and strips it down to its two most essential elements. Black base. One red stripe. That is the entire design. The result is sleek, gothic, and surprisingly elegant for a horror themed manicure.
Paint all nails with a glossy black base and let it dry completely. Then use a thin striping brush to paint a single straight red line down the center of each nail from cuticle to tip. Keep the line thin, around one to two millimeters wide. Finish with a clear topcoat to seal and protect everything.
This is a design you can wear to work, to school, or out with friends without it reading as too intense. But horror fans will immediately recognize the reference. It is a quiet nod to Freddy that functions as everyday nail art. The whole design takes about ten minutes once the base coat is dry. All you need is a black polish, a red polish, and a striping brush. Total cost is under five dollars from any dollar store or drugstore. This is also the best option for anyone who loves the Freddy aesthetic but wants something they can actually wear every day rather than just on Halloween.
12. Glow in the Dark Nightmare Nails
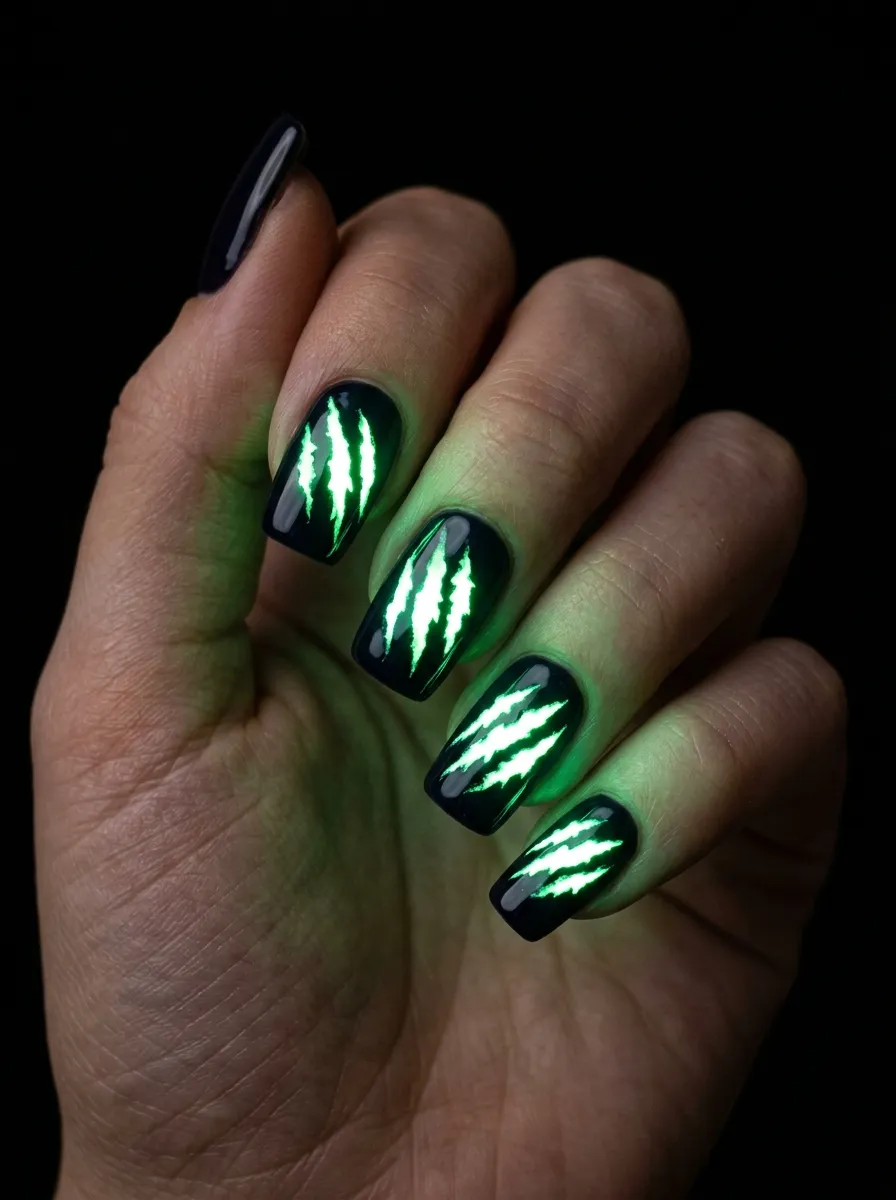
Glow-in-the-dark nail polish is one of the most exciting and affordable ways to push a Halloween nail look into genuinely spooky territory. For this Freddy design, you use a dark base, either black or very deep red, and then paint claw scratch marks using glow-in-the-dark polish on top.
In normal daylight, the scratch marks look pale and subtle, almost invisible against the dark base. In the dark, they come alive in eerie green or white and stop people in their tracks. The contrast between the dark base and the glowing marks is the whole point of this design. To do it, paint your dark base and let it dry completely. Then use a thin brush and glow-in-the-dark polish to paint the claw scratch marks across each nail. Apply two coats of the glow polish for maximum brightness.
Glow-in-the-dark polishes are widely available. Brands like Wet N Wild and Sally Hansen make affordable versions for around four to six dollars. You can find them at most drugstores, beauty supply stores, and dollar stores during the Halloween season. This design is perfect for costume parties because the effect surprises people the moment the lights go down. Hold your nails up in a dark room and the claw marks glow. It is a simple party moment that gets a huge reaction every single time.
13. Full Horror Story Nails
Why choose one Freddy design when you can wear all of them at once? The full horror story nail look combines multiple designs across all ten nails to create a complete visual narrative that covers every part of the Freddy Krueger legend. Each finger becomes its own chapter in the story.
Here is one way to arrange it. Thumb: classic red and brown stripes. Index finger: blood drips on black. Middle finger: claw scratch marks on dark gray. Ring finger: Freddy hat silhouette on black. Pinky: glow in the dark claw marks on deep red. Repeat on the other hand with slight variations between fingers so no two nails across both hands look exactly the same.
Each nail becomes its own small piece of horror art. Together they tell the full Freddy story across your fingertips. This look does require more time and more polishes than a single concept design. Plan to spend about an hour on the full set. Budget around fifteen to twenty dollars for all the polishes you need, though if you already own some of the shades from earlier designs in this list, the cost drops significantly.
This is the showstopper option for Halloween events, horror conventions, or costume competitions. It is the nail look that gets the most attention and the most questions from other people. And the answer to how you did it is simpler than they expect. Just one nail at a time, one design at a time.
Freddy Krueger nail art is one of the most creative and genuinely fun ways to celebrate horror season. These thirteen ideas cover everything from beginner-friendly stripe patterns to advanced face art and full character storytelling across all ten fingers. You do not need a salon or expensive tools to pull off any of these looks. Most of them cost under ten dollars to do at home with basic brushes and polishes from your nearest drugstore. Start with whichever design feels most achievable for your current skill level. Practice on a nail wheel or a piece of paper before committing to your actual nails. Take your time with each design and never rush the drying steps. Horror nail art rewards patience. Once you have mastered one or two of these looks, combine them into your own custom Freddy set. Your nails are your canvas. Make them nightmare worthy.