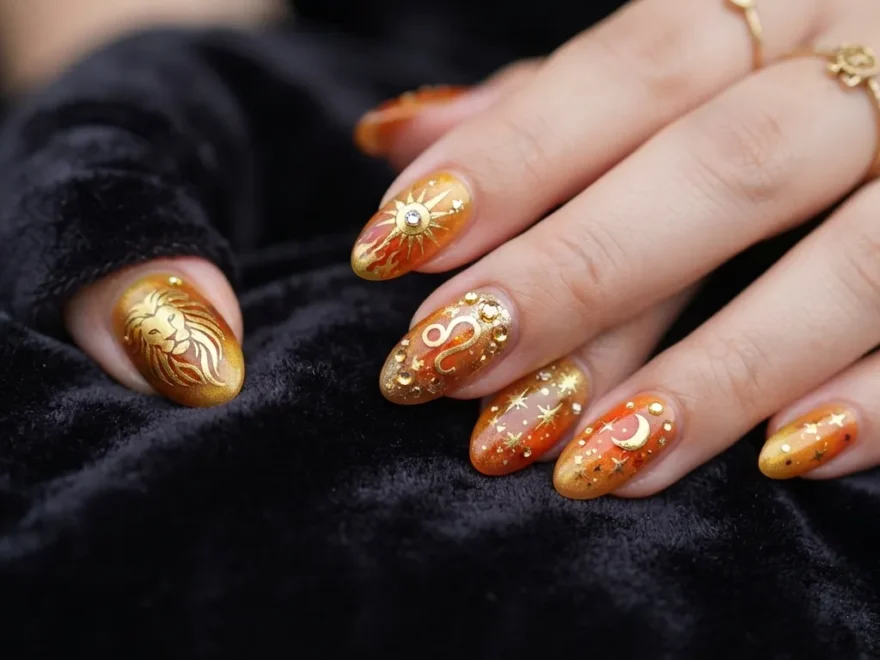
1. Gold Foil Leo Glam
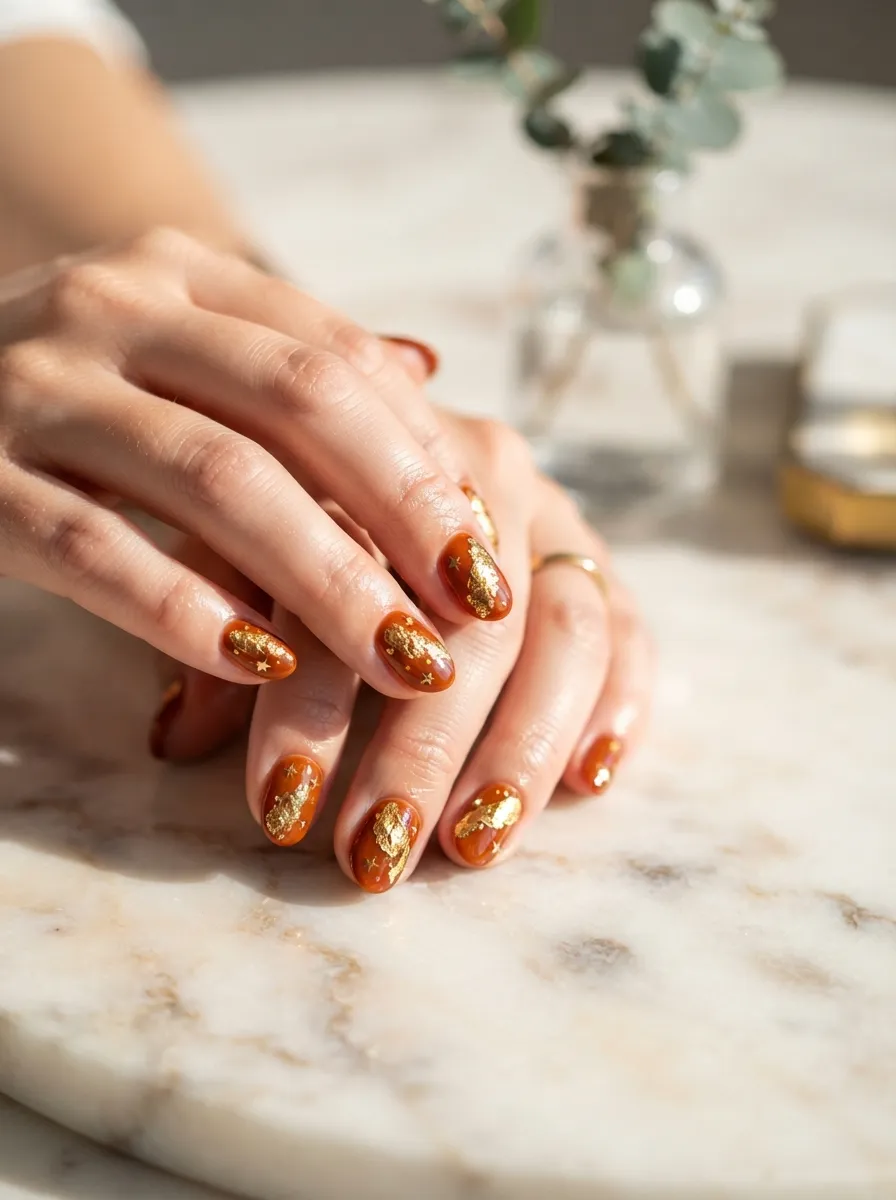
Gold foil is one of the easiest ways to get that rich, birthday-worthy finish without spending a lot.
You can buy gold foil nail sheets from any beauty supply store for under five dollars. They press right onto a tacky gel base coat or nail glue and stick beautifully.
The trick is to press the foil with a silicone tool or even your fingertip, then peel it back slowly to reveal that wrinkled, textured gold effect.
Pair this with a burnt orange or deep amber base. That warm color combination screams Leo season without being too over the top.
You do not need to cover the whole nail in foil. A diagonal strip across the tip or a random patch near the cuticle looks more editorial and modern.
Finish with a glossy top coat to seal everything down. This design photographs beautifully and holds up well for a full week.
If you are doing this at home, practice on one nail first. The foil placement is forgiving, but patience makes it look more polished.
This is a go-to for anyone who wants high-impact nails without high-impact effort or cost.
2. Sun and Celestial Symbols
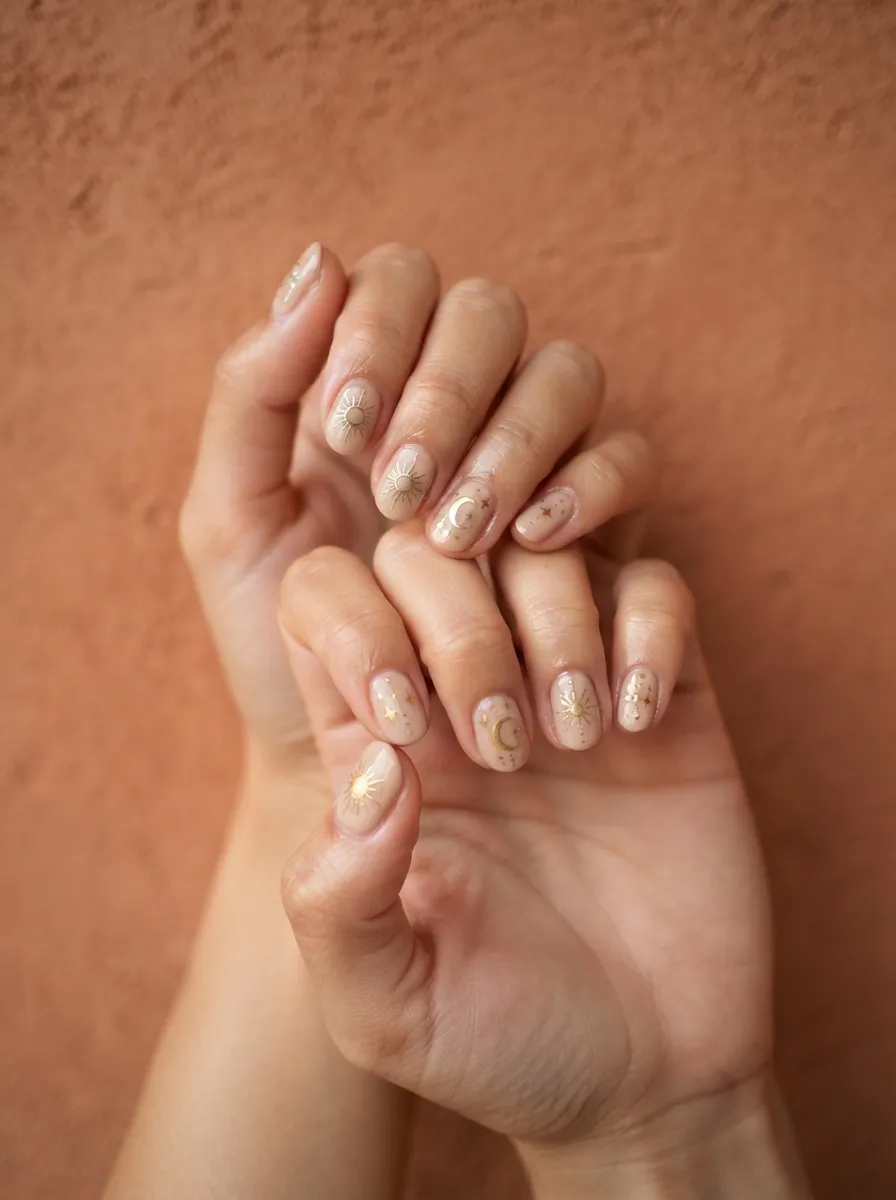
The sun is Leo’s ruling symbol, and putting it directly on your nails feels like the most personal birthday statement you can make.
You do not need to be an artist for this. A thin nail art brush and gold nail art paint are enough to create simple sun shapes with radiating lines around a small circle center.
Dot the tips of the rays with a toothpick dipped in paint for a clean, uniform look.
Mix in crescent moons and tiny four-point star dots across other nails for that full celestial spread.
The base color works best in warm nude, creamy white, or soft golden yellow. These shades let the painted details stand out without fighting for attention.
This design works for short and long nails equally well. On shorter nails, keep the sun small and centered. On longer nails, let it take up more space.
Practice the sun shape on a piece of paper first. Once you are comfortable with the stroke, move to the nail.
For under ten dollars in supplies, you can have a set that looks completely custom and totally personal to your Leo birthday season.
3. Warm Terracotta Ombre
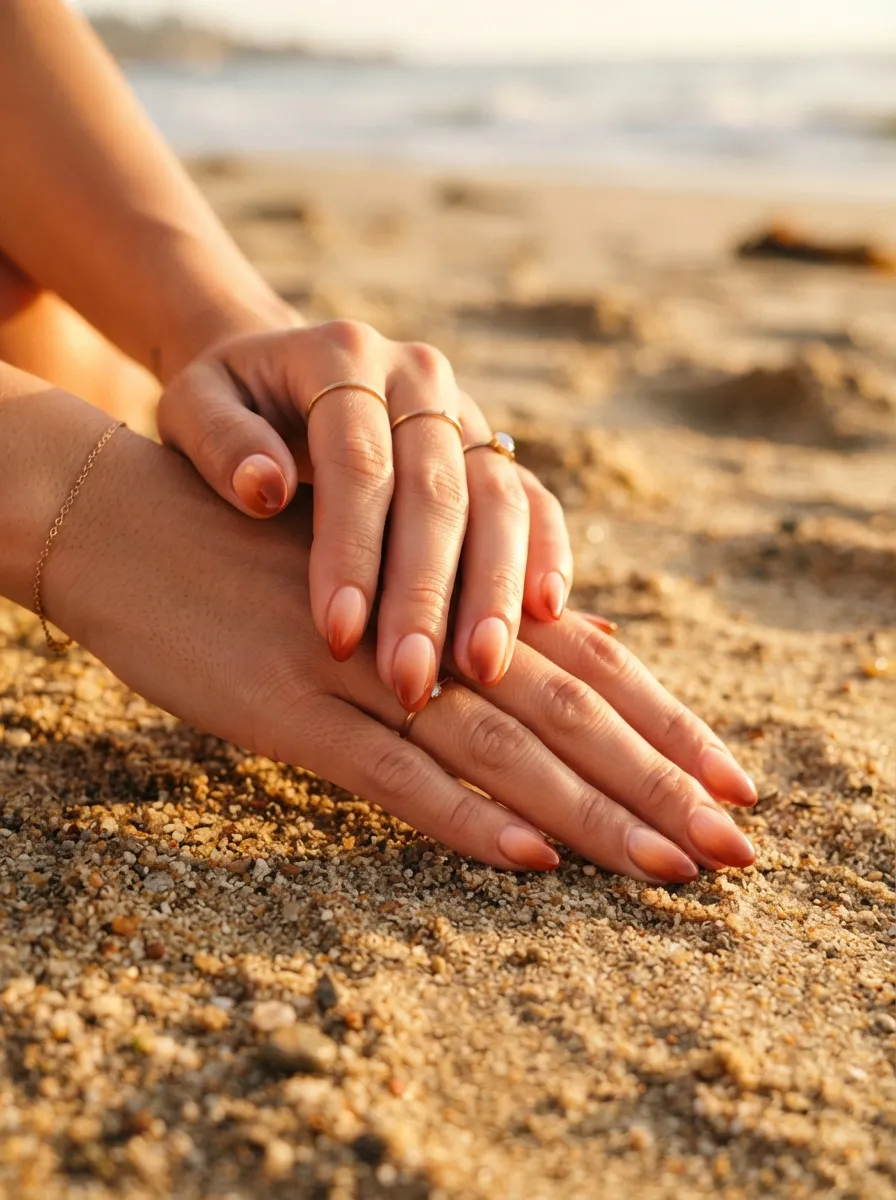
Terracotta ombre captures that dry, sun-baked Leo energy in the most wearable way.
This gradient goes from a soft peachy pink near the cuticle and deepens into a rich earthy terracotta at the nail tip. It looks warm and organic, like the nails were kissed by summer heat.
At home, you can create this with a makeup sponge. Paint two shades of orange onto the sponge side by side, overlapping slightly in the middle. Then press and dab the sponge onto each nail.
It takes two to three layers of dabbing to build up the color intensity. Let each layer dry before adding the next.
Clean up the skin around the nail with a small brush dipped in acetone. This makes the finished look much cleaner.
Cap the tips with a swipe of the darker terracotta shade freehand for extra depth.
This look works on every nail length. Almond and coffin shapes show off the gradient the best because of the wider surface area.
Top it with a glossy coat and you have a set that looks salon-done for the price of two polish bottles.
4. Birthday Cake Accent Nail
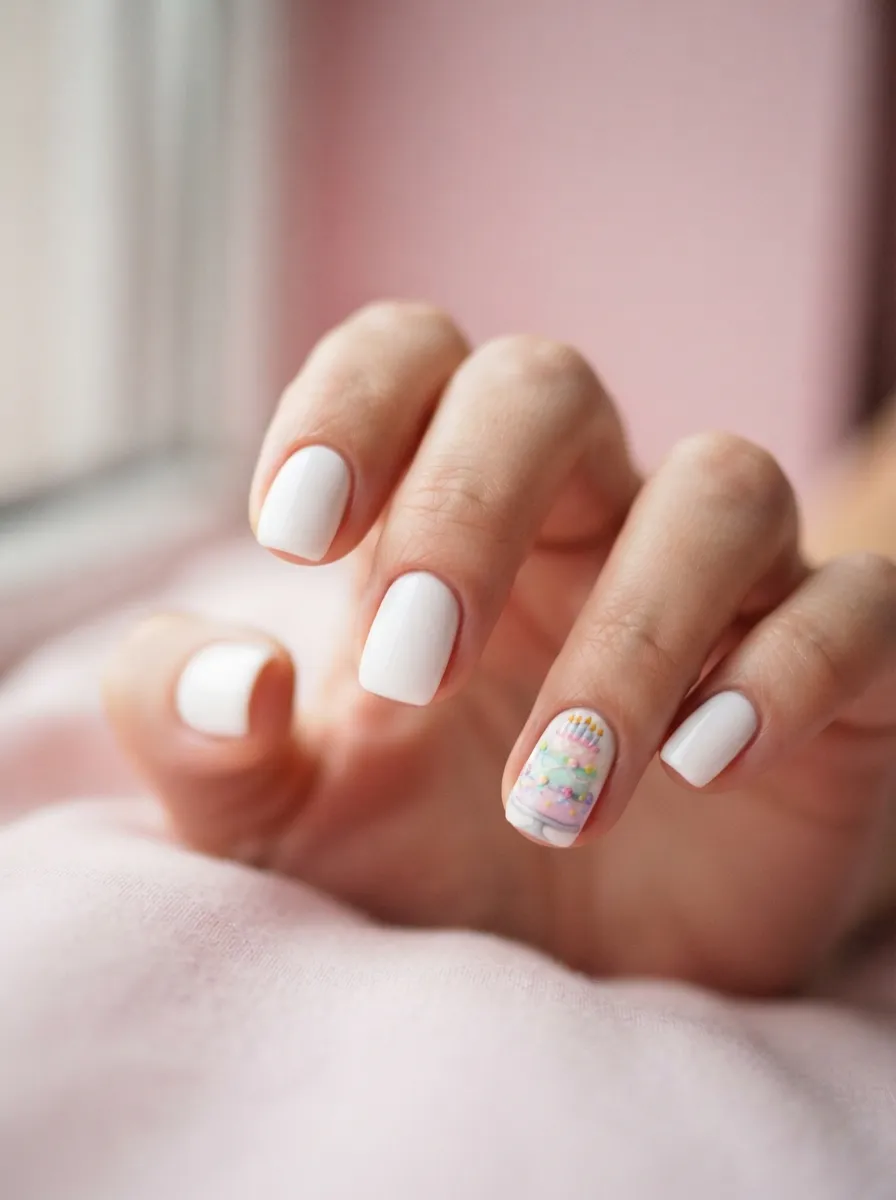
Every birthday nail set deserves at least one nail that fully commits to the celebration, and a birthday cake accent nail does exactly that.
Pick one nail, usually the ring finger, as the statement nail. Keep the rest in a clean, solid color like cream white, soft gold, or blush pink.
For the cake design, use a small dotting tool and nail art brushes. Start with a simple two-layer rectangle shape in a pastel color. Add tiny lines for candles, small dots as sprinkles, and a swirl of white at the top for frosting.
Even a rough version of this looks charming and intentional. It does not need to be perfect to look adorable.
You can also buy pre-made birthday cake nail stickers or water decals for under three dollars online. Press them onto a dry base coat and seal with a top coat.
If you are going to a nail salon, bring a picture as reference. Most nail techs can recreate this in about ten minutes.
Pair with a birthday crown or colorful birthday-themed jewelry for a fully coordinated look.
This accent nail idea works for anyone, regardless of skill level. It is sweet, personal, and makes people smile every time they notice it.
5. Liquid Chrome Gold
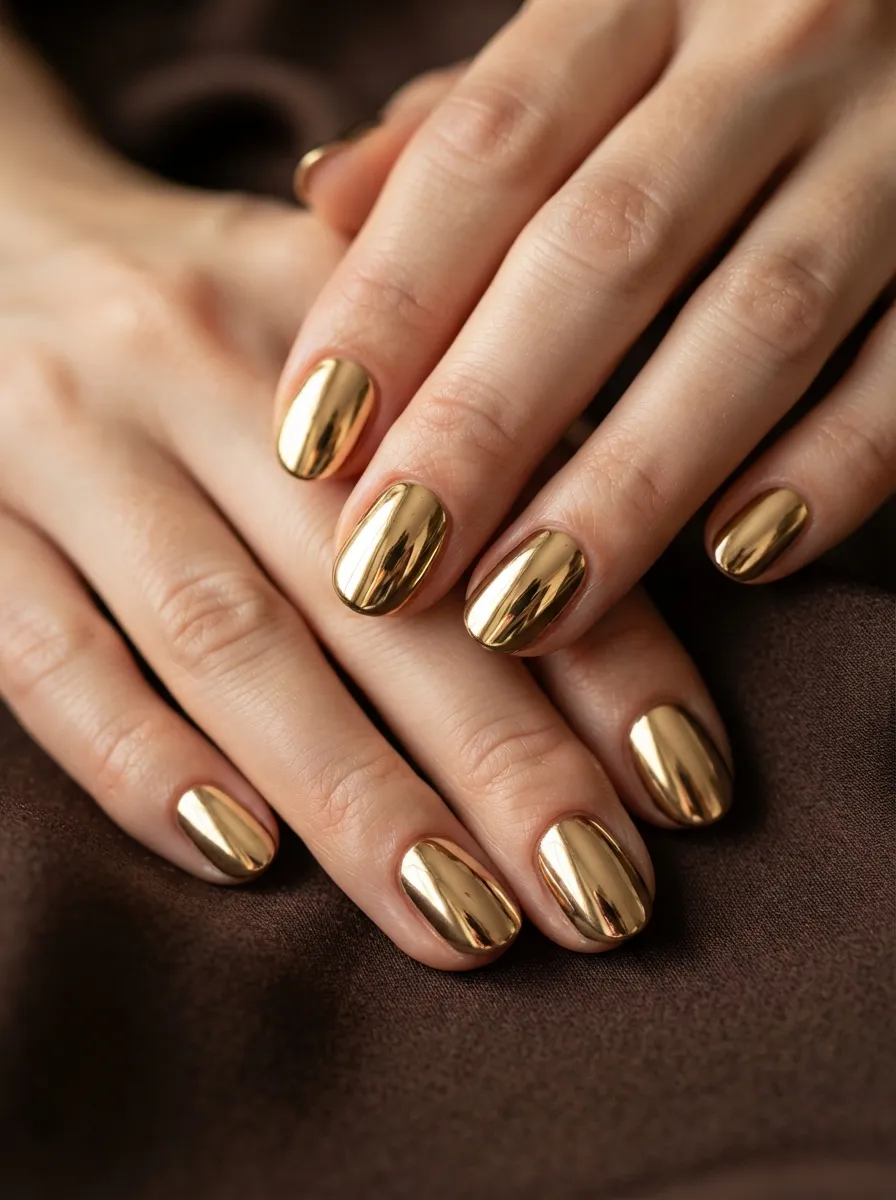
Chrome gold nails are the definition of Leo birthday energy. They catch every light in the room and make your hands look like accessories.
Chrome powder is the key ingredient here. It comes in tiny pots and gets rubbed onto a gel nail using a silicone applicator or even an eyeshadow brush. The result is a mirror-like finish that looks almost liquid.
You need a UV gel base to make chrome powder stick properly. If you do not have a UV lamp at home, choose a regular metallic gold polish instead. It will not be as reflective but still looks incredible.
Apply the chrome over a black or gold base for the most intense effect. A beige or nude base gives a more rose gold tone.
The powder rubs on in circular motions. Add more layers until you hit that full mirror finish.
For home manicures, gel chrome kits are available online for around fifteen dollars and last multiple uses.
Seal with a no-wipe gel top coat to keep the chrome from dulling.
This look is undeniably dramatic and pairs perfectly with an all-black birthday outfit. Your hands will absolutely steal attention before you even say a word.
6. Leo Constellation Map
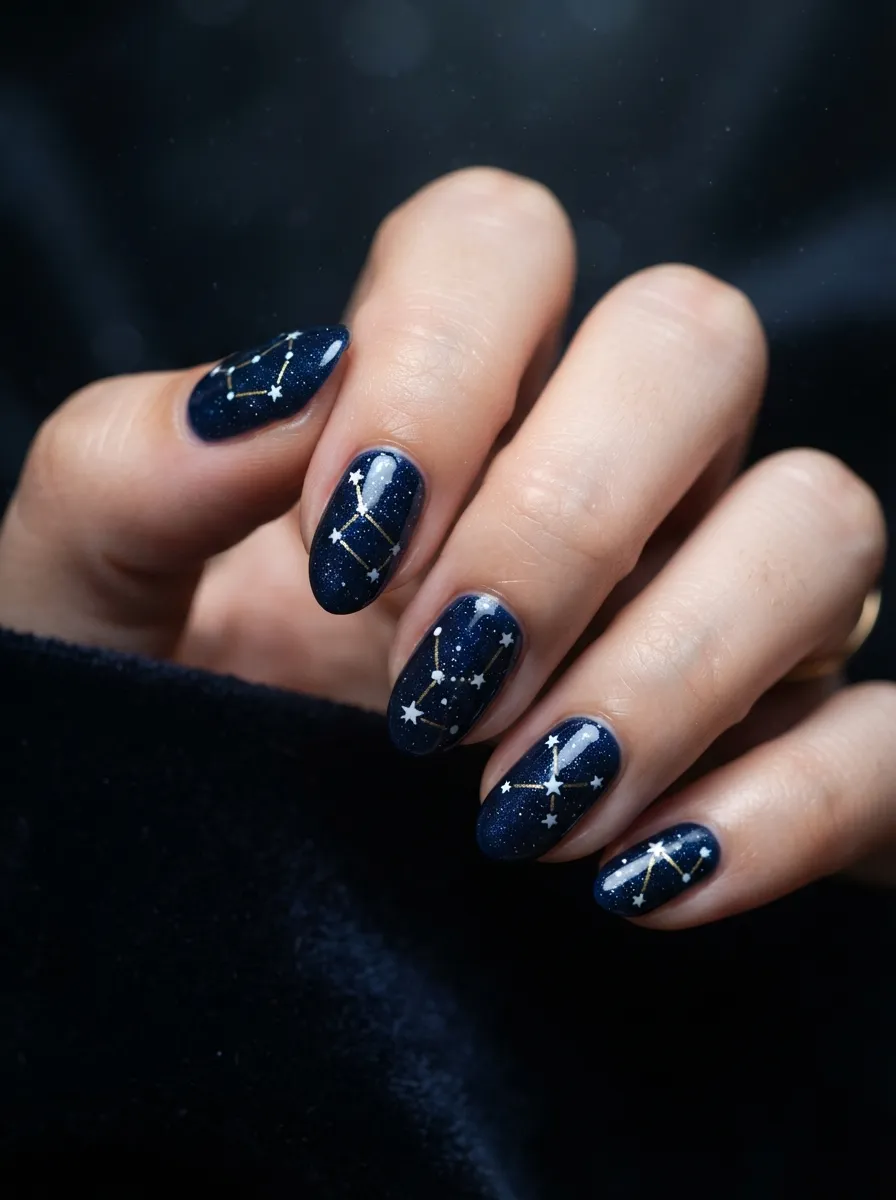
The Leo constellation is literally written in the stars, so putting it on your nails for your birthday is both personal and stunning.
Look up the Leo constellation pattern online before you start. It forms a backwards question mark shape, which is actually very easy to replicate on nails.
Use a thin nail art brush and white or gold paint to place small dots where each star falls. Then connect them with the thinnest lines you can manage.
Do not worry about being exact. A rough star map still reads as intentional and artistic.
A dark navy, deep black, or midnight purple base makes the constellation pop the most. Add a dusting of fine silver glitter over the dry base before painting the stars for a full galaxy effect.
You can do the constellation on all nails or just use it as an accent on two or three nails, filling the rest with solid dark color.
This design is a conversation starter every time. People who know astrology will immediately recognize it and love the detail.
For a simpler version, use star nail stickers from a craft store and connect them with a thin pen liner.
Budget for this look is under eight dollars if you already have a dark polish at home.
7. Orange Fire Tips
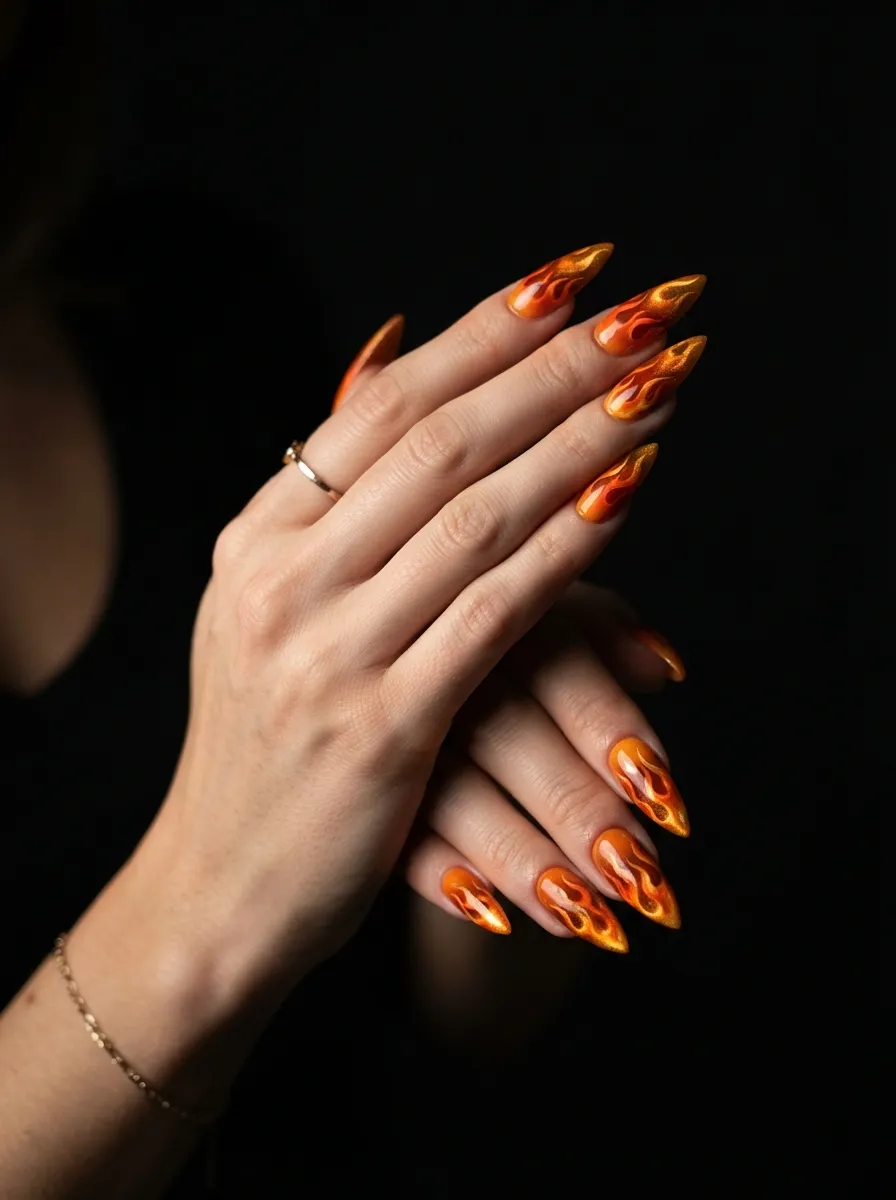
Fire tips turn your nails into a wearable symbol of Leo’s ruling element, and they look incredibly cool against any skin tone.
Start with a warm amber or golden yellow as the base coat. Let it dry completely before moving on to the flame tips.
Using a thin nail brush or a fan brush, paint wispy upward strokes in bright orange along the top third of the nail. Layer a deeper red-orange over the outer edges of those strokes.
The secret to realistic flame shapes is keeping the strokes uneven and organic. No two flames should look identical.
Finish the very tips with a touch of translucent yellow to add a glowing effect.
This design looks best on longer nails where the flame pattern has room to move. But it works on shorter nails too with a smaller, more compact flame shape.
You can also buy pre-made flame nail wraps at beauty supply stores for about five dollars. These press-on options are beginner-friendly and still look sharp.
Seal everything with a matte top coat for a more dramatic, editorial look. Or use glossy for a sleeker finish.
Either way, these fire tips command attention from across the room. Very on-brand for a Leo birthday.
8. Bold Red with Gold Accents
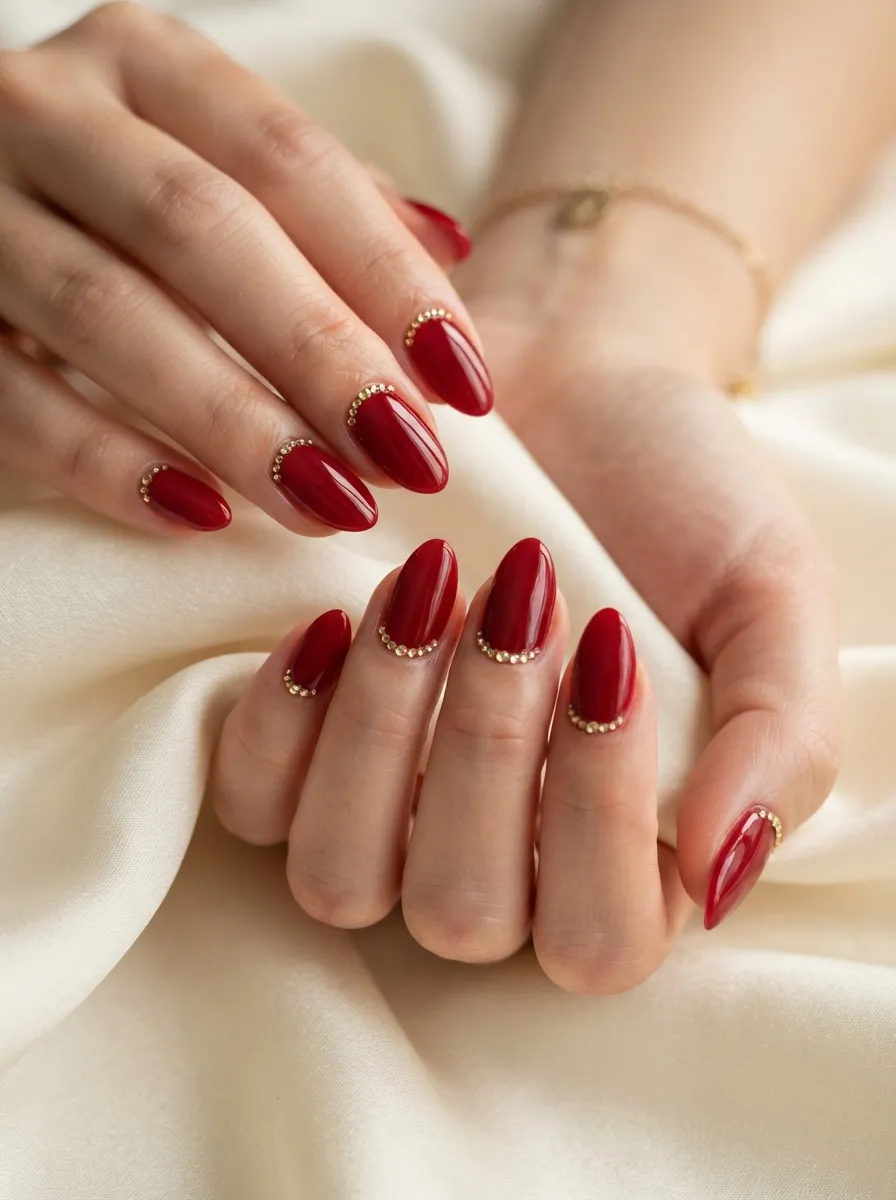
Red is a power color, and paired with gold it becomes pure royalty. This is the nail look for the Leo who wants to walk into their birthday celebration and immediately own the room.
Choose a deep, true red with a cream or jelly finish. Avoid sheer reds for this look because you want full, rich coverage.
Apply two coats and let them dry fully. Then use nail glue or a gel base to press small gold rhinestones or studs along the cuticle line. Space them evenly or cluster them in the center for different effects.
You can buy a mixed pack of gold nail rhinestones for under four dollars. One pack will last you many manicures.
A single row of studs looks sleek. Three or four rows looks more dramatic and glam.
Add a small gold foil accent to one nail per hand to break the pattern slightly and keep it from looking too uniform.
This look is date night ready and birthday party ready at the same time. It photographs in warm, richly saturated tones that look incredible in low lighting.
Top coat is very important here. Apply it carefully around each stone so they stay sealed without drowning under too much product.
Red and gold together are always a winning Leo combination.
9. Sunflower Nail Art
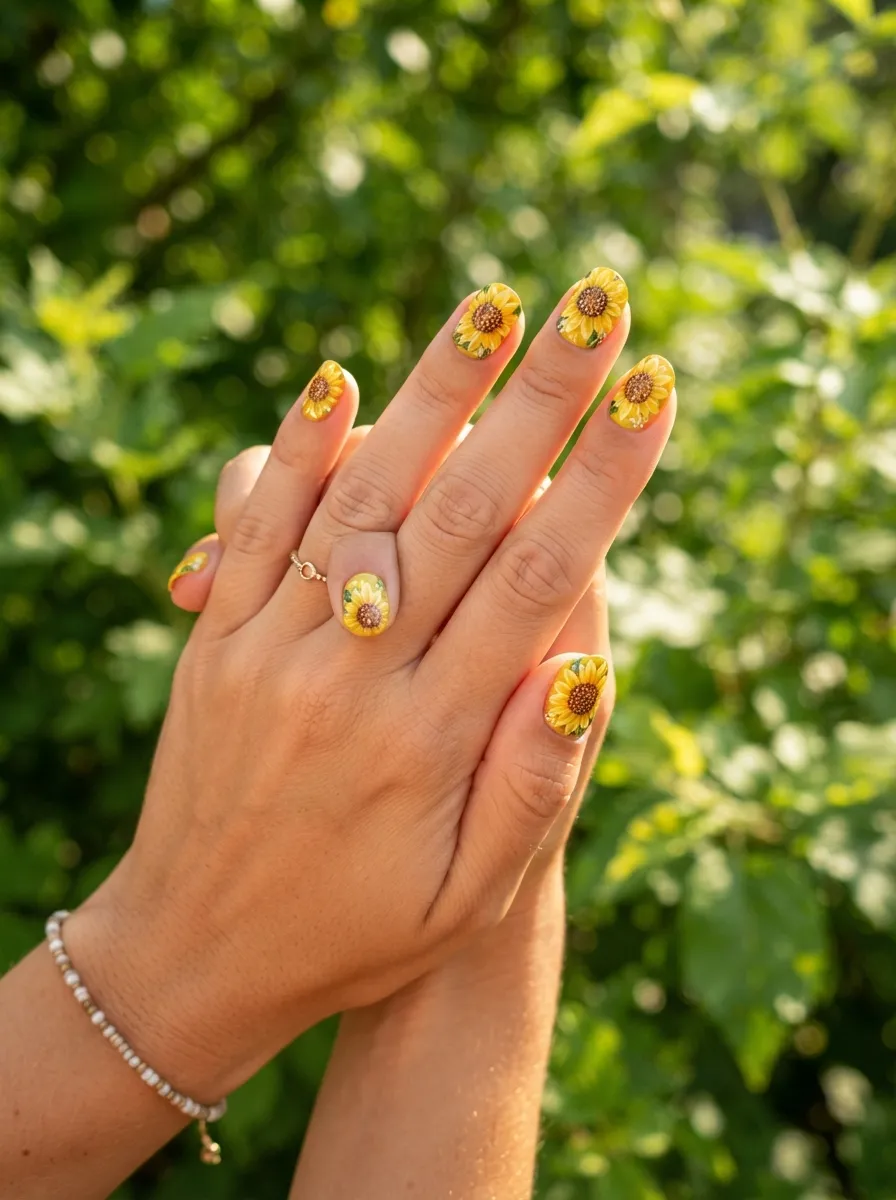
Sunflowers are the ultimate Leo birthday flower. They face the sun, they are bold and yellow, and they make everyone smile. They belong on birthday nails.
The base coat should be a warm golden yellow. Let it cure completely before adding the flower design on top.
Use a small round nail brush to paint elongated teardrop-shaped petals in a slightly deeper yellow. Layer them in a circular arrangement with gaps between each petal.
Fill the center with a small circle of brown nail art paint, then use a dotting tool dipped in black to add seeds across the center circle.
Add a thin white or cream outline around each petal with a liner brush if you want more definition.
This design works beautifully on all nail shapes but looks especially sweet on short square nails.
If freehand painting sounds intimidating, sunflower nail stickers and stamping plates with floral designs are easy alternatives. Stickers can be found for two to three dollars online.
You can put a sunflower on every nail or just alternate one sunflower nail with solid yellow nails for a cleaner look.
The whole set feels joyful, warm, and totally suited for a Leo born in the heart of summer.
10. Champagne Glitter All Over
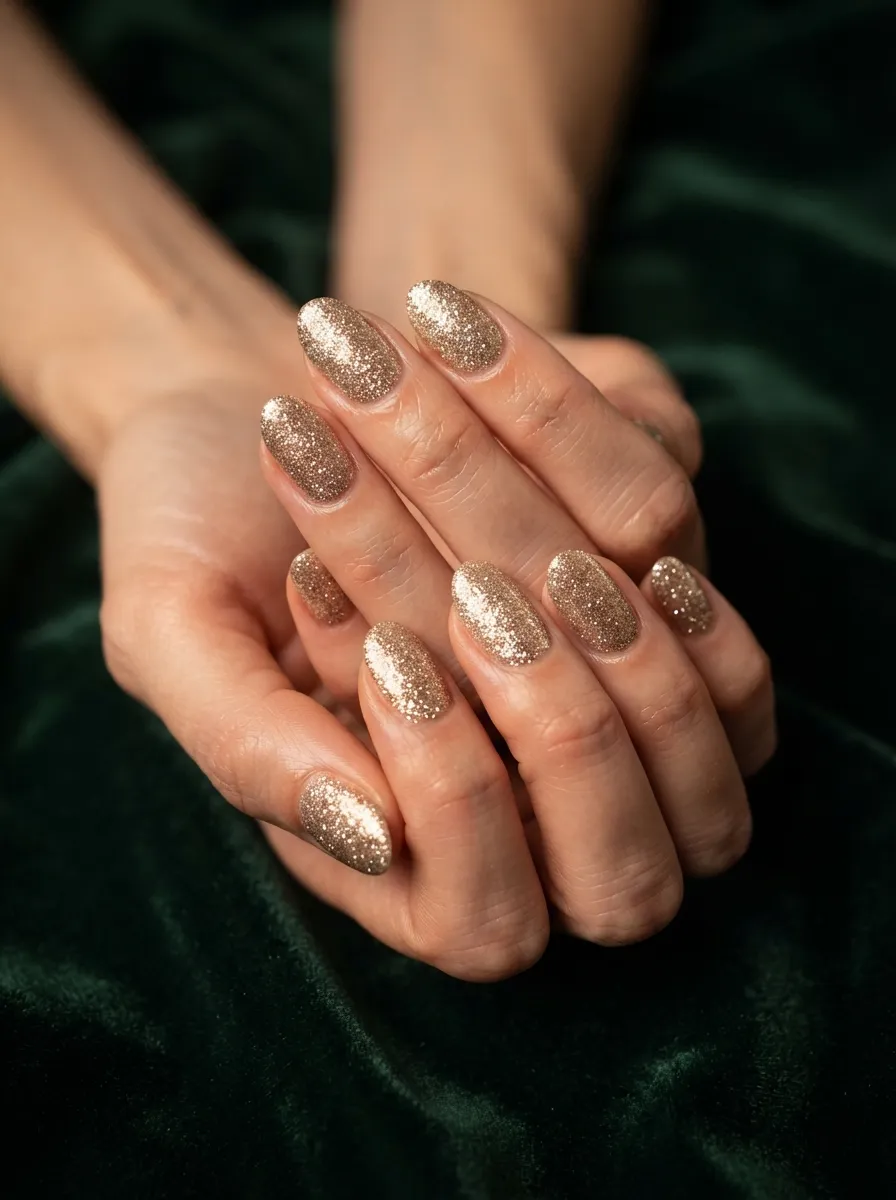
Champagne glitter is a Leo birthday staple. It is warm, it is sparkly, and it catches every single light source in a room.
Full glitter coverage nails look high-end but are genuinely one of the easiest nail looks to do yourself.
Start with a coat of gold or champagne base polish. Then apply a chunky glitter polish in the same warm tone on top, building up the layers until you reach full opaque coverage.
Pat the glitter on with a small eyeshadow sponge if you want even denser coverage than a brush can give.
The key to a clean glitter nail is a thick top coat applied in several thin layers. This fills in the gaps between glitter particles and smooths everything out.
For extra life and chip resistance, cap the free edge of each nail with glitter polish. This seals the tips and stops peeling.
Glitter polish remover can be messy, so soak a cotton ball in acetone, press it to the nail for 30 seconds before wiping, and it comes off much more easily.
Budget pick: Sally Hansen Glam Coat or similar drugstore glitter polishes get the job done beautifully for under six dollars a bottle.
This nail look works for every age and every party setting. It is effortlessly celebratory.
11. Mane-Inspired Wavy Lines
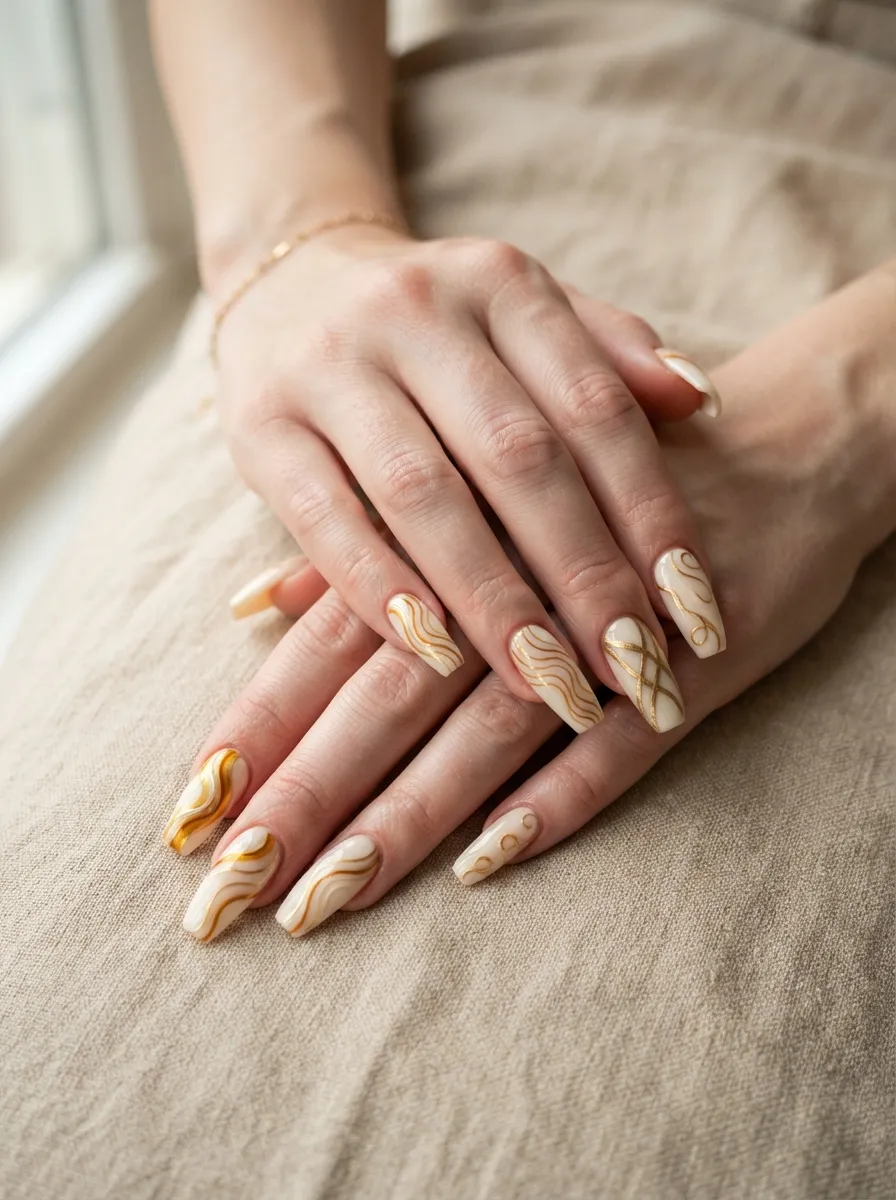
The lion’s mane is one of the most powerful symbols in Leo imagery. Translating that flowing, wavy energy onto nails is surprisingly simple and looks stunning.
Use a thin nail art brush and warm golden, amber, and caramel toned nail polish. On a cream or off-white base, paint loose, sweeping lines that curve and overlap across the nail surface.
No two lines should be identical. The more organic and free-flowing the strokes look, the better.
Try starting each line from a different edge of the nail and letting it arc toward the center or tip. Layer multiple colors by letting each line dry before adding the next.
This abstract style looks very editorial and modern, and it reads as intentional artistry even if your hand was completely freehand and imperfect.
Add a few thin gold stripes using a striping brush for structure between the wavy lines.
This design translates beautifully to coffin, oval, and almond shapes. The length gives the lines more room to curve.
For a beginner shortcut, wavy line nail stickers in gold tones are easy to apply and create the same effect.
The result is a set that looks like it belongs in a nail art magazine. And it takes maybe twenty minutes to complete at home.
12. Deep Purple Royalty
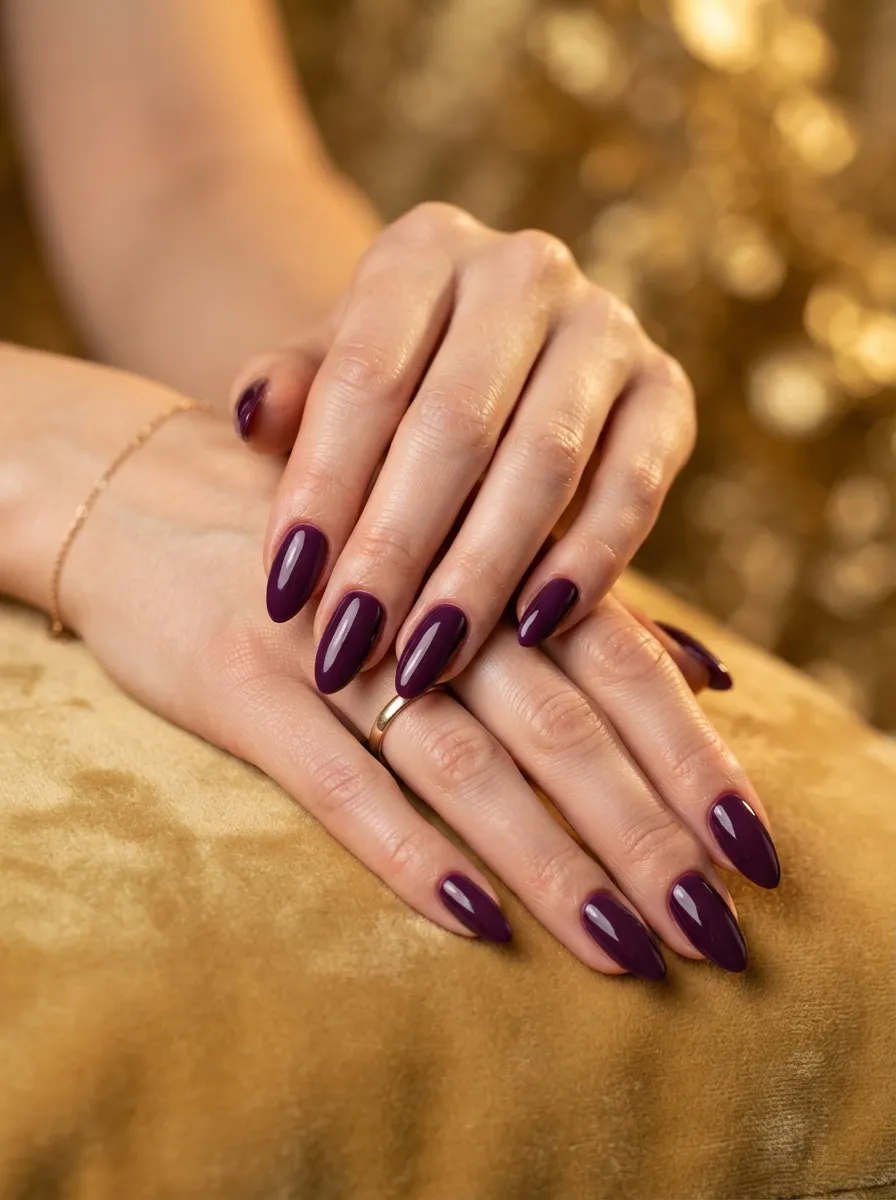
Leo birthdays are regal, and nothing says royalty quite like a deep, rich purple nail.
This is the cleanest, most effortless look on this list. No nail art needed, no tools, no stamping. Just a gorgeous jewel-toned purple applied flawlessly.
Choose a plum, grape, or deep violet shade with a cream finish for maximum color impact. Brands like Essie, OPI, or even budget options from e.l.f. all make incredible deep purples.
The trick with dark polishes is thin layers. Apply two very thin coats rather than one thick one. Thick applications streak and bubble, while thin coats dry evenly and look professional.
Clean up the cuticle edges with a small brush dipped in acetone while the polish is still slightly wet for razor-sharp edges.
If you want a small detail, press one gold rhinestone at the base of each nail for a crown-like touch.
A glossy top coat makes this color look like it came out of a salon. Apply it generously from cuticle to tip.
Purple and Leo might not seem like an obvious pairing at first, but given that Leo rules royalty, power, and self-expression, deep purple actually fits the sign perfectly.
This is the low-effort, high-reward birthday nail for the Leo who wants to look polished without spending an hour at a nail station.
13. Negative Space Sun Rays
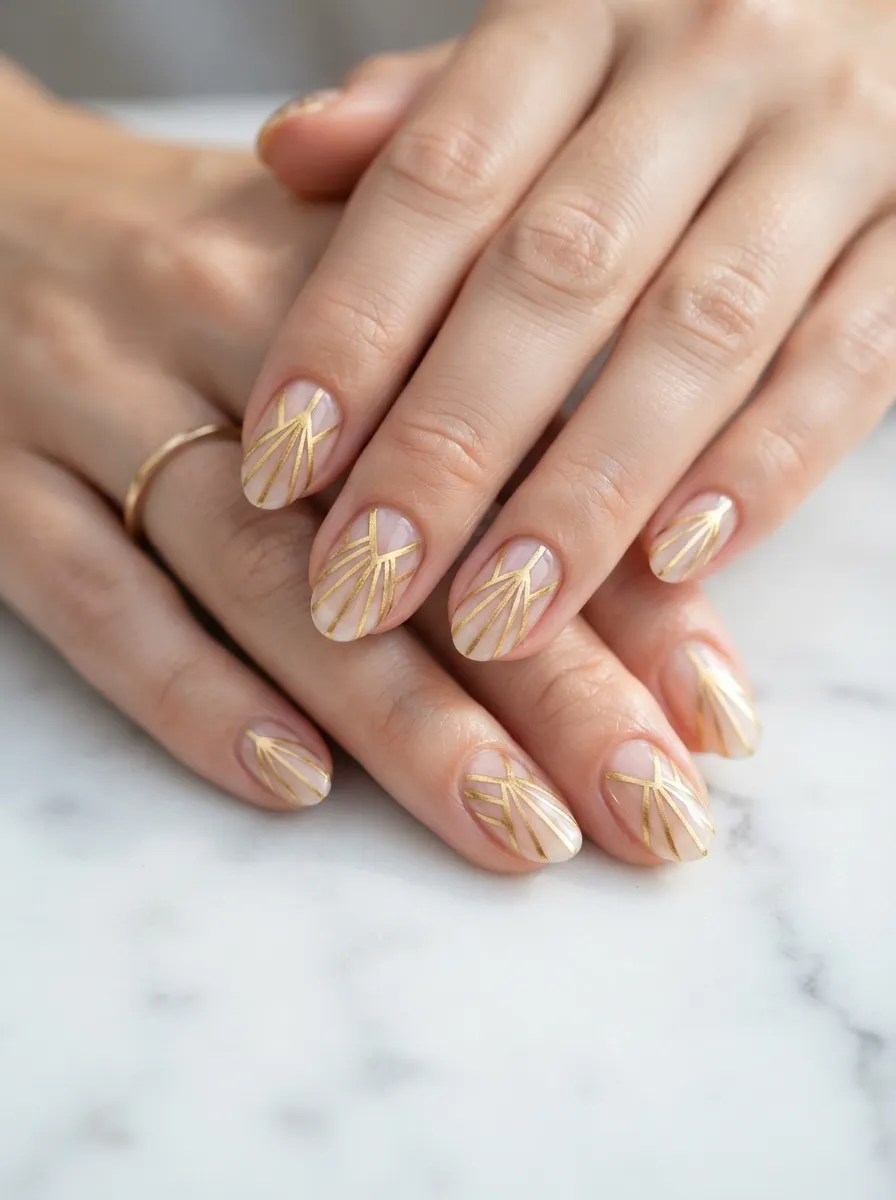
Negative space nail art is one of the trendiest and most wearable styles right now. And sun ray shapes make it feel tailor-made for a Leo birthday.
Start with a clear or very sheer nude top coat to protect the natural nail. Let it dry.
Then use a thin striping brush and gold nail art paint to paint outward rays from a central point at the base of the nail. Each ray should be a thin line tapering to a point.
Leave visible gaps between each ray so the bare nail shows through. That contrast is the whole point.
The sun looks like it is rising from the cuticle area. About six to eight rays per nail is enough for a clean design without overcrowding.
You can outline the center circle in gold and leave it hollow for an even more graphic look.
This design has an architectural, modern quality that works for office environments and parties alike. It does not scream birthday loudly but has a very intentional, personal symbolism behind it.
It also requires minimal materials. Just a striping brush, gold paint, and a clear base. Under ten dollars total.
For a shortcut, gold striping tape cut into tapered strips can create the same rays with no painting skills required.
14. Burnt Orange with Black Line Art
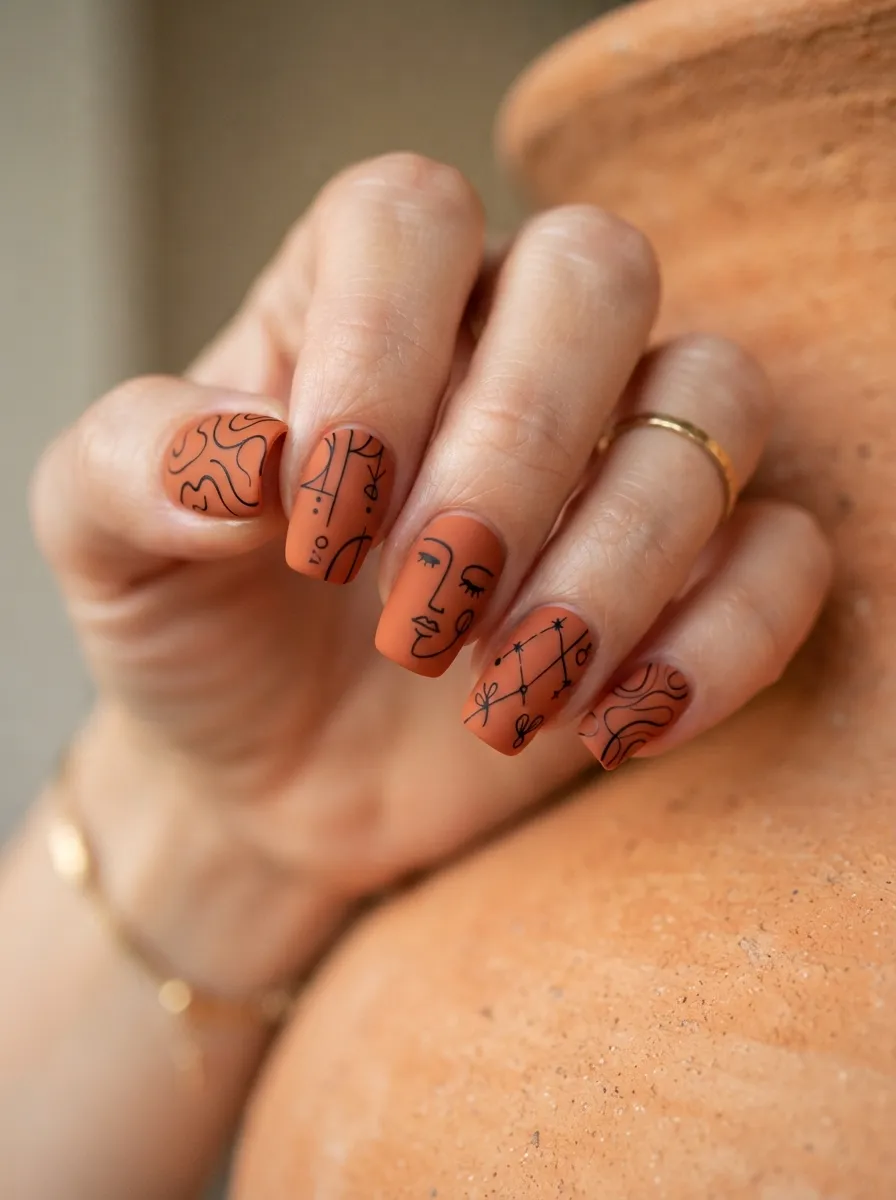
Burnt orange is the definitive Leo season color, and pairing it with black line art gives the look a graphic, art-forward quality that feels very grown-up and cool.
Paint all nails in a rich burnt orange. Let it dry fully. Then use a nail art liner brush or a thin felt-tip nail art pen to draw abstract shapes and lines on top.
These do not need to be representational designs. Geometric triangles, wavy abstract lines, asymmetric curves, or dot patterns all work beautifully.
Nail art pens are especially beginner-friendly because they handle like a regular pen. You get far more control than with a brush.
Matte top coat over this design takes it from polished to editorial in seconds. The matte finish makes the black lines look even sharper and more defined.
Try filling just two or three nails with line art and leaving the others solid orange. This mixed approach looks very professional and considered.
This color combination is inspired by retro 1970s aesthetics, which feels perfect for a Leo birthday given the sign’s love of drama and style across every era.
Total cost of this look at home is under twelve dollars if you already have orange polish and need only the nail art pen.
15. Pearl and Opal Shimmer
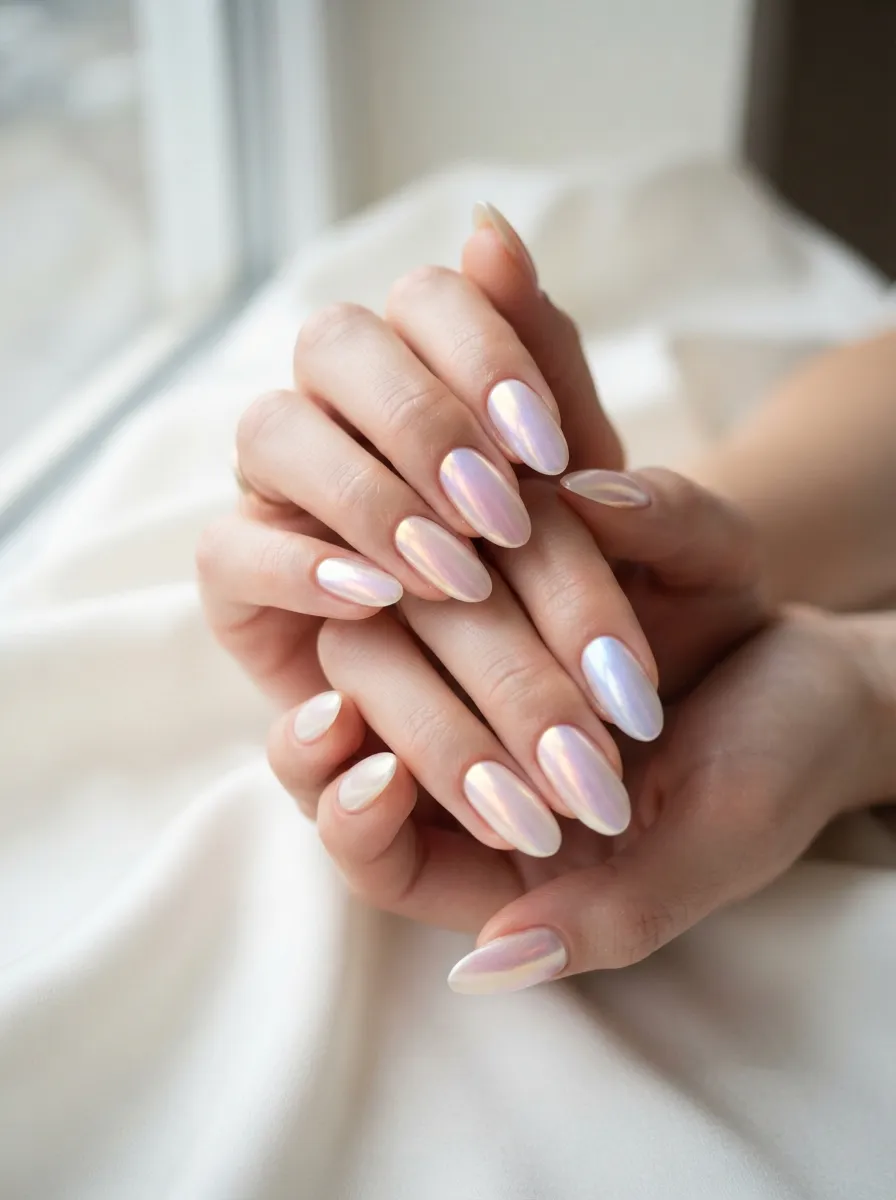
Pearl and opal nails bring a soft, ethereal energy to Leo birthday nails without losing that warmth and richness the sign is known for.
Opal effect polishes create a shifting shimmer that changes color depending on the angle and light source. In sunlight, they pick up warm gold. In shade, they shift toward pink or lavender. It is one finish that genuinely looks different in every photo.
You can find opal shimmer polishes at most drugstores or online for around six to eight dollars. Apply two thin coats over a white or very pale base.
The white base intensifies the shimmer and makes the color shifts more dramatic. Without a base, the opal effect looks more muted.
These nails pair beautifully with gold jewelry, especially layered rings. The warm metal accents play off the gold shifts in the shimmer.
This is also an incredibly elegant look for Leo birthdays that fall closer to formal events. It is not over-the-top but it is definitely not basic.
For a more intense opal effect, apply a duochrome powder over gel nails. Brands like Born Pretty sell duochrome sets for under fifteen dollars.
Clean, understated, and still completely eye-catching. Exactly the kind of balance a Leo can always appreciate.
16. Leopard Print Accent
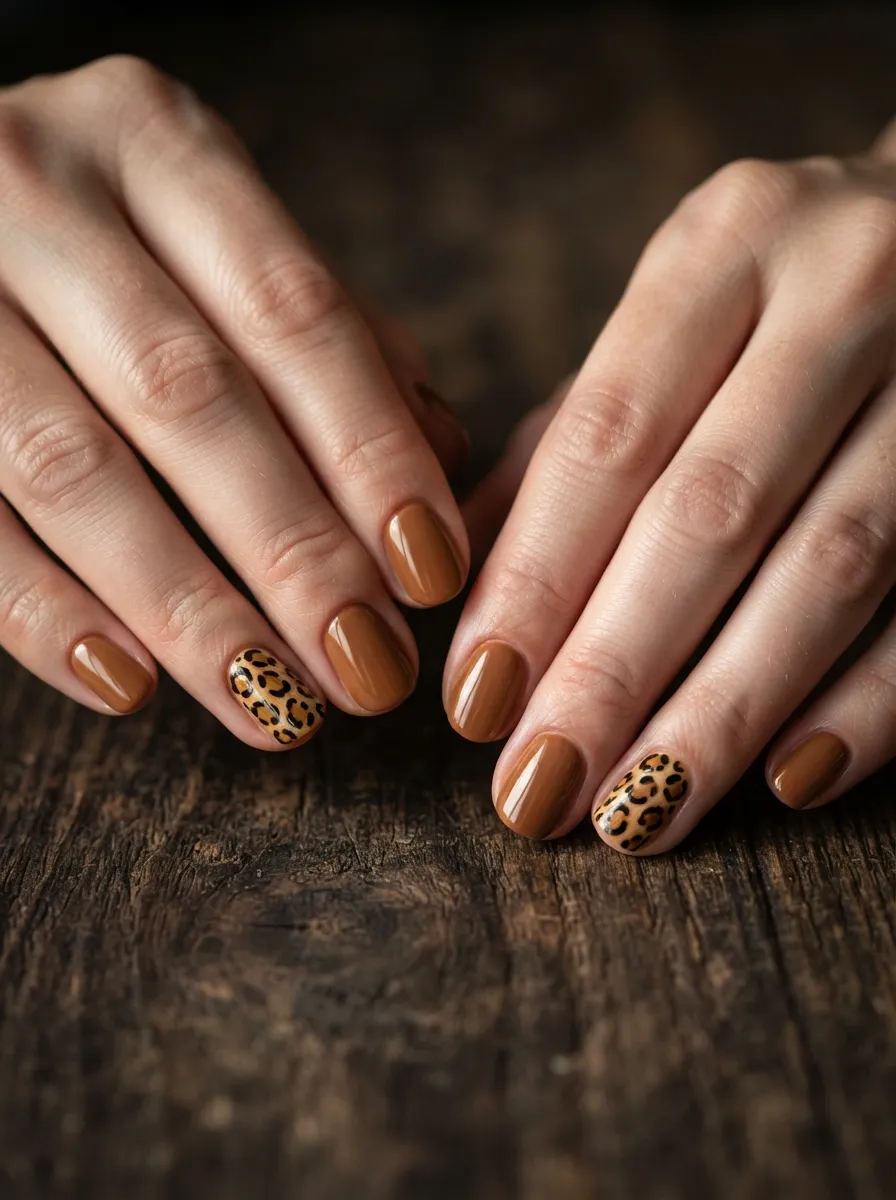
Leopard print and Leo season were made for each other. The animal print connection is obvious, and the warm brown and gold tones fit perfectly into Leo’s signature color palette.
Use all nails in a solid caramel or warm tan, then designate one or two nails per hand for the leopard print accent.
On the accent nails, start with a golden yellow base. Then use a small nail art brush dipped in medium brown to paint irregular oval and crescent shapes scattered across the nail.
While the brown is still slightly tacky, outline each shape with thin black strokes that do not fully close. Real leopard spots have open, broken edges, not solid outlines.
Add a few extra black strokes near but not touching the brown shapes to fill the negative space.
The pattern looks complex but takes about ten minutes once you get the hang of the repeat.
Drugstore hack: Leopard print nail stickers are sold at beauty supply stores for three to five dollars. Apply them over a solid nail and seal with top coat.
This print reads as bold and fashion-forward rather than trying too hard. It is one of those designs that ages well and photographs great.
Keep the rest of the set solid and neutral so the leopard accents stay as the focal point.
17. Stacked Gold Rings and Dots
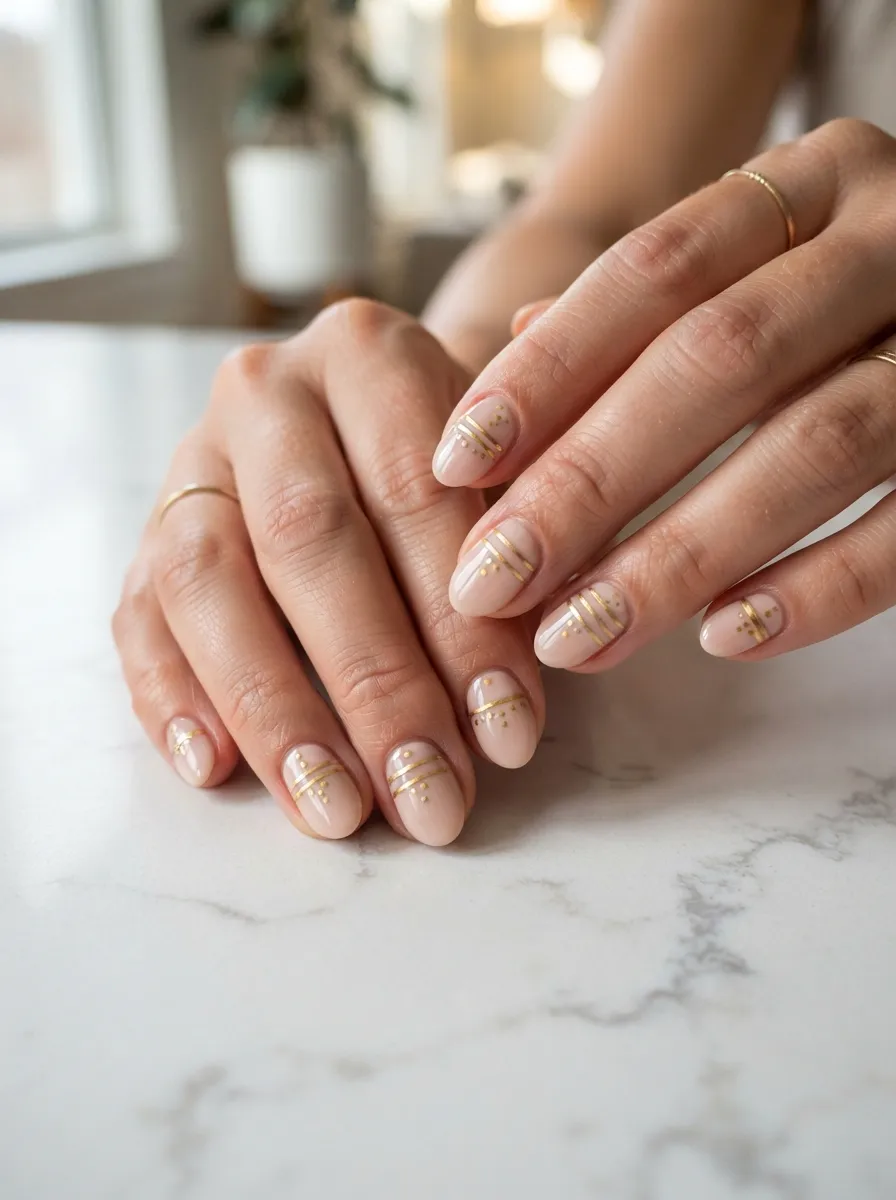
Gold rings and dot patterns give nails a jewelry-like quality, as if you have tiny accessories painted right onto your fingertips.
Start with a clean nude or soft blush base. Let it dry completely.
Using a thin striping brush and gold nail art paint, paint thin horizontal lines across each nail. Place them at different heights on each nail so the set does not look too matchy-matchy.
Between each line, press small dots using a dotting tool dipped in gold paint. Clusters of three dots look organic and balanced.
Vary the width of the lines slightly across different nails. Some very thin, some a touch thicker. This creates visual rhythm.
This style mimics the look of stacked gold rings on the nail surface and pairs beautifully with actual gold rings on your fingers.
The nude base keeps the overall look wearable for any setting, from a birthday brunch to an evening event.
This design is actually more beginner-friendly than it looks. Striping brushes are easy to control, and dots are the easiest nail art element to create.
Materials needed: a striping brush, gold paint, and a dotting tool. Total investment is about seven dollars for all three if you do not already have them.
A sleek, sophisticated birthday look that does not need a single rhinestone to feel luxurious.
18. Pastel Leo Rainbow
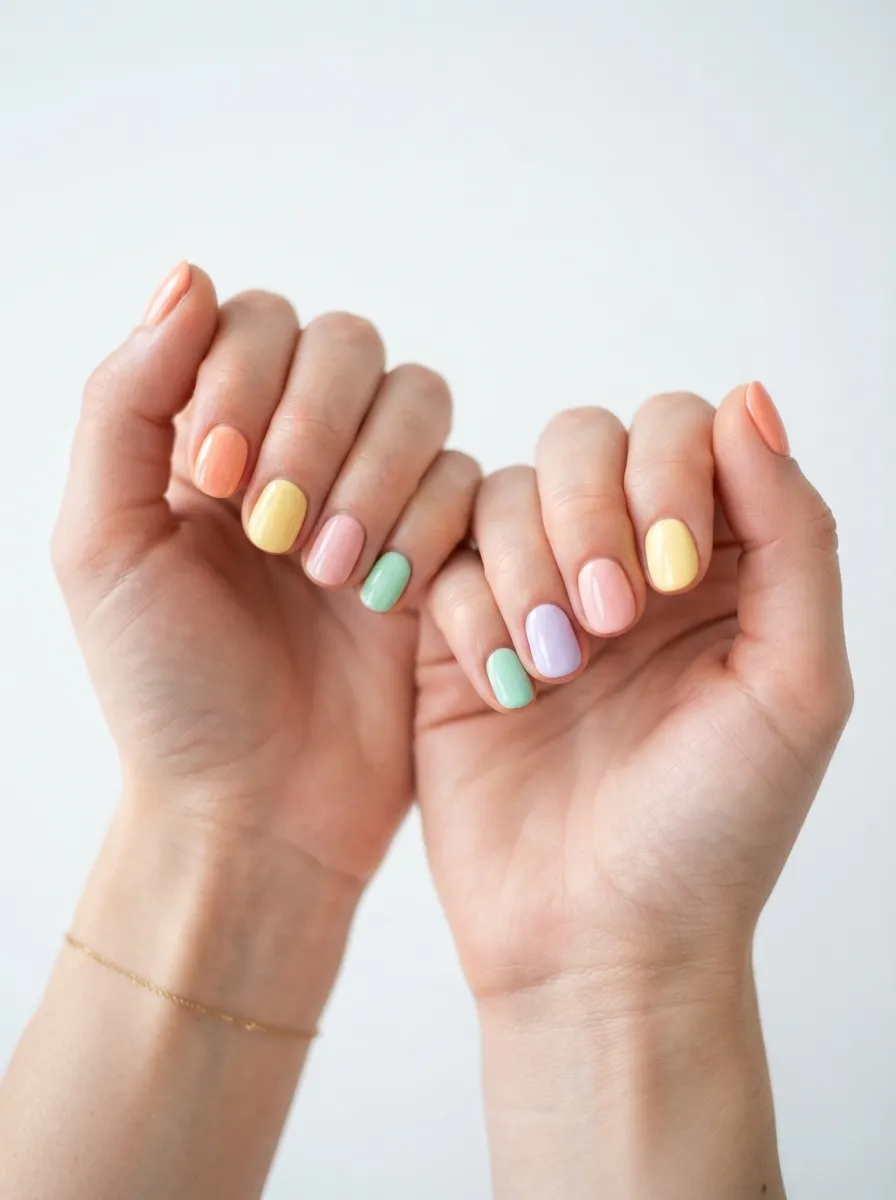
Not every Leo birthday nail has to be dramatic. Some Leos lean soft and playful, and a pastel rainbow set is the most joyful, birthday-appropriate look on this list.
Paint each nail a different pastel shade, working through a warm-toned spectrum. Peachy pink, soft butter yellow, blush mauve, lavender, and creamy mint all work together beautifully without clashing.
The key is choosing pastel shades with the same finish and saturation level so they look cohesive even though they are all different colors.
This look is completely achievable with five individual nail polish bottles, or you can buy a pastel rainbow nail polish set for around ten dollars at most beauty stores.
Apply two coats per nail for full coverage and seal with a glossy top coat to unify the finish across all five colors.
Add a tiny gold star on one accent nail to bring in that Leo celestial detail without making it too busy.
This set works at any age and for any personality type within Leo season. It is cheerful and effortless without being childish.
If you are gifting nails to a Leo friend, this is a crowd-pleasing design that appeals to a wide range of tastes.
Short, rounded nails make the color palette pop even more because the shapes feel soft and approachable. A fun, happy birthday nail choice.
19. Rhinestone Crown Design
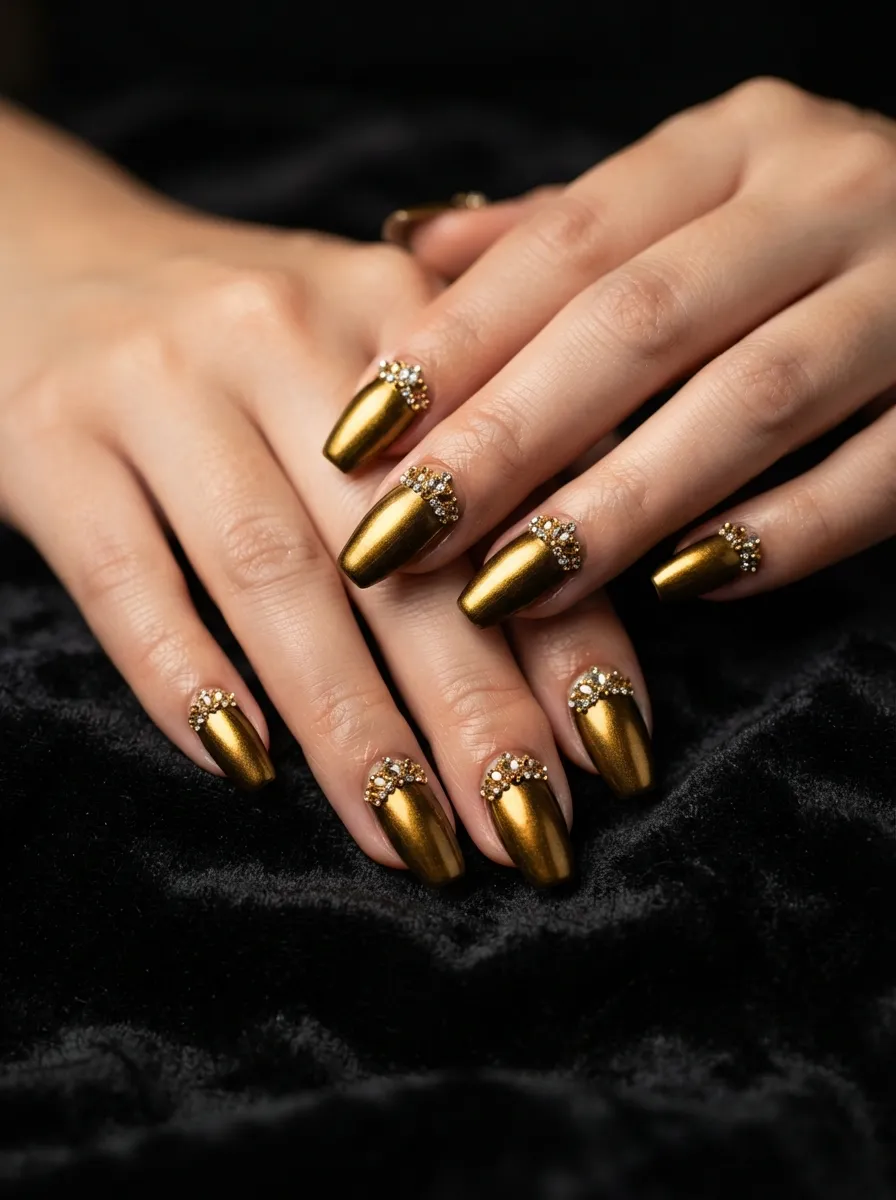
Leos and crowns belong together. A tiny rhinestone crown design on your birthday nails is the most literal, most fun expression of that Leo-royalty connection.
You can create crown shapes using small rhinestones and nail glue directly on the nail. Place a row of three or four slightly taller center stones and shorter stones flanking each side to form the crown silhouette.
Gold and clear stones look the most regal. Mixing in a few amber or red stones adds a jewel-tone richness.
Use a wax pencil or orange stick dipped in gel to pick up and place each tiny stone with precision. Tweezers also work well.
Set the design over a solid gold, burgundy, or deep black base for maximum visual contrast.
If creating the crown shape freehand sounds too difficult, try a crown nail stamp design instead. Nail stamps are inexpensive and require no artistic skill.
Seal the stones with a layer of gel top coat or very thick regular top coat. This keeps them from lifting off the nail.
For salon visits, show your nail tech a reference photo of the crown design and specify the stone colors. Most technicians can recreate this in under twenty minutes.
This design is birthday-specific in the best way. It is personal, symbolic, and completely extra. Which is exactly the Leo way.
20. Geometric Gold Triangles
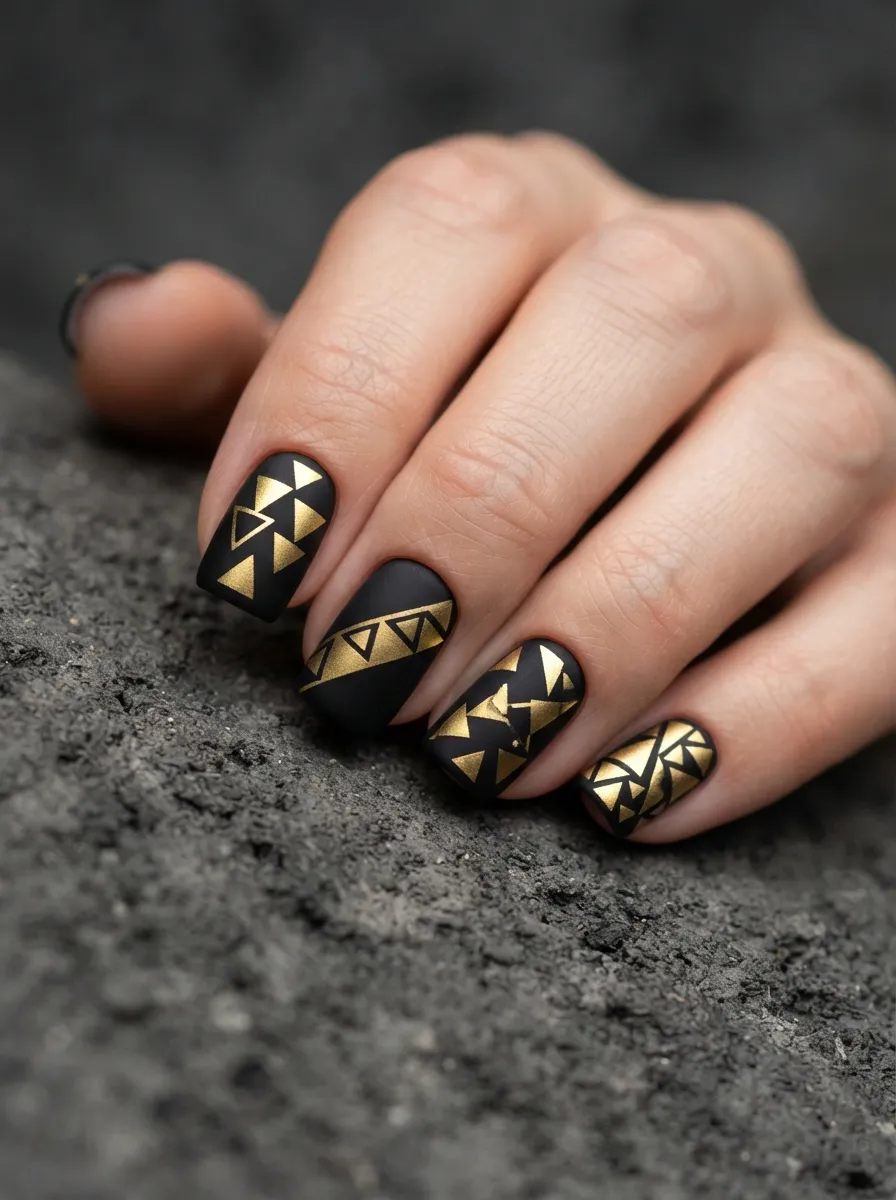
Geometric nail art looks sharp, modern, and intentional. Gold triangles on a matte black base have a graphic quality that feels very high-end without requiring high-end products.
Paint all nails in a matte black. Let each coat dry between applications.
Using a striping brush and gold nail art paint or gel paint, draw triangle outlines across each nail. Vary the sizes and angles. Some pointing up, some tilted, some overlapping.
Fill some triangles in solid gold and leave others as outlines only. The mix of filled and outlined shapes creates depth and visual interest.
A flat top coat keeps the matte base intact while sealing the gold triangles above it.
Geometric tape or nail guide stickers can also help create perfect triangles if you want sharp, even edges. Press the tape onto the nail, paint the gold section, then peel the tape while the paint is still slightly wet.
This design works especially well on square and coffin nail shapes because the angular nails complement the angular design.
Total cost for this look at home is under fifteen dollars, and it photographs extraordinarily well in editorial-style shots.
Bold, graphic, and modern. Exactly the energy a Leo birthday set should carry.
21. Sunset Gradient Nails
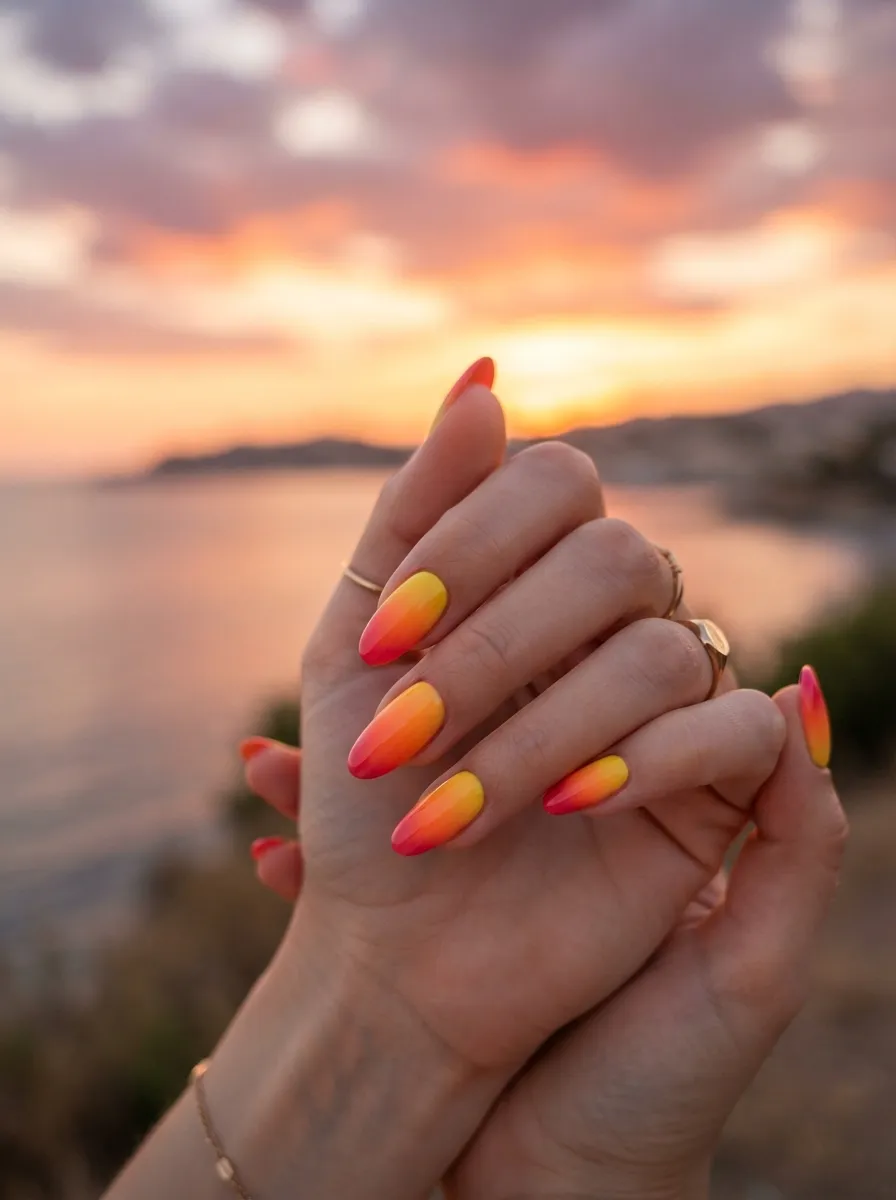
Sunset nails capture that feeling of August evenings when the sky turns into every warm color at once. Perfect Leo birthday energy.
This gradient uses four shades: yellow, orange, coral, and deep pink. Each color runs horizontally in blended bands from the cuticle to the tip.
The best way to create this at home is with a small makeup sponge. Paint all four shades in a horizontal stripe pattern on the sponge, then dab it onto each nail. Repeat several times to build up color opacity.
Wipe down the sponge and reload the colors after every two nails to keep them fresh and blended.
Clean up the skin around the nail with acetone before the top coat.
The finished result looks like your nails are on fire from the inside out. Warm, glowing, and perfectly suited for a Leo who loves golden hour.
This look works on all nail lengths and shapes. Shorter nails create a more compact gradient. Longer nails let the full sunset spectrum breathe.
Add a tiny white or gold star near the tip of one accent nail for an evening sky touch.
Budget: two to four nail polishes in the gradient spectrum cost around ten to sixteen dollars depending on the brand. Sponge is essentially free from any beauty routine.
22. Glittery French Tips in Gold
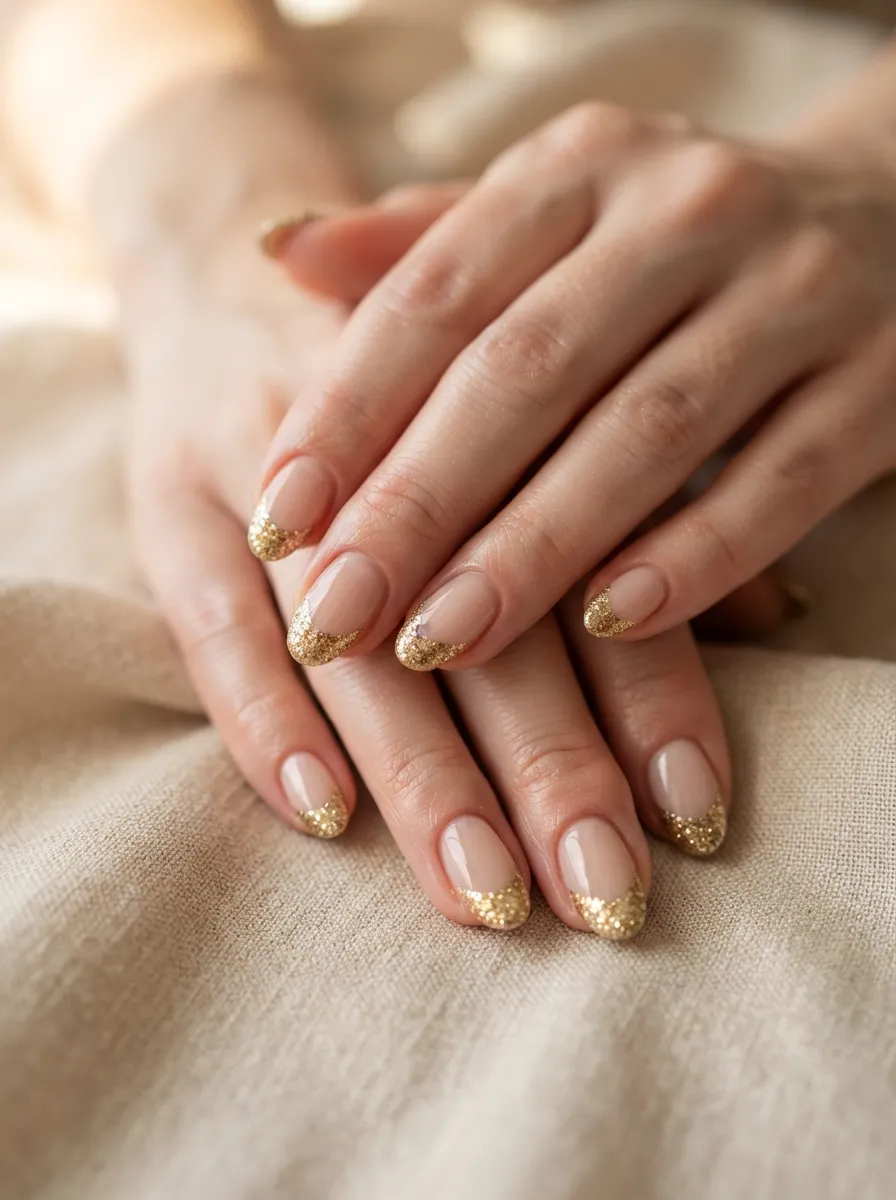
The French manicure is a classic, but gold glitter tips give it a birthday upgrade that makes it feel completely new.
Keep the base in the traditional sheer pink or nude tone. The only change is replacing the white tip with a chunky gold or champagne glitter polish.
Apply the glitter tip using a small nail art brush to keep the line clean and even. Follow the natural smile line of the nail for a traditional French shape, or go straight across for a modern geometric take.
Build up two or three layers of glitter at the tip for full, rich coverage.
Add a very thin gold line between the base and the glitter tip using a striping brush for an extra polished detail.
This design looks like a special occasion nail without being too themed or literal. It can be worn to birthday events and then straight to a work meeting the next day.
For the cleanest tip line, use nail guide stickers as a template. Press them onto the nail in a smile line shape, apply the glitter, then peel them off while the polish is wet.
Seal with a thick glossy top coat that covers both the natural base and the glitter tips in one smooth layer.
This is genuinely one of the most universally flattering nail looks and the gold tips make it birthday-specific in the best, most subtle way.
23. Embossed Gold 3D Nail Art
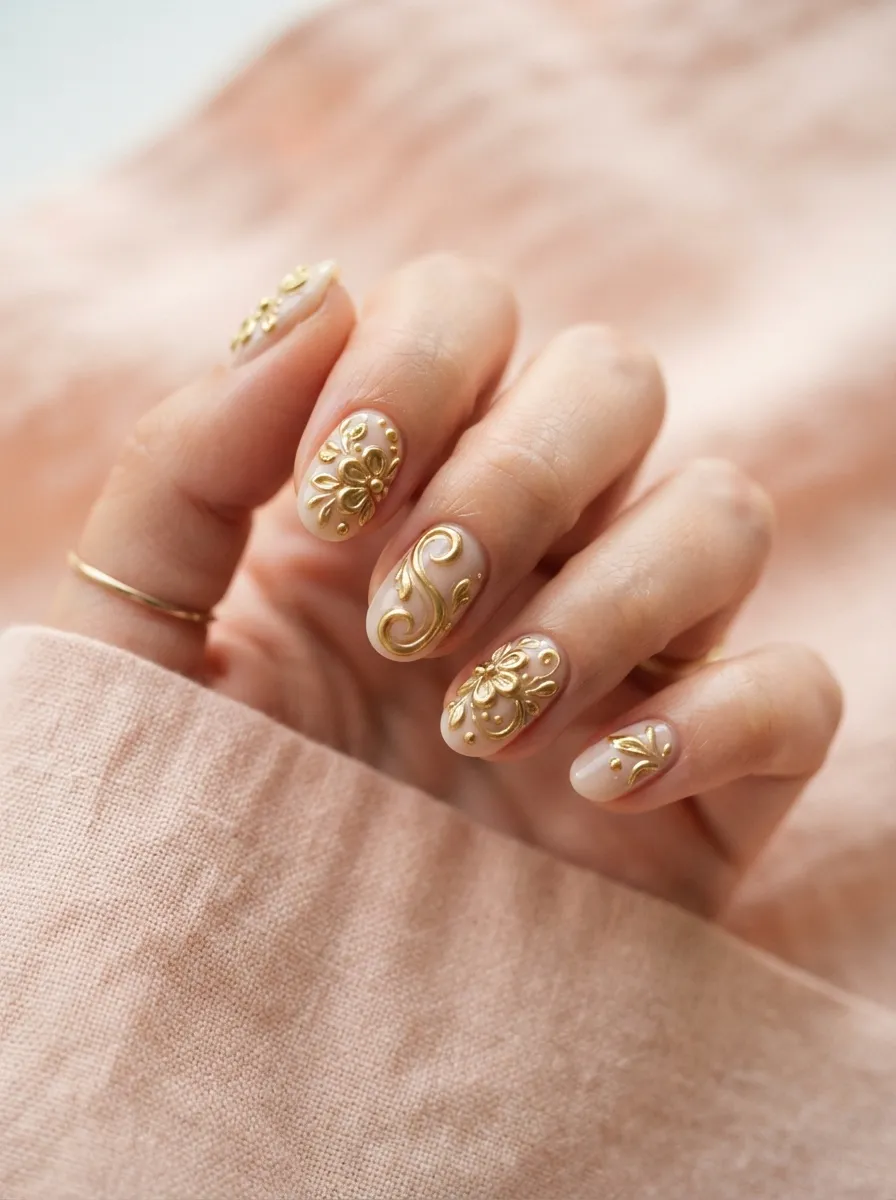
Three-dimensional nail art adds actual texture to your birthday nails, making them look and feel like wearable art pieces.
Nail art gel or builder gel is what creates the raised effect. It is a thicker, more viscous gel that holds its shape when you mold it onto the nail surface before curing.
Use a thin brush to draw swirl shapes, floral outlines, or geometric patterns onto the nail with the builder gel. Each stroke sits slightly raised above the nail surface.
Cure under a UV or LED lamp between each layer if you are building up significant height.
Once the shapes are cured, apply gold chrome powder or gold gel paint on top to finish them in a metallic finish.
For beginners, acrylic powder and a small mold brush can create a similar raised effect without needing UV equipment.
Rhinestone nail art also creates a natural 3D effect. Press stones into gel and they sit above the nail surface permanently.
If you are visiting a nail salon, ask specifically for 3D nail art or embossed design and show a reference image. Most salons with gel services can do this.
The raised textures catch light differently than flat designs and make every handshake, hand gesture, and photo irresistibly interesting.
These nails genuinely feel as good as they look.
24. Star and Spark Scattered Design
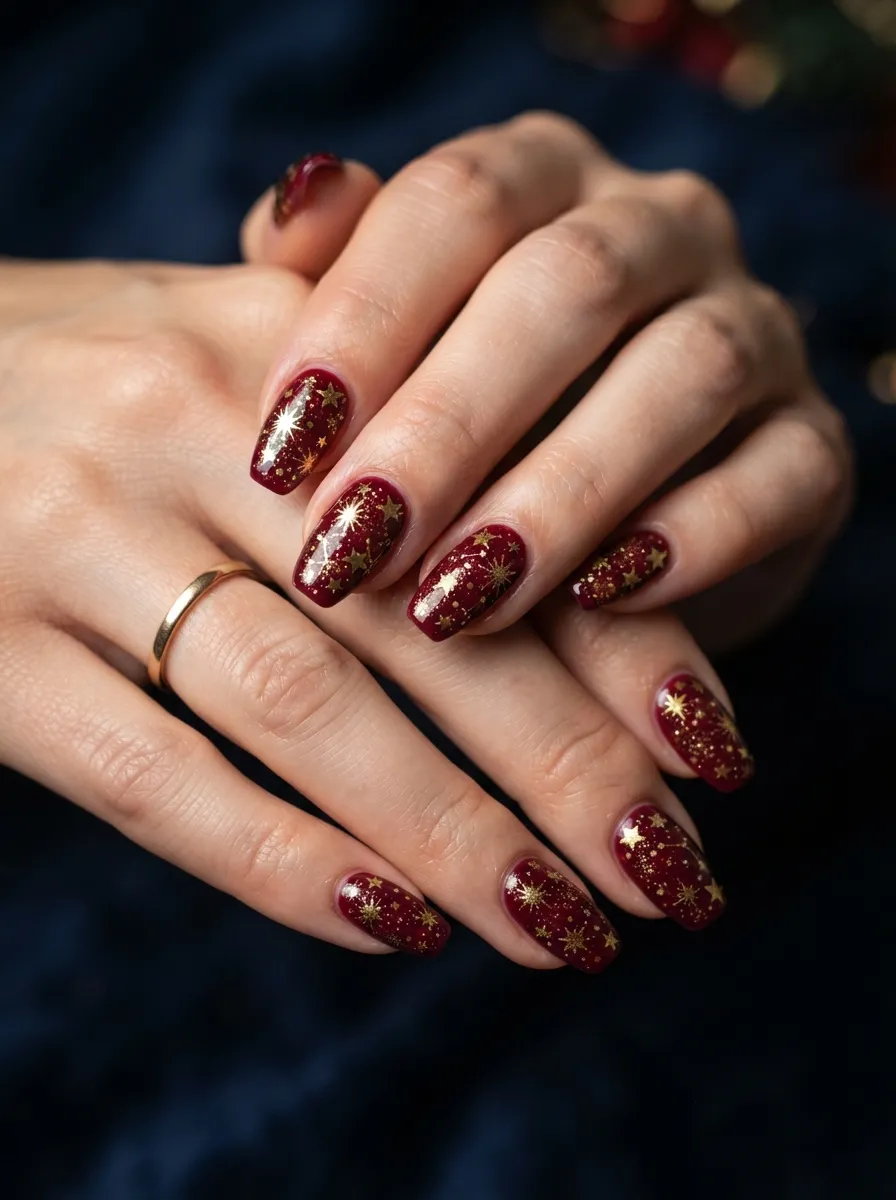
Stars scattered randomly across dark nails feel like the night sky after a birthday wish. Dreamy, magical, and completely Leo.
Use deep burgundy, forest green, or midnight blue as the base. Let it dry.
Then use a star nail art brush or a fine brush and gold nail art paint to scatter stars of different sizes across the nail. Some fully formed five-point stars, some just quick spark or asterisk shapes.
The randomness is the point. Do not try to space them evenly or create a pattern. Just scatter them freely.
Add tiny dot sprays around each star using a very fine brush to create a sparkle burst effect.
Silver and white can be mixed in with the gold stars to add dimension.
You can also layer gold star glitter or foil over the base first and then add individually painted stars on top for extra depth.
Star stickers from craft stores can fill in gaps or serve as the main star shapes if you prefer not to paint them.
This design looks extremely festive and celebratory without using any specific birthday imagery. It is subtle enough to wear for a week after the actual birthday without looking out of place.
Perfect for a Leo who loves the sky as much as they love the spotlight.
25. Warm Nude with Tiny Zodiac Symbols
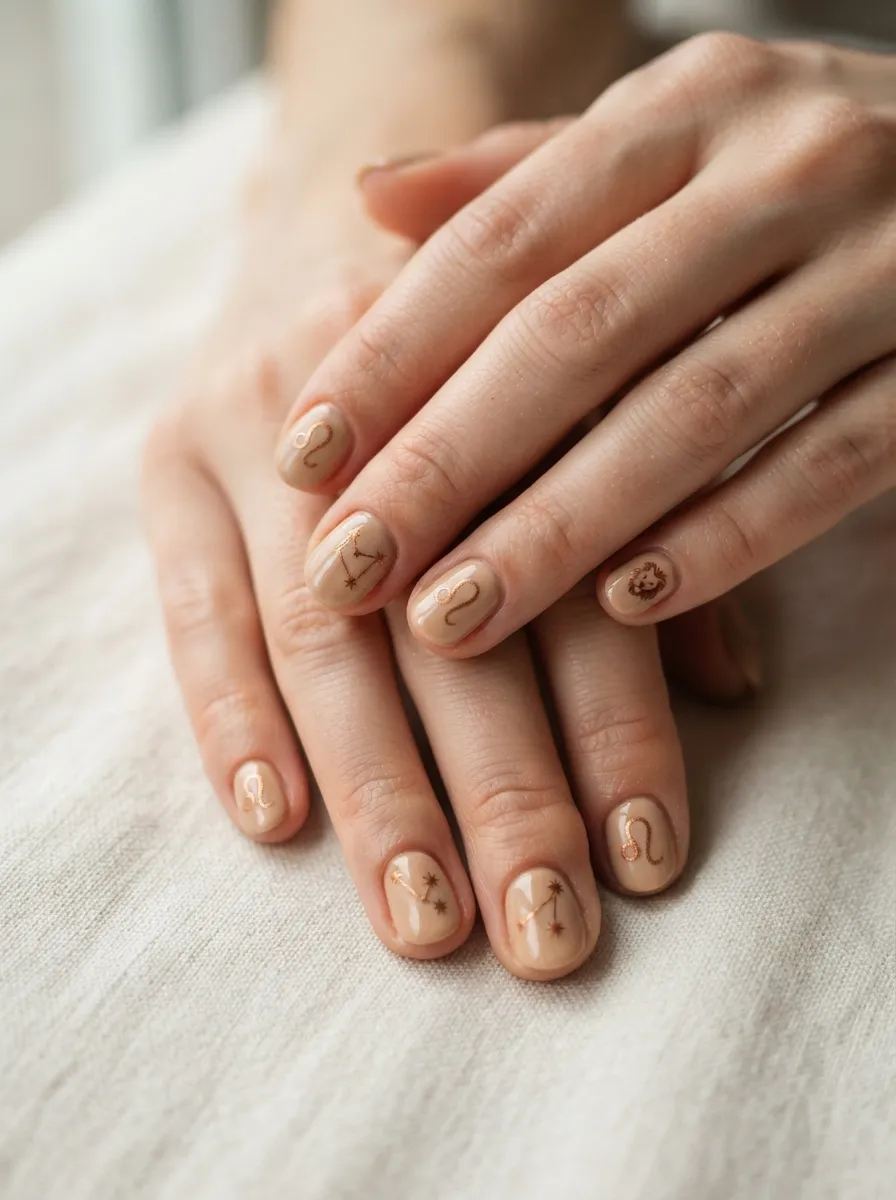
Sometimes the most personal nail art is the most restrained. A clean nude base with a tiny zodiac symbol on each nail is meaningful without being loud.
The Leo glyph looks like a curved letter L with a circular flourish at the end. Practice drawing it a few times on paper before attempting it on your nail.
Using a thin nail liner brush and copper or gold nail art paint, place the glyph centered on each nail. Keep it small enough that it reads as a detail rather than a focal point.
On the accent nail, paint the full Leo constellation symbol using dots and thin connecting lines instead.
This look is clean, intelligent, and very personal. Not everyone will notice the symbol immediately, but when they do, it always gets a positive reaction.
The nude base makes this design completely wearable for professional environments and everyday life, while still feeling special for your birthday week.
Pick a warm nude that matches your skin tone as closely as possible. This makes the nails look expensive and editorial.
Budget: one bottle of nude polish and a small nail art brush set is all you need. Total spend around eight dollars.
Quiet confidence is still very much a Leo trait, and this design captures that balance between understated and deeply personal.
26. Black and Gold Marble
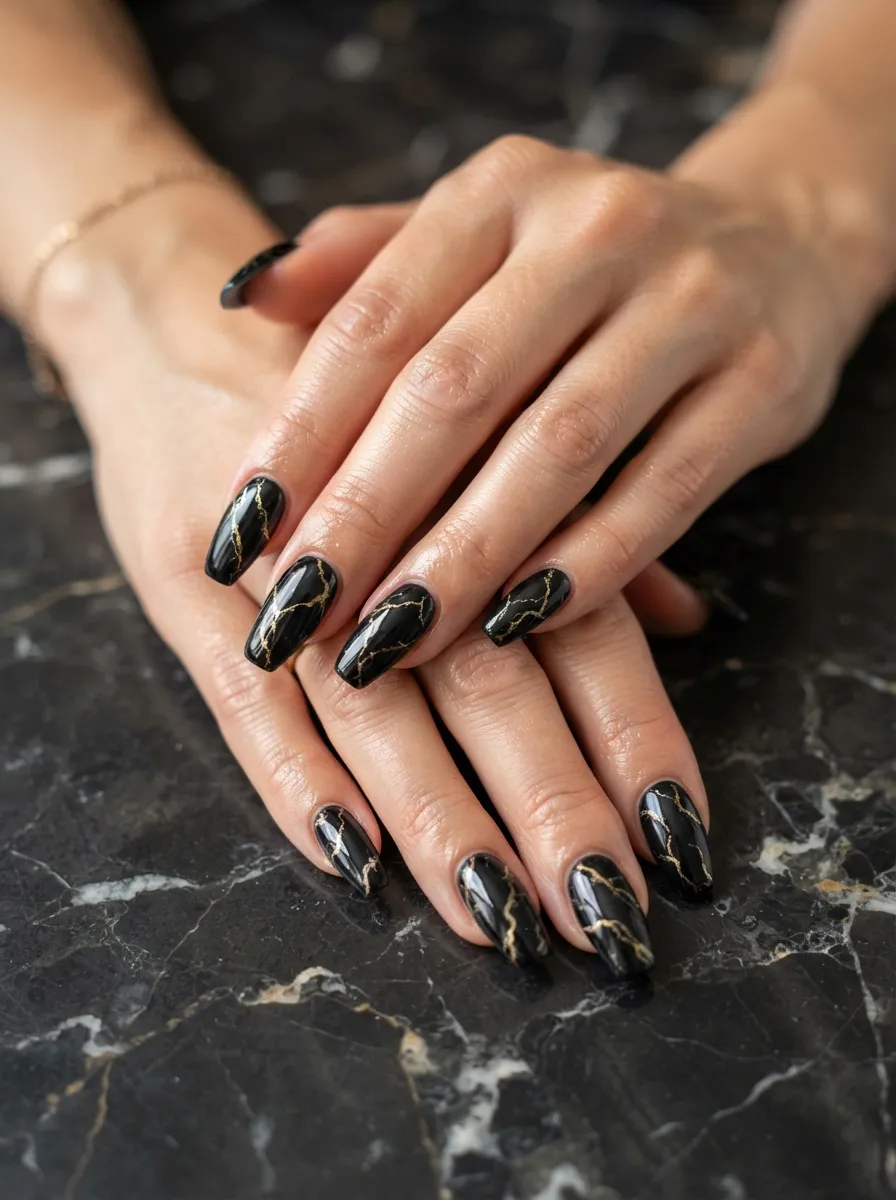
Black marble with gold veining is one of the most dramatic and luxurious nail looks possible. It is perfect for a Leo who wants birthday nails that feel expensive and powerful.
Start with a solid black base and let it cure completely.
Then use a thin liner brush or a small piece of dried out nail art brush and gold gel or nail paint to draw irregular, branching vein lines across the nail.
Real marble veins do not follow straight paths. They branch, thin out, thicken slightly, and sometimes split. Mimic this organic quality rather than drawing straight lines.
Add a few secondary thinner white or silver veins between the gold ones for additional realism.
A high-gloss top coat makes the marble look glossy and polished like actual stone. A matte top coat makes it look more raw and modern.
Watercolor marbling technique can also work well here. Swirl nail polish in a small container of water and dip the nail in to pick up the pattern. Seal immediately with top coat.
This design photographs spectacularly in both natural and artificial lighting. The gold veining glows against the black in a way that makes people look twice.
Salon version of this look typically costs between forty and sixty dollars. The DIY version, done with patience and a thin brush, achieves the same effect for under fifteen dollars.
27. Birthday Foil Confetti Nails
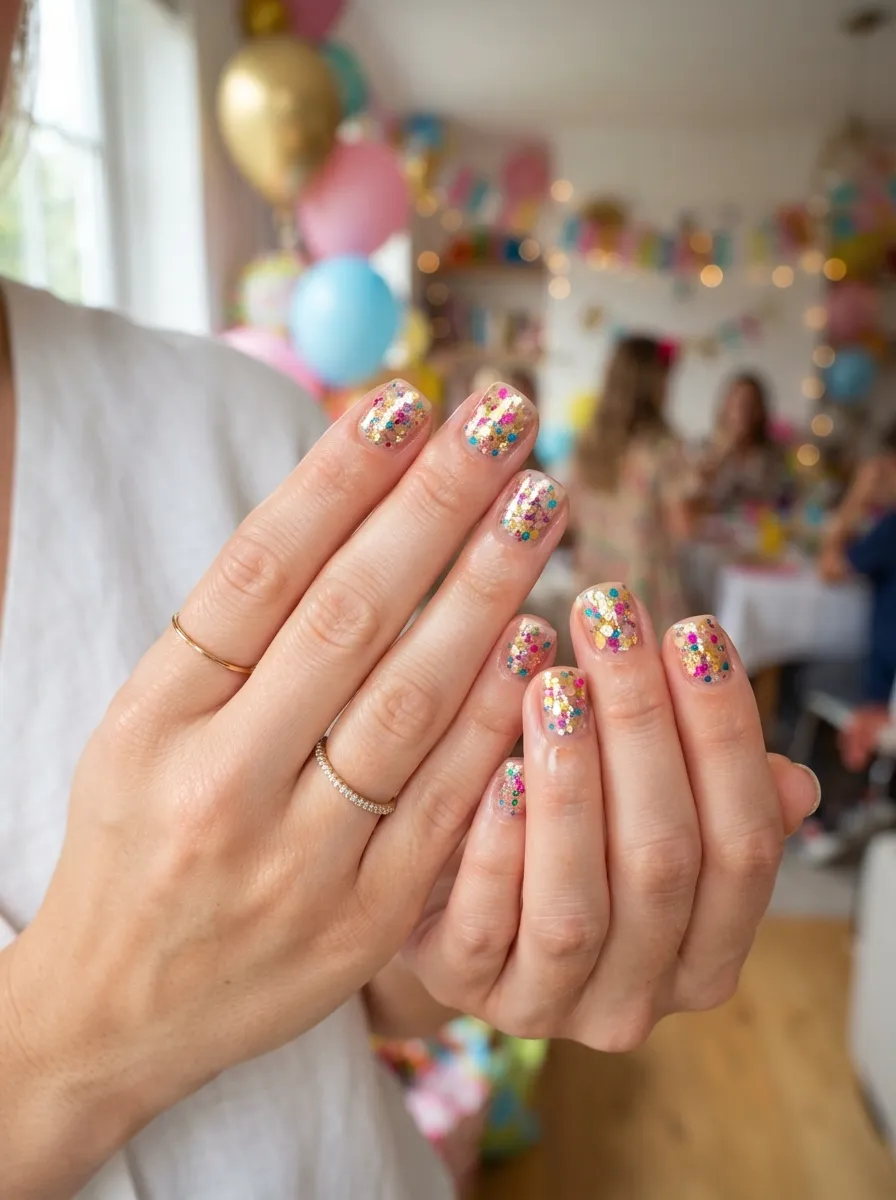
Confetti nails are the happiest nail art you can wear to your own birthday, and they are genuinely one of the fastest designs to create.
You need a sheer base or a light pink nail polish, confetti pieces (the small holographic or gold foil ones used in party decorations), and a top coat.
Apply the base coat. While it is still tacky, press tiny confetti pieces onto each nail using tweezers or your fingertip. Scatter them randomly so they look like they just fell from above.
Do not over-pack the nail. Leave some breathing room between pieces for a more natural confetti-scatter effect.
Apply two thick layers of top coat to encapsulate the confetti completely inside the nail. This keeps the pieces flat and smooth and prevents them from snagging on fabric.
You can also buy confetti nail glitters from beauty supply stores. These come in various sizes and shapes, from dots to stars to hearts, and are designed specifically to sit inside nail layers.
Mix gold foil with holographic silver confetti for a more Leo-aligned color palette.
This design takes about twenty minutes total including dry time and delivers a look that is pure birthday joy. It is impossible to feel anything but celebratory with glittery confetti nails on your hands.
Easy, affordable, and genuinely fun to create. A perfect final look to close out this list.
Leo birthday nails are not just a beauty choice. They are a statement about who you are and how you want to show up for your own celebration. Whether you go full chrome gold, hand-paint a tiny sunflower, or press confetti into clear polish, the right nail look sets the tone for your entire birthday energy. Every idea on this list can be achieved at home with minimal tools and budget, or handed to a nail tech as a clear reference. The most important thing is picking a design that actually feels like you, not just what looks impressive in photos. Leo season only comes once a year. Your nails should be ready for every single moment of it.