1. Pastel Rainbow Tips with Black Outlines
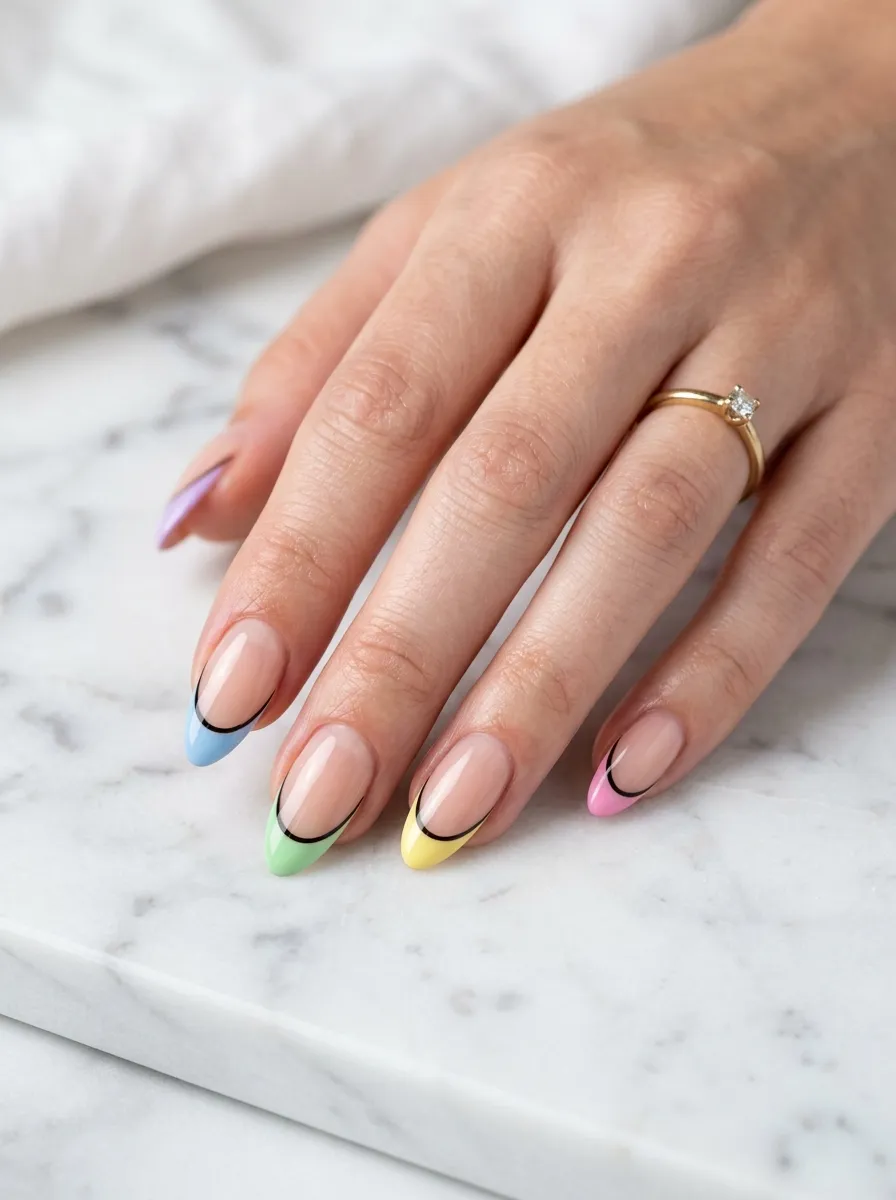
Pastel tips get a major personality upgrade when you add a thin black outline around the color. It makes the tips pop without going too dark or dramatic. Think baby pink, lavender, mint, peach, and sky blue each on a different nail.
You can do this at home with a thin nail art brush or a detail pen. Dip it in black nail polish and trace slowly along the edge of your colored tip. Do not worry about perfection. Slightly wobbly lines actually look more handmade and fun.
This look works on short and medium nails. The contrast between the soft pastels and the graphic black line gives the whole look structure. It reads artsy without trying too hard.
Budget tip: Buy individual pastel shades from Sally Hansen or Sinful Colors. They run about one to two dollars each. A thin nail art brush from Amazon costs under three dollars and lasts for many uses.
2. Chrome Swirl Nails on a Nude Base
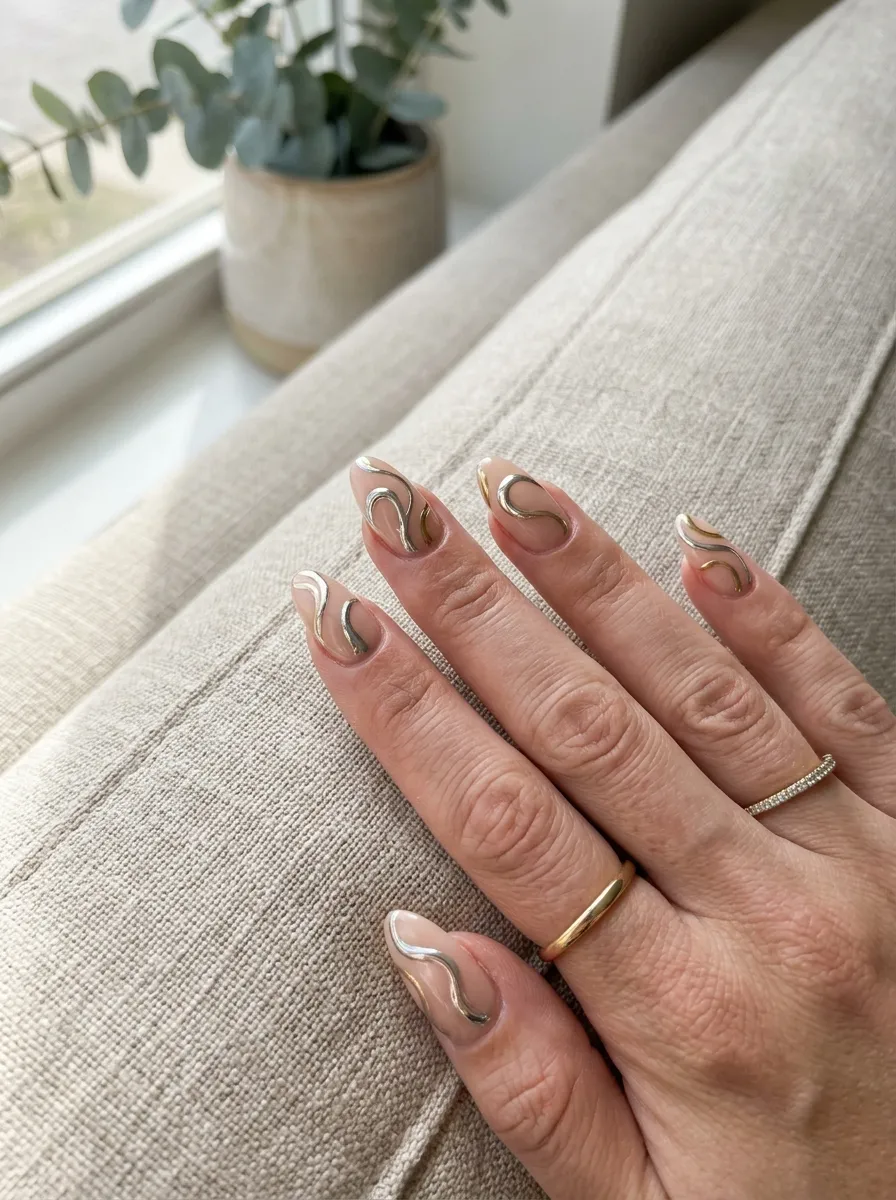
A nude base keeps things wearable while the chrome swirls do all the talking. The combination feels modern and editorial without being over the top.
You can use chrome nail powder rubbed over a gel top coat for that mirror-like shine. Or use a silver or gold nail art pen to draw freehand swirls directly onto a dried nude base. The pen method is easier for beginners.
Swirls do not need to be symmetrical. Loose, organic curves actually look better than stiff perfect spirals. Try doing thick-to-thin strokes for a brushstroke effect.
This nail style photographs beautifully. If you love sharing nail content, this one will get attention.
Budget tip: Chrome nail powder kits are available on Amazon for under eight dollars. Pair it with any nude polish you already own. A good nude shade from OPI or Essie works perfectly as a base.
3. Checkerboard Nails with Neon Accents
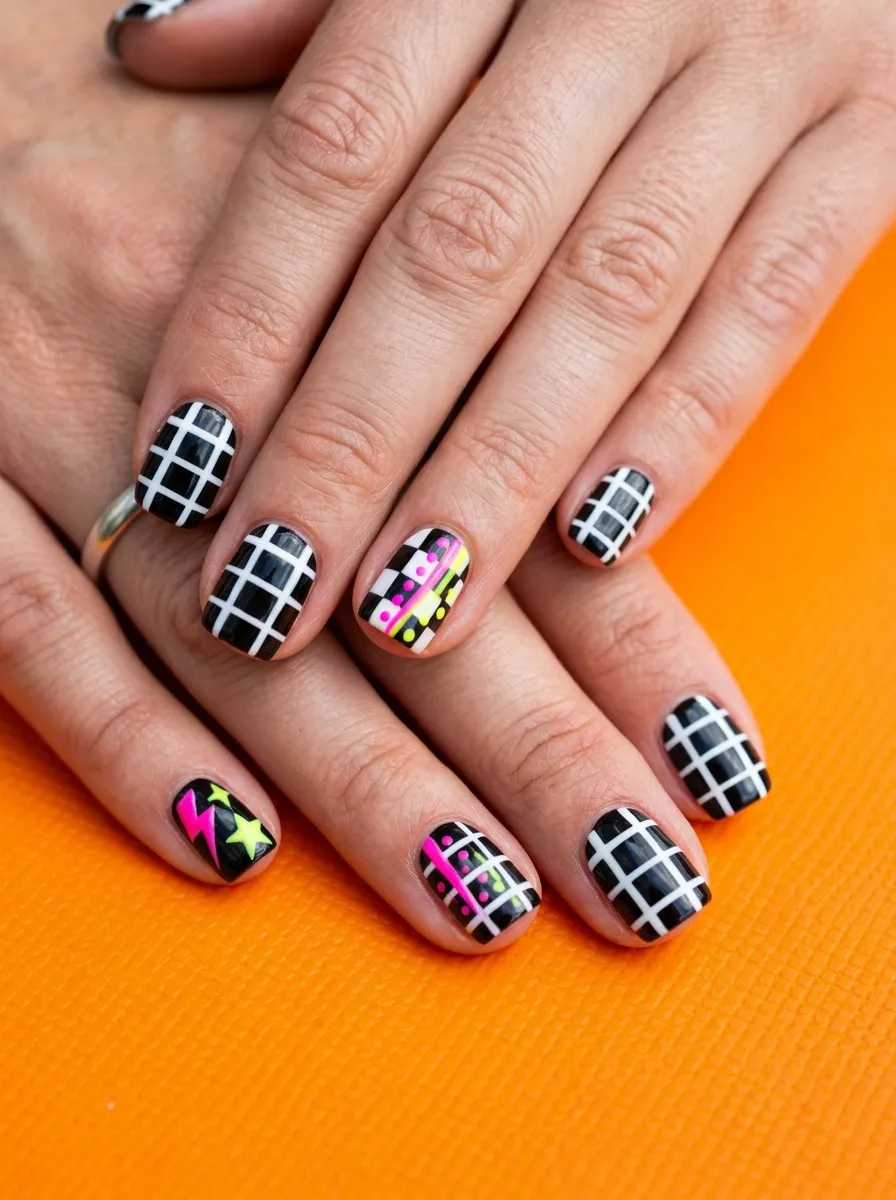
Checkerboard nails are a Quinn nail staple. They are bold, graphic, and surprisingly easy to do with a little tape and patience.
Use thin nail tape strips or striping tape to create the grid before painting the second color. Lay the tape in a cross-hatch pattern, paint over it, and peel before it fully dries. You get clean lines without a steady hand.
Add a pop of neon on one or two accent nails. Neon yellow over a black square section looks especially wild. Neon pink on a white section creates a different kind of contrast.
Keep the rest of your nails simple if the checker pattern feels like too much. One or two checker nails with the rest in a matching solid color is just as effective.
Budget tip: Nail striping tape is available in bulk packs online for about three dollars. Any drugstore black and white polish will work. Neon polishes from Sinful Colors are under two dollars.
4. Smiley Face Nail Art on Bright Yellow
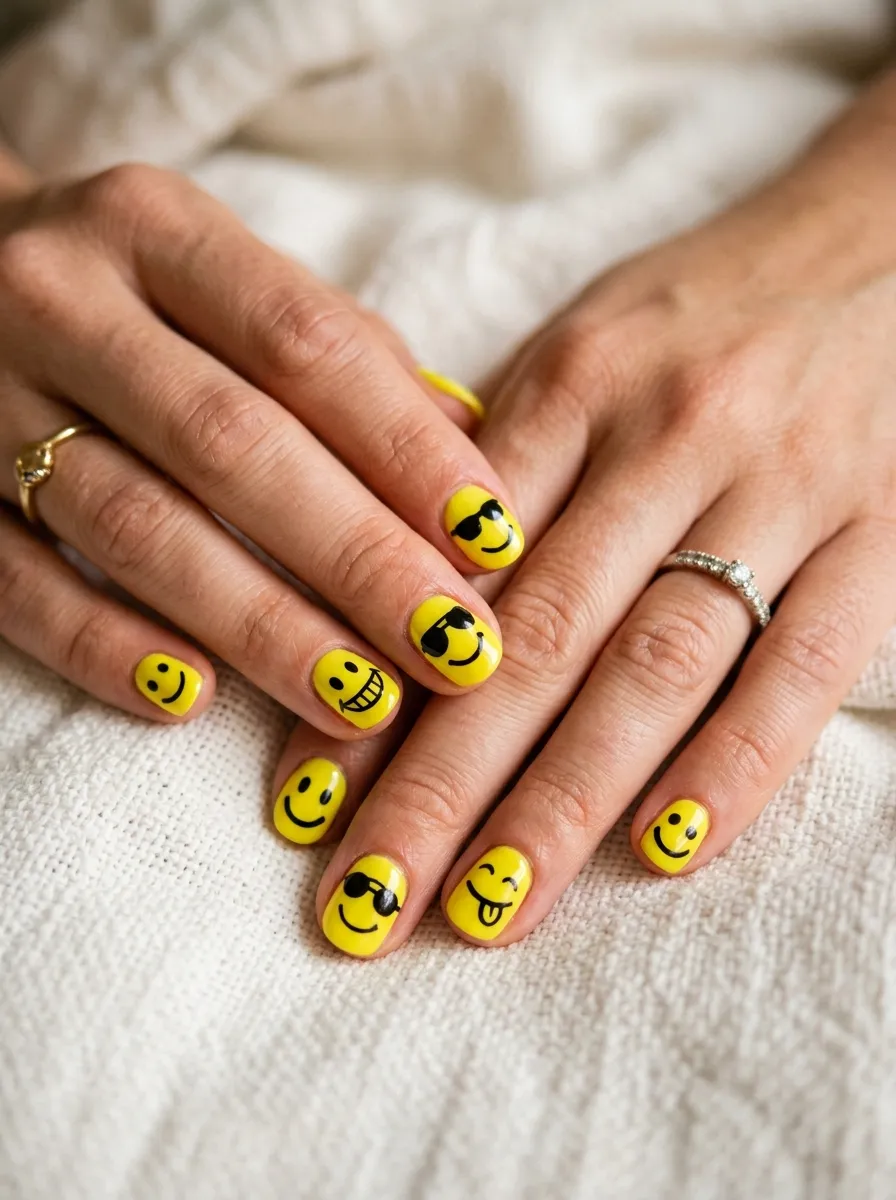
Smiley faces on nails are pure happiness. Bright yellow polish is the perfect base because it sets the cheerful tone immediately.
Paint your base coat first and let it dry completely. Then use a small dotting tool or the end of a bobby pin dipped in black polish to create eyes. Draw the smile with a thin brush or nail art pen. Give some smiles sunglasses or rosy cheeks for variety.
No two smileys need to match. Making them all slightly different makes the set look more playful and less rigid.
This is a great beginner nail art design. Even simple, slightly imperfect smileys look adorable on a yellow base.
Budget tip: Yellow polishes from NYX or Wet n Wild are bright and opaque for under two dollars. A dotting tool set costs about three to four dollars and works for dozens of different nail art styles. The investment is worth it.
5. Abstract Blob Nails in Contrasting Colors
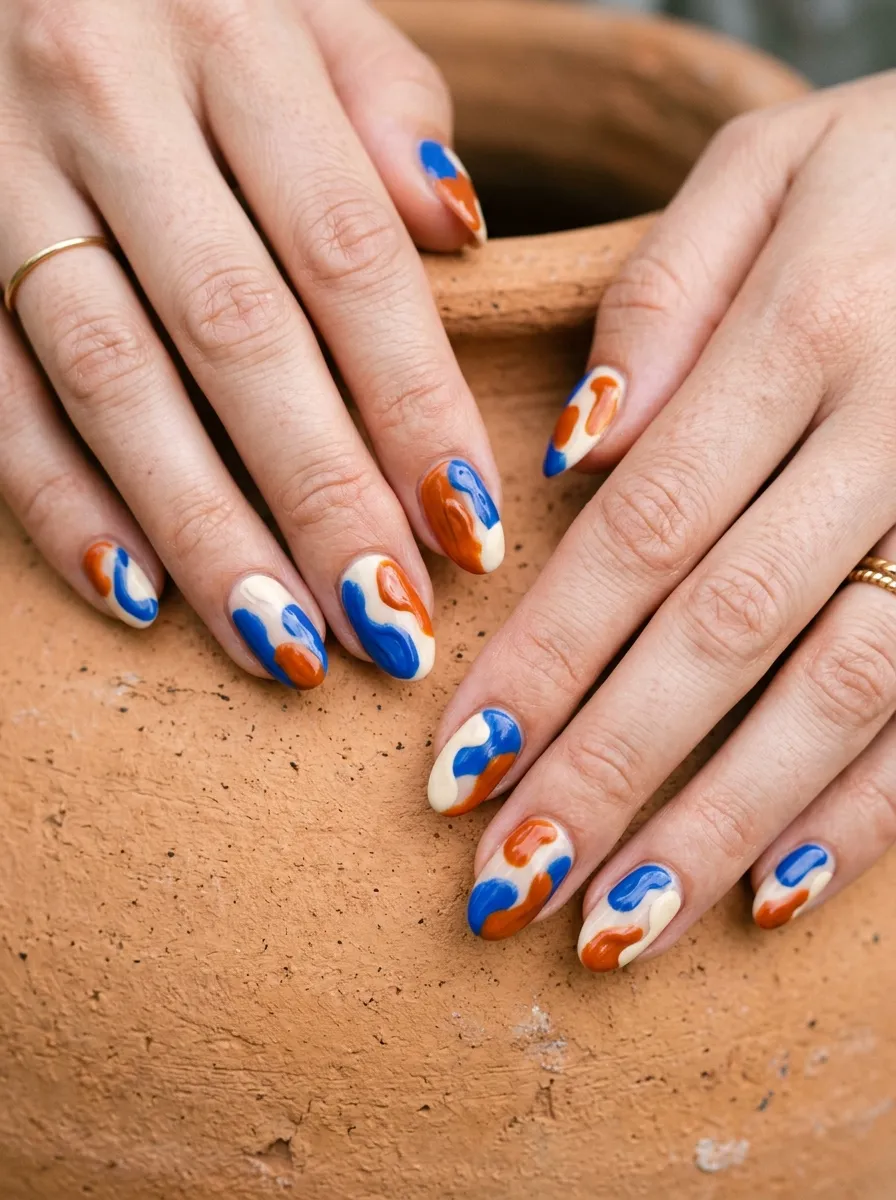
Abstract blob nails are basically nail art for people who say they cannot do nail art. The whole point is that they look random and imperfect.
Pick two or three colors that contrast strongly. Paint your base color first. Then drop irregular blob shapes in a second color using a dotting tool or a brush. They do not need to be round or even. Think amoeba shapes. Think splodges.
Add a third color on top of some blobs for layering. Outline a few blobs with white or black for extra definition. Or leave them raw for a looser look.
This style works on any nail length. Short nails with big blobs look especially bold.
Budget tip: Use up old nail polish in this design. That half-used cobalt blue you never wear can finally shine. Leftover colors work great because the random shapes hide any formula inconsistencies.
6. French Tips with a Twist: Colored and Thick
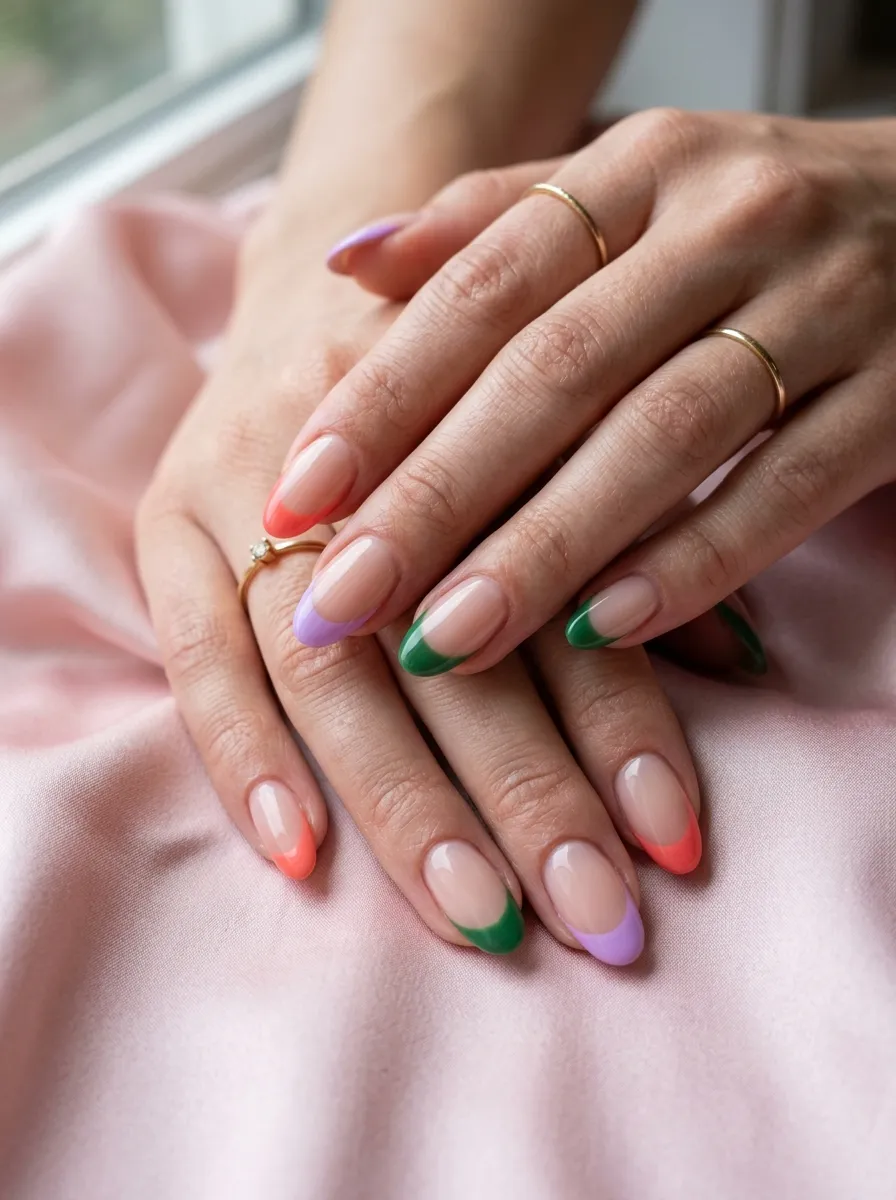
The classic French tip gets a complete makeover when you make the tips thick and swap white for unexpected shades.
Try forest green tips on a sheer base. Try coral on a tan base. Lilac on a soft white base looks dreamy. The key is making the tip line thicker than traditional French manis. Go dramatic with the width.
Use French tip guides or tape to get a clean line. Stick the tape just above where you want the color to stop, paint over it, and peel before it dries.
Mixing tip colors across the hand adds extra personality. No two nails need the same tip color.
Budget tip: French tip stickers and guides are sold at Sally Beauty for under four dollars. You can reuse each strip two or three times before it loses stickiness.
7. Star and Moon Stamped Nails
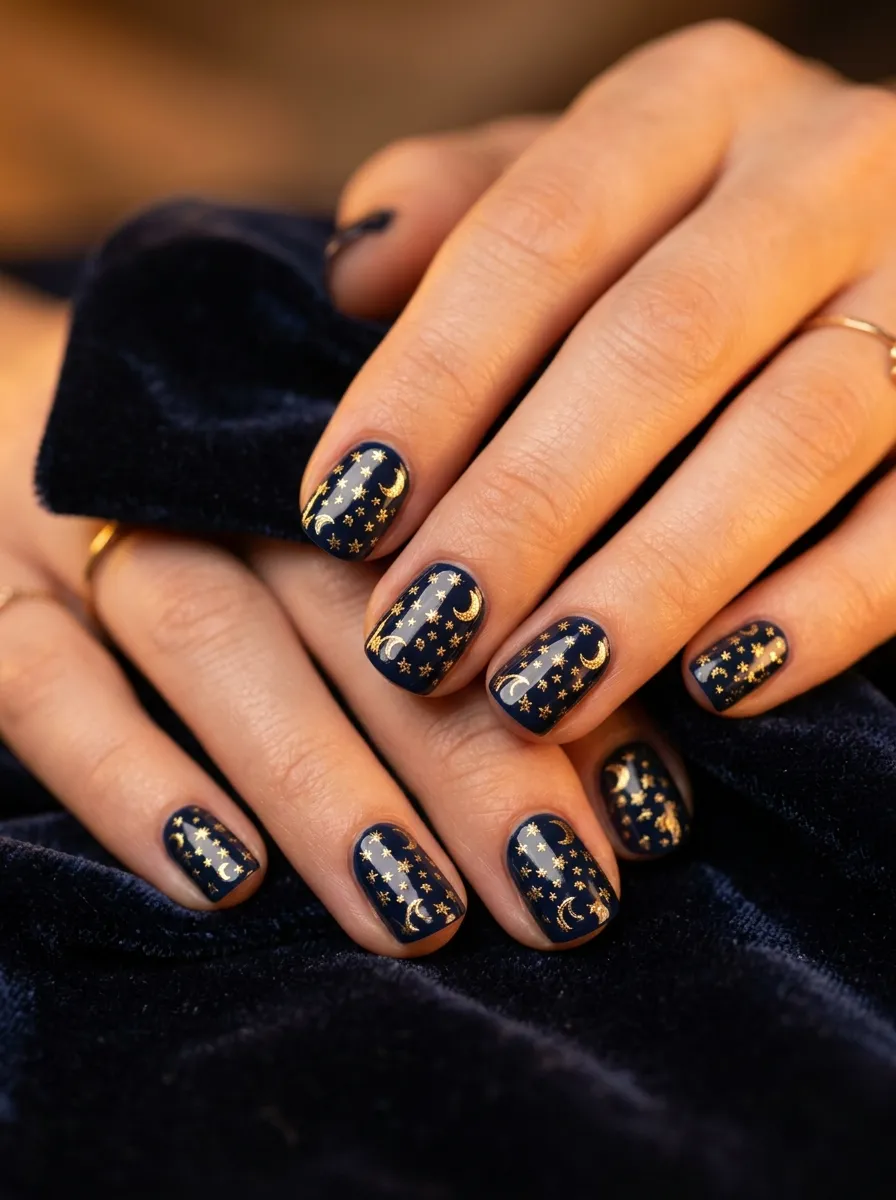
Star and moon nails feel celestial and a bit witchy. They look complex but stamping makes them totally achievable at home.
You need a nail stamping kit. These come with stamping plates, a scraper, and a stamper tool. Roll the stamper over the design on the plate, then press it onto your nail. The design transfers in one move.
Use gold or silver stamping polish on a dark base for the most contrast. Deep navy, black, or forest green are perfect base colors.
Practice on paper first if you are new to stamping. It takes two or three tries to get the pressure and speed right.
Budget tip: A basic stamping kit on Amazon runs about eight to twelve dollars and includes dozens of design plates. Born Pretty is a reliable budget brand for stamping supplies. The plates are reusable for years.
8. Daisy Chain Nail Art on Sky Blue
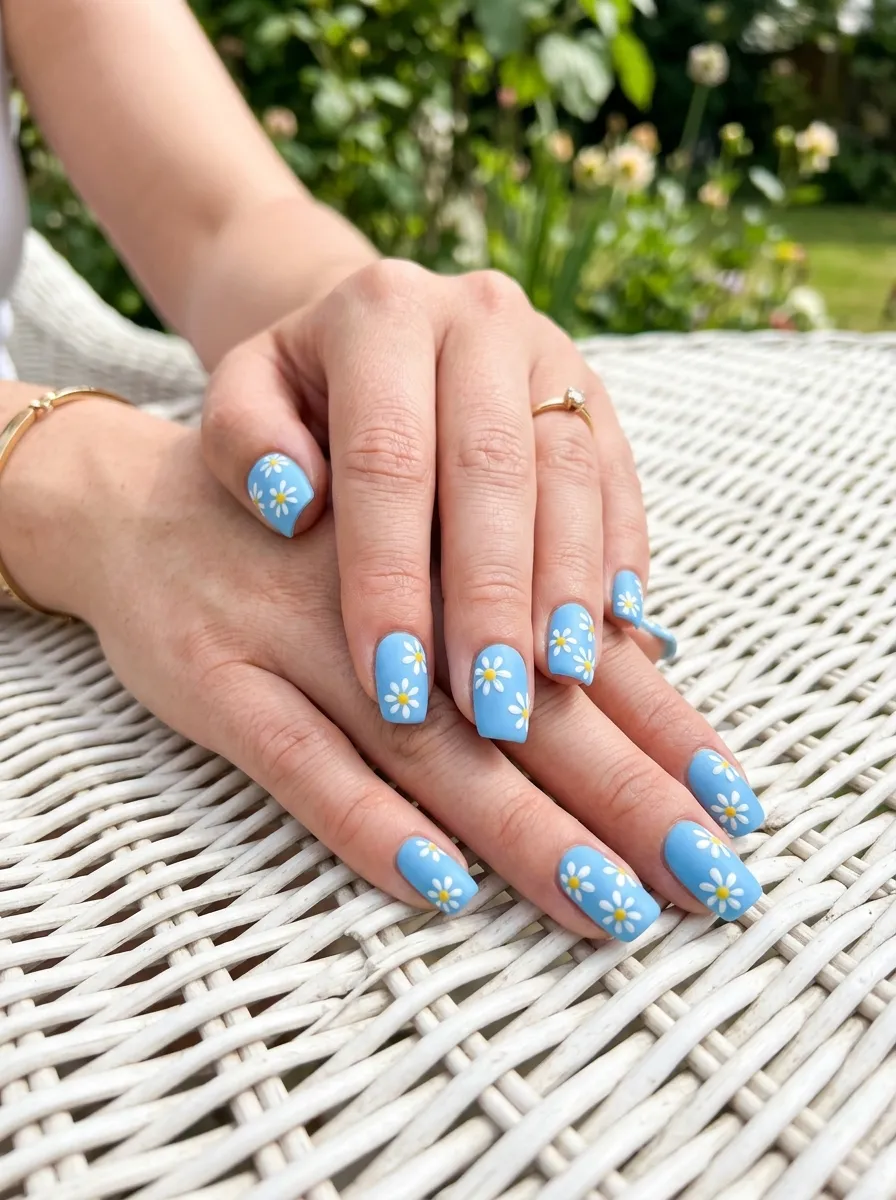
Daisies are the most charming nail art motif. They look cottage-core, playful, and fresh all at once. Sky blue is the perfect base because it mimics a clear day.
Use a small dotting tool for the petals. Place five small white dots in a ring and then add one yellow dot in the center. That is a daisy. Cluster two or three together on each nail or scatter them randomly across the nail surface.
Vary the sizes. Big daisies next to tiny ones make the design look more natural and less stamped-on.
You can outline petals with a thin black line for a more graphic look or leave them soft and painterly.
Budget tip: Sky blue polishes are everywhere right now. Essie has a shade called Bikini So Teeny that is perfect. White and yellow nail art pens from Amazon make the daisy details extremely easy.
9. Gradient Ombre in Unexpected Color Pairs
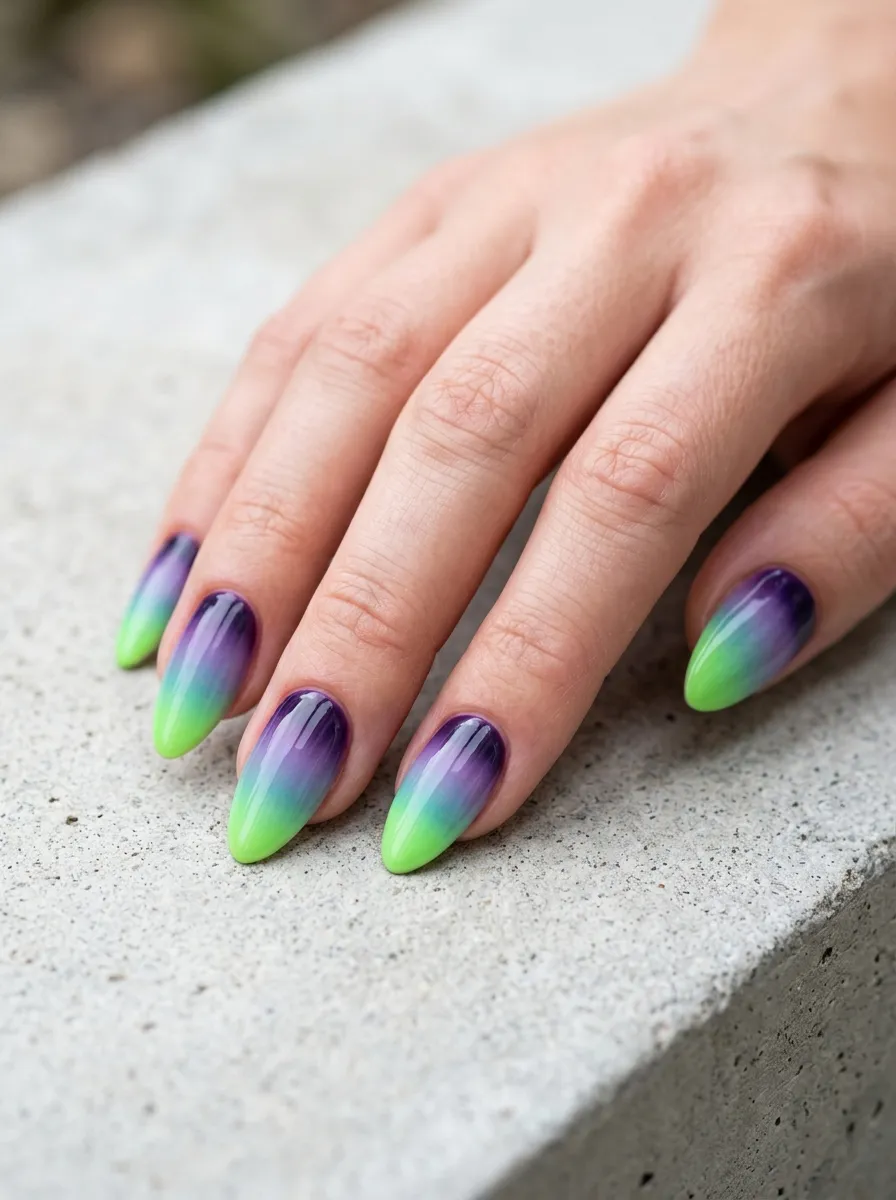
Ombre nails are classic. Unexpected color pairings make them Quinn-level wild.
Try purple to lime green. Try burnt orange to baby blue. Try hot pink to teal. These combinations should not work but somehow they absolutely do.
Use a makeup sponge to apply the gradient. Paint two colors side by side on the sponge, leaving a small overlap in the middle. Dab it onto your nail repeatedly to build the color blend. Finish with a glossy top coat to smooth everything out.
The more coats you dab, the smoother the fade. Do not rush this part.
Budget tip: Any cheap nail sponge or even a wedge makeup sponge from the drugstore works. Cut it into a small strip for easier control. Two polishes for this look cost under four dollars total if you shop drugstore brands.
10. Retro Flame Nails in Orange and Red
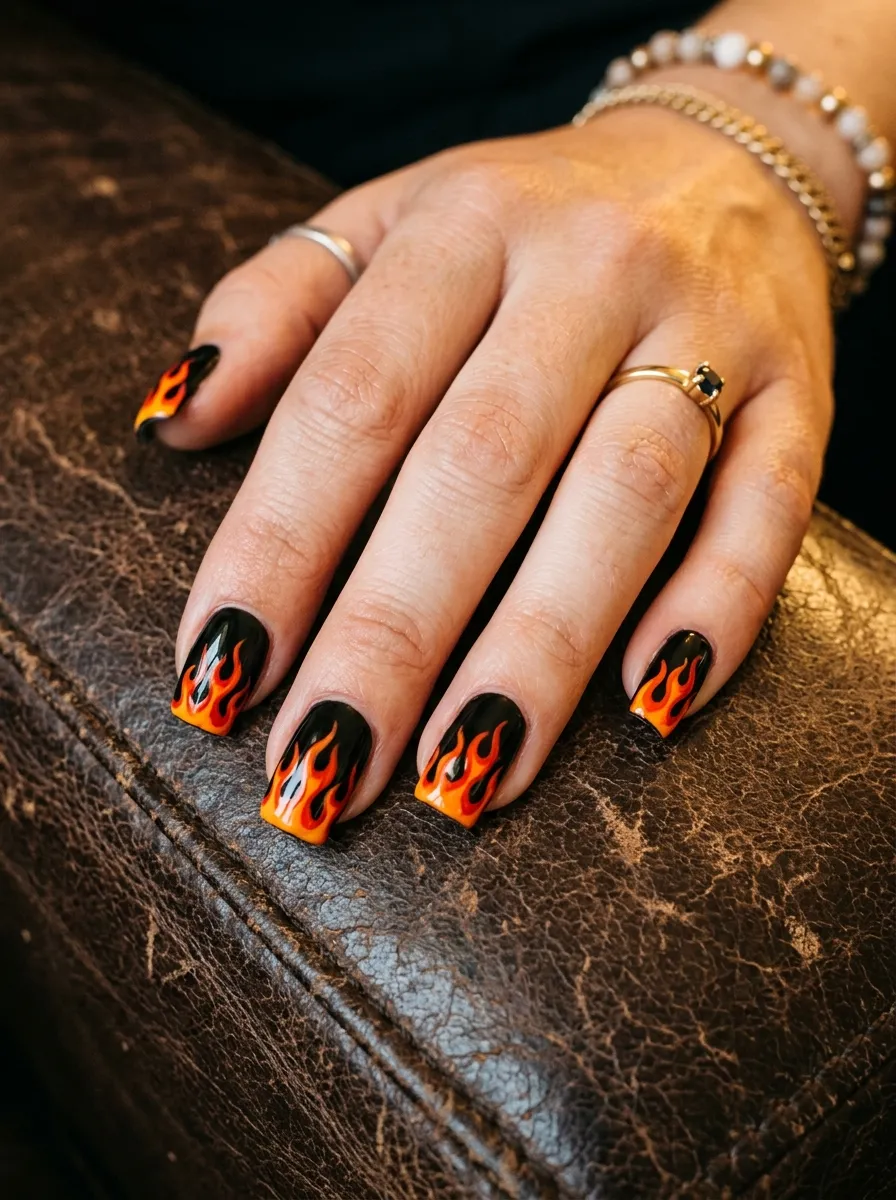
Flame nails are one of the most iconic Quinn nail designs. They look bold and retro without needing a professional artist.
Paint your base black first. Once dry, use an orange nail art pen or thin brush to paint the flame shape starting at the cuticle and moving upward in pointed curves. Add red at the base of the flames for depth.
Flames do not need to be identical across all nails. Letting them vary in height and width looks more natural.
If flames feel intimidating, try just two or three nails with flames and keep the rest black or solid orange.
Budget tip: A nail art pen in orange and red costs about two to three dollars each on Amazon. These pens make flame drawing much easier than a regular brush because you have direct control over line thickness.
11. Colorful Polka Dot Nails on White
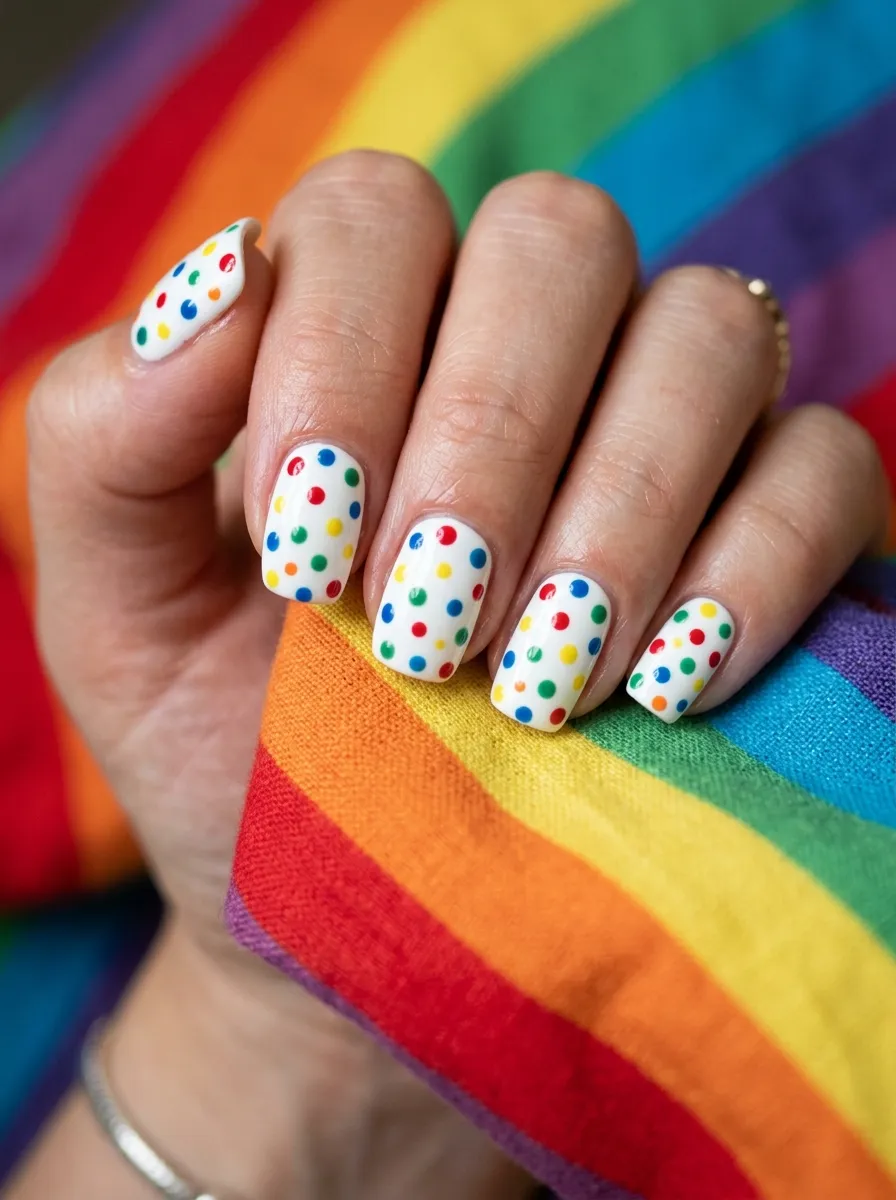
Polka dots on white nails look like confetti. They are playful, cheerful, and honestly effortless to create.
A dotting tool is your best friend here. Dip the larger end into colored polish and press gently onto a dry white base. Lift straight up without dragging. Repeat with multiple colors scattered randomly.
Vary the dot sizes by using different ends of your dotting tool. Mix large dots with small ones for a more dynamic pattern.
You can do all dots in one color for a more graphic look. Or go full rainbow chaos for maximum Quinn energy.
Budget tip: A double-ended dotting tool costs under two dollars. Or use the end of a bobby pin for tiny dots and the blunt end of a pencil for bigger ones. You already own these tools.
12. Negative Space Geometric Nails
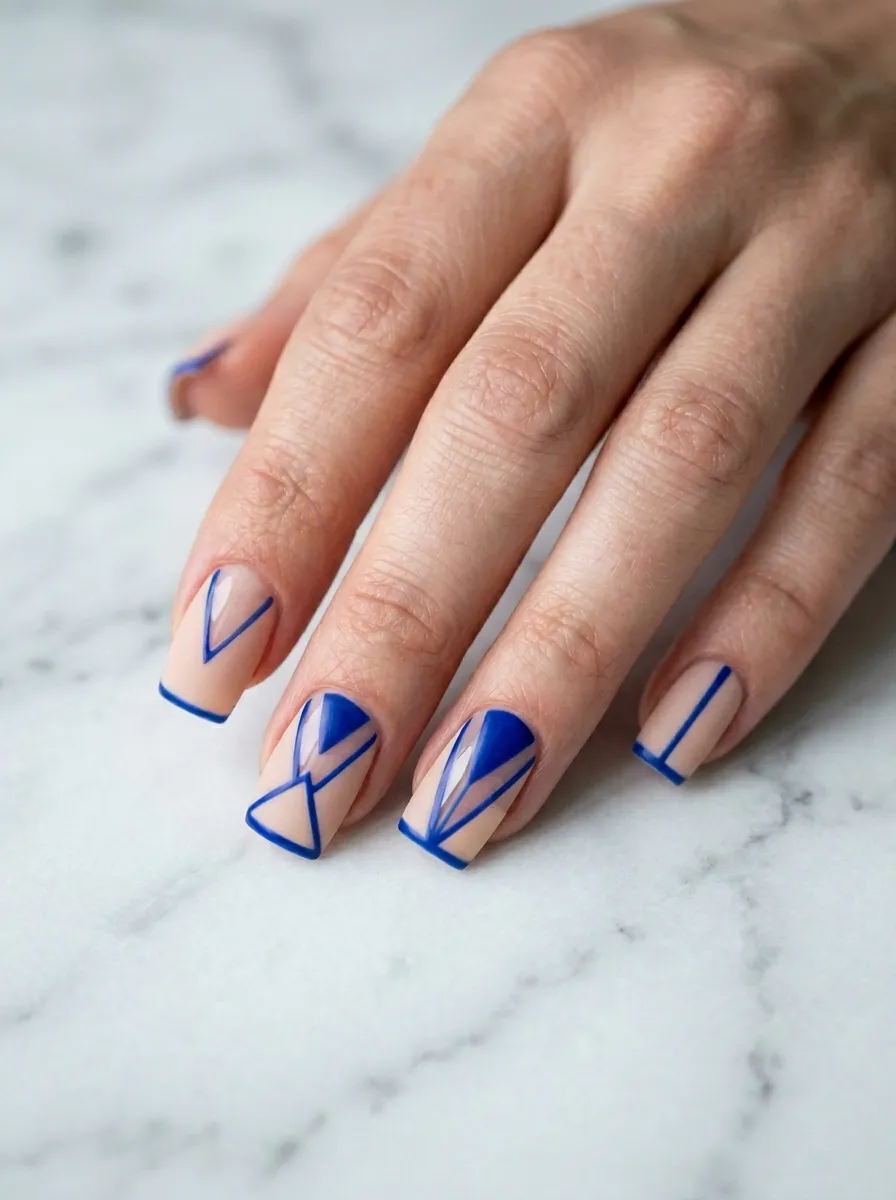
Negative space nails use the bare nail as part of the design. They look modern, architectural, and surprisingly easy to do with tape.
Paint a base color on part of the nail, leaving sections bare. Geometric shapes like triangles, rectangles, and diagonal lines work beautifully. Use tape to mask off the areas you want to keep clear.
The bare nail contrasting with the color creates a design on its own. Add a matte top coat to the colored sections for an extra contrast.
This style suits all nail lengths but looks especially striking on medium to long nails.
Budget tip: Regular household tape cut into thin strips works perfectly for nail masking. Remove it immediately after painting before the polish dries. Geometric designs require no special tools beyond tape and patience.
13. Tiger Print Accent Nails
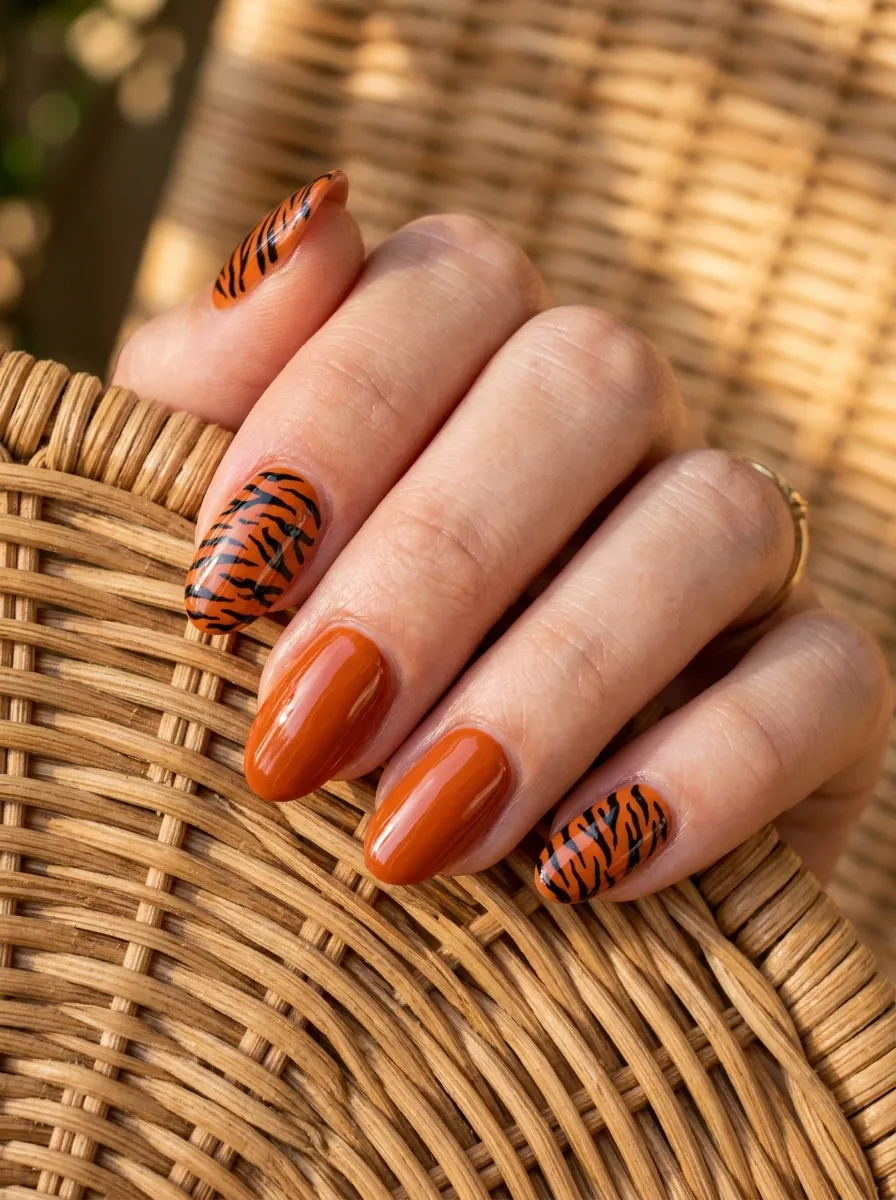
Tiger print nails are wild in the best possible way. They look expensive and fashion-forward but are completely DIY-friendly.
Paint two or three nails in orange as your tiger base. Once dry, use a thin black nail art pen or brush to add irregular stripes. Tiger stripes are never perfectly uniform. They curve, taper, and vary in thickness. That is what makes them look authentic.
Leave the remaining nails in solid orange or a complementary neutral like caramel or cream.
A glossy top coat makes the whole look sharper and more professional.
Budget tip: Orange polish from any drugstore works as the base. A black nail art pen for the stripes costs about two dollars. This entire look can cost under five dollars to recreate.
14. Spiderweb Nails for Everyday Wear
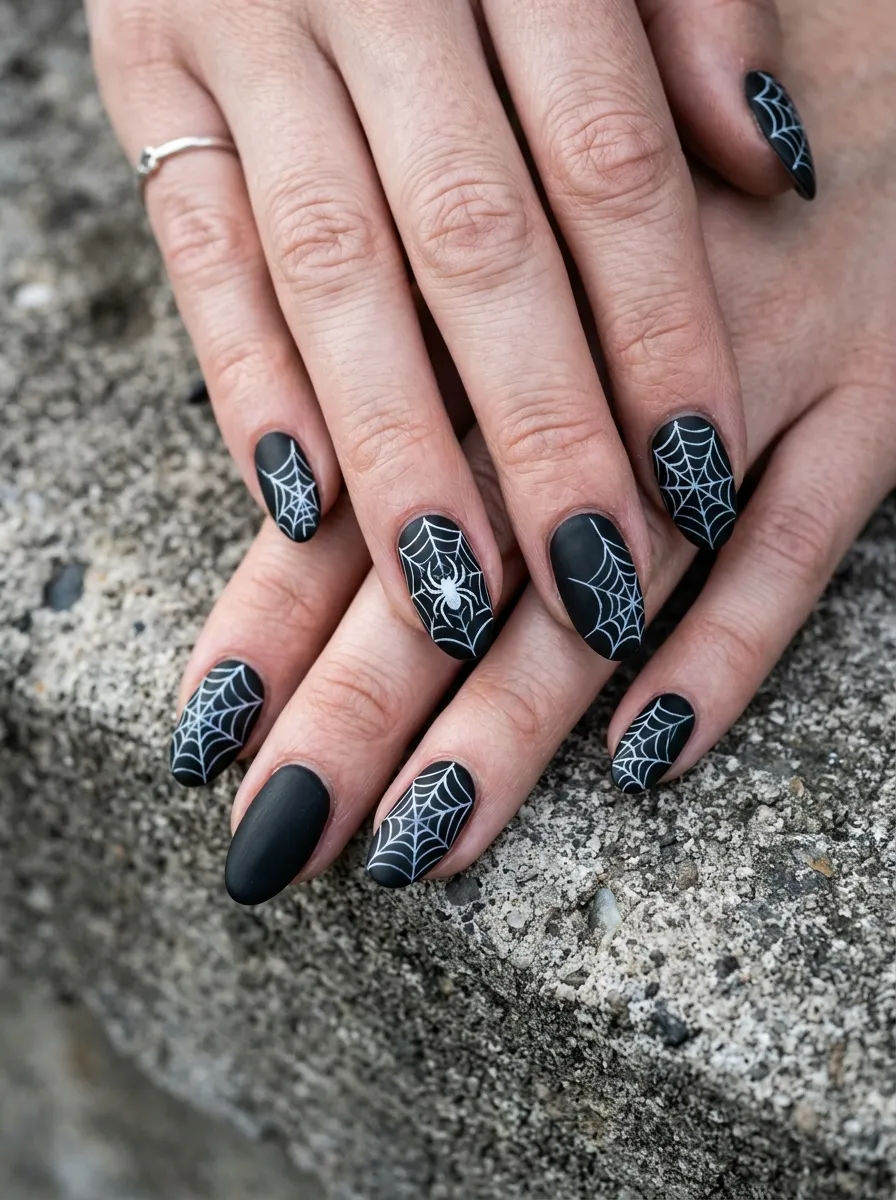
Spiderweb nails are not just for Halloween. They fit the Quinn nail aesthetic any time of year because they are graphic, quirky, and genuinely cool.
Paint your nails black first. Once fully dry, use a white nail art pen to draw the web. Start with a small dot in one corner. Draw lines radiating outward from the center. Then connect them with curved lines working from the center outward in rings.
Add a tiny spider on one accent nail using a dotting tool for the body and thin brush strokes for the legs.
Budget tip: A white nail art pen is the only special tool you need. These cost about two to three dollars. Practice the web pattern on paper first. Once you try it twice on paper, your nails will look clean and confident.
15. Fruit Slice Nail Art
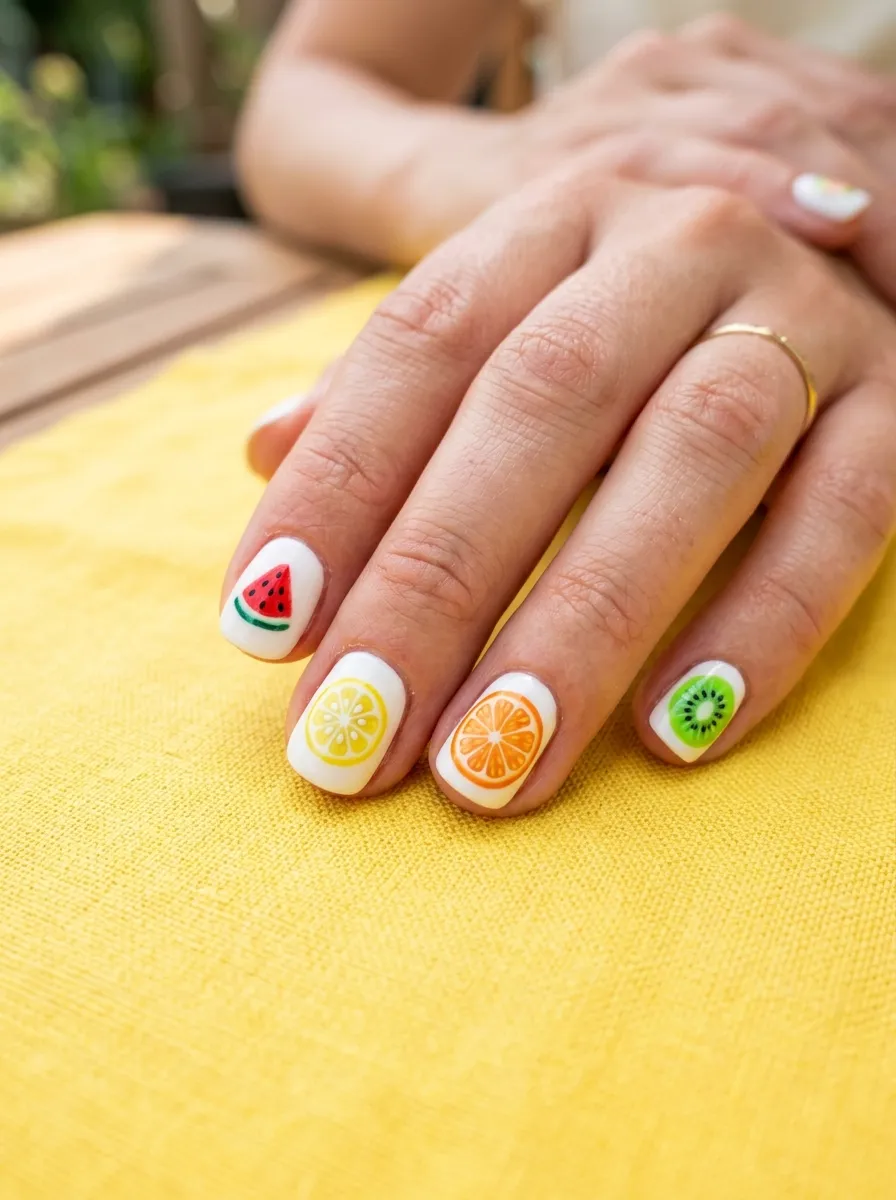
Fruit slice nails are colorful, detailed, and absolutely adorable. They suit spring and summer perfectly but honestly work all year.
Each nail gets a different fruit. Watermelon is the easiest to start with. Paint the top third red, the middle section white, and the base green. Add tiny black seeds with a dotting tool.
Lemon slices use yellow with white lines radiating from the center. Orange slices follow the same approach with orange polish. Kiwi uses green with brown center details.
Use a thin brush or nail art pen for the segment lines in each fruit.
Budget tip: You likely already own several of the colors needed for this look. Red, green, white, yellow, and orange are nail kit staples. A nail art pen for detail work costs about two dollars.
16. Cloud and Lightning Bolt Nails
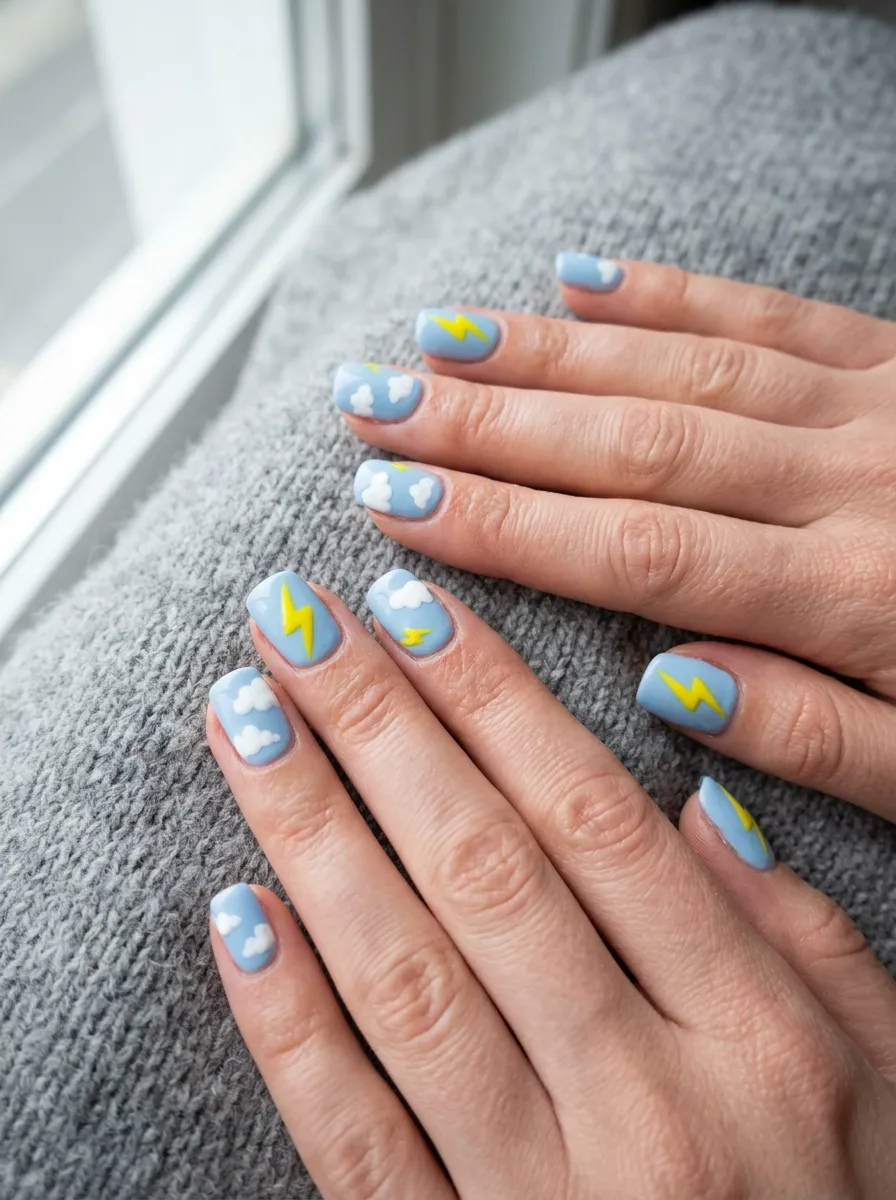
Clouds and lightning bolts are a dreamy-meets-electric combination. The contrast between soft clouds and sharp bolts captures the Quinn nail spirit perfectly.
Paint your nails in pastel blue. For clouds, use white polish and a thin brush to paint fluffy bumpy cloud outlines. Fill them in and add a second coat once dry.
Lightning bolts are simple zigzag shapes. Use yellow nail art pen or thin brush. One bold bolt per nail is enough.
Mix it up by putting clouds on some nails and bolts on others. That variation keeps the set interesting.
Budget tip: Baby blue polish in the two to three dollar range is widely available. White and yellow nail art pens are the only additions needed. This set can be done for under ten dollars including top coat.
17. Snake Skin Texture Nails
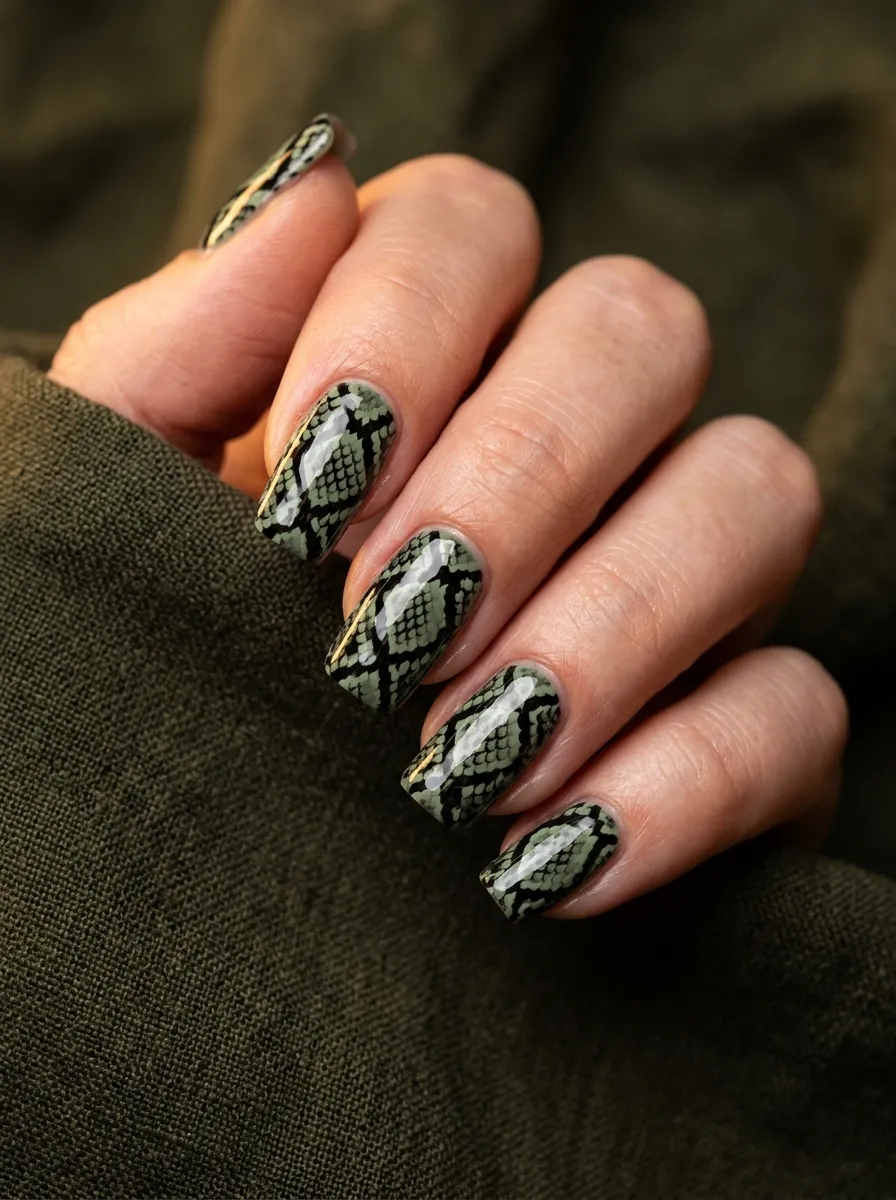
Snake skin nails look high-fashion and editorial. They are more detailed than basic nail art but completely achievable at home.
Start with a base in sage green, tan, or whatever color you want your scales to be. Use a thin brush to draw small U-shaped or crescent shapes in rows. Each row slightly overlaps the one above it like real scales.
Outline each scale in a darker shade of the same color or in black for high contrast. A matte top coat gives this look a more realistic feel.
Go monochromatic for a sleeker version or use two contrasting colors for a wilder effect.
Budget tip: This is all about the thin brush technique. A detail brush costs under three dollars. Take your time and work in small sections. You do not need to complete all nails in one sitting.
18. Butterfly Wing Accent Nails
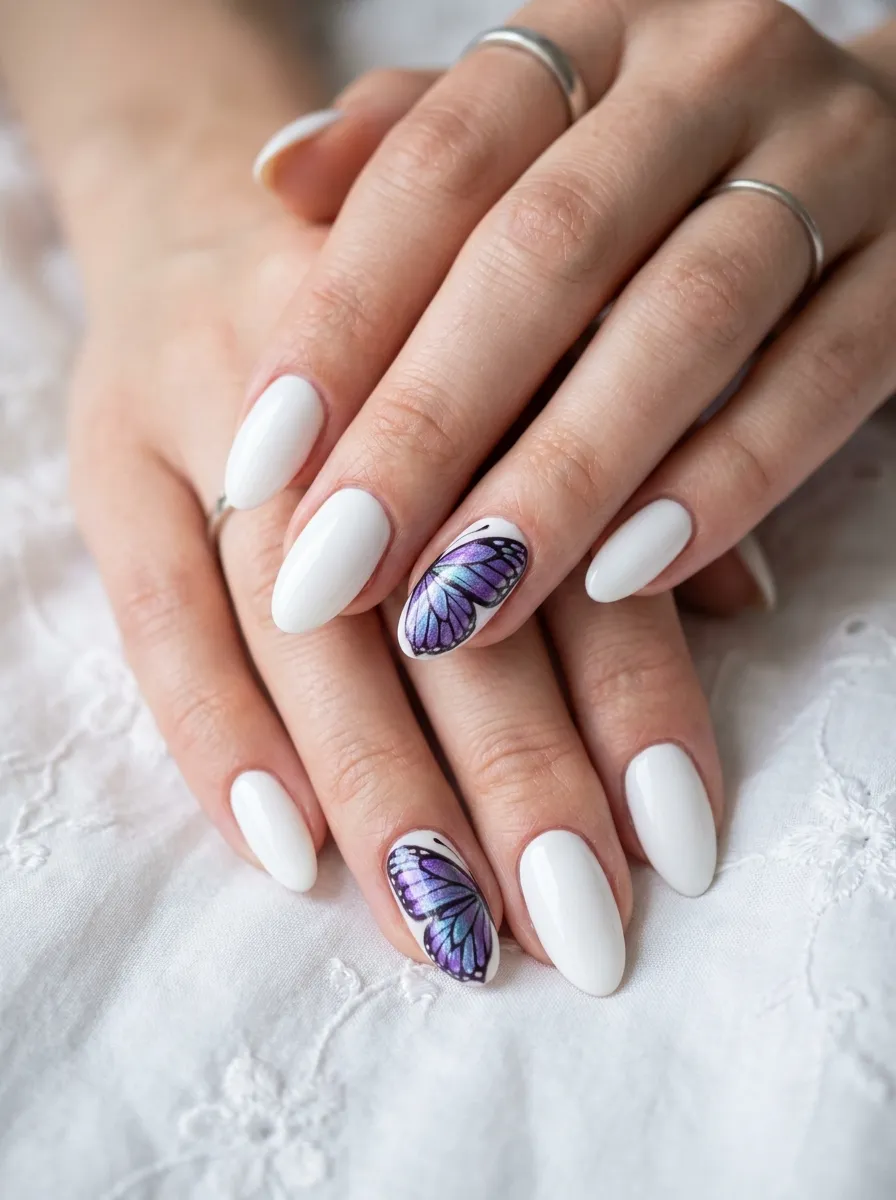
Butterfly nails are everywhere right now and the Quinn version goes full detail mode. Painted butterfly wings as accent nails look stunning against a clean white base.
Focus on the ring finger for your butterfly accent. Paint a simple symmetrical wing shape using a thin brush. Add veining lines inside the wings with a slightly darker shade. Use iridescent or holographic polish to give the wings a realistic shimmer.
You do not need to paint a full butterfly body. Just the wings on their own look beautiful and editorial.
Keep the remaining nails in white or a matching soft purple.
Budget tip: Iridescent polish is available for about three to four dollars from brands like Sally Hansen. It adds a dimensional quality that regular polish cannot replicate. One bottle goes a long way.
19. Racing Stripe Nails
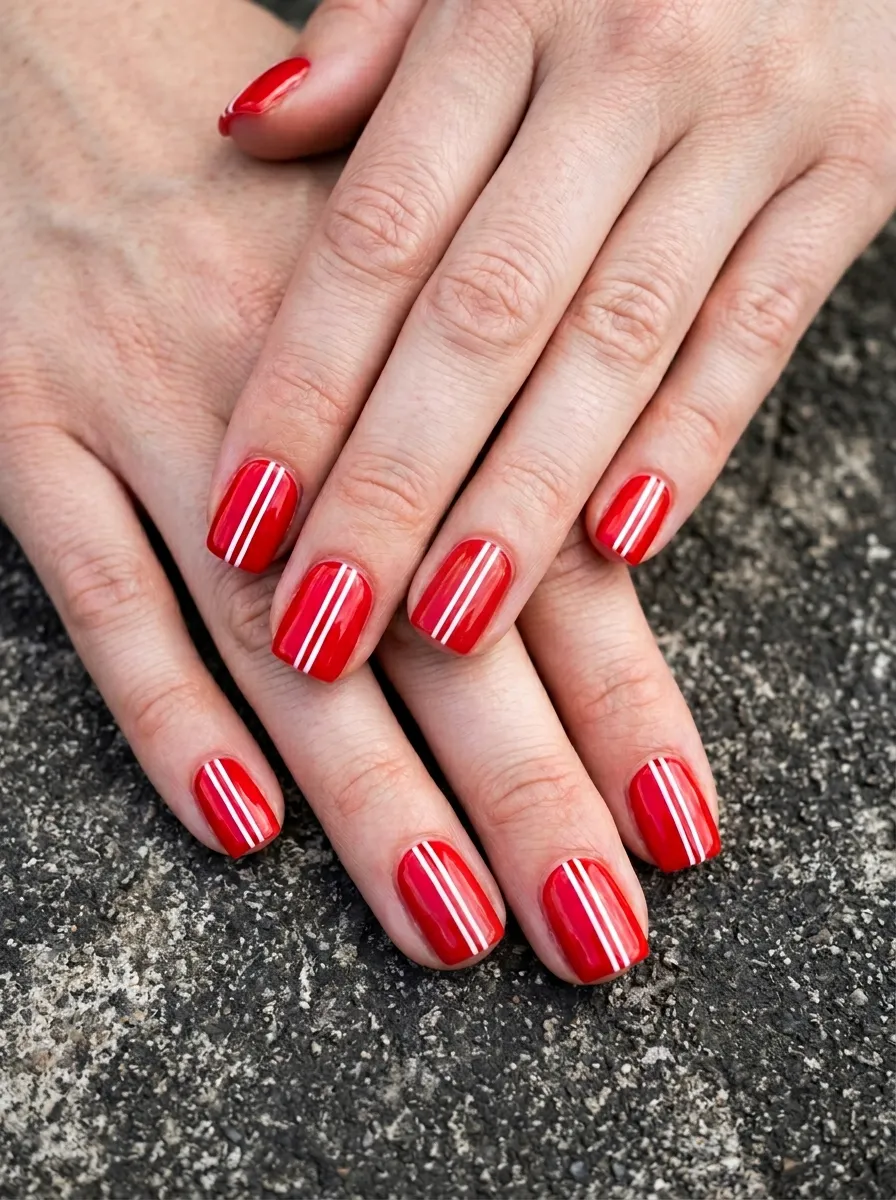
Racing stripe nails are fast-paced and sporty in the best way. They look graphic and intentional with almost no effort.
Paint your nails in a bold base color like red, black, or cobalt blue. Use striping tape or a thin stripe brush to add one or two vertical lines down the center of each nail in white or yellow.
Press striping tape firmly, paint over it with your stripe color, and peel while still wet. The result is a clean, graphic line that looks professional.
Add a checkered flag detail on one accent nail using a black pen for extra personality.
Budget tip: Striping tape is available in bulk for about three dollars. A thin stripe brush costs about two dollars. Red and white polish together cost under five dollars at any drugstore.
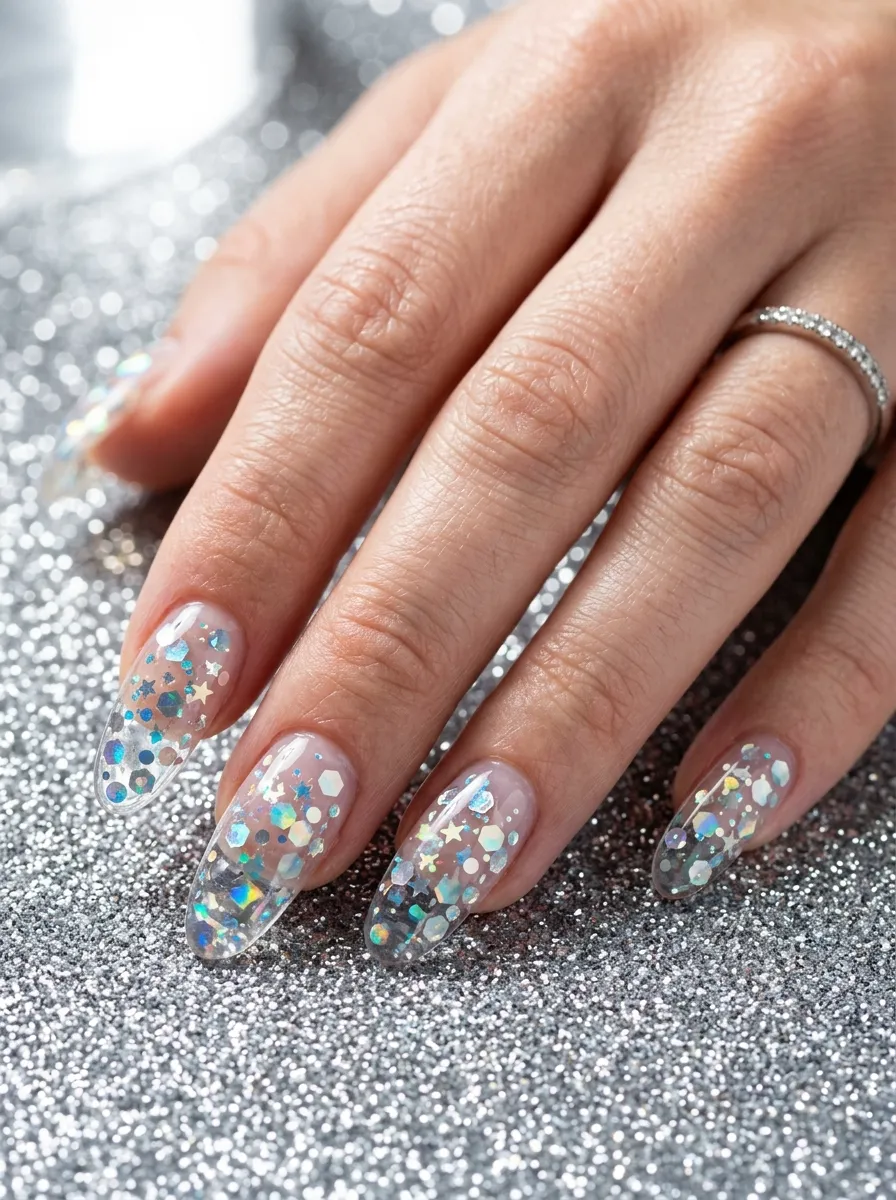
20. Holographic Glitter Tips
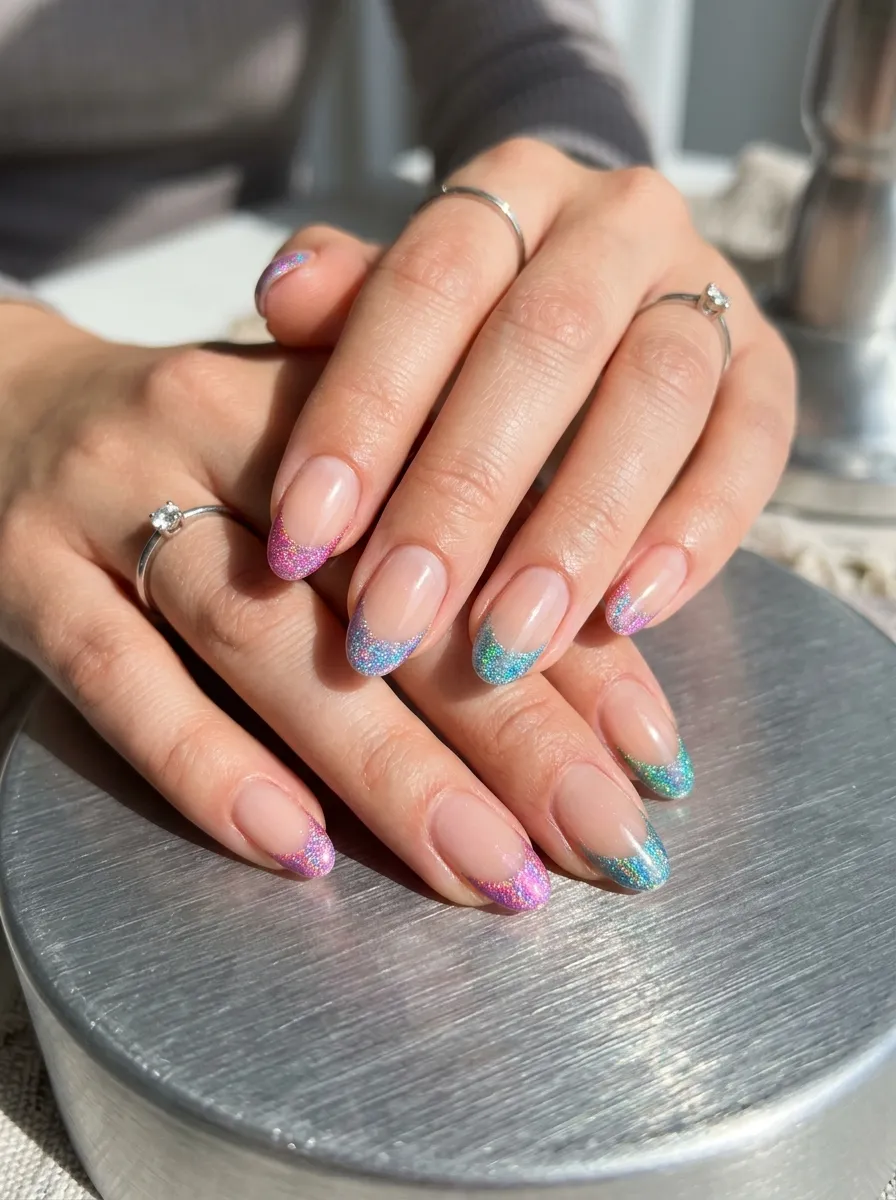
Holographic glitter tips take the French mani to a completely different dimension. Every time the light catches them they look like a different color.
Apply your sheer nude base first. Once dry, use a holographic glitter polish to paint just the tip of the nail. Use a French tip guide to get a clean line or freehand it for a more organic look.
Apply two coats of the glitter for full opacity at the tip. Seal everything with a high-gloss top coat to make the holographic effect pop even more.
This look photographs incredibly well in direct sunlight or under bright indoor lighting.
Budget tip: Holographic glitter polishes from Serum No. 5 or KBShimmer are popular choices and cost about seven to nine dollars. They last for many applications and the effect is worth every penny.
21. Broken Glass Foil Nails
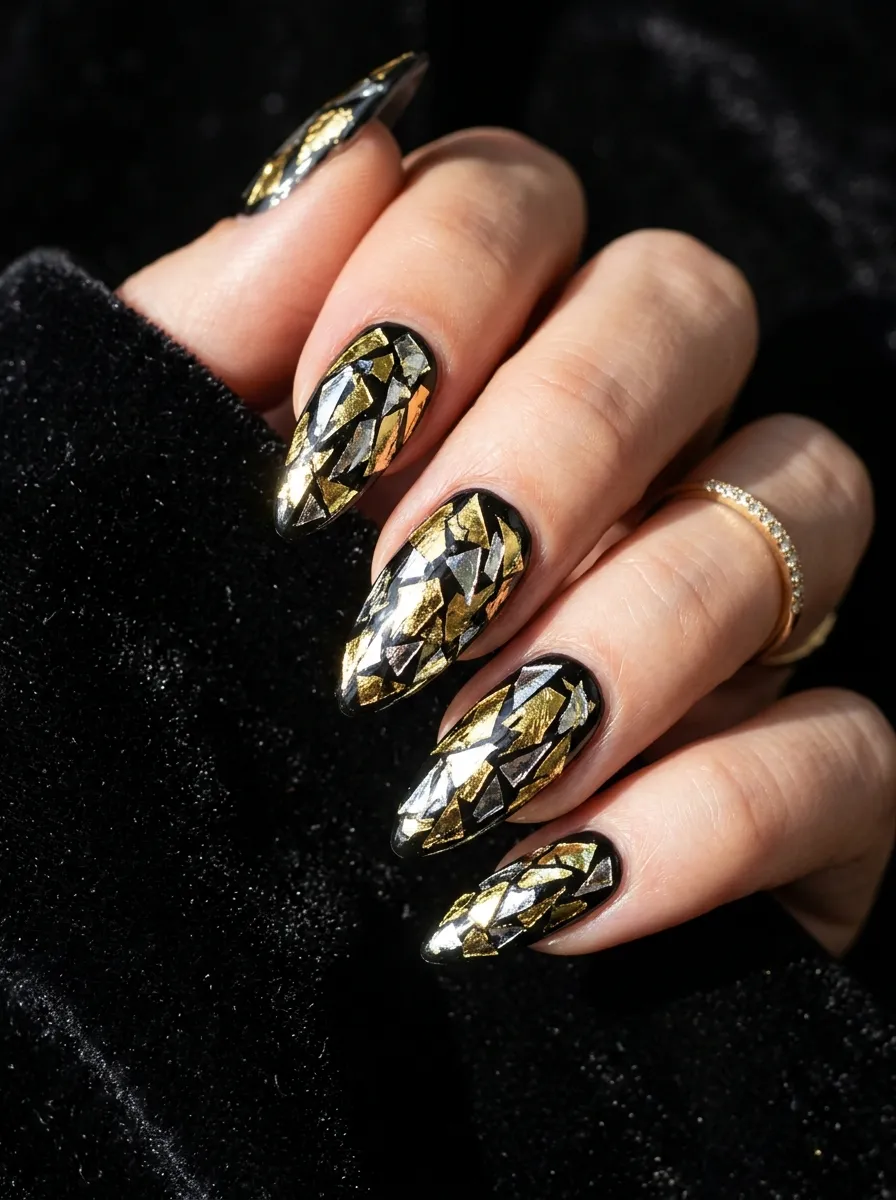
Broken glass nails look like tiny shattered mirrors on your fingertips. They are dramatic, edgy, and completely one of a kind.
You need nail foil sheets for this. Cut or tear small irregular pieces of foil. Apply foil adhesive gel to your dry base coat and let it get tacky. Press the foil pieces onto the adhesive, leaving gaps between pieces. The gaps create the broken glass effect.
Mix gold and silver pieces for more dimension. Apply a layer of top coat over everything to seal the foil in place.
Each nail ends up looking different which is exactly the point.
Budget tip: Nail foil starter kits are available for under eight dollars on Amazon. They include multiple colors of foil and the adhesive gel. The foil goes a long way because you only need small pieces per nail.
22. Polka Dots in Tonal Colors
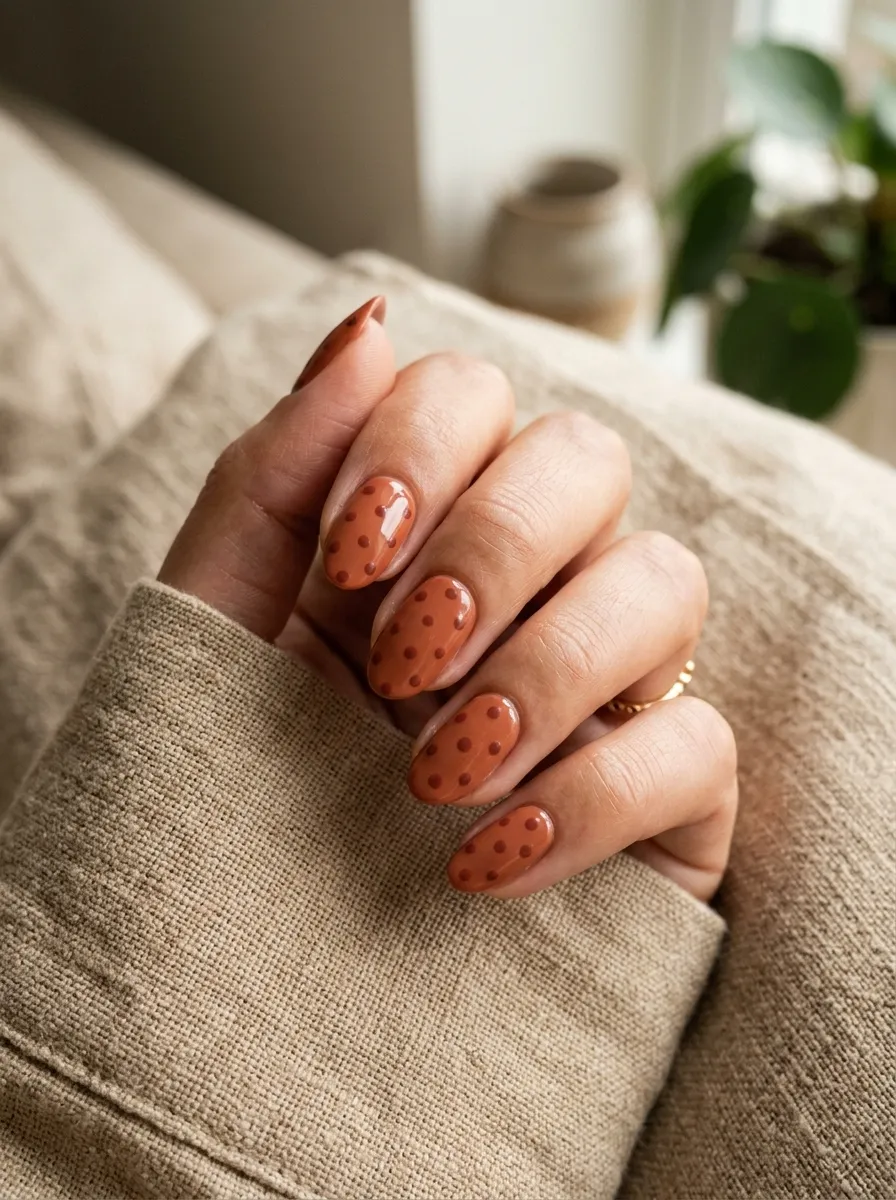
Tonal polka dots are the quiet version of the classic dot design. Instead of contrasting colors, you use multiple shades of the same color family.
Think terracotta base with rust dots. Navy base with cobalt dots. Sage base with forest green dots. The result is sophisticated and artsy.
Use a dotting tool for clean circles or go abstract with irregular blobs. Vary the sizes across the nail for movement.
This works beautifully on short nails because the design reads clearly even in a small space.
Budget tip: You likely already have polishes in similar color families. This design uses small amounts of each shade so it is a great way to use up half-finished bottles you have around.
23. Barbie Pink with White Cloud Accents
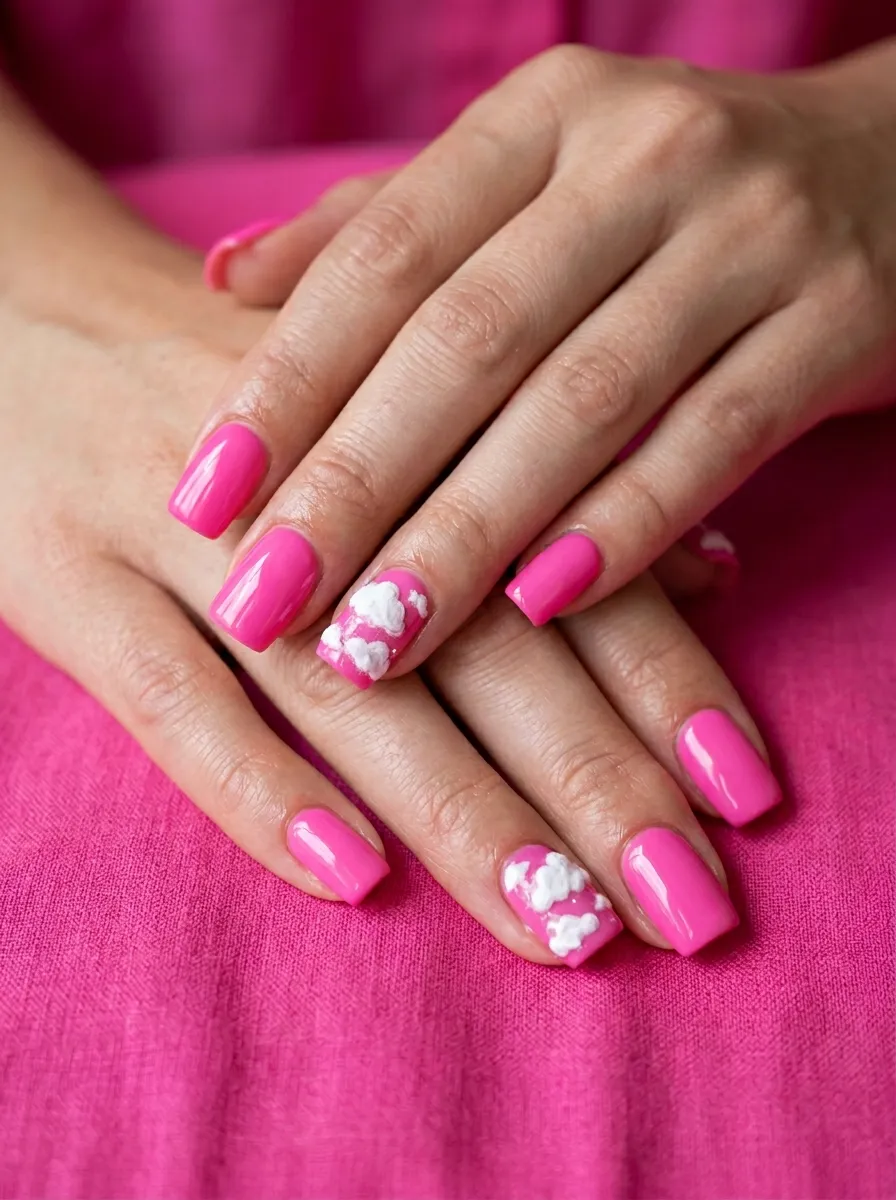
Barbie pink nails are a powerful choice on their own. Adding white clouds makes the set feel dreamy and whimsical rather than just bright.
Paint all nails in the most vivid hot pink you can find. Let it dry fully. On two accent nails, use thick white polish applied with a brush to build up fluffy cloud shapes. Multiple thin layers build up the cloud shape and give it a puffy, dimensional look.
The contrast between the bold pink and soft white creates an interesting visual balance.
This is an easy set for beginners. The cloud shapes do not need to be perfect. Imperfect clouds look more realistic anyway.
Budget tip: Barbie pink polishes are sold everywhere right now. OPI has a shade called Pink-ing of You that is perfect. White nail polish for the clouds is under two dollars at any drugstore.
24. Mosaic Tile Nails

Mosaic tile nails look like tiny works of art. They reference Mediterranean tiles and feel both artsy and worldly.
Paint a white base. Use a fine brush to create geometric patterns inspired by tiles. Squares, diamonds, and star shapes work well. Color sections in blue, terracotta, and cream. Add thin black lines between sections to mimic grout.
Each nail can feature a different tile pattern. The variation across all ten nails makes the full set look like a mosaic collection.
This design takes patience but not advanced technique. Go slowly and work one nail at a time.
Budget tip: A fine detail brush costs about two dollars. You likely already own the color palette needed for this look if you have a few basic polishes. Blue, white, and rust tones are common colors in most collections.
25. Anime Eye Nail Art
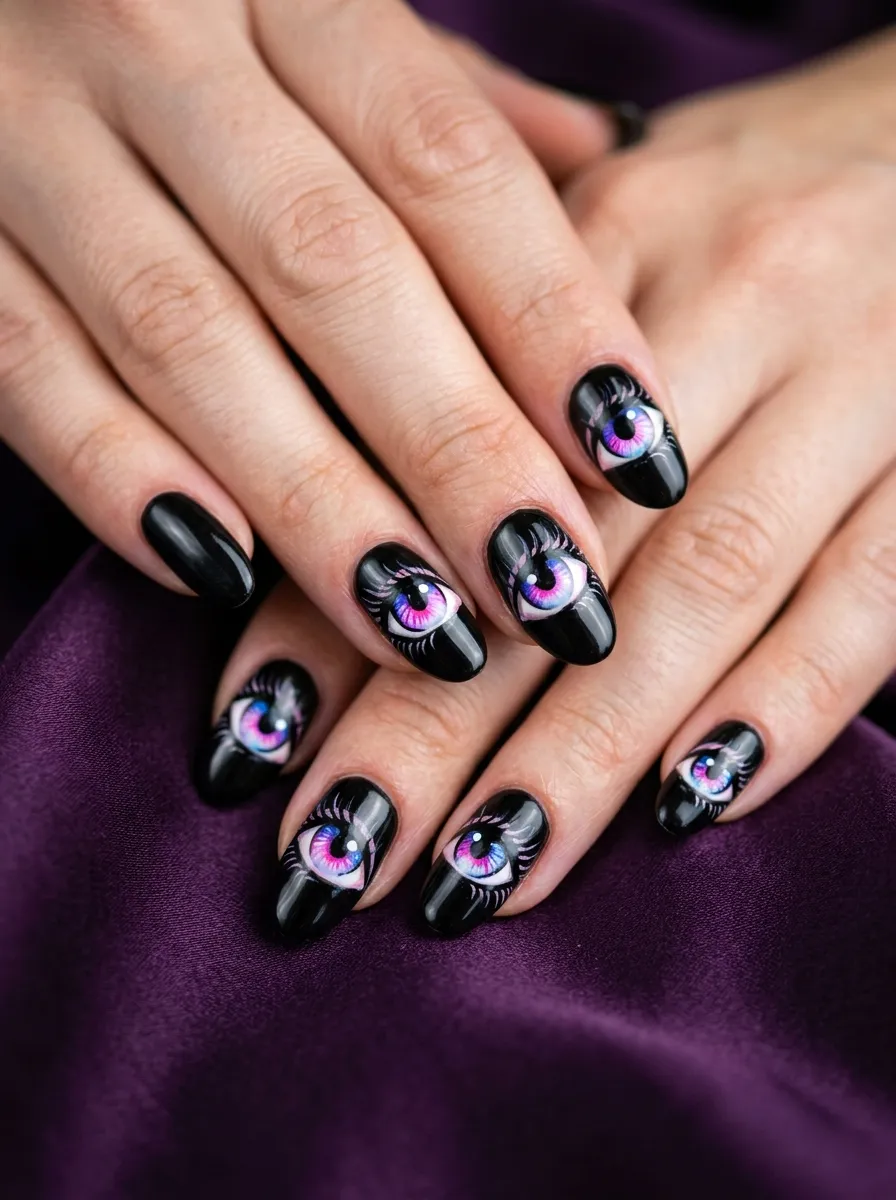
Anime eye nails are one of the most Quinn nail art designs out there. They are expressive, dramatic, and completely unexpected on fingertips.
Paint your base in black. Use a fine brush to paint a large eye on each nail. Start with a white or light colored oval for the whites of the eye. Add a colored iris using pink, purple, or any vivid shade. Draw a black pupil and outline the eye with a black liner stroke. Add short upper lashes with a thin brush.
Each eye can have a different iris color across the set.
Budget tip: This design benefits from a really fine nail art brush. Look for a striping brush that is 00 or 000 size. These cost about two to three dollars and make the fine lash lines much easier to achieve.
26. Marble Effect in Unexpected Colors
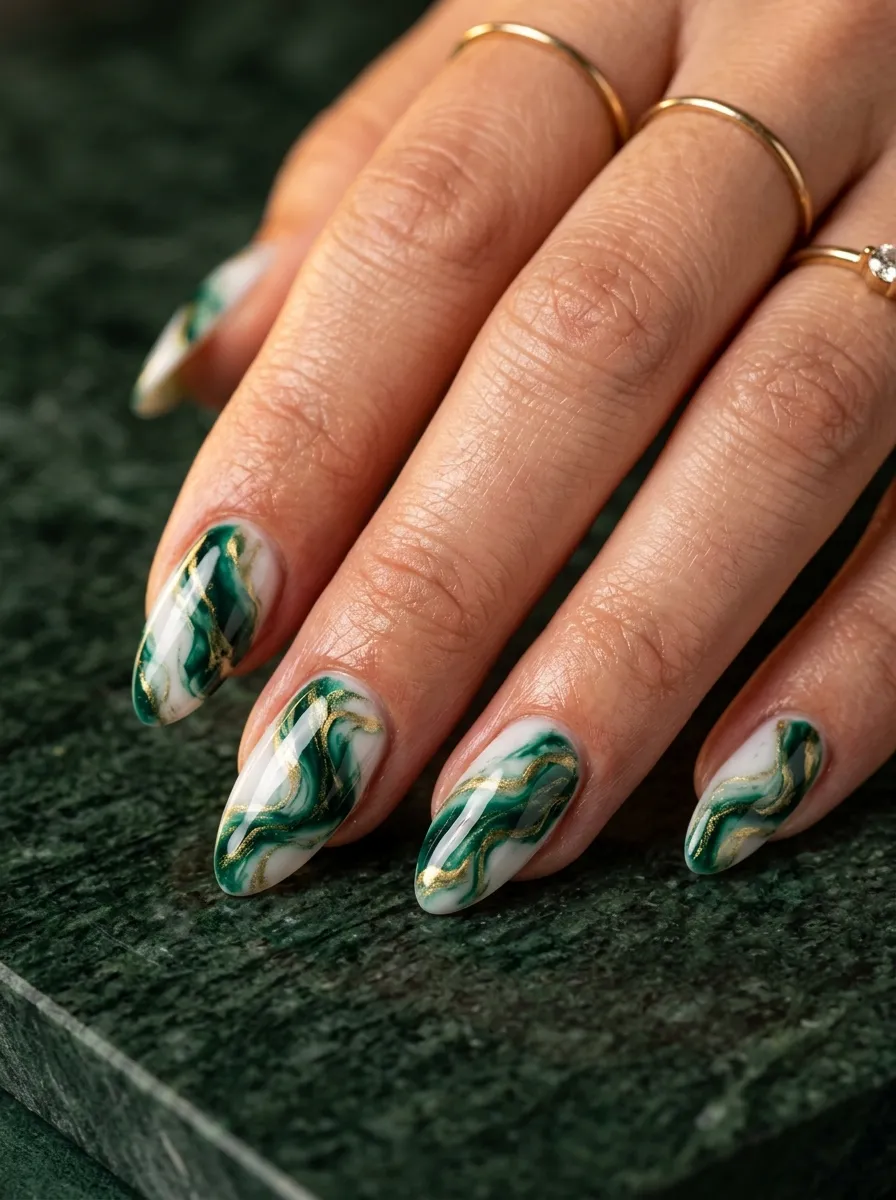
Marble nails in unexpected colors take a classic technique somewhere new. Emerald and gold marble feels rich and unusual. Pink and silver marble looks otherworldly.
Use a thin brush to create the vein structure. Load the brush with your vein color and drag it across the nail in a slightly jagged, organic line. Branching veins coming off the main line make the design look more realistic.
Use a small sponge or brush to add soft color depth around the veins. Blend gently to avoid hard edges.
Finish with a high-gloss top coat for a polished stone look.
Budget tip: Emerald green polishes are widely available right now. Gold nail art pens make the vein detail easy to control. Total cost for this design is about five to seven dollars if you shop affordable brands.
27. Hand-Painted Zodiac Symbols
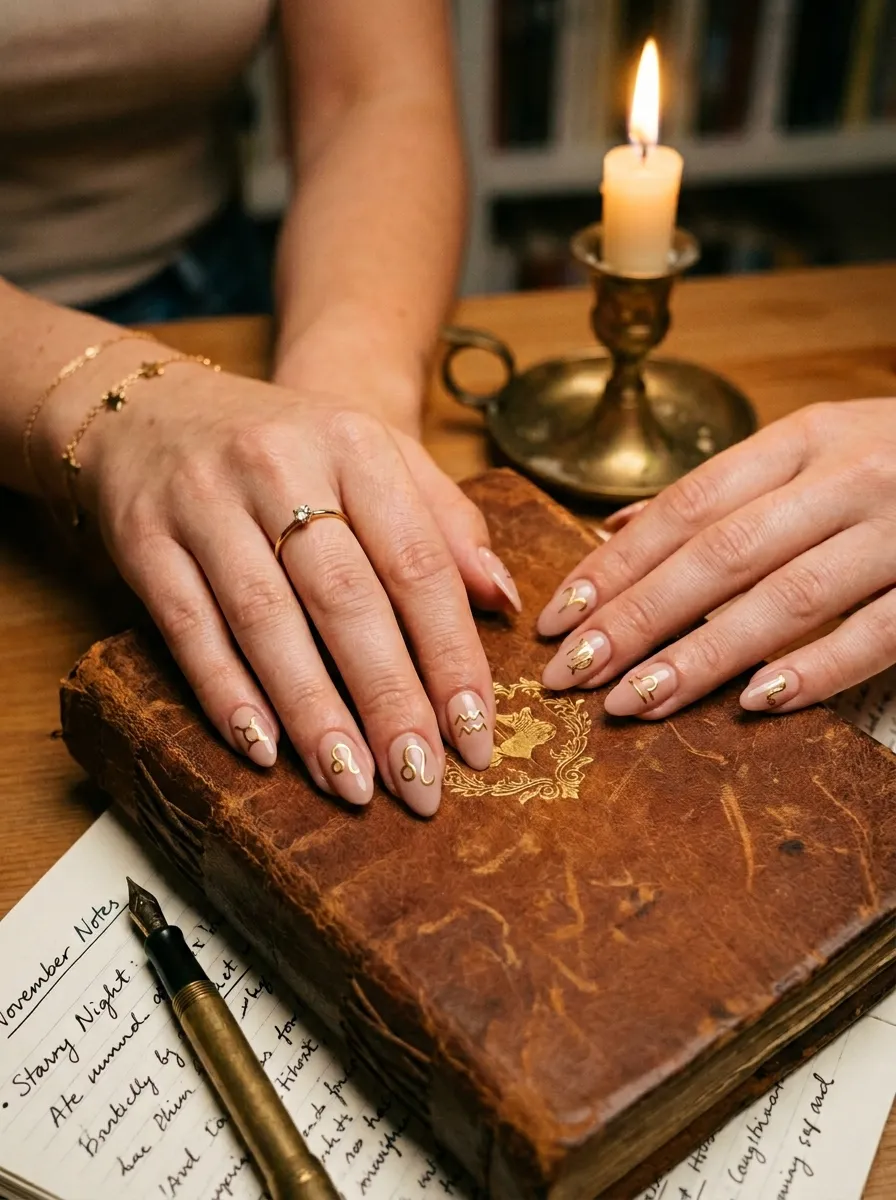
Zodiac nails are a way to wear your personality literally on your hands. Pick your sun, moon, and rising signs for a personalized set.
Use a nude or pale base. Apply the zodiac symbols with a gold nail art pen. The symbols themselves are simple once you look them up. Each one is just a few line strokes. Practice them on paper first.
Add a star or constellation detail on one or two accent nails to tie the theme together.
This makes a great personalized gift idea too. Paint someone’s zodiac signs for a thoughtful gesture.
Budget tip: Gold nail art pens cost about two to three dollars and let you write or draw with confidence. The fine tip gives you control over thin symbol lines without needing advanced brush skills.
28. Stained Glass Window Nails
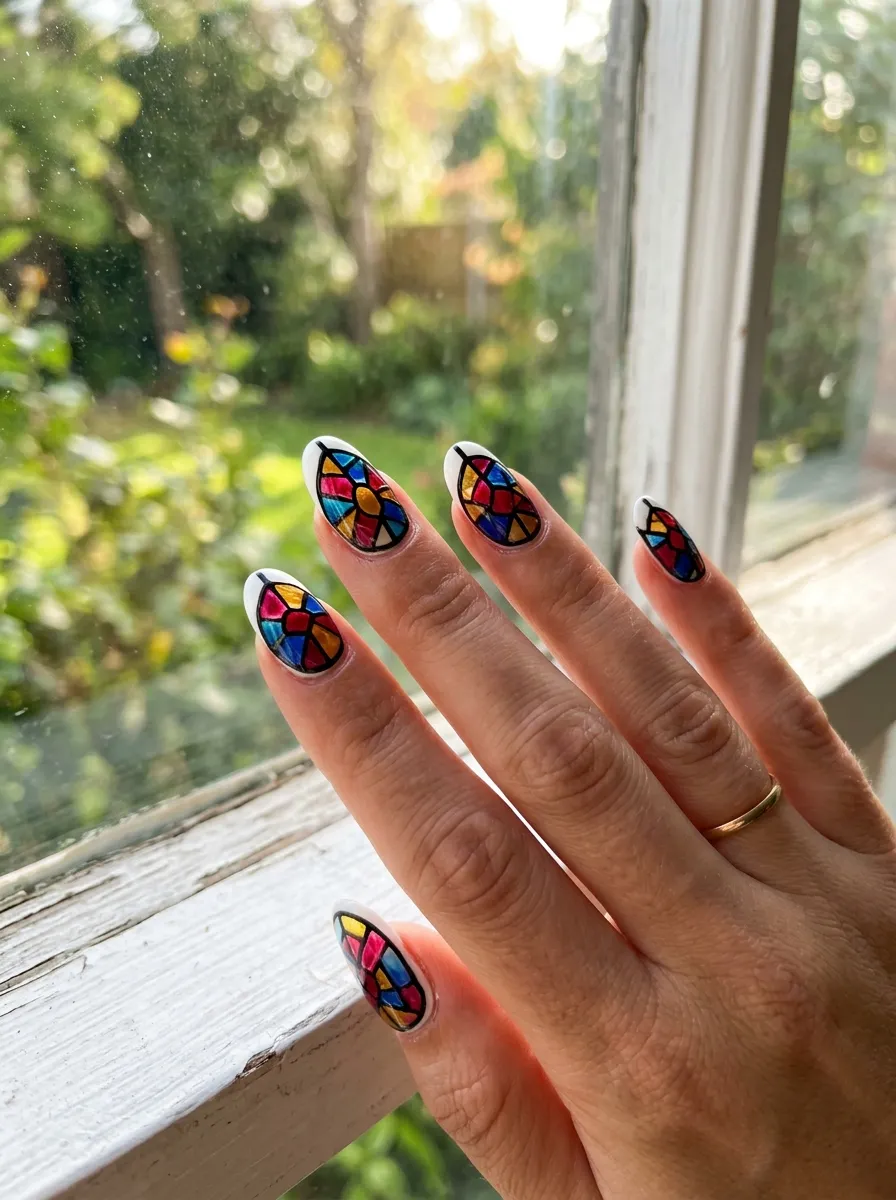
Stained glass nails look like something from a cathedral window. The jewel tones and black outlines together are striking.
Start with a white base. Draw irregular petal or geometric shapes across the nail using a black nail art pen. Fill in each section with different jewel tone polishes. Sapphire blue, ruby red, amber yellow, and emerald green work beautifully together.
Let each section dry before filling adjacent ones to prevent bleeding.
The black outlines pull the whole design together and make each color pop against the others.
Budget tip: This design uses small amounts of each color. Those little mini polish bottles that come in gift sets work perfectly here since you only need a few strokes per color per nail.
29. Botanical Leaf Nails in Green Tones
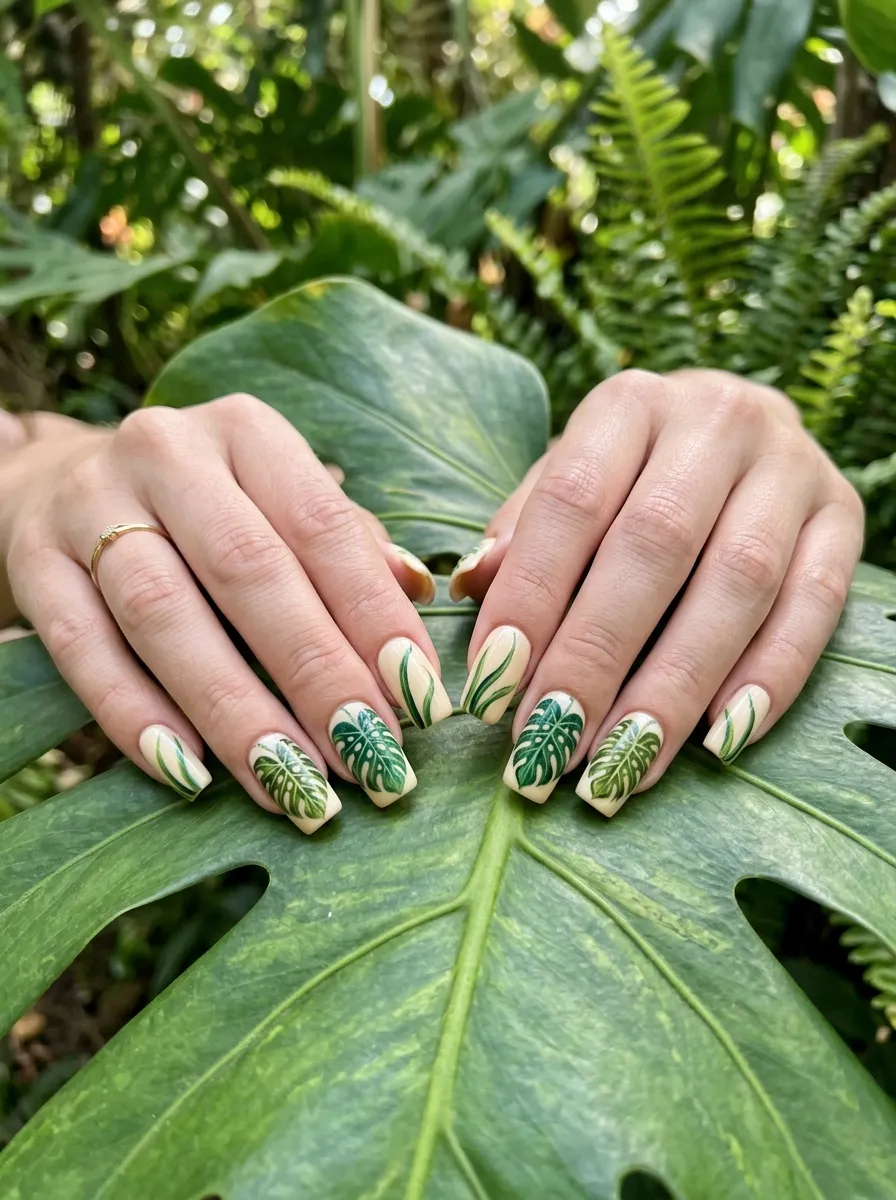
Botanical leaf nails are calm, modern, and surprisingly easy to pull off. Green on cream is a color combination that always looks considered and stylish.
Paint your cream or ivory base first. Use a thin brush to paint simple leaf shapes in different greens. Monstera leaves with their characteristic splits are very recognizable and actually simple to paint. Long grass blades are just thin curved strokes.
Add white vein lines on top of the leaves once the green is dry for extra detail.
Mix dark green, olive, and bright green across the set for depth.
Budget tip: Green polishes in various shades are usually in every basic nail kit. A detail brush for the vein lines is the only extra tool needed. This is an accessible design for anyone who enjoys simple drawing.
30. Floating Sequin Glitter Nails
Floating sequin nails look dimensional and futuristic. Individual sequins suspended in clear polish look like confetti frozen inside the nail.
Apply a clear or sheer base. While still slightly tacky, place individual nail sequins using tweezers or a dotting tool. Press them gently into the base coat so they sit flat. Apply a thick layer of clear top coat over everything to seal and create the suspended effect.
Mixing sizes and shapes of sequins creates more visual interest. Star shapes mixed with round sequins look especially playful.
Budget tip: Nail sequin packs with mixed shapes and sizes cost about three to four dollars on Amazon. They contain enough sequins for dozens of manicures. Clear gel top coat or regular glossy top coat both work for this look.
31. Hand-Written Word Nails

Putting words on your nails is an understated kind of bold. Short words that mean something to you work best because they are readable at the nail scale.
Use a white or nude base. Write one word per nail using a very fine nail art pen in black. Words like wild, soft, bloom, and honest are short enough to fit clearly. Cursive script looks elegant while block letters look more graphic and punchy.
Practice your chosen words on paper first to judge sizing and fit.
This also works as a message set for special occasions. Spell out a name, a date, or a phrase across all ten nails.
Budget tip: A fine-tipped nail art pen is essential for this design. The calligraphy-style pens from BORN PRETTY or Born to Nail cost about two dollars and let you write at a small scale without ink bleeding.
32. Tortoiseshell Nails in Bold Colors
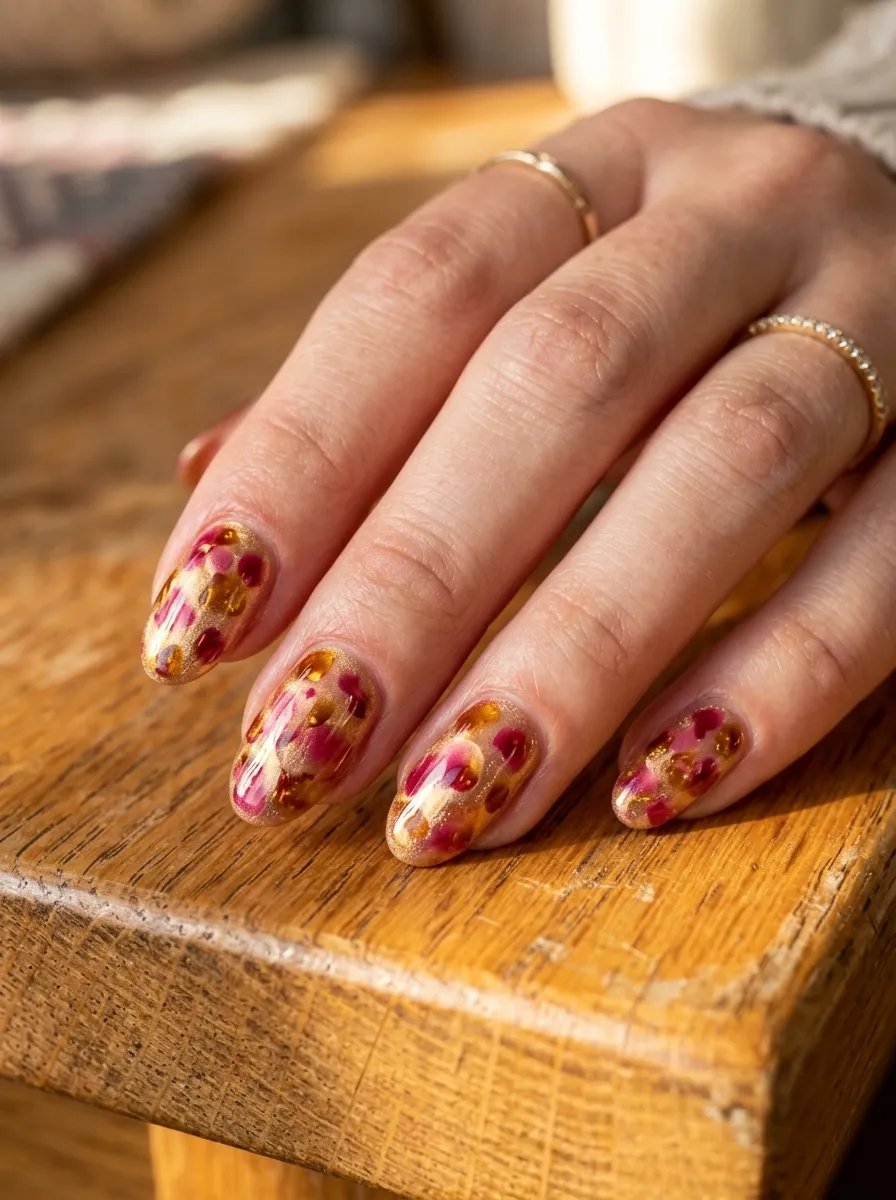
Traditional tortoiseshell gets a Quinn makeover when you swap brown for unexpected colors. Pink and gold tortoiseshell looks luxurious and playful at the same time.
Paint your base in a warm golden yellow or light pink. Once dry, drop irregular blobs in a slightly darker shade using a dotting tool. While that is still wet, add a few darker accents in amber or deep pink. Blend the edges of the blobs slightly with a brush tip for that signature tortoiseshell softness.
Work quickly while colors are wet for better blending. Seal with a glossy top coat.
Budget tip: You can create this effect with just two polishes in the same color family. One lighter base shade and one deeper accent shade are all you need. Total cost can be under five dollars with drugstore brands.
Quinn nails are proof that your fingertips can hold a whole personality. Every look on this list is something you can actually try at home with budget-friendly tools and a little patience. You do not need a professional kit or years of practice to make these work. Start with the design that excites you most and go from there. Even imperfect attempts usually turn out better than expected because the Quinn nail style celebrates that slightly wild, slightly off-kilter quality. Nail art is one of the most accessible forms of self-expression you have. It washes off if you change your mind. It costs a few dollars if you shop smart. And it makes people stop and stare in the best possible way. Pick your favorite idea from this list, grab your brushes, and start painting.